The Account Inquiry form (ALT-A) is an inquiry-only version of the Account Maintenance form. It's safer to give access to inquiry-only areas to the general user than the database areas because you can monitor and control changes more easily. Since the inquiry matches the database exactly, there is no need to repeat what has been documented elsewhere. Please, refer to the Account Maintenance form for more detailed descriptions.
To access the Account Inquiry form:
From the Main Menu, choose Point of Sale > Inquiry > Account.
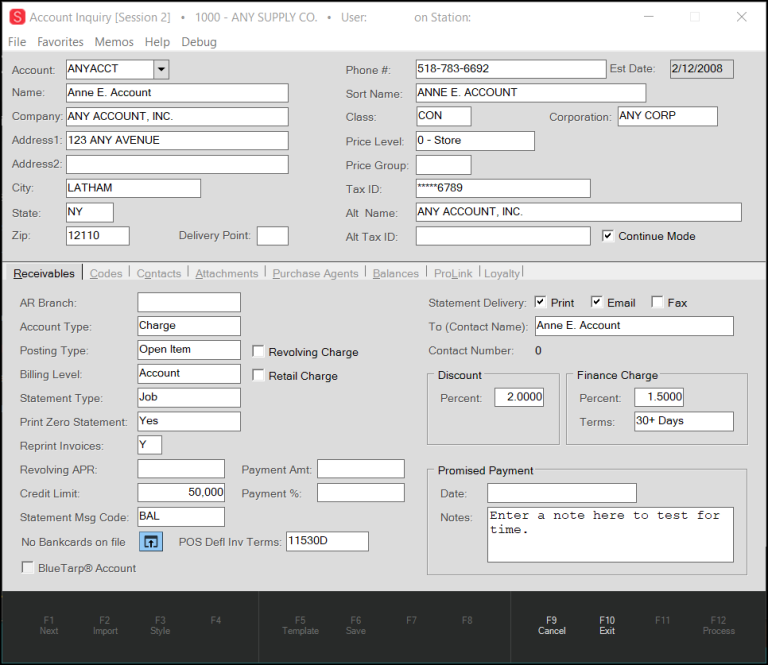
Account Inquiry Form
The Account Inquiry form provides exactly the same information as the Account Maintenance form (given the same user security), but users cannot make changes to the information they are viewing.
Understanding the Account Inquiry Fields
In the main form (upper area above the folder section), the account's basic information displays. Most of this information is self-explanatory such as name, address, state, etc.; however, a few may not be. Here are some explanations for these fields:
Account
The Account ID is an identifier that may contain letters, numbers, and certain symbols. In most transactions, the entry in the Name field is used for account selection; however, there are a few areas where account ID is the primary selection method, particularly for account billing. Alternate menu choices are available whenever account selection is required, so it's never your only choice, and in many areas you can use both name and account ID. The account is used for selection on some reports and the format can be used by your company to indicate certain attributes (such as branch, account type, etc.) as needed.
Address Fields
The formatting for the Address fields is defined by parameters as well as your computer's region and language settings. The address appears differently based upon where your company is located (in the United States, Canada, Australia, the Caribbean, or the United Kingdom). The same address control is used in a wide range of transactions and forms; however, each area may use the address differently. Branches, accounts, contacts, jobs, and vendors all have associated address data.
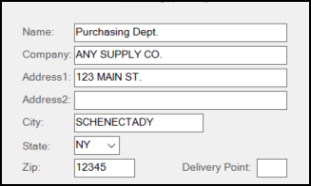
Name
The Name field is used to identify a person associated with an account or an office associated with the account's address. This is the first (top) line when an address is printed or displayed. This field can be up to 50-characters long.
In some cases, the Name address field performs additional functions that might not be obvious. For example, when a new account is added, the Name field becomes the default Sort Name and the Primary Contact for the account. In the Account Maintenance form, you can modify the Sort Name so that it is different from the address Name; however, changes to either the Name entry or the Contact 0 entry automatically update to keep both fields the same.
Company
This is the company name associated with the address (if any). If supplied, the company prints/displays below the Name field entry and above the Address Lines (1 & 2). This part of the address can be up to 30-characters long.
|
Note: If the Company and Name field entries match exactly, the application only prints the entry once on documents to avoid any unnecessary duplication. |
Address Line 1 and 2
Address Lines 1 and 2 show the address for the account as needed. Both of these entries are optional if you do not need to display the company address on documents or send the account mail. Usually, when an address is displayed or printed on a document, an address line is only shown when it has been assigned a text value. This is done to avoid unnecessary blank spacing between address lines. Each of these fields can be up to 30-characters long.
City
This text area is reserved for the city, town, village or municipality of the account's address. This field can be up to 30-characters long.
State (Province) Code
This portion of the mailing address varies based on your software region setting located under the Parameters database (United States vs. Canada) or your computer's globalization setting. When shown, it is a postal abbreviation used for the state, province, or territory where the address is located. When using a zip/postal code, this field may be automatically completed to match the database settings. Listings of state and province codes also include territories. This field can be up to two or sometimes three-characters long. In some cases, the printed address will only show the state/province if the City entry is also present.
Upon request, Support can enable a parameter that would include country codes in addition to the state or province code.
States, provinces, and country codes are grouped together. If your company is located in Canada, province codes are listed first in the drop down followed by states and then countries (if enabled). In the United States, state codes are listed first, followed by Canadian provinces, and then country codes (if enabled). If your company is located in the United Kingdom (UK), this field does not display nor is it typically printed. There is no "UK" parameter setting. If you are located in the United Kingdom, the software uses the region and language settings as well as the database region (in certain cases).
Zip/Postal Code
In certain cases, postal (ZIP) code changes can trigger other changes such as setting the sales tax location. This part of the address can be up to 10-characters long. In North America, the zip code is numeric and is listed to the right of the city and state/province when printed. In the United Kingdom, the postcode is printed as a separate line (the last or bottom line of the address).
Delivery Point
The USPS (United States Postal Service) assigns delivery points in addition to the zip + 4 codes as a way of designating multiple delivery points at the same address (such as when there are multiple offices in the same building -- or -- two apartments in the same house). The application does not typically print Delivery Points (except for some Canadian users in certain cases), but they are included when POSTNET barcoded mailing labels are printed. Usually, this is a single digit added to the end of the ZIP code, ZIP+4 code, or a combination of both codes when printing a barcode. Typically, a check digit is also added after the delivery point (if included). This field can be up to four-characters long.
For Canadian users, the Delivery Point field has an alternate use (see below):
 Delivery Point Settings for Canada
If your company is located in Canada (and assigned to the Canada regional parameter), the Delivery Point can be used to add a country notation to addresses on documents. If the Delivery Point is US, USA, or CAN, these fields are printed with most document addresses. Again, this is only for Canadian systems (as determined by the "Canada" regional parameter).
Sort Name
The application uses the Sort Name field in reports and is the default for selection by account name in other areas. The Sort Name entry defaults to match the Name field but it can be different. This providing some control over how the customer's name appears in selection lists (first name, last name or last name then first, for example). This should be done consistently and match your company's preferences for reporting and account selection.
Tax ID
This area is reserved for entry of the account's federal tax identifier. In most cases, tax/business identification numbers are required in limited circumstances, so it may not always be necessary for your company to maintain a record of it. For some situations, it may be required, however. Because this information is considered sensitive, all but the last 4-characters are now masked with asterisks (******1234, for example) during maintenance on an existing account and inquiry except when the current user is a system administrator.
Class
Class is a organizational tool for accounts which is entirely optional. Class codes can be up to three) alpha-numeric characters or blank if no class is assigned. The account classes may be used as a selection method on some reports and also for statements.
Corporation
The Corporation field provides a way to link individual accounts that may be related in some way. The intention behind this feature is that an account may be a corporation with several separate accounts with your company. For example, a corporation may be a construction company that builds housing. Each account representing a separate building project (location) along with jobs representing the individual lots at that specific development. These accounts may be linked together by assigning them to a corporation. This field is covered in more depth in the Account Maintenance form topic.
Price Level
This field is used to assign accounts to one of seven potential inventory price levels. Price Level 0 is always labeled as Store Retail. Other level descriptions can be modified by a system administrator. Level pricing can be set up differently for each item. When an account is assigned to a price level, it determines which of the seven pricing levels the software will use to define prices for individual items sold to the account. Level prices on items might be a set price, discount off of list, or markup based on cost.
|
Compare to Store Retail When the account's price level is set to a level other than the Store Retail, or level 0 price, there is an additional Compare Store Retail check box. When this check box is selected, and the store retail price is less than the account's price level price, the application uses the Store Retail (level 0) price instead. Certain other pricing, not based on levels, such as contract pricing, can override this behavior. |
Alternate Name
This field allows entry of an alternate name for the account. In some cases, a company might be a subsidiary of a larger corporation, for example. In this example, the account's billing and sales may use one name, but tax forms might go to the owner company. Alternate name could be used to store information such as a subsidiary's owner.
Alternate Tax ID
Similar to the previous field, this applies to companies who may be owned by another entity. The owner company may have a different tax ID number from the subsidiary.
Continue Mode
This option is used when adding or modifying accounts in a sequence. If checked, continue mode maintains the current tab selection after choosing either the Process (F12) or Next (F1) functions.
Account Inquiry Tabs
There are several tabs in the Account Inquiry form, which may vary depending on the features your business has enabledin the application. Use these links to learn more about aspecific tab:
Receivables (ALT-R)
The settings on this tab determine whether the account is used with self-managed receivables, and if so, it determines how the account is billed and managed.
Codes (ALT-C)
This tab offers additional settings related to general account operation primarily with regard to Point of Sale.
Contacts (ALT-O)
This tab allows you to review contacts associated with the account.
Attachments (ALT-A)
Attachments allows you to review the account's attachments (windows files, map links, web addresses, and application documents).
Purchase Agents (ALT-P)
This tab allows you to review purchase agents associated with the account. Purchase agents are the individuals allows to use the account for purchases. Names may optionally be linked with an image. If purchase agents are added, selection is required at Point of Sale.
Balances (ALT-B)
This read-only tab lists a summary of the account's receivables and sales activity.
ProLink (ALT-L)
This tab is used for activation of the ProLink app for the account.
Loyalty
The Loyalty tab lists the rewards programs that the account is eligible for and the status of their eligibility.
Ecommerce
Use this tab to review the account's payment posting rule, which defines how online payments are applied to the account. This tab does not display if the Ecommerce parameter is disabled for the business.
Using the Account Inquiry Function Keys
There are several standard functions available in this form as well as a few that apply only to maintenance type areas. Standard functions include Next (F1), Cancel (F9), and Exit (F10).
Understanding the Account Maintenance Form
To add a new account or make changes to an existing account, use the Account Maintenance form from the Main Menu, choose to Point of Sale > Database > Account. You can learn more about this form here.

Account Maintenance
Users with appropriate security permissions have access to Menu Marker (![]() ) -accessible context menus.
) -accessible context menus.