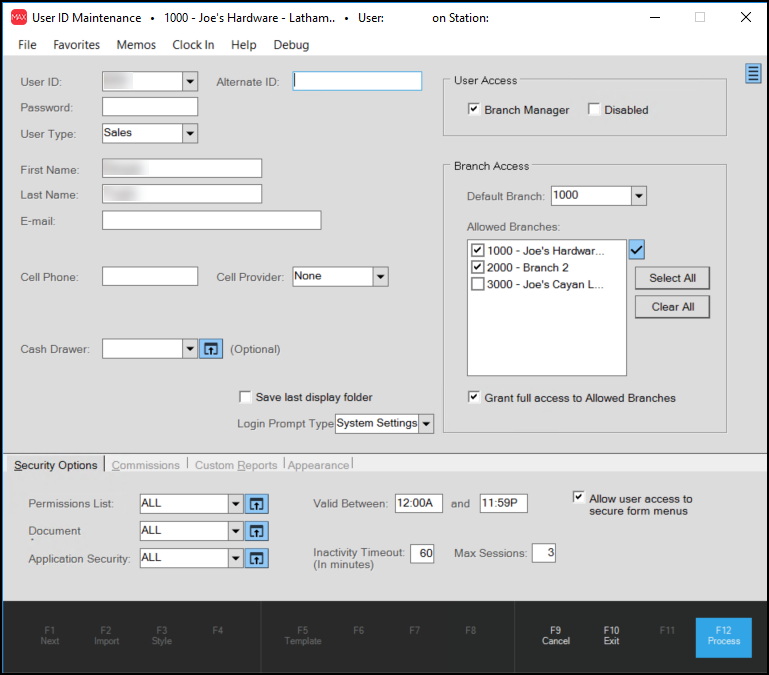
User ID Maintenance
Use the User ID Maintenance form to manage the user accounts for the employees who use the application. For each person who uses the system, you can manage the type of information they have access to an keep track of their email, cell phone, and other contact information.
To access this form, from the Main Menu, choose Maintenance > Database > User IDs.
All users who access the system must have a User ID and Password entered on this form. The application uses this information to record the work this individual does in the documents of all kinds based on many different types of transactions including Point of Sale, Purchasing, Inventory, and all other processes.
It is always best to provide each user with their own user account. Users should not share the same ID because they are used for both identity and security.
These are the fields in the form and what information is required in each.
User ID
Enter a six-character ID (letters and numbers allowed) to identify the user. This field is required.
The application uses the user ID to identify the user on documents, reports, and transactions of all kinds. Users cannot change their own user name (ID) but they can modify their password independently, and in some cases, are required to. Choosing what to use for an ID depends somewhat on your business's needs. Smaller companies might want to use first names or initials. Larger companies with a lot of employees might want to assign numbers or other character combinations.
Alternate ID
Use the Alternate ID field to add a longer identifier associated with a User ID, which can be used for reporting and exporting to third-party systems. This field has a 20-character alphanumeric limit and is optional.
Password
Enter an initial password for each user when you create the user account. This field is required.
Users can modify their own passwords at any time and may be required to if your company enables password expiration. Passwords are neither printed nor are they visible in any areas. Any users who are allowed access to this area will be able to modify any another user's password, so it's important to limit access to this form. Passwords can be up to 24-characters in length. You may optionally enable requirements from the Parameters area. If enabled, these parameters establish rules about password lengths and the types of characters a password must contain. If used, these parameters determine whether or not a new password is acceptable when making changes.
User Type
Use this field to specify the type of work this user will do. This field is required.
There are currently
User AccessBranch ManagerThe Branch Manager (Branch Mngr) check box designates this user as a manager at their default branch location. Currently, this field has limited functionality. A Branch Manager can view sales for other users in the User ID Sales Inquiry (located in the Point of Sale area). In addition, a Branch Manager is allowed to access the Point of Sale area on a station that is locked (POS Lock) for Point of Sale. Being a Branch Manager also affects some user notifications (only under certain conditions): 1. SO (Special Order) Item Received Notifications originating from either Receipts or Manufacturing (sends the notice to all Branch Managers). 2. Pending Transfer Notifications (sent to the first Branch Manager found for the location only). DisabledUse this check box to disable the selected user ID. Disabled users are not allowed to access the application and will not be included in most user selection listings. Users who are merged with another user are automatically set to "disabled" after the merge completes. |
First Name, Last Name
Enter the user's first and last names in these fields. The application displays this name in user selection listings and printed in some cases. These entries are required.
Branch AccessThe selections in the following fields affect a user's ability to access, and in some cases, view information regarding other branch locations: Default BranchSelect the user's default branch from this list. The default branch is where the user first logs in. This selection is required. If the user's default branch is not selected from the Allowed Branches list, you cannot save the user record. Allowed BranchesSelect the check box beside each branch this user should have either full or limited access to. If a branch location is not checked, the user won't be able to select the branch in most areas where branch selection applies and also is prevented from changing to that branch location. Grant full access to Allowed BranchesSelect this check box to allow the selected user full navigation and access permissions to the branches checked in the Allowed Branches list. The user's rights would match their normal security permission in the default branch. When this option isn't checked, the user has limited access to the data in the branch locations checked under the Allowed Branches. The user is allowed to view information regarding allowed branches on some reports and has the ability to apply File Maintenance changes to those locations in some cases. The user cannot change their branch to any location other than their default location in this case. |
Communication E-mail
Enter the user's email address in this field. If you need the application to provide email notifications to this user at any time, this field is required.
The application uses this email address to send notifications to this user when the Get notifications and messages via email check box is selected. This address is usually used as the default "from" address on transactions or documents being transmitted by this user via email from the application. All email processing is dependent upon, and controlled by, your company's designated mail server. This server may filter or otherwise verify the validity of any addresses used for out-going email. Some addresses could be blocked if the server doesn't recognize them, so it's important to test any new email address before relying upon it for document delivery.
Note: You can send text messages (SMS) to a mobile phone number using the E-mail field. The phone number must be formatted as an email address using whatever format is required by the user's mobile provider. The mobile phone user typically must enable the ability to receive text messages via email with their service provider. Most providers will block messages sent from an email address by default to prevent spam and other unwanted communications, so unless the user elects to allow this type of message, they usually won't receive such notifications.
Credit Override NotificationsThis software has a notification option to immediately notify the Credit Manager when a customer's transaction requires a remote credit override decision. This is feature does not replace or change the functionality of the existing credit override notifications (sent after an override to either or both the Credit Manager(s) and Salesperson assigned to the customer (if any)). The following two settings currently only apply to this "Pending" credit override notification. If the fields are completed and valid, the application uses these entries to notify a Credit Manager by text message (SMS) that a remote override is pending. To receive this type of text notification, the user must also be a Credit Manager, which is specified in the Parameter Settings form (on the Setup > Notify tab) and their device must also allow the receipt of text messages sent via email. This is typically an option that needs to be enabled through their mobile service provider (Verizon Wireless, AT&T, etc.). In most cases, the ability to receive text messages directly from an email address is blocked. Although the Email field can also be used for text messaging, these fields were added specifically for "remote" credit overrides since the handling of these overrides requires immediate attention. Messages are only sent when the Point of Sale users clicks the Remote button on the override form. Please consider that a mobile device user may incur charges for any text messages they receive depending upon the details of their plan or service. |
|---|
Cell PhoneThis is the user's cell phone number to be used for pending Credit Override notifications sent to the user. It is best to only specify digits since each phone provider may or may not permit the use of other characters (dashes, parentheses, spaces, or dots/periods, etc.). In areas where some type of optional area code is used, it is typically required even if your company is located within the same area code (messages are sent as email, not device-to-device, so the sender's location is not known). Cell ProviderThis is the service provider for the cell phone number listed above. This is used to determine the email address format necessary for messages. |
|
These options don't replace or affect the delivery of standard "Credit Override" notifications which are generated after an override request has been processed. The standard notification process is used in these cases and involves either the default application notification queue or email. |
Save last display folder
Choose this check box to display the user's most recently selected folder tab (in an application area) when the user visits other transactions or the same transaction in that application area. The application saves the last folder selection made in each application area (Point of Sale, Purchasing, etc.) for the current user when this check box is enabled. The system retains this folder setting even when the user closes the application. The last displayed folder only works with transactional tabs aligned on the left-hand side of the folders control. The application does not retain non-transactional folder tab selections, those aligned to the right-hand side, including the Info, Entry, Document, and any other tabs on that side. Choosing one of these tabs effectively returns the folder to default tab selection.
Cash Drawer
This optional feature gives the business a way to assign a specific cash drawer to this user.
If you choose a specific cash drawer, this selection overrides the station drawer assignment. Regardless of which station the user is working from, the application uses this selected cash drawer assignment. It is important, therefore, for the user to sign out of the application before moving to another station so that another user's transactions don't wind up in their drawer.
To add a new cash drawer assignment to the selected user, click the Cash Drawer Settings ![]() icon to display the list. Although you can assign an existing cash drawer record to this user, we'd anticipate that a single cash drawer would be assigned to each user in these cases. To show information about Cash Drawers,
icon to display the list. Although you can assign an existing cash drawer record to this user, we'd anticipate that a single cash drawer would be assigned to each user in these cases. To show information about Cash Drawers, ![]() click here.
click here.
")
")
 provided on the form. The Menu Marker access may be limited by your user security. If the marker does not appear or its associated menu is disabled, you do not have permission to access it.
Login Prompt Type
Time Clock-specific feature. Use this option to choose whether this user should log into the application before being prompted to clock in.
-
Choose Off to prevent the application from prompting your employees to login before choosing Clock In/Clock Out.
-
Choose System Settings to prompt your employees to log in before they Clock In/Clock Out.
Note: The Login Prompt Type is a per-user setting. The ECI team sets the global log in setting as you directed, but if you want this user to have different settings, set the permissions for the code group.
Security Options
The "Security Options" folder tab contains settings related to user permissions and access. Security options are linked to codes rather than user to make global changes easier (for example, cashiers might all be assigned to the same code).
It's important to understand that some security settings can conflict with each other. For example, if you wanted to prevent a user from performing returns, but then provide them access to Charge Returns (an area that is only used for returns), it would cause one such conflict. In some cases, it's necessary to both limit access to certain areas as well as set security options to truly block certain types of information or activities.
Security Codes
There are three groups of access codes: application (permissions list), document, and application security. Use the Settings ![]() icon to change, add, or delete codes for each of the three different types. To view a list of all defined codes, clear any existing entry then click the down arrow button
icon to change, add, or delete codes for each of the three different types. To view a list of all defined codes, clear any existing entry then click the down arrow button ![]() .
.
![]()
Permissions List
This provides "navigational" security either enabling (providing) or limiting (denying) access to various areas of the software (menu selections, inquiries, etc.).
Document Access
This code defines which documents a user has permission to access (view and/or print).
Application Security
This security code grants or denies access to specific features and options in the software. These are primarily Point of Sale related, but not exclusively. Use caution when changing these options as some options grant permission while others deny or prevent permission when checked.
In the code maintenance dialogs, there are some similar features. Button choices such as Copy (ALT-C), Select All (ALT-S), Clear All (ALT-C), Apply, and Return are standard. Apply (ALT-A) saves changes or additions. Return (ALT-R) closes the process form with or without processing (a prompt appears if an apply has not been done). Codes may be deleted using the Menu Marker  context menu.
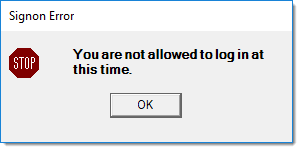
Valid Between
Use these fields to specify the time range this user can access the application. Type the time followed by "a" or "p" as the AM/PM designator. The application will block this user from accessing the software outside of the designated times. If the user tries to log in outside this time range, the application displays this message below. We recommend that you limit access for most users to the period of the day when daily processing occurs.
Allow user access to secure form menus
Enable this check box when you want to give this user access to secure options available from Menu Markers ![]() . These secure options are typically reserved for a system or application administrator. Menu Markers that have been designated as secure are not even visible to users who don't have this option checked (selected).
. These secure options are typically reserved for a system or application administrator. Menu Markers that have been designated as secure are not even visible to users who don't have this option checked (selected).
Inactivity Timeout (in minutes)
Use this setting to determine the amount of time (in minutes of inactivity. The application will sign out (log off) this user after this time has lapsed. A setting of zero minutes disables any user based time-out.
If you select a timeout period greater than zero and the user is signed out due to inactivity, the application may also close if no other user logs in after an additional 20 minutes. This second time out is not the same as the user setting described here. Application timeout can be adjusted upon request; however, it cannot be disabled entirely.
Max Sessions
Use this field to enter the maximum number of sessions this user can have open at any one tie. Any additional form windows that are opened within the application are not considered separate sessions. Sessions are completely independent instances of the application running on the local machine or server. The number of sessions may also be limited by the device (station). A setting of zero indicates no limit to the number of sessions available.
Note: Remember, per your contract, you have a certain number of concurrent seats to use at any given time. You can look up the number of concurrent seats or licenses you have by going to Maintenance > Database > Parameters > Software tab and in the Installed Sales section, check the entry in the # Concurrent Seats field.
|
Why establish timeouts and maximum sessions limitations? There are a number of reasons for establishing these limitations. Any time an application is running, some type of resources are being used and in most cases, some type of licensing is being affected. While signed on, both active and inactive users all use software licenses. Each session (instance of the application running) that is signed on uses a separate license; however, any forms opened from within the application don't use additional licenses. If your company uses Microsoft Terminal Services (called Remote Desktop Services), anytime the software is active (even if no user is signed on), a Microsoft license is being used as well as server memory. Your company's SQL Server is also using resources for any open instances of the software whether active or inactive. |
Custom Reports Folder
This tab specifies the folder location for companies who use custom reporting software and want to provide this user access to reports from a shared location.
")
When enabled, the user would access their specified report's folder by using the Custom Library selection on the Reports drop down menu. Report files must use a specific naming convention based upon the application they pertain to (a PS prefix is required for Point of Sale related reports, for example). Prefixes are as follows:
AR - Receivables
IN - Inventory
MN - Maintenance
PO - Purchasing
PS - Point of Sale
Typically, the folder specified is not local, but rather a shared network location. Using a local folder is possible; however, the application does try to verify the validity of any folder specified. This can cause issues if a user's record is modified from another work station (likely) because a matching folder probably won't be found. Use of one shared network location is suggested for this reason and also because it makes adding or modifying reports far easier to manage.
When using a shared network location, make sure the shared repository is accessible and that the connection to that location is re-established when the user's computer is rebooted (this is optional when using "mapped drives," for example). The best and easiest way to ensure access is to use the application's deployment folder as the location where report files are distributed. This location would always be accessible if the user is able to run the application.
To access custom reports, users must have the software available locally. For example, in the case of ActiveReports® software, a Windows file association must exist between report files (extension ".rpt") on the computer where the files are accessed. File associations can be tested by browsing to an existing report file and double-clicking on the file to open it (using File Explorer). If your Windows® operating system asks you which program to use to open the report, no file association exists. Choose ActiveReports and check the "always open with" check box to associate report (rpt) files with the ActiveReports software.
The "custom library" is really just a shortcut and convenience tool; it provides no access to running or making changes to the reports. If the user doesn't have an ActiveReports software license installed, providing access to report files is pointless. Any licensing, installation, training, and use of ActiveReports software is the customer's responsibility. Our web site does provide free templates for our customer's convenience; however, we provide no end-user support for ActiveReports software. Additional ActiveReports templates are available on the Customer Portal.
Appearance
Use this tab to choose the form scaling options for this user. Scaling affects the display size of the application window. The default setting is 100%. If another scaling size works for this user, choose the percentage that works for them. See this topic for more information.
Note: If your business uses Windows scaling, set this option to Off.
Deleting, Merging, and Renaming Users
Under certain circumstances, users may be deleted, merged with another user, or renamed. To access these options, click the Menu Marker ![]() to display the context menu in User ID Maintenance form. Access to these menus is restricted to users who have access to “secure” menus.
to display the context menu in User ID Maintenance form. Access to these menus is restricted to users who have access to “secure” menus.
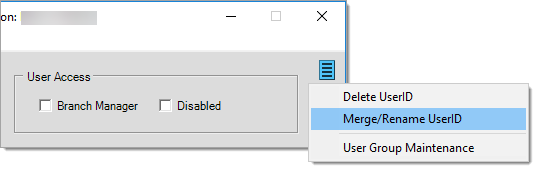
Use the Delete UserID option to permanently remove a user from the database; however, this is only permitted under certain circumstances. The following restrictions prevent a user from being deleted:
-
The user is assigned to parameters as an administrator/manager or for certain notifications.
-
Totals are associated with the user (sales activity, etc.).
-
The user is currently assigned to customer accounts.
-
The user is a member of a user group.
-
The user is a reserved type used for support or development purposes.
In addition, certain database restrictions (constraints) may prevent a user from being deleted. If deleting a user causes errors or any problems accessing data or documents, re-add the user. In this case, disabling the user should be done as a substitute. Disabling prevents the user from appearing in listings and being selected in most cases.
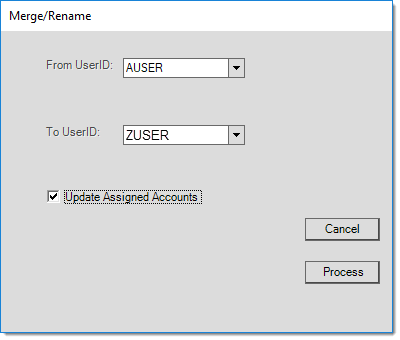
Merge/Rename options modify all occurrences of the user in all tables referencing the user in the database (this includes data for past activity). Archived data is maintained in a separate database and not modified, so renaming (or merging and then deleting) users may potentially cause issues referencing archived documents for the user. The "rename" option effectively removes the original user ID if the operation completes successfully. The “merge” option combines the totals for the users after the operation completes (modifying the user’s ID in all database tables) and then disables the “from” user. Merging doesn’t immediately remove the original user; however, it is possible to then manually delete the user after the merge has completed.
Users who are assigned to any parameters (notifications, administrators) should be manually changed prior to merging or renaming. We don't permit the current user to merge/rename their user ID.
With user merge/rename, it is possible to choose whether or not to update the assigned user on account (customer) and job records. If you choose to not update the assigned user and the merge “from” user is assigned to accounts and/or jobs, the user will be removed from those accounts and jobs leaving no assigned user. The option to update the assigned users does not affect the assigned user on documents (invoices and orders, etc.) nor does it change how the user's totals are merged (if a merge is being done). Regardless of your selection, assigned sales totals and the assigned users for invoices, orders, etc. will be changed to either the rename or merge “to” user.
We strongly suggest that any type of merge or rename be done outside of regular business activity to minimize the chance that the user is currently in use. It is possible for merges and renames to affect system performance or cause errors if the user being changed is in use at the time the merge/rename is processed. There is no undo for merged data. You can reverse a rename by changing the user ID back to its original code.