Transfers
When you move items from branch to branch, you can use Transfers to process these adjustments and maintain accurate on-hand quantities between branch locations. In certain cases, it makes sense to move inventory from one location to another. Choosing to do so typically depends on conditions such as fuel costs, truck availability, and distance.
You access the Transfers feature from the Main Menu by selecting Inventory > Transfers.
There are three types of inventory transfers: Transfer In, Transfer Out, and Pending Transfers:
•Transfer Out refers to the movement of inventory to another branch (location) from your current location.
•Transfers In refers to the movement of inventory into your branch (location) from another location.
•Pending gives you a way to "request" an inventory transfer from another branch (location).
Entering Transfer Items into the Grid
As with other Item grids, products can be either manually entered, scanned, or the grid can be populated using Import (F2) or Build-PO (F5) functions (explained under the Transfer's Out section).
The Transfers grid supports the use of random-length type tallies (including Lot-Location and Lineal types). If after initial quantities are specified, should the user re-click on the item description, the tally will be reset, and the user will need to re-select the tally quantities. Fixed length and other types are not allowed.
Both "out" and "pending" transfer quantities are color coded for reference. If the on-hand is exceeded in the applicable branch, the quantity is colored red. If the on-hand is not exceeded, but the quantity does exceed what’s available, the quantity is colored green. Transfers-in don't perform color coding because quantities are not modifiable and we assume that the person initiating the transfer has already considered their inventory availability.
Managing Transfers Out
Begin a transfer out by either:
-
Selecting the receiving branch from the Send To list or
-
Choosing an existing "Pending Transfer" document from the Pending Doc# list
Pending transfers are requests for transfer from another location. Choosing Pending copies all the items and requested quantities from that transfer document to the data grid.
Mark as Received
When transferring goods to another location, inventory may either:
-
Be automatically and immediately received in the branch goods are being transferred to or
-
Not received automatically which requires that the receiving location still process the transfer at some point to update their inventory (using the "Transfers In" option).

Select the Mark as Received check box to indicate that the transfer is completed when the user clicks the Process (F12) button. The default setting is to not receive automatically (the box is unchecked).*
*The reason that the default isn't set to automatic is because for those users who don't want to automatically update, it involves more work to "reverse" a received transfer once processed. It is far easier for a user who normally auto-receives a transfer document to just receive the document manually in the event that they forget to check the box.
After all the transfer items have been entered, select the Process (F12) function key to complete the transfer (and create a transfer document for later processing).
Using the Import (F2) Options
When creating a new transfer out or pending transfer, users can choose from a variety of Import functions. Here's a list of what's currently available:
Inventory
The Inventory Import allows users to populate the grid with items selected by group or group and section, location code, and classification.
Customer Order
A customer order can be imported into the Transfers grid using this function. Either type in or select a customer's order for import. Only customer orders for the current branch location are provided (where the current branch is associated with the order as an, entry, selling, or material branch). No document linkage is produced between the imported order and the resulting transfer document, and no information regarding the customer order is referenced on the transfer document. As an alternative, the Build (F5) function (see here) also offers a Customer Order option to provide a way to link a customer order with a transfer of goods.
Work Order
A work order (used with Manufacturing) can be imported into the Transfers grid using this function. Either type in or select a customer's work order for import. Only work orders for the current branch location are provided.
Recv Branch < 0
This function copies all items at the receiving branch with an on-hand less than zero. The on-hand quantity is used as the default for the transfer quantity. Users may want to use the Consolidated inquiry after import to review items listed to check other quantities such as available, on-order, and committed.
Document
The Document function allows users to select a Purchase Order or Purchase Order Receipt document for import. For these document types, there is no need to map columns as is necessary with the wizard. Limited information is copied, usually just items, quantities, and units of measure.
Wizard
The Wizard provides a way of importing items from either a Windows-based file (spreadsheet, delimited file, etc.) or an existing application document. Document or data columns must be mapped properly so that the wizard knows how to use the data.
Build (F5) Function
![]()
The Build (F5) function is used to copy items from either
-
A consolidated purchase order (PO), or
Note: A Consolidated PO has branch allocations for item quantities.
Only the allocations for the "Send To" branch will be copied in. This can be done before or after receiving, but normally would be done after the goods were received into the main branch (or a warehouse, etc.).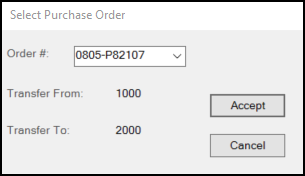
-
A single customer order
This option allows you to copy a single customer order into a transfer out or pending transfer request.
![]()
An important point to note is that on-order quantities in allocated branches are not reduced automatically by receiving a consolidated purchase order nor are they cleared by the transfer of goods from the consolidated (warehouse) branch to the allocation branches. This means that a consolidated Purchase Order must be manually closed after the consolidated purchasing process is completed in order to maintain proper on-order quantities in the branch locations.
A Note about the Import (F2) Customer Order Option
The "build" option works a bit differently from the Import (F2) function's Customer Order option. This feature creates a document link between the transfer document and the customer order, the Import (F2) function does not do this. Additionally, the Build option for the customer order allows selection of customer orders regardless of the order's branch associations. When using the Import (F2) option to copy items from a customer order, selection is limited to orders involving the current branch only. The customer order document, account name, job number, and job name are printed in the Document notes area of the Transfer document.
Specifying Adjustments (Adjust F6)
Just like with a purchase order, the user can designate adjustments that will affect the costs of the items being transferred. Adjustments are commonly used for freight, tarp charges, etc. Use the Adjust (F6) function to specify adjustments as necessary. Adjustments may be designated later for Transfers-In using the Cost Corrections transaction on the Inventory menu.
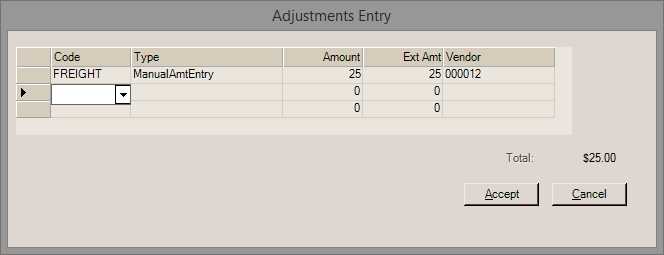
Adjustments cannot be modified by the receiving ("in") location but the total adjustment amount is included in the totals panel.
Measures/Branch (F8)
The F8 function toggles the display panel next to the "totals" near the top of the form between "Measures" and "Branch." When the Measures panel is displayed (by pressing Measures (F8)), the panel lists the total weight, board footage, and square footage for items associated with the transfer. Weight is only provided for items with an assigned weight (load) factor. Weight factors are applied to the relative "base" quantity for each item when present. Items with no assigned weight are not included. Board and square footage is only shown for dimensional type items (lumber, plywood, etc.) which have also been assigned dimensions in Item Maintenance. A "lumber" or "plywood" type item that has no dimensions designated won't be included in the totals.

Measures (F8) |
-- OR -- |
")
Branch (F8) |
Managing Transfers In
This selection is used for completing a transfer of goods to your location and is the final step in the transfer cycle.
Once goods arrive from a transfer to your location, begin by selecting the transfer document from the drop down selection labeled "Receive Doc#." The items from that transfer document are copied into the grid. The grid will be "read-only," indicated by the cells appearing grey; therefore, changes are not allowed. Changes are prevented to maintain consistency between the value of stock moving from location to location and to prevent the possibility of any undocumented shrinkage using transfers. If adjustments to a transfer need to be made, they should be done after the transfer is processed.
Managing Pending Transfers
This is used for requesting a transfer of goods from another branch location that must be approved or finalized by the branch the request is made to. On completion of the Pending Transfer, a document is created for future processing. Processing a pending transfer can also generate an automated message to a branch manager, dispatch-type user* (sent either via Email or the software messaging function). User security settings can be used to limit users to only performing "pending" transfer requests. If enabled, the user won't be allowed to process a "transfer-in" or "transfer-out" from this area (those radio buttons don't allow selection in this case).
*Messages regarding a Pending Transfer are only sent to the first user located who is both (a) a branch manager and (b) a "dispatch" type user assigned to the branch where the request goods are located. If there is no branch manager who is a dispatch user at the location, no message will be created. If there is more than one branch manager-dispatch user at the location, only the first one located is notified.
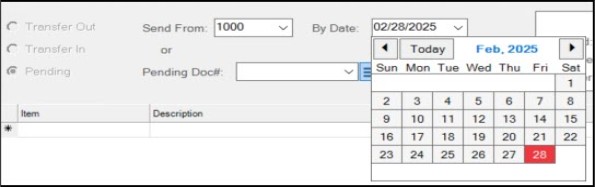
When creating a new pending transfer document, choose a branch and a date. The date would be the date you are requesting the transfer be completed by. The "Pending Doc#" drop down selection is provided for making modifications to an existing pending transfer request.
You can only request a transfer of items if those items exist at the branch the goods are requested from. A message will appear in the task list if you attempt to request items that the branch does not stock.
The "Consolidated" option available from the Build (F5) function is disabled in the case of a Pending transfer. Users can choose the "Customer Order" option to associate an individual (one) customer order with the transfer. Doing this allows selection of a customer order for any branch location. Branch designations on the customer order are listed in the drop down; however, they are not considered when associating an order with the transfer. Branch associations on customer orders are provided for delivery reasons. Transfers are typically done when your company moves stock to a single location from where the goods will be delivered. The Build (F5), Customer Order function creates a document link between the pending and resulting "transfer-in" document and the customer order.
Correcting Transfer Mistakes
If goods are transferred in error, it is possible to either:
(a) reverse the transfer procedure manually from the receiving branch back to the original location or
(b) use Adjustments in the Inventory application to fix the error. There is no automated transfer "reversal" option.
If transferred goods are received but are missing adjustments (adders such as freight, for example), the Cost Corrections transaction can be used to associate adjustments later.