Tags & Labels
The Tags & Labels Utility gives you a way to create, organize, and print bin labels, price tags, special order tags, unit tally item tags, price update tags, and sales price tags and labels you need in your store. You can print these labels on Zebra™ and DYMO® label printers or on laser printers, as appropriate for your work.
Customers have told us over the years that they want more control over the Tags and Label creation process, more choices of where they can print the tags and labels, and the ability to create batches of labels for printing later. Based on this feedback, we expanded the Tags & Labels Utility into three pieces:
-
the Designer, where you design and create the templates you use for Tags & Label production;
-
the Printer (see below), where you use the template to print the tags and labels throughout the application, and
-
the Batch Maintenance Utility, which allows you to collect and print labels using the new custom templates.
We have also enhanced the AnyWare app to provide more support for these expanded features. Features include:
-
Setting a default label type for stations that print the same custom label type consistently, see here
-
Enhancing the preview for tag/label items before printing to confirm that they display as you expect
-
Printing tags and labels from the Process Document in Point of Sale and from Inventory Receiving
-
Modifying label batches to remove batched items, increase or decrease the label counts, or even consolidate multiple batches into a single batch to make printing easier
There is a Tags & Labels Menu to provide permission-based access to Batch Maintenance, Designer, and Printing features
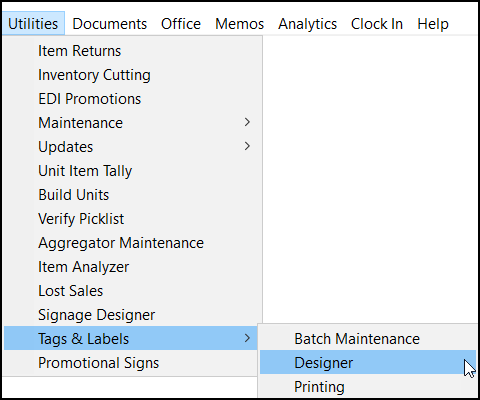
Tags & Labels Menu
Important: To make the new Tags & Labels features work, we have converted your existing templates to a new format. This new format gives you more flexibility in printing and managing the entries in these labels but may affect the way these labels display in the Designer. We have added extra support for legacy template fields. We recommend that you preview your content before printing to ensure that tags and labels display how you expect to prevent wasted paper stock.
Setting the Tags & Labels Permissions
The new Tags & Labels features require specific permissions for all users. With the new features, Inventory and Sales employees with label printing responsibilities can create their own label batches, but you may want to restrict who can design the labels. Use these instructions to add batch maintenance, label designer, and printing permissions to individual User IDs or groups as works best for your business. User IDs that do not have permission will not see some Tags and Labels menu options.
To add Tags & Labels permissions to a user ID:
1. Log into the application with administrator permissions.
2. Go to Maintenance > Database > User IDs to display the User ID Maintenance form.
3. In the User ID field, choose the user ID of the person or group you want to add Tags & Labels permissions to.
4. In the Security Options tab, select the Permissions Settings ![]() box to display the Permissions List Code Maintenance options.
box to display the Permissions List Code Maintenance options.
5. Scroll down and select the + icon beside the Utilities option. The feature list displays.
6. Scroll down and select the + icon beside the Tags Labels option. The Tags and Labels options display.

Permissions List Code Maintenance Box with Tags & Labels Settings Highlighted
7. Choose the Batch Maintenance, Designer, and/or Printing check boxes as appropriate for this ID.
Note: Selecting the check boxes in this list displays the menu option for this/these user(s).
8. Choose Apply. The message Database Updated displays.
9. Choose Return to redisplay the User ID Maintenance form.
10. Choose Process (F12) to save these permissions.
Setting a Default Label Type for a Station
When a station prints the same labels every time, you can add a default label template to the station record. You can change this setting locally if you need to, but once you set this option, it displays by default.
To set the default label type for a station:
1. Log into the application with administrator rights.
2. From the Main Menu, choose Maintenance > Database > Devices to display the Devices Maintenance form.
3. From the Device Name field, select the station you want to set the default label template for.
The fields update to show the default settings for the station.

Device Maintenance Form with Default Label Template Highlighted
4. From the Default Label Template list, choose the template you want to use by default for this station.
5. Choose Process (F12) to save this setting.
Understanding the Station Print Options
A station can only have one assigned label printer; however, if your station is assigned to a DYMO printer, you can still print to a Zebra printer. DYMO LabelWriter printers are usually connected via USB and are available on the local computer only. It is possible to connect a USB printer via a print server. In this case, the print server provides an TCP/IP address that can be used for network communication. If you choose this option, you may be able to print to a DYMO brand printer over a remote connection, for example. Zebra brand printers may be ordered with network capability, so they can be accessed even if they are not assigned to your station (the Zebra printer needs to be installed in Windows, with the same Windows printer name as is assigned to the printer device in the software, and you must change the printer from the Process (F12) form). Regardless of your choice of printer, printer and any network configuration is solely the responsibility of the end-user unless otherwise indicated.
The scanning of barcodes on labels is more reliable when the barcode is larger, so we recommend that you use the largest size that is practical for your label. Note that when a label with a barcode element is produced for an item with no barcodes on file, the printed barcode will be for the text "N/A" (Not Applicable). If you allow users to add barcodes to items at POS, warn them not to add that “N/A” barcode to any item, since the "N/A" barcode will then always bring that item up when scanned, resulting in incorrect sale prices and inventory levels.
|
Printing to a Zebra vs. DYMO Device Zebra brand printers use their own proprietary language and only accept ZPL format files for printing. DYMO, and certain other label printers, accept the PCL format which are produced via templates created using ActiveReports (the same software we use for documents). Our design feature can now be used for either; however, there are some limitations when designing labels for use with the DYMO printer. DYMO printers can be used for three of the four available label types/sizes: price tags (1 x 2), bin labels, (1 x 3), and special order tags (3 x 4). Unit Tags and unit elements are not supported for use with the DYMO designer. The physical size of the DYMO labels is slightly different than those used with the Zebra printers, so we do adjust the sizing when printing. When choosing a specific label size for DYMO printing, the Windows Printer driver must be updated to use the proper label form! There is no automatic detection of the form size, so if you don't specifically set it, labels will not print correctly. Please see the DYMO Label Printer topic for additional details and form numbers. If more than one DYMO printer is being used, consider adding different printers in the software for each. Configure the proper settings on the local machine using the printer or RDS (Remote Desktop Server) where printers are installed (requires the assistance of the hosting team). |
Label Types
Label types of Bin Labels, Price Tags, Special Order, and Unit Tags are used with Zebra brand label printers only. Choosing one of these four types modifies the format of the data grid to match your selection. For example, "Special Order Labels" will include columns for order ID, account, and project that would not appear or apply to bin labels or price tags. Special Order labels are for use when referencing customer orders only.
Bin Labels
This label type is intended for use as a bin or shelf label. The default label size is 1" x 3" or 25.4 x 76.2mm (vertical height x horizontal width) for use with Zebra printers. DYMO labels for use with bin and documents are the following size: 1-1/8" x 3-1/2" (28mm x 89mm), SKU# 30252.
Price Tags
This label type is intended for placement directly on products and is the smallest of the labels. The default label size for Zebra printers is 1" x 2" (25.4 x 50.8mm). The corresponding size for use with DYMO printers is 1" x 2-1/8" (25mm x 54mm) or SKU # 30336.
Note: The application does not apply price rounding when you print price tags. Tags & Labels takes the prices directly from the item's record in the database without applying any price rounding settings.
Special Order
This label type is intended for use with customer orders and staging for delivery. The default label size for special order type is 3" x 4" (76.2 x 101.6mm) for Zebra printers vs. 2-1/8" x 4" (54mm x 102mm) for DYMO Brand printers (SKU # 30323).
Unit Tally Tags
This is the newest of the label types and is used for Unit tallies. Unit tallies may be used for most bulk packaged products such as goods that are wrapped or strapped to a pallet, for example. These goods may be tracked along with details regarding the contents of the bulk container. There is no corresponding "unit" label for DYMO brand printers. The default label size for unit tags is 6" x 4" (152.4 x 101.6mm) for Zebra brand printers (only). Use the Import (F2) options for Receipts or Units to populate the data grid.
Vendor Labels
Vendor labels provide a quick way to print preset sheet labels for ACE, Do It Best (DIB), Orgill and True Value vendors. Vendor labels must only be used with a laser printer and must use the multi-purpose feeder tray. Instruction on how to use Vendor Labels can be found here.
DYMO Price Tags
The default format includes the item SKU, description, numeric group and section code, price, unit of measure, and barcode.

DYMO Price Tag
DYMO Bin Labels
The default format includes the same information as the price tag but also include the location code and branch name. In addition, the bar code is larger on the bin label.

DYMO Bin Label
DYMO Special Order Labels
The default format includes the (customer) order document, customer account and job, account name, item SKU, vendor, description, quantity ordered, quantity received, and branch description.

DYMO Special Order Label
The "Custom Form" drop down lists any custom label templates that your company has requested and purchased.
Printing Tags & Labels
Use the Tags & Labels Print Utility to print and retain or empty the list of items in the data grid. This feature has changed. You use the Print (F8) option to maintain the list of items in the data grid and the Process (F12) to reset (empty) the list of items from the data grid.
Note: There is a setting that allows you to prevent a label from printing for a particular inventory item. You can find those instructions in Preventing Items from Batching and Printing.
Printing using the Custom Templates Option
To use custom templates to print item-based tags and labels:
1. From the Main Menu, choose Inventory > Utilities > Tags & Labels > Printing to display the Tags & Labels Printing form.

Tags & Labels Printing Form > Custom Templates Option
This form works differently from the original utility. Here, the label and printer types are tied to the Custom Template you develop in the Designer. Therefore, the Label and Printer Type entries are filled based on the template settings you created in the Designer. When you select the template, you cannot change the Template filter settings.
2. Select the Custom Templates option when you want to use a template created in the Tags & Labels Designer.
Note: We describe the Vendor Templates option in this section.
3. From the Template Selection list, choose the template you want to use to specify the printing style. The Template Filters update based on the template you selected.
4. In the data grid, enter the items you want to print labels for and choose the count number.
Alternatively, you can choose the Import (F2) option and import your current batch. See Importing a Batch in Printing for these instructions.

Tags & Labels Printing Form with Print Preview Option Highlighted
Note: The Menu Marker  provides access to the Set Count options 1, Quantity on Hand, on Order, and New Counts. Further, if you open Tags & Labels from Item Maintenance or Purchasing/Receiving, the default count may reflect the settings from those data grids instead.
Unit of Measure Note: The unit of measure you specify in the data grid overwrites the unit of measure defined in the template when the label prints.
5. To preview the tags/labels, choose Preview (F7).
The Viewer displays the tag/label for the first item in the data grid.

Tags & Labels Printing Form Confirmation Prompt
7. Choose the appropriate option depending upon the printing results.
-
Choose Yes if the printing was successful. When you select this option, if you chose Print (F8), the items will remain in the list; if you chose Process (F12), the application clears the entries from the data grid.
-
Choose No if the printing was not successful. When you select this option, the application retains the entries in the data grid without regard to your Print or Process selection.
Printing using the Vendor Templates Option
To print vendor template tags and labels based on items in the data grid:
1. From the Main Menu, choose Inventory > Utilities > Tags & Labels > Printing to display the Tags & Labels Printing form.

Tags & Labels Printing Form > Vendor Templates Option
2. Choose the Vendor Templates option to display the Template Selection list. This list contains the vendor labels stored in your application.

Tags & Labels Printing Form with Template Selection Entries
3. Choose the vendor label you want to use to produce the tags or labels you need.
4. In the data grid, add the items you want to use to create the tags or labels.
5. If you are printing labels on a page where some labels have already been printed, choose the Labels to Skip Settings ![]() button in the Print Options box. The Label Layout box displays.
button in the Print Options box. The Label Layout box displays.

Label Layout Box with O Labels to Skip and 3 Labels to Skip Selected
-
Choose the number of rows you want the printer to skip and click OK.
This step is not required if you do not need to skip labels.
6. When you are ready to preview your labels, choose Preview (F7). The Viewer displays the tags/labels you selected for the items in the data grid.

Viewer with Vendor Tags/Labels based on Items in the Data Grid
7. When you are ready to print, choose the appropriate option:
-
To print and retain the list of items in the data grid, click Print (F8)
-
To print and clear the list of items in the data grid, click Process (F12).
IMPORTANT: We have changed the way these two functional keys work! Retain the List with Print (F8) and Clear the List with Process (F12).
When printing is complete, a confirmation prompt displays:

Tags & Labels Printing Form Confirmation Prompt
8. Choose the appropriate option depending upon the printing results.
-
Choose Yes if the printing was successful. When you select this option, if you chose Print (F8), the items will remain in the list; if you chose Process (F12), the application clears the entries from the data grid.
-
Choose No if the printing was not successful. When you select this option, the application retains the entries in the data grid without regard to your Print or Process selection.
Importing a Batch in Printing
This is the process for importing batches you created in this section. You can use this process to import price updates, orders, work details, etc. The process is essentially the same, although the prompts are different depending upon the type of information you are importing.
To import a label batch in Tags & Labels Printing:
1. From the Main Menu, choose Inventory > Utilities > Tags & Labels > Printing to display the Tags & Labels Printing form.
2. Select the Custom or Vendor Templates option as needed.
3. From the Template Selection list, choose the template you want to use to specify the printing style. The Template Filters update based on the template you selected.
4. To import the current batch of labels or tags, choose Import (F2). The Import menu displays.

Tags & Labels Printing Form with Import Menu Displaying
5. Choose the Batch option in the menu. The Select Queued Label Batch list displays.

Tags & Labels Select Queued Label Batch Box with Options
The application saves your batches based on your user ID and station settings for the current branch location.
6. Click Accept to import the batch entries. The data grid updates with the items from the batch list.

Tags & Labels Printing Form with Imported Batch Entries
7. To set the number of labels for each item in the list, choose the Menu Marker to display the count options.

8. Choose the count option you want to apply to the item list in the data grid:
-
1 = Prints one Label
-
QOH = Prints one label for each item based on the Quantity On Hand you have of that item
-
OnOrder = Prints one label for each based on the on-order quantity for the item (purchasing, not customer orders)
9. From here, you can add new entries or delete existing entries until you have the batch that you want to print.
10. Choose Preview (F7) to see the list of labels before you print. (Not Required)
11. Choose the following option based on your handling of the data grid list:
-
To print and retain the list of items in the data grid, click Print (F8)
-
To print and clear the list of items in the data grid, click Process (F12).
IMPORTANT: We have changed the way these two functional keys work! Retain the List with Print (F8) and Clear the List with Process (F12).
When printing is complete, a confirmation prompt displays:
Tags & Labels Printing Form Confirmation Prompt
12. Choose the appropriate option depending upon the printing results.
-
Choose Yes if the printing was successful. When you select this option, if you chose Print (F8), the items will remain in the list; if you chose Process (F12), the application clears the entries from the data grid.
-
Choose No if the printing was not successful. When you select this option, the application retains the entries in the data grid without regard to your Print or Process selection.
Preventing Items from Batching and Printing
If you do not want to batch and print an inventory item, there is also a setting in the Item Maintenance form to prevent that.
To prevent the application from batching and printing an item:
1. From the Main Menu, choose Inventory > Database > Item to display the Item Maintenance form.
2. In the Item list, choose the item you want to prevent the batch and print settings for.
3. Choose the Codes tab.
4. Enter N in the Print Labels box to prevent this item from being added to a print batch.

Item Maintenance Form > Codes Tab > Print Labels Box Highlighted
5. When you have completed this setting, choose Process (F12) to save this change.
Supported Label Printers
The following table lists the current printers supported for use with label printing by the software:
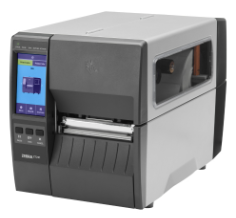
Zebra ZT231 |
The Zebra® ZT231™ model is an industrial-grade label printer for barcoded price labels. It is a non-portable thermal label printer. You must request this option when ordering; it is not typically included. The standard USB and Serial connections are supported. This is the replacement for the Zebra ZT230 model which has been discontinued by ZIH Corp. Zebra Technologies (https://www.zebra.com/us/en/products/spec-sheets/printers/industrial/zt231.html) • Custom design your labels • May be shared • Adjustable sensors offer greater media flexibility • Large ribbon roll capacity lets you change media less frequently |
|
|
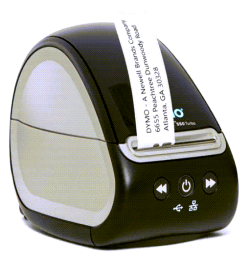
DYMO LabelWriter 550 Turbo |
Use the DYMO® LabelWriter 550 Turbo model printer to print barcode document labels as well as price tags, bin labels, and special order labels. It uses a thermal print method and has its own print server. The internal print server provides network capability and allows you to assign an IP address to the printer. • Uses a USB connection • Uses Preset Label Formats and applies templates from the Designer • 3.5" Roll Capacity • Plastic Construction • Lower Cost • Requires custom DYMO labels Note: Modify the Windows Printer properties when changing to a different label size See Dymo Label Printers for more information. |
|
|
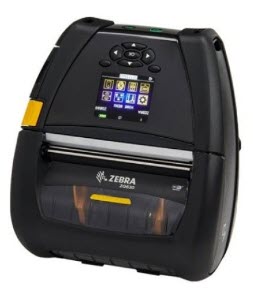
Zebra ZQ630 |
Use the Zebra ZQ630 wireless label printer for barcode price labels. You can use this portable device with supported mobile devices and the AnyWare software. Wireless access point required to connect. • Uses Bluetooth technology, requires a Wireless Network • Lithium ion battery • Direct Thermal printing/transfer labels • Portable and Lightweight (2 lbs.) • Maximum Roll size = 2.625" (66.68 mm) (on .75" (19.05 mm) core)
|
Reference
The following provides additional information about the Tags and Labels feature.
Importing Other Types of Entries
An Item setting, Print Labels, can affect whether or not an item is eligible for Import. This setting is intended to be used so that a company can prevent items they designate from printing tags or labels. You can now set this option in the Item Maintenance form as described here.
Note: The Copy Quantity preference must be selected prior to importing data and will not affect any items that have been manually entered previously. The other two choices may be used at any time and do affect an previously entered items.
For important details regarding each of the Import selections, ![]() click here.
click here.


Understanding the Data Grid Entries when using the Style (F3) Option
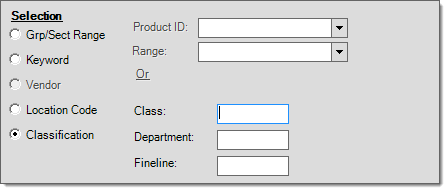
When using the Bin Tag or Price Tag options, there are three grid styles available: Item Entry, Vendor SKU, and Location Codes.
Item Entry is the standard grid format and the only one that allows entry of pricing and quantities.
Vendor SKU displays each item, description, and the vendor SKU for the item's primary vendor (if any).

Style (F3): Vendor SKU
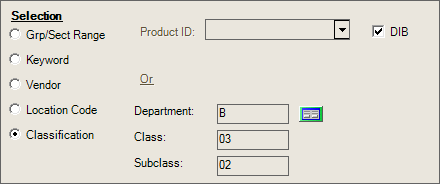
Location Codes displays the location each item is stored in (if you track this information).
![]()
Style (F3): Location Codes
Viewing Data Grid Information using Folders (F4)
Folders in Inventory areas are similar to those found in the "Purchasing" application except that a Pricing tab replaces "vendor." Click here for specific information regarding the folder contents.

Folders (F4) with Pricing Tab Selected
Printing using the Print (F8) Option
Use the Print (F8) function to print labels and retain the list in the Tags & Labels Printing form afterward. The selections in the upper form remain unchanged. The number of labels printed for each item (row) will match the "count" entered for each item in the grid (the count defaults to one during unless modified). Use the menu marker to quickly set ALL counts equal to either one (1) (useful for bin type tags) or quantity on-hand before or after item entry; however, the "New Counts = Copy Quantity" only functions if selected prior to copying a document or file, etc.
Printing using the Process (F12) Option
Use the Process (F12) function to print the labels for the selected items, orders, or units and then reset the entire form. The number of labels printed for each item (row) will match the "count" entered for each item in the grid (the count defaults to one during unless modified). You can use the Menu Marker to set ALL counts equal to either one (useful for bin type tags) or quantity on-hand before or after item entry; however, the "New Counts = Copy Quantity" only functions if selected prior to copying a document or file, etc.
")
Process (F12)
The Process (F12) form for Tags & Labels is fairly straightforward. Choose the appropriate printer from the list and choose Finish (ALT-F) to send the job to the printer, or select Back (ALT-B) to return to the Tags & Labels data grid.