Scheduling a Report
You can schedule many of the reports available in the application to run while your business is closed. This is particularly useful for reports that require a lot of processing, because they will not interfere with the other normal operations of the application. You can schedule many, but not all, reports to run automatically. When this feature is available for a report, the Schedule (F7) key displays.
Scheduling involves deciding when and how often the report should be run. Reports may be scheduled to run once, daily, weekly, monthly, or yearly. Your choice of period determines the appearance and settings on the form. Monthly schedule options are different from weekly and weekly options are different from daily, for example. It makes sense to consider all of these scheduling options carefully before you get started. You should also take into account the other scheduled reports when you are timing the new report.
![]()
There are three functions that may be involved in report scheduling: Select (F5), Save (F6), and Schedule (F7).
Scheduling a Report
Report scheduling requires specific user rights defined in the User ID form. If you do not have sufficient rights to perform these steps and you need them, contact your system administrator to update your permissions.
Pro Tip: Rather than schedule all of the nightly reports at the same time, we recommend that you schedule them for different times to ensure that the End of Day process manages each report sequentially. This prevents the application from trying to run related reports at the same time. Report outcomes tend to be better using this tip.
To schedule a report:
1. Before you schedule a report, research where to save and store the reports. See Where are the Saved and Scheduled Reports?.
2. From the Main Menu, choose the application area of the report you want to schedule and choose the Reports.
3. From this list, choose the report you want to schedule. The Report selection options display.
4. Choose the criteria for the report as you normally would or choose the Select (F5) function to load the saved settings for the report you want to schedule instead.
5. When you have selected all of your options, choose Preview (F8) to review the results based on the criteria you selected. Make any changes you need.
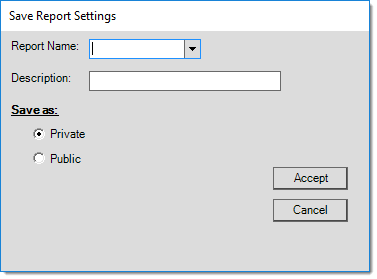
6. When you are satisfied with the results, choose Save (F6). Saving stores the current report's settings for future use. For more information about saving a report, ![]() click here
click here
 Function")
After you save the report, the Schedule (F7) function enables.
7. To schedule a report, choose Schedule (F7). The Schedule this Task box displays.
To learn more about the specifics of scheduling a report, ![]() click here
click here
 Function")
")
")
")
")
")
")
")
When scheduling reports, the "Save Pathname" (or "Save Filename") is the name to be used for the file created by the schedule. You don't have to specify a directory path, just the file name.
8. When you have completed the Schedule this Task entries, choose Accept.
9. To complete the scheduling process, choose Process (F12).
Questions about this Process?
What if there is No Data that Matches the Report Criteria?
In these cases, the application still creates the file, but includes the message: No records found matching criteria. The application displays this message so you can distinguish between a report that did not run, from a report that ran but had no matching results.
Where are the Saved and Scheduled Reports?
The application saves the reports according to a setting in the system parameters (Maintenance > Database > Parameters > Setup > System tab), which are set and modifiable by a system administrator. There are two folders that you can set up to save/store reports on the application server (or in the case of the cloud-based customers, the
User Report Directory - which contains the report results that are restricted to the review of a specific user. When a report is restricted in this way, after the scheduled task runs, the application will store the results in a folder with the user's ID in the directory listed here. If a folder doesn't already exist for the specified user, the application creates one.
Scheduled Report Directory - which contains the scheduled reports results that can be reviewed by any authorized users.
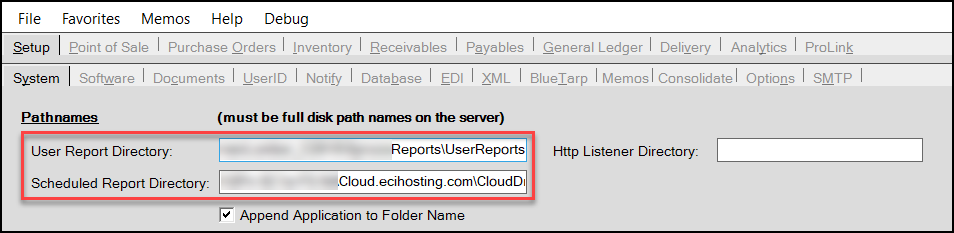
The directory names do not have to match the examples shown and they can be the same if desired. Since users should already have network permission to access the shared "Deploy" directory, you may want to designate a location within that directory. Whatever directory (folder) location is selected can be shared on your network with all users or specific people only.
The System tab has an Append Application to Folder Name check box that adds a further layer of organization to scheduled, when you select it. This feature creates a folder for each application (Point of Sale, Inventory, Receivables, etc.) within the designated Scheduled Reports Directory and within each application folder, it creates sub-level folders named using a numeric year-month format are created.
For example, if today is December 1, 2025, scheduled reports for today will cause a folder to be created in the designated directory named 2512 (53 for the last two digits of the year, 12 for the month of December). Months are always numbered based on the calendar year, not a fiscal year.
Since scheduled reports are saved on the application server (or in the specified hosted folder) not locally on the user's machines, your system administrator should ensure that all authorized users have access to the Scheduled Reports Directory. Additionally you may need to provide instructions or shortcuts to facilitate access. This organization and level of set up is the user's responsibility and not the responsibility of our Support or Training departments. If you have questions about the location of these resources, please contact your business's system administrator.
*Directory names and IP addresses shown in the examples are for illustration only. Your company's server address and directory set up won't match these examples.
What File Types can I save the Report Data In?
There are six types of files are supported for report creation. These are:
-
PDF (Adobe Portable Document Format),
-
Excel (Microsoft Office Excel spreadsheet application files, both XLS, and XLSX),
-
HTML (Hyper Text Markup Language, uses a web browser),
-
TIFF (Targa Image File Format, an image file type commonly used with faxing), and
-
CSV ( Comma Separated Values), often an alternative to Excel formats that also stores tabular data in plain text where each line represents one data record.
For users to access reports saved as a result of scheduling, they need appropriate software to open and view the supported file types. A user without a spreadsheet application installed won't have much use for a file that uses Excel or CSV format, for example.
How does Notification Work?
When a report is scheduled for a specific user, the application sends a message (either an internal system message or by email, based on the user's User ID settings) when the report has been generated.
Schedule Maintenance and Inquiry
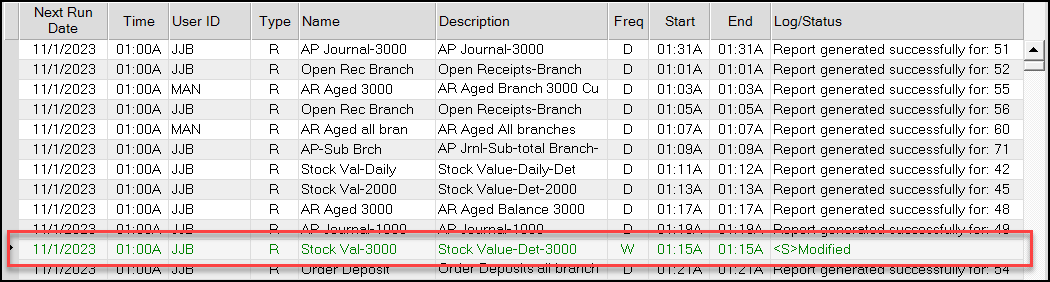
Scheduled items are added to a SQL database table and a scheduled background task (service) checks for scheduled items on a regular basis for processing. The status of scheduled tasks (such as scheduled reports) can be viewed in the Maintenance area using the Task Scheduler activity. Users can view, modify, and delete scheduled reports from this area. In order to make these changes, the user ID must be an administrator, however.
Modifying or Deleting a Scheduled Report
1. From the Main Menu, choose Maintenance > Task Scheduler. The Task Scheduler form displays.
2. Choose the Calendar (F5) function key. The Calendar Scheduler window displays.
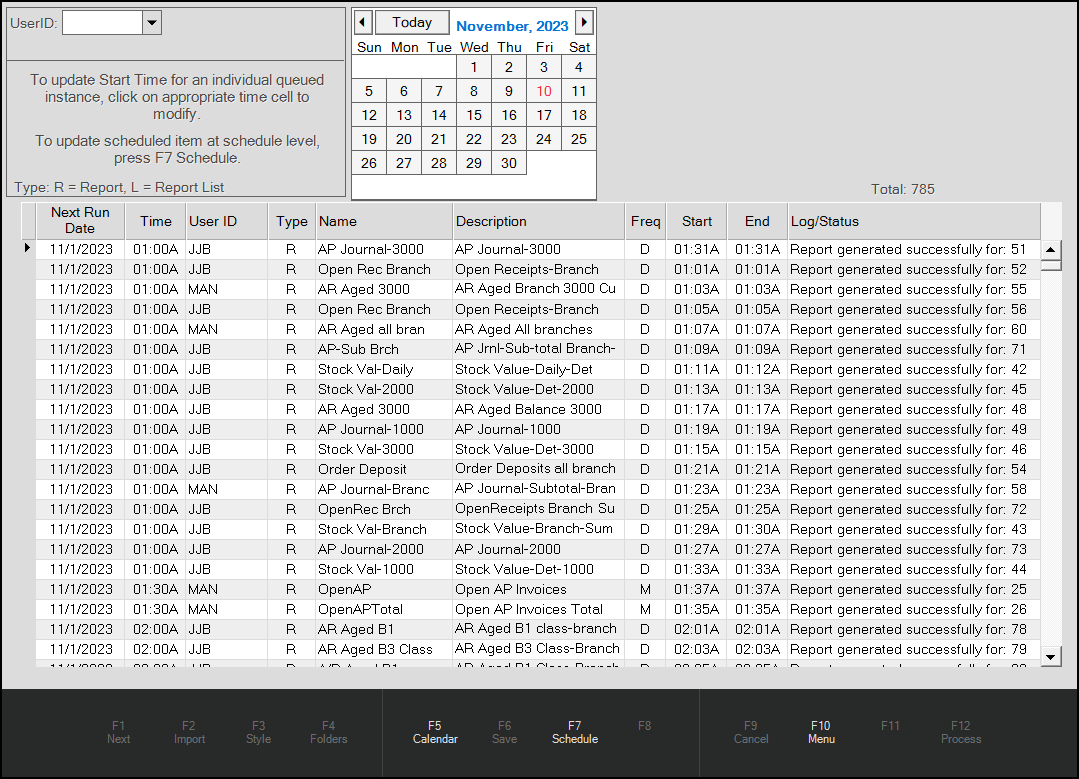
In the upper area of the screen, a calendar selector is displayed.
3. To jump to the scheduled items for a particular date, double-click on a date in this calendar control.
Most of the form contains a grid of the tasks scheduled to run by date.
4. Find an occurrence of the report you want to modify and click the row.

5. Choose the Schedule (F7) function key. The Scheduler form opens to allow you to make changes.
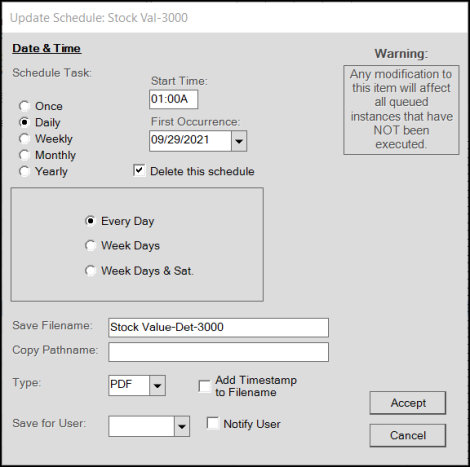
This form is very similar to the standard form found in Report process forms, but there are a couple of differences.
6. Depending on your task, do one of the following:
-
To make changes to the schedule, modify the settings to meet your new needs.
When you make changes to this schedule, the application prompts you to validate that you want to make these changes before processing. -
To delete the scheduled report, select the Delete this schedule check box. When you select this option, the application will prompt you to ensure that you are sure you want to delete the scheduled item before processing.
Note: Any changes to a recurring task affects all future occurrences of that task.
7. When you have completed your changes, choose Accept.
8. To update the calendar with your changes, choose Process (F12). Prompts display.
9. Choose OK to confirm.
After using the "Update Schedule" form to make changes or deletions, modified items will appear in green text in the grid.
10. Choose Save (F6) to complete the modification or deletion.