Payments > Receive on Account
The Receive on Account payment option is used to accept payments toward a receivable balance. Enter or select a customer's account by name or use alternate menu selections for other options. You can select either charge or cash accounts for this payment type. Job billing-level accounts prompt for job selection as well. Enter the amount the customer is paying in the text area next to Amount To Apply.
Cons Balance
When a customer with more than one job who also maintains job balances (job-level billing) is selected*, the "Cons Balance" check box is displayed. This allows you to optionally view the combined totals for all jobs in cases where the customer has or wants to remit one payment for all jobs rather than individual one's. The display can be toggled between the job balance (not checked) and combined totals (checked).
Document "Balance after Payment" MessageWe now print the customer or job remaining balance after payment on the resulting application document. The balance after payment is either the account's or job's information and is calculated by taking the outstanding balance plus finance charges less open credits (when considered). This is printed in two (2) places on the document: below the "Received On Account" information in the body section of the document (shown) and near the bottom with the payment method information. It's important to understand how this works in case you receive questions from a customer. If a user selects (check) "Cons Balance" and processes a payment, the resulting document's "Balance after Pmt" message will reflect the entire account's amounts and not the selected job's information. Changes have been made to the message presented to more clearly indicate this. There are now three (3) "balance after" messages that may appear on a payment document:
This message only appears when the payment was to an customer (account) that is job billed but the user processing the payment chose the "Cons Balance" check box. The balance is the outstanding plus finance charges less open credits for the entire account.
This message is shown when the payment was to a customer (account) that is job billed but the user processing the payment did not choose the "Cons Balance" check box. The balance is the outstanding plus finance charges less open credits for the selected job only.
This message appears when the payment was to an customer who is billed at the account level (not by job). No "consolidated" check box is offered in this case. The balance is the outstanding plus finance charges less open credits for the entire account. OverpaymentIf you overpay on a job or account, the "balance after payment" message will reflect the credit balance in brackets. For example, if the amount of the credit is $100, the credit line will be reflected as shown below: Balance after Pmt: ($100.00) No negative symbol is shown; however, the figure represents a credit or negative balance. If you are overpaying on a job because a customer is paying more than one job balance or the balance for their entire account, consider using the "cons balance" option instead. This can help avoid "credit" balances from printing and causing confusion. TimingThe balance shown is a real-time figure, so if there's posting or other activity concurrent with the processing of the account payment, the balance may appear off. |
*Not all customers with jobs maintain balances by job. When they do, the jobs are treated more like individual accounts.
Include Unapplied Credits (Incl Unapplied Credits)
When checked, this option reduces the balance for the account or job (if job billed) by the open credit balance for the account or job. When the "Cons Balance" is checked (selected) for a job-billed customer, the account information is used rather than the job's figures.
Pay Off Amount Figures
Some information is included for reference regarding potential payment amounts. The account's "pay off" amounts are listed in one panel (to the left), and the customer's most recent statement due and due less discount are listed in another (to the right).
Current Total Due
This figure is the customer's total outstanding balance including all past due or previously billed unpaid balances plus the customer's current (not yet billed) balance. No discounts have been considered in this figure. This figure is used for calculating the "Balance after Pmt" dollar amount shown on the resulting application document. The Current Total Due plus any finance charges less any unapplied credits (if applicable) is the Net Total Due.
- Open Credits
This figure is the account or job's current open (unapplied) credit balance. It's important to point out that it is possible for credits from one job to be applied to another. Credits may be applied in a way that does not reduce a particular job's balances, so this figure may not necessarily match the customer's statement.
Net Total Due
The Current Total Due less any Open Credits.
-Current (New) Discount
This is the dollar amount of the discount for new charges since the customer's last statement (billing). This amount is not reflected in the customer's statement discount.
Post Disc Payoff
The Post Disc (discount) Payoff is the Net Total Due amount less any current (new) discount. This figure is intended to be used in cases where a customer is paying their entire account balance (possibly before being billed), but is doing so after the statement's discount date has passed. Because the date has passed, the customer is not eligible for their statement discount. Current discount (if any) reduces this figure because a customer would be considered eligible for any new discount since they are technically paying that new balance early.
- Unused Stmt Discount
The Remaining Stmt (Statement) Discount is the amount of discount from the customer's last statement that has not been previously applied/taken (during posting). If the customer's original statement discount was $8.99 and this figure shows $4.00, it means that $4.99 of the customer's statement discount had previously been applied, for example. This figure will match the customer's statement discount if no payments, or other credits, have been applied that reduced the discount since the last billing.
Pre Disc (Discount) Payoff
The Pre Disc Payoff is intended for use when a customer is paying their entire account balance prior to the designated discount date. This figure including any new charges since their last bill and is reduced by all eligible discounts. For this reason, the customer's pay-off amount would be the outstanding balance less both their current discount and remaining statement discount.
Statement Figures
Customers may want to know how much they owe from their last statement, so this panel provides the last amount billed (Last Statement), statement credit balance (- Stmt Credit Bal), statement discount (- Stmt Discount), and the net billed (NET Stmt Due equals billed, less (-) credits, and less (-) discount).
Important!The "Net Due" in this panel is not necessarily the amount due now! New customer purchase activity (since the last billing) is not reflected by these figures (payments, memos, etc.). |
Credit balances, when allowed, appear within brackets. Use the Folders (F4) function to view more information regarding the selected account.
For a charge and cash accounts, you can enter a payment that exceeds the total due or payoff amount. The application will consider the excess amount as a credit balance. Some customers intentionally pay for their purchases in advance, so they can "draw down" from that amount as the expenses arise. If an account does not receive a statement, it may make more sense to add a draw down PO (purchase order) to the account instead to manage those funds.
Using a Draw Down Purchase Order vs a Point of Sale-Based Draw Down Account
There are two ways an account can function as a “draw down” account. One is to add a draw down PO job feature to a charge account and the other is to create a cash-only balance forward account with a credit limit of zero, to allow customers to fund the account, and subsequently post payments to it.
-
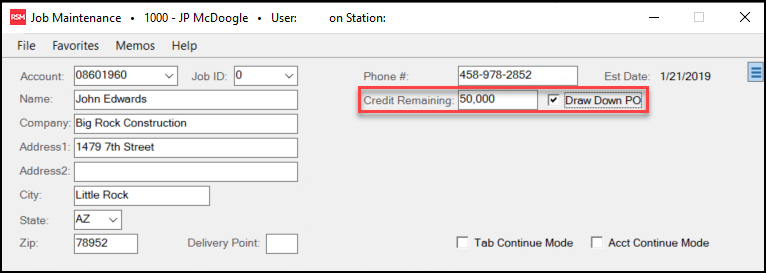
For charge accounts you can use the draw down PO job feature. To set up this process, in the Job Maintenance form, enable the Draw Down PO check box enabled and enter the credit amount in the Credit Limit/Remaining field. When these settings are complete, you can add a purchase order to track these values or the customer can submit a payment to match the credit limit assigned to the job and the account. When sales are processed, the credit balance of the job will decrease with each sale until it reaches zero. Sales with a charge amount will not be permitted if they exceed the job limit.
-
For cash only, balance forward accounts, you can post a payment to the account with a credit limit of zero to set a negative (credit) balance to draw from. Doing a receive on account payment isn’t enough to monitor this behavior, so the payment must be applied (posted) as well. Sales will reduce the current balance until it is zero. Cashiers cannot modify the charge amount to any amount that exceeds the credit balance. The charge option would only appear while the current balance is negative. Once the credit is exhausted, only cash-type payment methods are provided.
Cash-type accounts typically do not receive monthly statements but are considered part of the company’s receivable balances. These accounts may be optionally excluded from some reports, which can potentially lead to reconciliation issues.
Process (F12)
The payment process form is fairly simple. Three tabs are provided on this form: Payment (ALT-M), Transmit (ALT-T), and Print (ALT-P).
Once all process form changes have been made, press or select the Finish (ALT-F) button. To cancel processing and return to the activity screen press or select Back (ALT-B).
Payment (Alt-M)
Use the Payment (ALT-M) tab to specify the payment method for the payment being received. Depending upon the method chosen, the remittance requirements will change. Use the Reset button to clear all existing payment references to start over.
Transmit (Alt-T)
The "transmit" tab can be used to E-mail and/or fax a copy of the payment document to the customer. If the selected customer has fax and email information associated with the account or job's contact, that information will be used to populate the form. Any default information listed can be manually changed by the user. The "End Of Day" radio button is not available for payments. All payment Emails must be sent immediately.
Both faxing and Email capability is dependent upon outside factors. Faxing is managed by Microsoft Fax Server and a fax modem/phone line and Emailing requires a SMTP server or provider as well as configuration. The application is not responsible for the actual transmission of either faxes or Emails.
Print (Alt-P)
The "print" tab allows printer selection and options for saving as a file instead of, or in addition to, printing. For information about the PS Payments document created for a Received on Account, click here.
Reversing a Payment
If a payment is entered for the wrong account or needs to be reversed for any other reason, you can use the Open Credits utility to do this. The utility provides the ability to reverse any payment (ROA) credit, but not credit memos or adjustments. Users must have security permission to use the feature.
Applying Convenience Fees to a Receive on Account Payment
When you need to process a credit card payment for a Receivables account, that costs you money. Adding a convenience fee allows your customer to handle their account their way and helps you maintain your profit margin. After the Convenience Fee setup and mapping are complete, the application will apply Convenience Fees automatically to any account that pays all or part of their balance using a credit card. Before you implement a Convenience Fee policy, we recommend that you add a note to your customer statements alerting them of this new policy and when you will be implementing it.
Disclaimer: When you apply Convenience Fees to account payments by credit or debit card, your region may have legal, tax liability, and/or contractual restrictions. Additionally, this charge may affect the terms of certain card merchant or other agreements. It is your company's responsibility to research the legality of any fees you may choose to charge using the features in the software and to meet any requirements as legally or contractually indicated. ECI and the software applications we provide are not responsible for making any legal determination or claim of suitability for your company's particular situation. Your business is not required to use the Convenience Fee feature and the application does not make any determination whether a convenience fee is permitted in any specific location. Before enabling the feature, we recommend you work with your legal counsel to see if you can apply Convenience Fees where you are.
A Note about Tax Liability: The Convenience Fee feature has no automatic consumer tax impact. Specifically, existing tax reports and transaction details for consumer tax at time of sale will not include convenience fees applied to payments. For regions where Convenience Fees are considered taxable, you must ensure that reporting or payment of consumer tax charged at the time of sales (VAT/GST, etc.) is completed as a manual process. Convenience Fees are recorded financially, usually as income (your GL mapping determines how these fees are applied in the application), and do impact financial reporting as a company.
You can also completely prevent bank card payments for Receivables accounts by updating the severity on a task list to an error. This prevents credit card payments during the processing step in the Point of Sale > Payments transaction. Managers or employees with administrative rights can override this setting, if needed.
Convenience Fee Setup
The setup and implementation of the Convenience Fee feature requires two linked steps:
-
Setting the Convenience Fee Parameters
Allows you to set the default convenience fee percentage by branch for each credit card your business accepts.
-
Mapping the Convenience Fees to the Appropriate Journal Account
Allows you to specify which journal account to apply the Convenience Fees to. Once this mapping is established, the application will manage this for you.
Setting the Convenience Fee Parameters
To set the Convenience Fee parameters, you must have administrative application privileges. When you set these parameters, we recommend you set them for all branches that use the application. You can set separate rates for various credit cards, based on their charges, if you wish, or you can set one percentage for all cards. You can include or exclude debit cards from this fee.
To set the Convenience Fee parameter:
1. From the Main Menu, go to Maintenance > Database > Parameters to display the Parameter Settings form.
2. Select the Receivables tab to display the Card Convenience Fee options.
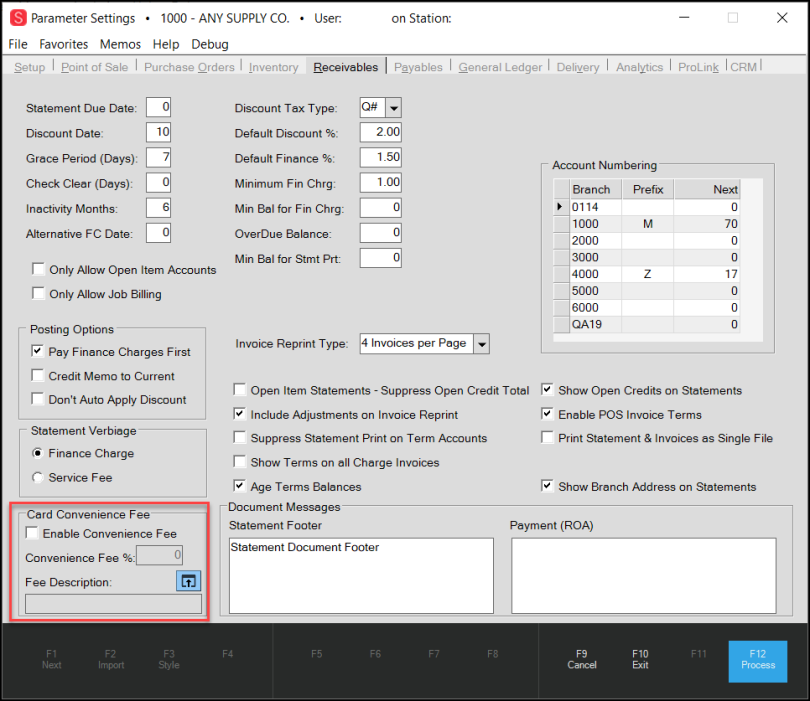
Parameter Settings > Receivables > Card Convenience Fees Options
3. In the Card Convenience Fee box, select the Enable Convenience Fee check box.
4. Select the Fee Description Settings ![]() icon to display the Convenience Fee Setup box.
icon to display the Convenience Fee Setup box.
If you choose to set different rates for different cards, the Card Type list displays the list of cards from the Parameters > Setup > Software tab. Only cards in that list are configurable in this feature.
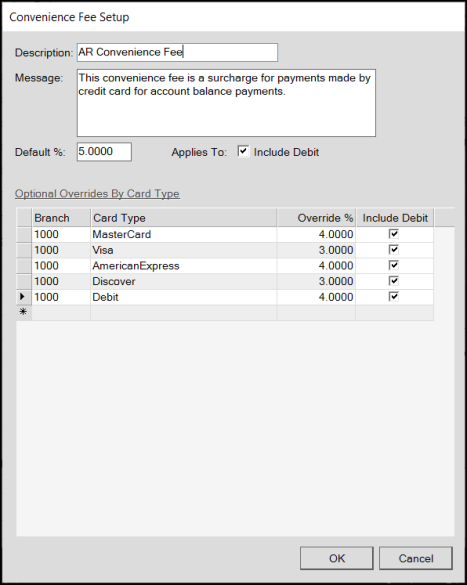
Convenience Fee Setup
You can sort this list by selecting the Branch heading. You cannot enter duplicate records for the same branch.
5. Complete the settings in this box for each card you accept at each Branch.
-
Description
Enter a description for the Convenience Fee. (Required) This is the text that displays beside the convenience fee transaction amount in the payment document. -
Message
Enter the message you want to display on the payment documents when the customer pays their balance by credit card. This message displays only when the application applies a Convenience Fee. -
Default Percent
Enter the default percentage for any card you accept that you do not explicitly list in this box. This entry must be a positive, numeric value and cannot exceed 99.9999%. The application applies the default convenience fee percentage to any debit cards you do not list specifically in the data grid.
Notes: You can also add different percentages for the cards you accept. The percentages you establish in this list are the percentages used at the Point of Sale when the application applies the convenience fee. You can also vary these amounts by branch. -
Include Debit
Select this check box if you intend to include convenience fees for debit card payments by default for all card types. -
Data Grid Entries
For each branch, choose the credit card type and enter any override percentages for that card type. Note: If you leave out any branch/card combinations, the application displays a warning message to ensure that are sure you want to apply the default settings. -
Debit check box
Select this check box to include debit charges for the entered card type.
You can include or exclude Debit cards by default (check box at the top) or include debit cards by card type if you prefer by selecting the appropriate check box(es).
Note: When you add a new branch location, you need to add any necessary Convenience Fee settings if you want to add specific fees for that branch in this table. This is not completed automatically. If you do not add new entries, the application applies the default percent to transactions that incur convenience fees.
6. When you have completed these entries, select OK to save them. The application updates the parameter settings based on your entries.
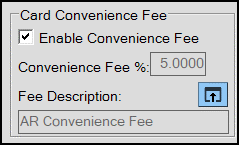
Card Convenience Fee Entries Complete
7. Select Process (F12) to save these settings. An error message displays, reminding you to set the mapping for this fee in the Journal Account.
Note: When you create this fee, you need to complete the journal mapping so the company can track this asset appropriately.
8. Complete the steps in Mapping the Convenience Fees to the Appropriate Journal Account and then return to these instructions.
9. Press Process (F12) again to clear the error message and complete the setup process.
Mapping the Convenience Fees to the Appropriate Journal Account
After you set the Convenience Fee parameters, it is important to map these payments to the appropriate journal account. A default script adds a new AR Convenience Fee entry in the System Journal Setup form, but you need to add this journal account to track these incoming funds.
To map the convenience fees to a journal account:
1. From the Main Menu, go to General Ledger > Database > System Journals to display the System Journal Setup form.
2. In the Journal Type list, choose Point of Sale.
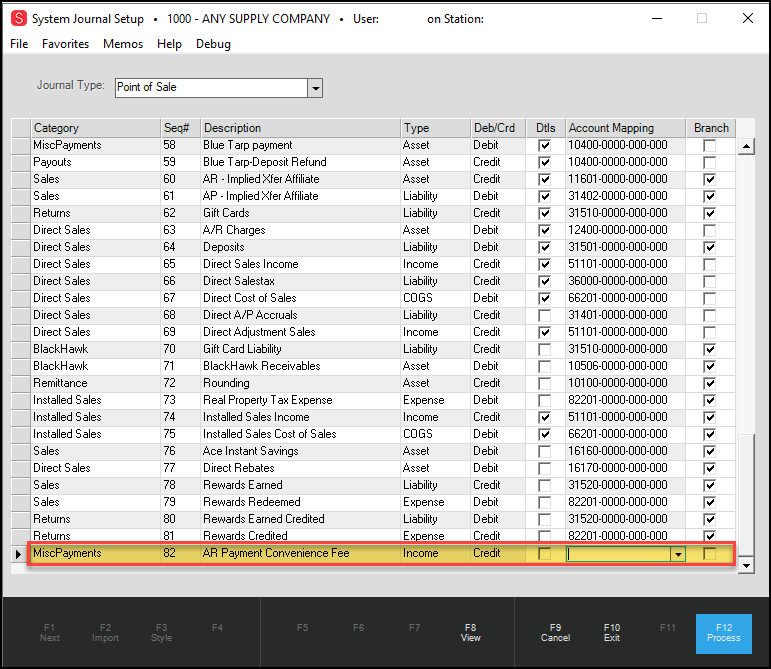
System Journal Setup with MiscPayments Entry for Convenience Fee Payments
3. Scroll down to find the AR convenience fee entry you created in the Description field in Step 5 of the Setting the Convenience Fee Parameters.
4. From the Account Mapping list, choose the appropriate business's account to track this payment amount and select the Branch check box. Checking the Branch box ensures that the application records these payments by branch.
5. When you have completed your mapping settings, select Process (F12) to save the change.
6. Return to the Parameter Settings > Receivables tab and select Process (F12) to update the journal mapping.
Applying a Convenience Fee in Receive on Account
B-94099, B-94295, B-100101, B-100102 - In the Point of Sale > Receive on Account task, when you select the bankcard option (and the Convenience Fee settings are in place), the application applies the convenience fees by default. You can override Convenience Fees at Point of Sale if you need to, with the proper permissions. In regions with currency rounding rules, these rules also apply to Convenience Fees.
To see the Convenience Fee to be applied at Receive on Account:
1. From the Main Menu, choose Point of Sale > Payments > Receive on Account to display the Accept Payment form.
2. From the Account Name field, select the account you want to process the payment for.
3. In the Amount to Apply field, enter the amount the customer is paying.

Accept Payment Form with Receive On Account Amount Applied
4. Select Process (F12) to display the Process Payment Document.
5. Select BankCard (F2) to display the debit and credit card options for the account.
Note: The application does not select a default credit card when Convenience Fees apply. The fee rate may vary and depend upon the card you choose, so the application cannot apply the convenience fee until you complete the credit card entries.
6. Select the Credit or Debit button and choose the credit card type.
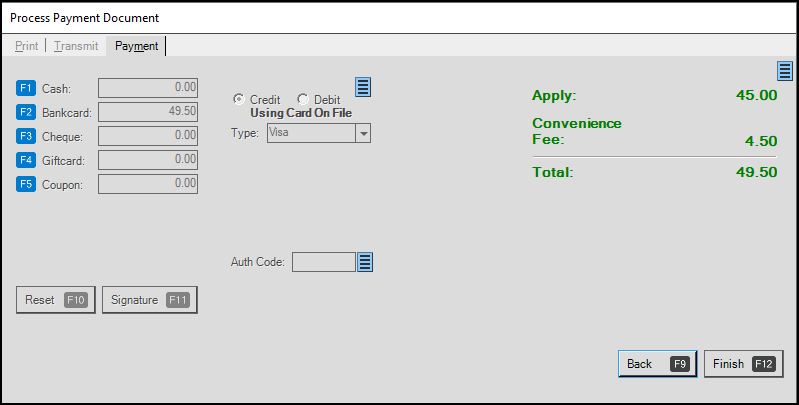
Note: The percentage set for the Mastercard credit card in this case is 4%.
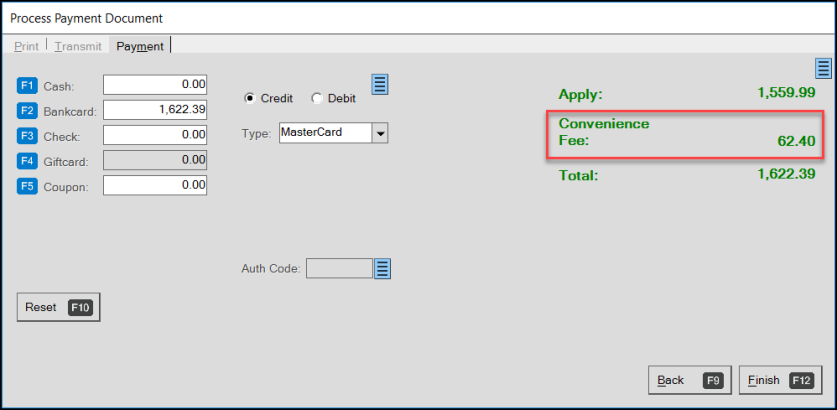
Process Payment Document for Receive on Account Payment with Credit Card
7. If you change the credit card type, and the percentage setting is different, the Convenience Fee updates.
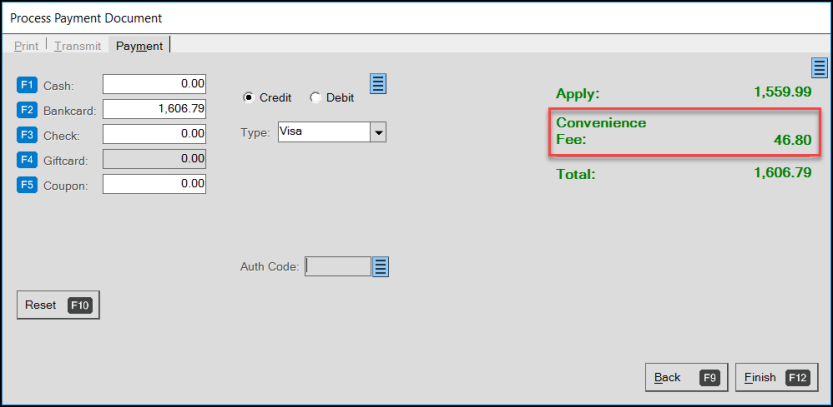
Process Payment Document for Receive on Account Payment with Different Card Percentage
To override the convenience fee in the Process Payment Document box, select the blue Menu Marker to display the override option.
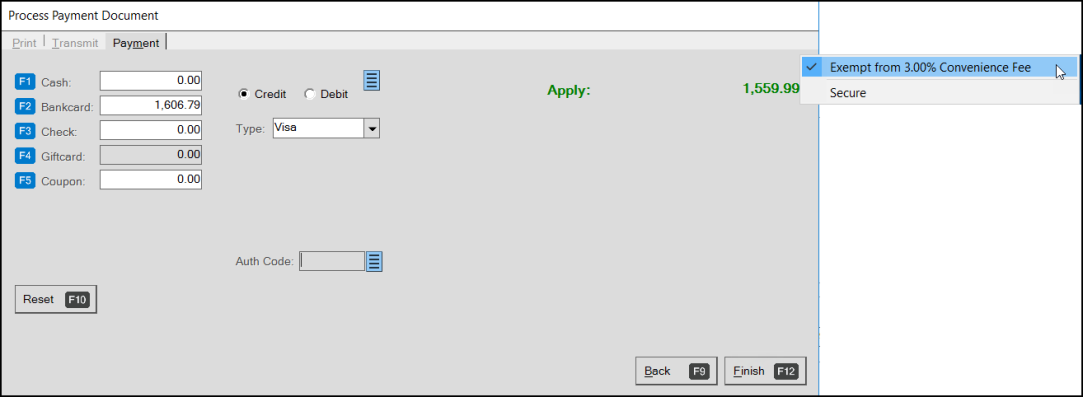
Process Payment Document with Override Message
Select the Exempt from X.XX% Convenience Fee option. The application removes the convenience fee from the transaction. Uncheck the option to redisplay the Convenience Fee.
Note: If you override the convenience fee, re-enter the original amount in the Bankcard field to reflect the total without the convenience fee.
8. Complete the credit card entries and select Finish (F12).
When you pay with a credit card or override the payment with a credit card, a warning message displays:
-
Bankcard payment type specified for Received on Account
9. Select the Accept Warnings option to continue.
10. To review the Payment document, go to Documents > PS Sales Invoices (Account Name).
The customer copy of the invoice displays. The message at the top is the message entered in the parameter settings. The AR Convenience Fee (Percentage) reflects the Convenience Fee percentage charged.
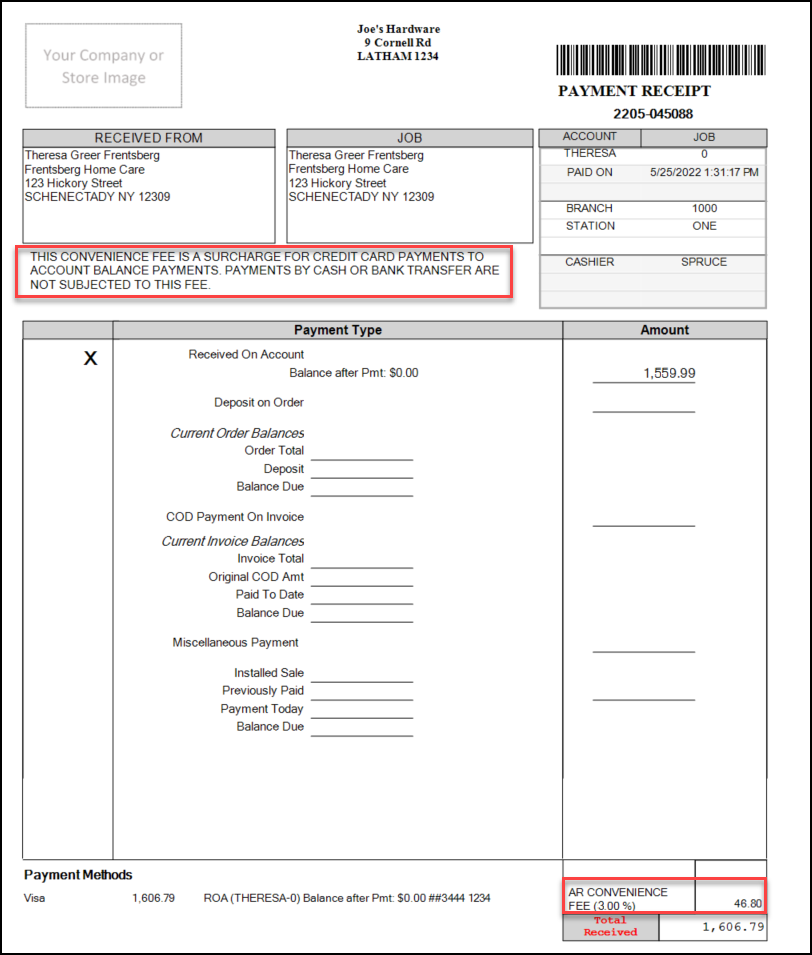
Invoice Document with Convenience Fee Message and Entry Highlighted
B-94102 – When you complete a transaction with a convenience fee, the application updates the appropriate general ledger account for the End of Day report and the EOD Cashier’s Report. Convenience fees display as separate line items.
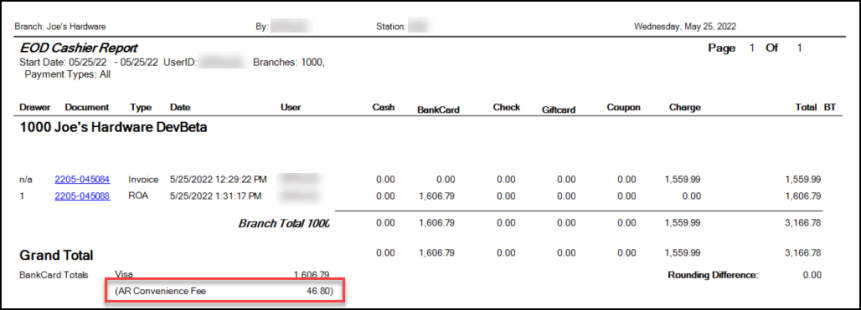
Convenience Fee on EOD Cashier Report
Processing a Convenience Fee using ProLink
B-100108 – You can also use ProLink to apply convenience fees to accounts with balance forward settings. No additional configuration is required for this to work on ProLink.
To process a payment with a convenience fee for a customer in ProLink:
1. Log into ProLink and access an account with a balance forward amount.
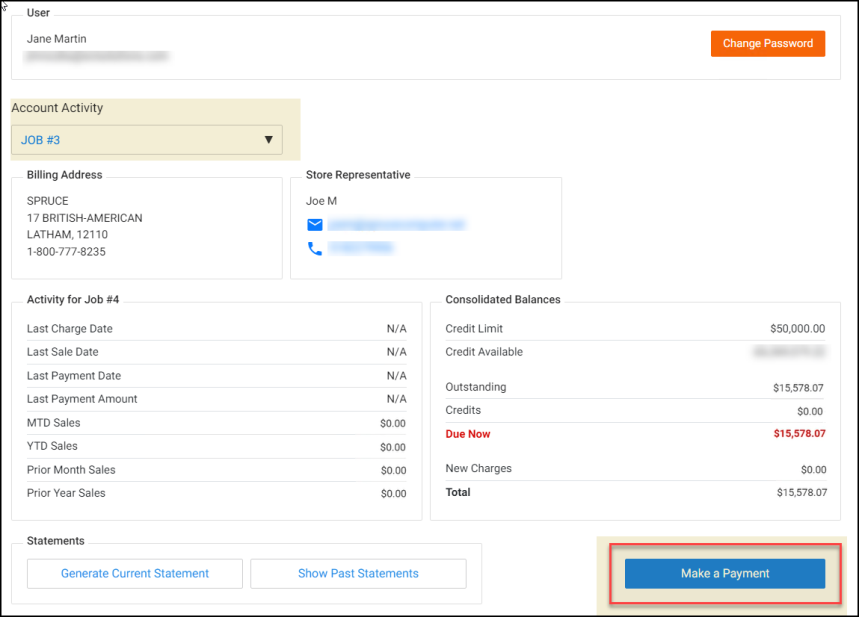
ProLink with Account Activity to be Paid
2. Select Make a Payment. The Make a Payment page displays.
3. Enter a credit card payment amount (such as 45) and the Convenience Fee amount displays (updating the total).
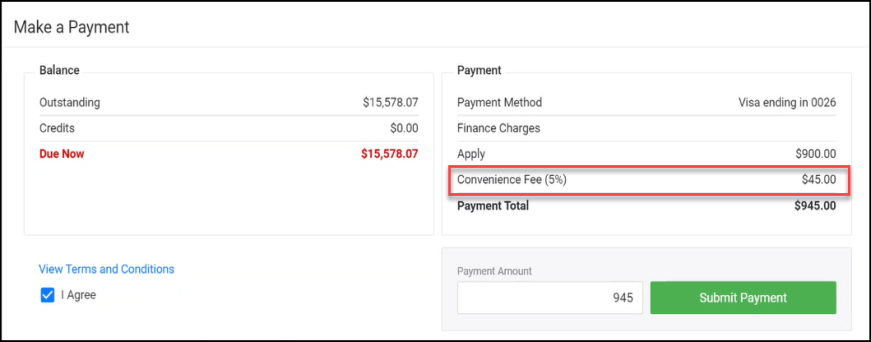
ProLink – Make a Payment with Convenience Fee Highlighted
4. Select Submit Payment. The confirmation message displays confirming the Payment total amount was made.
You can also see the Convenience Fee applied to a specific invoice if the customer wants to pay that way.
To see the convenience fee applied to a specific invoice in ProLink:
1. Login to ProLink with the same account as above.
2. Select the Select Invoices button to display the list of open invoices.
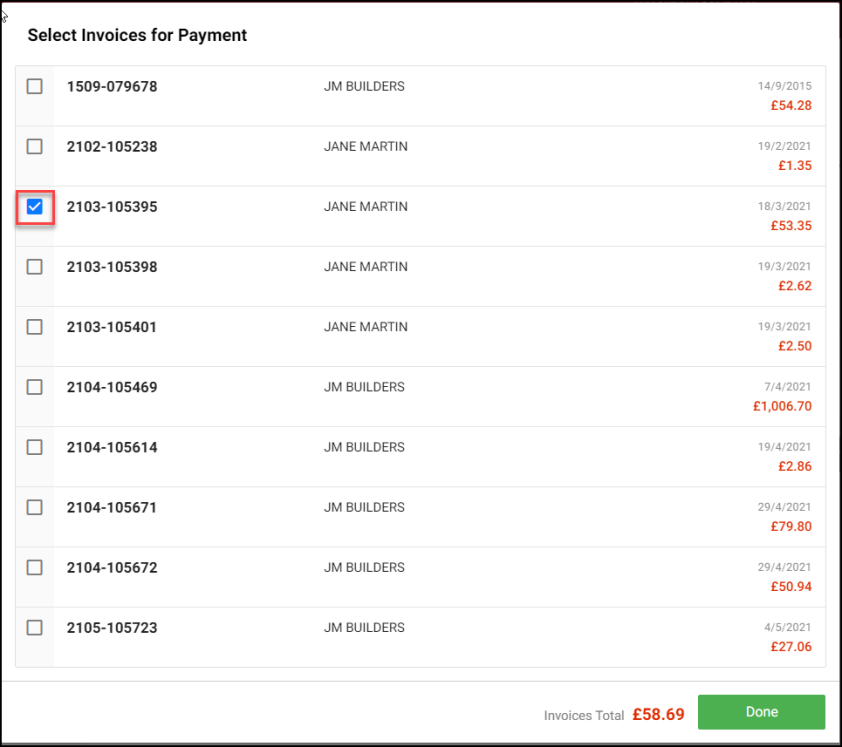
ProLink – List of Open Invoices
3. Select the check box beside the invoice you want to pay and choose Done. The Make a Payment page displays.
4. Enter a credit card payment amount for the full amount and the convenience fee field updates.
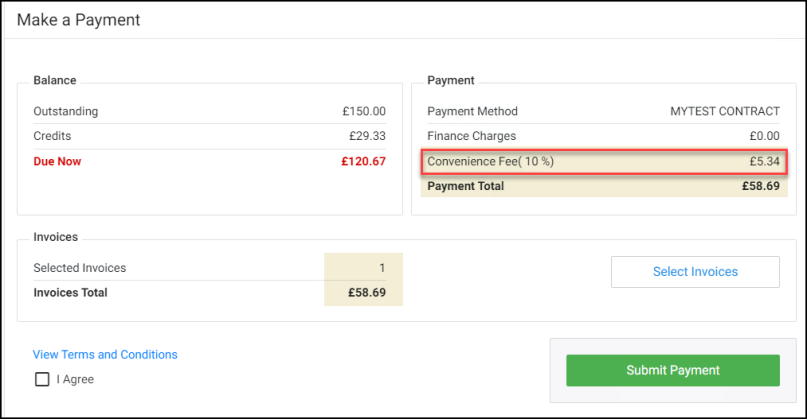
ProLink – Make a Payment with Convenience Fee Amount Highlighted
5. Select Submit Payment to complete the transaction. A message displays confirming the transaction amount.
Importing E-Commerce Payments and Applying Convenience Fee
B-94100, B-94101 – When you import a customer’s on-line purchase, you can apply a convenience fee for using a credit card. You can select the account in ProLink to make the payment request as well.
To import an e-commerce payment:
1. From the Main Menu, go to Point of Sale > Payments > Receive on Account to display the Accept Payment form.
2. In the Account Name field, choose the account you want to process the payment for.
3. Select Import (F2) and choose the E-Commerce option.
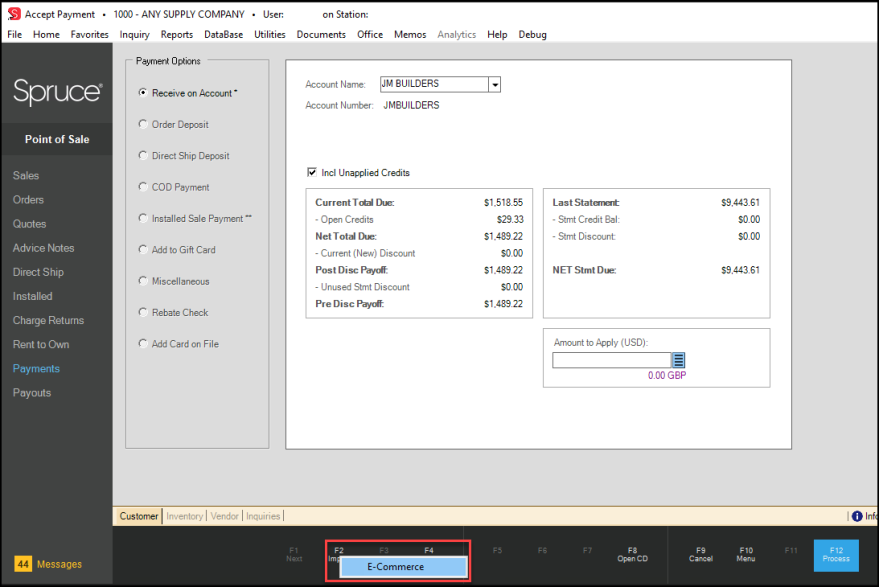
Accept Payment Form with Import E-Commerce Option Highlighted
The Import E-Commerce Payment box displays.
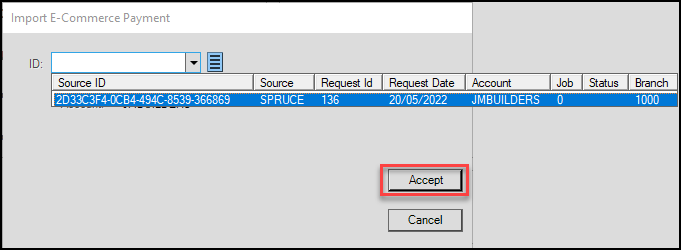
Import E-Commerce Payment Box
4. Select the payment ID from the list and select Accept.
The application adds the payment amount in the Amount to Apply field. The entered amount is read-only.
5. Select Process (F12) to process the payment. The Process Payment Document box displays.
The application applies the convenience fee automatically based on the e-commerce record.
Process Payment Document with Convenience Fee Applied Automatically
6. Select Finish (F12) to complete the transaction.
When you review the convenience fees in your general ledger accounts, you notice that they display like this:
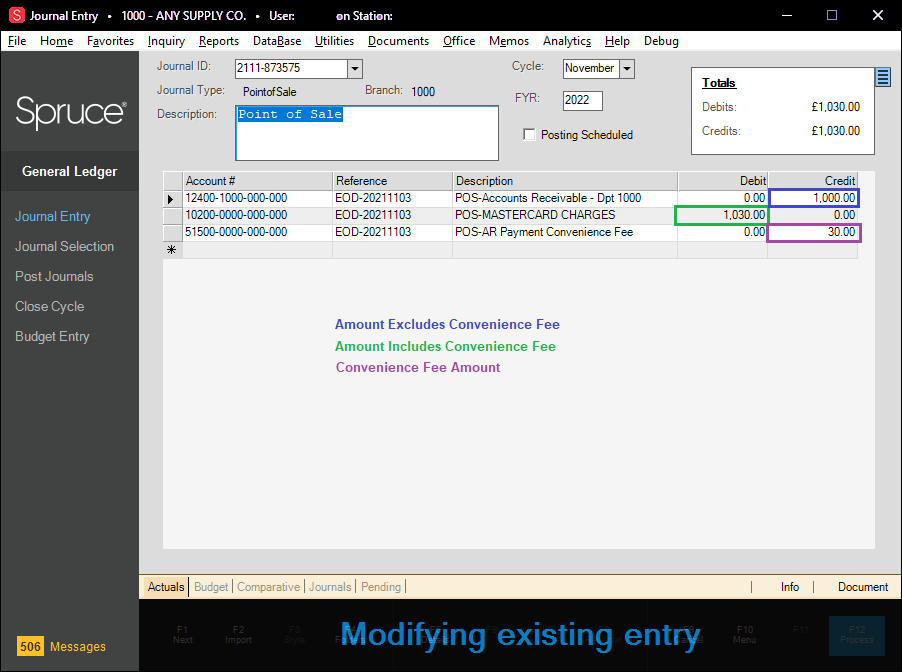
Journal Entry Form with Convenience Fee Mapping Shown