Merge/Rename Item Utility
Using the Merge/Rename Item utility, you can merge two existing inventory items together (eliminating one item) or you can rename an existing item (and change the SKU). There are some significant differences between these two operations as well as some limitations to both.
When you rename an item, the item retains most data (history) associated with the item and updates the original item's data to a new item identifier (SKU).
When you merge two items, the application combines only selected data for the "from" item with another existing item. Far less data is updated when doing a merge. Merges are more complex and limited because they can involve unit of measure differences, must guard against the duplication of records, and must combine existing data together.
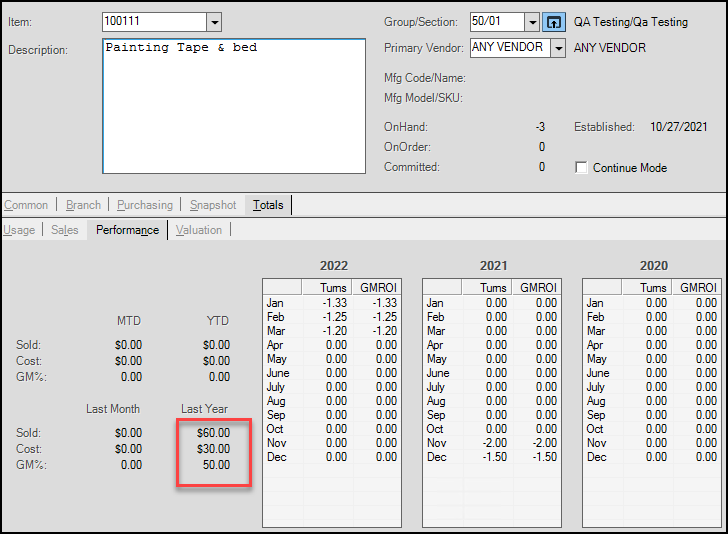
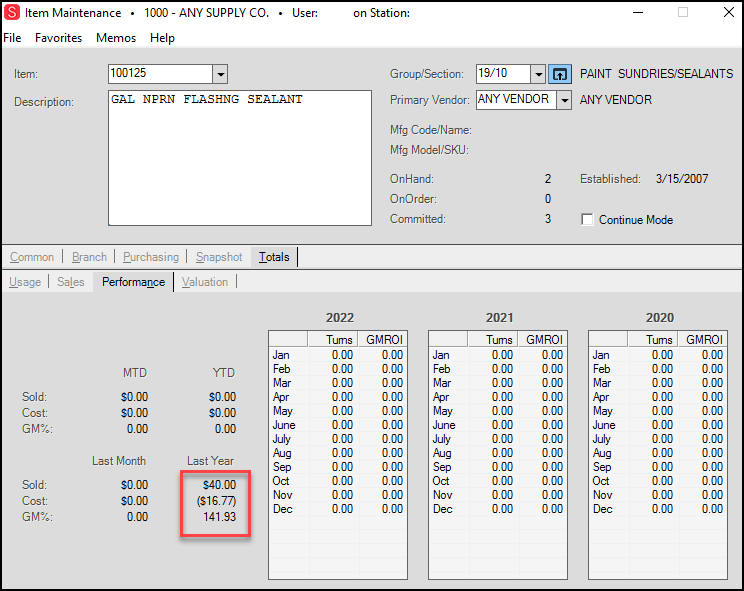
Note: For merged items, we cannot show the turn and GMROI data for both items, but we can show the combined year over year values for the merged item.
Considerations before merging or renaming
Before merging or renaming items, it's best to keep in mind that altering data such as items, particularly commonly used items, during business hours may cause issues for some or even most users. When you merge or rename items while they may be actively used in transactions, you can potentially cause either errors or processing delays. For these reasons, it's best to rename or merge items when you can be sure that no other activity is taking place. It's also important to be careful so that an accidental merge is not performed due to an entry error. There is no undo for item merges, so if the wrong items are merged, there will be no way to separate the items back to the original item records.
Merging Items
After you decided whether to merge or rename an item, the process for completing this work is very similar.
When merging, you are specifying two existing items. We refer to these as the "from" and "to" items. After the merge is complete (processed), the application removes the "from" item from inventory and some, but not all, data associated with the "from" item is either deleted, updated to match, or combined with the "to" item. Certain data referencing the "from" item is not updated when you merge items together. Other data is consolidated summarize the "from" item's activity using new records and the detailed history is either removed or left unchanged.
In the Folders (F4) for the merged item, the history and information for both items displays, not just the "Merge From Item." If any item information is displayed on the right area of the folder tabs, it indicates that an existing item has been entered (meaning a merge is assumed).
When merging existing items together, it's possible to define the numeric relationship between the two items' BASE unit of measure values. The default relationship is one to one (1:1). If the unit of measurement values between the two items are different, we recommend that you change the relationship before processing; however, make sure the numeric relationship is correct. There is no "undo" if you make a mistake.
The "to" item's settings and pricing structure remain unchanged after the merge; however, quantities and most totals are combined together. Certain current data referencing the "from" item is also updated to instead reference the "to" item when necessary; however, to reiterate, this does not include all data. Merging always permanently removes some information regarding the "from" item.
|
"Depending upon the situation, it may not always be best to merge items." |
In summary, you should not expect to have access to all the information about the "from" item once the merge has been processed, and depending upon the situation, it may not always be best to merge items. If you need to retain all the information about an item, consider disabling the existing item and creating a new item for future use instead.
UPDATE: For merged items, we cannot show the turn and GMROI data for both items, but we can show the combined year over year values for the merged item.
Merge Totals Example:

Renaming Items
When you rename an item, you choose the existing item to be renamed in the "Merge from Item" text box. The new SKU or item number is entered in the "Merge To/Rename Item" text box (on the right-hand side of the form). Most, if not all, item details are updated in the data when processing a rename.
UPDATED: When you rename an item, we append the records so when you access the Item Maintenance form for a renamed item and select the Totals > Performance tabs, the GMROI and turn history information for these items still display.
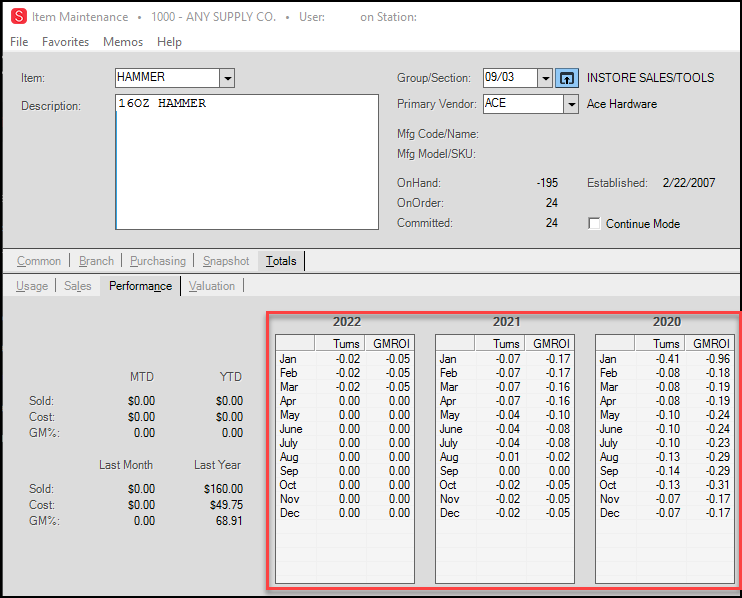
Rename Item (Before)
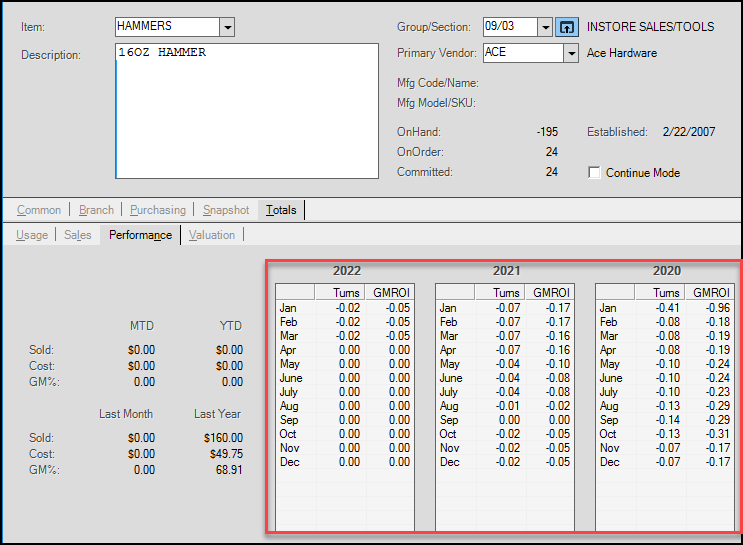
Rename Item (After)
Merging and Renaming Items (Process)
Do It Best BOPIS Note: If you are merging, deleting, or renaming items that have the Ecommerce tab Buy Online Pickup In-Store enabled, disable this check box for these items first and wait (five or 10 minutes) for the EDI update to complete before you follow these instructions. If you do not take these steps, errors result. After the update is complete, re-enable the Buy Online Pickup In-Store check box for the item(s) you are going to change and return here to begin this process. The application will update the Do It Best BOPIS records you modify through the normal EDI process after the merge/renaming is complete.
To merge or rename items:
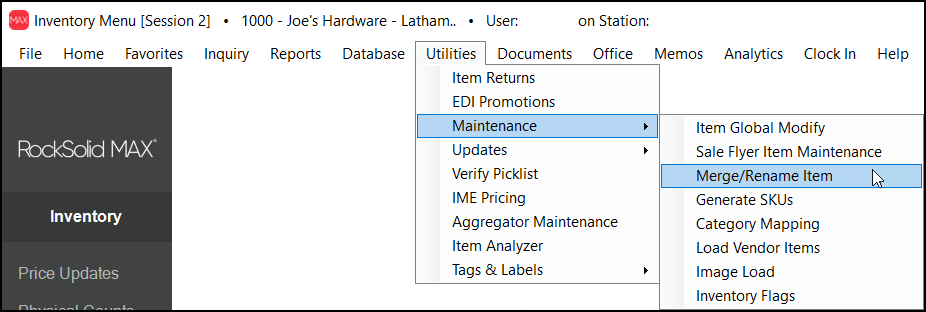
1. From the Main Menu choose Inventory > Utilities > Maintenance > Merge/Rename Item to display the Merge Rename Item form.
2. In the Merge from Item list, enter or find the item you want to merge or rename.
3. In the Merge to/Rename Item list, do one of the following:
-
To merge two items, enter or find the item you want to merge the selected item with in the Merge to/Rename Item field..
-
To rename the item you specified, enter the new name in the Merge to/Rename Item field.
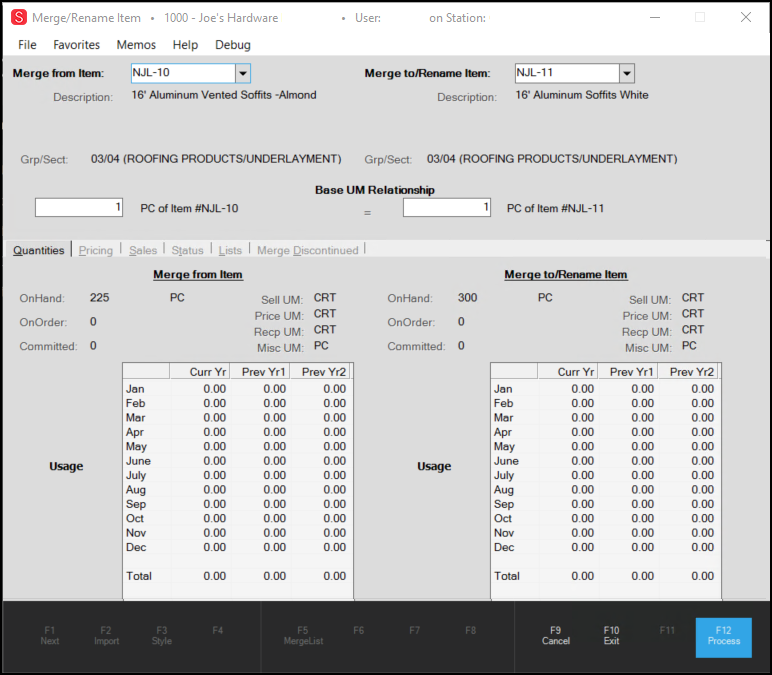
Merge/Rename Item Form with Merge Entries
Note: The application distinguishes between a "merge" and "rename" based upon whether the "to" item already exists. If a matching item exists in inventory , the program assumes that you want to merge the two items. If the "merge-to/re-name item" you choose does not exist, the program assumes you want to re-name the existing item.
4. Review the Base UM Relationship settings to ensure they are compatible.
If you are merging two items, we recommend that you manage the base UM settings so that they match before you begin this process.
5. Choose Process (F12) to merge or rename the item(s) as specified.
Note: If you are processing a merge or renaming an item that is in an Open Ticket (Advice Note) this type of message displays:
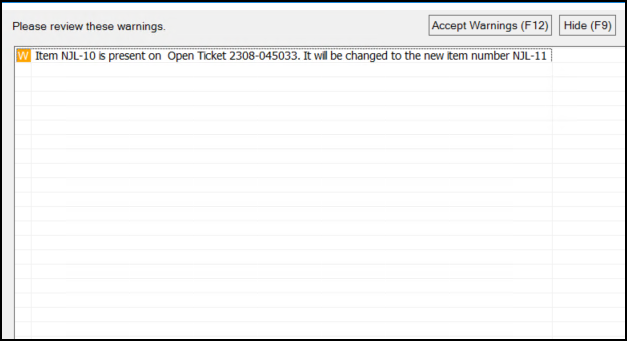
6. To accept the warning (and change the Item name in the open ticket/advice note to the new entry), choose Accept Warnings (F12). To return to the transaction without making this change, choose Hide (F9).
After you accept the warning, a confirmation message displays to tell you which operation is being performed.
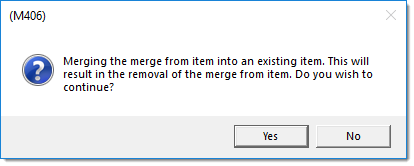
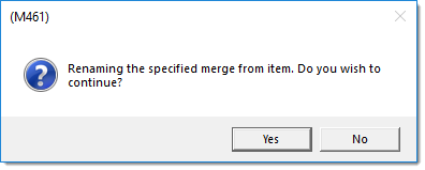
7. Do one of the following:
-
To confirm the merge or rename process, choose Yes.
-
To go back and make changes to the merge or rename items, choose No.
After you confirm, you may be prompted to choose the branches that this change affects.
8. From the Branch List, choose the branches that this change affects and click Accept.
Important: This is your last opportunity to cancel the merge or rename prior to attempting to process. If the "from" item exists in more than one branch location and is not merged in all the locations in which it exists, both the common item record as well as any branch records for the locations that were not included will remain. In this case, the merge "from" item is not completely removed and can easily be re-added to the branches it was merged out of (doing so would not replace any merged history or undo changes caused by the merge for those locations, however).
When you click Accept, the Status tab of the Merge/Rename record displays to show the status of the merge or rename in the branches you specified.
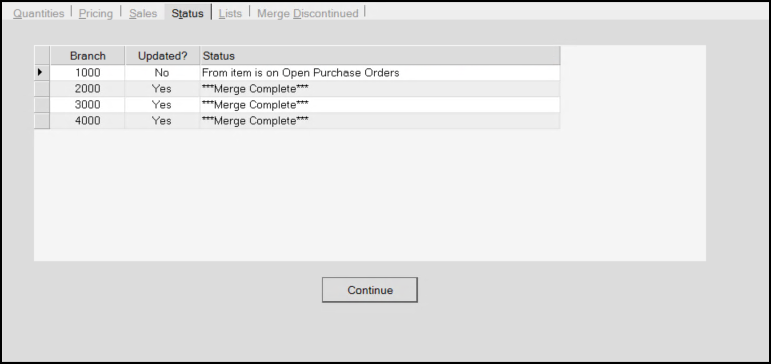
9. Choose Continue to complete the process.
Processing Item Merges and Renamed Items
After you choose Continue, the application processes the merge or rename by following many additional steps. There are hundreds of different data tables used by the application. Currently, there are 43 tables that directly reference "item" data and others that do so indirectly (using XML data, for example).
Before actually processing a merge or rename, the software checks certain areas for activity regarding the "from" item. When the merge cannot process due to certain predefined reasons, a task list appears. If any issues occur during the merge preventing proper completion, applied changes are rolled back (undone) and the "status" tab indicates the reason the merge could not complete.
Pre-processing Checks
The following conditions are checked prior to processing. Most have a severity level of "error" if encountered. If any of these conditions are met, a task list is presented and any errors will prevent the merge from being processed until they have been resolved:
•Item may not be deleted/merged - set as generic SKU for SO items.
•Vendor MISC not found - required for merge of this item.
•From Item is present on unexpired contracts.*
•From Item is contained in unapplied price update(s).
•From Item is contained in unapplied price level update(s).
•From Item is contained in unapplied sale pricing update(s).
•The Merge From Item is linked with one or more Material Lists and cannot be merged at this time.
•From Item is marked for Physical Inventory in progress.
•From Item is contained in open rentals.
*Users can choose to ignore task list items that have a severity level of "warning;" however, the reason the warning appears is because the data won't be updated if the rename or merge is processed. This won't cause errors, but the data (contract pricing, in this case) won't be updated to match the new item.
If the task list either doesn't appear or allows you to continue (when you click Accept on warnings), one or more confirmation prompts appear next. This indicates whether a "merge" or "rename" is being done just to make sure the user is informed about which operation is being conducted.
In limited cases, the following prompt ("Is this a continuation of a prior item rename?") may appear:
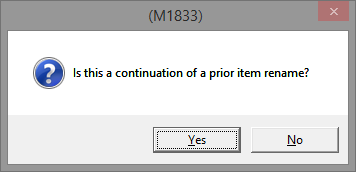
This indicates that the "merge-to" item doesn't exist in the current branch but does in other locations. The software is not able to tell whether this situation is due to a prior "rename" that encountered branch errors or when the user is merging to an item that doesn't exist in the current branch but does exist in other locations. Only answer "Yes" if you are attempting to rename the item; otherwise, answer "No" if you are merging to an item that doesn't exist in the current branch location.
Checks during Processing
For programming and efficiency reasons, some types of data checks aren't done until the merge actually begins processing. This prevents the software from having to access the same data more than is necessary. Most issues from this stage forward are reported via the Status folder tab. Processing will abort at the first occurrence of a problem. You may have to process more than a few times if there are multiple errors to resolve. Here is a list of reasons why a merge might fail during processing:
•The "from" item was not found at one or more branch locations.
•The "from" item has a negative on-hand.
•Un-billed inventory receipts exist for the "from" item.
•The "from" Item is on Transfer(s) In or Out which have not yet been received.
When the item is a special order ("renumbered" type item), the following additional checks are done in addition to the checks shown above:
•From Item is on Open Tickets
•From Item is on Open Customer Orders or Direct Ship Orders.
•From Item is on Open Customer Quotes (merges are allowed when the Quantity Remaining = 0 and document is "closed")*
•From Item is on E-Commerce Orders or Quotes requests.
•From Item is on Open Purchase Orders
*Quotes have both a close after date and an expiration date. The expiration date is not considered. Only items linked with closed quotes would allow merging.
Processing Details for Rename and Merge Events
Rename processing is a bit simpler than processing for a merge because no conversion of quantities or cost accounting is necessary, so we will discuss the steps in a rename first.
Renaming an existing item creates a new item and then copies the "from" item's information to the new record. The application copies all the data from the original item except for the item number and branch ID. These are set to match the "to" item and the branch being updated. The old SKU is added as an "Alternate SKU" for the new item. This allows youto type in the old code and automatically select the new item. If you don't want this to occur, you can modify the item after processing and remove the Alternate SKU.
-
The application runs a procedure to update occurrences of the original item in various data tables to the new item SKU. The following tables are updated as needed:
✓Attachments
✓ContractPricing
✓HH_PhysCntsSessDtl (Hand Held Physical Count Sessions)
✓InvoicesDtl (Invoice Details)
✓InvoicesDtl (Updates Linked SO Item when Applicable)
✓InvReceiptDetails
✓InvReceiptDetails (Updates Linked SO Item when Applicable)
✓ItemCorrectionsDtl (Item Cost Corrections)
✓MobilePOSDtl (Mobile Point of Sale Details)
✓OrdersDtl (Includes Customer Orders, Quotes, Work Orders, and Direct Orders)
✓PhysCountPostingDtl (Physical Inventory Counts Posting)
✓PhysicalCountsDtl (Physical Inventory Counts Entry)
✓PriceLevelsUnApplied
✓PriceUpdatesDtl
✓PurchaseOrderDetails (Both the item and any vendor items are modified to the new SKU)
✓QuantityAdjustDtl (Quantity Adjustments and Cutting)
✓Rental
✓SalePriceUnapplied
✓SalePriceUpdatesDtl
✓SerialNumbers
✓TransfersDtl
✓VendorCatalog (Substitute Items Only)
✓VendorQuoteDtl (All item references including vendor item are updated to match the new item SKU).
✓WAVCostAdjDtl
✓WorkOrderDtl
✓WorkOrderDtlMaterials
✓WSWholesalerIDs (Changes the Template Item if Renamed)
✓InvQuantities
✓InvQuantityLinks
✓InventoryStore (Updates Renumbered SKUs if renaming a linked SO Item)
✓ItemReturns
Some other tables (not listed above) are also updated automatically due to data relationships defined between the tables in the SQL database. This includes vendor items (VendorItems), barcode lookup (BarcodeLookupCommon), EDI details for Payables (APEDIInvoiceDtl), Stock Value (StockValue), Keyword Lookup (KeyWordLookupCommon), SKU Lookup (SKULookupCommon), and Inventory Common (InventoryCommon).
After a rename has completed updating as described above, one final step is done. Some "item" references are included in XML (Extensible Markup Language) format instead of as separate fields in database tables. This final step updates the XML data used for material list items. Only a "rename" currently updates XML for material lists due to the possibility of unit of measure differences when merging.
Merging two items requires similar processes that run in the same order as listed below:
-
The following quantities recorded for the "from" item are adjusted to match the "to" item's BASE measure (if a 1:1 relationship was not indicated) and added to the "to" item's quantities:
Current Month-to-Date Transfers In
Current Month-to-Date Transfers Out
Current Year-to-Date Transfers In
Current Year-to-Date Transfers Out
Current Previous Month Transfers In
Current Previous Month Transfers Out
Current Previous Year Transfers In
Current Previous Year Transfers Out
-
If the "from" item's on-hand is not zero, a new "closed" receipt record is generated for the "to" item. This uses the vendor "MISC" and is used to update the "to" item's on-hand and weighted average cost. This step also updates the "to" item's last receipt date. A quantity adjustment is also created to offset the accrual account entry generated by the receipt.
-
Next, stock valuation records are updated. Stock valuation records maintain various quantities, usage, sales, cost of sales, and promotional sales information for inventory items. These are maintained as monthly and daily totals. All detailed records regarding the "from" item are appended to the current record(s) for the "to" item. After these quantities and sales records are combined, the "from" item's records are removed.
-
When the "from" item is a special order SKU used for generating renumbered items, we update the renumbered or resale items created from that SKU to reference the new (to) item. The renumbered and resale items will be updated to reference the new "to" item as their "original" or "base" SKU. Note: the renumbered SKU is not being changed in this specific case, just the "origin" item that the renumbered SKU was linked with is changed. This is done for the purposes of future SO merging (so that the items are able to merge due to the change applied to the "base" SKU they were generated from). This step also updates items on "open tickets" or "advice notes" which are essentially invoices that have not yet had payment processed for them.
-
Existing customer order records containing the "from" item are now updated to reference the "to" item. This includes regular customer orders as well as quotes and direct orders (all are maintained in the same table of data). As mentioned in the "Checks during Processing" section above, a merge is not allowed if the "from" item is linked to any "renumbered" type items on orders (as the originating item for the renumbered SKU). Generated items (resale and/or renumbered) types can be merged back into their origin item after activity on the item has ceased. This is a separate procedure, optional, and done automatically if enabled after a set number of inactive days (based upon an inventory parameter).
-
Next, existing purchase orders are updated changing all occurrences of the "from" item to match the "to" item SKU. If the "from" item exists on open purchase orders, it's important to point out that only the item is updated. We don't update quantities, units of measure, or vendor item information to match the new item. Manual modifications may be either necessary or desirable in some cases.
-
After the above detail merges have been completed, a procedure is run to verify item quantities against the updated data to make sure that committed, on-order, POQDue, and COQDue quantities for the "to" item are correct.
-
The "from" item's SKU is added as an "Alternate SKU" for the "to" item. This allows users to type in the "from" code and automatically select the item it was merged with. If you don't want this to occur, modify the item after processing and remove the Alternate SKU.
-
The "from" item is deleted as the final merge step.
What Merge Processing Does Not Do
It's just as important to mention what merge processing doesn't do. Merges leave most existing item history untouched. The following data is either not updated or is removed/deleted for the "from" item as a result of a merge:
•Detailed Quantity Tracking Records
•Receipt Details
•Vendor Item Information linked with the Item
•Item Returns*
•Expired or Applied Sale Pricing and Price Updates*
•Average Cost Adjustment Records
•Quantity Adjustment Details
•Transfer Details*
•Physical Count Details**
•Vendor Quotes
*Open transactions for these types produce errors prior to processing, so only closed or processed transactions are affected.
**Merged items will still be visible on existing Physical Count documents and won't be updated to match the "to" item. Items that no longer exist when posting counts are ignored. No warnings or messages are provided if the "from" item has unposted counts, so it's best to not merge items when performing physical inventory.
For merges, users should assume that any type of data that is not specifically mentioned here as being updated is not updated by a merge. Because the "from" item will no longer exist after a merge, most inquiries and many reports will no longer reference or allow selection of the original item.
|
Physical Counts and Merges Once initialized or any count is saved for an item, we begin tracking all changes to on-hand as a separate adjustment quantity value for the item (PIAdjustQty). We assume a controlled count environment (meaning your business is closed or you have sectioned off the area being counted) when the product is being counted and therefore also assume that any on-hand changes (receipts, sales, etc.) are occurring after the count has been taken. For this reason, if you merge an existing item into one that in the process of physical inventory, the adjustment quantity will be incremented by the "from" item's on-hand. This adjustment is applied at time of posting. It may not be obvious when processing a merge that an item is the process of being counted, especially since counting is done by branch, so this adjustment may not always be expected. It's best to only merge items when physical counts are not being done for this reason. We do prevent merging from an item with active counts, but not to an item that's being counted. |
Merging to Modify an Item's Base Unit of Measure
Merges can be used as a method for changing an item's base unit of measure. Normally, once an item has been added, the item's base unit of measure cannot be modified directly. This is done to make sure that the relationships between the item's other units of measure are maintained properly. If an item's base unit of measure does need changing, there is a way around this limitation, however. It's best to do the following while the item in question is not in use.
•Re-name the existing item temporarily.
•Create a new item with the same item number as the original. It's easiest if the re-named item is used as a template (F5). Modify the base unit of measure before saving the replacement item.
•Merge the re-named item into the new SKU and enter the proper numeric relationship between the original and new base unit of measures.
Note: the same caution and rules apply as any merge, so item information may still be condensed or removed when merging. Since you are renaming the item back to the original SKU, some of the original item history will still be accessible after the merge; however, this will not include everything.
Folders
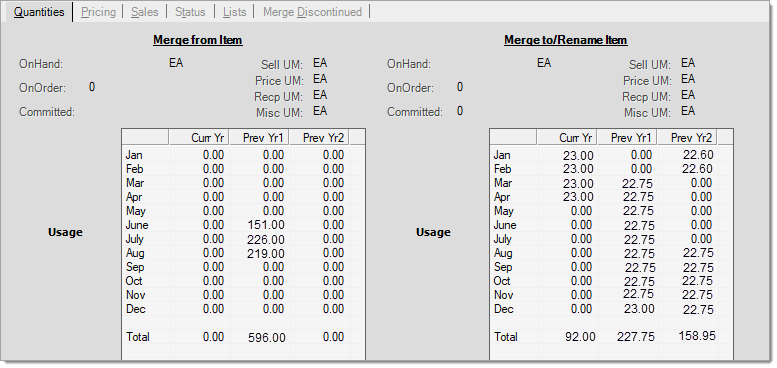
There are 4 folders containing reference information about both items (when available): quantities, pricing, sales, and status. When performing a re-name, only the origin item will have data associated with it, so nothing will appear for the "re-name" code. During entry and prior to processing a merge, information displays for both items, side-by-side in the folders. After merging, applicable figures will be combined together. Item settings remain unchanged on the "merge to" item (except that a new Alternate SKU is added). The "merge from" item settings are not retained.
If you'd like to retain any of the information regarding items involved in a merge, consider screen printing the folder information prior to processing or using reports.
Quantities (Alt-Q) Tab
The quantities tab lists the on-hand, on-order, and committed quantities for both items when applicable. Unit of measure descriptions are listed as well as the past 3 years of usage for the 2 items (if merging). Items with an on-hand less than zero may not be merged. Usage and quantities will only display for the "merge from" item when doing a "re-name."
Pricing (Alt-P) Tab
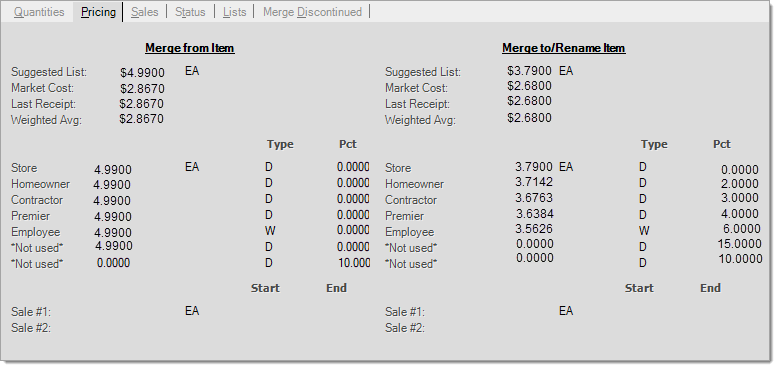
The pricing tab shows pricing such as the suggested list, market cost, last receipt, and weighted average for each item when applicable. Level pricing is displayed as well as each item's sale pricing (if any). Only the "merge to" item's pricing structure is maintained after merging 2 items. If a re-name is being done, only the "merge from" item will display any pricing.
Sales (Alt-S) Tab
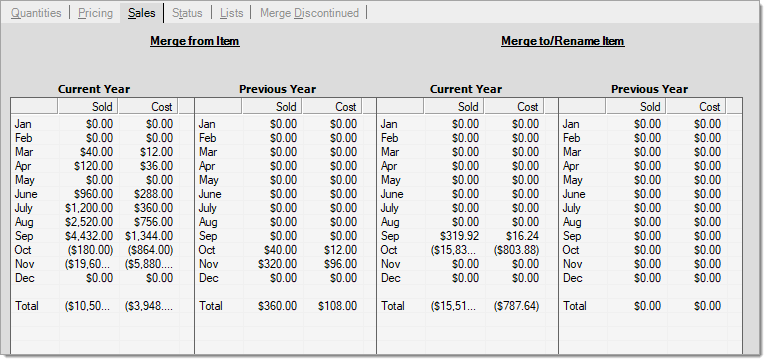
The sales tab shows monthly sales and cost of sales history for the current and prior year for both the "merge from item" and "merge to/rename item" (when applicable). Sales and cost of sales history is combined when a merge is processed. If a re-name is being done, only the "merge from" item will display sales history.
Status (Alt-T) Tab
The status tab lists the results of merge processing. Each branch included in the merge is listed with a separate status. If processing cannot complete, only the first problem encountered is reported. This usually indicates an area where data exists involving the "from" item that must be resolved before the merge can be allowed to process. Certain data checks are only conducted during processing.
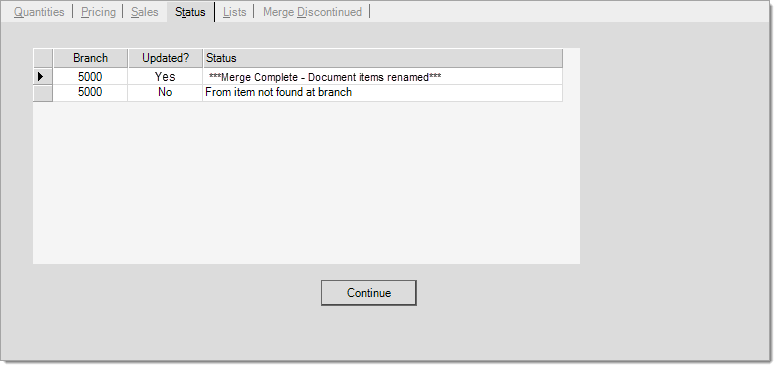
The Continue button clears/resets the form so that another merge or rename can be processed. Note: the "Merged?" column heading is used for both "merges" and "rename" processing. A "yes" in this column means that the merge or rename was successful for the branch location indicated on that row; otherwise, a "no" means that either the item was not found or there was some other issue that prevented processing.
List (Alt-L) Tab
The "List" tab can be used to process a list of items at a time you designate (in the upper area of the form). The intent behind this option is that a user would create a list of items to merge and/or rename and then process the list during off-hours (usually after leaving work for the day). Before continuing, here are a few important points about merge/rename lists:
-
There is one shared merge list. The list is not user or branch specific, so other users with access can simultaneously remove or append the list.
-
The list always processes for ALL branch locations.
When a merge/rename list exists and has not yet been processed, fields are provided so that you can specify a time of day for running the merge. These fields will only show once you have appended at least one item to the list. Specify the hour and minute the merge should begin once you select Merge List (F5) function. User assigned application time-outs won't prevent the merge from processing since the timer (see below) keeps the application active.
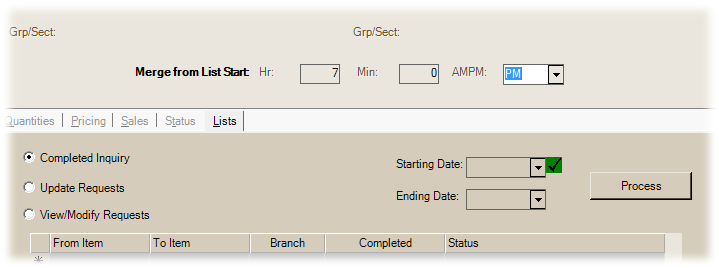
Merge from List Start (Start Time)
A list of merge/rename items can be manually entered here or imported from another source (such as a spreadsheet, etc.). The list is processed in a similar to fashion as manual merges and renames (one merge/rename at a time), and the same exclusions and conditions apply.
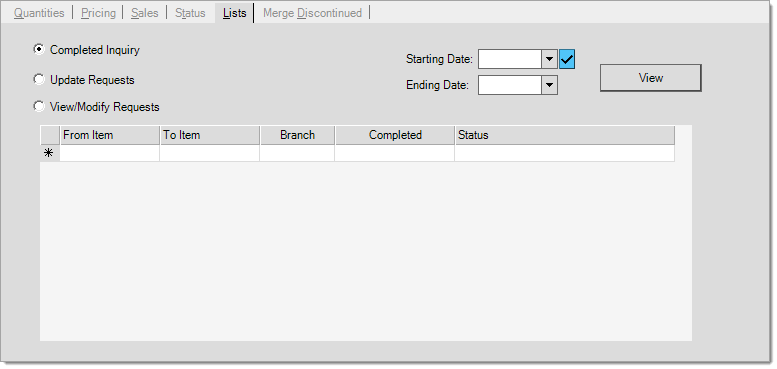
There are three (3) radio button options on the Lists folder tab: Completed Inquiry, Update Requests, and View/Modify Requests.
Completed Inquiry
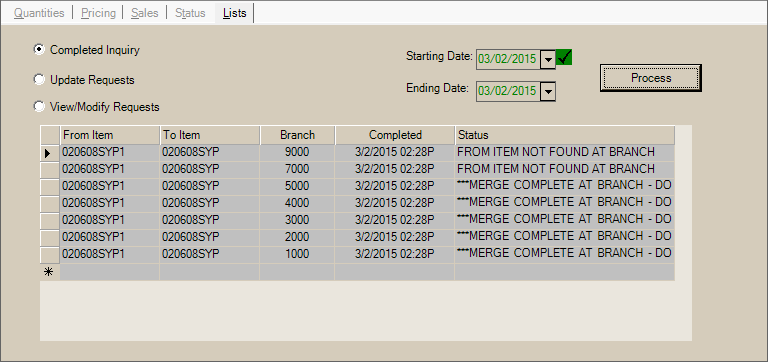
This option provides a date-based log of merge/rename activity. Choose a date, range, or select a preset and then choose Process (F12) to populate the log's data grid. The "completed" column indicates the time the merge or rename was successful. The "status" column indicates details regarding any errors encountered. You can click in the status cell to view the complete message.
Update Requests
This option can be used to append the existing list with new items to or to replace the list with new items. The distinction between the "update requests" and "view/modify requests" options is that "update requests" does not show any items that have previously been added. Use the "view/modify requests" option to see all active list items.
View/Modify Requests
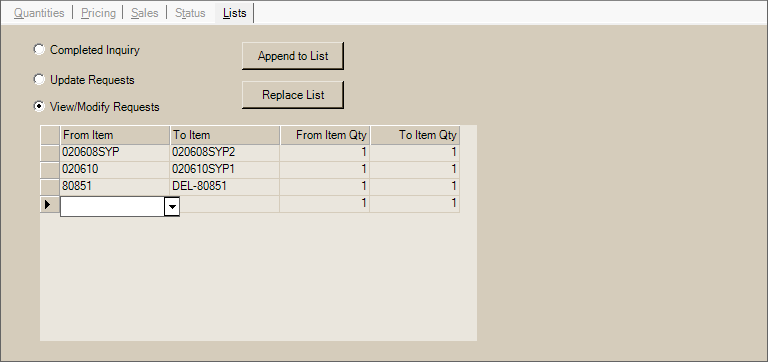
This option provides a listing of all items currently active in the list. Changes and additions can be made to the list by using the "Append to List" or "Replace List" buttons. In order for items to be "saved" with the list, you must use one button or the other. In order to not conflict with other users, it's safer to use the "append" button which won't remove any other list items that may have been subsequently added by others. "From" and "to" quantities use BASE measures only.
View/Modify Requests
Processing a Merge List
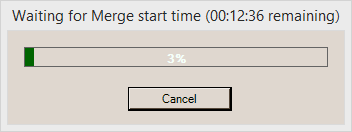
Processing a merge list involves choosing a time of day that you want the list to begin processing (current only). Once the time is specified, you can choose Merge List (F5) and a timer is started that waits until the designated time before it begins processing. A progress bar is shown that counts down the time remaining until the merge will process. The user can choose "Cancel" to stop the timer and prevent the merge/rename operation from continuing. Canceling may not be immediate (processing occasionally pauses for input) and the utilities form is placed in a read-only state until the operation is canceled or completes.
Waiting for Merge start time...
Merge Discontinued Tab
This option allows you to merge items that were discontinued by a vendor into their indicated replacements. This feature was added for use with True Value Company, but can be used with other vendors if their catalog updates set the discontinued flag, discontinued date(s), and have indicated a replacement item. Only inventory items that have not previously been disabled will be included. In addition, if the discontinued flag is not set, the discontinued date or "to be" discontinued dates in the catalog must be equal to or less than the current date. Discontinued "reason" codes only apply to True Value Company currently. Other vendors will report a reason of either "unknown" or "not specified."
To begin, select the vendor you want to merge discontinued items for. The data grid will be populated automatically after vendor selection if there are eligible items.
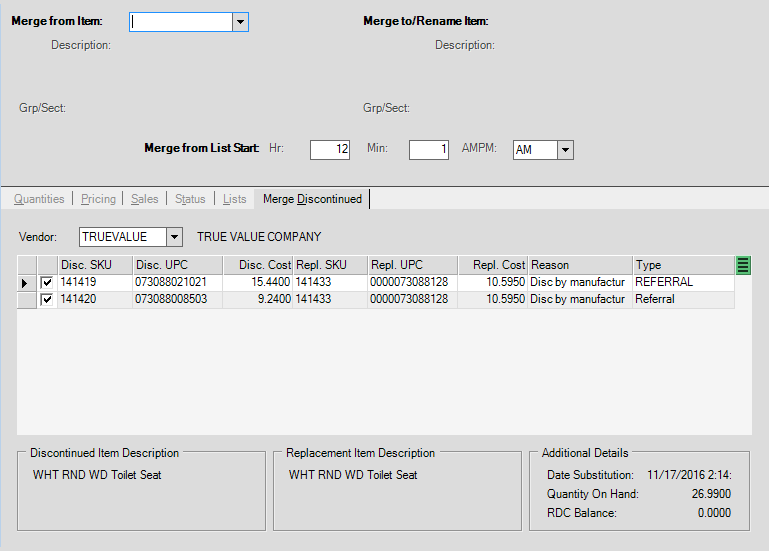
Merge Discontinued
Use the menu marker's context menu to select all or clear all selections or individually select the records you want to process (by checking the check boxes in the second column).
Once you are ready to process the merge list of discontinued items, enter a start hour (Hr), minute (Min), and select either AM or PM from the Merge from List Start section above the folders, and choose Merge List (F5).
A count-down timer will display until the merge list time is reached. We suggest merging items off-hours to ensure that the items are not in use.
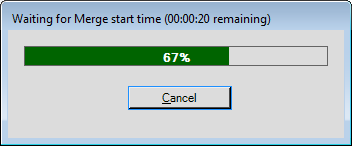
Waiting for Merge start time...
After the merge has completed, the items are added to a "merge completed items" table. The substitute replacement report or custom reports can be used to view them.
