Import (F2) Wizard (Inventory)
The Item Maintenance Import Wizard allows you to either create new inventory items or update existing items using data from a file created outside the software (typically, a spreadsheet, delimited file, etc.). Using the Wizard is similar throughout the application; however, the fields and requirements are different.
|
Microsoft® Access Database Engine 2010 Your computer must have the proper OLEDB drivers to open Excel and certain other Microsoft Office® files. Should you receive an error attempting to open Office files, download the appropriate Microsoft OLEDB Drivers for your system. |
Creating an Inventory File to Import
Begin by preparing the data file that includes the items you want to add or update into Inventory. Make sure each item in the file contains the required information as specified in the Rules for Adding Inventory. This includes the following list at a minimum:
-
Base Unit of Measure
-
Group ID
-
Section ID
-
Item ID (Number)
When you are updating existing items records that are already in the inventory database, there are different Rules for Updating Inventory to follow. There is only one required entry for this type of item import:
-
Item ID (Number)
You can use a variety of Windows-based file formats for importing items. For example, you can create an import file using Microsoft® Office® Excel® or some form of delimited text file. When using delimited files, it's best to use a delimiter character that is not found in the data (do not use a character that might be found in item descriptions or other fields, for example).
Adding Inventory Items from an External File
Access to the Add Inventory and Update Inventory processes is controlled by permissions established in the User ID Maintenance form. The Update process runs using the same instructions, but the required fields is/are different.
To add a new file of item data to inventory:
1. From the Main Menu, choose Inventory > Database > Item. The Item Maintenance form displays.
2. Choose the Import (F2) key to display the context menu (as shown below).
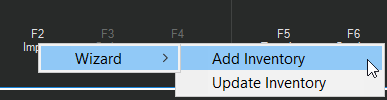
3. Choose Add Inventory. The Import From box displays.

4. At the end of the Windows File field, click the Elipsis  button and navigate to the folder that contains the inventory file you want to import. Click the file in the list and click Open. The Select Input Source box updates to reflect the selected file. One of the following displays below the Windows File:
-
The Delimited by button options display allowing you to choose the delimiter used in the file, if needed.
-
If the application can predict the delimiter, the Sheet list displays so you can select different sheets associated with the selected file.
 > Database > Item, Import (F2)")
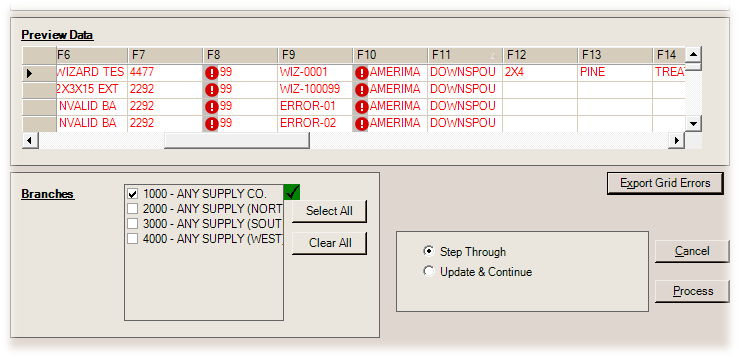
5. From the Grid Mapping box, in the Use Mapping list, choose the mapping format you want the application to use to import the items from the file. The Mapping fields display in the Grid Mapping list. The Preview Data box displays the first set of items in the file.
6. If the first row in the Preview Data box contains column headings that describe the data, select the Exclude First Row (Headers) check box in the Options list.
7. Review the column entries in the Preview Data list and find the matching fields in the Grid Mapping list.
8. In the From column of that matching row (field), enter the column ID (F1, F2, F3, etc.) from the matching Preview Data field.
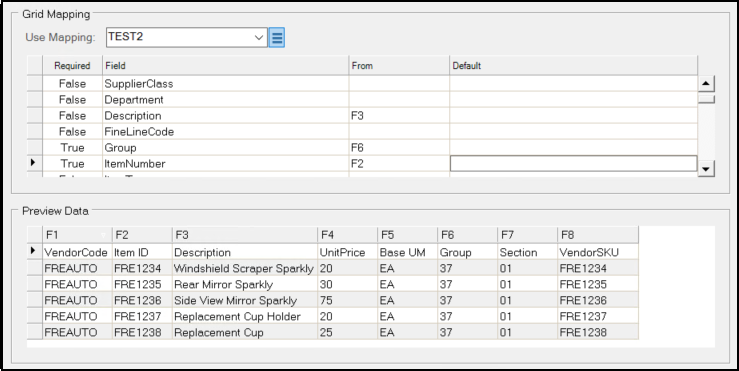
For example in the form above:
-
In the Preview Data list, the item's Description displays in the F3 column.
-
Go to the Grid Mapping list, find the Description row, and choose F3 in the From column of that row.
9. Repeat these steps for each required item entry and any additional entry until all of the file fields are mapped. The rows in the Grid Mapping list with the Required entry True must be completed to process the file.
While only a few fields are required, you can match the data you have in the file with the rows in the Grid Mapping list to more fully populate the item record.
10. For fields that are not mapped, you have some additional choices:
-
When applicable, the application you can rely on the default settings that are part of the Grid Mapping record (TEST2 in the Use Mapping list above) for any item fields that are not provided.
-
You can supply a default value (by adding a specific entry in the Default column of the Grid Mapping list), or
-
You can leave the leave both blank to use the Item Maintenance form's defaults.
Even though neither field is required, it is usually best to supply the "prevailing market cost" and/or "suggested retail" in your data... particularly when one or both settings are used to calculate price levels.
If both the From and Default values are left blank, the application applies the Item Maintenance form defaults (if any) when adding the item to your company's inventory.
10. In the Branches list, select the check boxes beside each branch you want to add the item to.
11. Now you are ready to choose how to add these items to the inventory database. Review these choices in the Choosing either Step Through or Update & Continue below.
12. Choose either the Step Through or Update & Continue button in the Import Method box and choose Process.
-
If you selected the Update & Continue option and choose Process (F12), if there are no errors, the application adds the data without highlighting other important fields that may be missing in the record. When all the items have been added to the database successfully, the message, Load Completed displays.
-
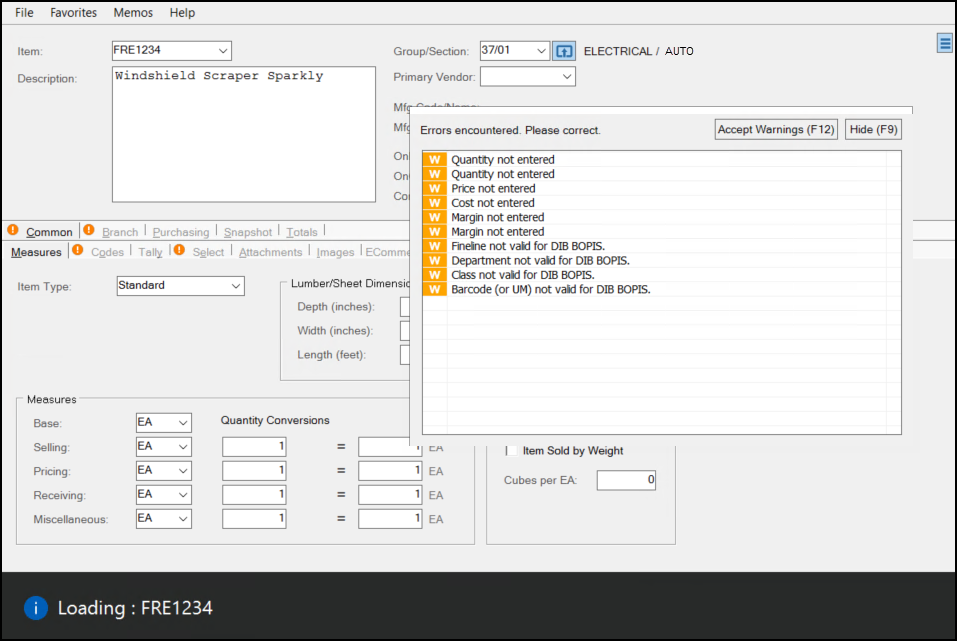
If you selected the Step Through option and choose Process (F12), if there are no errors, the application displays each new entry in the Item Maintenance form with a corresponding list of entries that are important but not required. You can either choose the Accept Warnings (F12) option and update these fields later or choose Hide (F9) and update the fields highlighted in the form right away. The application will step through each item in the list and apply this logic for each item. When each item is either skipped or updated, the message, Load Competed displays.
It's strongly suggested that you carefully review any newly added items after loading them using the wizard to ensure that they contain the settings you are expecting. There is no Undo button for this process, so if you process and add items you don't want, you need to delete them manually one-at-a-time.
Choosing either Step Through or Update & Continue
When processing, you have the option of either Step Through or Update & Continue.
-
Step Through processes each row in the "Preview Data" table one-at-a-time and allows you to add other important item information as you go.
When you use the "Step Through" option for processing, the Wizard will add new items until the listing is completed or whenever any Item Maintenance task list encounters an error or warning. When a task list displays, the application pauses processing to wait for your response (where you choose "Accept Warnings" or fix the issue). After you resolve all the errors, processing will continue immediately. To stop processing, you can use the Cancel (F9) function while processing is paused due to a task list error. If stopped, all wizard mapping and file selection will need to be repeated; this information is cleared once you cancel processing. -
Update & Continue processes all rows for each item at a time and does not prompt you for additional information. Using this import method, the application only stops when it encounters an error.
When using the "Update & Continue" option for processing, the Wizard will continue to add new items until the listing is completed. If the application encounters an Item Maintenance task list error, processing will pause; however, task list warnings are automatically accepted and do not display. If a task list error displays, the application will continue processing the import after you resolve the error. When you use the Update and Continue option, the application only stops processing when you select Cancel (F9) function while processing is paused due to a task list error.
Application or system administrators can change the severity level on some task list items. The Wizard also has it's own task list that identifies certain issues prior to processing.
Cancelling the Import Process
In either case (when adding or updating item records), any time processing is stopped (using the Cancel (F9) key), you need to repeat all wizard mapping and file selection instructions to attempt to process the same file again. When you cancel processing, the wizard information is cleared.
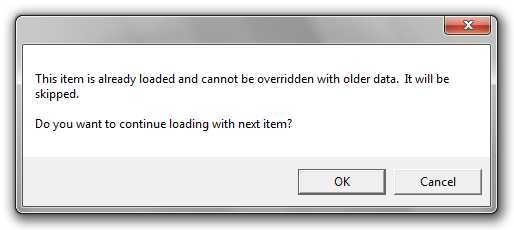
If an item already exists or was previously added using the wizard, the following message displays. Select OK to continue processing with the next sequential item.
Handling Errors
When you attempt to process the imported data, the application reports the errors in the data grid for the columns that have them using the Error ![]() icon. Hover over an Error icon to view a description of the error.
icon. Hover over an Error icon to view a description of the error.
When any errors occur, you can use the Export Grid Errors button to save a copy of the error data only to a comma-delimited (CSV) file in the same directory where the original file originated from.
If there aren't many errors, you can manually correct errors directly in the data grid; otherwise, we suggest saving the error data then removing the error data rows by selecting the rows and choosing either Delete from the data grid's context menu or pressing the "Delete" key on your keyboard. In cases where all the data has errors, it may be a better idea to choose "Cancel" and fix the data directly in the source file.
You can use the Export Grid Errors button for both the Add and Update Inventory Item processes.
Requirements for Adding Inventory
Requirements and conditions for adding/importing new items are different from those allowed when you modify or update inventory. Please refer to the Item Maintenance Help topic for further information about the Item Maintenance fields and settings.
This table lists all of the fields you can currently import to add new items to inventory (required fields are highlighted in red). If you are creating a new Grid Mapping template, the table below may help you create one that is more comprehensive.
Note: All settings (Group/Section, unit of measure, taxable codes, etc.) selected in the Item Maintenance form must be created before they can be selected in this form.
| Req? | Database Field Name | Description | Field Name / Tab Location |
|---|---|---|---|
| No | AlternateSKU0 | Unique, primary alternate SKU for the item. 16 characters maximum | Alternate SKUs (first) / Common > Select |
| No | Barcode0 | Primary numeric barcode for the item. 16 characters maximum | Bar Codes (first) / Common > Select |
| Yes | BaseUnitofMeasure | Item's BASE unit of measure | Base / Common > Measures |
| No | Class | Merchandizing class of the item | Class / Common > Codes |
| No | Department | Merchandizing department of the item | Department / Common > Codes |
| No | Description | Item description | Description / Main form |
| No | FineLineCode | Merchandizing fine line code (now called Subclass) | Subclass / Common > Codes |
| Yes | Group | Group number the item is assigned to in inventory | Group / Main form |
| Yes | ItemNumber | Item SKU (ID) that defines the item in inventory | Item / Main form |
| No | Keyword0 | First keyword assigned to the item | Keyword (first) / Common > Select |
| No | Keyword1 | Second keyword assigned to the item | Keyword (second) / Common > Select |
| No | Keyword2 | Third keyword assigned to the item | Keyword (third) / Common > Select |
| No | Keyword3 | Fourth keyword assigned to the item | Keyword (fourth) / Common > Select |
| No | Keyword4 | Fifth keyword assigned to the item | Keyword (fifth) / Common > Select |
| No | MiscUMQtyConversion | Decimal value used to convert quantities or pricing using the Misc unit of measure setting to the equivalent value of the BASE measure. This "From" value represents the left side conversion value for the Miscellaneous measure. See more detail here. | Misc Quantity Conversions / Common > Measures |
| No | MiscUMQtyConversionTo | Decimal value used to convert quantities or pricing using the Misc unit of measure setting to the equivalent value of the BASE measure. This "To" value represents the right side conversion value for the Miscellaneous measure. See more detail here. | Quantity Conversions / Common > Measures |
| No | MiscUnitofMeasure | Miscellaneous unit of measure setting in the first column of the Measures tab. If no setting is entered, the application assumes this value equals the BASE unit of measure. | Miscellaneous / Common > Measures |
| No | PrevailingMarketCost | Market Cost of the item. For new items, this is the default for the Last Receipt and Weighted Average Cost values. This value may be up to four decimal places. If you do not supply this cost, the application sets the value to zero. Additionally, assigning a zero cost can cause the item's price levels to be zero if the default levels are calculated using any of the three item costs (including Last Receipt, Market, and Weighted Average Cost). | Current Market / Branch > Pricing |
| No | PriceUMQtyConversion | This decimal value is used when converting quantities or pricing represented using the Pricing unit of measure to the equivalent value in terms of the BASE measure (and the reverse). This "From" value represents the left side conversion value for the Pricing unit of measure. See more detail here. | Pricing Quantity Conversions / Common > Measures |
| No | PriceUMQtyConversionTo | This decimal value is used when converting quantities or pricing represented using the Pricing unit of measure to the equivalent value in terms of the BASE measure (and the reverse). This "To" value represents the right side conversion value for the Pricing unit of measure. See more detail here. | Pricing Quantity Conversions / Common > Measures |
| No | PricingUnitofMeasure | This is the item's Pricing unit of measure. If you do not set this value in the item record, the application assumes that this value equals the BASE value setting. | Pricing / Common > Measures |
| No | PrimaryVendorCode | Vendor code of the primary vendor. | Vendor / Purchasing > Primary |
| No | ReceiveUMQtyConversion | This decimal value is used when converting quantities or pricing represented using the Receiving unit of measure to the equivalent value in terms of the BASE measure (and the reverse). This "From" value represents the left side conversion value for the Receiving unit of measure. See more detail here. | Receiving Quantity Conversions / Common > Measures |
| No | ReceiveUMQtyConversionTo | This decimal value is used when converting quantities or pricing represented using the Receiving unit of measure to the equivalent value in terms of the BASE measure (and the reverse). This "To" value represents the left side conversion value for the Receiving unit of measure. See more detail here. | Receiving Quantity Conversions / Common > Measures |
| No | ReceivingUnitofMeasure | This is the item's Receiving unit of measure. If you do not set this value in the item record, the application assumes that this value equals the BASE value setting. | Receiving / Common > Measures |
| No | ReportSequence | This value defines the order the item appears when it occurs in selection lists and in some cases on reports. This is particularly helpful when an item indicates dimensions. Report sequences are ordered as text, not numerically, so the value 1 and 1000 would appear before the number 2, when the item is sorted. To ensure the item entries display numerically, we recommend you use padding zero digits (as in 00001 rather than 1). If you do not set this option, the application relies on the SKU (Item ID) for item sequencing. | Report Sequence / Common > Select |
| Yes | Section | Section number the item is assigned to in inventory | Section / Main form |
| No | SellingUnitofMeasure | This is the item's selling unit of measure. If you do not set this value in the item record, the application assumes that this value equals the BASE value setting. | Selling / Common > Measures |
| No | SellUMQtyConversion | This decimal value is used when converting quantities or pricing represented using the Selling unit of measure to the equivalent value in terms of the BASE measure (and the reverse). This "From" value represents the left side conversion value for the Selling unit of measure. See more detail here. | Selling Quantity Conversions / Common > Measures |
| No | SellUMQtyConversionTo | This decimal value is used when converting quantities or pricing represented using the Selling unit of measure to the equivalent value in terms of the BASE measure (and the reverse). This "To" value represents the left side conversion value for the Selling unit of measure. See more detail here. | Selling Quantity Conversions / Common > Measures |
| No | SuggestedRetail | Decimal amount used to set the suggested retail (list price) of the item. Price levels may or may not be based on this entry. The default price levels you define determine the initial settings when you add new items. These defaults are used by the Import wizard. If you do not add a suggested retail (or list) amount, the item will be added with no retail/list price, which can cause the item's price levels to calculate a zero price, if they are based on the suggested list. | Suggested List / Branch > Pricing |
| No | DaysSupply | Days Supply is an integer (whole number) that represents the anticipated number of days that an item should be stocked for when ordering. For example, if this number is 30, the purchase build process will consider the quantity necessary to maintain a supply for a 30-day period of time. This entry is often used to recalculate the maximum quantity when the item's adjustment type is set to "system automated adjustment." This is only true if no Usage Interval is set. Days Supply is also used to calculate the POQDue and COQDue figures used to determine order quantities when processing automated purchase order builds. |
Days Supply / Branch > Codes (Purchasing) |
| No | Disabled | The Disabled flag is a true/false (Boolean) entry that indicates whether the current item is no longer used and therefore is not available for selection in the Point of Sale list. Options include: N (0) = Item is not disabled, or Y (1) = Item is disabled. |
Disabled / Branch > Codes |
| No | Discontinued | The Discontinued flag is a true/false (Boolean) entry that indicates whether the current item is no longer available from the manufacturer and therefore is not available for selection in the Purchase Order process. Discontinued items can, in some cases produce warnings during use. Options include: N (0) = Item is not discontinued, or Y (1) = Item is discontinued. |
Discontinued / Branch > Codes |
| No | DiscountCode | The AR Statement Discount code indicates whether the item is discountable on a statement or is eligible for line-item discounts. The application adds calculated statement discounts when the account pays their receivables amount by the designated discount date. This setting does not affect changes to pricing applied automatically in a Point of Sale transaction or as part of the item's regular price structure. Options include: Discountable (0) = Application calculates discounts for statements including this item Net (1) = Application does not calculate statement discounts for this item. |
AR Stmt Discount / Common > Codes |
| No | ECommerce | The E-Commerce Enabled check box is a True/False (Boolean) indicator that specifies whether the item can be sold online. When the E-Commerce Enabled check box is selected, the item is available for sale on the businesses' website. When the E-Commerce Enabled check box is not selected, the item is not available for online sale. | E-Commerce Enabled / Common > ECommerce |
| No | ExpectedGrossMargin | The Expected % field specifies the gross margin for this item. It is provided for reference but is not used in any calculations. | Expected % / Branch > Pricing (Margins) |
| No | LeadTime | The Lead time is the number of days between when the item is ordered and when you receive it into inventory. This might be determined by the vendor, the particulars of the item, or your company's purchasing procedures. For example, if you purchase widgets from vendor XYZ, but only place orders every two weeks, the lead time entry would be 14 (days). The Purchase Order Build process uses the Lead Time entry to determine (a) whether an item should be included in the build and (b) what quantity to order. The requirement (or order) quantity is adjusted (reduced) by the quantity of the item expected to be received from Purchase Orders due within the lead time period. This can help avoid duplicate orders when an item already has already been added to a Purchase Order and another build is processed. |
Lead time / Branch > Codes (Purchasing) |
| No | LFBFDepthDenominator | For Lumber/Timber and Sheet Goods products, the Dimensional Depth Denominator specifies the depth dimensions for items that are quantified by fractions. It is an integer field and will always be a whole number (1 or higher). For example, 8 is the denominator in the fraction 7/8. In cases where a decimal depth or whole number is specified, the denominator is set to one. The measurement system used will vary by region. Dimensions are used to calculate the initial volume conversion values (board footage, cubic metres, etc.) and in some cases are used with Tally items. This setting is optional. |
|
| No | LFBFDepthNumerator | For Lumber/Timber and Sheet Goods products, the Dimensional Depth Numerator specifies the depth dimensions for items that are quantified by fractions. It is an integer field and will always be the first or top number. For example, 1 is the numerator in the fraction 1/8. In cases where a decimal depth or whole number is specified, the numerator holds the value and the denominator is set to one. The measurement system used will vary by region. Dimensions are used to calculate the initial volume conversion values (board footage, cubic metres, etc.) and in some cases are used with Tally items. This setting is optional. |
|
| No | LFBFLength | For Lumber/Timber and Sheet Goods products, the LFBF Length specifies the dimensional length of the item. This length value can be specified either as a whole number or a decimal. The measurement system used will vary by region. Dimensions are used to calculate the initial volume conversion values (board footage, cubic metres, etc.) and in some cases are used with Tally items. This setting is optional. | |
| No | LFBFWidth | For Lumber/Timber and Sheet Goods products, the Dimensional Width can be either a whole number or a decimal value. The measurement system used will vary by region. Dimensions are used to calculate the initial volume conversion values (board footage, cubic metres, etc.) and in some cases are used with Tally items. This setting is optional. | |
| No | LocationCode0 | Primary location code for inventory item. First of three location codes for this item. | Primary / Branch > Codes (Locations) |
| No | LocationCode1 | Alternate location code for inventory item. Second of three location codes for this item. | Primary / Branch > Codes (Locations) |
| No | LocationCode2 | Second Alternate location code for inventory item. Third of three location codes for this item. | Primary / Branch > Codes (Locations) |
| No | MaximumQuantity | Maximum Quantity should be considered the desired "shelf" quantity for a product. The application uses this entry for purchase order build calculations and with some reports. If this entry set to a non-zero value, the Maximum Quantity can be used to define the re-order quantity during an automated (PO) build. Items with a zero minimum and maximum quantity are not included in purchase order builds. The Maximum Quantity is reflected in the BASE unit of measurement. You can use the Adjustments option from the Purchasing menu to recalculate the maximum based upon any automatic settings. | Maximum Qty / Branch > Codes (Purchasing) |
| No | MinimumGrossMargin | Minimum Gross Margin is the percentage that represents the lowest gross margin at which your company would consider selling this item. Used for reference, exception alerts, and some reports. | Minimum % / Branch > Pricing (Margins) |
| No | MinimumQuantity | The Minimum Quantity is the lowest on-hand quantity that should be maintained for the item before re-ordering. This quantity is considered the re-order point for the item. Minimum is used for purchase order build calculations and with some reports. Items without this setting are not included in the purchase order build process. The Minimum Quantity is reflected in the BASE unit of measurement. | Minimum Qty / Branch > Codes (Purchasing) |
| No | PrcPrice0 | The PrcPrice0 is either the percentage (discount, markup or margin) or a set price assigned to this level. This used in conjunction with the PrcType fields to determine the price level for the item. Price Levels are named by each business according to their own needs. |
Price Level 0 / Branch > Pricing (Levels) |
| No | PrcPrice1 | The PrcPrice1 is either the percentage (discount, markup or margin) or a set price assigned to this level. This used in conjunction with the PrcType fields to determine the price level for the item. Price Levels are named by each business according to their own needs. |
Price Level 1 / Branch > Pricing (Levels) |
| No | PrcPrice2 | The PrcPrice2 is either the percentage (discount, markup or margin) or a set price assigned to this level. This used in conjunction with the PrcType fields to determine the price level for the item. Price Levels are named by each business according to their own needs. |
Price Level 2 / Branch > Pricing (Levels) |
| No | PrcPrice3 | The PrcPrice3 is either the percentage (discount, markup or margin) or a set price assigned to this level. This used in conjunction with the PrcType fields to determine the price level for the item. Price Levels are named by each business according to their own needs. |
Price Level 3 / Branch > Pricing (Levels) |
| No | PrcPrice4 | The PrcPrice4 is either the percentage (discount, markup or margin) or a set price assigned to this level. This used in conjunction with the PrcType fields to determine the price level for the item. Price Levels are named by each business according to their own needs. |
Price Level 4 / Branch > Pricing (Levels) |
| No | PrcPrice5 | The PrcPrice5 is either the percentage (discount, markup or margin) or a set price assigned to this level. This used in conjunction with the PrcType fields to determine the price level for the item. Price Levels are named by each business according to their own needs. |
Price Level 5 / Branch > Pricing (Levels) |
| No | PrcPrice6 | The PrcPrice6 is either the percentage (discount, markup or margin) or a set price assigned to this level. This used in conjunction with the PrcType fields to determine the price level for the item. Price Levels are named by each business according to their own needs. |
Price Level 6 / Branch > Pricing (Levels) |
| No | PrcType0 |
Price Type Level 0 is an integer enumeration listing the type of pricing used for each price level. The enumeration is as follows:
0= D (Discount % off Suggested List) 1 = M (Markup % over Market Cost) 2 = L (Markup % over Last Receipt Cost) 3 = W (Markup % over Weighted Average Cost) 4 = P (Fixed Price) 5 = C (Margin % using Market Cost) 6 = R (Margin % using Last Receipt Cost) 7 = A (Margin % using Weighted Average Cost) 8 = S (Discount % off Store Retail Level) 9 = X (Markup % Higher of Market or Average) |
Type (Column) / Branch > Pricing (Levels) |
| No | PrcType1 | Pricing Type Level 1 integer enumeration representing the Markup % over Market Cost pricing selected. See PrcType0 for details. | Type (Column) / Branch > Pricing (Levels) |
| No | PrcType2 | Pricing Type Level 2 integer enumeration representing the Markup % over Last Receipt Cost pricing selected. See PrcType0 for details. | Type (Column) / Branch > Pricing (Levels) |
| No | PrcType3 | Pricing Type Level 3 integer enumeration representing the Markup % over Weighted Average Cost pricing selected. See PrcType0 for details. | Type (Column) / Branch > Pricing (Levels) |
| No | PrcType4 | Pricing Type Level 4 integer enumeration representing the Fixed Price Cost pricing selected. See PrcType0 for details. | Type (Column) / Branch > Pricing (Levels) |
| No | PrcType5 | Pricing Type Level 5 integer enumeration representing the Margin % using Market Cost pricing selected. See PrcType0 for details. | Type (Column) / Branch > Pricing (Levels) |
| No | PrcType6 | Pricing Type Level 6 integer enumeration representing the Margin % using Last Receipt Cost pricing selected. See PrcType0 for details. | Type (Column) / Branch > Pricing (Levels) |
| No | Weight | The Weight (Load Factor) used to calculate the weight of these materials for deliveries and purchasing. For weight to be used effectively and accurately, specify all weights using the same measure for all products with a weight specified (such as pound (lb.), Kilogram (Kg), etc.) The application calculates the weight by multiplying the weight value times the quantity of the BASE measurement. | Weight per <BASE Measure> / Common > Measures |
| No | YardFlag | The Yard Code indicates the location of the item in the yard. Some documents may contain the Yard Code if it is assigned to the item as well. | Yard Code / Branch > Codes (Inventory) |
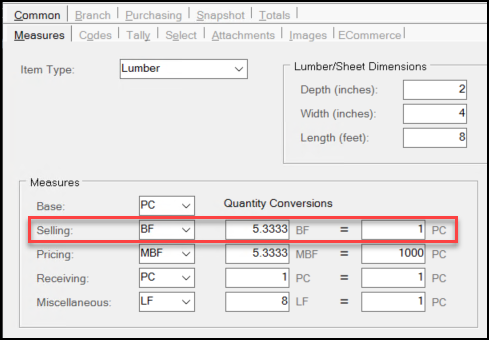
Understanding the Miscellaneous Quantity Conversion Settings
As some items come into inventory they can be quantified and priced in a variety of ways. You use the Quantity Conversion section of the Common > Measures tab to define those item measurements so the application can convert them accurately based on how they are sold to ensure the pricing is appropriate.
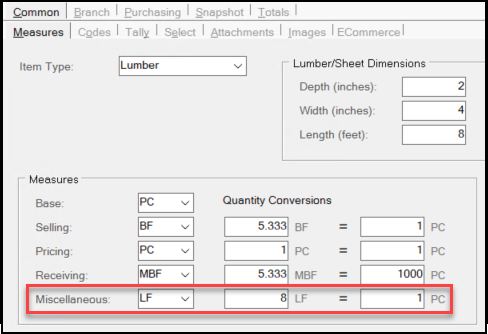
To quantify items using the Miscellaneous measure, the numeric Unit of Measure defined in the table becomes the "From" value. This decimal value is used when converting quantities or pricing represented using the Miscellaneous (Misc) unit of measure to the equivalent value in terms of the BASE measure (and the reverse).
To convert a value (price or quantity) from a BASE to the Miscellaneous measure, the application uses the following calculation:
-
Value * (
MiscUMQtyConversion/MiscUMQtyConversionTo)
To convert a value (price or quantity) from MISC to the BASE measure, the application uses the following calculation:
-
Value * (
MiscUMQtyConversionTo/MiscUMQtyConversion)
The MiscUMQtyConversion field represents the left side conversion value for the Miscellaneous measure as defined in the Quantity Conversion column. When you do not supply a value for this field, the application assumes that the Miscellaneous and BASE measures are the same and sets both the To and From values to 1.
Understanding the Pricing Quantity Conversion
Similar to the Miscellaneous Quantity conversion process, the Pricing Quantity unit of measure calculation is based on the settings you enter in the Pricing row in the Measures list.
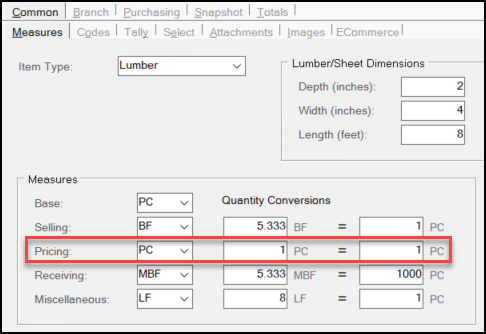
In this case the PriceUMQtyConversion value is the "From" value in the calculation. This value is used when you are converting quantities or pricing represented in the Pricing unit of measure to the equivalent value to the BASE unit of measure (and the reverse).
Specifically, to convert a value (a price or quantity) from BASE to the Pricing measure, the application uses the following calculation:
-
Value * (
PriceUMQtyConversion/PriceUMQtyConversionTo)
Similarly to convert a value from Pricing to the BASE measure, the application uses the following calculation:
-
Value * (
PriceUMQtyConversionTo/PriceUMQtyConversion)
The PriceUMQtyConversion field represents the left side conversion value for the Pricing measure as defined in the Quantity Conversion column. When you do not supply a value for this field, the application assumes that the Pricing and BASE measures are the same and sets both the To and From values to 1.
Understanding the Receiving Quantity Conversions
Similar to the Miscellaneous and Pricing Quantity conversion processes, the Receiving Quantity unit of measure calculation is based on the settings you enter in the Receiving row in the Measures list.
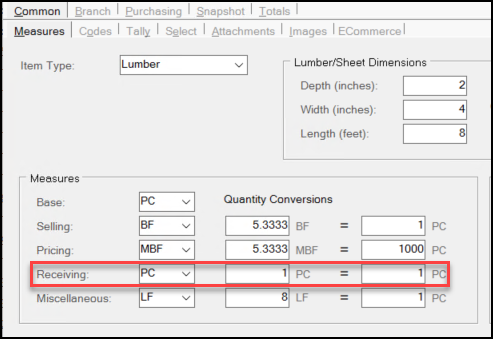
In this case the ReceiveUMQtyConversion value is the "From" value in the calculation. This value is used when you are converting quantities or pricing represented in the Receiving unit of measure to the equivalent value to the BASE unit of measure (and the reverse).
Specifically, to convert a value (a price or quantity) from BASE to the Receiving measure, the application uses the following calculation:
-
Value * (
ReceiveUMQtyConversion/ReceiveUMQtyConversionTo)
Similarly to convert a value from Receiving to the BASE measure, the application uses the following calculation:
-
Value * (
ReceiveUMQtyConversionTo/ReceiveUMQtyConversion)
The ReceiveUMQtyConversion field represents the left side conversion value for the Receiving measure as defined in the Quantity Conversion column. When you do not supply a value for this field, the application assumes that the Receiving and BASE measures are the same and sets both the To and From values to 1.
Understanding the Selling Quantity Conversions
Similar to the Miscellaneous, Pricing, and Receiving Quantity conversion processes, the Selling Quantity unit of measure calculation is based on the settings you enter in the Selling row in the Measures list.
In this case the SellUMQtyConversion value is the "From" value in the calculation. This value is used when you are converting quantities or pricing represented in the Selling unit of measure to the equivalent value to the BASE unit of measure (and the reverse).
Specifically, to convert a value (a price or quantity) from BASE to the Selling measure, the application uses the following calculation:
-
Value * (
SellUMQtyConversion/SellUMQtyConversionTo)
Similarly to convert a value from Selling to the BASE measure, the application uses the following calculation:
-
Value * (
SellUMQtyConversionTo/SellUMQtyConversion)
The SellUMQtyConversion field represents the left side conversion value for the Selling measure as defined in the Quantity Conversion column. When you do not supply a value for this field, the application assumes that the Selling and BASE measures are the same and sets both the To and From values to 1.
Requirements for Updating Inventory
The fields available for modifying existing items are different than those permitted for adding. Field names correspond with the names in the Import Wizard's grid, and are not necessarily the same as column names used by the Inventory data tables. Most inventory data is maintained in two separate tables dbo.InventoryCommon (shared item data across the application) and dbo.InventoryStore (branch-specific data). The Suggested List and Prevailing Market Cost fields have been removed from the listing (below) as they cannot be updated using the import process. The ItemNumber field is the only required field when updating inventory and displays in red.
Note: All settings (Group/Section, unit of measure, taxable codes, etc.) selected in the Item Maintenance form must be created before they can be selected in this form.
| Common / Branch | Database Field Name | Description |
|---|---|---|
| Common | AlternateSKU0 | Unique, primary alternate SKU for the item. 16 characters maximum |
| Common | AlternateSKU1 | Unique, additional alternate SKU for the item. 16 characters maximum |
| Common | AlternateSKU2 | Unique, additional alternate SKU for the item. 16 characters maximum |
| Common | AlternateSKU3 | Unique, additional alternate SKU for the item. 16 characters maximum |
| Common | AlternateSKU4 | Unique, additional alternate SKU for the item. 16 characters maximum |
| Common | AlternateSKUum0 | The Unit of Measure associated with AlternateSKU0, which must be a valid UM for the item. This code may be up to 4-characters long |
| Common | AlternateSKUum1 | The Unit of Measure associated with AlternateSKU1, which must be a valid UM for the item. This code may be up to 4-characters long |
| Common | AlternateSKUum2 | The Unit of Measure associated with AlternateSKU2, which must be a valid UM for the item. This code may be up to 4-characters long |
| Common | AlternateSKUum3 | The Unit of Measure associated with AlternateSKU3, which must be a valid UM for the item. This code may be up to 4-characters long |
| Common | AlternateSKUum4 | The Unit of Measure associated with AlternateSKU4, which must be a valid UM for the item. This code may be up to 4-characters long |
| Common | Barcode0 | The primary numeric barcode (UPC) for this item. It can be a maximum of 16-characters long and it must be unique to this item. |
| Common | Barcode1 | An additional numeric barcode (UPC) for this item. It can be a maximum of 16-characters long and it must be unique to this item. |
| Common | Barcode2 | An additional numeric barcode (UPC) for this item. It can be a maximum of 16-characters long and it must be unique to this item. |
| Common | Barcode3 | An additional numeric barcode (UPC) for this item. It can be a maximum of 16-characters long and it must be unique to this item. |
| Common | Barcode4 | An additional numeric barcode (UPC) for this item. It can be a maximum of 16-characters long and it must be unique to this item. |
| Common | BarcodeUM0 | The Unit of Measure associated with Barcode0. It must be a valid Unit of Measure for the item and the code can be up to 4-characters long |
| Common | BarcodeUM1 | The Unit of Measure associated with Barcode1. It must be a valid Unit of Measure for the item and the code can be up to 4-characters long |
| Common | BarcodeUM2 | The Unit of Measure associated with Barcode2. It must be a valid Unit of Measure for the item and the code can be up to 4-characters long |
| Common | BarcodeUM3 | The Unit of Measure associated with Barcode3. It must be a valid Unit of Measure for the item and the code can be up to 4-characters long |
| Common | BarcodeUM4 | The Unit of Measure associated with Barcode4. It must be a valid Unit of Measure for the item and the code can be up to 4-characters long |
| Branch | BuyerId | This is the Notification Buyer ID, which is the user ID of the purchaser. User IDs may be up to 6-characters long and this ID must exist. |
| Common | Class | Merchandizing class code of the item, which can be a maximum of six characters. Located on Common > Codes (Merchandising) in the Item Maintenance form. |
| Common | CostPercentage | Cost Percentage is a decimal value that indicates the cost percentage for the item (if any). This percentage can be up to four-decimal places long. |
| Common | Department | The department code that is assigned to the item, if any. It can be a maximum of six characters long and is located on the Common > Codes tab (Merchandizing) area in the Item Maintenance form. |
| Common | Description | The item's description, which can be up to 1,088 characters long. |
| Common | FineLineCode | The fine line code that is assigned to the item, if any. It can be a maximum of six characters long and is located on the Common > Codes tab (Merchandizing) area in the Item Maintenance form. |
| Common | Group | The group code that is assigned to the item, must me an integer between 1 and 255. |
| Common /Branch | ItemNumber | The item ID (SKU) used to identify the item can be a maximum of 16 characters long. |
| Common | Keyword0 | The first of five keywords you can assign to this item. Keywords can be up to 16 characters long and display on the Common > Select tab in the Item Maintenance form. |
| Common | Keyword1 | The second of five keywords you can assign to this item. Keywords can be up to 16 characters long and display on the Common > Select tab in the Item Maintenance form. |
| Common | Keyword2 | The third of five keywords you can assign to this item. Keywords can be up to 16 characters long and display on the Common > Select tab in the Item Maintenance form. |
| Common | Keyword3 | The fourth of five keywords you can assign to this item. Keywords can be up to 16 characters long and display on the Common > Select tab in the Item Maintenance form. |
| Common | Keyword4 | The fifth of five keywords you can assign to this item. Keywords can be up to 16 characters long and display on the Common > Select tab in the Item Maintenance form. |
| Common / Branch |
PrimaryVendorCode | Primary vendor code for the item. This code, which can be up to 10-characters long, must match an existing vendor ID (not a "pay-to" type vendor). |
| Common | ReportSequence | This value (up to 16 characters long) defines the order the item appears when it occurs in selection lists and in some cases on reports. This is particularly helpful when an item indicates dimensions. Report sequences are ordered as text, not numerically, so the value 1 and 1000 would appear before the number 2, when the item is sorted. To ensure the item entries display numerically, we recommend you use padding zero digits (as in 00001 rather than 1). If you do not set this option, the application relies on the SKU (Item ID) for item sequencing. |
| Common | Section | The section number assigned to the item. It must be an integer between 1 and 255. |
| Branch | DaysSupply | Days Supply is an integer that represents the anticipated number of days that an item should be stocked for when ordering. For example, if this number is 30, a purchase build will consider the quantity necessary to maintain a supply for 30-days. The Days Supply number is often used to recalculate the maximum quantity when the item's adjustment type is set to "system automated adjustment, if no Usage Interval is set. It is also used for calculating the POQDue and COQDue figures, which determine order quantities when processing automated purchase order builds. |
| Common | DescriptionRequired | The Description Required entry is a true/false (Boolean) value that indicates whether an item requires a description. Options include: N (0) = False (Item does not require a description) Y (1) = True (Item requires a description) |
| Branch | Disabled | The Disabled flag is a true/false (Boolean) entry that indicates whether the current item is no longer used and therefore is not available for selection in the Point of Sale list. Options include: N (0) = Item is not disabled, or Y (1) = Item is disabled. |
| Branch | Discontinued | The Discontinued flag is a true/false (Boolean) entry that indicates whether the current item is no longer available from the manufacturer and therefore is not available for selection in the Purchase Order process. Discontinued items can, in some cases produce warnings during use. Options include: N (0) = Item is not discontinued, or Y (1) = Item is discontinued. |
| Common | DiscountCode | The AR Statement Discount code indicates whether the item is discountable on a statement or is eligible for line-item discounts. The application adds calculated statement discounts when the account pays their receivables amount by the designated discount date. This setting does not affect changes to pricing applied automatically in a Point of Sale transaction or as part of the item's regular price structure. Options include: Discountable (0) = Application calculates discounts for statements including this item Net (1) = Application does not calculate statement discounts for this item. |
| Common | ECommerce | The E-Commerce Enabled check box is a True/False (Boolean) indicator that specifies whether the item can be sold online. When the E-Commerce Enabled check box is selected, the item is available for sale on the businesses' website. When the E-Commerce Enabled check box is not selected, the item is not available for online sale. |
| Common | Estimating | The Estimating flag is a true/false (Boolean) value that indicates whether there is an integrated estimating feature enabled.
0 = No or False 1 = Yes or True |
| Branch | ExpectedGrossMargin | The Expected % field specifies the gross margin for this item. It is provided for reference but is not used in any calculations. |
| Branch | LeadAdjust | Lead Adjust or Lead Type value indicates the type of lead time adjustment. Valid values are:
0 = Manual 1 = Automatic |
| Branch | LeadTime | The Lead Time is the number of days between when the item is ordered and when you receive it into inventory. This might be determined by the vendor, the particulars of the item, or your company's purchasing procedures. For example, if you purchase widgets from vendor XYZ, but only place orders every two weeks, the lead time entry would be 14 (days). The Purchase Order Build process uses the Lead Time entry to determine (a) whether an item should be included in the build and (b) what quantity to order. The requirement (or order) quantity is adjusted (reduced) by the quantity of the item expected to be received from Purchase Orders due within the lead time period. This can help avoid duplicate orders when an item already has already been added to a Purchase Order and another build is processed. |
| Branch | LocationCode0 | Location Code #0 is the Primary location code of the item in the Item Maintenance form. The first of three location codes provided for this item, it can be a maximum of eight-characters long. |
| Branch | LocationCode1 | Location Code #1 is the second location code of the item in the Item Maintenance form. It can be a maximum of eight-characters long. |
| Branch | LocationCode2 | Location Code #2 is the third location code of the item in the Item Maintenance form. It can be a maximum of eight-characters long. |
| Branch | MaximumQuantity | Maximum Quantity should be considered the desired "shelf" quantity for a product. The application uses this entry for purchase order build calculations and with some reports. If this entry set to a non-zero value, the Maximum Quantity can be used to define the re-order quantity during an automated (PO) build. Items with a zero minimum and maximum quantity are not included in purchase order builds. The Maximum Quantity is reflected in the BASE unit of measurement. You can use the Adjustments option from the Purchasing menu to recalculate the maximum based upon any automatic settings. |
| Branch | MaxQtyAdjType | The Maximum Quantity Adjustment Type is an integer enumeration that determines if the item's maximum quantity should be automatically adjusted. Options include:
0 = Manual 1 = Automatic |
| Branch | MinimumGrossMargin | Minimum Gross Margin is the percentage that represents the lowest gross margin at which your company would consider selling this item. Used for reference, exception alerts, and some reports. |
| Branch | MinimumQuantity | The Minimum Quantity is the lowest on-hand quantity that should be maintained for the item before re-ordering. This quantity is considered the re-order point for the item. Minimum is used for purchase order build calculations and with some reports. Items without this setting are not included in the purchase order build process. The Minimum Quantity is reflected in the BASE unit of measurement. |
| Branch | MinQtyAdjType | The Minimum Quantity Adjustment Type is an integer enumeration that determines if and how the item's minimum quantity can be adjusted. Options include:
0 = Manual 1 = Percentage of Maximum 2 = Automatic |
| Branch | MinQtyPercentofMax | The Minimum Quantity Percentage of Maximum requires a decimal value (up to four-decimal places) that is only used in cases where the item's MinQtyAdjType was set to "Percentage of Maximum" (1). |
| Branch | PhysCtUM | The Physical Count Unit of Measure Default is an integer value that indicates which of the item's five units of measure should be used as the default for quantity entry as physical inventory counts. Choices include:
0 = Stock (Base) 1 = Selling 2 = Pricing 3 = Receiving 4 = Miscellaneous |
| Branch | POSQtyUM | The Point of Sale Quantity Unit of Measure default is an integer value that indicates which of the five units of measure should be used as the default for Point of Sale transactions. Options include: 0 = Stock (Base) 1 = Selling 2 = Pricing 3 = Receiving 4 = Miscellaneous |
| Branch | POSPriceUM | The Point of Sale Pricing Unit of Measure Default is an integer value that indicates which of the item's five units of measure should be used as the default for pricing that displays in Point of Sale transactions. Choices include: 0 = Stock (Base) 1 = Selling 2 = Pricing 3 = Receiving 4 = Miscellaneous |
| Branch | PORecptQtyUM | The Purchasing Receipt Quantity Unit of Measure Default is an integer value that indicates which of the item's five units of measure should be used as the default for Purchase Orders and Receipts. Choices include: 0 = Stock (Base) 1 = Selling 2 = Pricing 3 = Receiving 4 = Miscellaneous |
| Branch | PORecptCostUM | The
Purchasing Receipt Cost Unit of Measure Default is an integer value that indicates which of the item's five units of measure should be used as the default for costs that display for Purchase Orders and Receipts. Choices include: 0 = Stock (Base) 1 = Selling 2 = Pricing 3 = Receiving 4 = Miscellaneous |
| Branch | PrcPrice0 | The PrcPrice0 is a decimal value that is either the percentage (discount, markup or margin) or a set price assigned to this level. This used in conjunction with the PrcType fields to determine the price level for the item. Price Levels are named by each business according to their own needs. |
| Branch | PrcPrice1 | The PrcPrice1 is a decimal value that is either the percentage (discount, markup or margin) or a set price assigned to this level. This used in conjunction with the PrcType fields to determine the price level for the item. Price Levels are named by each business according to their own needs. |
| Branch | PrcPrice2 | The PrcPrice2 is a decimal value that is either the percentage (discount, markup or margin) or a set price assigned to this level. This used in conjunction with the PrcType fields to determine the price level for the item. Price Levels are named by each business according to their own needs. |
| Branch | PrcPrice3 | The PrcPrice3 is a decimal value that is either the percentage (discount, markup or margin) or a set price assigned to this level. This used in conjunction with the PrcType fields to determine the price level for the item. Price Levels are named by each business according to their own needs. |
| Branch | PrcPrice4 | The PrcPrice4 is a decimal value that is either the percentage (discount, markup or margin) or a set price assigned to this level. This used in conjunction with the PrcType fields to determine the price level for the item. Price Levels are named by each business according to their own needs. |
| Branch | PrcPrice5 | The PrcPrice5 is a decimal value that is either the percentage (discount, markup or margin) or a set price assigned to this level. This used in conjunction with the PrcType fields to determine the price level for the item. Price Levels are named by each business according to their own needs. |
| Branch | PrcPrice6 | The PrcPrice6 is a decimal value that is either the percentage (discount, markup or margin) or a set price assigned to this level. This used in conjunction with the PrcType fields to determine the price level for the item. Price Levels are named by each business according to their own needs. |
| Branch | PrcType0 |
Price Type Level 0 is an integer enumeration listing the type of pricing used for each price level. The enumeration is as follows:
0= D (Discount % off Suggested List) 1 = M (Markup % over Market Cost) 2 = L (Markup % over Last Receipt Cost) 3 = W (Markup % over Weighted Average Cost) 4 = P (Fixed Price) 5 = C (Margin % using Market Cost) 6 = R (Margin % using Last Receipt Cost) 7 = A (Margin % using Weighted Average Cost) 8 = S (Discount % off Store Retail Level) 9 = X (Markup % Higher of Market or Average) |
| Branch | PrcType1 | Pricing Type Level 1 integer enumeration representing the Markup % over Market Cost pricing selected. See PrcType0 for details. |
| Branch | PrcType2 | Pricing Type Level 2 integer enumeration representing the Markup % over Last Receipt Cost pricing selected. See PrcType0 for details. |
| Branch | PrcType3 | Pricing Type Level 3 integer enumeration representing the Markup % over Weighted Average Cost pricing selected. See PrcType0 for details. |
| Branch | PrcType4 | Pricing Type Level 4 integer enumeration representing the Fixed Price Cost pricing selected. See PrcType0 for details. |
| Branch | PrcType5 | Pricing Type Level 5 integer enumeration representing the Margin % using Market Cost pricing selected. See PrcType0 for details. |
| Branch | PrcType6 | Pricing Type Level 6 integer enumeration representing the Margin % using Last Receipt Cost pricing selected. See PrcType0 for details. |
| Branch | PriceMatrix | The Price Matrix Code defines the price matrix code for the item (if any) and can be up to four-characters long. |
| Common | PriceRounding | The Price Rounding Code is an integer enumeration that represents the codes for rounding prices, if price rounding is used in the business's region. Options include:
0 = No rounding 1 = Round to .01 2 = Round to .09 3 = Round to $1 4 = Round to $5 5 = Ace Rounding 6 = Price Range 7 = Cent Range 8 = Round to .001 |
| Common | ProductId | The Product ID Code indicates the product ID for the item (if any) and can be up to 16-characters long. These codes are defined in the Code Definitions Maintenance form or can originate with Do It Best Corp.'s product codes (which must be loaded prior to use). |
| Branch | QtyBreak0 | The Quantity Break Minimum 0 is the first of four possible quantity breaks you can use to define volume pricing. This integer value is the minimum quantity in base terms required to receive a volume discount at this level. |
| Branch | QtyBreak1 | The Quantity Break Minimum 1 is the second of four possible quantity breaks you can use to define volume pricing. This integer value is the minimum quantity in base terms required to receive a volume discount at this level. |
| Branch | QtyBreak2 | The Quantity Break Minimum 2 is the third of four possible quantity breaks you can use to define volume pricing. This integer value is the minimum quantity in base terms required to receive a volume discount at this level. |
| Branch | QtyBreak3 | The Quantity Break Minimum 0 is the last of four possible quantity breaks you can use to define for volume pricing. This integer value is the minimum quantity in base terms required to receive a volume discount at this level. |
| Branch | QtyPrice0 | The Break Price 0 amount (known as Volume Discount) is a decimal value (with up to four decimal places) that is applied as the first of four possible quantity breaks. The "amount" may represent either a set price or percentage as determined by the QtyType0 value. The QtyBreak0 value determines the minimum quantity purchase required to receive the break price. |
| Branch | QtyPrice1 | The Break Price 1 amount (known as Volume Discount) is a decimal value (with up to four decimal places) that is applied as the second of four possible quantity breaks. The "amount" may represent either a set price or percentage as determined by the QtyType1 value. The QtyBreak1 value determines the minimum quantity purchase required to receive the break price. |
| Branch | QtyPrice2 | The Break Price 2 amount (known as Volume Discount) is a decimal value (with up to four decimal places) that is applied as the third of four possible quantity breaks. The "amount" may represent either a set price or percentage as determined by the QtyType2 value. The QtyBreak2 value determines the minimum quantity purchase required to receive the break price. |
| Branch | QtyPrice3 | The Break Price 3 amount (known as Volume Discount) is a decimal value (with up to four decimal places) that is applied as the las of four possible quantity breaks. The "amount" may represent either a set price or percentage as determined by the QtyType3 value. The QtyBreak3 value determines the minimum quantity purchase required to receive the break price. |
| Common | QtyRounding | The Quantity Rounding setting is a true/false (Boolean) integer value that indicates whether the item is subject to quantity rounding. Settings include: N (0) = False Y (1) = True |
| Branch | QtyType0 | The Price Type for Break Price (aka. Volume Discount) is an integer enumeration that indicates how the QtyPrice0 value is used for calculating or setting the break price the customer receives. This is for the first of the four possible quantity breaks (if they meet the QtyBreak0 minimum quantity). The enumeration is defined below:
0 = D (Discount % off Suggested List) 1 = M (Markup % over Market Cost) 2 = L (Markup % over Last Receipt Cost) 3 = W (Markup % over Weighted Average Cost) 4 = % (Additional % off Customer Price) 5 = $ (Dollar Amount off Suggested List) 6 = C (Margin % using Market Cost) 7 = R (Margin % using Last Receipt Cost) 8 = A (Margin % using Weighted Average Cost) 9 = S (Discount % off Store Retail Level) |
| Branch | QtyType1 | The Price Type for Break Price (aka. Volume Discount) is an integer enumeration that indicates how the QtyPrice1 value is used for calculating or setting the break price the customer receives. This is for the second of the four possible quantity breaks (if they meet the QtyBreak1 minimum quantity). The enumeration is defined below:
0 = D (Discount % off Suggested List) 1 = M (Markup % over Market Cost) 2 = L (Markup % over Last Receipt Cost) 3 = W (Markup % over Weighted Average Cost) 4 = % (Additional % off Customer Price) 5 = $ (Dollar Amount off Suggested List) 6 = C (Margin % using Market Cost) 7 = R (Margin % using Last Receipt Cost) 8 = A (Margin % using Weighted Average Cost) 9 = S (Discount % off Store Retail Level) |
| Branch | QtyType2 | The Price Type for Break Price (aka. Volume Discount) is an integer enumeration that indicates how the QtyPrice2 value is used for calculating or setting the break price the customer receives. This is for the third of the four possible quantity breaks (if they meet the QtyBreak2 minimum quantity). The enumeration is defined below:
0 = D (Discount % off Suggested List) 1 = M (Markup % over Market Cost) 2 = L (Markup % over Last Receipt Cost) 3 = W (Markup % over Weighted Average Cost) 4 = % (Additional % off Customer Price) 5 = $ (Dollar Amount off Suggested List) 6 = C (Margin % using Market Cost) 7 = R (Margin % using Last Receipt Cost) 8 = A (Margin % using Weighted Average Cost) 9 = S (Discount % off Store Retail Level) |
| Branch | QtyType3 | The Price Type for Break Price (aka. Volume Discount) is an integer enumeration that indicates how the QtyPrice3 value is used for calculating or setting the break price the customer receives. This is for the last of the four possible quantity breaks (if they meet the QtyBreak3 minimum quantity). The enumeration is defined below:
0 = D (Discount % off Suggested List) 1 = M (Markup % over Market Cost) 2 = L (Markup % over Last Receipt Cost) 3 = W (Markup % over Weighted Average Cost) 4 = % (Additional % off Customer Price) 5 = $ (Dollar Amount off Suggested List) 6 = C (Margin % using Market Cost) 7 = R (Margin % using Last Receipt Cost) 8 = A (Margin % using Weighted Average Cost) 9 = S (Discount % off Store Retail Level) |
| Branch | SeasonalCode | The Seasonal Code is an up to four-character code that indicates the seasonal need for the item for purchasing. |
| Branch | Stocked | The Stocked code is a true/false (Boolean) integer value that indicates whether the item is Stocked or Non-Stocked. Options include: N (0) = Non-Stocked Y (1) = Stocked |
| Branch | SubstituteSKU | The Substitute SKU is a 16-character item SKU for the item that must exist in the current branch and cannot be a tally item. |
| Branch | Returnable | The Returnable code is a true false (Boolean) integer value that indicates whether the item is returnable. Options include: N (0) = Not Returnable Y (1) = Returnable |
| Common | TagIDRequired | The Tag ID Required code is a true/false (Boolean) integer value that indicates whether a serial number is required for the item. Options include: N (0) = Tag ID Not Required Y (1) = Tag ID Required |
| Common | Taxable | The Taxable code (flag) is an integer enumeration that represents the taxable status of the item. Some options are only applicable in Canada or the United Kingdom (UK) only. Options include: 0 = Yes 1 = No 2 = Always 3 = VAT (UK Only) 4 = GST (Canada Only) 5 = PST (Canada Only) |
| Common | TaxSurcharge | The Tax Surcharge code is a true/false (Boolean) integer value that indicates whether a tax surcharge is applicable to the item. Options include: 0 = No 1 = Yes |
| Common | TrackQtyOnHand | The Track Quantity on Hand setting (known as the Maintain Receipts) is a true/false (Boolean) integer value that indicates whether the on hand quantity is tracked for the item. Options include: N (0) = No Y (1) = Yes |
| Branch | UsageInt | The Usage Interval is an integer value that indicates purchasing frequency. See Calculations for Usage-Based Purchase Order Builds for more. |
| Common | Weight | The Weight (Load Factor) used to calculate the weight of these materials for deliveries and purchasing. For weight to be used effectively and accurately, specify all weights using the same measure for all products with a weight specified (such as pound (lb.), Kilogram (Kg), etc.) The application calculates the weight by multiplying the weight value times the quantity of the BASE measurement. |
| Branch | WMSItem | The Warehouse Management Item (WMS) flag is a true/false (Boolean) integer value that indicates whether the item is tracked using the WMS app, which is a separately priced feature. Options include: N (0) = No Y (1) = Yes |
| Common | YardFlag | The Yard Code is a two-character code that indicates the location of the item in the yard. Some documents may contain the Yard Code if it is assigned to the item as well. |