Branch > Codes
The Item Maintenance Branch, Codes (ALT-D) tab contains settings for inventory, locations, purchasing, and default unit of measure branch-specific item settings.

Inventory
The settings in this area pertain to the basic function of the item being added or modified.
Stocked
"Stocked" refers to whether an item is maintained as a part of inventory or not. Items you receive and sell regularly are usually considered stocked items. Goods that are only ordered when a customer requests them or that have some unique characteristic tend to be "non-stocked." The "stocked" flag changes the function of the inventory item during grid entry. Items that are not stocked prompt for additional information in a special form (descriptions, vendors, etc.).
Typically, non-stocked items require a description (see Description Required under Common and Codes) and don't track quantities (see Track Quantity On-hand). In addition, a non-stocked item may be associated with a comment or catalog list which is used in place of a manually entered description.
Returnable
"Returnable" items are goods that a customer may return. If this flag is set to N (no), the item will not allow returns. This is commonly used to prevent returns on special orders or custom paint colors, for example. If the item is a "rental" type and is being used with the standard application's rental feature, this must be set to Y (yes) to allow returns.
Discontinued
Discontinued items are goods that are either (1) no longer available for one reason or another, or (2) they are goods your company has decided not to purchase in the future. Discontinued items can be sold, but will not be included in purchase builds.
Disabled
Disabled items are items that are no longer in use. This is really a substitute for deleting items. Deleting items with activity isn't allowed in order to maintain the integrity of the database and any documents linked with the item. When an item is disabled, it won't appear in selection lists and manual entry is prevented. This prevents it from being included in new transactions.
Yard Code
A Yard Code is used to flag items on a "yard" style document for the purpose of identifying their location. Use the Settings ![]() icon to add or maintain yard codes. Certain Style (F3) options for the grid will display yard codes. Yard items are also printed on "yard copy" style documents along with the code assigned. The "yard copy" invoice style only prints when yard items are present and will not be printed if no yard items are found.
icon to add or maintain yard codes. Certain Style (F3) options for the grid will display yard codes. Yard items are also printed on "yard copy" style documents along with the code assigned. The "yard copy" invoice style only prints when yard items are present and will not be printed if no yard items are found.
Add-on SKU
Use the Add-on (known as an "associated") SKU feature to add an additional item to the data grid automatically when the current (parent) item is added to the transaction. There are a number of reasons for adding an Add-on SKU to an inventory item:
•To add a "Deposit" amount to the parent item. You can use this for bottle deposits, rental security deposits, etc.
•To add an additional charge that is specific to the care or service of the parent item, such as a pallet fee, installation cost, etc.
•To add a related item that is required when this item is purchased or an item that is perhaps an potential add-on or impulse sale.
•To add a comment item that includes a disclaimer or other message related to the current item.
The Add-on SKU may have a different base unit of measure than the parent SKU.
Add-on Multiple
The Add-on Multiple fields define how to apply the Add-on SKU to the transaction when you add the parent item to the Point of Sale data grid. The parent item's Quantity entry in the data grid and the item's BASE Unit of Measure are used to calculate the Add-on SKU's multiple values.
There are three fields associated with this calculation:
-
From
The application compares this number to the Quantity entry of the parent item in the data grid to determine whether to add the Add-on SKU.
-
To
The application uses this number to indicate the quantity of the add-on SKU that is to be included.
Note: Both the From and To field entries must be non-zero values or they are disregarded. -
Minimum
The application uses this entry to determine how to apply the BASE unit of measure (or not).
These fields describe how to quantify the Add-on SKU when it is added to a point of sale data grid or an ecommerce request.
Add-on (Associated) SKU |
||||||||||||||||||||||||||||||||||||||||||||||||||||||||||||||||||||||||||||||||||||||||||||||||||||||||||||||||||||||||
|---|---|---|---|---|---|---|---|---|---|---|---|---|---|---|---|---|---|---|---|---|---|---|---|---|---|---|---|---|---|---|---|---|---|---|---|---|---|---|---|---|---|---|---|---|---|---|---|---|---|---|---|---|---|---|---|---|---|---|---|---|---|---|---|---|---|---|---|---|---|---|---|---|---|---|---|---|---|---|---|---|---|---|---|---|---|---|---|---|---|---|---|---|---|---|---|---|---|---|---|---|---|---|---|---|---|---|---|---|---|---|---|---|---|---|---|---|---|---|---|---|
|
After selecting the Add-on SKU (item), there are three text fields below it that determine how the add-on SKU will be applied to the transaction.
Use the From and To values to define the relationship between the parent (this) item and the Add-on SKU. When the Add-on Multiple Minimum field is 0 or is not set:
•The quantity entered is always considered irregardless of the unit of measure for the quantity of the parent item at Point of Sale. •If the quantity of the parent (this) item is greater than or equal to the "from" quantity specified, the "to" quantity (add-on) is multiplied times the result of dividing the quantity being sold by the "from" quantity. When the Add-on Multiple Minimum field is more than 0: •Only quantities of the parent (this) item at Point of Sale, converted to this item's BASE measure, that are above the minimum quantity specified will trigger inclusion of the add-on (associated) SKU. For example, if the minimum is 32 EACH and 12 EACH are sold, the add-on (associated) SKU is not added. •The relative BASE quantity of the parent (this) item is used for all calculations instead of the entered quantity at Point of Sale. This means that the quantity of the add-on is affected by the quantity Unit of Measure (UM) being used with the transaction. For example, if your parent item establishes a 1:1 "from-to" relationship and minimum of 1 (one), selling 1 BOX (where 1 BOX = 12 EACH) would result in 12 EACH of the add-on item being used at Point of Sale (the same as if 12 EACH were being sold). This is different from how the add-on (associated) SKU works when there is no minimum or a zero minimum (a negative minimum is not allowed). •A decimal "minimum" quantity may be necessary in cases where the triggering quantity is smaller than a single unit of the item in its BASE measure. For example, the item has a BASE unit that represents one package of four. You could set the minimum quantity to 0.25 to trigger the add-on anytime a single unit is sold. ExamplesIn the following examples, item ABC is the parent item and XYZ is add-on SKU. Item ABC has the following units of measure defined (we're just listing two to keep the example simple): BASE = EACH
*In this case, the item is not added to the transaction. Deposit items that would result in a zero quantity won't be added. **For the last row, quantity rounding must be set to Y (yes). As long as the quantity entered at Point of Sale doesn't ever meet or exceed the "From" value, the resulting add-on quantity will always be one (1). This would be used when you only want one of the add-on regardless of the quantity being sold of the parent or "trigger" SKU. Exceptions & ConsiderationsDeposit type items associated with a "Rental" type item as the add-on default to a negative (-) quantity when the rental item is being returned (in this case, the rental item has a positive quantity due to the way rentals are handled). Certain types of items are not allowed as "add-on" SKUs. With release 10.3.1 (March 2015), both fixed and variable price material lists are now allowed. If you choose to use an "add-on" SKU as a way of handling a deposit or fee, etc., you should be aware that sales totals and financial data are affected the same as if an actual item was being sold. You can place such items in a separate product group and map that group to different accounts to handle this situation in the ledger (to treat the item as an expense, liability, or form of income, for example). There are other ways of handling certain types of fees and deposits in most cases that don't involve the use of an item. If an item is added to a transaction and the "add-on" SKU is then deleted from the item grid, changes to the origin item's quantities will not re-add the missing add-on SKU. A dialog "Unable to Retrieve Associated SKU" is provided in these cases to warn the user. |

Substitute Item
Substitute items are items that can be sold as replacements for this item should the original item not be available for sale.
Price Matrix
A price matrix is a code linking to a group of multipliers that calculate price levels based upon a specific price, a multiple of the suggested list price, or multiplier using either current market, last receipt, or weighted average cost (the same as a markup). These differ from the normal way level pricing is defined because instead of percentages, multipliers are used. Use the Settings ![]() icon to create or modify a matrix code. The drop down lists any codes that have been previously added.
icon to create or modify a matrix code. The drop down lists any codes that have been previously added.
If a Price Matrix is removed from an item, pricing must be reset. How this is done depends upon a few things. For items that originally were created with no price matrix, the original levels assigned prior to the matrix being added are restored. If the original item record was set up with a price matrix, it's necessary to instead convert the multipliers to percentages based on the following calculation:
((multiplier - 1) * 100)
Any time an item's matrix assignment is modified, a warning is produced suggesting that the user verify the reset pricing prior to processing. Changes made to the definition of a code require that any items assigned to that code be updated (this is not automatically done). This can be done either individually by modifying and re-saving the items or by using the Price Changes transaction in the Inventory area (choose Price/Cost Entry, and then Import (F2) items by Price Matrix code and Process (F12)).
Locations
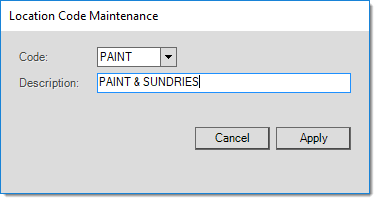
This area is used to optionally specify up to t locations for the item. The first input is the "primary" location; the other two are alternates. Locations are intended to be used for stocking or physical inventory purposes; however, the use of locations is entirely optional, and they may be used in any way your company chooses. Use the Settings ![]() icon to add or modify location codes. Location codes are not specific to a particular location assignment. Once added, they immediately become available for use with all locations.
icon to add or modify location codes. Location codes are not specific to a particular location assignment. Once added, they immediately become available for use with all locations.
Purchasing
Purchasing settings are used primarily with automated purchasing (builds) and don't affect manual purchase orders. Using automated builds can greatly reduce the amount of time required for putting together an order; however, effective use of builds requires some setup and on-going maintenance to "tweak" the settings to your needs. For users who are new to the software, there won't be much history (such as usage) for some settings with "automatic" options, so manually configuring settings at first is probably best.
The two most important settings required for basic build functionality are the minimum and maximum quantity fields. These represent (a) the re-order point and (b) the desired "shelf" or stocked quantity respectively. Automated builds are typically best used with hard goods (tools, hardware, etc.) rather than commodities such as lumber where market conditions have a much stronger impact on purchasing decisions.
Seasonal Code
The Seasonal code is used to determine the months that the item should be stocked. Use the Settings ![]() icon to add or modify seasonal codes that apply to the item. Seasonal codes affect build calculations for purchase orders. A seasonal cycle of 12-months is assumed in the absence of a specific seasonal code. If an item should be ordered throughout the entire year, leave this field blank.
icon to add or modify seasonal codes that apply to the item. Seasonal codes affect build calculations for purchase orders. A seasonal cycle of 12-months is assumed in the absence of a specific seasonal code. If an item should be ordered throughout the entire year, leave this field blank.
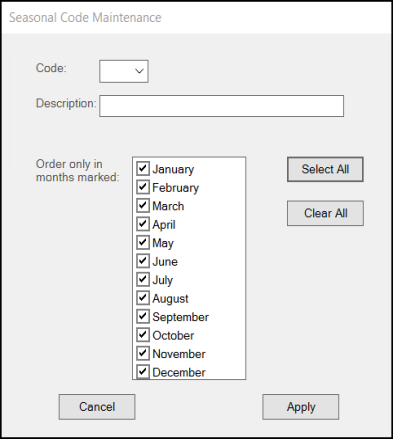
When setting up seasonal codes, consider the time period the item should be ordered during rather than when items will be sold. A good example would be a business in the Northeast who sells snow shovels during the cold weather months. Although some of their customers may still buy snow shovels in March, fully replenishing their stock at that time would likely leave the company with goods (shovels) that won't be sold until next season. For this reason, they'd likely only re-stock shovels up to a certain point in the Winter season. In addition, they might place their initial orders for shovels in the Summer or early Fall prior to bad weather. In this case, the seasonal code would include the months the shovels would be ordered, and not the entire period they'll be sold during.
Days Supply
Days supply indicates the desired period (in days) that an item should be maintained (stocked) for when using automated ordering (PO builds) for purchasing. For example, when ordering a product, I may want to order enough quantity to last 30-days. This calculation is based on the item's maximum quantity and committed quantity during the period. Maximum quantity is the desired "shelf" (on-hand) quantity when fully stocked. Committed quantity is the quantity committed to customer orders, pending transfers, manufacturing, etc. In addition, this setting is sometimes used when determining the usage period for calculating daily average usage.
Minimum Quantity
Minimum quantity is the lowest quantity on-hand that should be maintained for the given item. This is used for purchasing and is frequently used with automated PO builds. Minimum quantity can also be calculated based on a percentage of the maximum or adjusted by the item's specified lead time. Items with a zero minimum and maximum quantity are not included on purchase order builds.
Usage Interval (Int)
If a usage interval is entered (above zero), it will be used in place of days supply to calculate the average daily usage used for automatic adjustments made to maximum quantities. If the maximum's adjustment type is set to "system automatic adjustment," the Adjustments activity located under Purchasing can be used to update the maximum and other purchase related settings when needed. Although it may sometimes make sense to use a specific period for calculating a new maximum, it shouldn't be set too high. Seasonal changes in usage wouldn't really be considered appropriately and you lose some of the benefits of an automatic calculation.
For example, if this figure is set to 60-days and the current date is June 23rd, the prior year period used for determining average usage would be June 23rd - 30th (7 days), all of July (31-days), and the first 22 days of August.
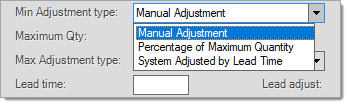
Minimum Adjustment Type and %
Minimum quantities can be manually set, based on a percentage of the maximum quantity, or adjusted automatically using lead time. Select how this item's minimum quantities should be set choosing one of these choices:
(1) Manual Adjustment,
(2) Percentage of Maximum Quantity, or
(3) System Adjusted by Lead Time. When you select the Percentage of Maximum Quantity option, enter the percentage in the Percent field.
When you select the System Adjusted by Lead Time option, enter the amount in the Lead time field.
Maximum Quantity
This is the desired stock or shelf quantity for the item when fully stocked. This is used mostly for purchasing and can be used with automated builds to determine how much to order. When maximum quantity is "system adjusted," usage and days supply can be used to calculate a new maximum quantity from the Adjustments activity under Purchasing. Items with a zero minimum and maximum quantity are not included on purchase order builds.
Maximum Adjustment Type
Maximum quantities can be manually set or adjusted automatically. Select how this item's maximum quantities should be set choosing one of the following choices:
(1) Manual Adjustment or
(2) System Automatic Adjustment. If used, the Automatic Adjustment will calculate a maximum based on usage and the number of days supply or usage interval specified for the item.1 The "System Automatic Adjustment" requires the use of the Adjustments activity under Purchasing to initiate the calculation of new maximum quantities.
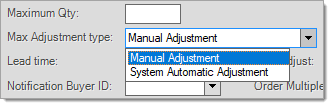
1Usage Interval is used in place of days supply if set.
Lead Time
This is the number of days between when the item is ordered and when it is received. This might be determined by the vendor, the particulars of the item, or your company's purchasing procedures. For example, a company might purchase widgets from vendor XYZ, but only places orders once every 2 weeks... in this case, the lead time would be 14 (days).
Lead time is used to calculate a POQDue (Purchase Order Quantity Due)* figure which is then used by purchase order builds for determining the quantity to order (quantity needed). The requirement (order) quantity is adjusted (reduced) by the quantity of the item expected to be received from Purchase Orders due within the lead time period. This can help avoid duplication when an item already has been ordered on another Purchase Order when another build is processed. If the item's lead time is set to zero (0), a default lead time of 7 days is used when POQDue is recalculated.
*The POQDue is the purchase order quantity due within the lead time period. This figure is recalculated any time the item is processed on a purchase order, inventory receipt, or inventory transfer document. POQDue is also updated daily by a SQL scheduled job or task (usually this runs prior to midnight, but adjusts the date based upon the run time).
Lead Adjust
The software can automatically adjust lead time based on purchases. To enable this feature, select "automatic" in this field; otherwise, lead time is a manually determined figure. The "automatic" setting causes the lead time to be re-calculated each time a receipt of inventory is done. The last 4 receipts for the item are used to determine an average lead time. The number of days difference between order date and last receipt dates for the last four purchase orders that were received for the item are averaged to determine the new lead time (in days).
Order Multiple (Preferred)
This setting determines the item's preferred vendor multiple for purchasing (if any). The value must be an integer (numeric) value between 0 and 3. A zero means there is no preferred multiple and lets the software determine which one to use based upon the needed quantity. Values 1 to 3 correspond to the vendor multiples located on the Purchasing tab (also in Item Maintenance). Vendor specific purchasing settings can be set up for up to 3 vendors, and each vendor can have up to 3 levels of multiples defined.*
*Some vendors offer different cost pricing based on the quantity being ordered. The vendor levels are used to define these.
As stated above, a zero value allows the software to determine which multiple level to use during purchase order build processing. Why override this? The ability to override the level is really intended for companies with more than one location. In these cases, each location may have different considerations and preferences regarding ordering a particular item. These might be based upon the size of the location and/or sales volume, as one example.
Default Unit of Measure Settings
Units of measure define the numeric relationship between quantities and pricing. Most of the unit of measure types are intended for use with particular functions such as Point of Sale quantities or Purchasing costs, for example; however, it is possible to modify some defaults using these settings. These defaults are applied in specific transactions only.
Point of Sale Quantity
This determines the default entry measurement to be used for quantities of this item in Point of Sale activities. This does not affect how item quantities are reflected in folders (most quantities are reported using the item's BASE measure only). The Point of Sale quantity measure can affect Unit of Measure pricing if used with the item. Only valid unit of measure prices that do not match this measure will be applied.
Point of Sale Price
Choose the default measurement to be used for unit prices (U/P) during Point of Sale activities.
PO/Receipt Quantity
This measurement will be used for quantity entry on purchase orders and during receiving.
PO/Receipt Cost
This measurement will be used for cost pricing display and entry on purchase orders and during receiving.
Price Updates
This measurement unit is used when performing pricing updates.
Physical Count Quantity
This determines the initial quantity entry measure used for ALL physical count entry for this item. This is used despite whatever method of entry is being used includes scanning barcodes linked with a different unit of measure. After the count is entered in this unit of measure, the quantity is immediately adjusted (converted) to the item's BASE unit of measure. The entry unit of measure is not printed on any resulting documents including Count Worksheets. Custom reports may be designed to use this measure if desired.