Item Analyzer
The Item Analyzer Utility compares a vendor's catalog records with matching items in your inventory to identify differences between the two. Changes by the vendor or differences in inventory setup can cause issues with purchasing, which makes this utility helpful. After you complete this analysis, you can make changes to the inventory records based on the differences you see. You use the Item Maintenance form (Inventory > Database > Item) form to make these changes.
To compare your inventory items to the vendor catalog records:
1. From the Main Menu, choose Inventory > Utilities > Item Analyzer. The Item Analyzer form displays.
2. From the Vendor list, choose the vendor whose records you want to compare to your inventory items.
Note: This list only shows vendors you have catalog records for.
3. In the Select fields to compare list, choose the check boxes of the fields you want to compare.
This list of fields is the same for all vendors, except for True Value. There are some additional fields to compare for that vendor.
4. Choose View (F8) to populate the data grid.
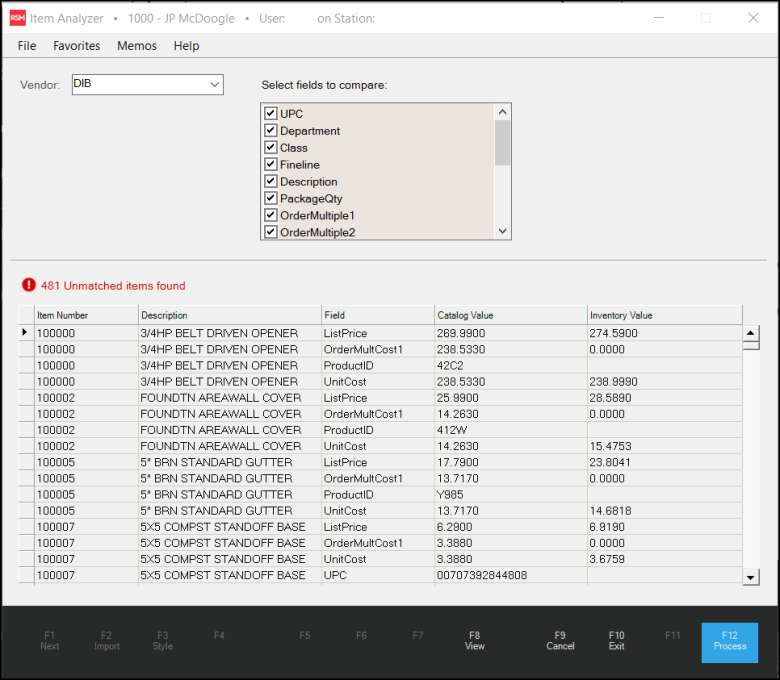
The data grid updates to show the records that have mismatched data between the item records in inventory and the vendor's current catalog. When an item has more than one mismatch in the same record, the item displays more than once in the list.
5. To print this list as a report, right-click the data grid and choose Print. Using this option, you can adjust the page orientation and other settings before printing.
What Fields does the Item Analyzer Compare?
This is the list of fields the Item Analyzer compares, depending on whether the vendor is True Value or not. You can look up the field definitions in the Data Dictionary. You can get the Data Dictionary Custom Report from the Customer Portal.
|
Vendor |
Catalog Fields |
|---|---|
|
Default |
UPC, Department, Fineline, Class, Description, OrderMultiple1, OrderMultiple2, OrderMultiple3, OrderMultCost1, OrderMultCost2, OrderMultCost3, PackageQty, Discontinue, VendorUM, ListPrice, UnitCost, PrimaryVendor, Weight |
|
True Value |
UPC, Department, Fineline, Class, Description, OrderMultiple1, OrderMultiple2, OrderMultiple3, OrderMultCost1, OrderMultCost2, OrderMultCost3, PackageQty, Discontinue, VendorUM, ListPrice (True Value Suggested), UnitPrice (Variable Price), UnitCost, PrimaryVendor, Weight, DiscontinueReason, Model |
IMPORTANT: This utility does not change any settings on inventory items unless you have the proper permissions. It's just a tool for comparison. Changes would typically be made in Item Maintenance. If you wish to update prices through the Item Analyzer tool, the steps do so are documented below.
Using the Item Analyzer to Update Prices
You can also use the Item Analyzer to update prices of the selected items in the data grid. Your user ID has to have the Allow Item Updates through Item Analyzer and/or Allow Price Changes through Item Analyzer permissions enabled to use this process. These settings are in the Application Security list.
This process begins by collecting the records you want to update into a file (using this utility) and then performing the update by applying the file using the Price Update feature. We cover this process in these instructions.
To use the Item Analyzer to update List Price and Unit Cost entries to match the entries in the current vendor catalog:
1. From the Main Menu, choose Inventory > Utilities > Item Analyzer. The Item Analyzer form displays.
2. From the Vendor list, choose the vendor whose records you want to update to your inventory pricing fields.
3. In the Select fields to compare list, choose the List Price (Suggested List) and/or the Unit Cost (Market Cost) check boxes.
Note: You can update one or the other or you can update both entries, if you need to.
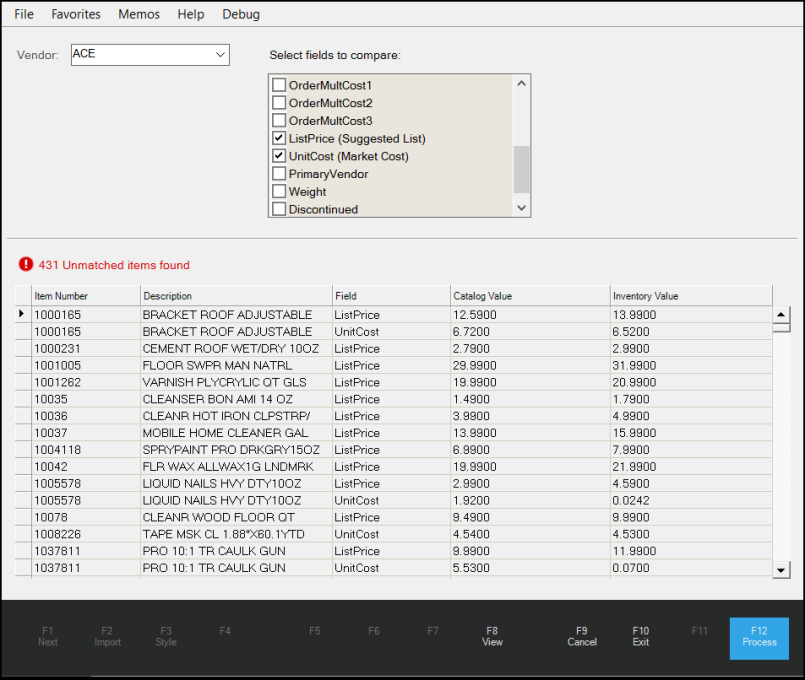
4. Choose View (F8) to populate the data grid.
5. To set up the price update for the list price and or unit cost entries for the items in the data grid, choose Process (F12).
The selected items will be modified message displays.
6. Choose Yes to continue or No if you are not ready to create the price update file. Another prompt displays to confirm your selection.
When you choose Yes, the application creates an Unapplied Price Update file with the data from the grid in it and displays this message:

7. Click OK to continue and click Menu (F10) to return to the Inventory menu.
8. From the Left Menu, choose the Price Updates option. The Price Updates form displays.
9. Choose the Price/Cost Entry button and the Effective Date of the price change as appropriate. The Copy in existing price update data message displays.
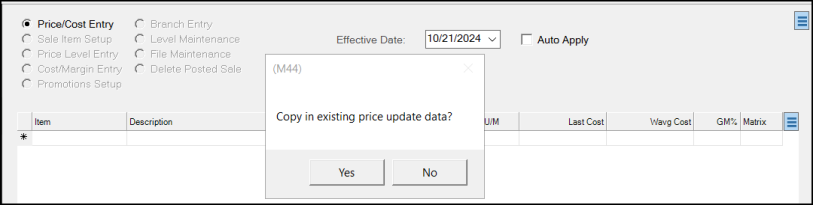
10. Click Yes to apply the changes in the unapplied price updates file to the application or click No to return to the form without applying the changes.
When you select Yes, the application updates the data grid with the information from the unapplied price update file.
11. Select the Auto Apply check box to apply the price changes to inventory items in the data grid based on the settings in the unapplied price updates file.
12. Choose the Process (F12) key to continue. The Branch List displays so you can choose the branches these changes apply to.
13. Choose the check boxes for the branches you want to include and choose Accept.
Note that the prices may differ because of unit of measure conversions. The value in the catalog is based on the purchasing UM and the value in the Inventory is based on the retail UM. By taking the catalog price and dividing by the retail UM, you will get the price that is in the suggested list or market cost.