F2 - Import
Import functions vary based upon the transaction and are not offered in all cases.
The F2 (import) key is used to import grid data from an existing document into the current activity.
|
When to use Import (F2) An important distinction to make about the import function is that only copies data (usually item information). Import doesn't create any linkage to the copy source (document, file, etc.). For example, using the Import (F2) function to copy items from a purchase order document into the Receipts transaction won't "receive" the purchase order document. This is because importing only copies item data from the PO document; it does not create any linkage to that document. To receive a purchase order, you would instead use the Receiving (F5) function found in the Receipts transaction. The same rule holds true in Point of Sale. Copying items from a customer order document into a sale won't update the customer's order in any way such as marking it as sold. The Invoicing (F5) function found in the Sales transaction would be used in this case. For most operations, using Import (F2) isn't required, but it can be useful depending upon the need. |
Document
The Document option allows you to choose an existing

Document Selection
In some transactions, additional "document" import selections are provided that filter on a specific document type or types. These are listed as separate import options, but are functionally the same.
Import functions vary based upon the transaction and are not offered in all cases.
The F2 (import) key is used to import grid data from an existing document into the current activity.
|
|
Importing Transaction Documents
The Document option allows you to choose an existing
Document Selection
In some transactions, additional "document" import selections are provided that filter on a specific document type or types. These are listed as separate import options, but are functionally the same.
Processing Ecommerce Submissions (Orders/Quotes)
After a customer submits an order or quote online, the submission should be either processed or rejected by your company. The ecommerce order, quote, or payment doesn't become an actual transactions until someone at your company imports them and processes them. The process is the same for orders and quotes, so we show the order process here. Quotes don't have payments associated with them, typically, but essentially the process is the same. When a customer that does not have a receivables account submits an online order, you can use the Cash account to process the transaction.
To process an ecommerce order or quote:
1. From the Main Menu, choose Point of Sale > <Orders or Quotes>. The appropriate entry form displays.
2. Choose the required account or choose the Cash account and click Tab to add a new Order number. The Import (F2) key enables.
Note: For some accounts the Job # entry is required.
3. Choose Import (F2) and from the context menu, choose the E-Commerce menu item.
The Import E-Commerce Quote/Order dialog box displays. In the ID list, only orders or quotes that match the customer ID you selected display. If a particular submission is assigned to a job other than the transaction's current job selection, the application will update the transaction to reference the submission's job after the submission is complete.
For Cash accounts, you may need to obtain some order information from the customer to identify the order in the list.

4. From the ID list, choose the transaction you want to process.
A Note About Deleting an Ecommerce Transaction. You can delete a transaction at this point if you need to clear a duplicate submission or remove a canceled request at the direction of a customer. To delete an ecommerce request, click the Menu Marker  icon and select the Delete option.
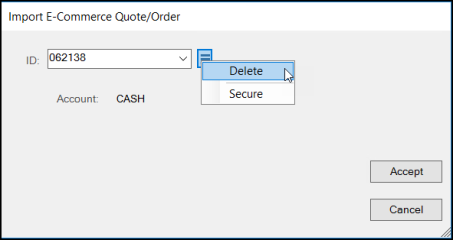
A confirmation prompt displays. Choose Yes to delete the order or quote. You must have specific permissions to perform this action.
You must delete an ecommerce submission before you accept it. This is not the same as rejecting an order or quote (see the IMPORTANT! message below).
5. To import the selected ecommerce transaction, choose Accept.
The items listed in the transaction populate the data grid. After you accept an order you have two options. You can reject the order/quote (as when you don't have the stock to fulfill the order) or you can process the order. If you need to reject the online ecommerce order, see Rejecting an Ecommerce Order/Quote.
6. Review the transaction details to see if there are any changes and to verify that the materials the customer has are the ones they ordered. Typically, online orders are paid in full using a third-party processor, so you do not need to process a payment for these transactions.
However, if the customer only paid a deposit, the application may prompt you to process the payment for the balance. In these cases, it is usually for an account that has a card on file, so you would process the payment using that payment method. You may also process the remaining payment to the account as a charge, if the customer wants to use that option. We recommend that you contact the account customers directly if you are not sure how this process should work for this transaction.
7. When you are ready to process the transaction, choose Process (F12). The appropriate process Document displays.
8. Complete any adjustments or delivery steps that are required for this transaction and choose Finish (F12) to complete the process.
A Note About Importing UOM Tally Items in Ecommerce Orders
When you sell UOM-based tally items online, how the application handles the order import process depends on the platform (Spruce eCommerce or Ecommerce API) you use to do business.
-
Spruce eCommerce
For this platform, the application only allows an overall tally quantity during the order process.
The application converts the tally quantity into the individual UOM quantities supported at Point of Sale. -
Ecommerce API
For this platform, the application only allows an overall tally quantity during the order process. The processing is managed slightly differently for manually processed and auto-processed orders-
If the order includes a UOM tally item and is auto-processed, the application saves the tally item quantity details with the customer order and displays these quantities in the item's Description field on the order document.
-
If the order includes a UOM tally item and is manually imported and processed, the application displays the UOM quantities and totals (in the Unit of Measure Tally box) when you click the Description field after importing the order into the data grid. This ensures the UOM tally item order details display correctly for internal picking teams and in the order document.
-
Rejecting an Ecommerce Order/Quote
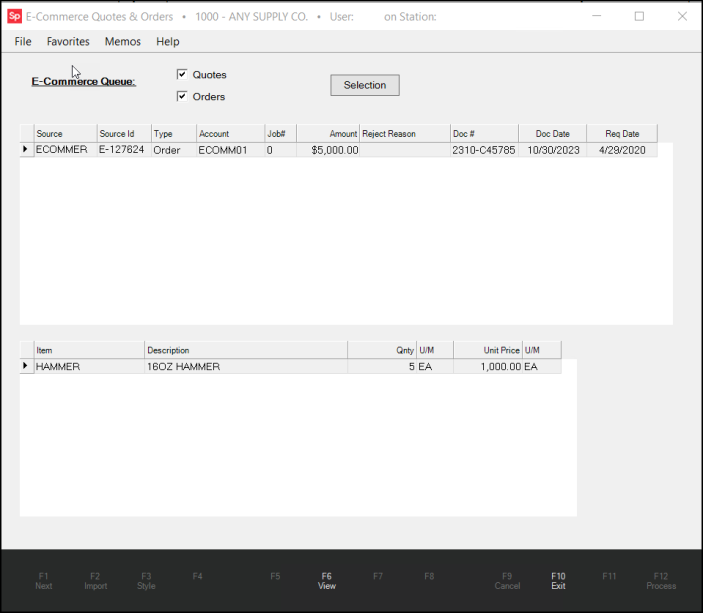
Rejected submissions remain available for processing in the future. They display in the Import E-Commerce Quote/Order ID list with the reason selected in the Status column.
To reject an ecommerce transaction after accepting the transaction and displaying it in the data grid:
1. Click the Menu Marker  icon next to the data grid and choose the Reject E-Commerce Order option.
The Reject E-Commerce Quote/Order box displays.

2. From the Reason list, choose the reason for the rejection of the transaction and enter any detail needed in the Additional Comments field.
3. Click Accept to process the rejection.
The application saves the reason code and the message with the submission. The application sends a notification to the customer (if they have an email address associated with the account's billing contact) whenever an ecommerce submission is rejected.
|
Important! Deleting a submission is not the same as Rejecting a submission. Deleting does not send any notification to the customer and the submission is removed from the application permanently. Rejecting a submission notifies the customer that there is an issue and allows you to choose a reason and type in a message regarding the problem. Rejected submissions are not removed and do remain available for future processing in the event that the issue is resolved. For these reasons, deletion should only be used for clearing duplicate submissions, old rejected submissions, or removing an unwanted submission at the direction of a customer, for example. |
What if I accept an ecommerce request and then cancel the transaction (Cancel (F9))?
Canceling leaves the submission untouched. It will remain available for future selection and processing (or later rejection).
What happens if I reject an ecommerce quote or order?
The quote or order remains available for future processing, but the application updates the record with the rejection status and comment. The application sends the customer a notification (if the email address is available). They can also see that the order or quote was rejected in the ProLink app (under either Orders or Quotes). The application also updates the record for display in the website.
What happens after I process an ecommerce order or quote?
If the account's primary (billing) contact has an associated and valid email address, the application sends an email notification that their order or quote was processed (when you have enabled the Confirmation Emails settings in the Ecommerce parameters). In addition to this notification, the customer can check the website to see when their order or quote has been processed (approved).
How can I view ALL ecommerce order/quotes?
Yes. Go to Inquiry > E-Commerce (E-Commerce Inquiry) to view all or selected order or quote requests with item details.
One other option is to use the system CASH account in either an Order or Quote transaction and then choose Import (F2), E-Commerce. All orders or quotes are listed when the CASH account is being used. After a selection is made, the transaction's account and job are reset to match the account and job assigned to the submission.
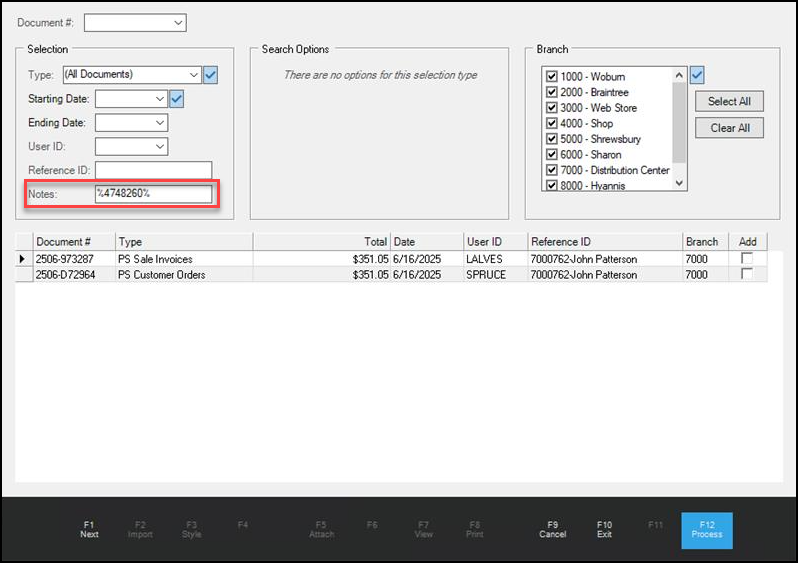
Note: If you are looking for a Spruce eCommerce order (with a SPEC-specific ID), we keep track of this information in the Order and Sale documents linked to the transaction. You can use the Document Viewer to search for the ID by entering the seven-digit ID in the Notes field between two % symbols.