Using the Changes in this Release
This section explains how to use the changes in the version 28 and 28.1 releases.
-
To review the major release changes in this release, see the Major Features.
-
To review defect resolutions for this release, see the Resolution Log.
Key Features:
Understanding the ECI Mail Process
Using the Do It Best Rewards Rewards ID National Lookup API
Using the Contract Sales Invoice Document Style
Using the PSN to Send Retail Data to Do It Best
Syncing Application Inventory Changes with Spruce eCommerce
Updates Add Statement and Invoice Discounts to Spruce eCommerce Websites
Remote Client Update Process Ensures Better Results
Understanding the ECI Mail Process
LBMH03-4872 - ECI Mail uses a third-party email platform to manage Point of Sale, Purchasing, Receivables, and eBlast communications for companies that use Gmail. The ECI Mail process ensures that the email addresses you have stored in the application for your business, your customers, and your vendors work as they have in the past. This process has been set up for you in the background and requires no changes on your end. This feature is part of the version 28.1 Release.
Note: If you created an App Password for your store's Gmail account and saved this password in the application, as described here, the changes that Google is making will not affect you. You can continue to use your existing email process to communicate with customers and vendors. You can still use this App Password process rather than the ECI Mail process discussed below if you prefer.
Understanding the ECI Mail No-Reply Address Formats
The ECI Mail parameters are proprietary and confidential. This ensures better security. These settings are enabled for all businesses that use Gmail and are deployed to your application automatically with the version 28.1 update. The ECI Mail process uses a no-reply address and embeds an appropriate <reply-to-address> within the body of the email, so your customers and vendors can reply to your emails directly. The format of the no-reply email address is based on the type of email you are sending and your application’s delivery platform.
For most emails, such as sending invoices, statements, and purchase orders, there is a standard no-reply email address that is specific to your environment:
-
For Hosted businesses, this is the no-reply email address format: noreply@spopsh.ecilbmh.com.
-
For On-Premises businesses, this is the no-reply email address format: noreply@spops.ecilbmh.com.
For eBlast emails, because there are a lot more of them going out at once, ECI Mail uses a different no-reply email address, depending upon your application's delivery platform:
-
For Hosted businesses, this is the no-reply email address format: noreply@spmkth.ecilbmh.com.
-
For On-Premises businesses, this is the no-reply email address format: noreply@spmkt.ecilbmh.com.
Note: This new process makes no changes to the Subject line logic. This works as it always has.
The use of these no-reply email addresses means that the reply process will be slightly different now. The “reply to” email addresses you have created for customer and vendor responses in the application (for statements, invoices, purchase orders, etc.), will be embedded in the body of the emails due to the ECI Mail process. While your customers will not be able to click Reply to respond to you, the emails they receive will contain an address that uses the same reply email address as before.
For most email clients, this text will display as a link that the responder can click to begin a new reply email. With others, the responder may be required to copy and paste the <reply-to> address into a new email to reply.
Understanding the <reply-to-address> Settings
When your customer or vendor receives an email from you using this new process, they cannot reply to the no-reply address the email comes from. At the top of each email, there is embedded text that contains a <reply-to-address>:
-
** Please direct replies to the following email address: <reply-to-address> **
But how do you know what the <reply-to-address> is?
In the Parameter Settings > Setup > System tab, if the Default check box is enabled (checked), the application embeds the From Address field entry as the <reply-to-address>:
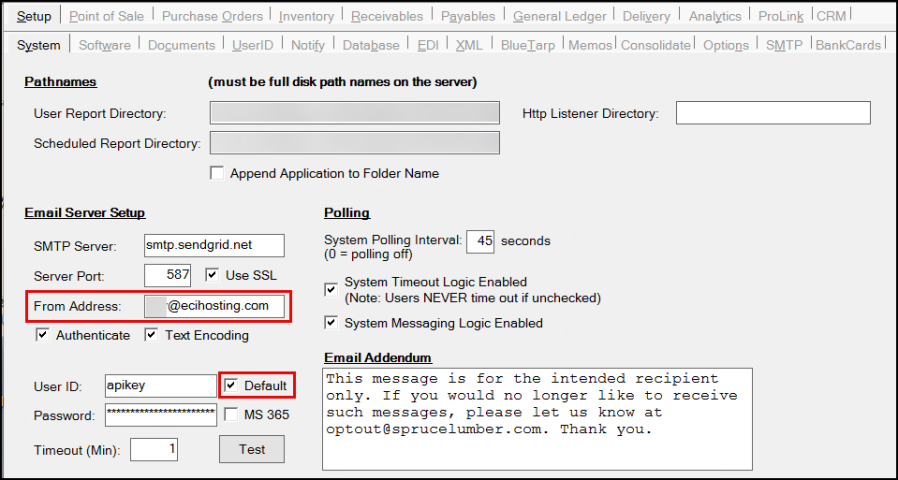
If the Default check box in the Setup > System tab in Parameters is not enabled (unchecked), ECI Mail uses the current email address logic in your system for the <reply-to-address> based on the type of email that you are sending. For example:
-
For statements and invoices, the <reply-to-address> would be the email address set in the Branch Setup form:
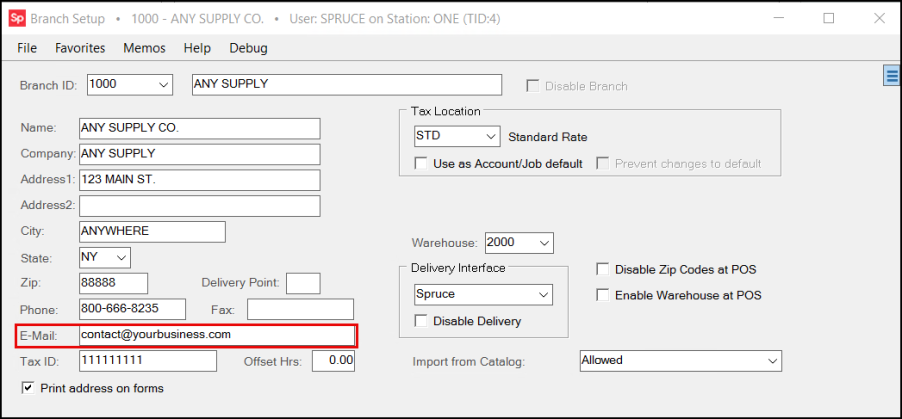
-
For Purchase Order transactions, the <reply-to-address> is the From Addr field entry in the Transmit > Email tab of the Process form. The email address may also be tied to the contact you choose from the Contact list.
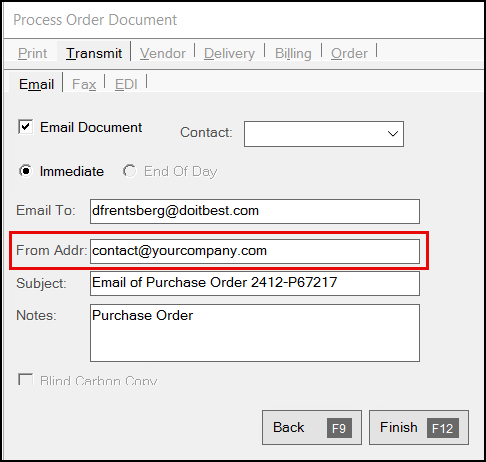
-
For eBlast emails, the <reply-to-address> is the From address entry in the Mass E-Mailing form.
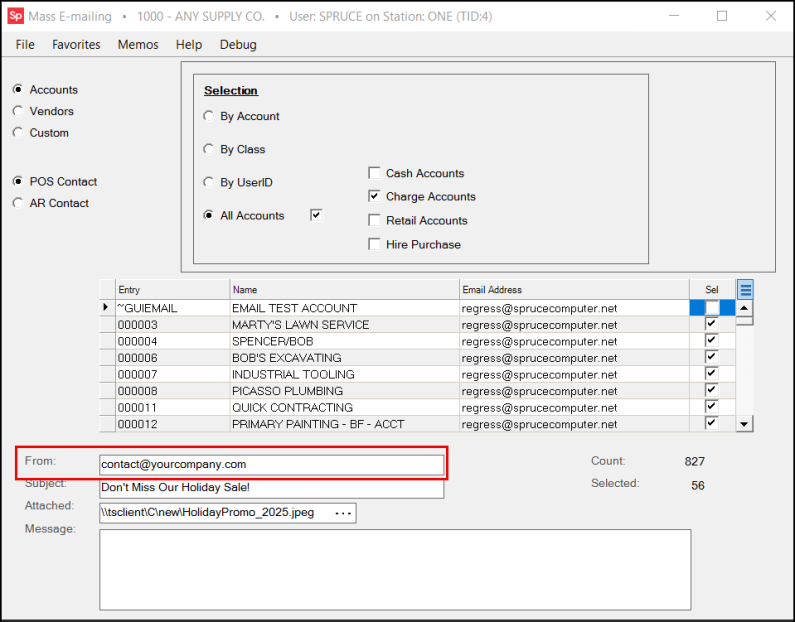
For all other types of email communications, the address will default to your current email notification settings in the application.
Using the Do It Best Rewards ID National Lookup at Point of Sale
Typically, when your customer enrolls in the Do It Best (DIB) Rewards program at your store, the application saves the rewards ID locally and considers your store the customer’s Preferred Store. Whenever the customer makes a purchase of DIB products, they collect points that they can apply to future transactions to save money. When a DIB Rewards customer who usually shops at another business comes in, and they want to apply their points to a DIB sale, you can now look up their rewards ID in the Do It Best National Lookup API online. This way, they can tie the points they earn or use to their existing rewards account, even if they normally do business in another store.
When a customer signs up with DIB Rewards in another branch of your business, the application applies the Preferred Store status to the current branch and skips the national lookup process.
You can decide how this is handled by selecting the Disable Preferred Store Check option in the branch settings discussed below.
-
When you select the Disable Preferred Store Check check box, the application skips the local lookup of the rewards ID and only checks for it online. That is, the application will check the DIB National Lookup API every time a customer gives you a Rewards ID card without checking the local settings.
-
When you do not select the Disable Preferred Store Check check box, the application looks for the Rewards ID locally, and if it finds it, it skips the national look-up search. This can save time for your current customers.
These instructions assume your business supports the Do It Best Rewards program in your branches/store(s) and you have set the program up in the system parameters.
Before you begin, make sure you have a unique API Subscription Key for each branch that applies Do It Best Rewards to your DIB customer transactions.
Setting up the Do It Best National Lookup API for a Branch
LBMH03-2123, LBMH03-2176 – To set up the Do It Best (DIB) National Lookup API to retrieve your customer’s Do It Best Rewards data, complete the settings below. Complete these instructions for each branch that will use the national lookup API using the Do It Best branch-specific API keys. These instructions assume the Do It Best EDI properties have been set up in the Parameter Settings > EDI > General tab form.
To add the Do It Best National Lookup API settings to your application:
1. From the Main Menu, choose Maintenance > Database > Branches. The Branch Setup form displays.
2. In the Branch ID list, choose the branch you are completing this process for.
3. In the EDI tab, choose the Do It Best ID from the Settings for list. The Do It Best settings display.
4. Click the Menu Marker  to display the menu options.

Branch Setup > EDI > Do It Best Program Settings Option
5. From the context menu, choose Do It Best Program Settings.
Note: This menu option used to be Best Rewards Settings.
The Do It Best Program Settings box displays. Options not listed as required are optional.
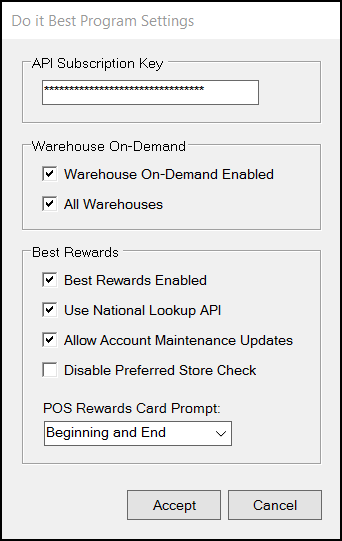
Branch Setup > EDI > Do It Best Program Settings
6. Complete the entries and selections in this box as follows:
-
API Subscription Key
Enter the branch-specific API key for the current branch (from Do It Best). This is required.
Note: If you do not add this key or the key is not valid, the API cannot authorize the connection to the DIB database. This error message displays:
API returned Error 400: Access to the requested URL is not authorized. -
Warehouse On Demand Settings
Depending on whether your business uses the Warehouse On Demand or all warehouses options, select one or both of these warehouse settings check boxes. -
Best Rewards Enabled
Select this check box as it enables the other check boxes below it. This is required. -
Use National Lookup API
Select this check box. This is required. -
Allow Account Maintenance Updates
Select this check box to allow the API to update your account maintenance settings based on the customer’s rewards program information from the DIB database. This is not required. -
Disable Preferred Store Check
Select this check box if you want the application to use the National Lookup API whenever a customer uses a DIB Rewards cards. If the customer is based in your store, this may make the look-up process take longer. -
POS Rewards Card Prompt
Choose when the Salesperson will be prompted to ask the customer for their Do It Best Rewards card. Typically, this entry is already set if you use the DIB Rewards program.
7. When you have completed these settings, choose Accept to save them locally.
8. Choose Process (F12) to save these settings to the database.
9. Repeat these steps for each branch that will use the DIB National Lookup API.
Looking up Do It Best Customer Rewards in the National Lookup API
LBMH03-2201, LBMH03-2209, LBMH03-2217 – The National Lookup API allows Salespeople to look up Do It Best Rewards information for customers, even if there account is not based in the current store. If the Salesperson enters or scans the Best Rewards Loyalty ID and clicks Lookup, the application checks to see if the loyalty ID is saved locally.
-
If the application finds the Rewards ID locally, the application proceeds to the Sale Entry process with the Rewards ID listed in the form.
-
If the customer’s Best Rewards ID is not found locally, the application looks it up in the DIB National Lookup API. If the API finds the customer’s Rewards ID, the application applies the Rewards ID to the transaction, but may not save it to the branch record; the exception to this rule is when the ID is associated with a different branch associated with the same business.
-
If the customer doesn’t have their card with them / doesn’t know their Rewards ID number, the Customer or the Salesperson can enter identification information (ID or Phone Number OR Phone Number, Email, Postal code, or Name) so the National Lookup API can find a Rewards ID that is associated with the given information. If the Rewards ID applies to a local account, you can choose to apply it to the branch account.
-
If the customer has not enrolled in the Do It Best Rewards program but wants to be, you can scan a new card to apply the new Rewards ID to a local branch account using the New Membership record. If the account already exists in the branch you can use the branch information to populate the New Membership record.
To see this lookup process in action and apply the customer’s Rewards ID to a sales transaction:
1. From the Main Menu, choose Point of Sale > Sales. The Sale Entry form displays.
Depending on the POS Rewards Card Prompt you selected, the Loyalty Program box displays with the Best Rewards button in it. The Salesperson can select <Ctrl R> to display the rewards prompt options as well.
2. Choose the Best Rewards button to display the Loyalty/Rewards ID prompt.
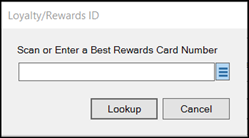
Sale Entry > Loyalty/Rewards ID Box with Lookup Button Highlighted
Note: If you have not completed the Do It Best National Lookup API setup described here, the Lookup button is Accept instead.
3. Continue based on the circumstances of this transaction:
-
If the customer knows their rewards ID or has the card with them, scan or enter the ID in the field provided and press Lookup.
-
If the Rewards ID matches an existing branch account, the Sale Entry form displays the account information and updates the Rewards ID field with the ID entered. You can begin adding the transaction.
-
If the Rewards ID does not match an existing account, the application sends the Rewards ID to the National Lookup API to search for it. If it finds the Rewards ID in the API, but it does not apply to a local branch account, the application adds it to the transaction.
-
-
If the customer doesn’t have their card and wants to enter either their phone number or Rewards ID number on the pin pad, choose the Menu Marker
 next to the field to display the Pin Pad Prompt options. Choose either Card Number or Phone Number. The application displays a message to prompt the customer to enter the number on the key pad.
-
If the ID or the phone number matches an existing account for the branch, you can begin the transaction.
-
If the ID or the phone number does not match an existing account, skip to step 5.
-

Loyalty / Rewards ID > Pin Pad Prompt with Options
-
If the customer has a Rewards account but doe not know their ID, choose the Lookup button. The Best Rewards National Lookup options box displays.
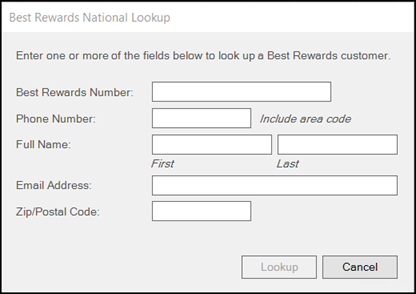
Sale Entry > Best Rewards National Lookup Box
• If the customer does not have a DIB Rewards card and wants one, scan a new card and proceed to step 5.
4. In the fields provided, enter the customer’s information and choose Lookup. One of the following occurs:
-
If you submit information and the national DIB site does not find a match, a message displays to ask you to enter different search information.
-
If you submit information that only matches one national customer, the application searches the branch accounts to see if the customer record matches an existing branch account.
-
If the account you selected in the list matches a branch account, the Sale Entry form updates to reflect the customer’s Rewards ID.
-
If the account you selected in the list does not match a branch account, continue to the next step.
-
-
If you submit information that matches more than one national customer, a list of matching customers displays. Scroll through the list until you find the customer’s record and click it in the list. Then choose Accept.

Sale Entry > Best Rewards National Lookup Results
Note: You can click the column headings to sort the list by City, State, Zip Code, etc.
5. The application displays the New Membership box, where you either can add the Reward ID to an existing branch account or create a new branch account for the ID.
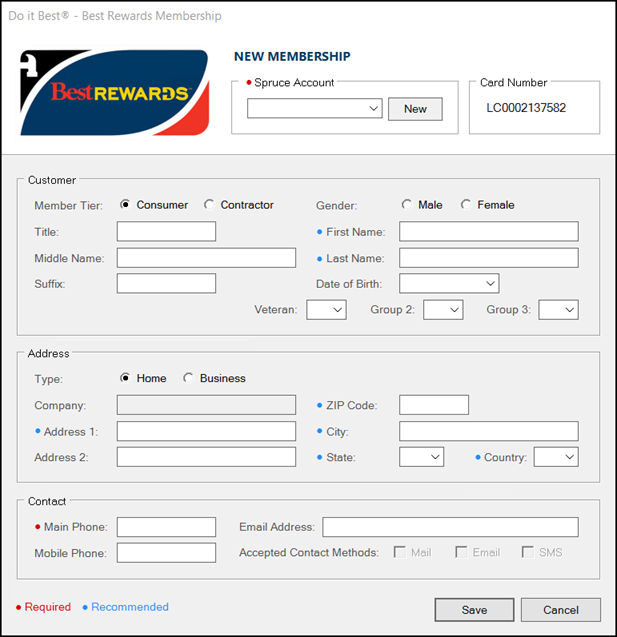
Sale Entry > Do It Best > New Membership Box
6. Complete the required fields and choose Save. Continue based on the circumstances:
-
If you add a Rewards ID to an existing branch account, but the information in the New Membership form is different from the account record, this prompt displays:
Would the customer like to update their customer account with the information entered on the Best Rewards enrollment?
Choose Yes or No.
-
If the Rewards ID is associated with an existing branch account, this prompt displays:
Best Rewards # LCXXXXXXXXXX – Preferred Store # #### is associated with
Account: <Branch Account Number> (Branch Account Name) Would you like to add this Best Rewards number to this customer’s account?
Choose Yes or No.
Note: If the current branch is not the Preferred Store, but the Preferred Store is part of the same business, the application applies the Rewards ID to the account.
-
If the Preferred Store for the Rewards ID you found for does not apply to any of your branch records, this prompt displays:
This Best Rewards member’s preferred store # #### is not associated with any branch record; add anyway?
Choose Yes or No. Consider these options as follows:
If you choose Yes, the application adds the Rewards ID to the account you specified and displays it in the Sale Entry form. This ID will be available for future DIB Rewards transactions.
If you choose No, the application adds the Rewards ID to the transaction only and displays it in the Sale Entry form. The application does not save the Rewards ID to the account record.
The National Lookup keeps track of the points earned or applied to the customer’s Do It Best Rewards account. When you complete these entries, the application displays the Do It Best Rewards ID in the Sale Entry record.

Using the Contract Sales Invoice Document Style
LBMH03-4156 – The purpose of the Contract Sales Invoice document style is to provide a non-itemized contract sales invoice summary that supports up to ten lines of expanded notes and more detail about the adjustments specified in the transaction. The Salesperson can add the notes during the Point of Sale process in the Folders (F4) > Document section. There will also be additional room in the transaction section for adjustment details, so the customer is clear about the additional costs and discounts they are receiving.
In this section, we will describe how you add the notes to the transaction and how to set up the station and the printers to complete the print and document layout work.
Adding the Contract Sales Invoice Style in Station Settings
LBMH03-4223, LBMH03-4231 – For each printer you want to print the contract sales invoices from, you will need to add it to the printer device style settings. Follow these instructions to add this new document style to the printer and tray you want to use:
1. From the Main Menu, choose Maintenance > Database > Devices. The Device Maintenance form displays.
2. Choose the Printer button to display the printer settings options.
3. From the Device Name list, choose the printer you want to print the Contract Sales Invoice from.
4. Consider the printer tray you want to use to print this form from and click the Style # column for that tray.
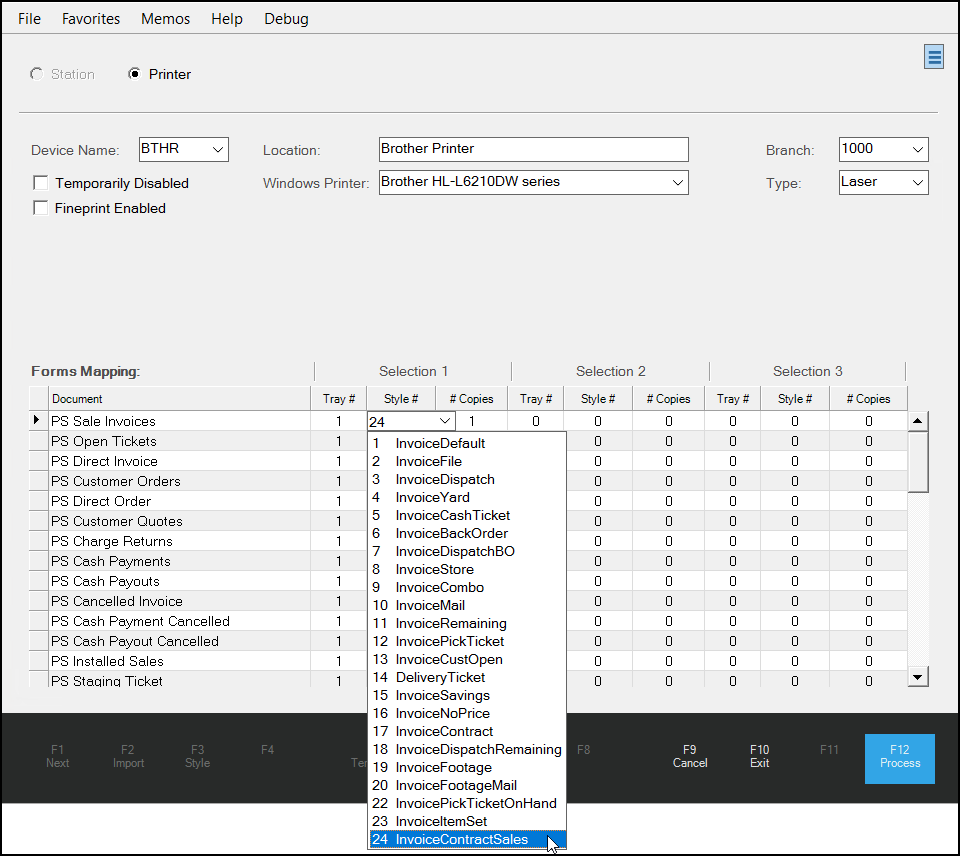
Device Maintenance > Printer > Style # > InvoiceContractSales Style Format
5. Choose the 24 InvoiceContractSales option from the list.
6. Choose Process (F12) to save this change.
For any station that is assigned this printer in the Default Printers settings, when they print a sales, order, quote, ticket, or other invoice from that station, the application will use this format and tray you selected to print the receipt using the Contract Sales Invoice document format.
LBMH03-4271 – To display this document from the Documents list, follow these instructions:
1. From the Toolbar, choose Documents. The Documents form displays.
2. From the Document # list, choose the contract sales invoice document you processed. The document displays using the standard invoice format.
3. Right-click the document and choose the Format > InvoiceContractSales option. The Contract Sales Invoice document displays.
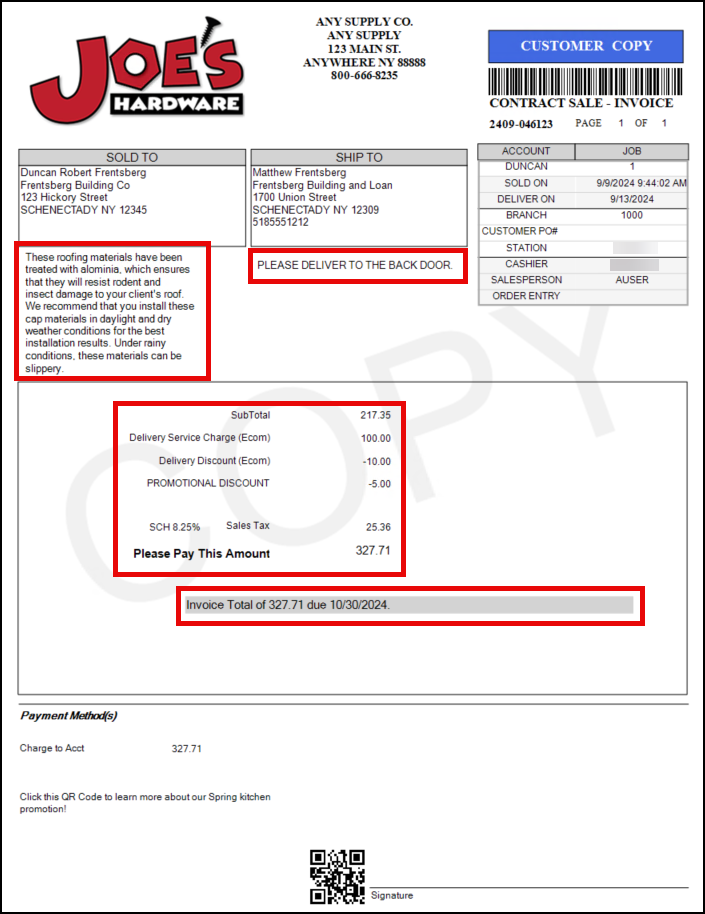
Contract Sales Invoice Document Sample
The Contract Sales Invoice contains up to ten lines of notes from the sales document (described in next section) under the Sold To section and then shows the delivery notes below the Ship To address as in other POS documents. In the Subtotal section, the document lists the invoice total, the details of up to three adjustments, and the sales tax information specific to the transaction. The spacing in this section adjusts automatically based on the number of adjustments. The invoice total and due date information displays below the Subtotal.
Adding Notes to a Contract Sales Invoice Document
LBMH03-4263 – To add notes to the contract sales invoice document you begin in any Point of Sale form. This process works the same way with all types of transactions. You do not need to do anything differently to add adjustments to the Contract Sales Invoice document. This happens in the background of the document process.
To add notes to the Contract Sales Invoice document:
1. From the Main Menu, choose Point of Sale and the type you need to create the transaction you need.
2. Complete the account and transaction-specific choices needed and choose the items the customer is purchasing.
3. Choose the Folders (F4) key and choose the Document tab.

Point of Sale > Folders (F4) > Document Tab > Notes Section with Entries
4. In the Notes section, enter the information you want to print on the invoice document. You can add up to ten rows and each row can have 36 characters in it.
5. When you complete your entries, choose Process (F12) to save them.
6. Add the adjustments you need to for the transaction and choose Finish (F12).
Using the PSN to Send Retail Data to Do It Best
LBMH03-731—We worked with Do It Best to add the Send Retail Data feature to the Private Supply Network (PSN), which improves the security of transaction information and enhances communication with the vendor. The Send Retail Data process helps Do It Best to understand trends in member store sales, which helps them make better decisions about the products to keep in inventory. This provides your business with more of the products your customers are asking for and need to be successful. It also helps you evaluate what to keep in stock and how to price those items.
The Send Retail Data process sends your sale information to Do It Best hourly. After you complete the setup process, it runs in the background for you. This feature is set up by branch.
Note: Businesses that do not use the Private Supply Network will still send their retail data the way they did in the past and in the beginning, we will be sending the data using both processes. This gives us a way to ensure that all of the data is transmitted correctly. If there is an issue with the size of the data batch in the send process, there is a way to modify the batch size to ensure it is delivered correctly.
Setting up the Send Retail Data Process (Internal Teams)
LBMH03-2629 – We have set up the Send Retail Data process to run automatically for Do It Best-supplied businesses. For new customers, you may need to set up the Send Retail Data process manually, using your administrator permissions. First, you add the vendor’s Send Retail subscription to the application, and then complete the branch settings for each branch that needs to send this information to Do It Best. This process is described below. You can also send the Do It Best retail data manually as described here: Sending the DIB POS Retail Data Manually.
To complete the Send Retail Data setup:
1. From the Main Menu, choose Maintenance > Database > Parameters. Then, choose the Setup > EDI tab to display the General tab settings.
2. In the Installed Wholesaler Tie-Ins list, ensure the Do It Best, the Best Rewards, and the Do It Best BOPIS check boxes are enabled, if the customer participates in these programs.
3. Choose the PSN tab and select the following:
-
From the PSN Vendor list, choose Do It Best. The Subscriptions list updates.
-
From the Subscriptions list, choose the POS Retail Sales check box.
Note: If you do not select this option, the application sends the retail data using the old process. Enable this check box to take advantage of the more secure process.
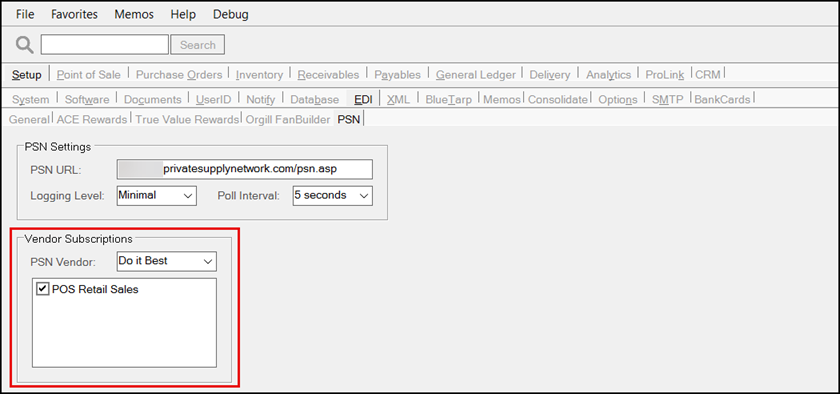
Parameter Settings > EDI > PSN > Vendor Subscriptions for Do It Best
4. Choose Process (F12) to save these settings.
5. Choose Exit (F10) and Yes to return to the Database Menu.
6. From the Database menu, choose Branches. The Branch Setup form displays.
7. From the Branch ID list, choose the branch for which you want to add the Send Retail Data hourly process.
Note: Repeat steps 7 -12 for each branch that needs to send hourly retail data to Do It Best.
8. Choose the EDI tab to display the EDI options.
9. From the Settings for list, choose Do It Best.
10. Choose the Menu Marker  and from the context list, choose Automation. The Auto Run Schedule – Do It Best box displays.
11. In the Hourly Routines box, choose Send Retail Sales via API and choose Accept.
Note: If you do not select the POS Retail Sales Vendor Subscription in step 3, this option does not display.
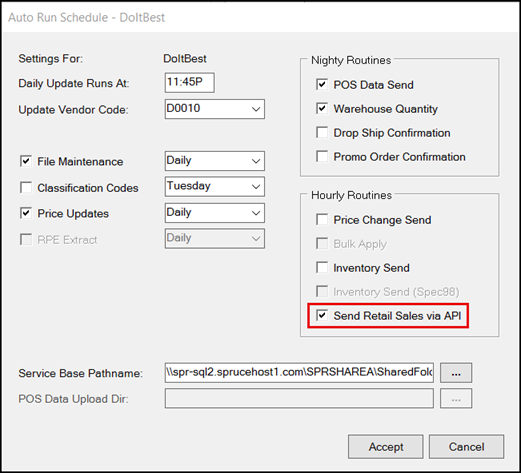
Branch Setup > EDI > Do It Best > Automation > Send Retail Sales via API
12. Choose Process (F12) to save these changes.
Sending the DIB POS Retail Data Manually
LBMH03-2680 – Although we have set the POS Data Send process to run automatically, there is also a manual process available, which we describe here. This process assumes you have completed the processes above. Customers might need this if there was a system outage on their end or a data issue on the DIB corporate systems end.
To send the store’s POS data to Do It Best manually:
1. From the Main Menu, choose Purchasing > Vendor EDI. The Vendor EDI Communications form displays.
2. From the EDI Interface and Vendor lists, choose the Do It Best entries.
3. From the bullets list choose Extras.
4. From the Function list, choose POS Data Send to display new options.
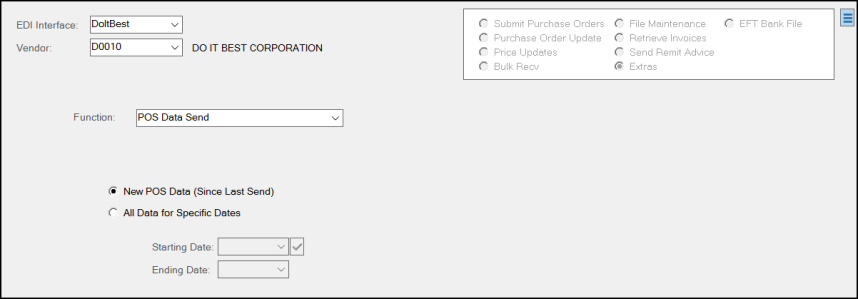
Vendor EDI Communications > Extras > POS Data Send Options
5. Continue based on the needs of the send process:
-
To send only the new data since the last transmission, choose the New POS Data (Since Last Send) button.
Or -
To send all data for a particular date range, click the All Data for Specific Dates button and then choose the dates in the Starting and Ending Date entries based on the data you need to send.
6. When you have completed these entries, choose Transmit (F6).
A scripting message may or may not display. If it does, choose OK. Based on the configuration you have chosen the application creates the files in the path defined and the application sends the file to the wholesaler using the PSN portal.
Syncing Application Inventory Changes with Spruce eCommerce
LBMH02-713, LBMH02-1787 – Part of supporting your ecommerce website is ensuring that it accurately reflects the inventory and pricing changes you make in the application. When you receive new stock in the store, the website should reflect the new data and show any price updates you have assigned to this change.
Using a third-party product to manage this data update process has proven expensive and some customers have reported that the updates are unreliable. To improve performance and increase security for Spruce eCommerce, we have added a new process called Inventory Item Synchronization (Inventory Item Sync), which updates a data store with changes to your Spruce eCommerce-enabled data. New processes monitor the changes you make to your inventory and pricing and transmit updates automatically to the remote data store every few minutes. This keeps your application and your website in sync. We are using the EvolutionX ecommerce platform to support this change.
Important: Currently, this feature is managed using a feature flag, which the Implementation or Support team must enable before you get started. These team members can find these instructions in the Internal Release Notes.
We have included the setup instructions for this new feature below. The Inventory Item Sync feature is part of the EvolutionX solution for Spruce eCommerce and is not available to Ecommerce API-only websites. You can enable the inventory sync process for all ecommerce items or for only some of them. For instructions, see
LBMH02-1789, LBMH02-1892, LBMH02-1951 - When you sync inventory information using this new process, the application adds any new items to the website that you have enabled for ecommerce since the last update, removes any items that you disabled since the last update, and sends the following changes to the EvolutionX inventory data store:
-
Item ID/SKU
-
Title and Descriptions
-
Group/Section settings
-
Weights and Unit of Measure setting updates
Note: These values must be in decimal form to ensure accurate updates. -
Taxable status changes (whether the item is taxable or not)
-
Returnable settings
-
Keywords
-
Disabled status of the item
Note: Disabled items still display in Spruce eCommerce, but do not display on the website. -
Lead time required to PO an item to ensure on-time delivery
-
Enabled for Ecommerce status
Note: When the Ecommerce Enabled check box is unchecked after the item is synced, the Spruce eCommerce platform does not display the item on the website. -
List prices and cost prices
The last sync update information is stored in only one table to ensure there is only one source of truth on the date of the last synchronization between the application and the website.
We will update the information we send using these processes as time goes on to ensure that additional data, like quantity on hand, stock images, and category mapping are part of the inventory sync process.
A Note about the Default Branch in Parameters
EvolutionX does not support individual branch records for inventory items currently. Due to this limitation, we use the default branch setting to define the store-level values of the products, such as pricing and cost, returnable status, disabled status, etc. when syncing inventory data to the EvolutionX platform. If a product does not exist in the default branch, but it does in another branch, the other branch’s settings will be sent to EvolutionX. The application uses the first available branch the product exists in to gather branch-level values for that item.
A Note about the Default Category ID in Parameters
In the remote data store, the system uses the inventory item’s group and section records to map to particular categories for display on the website. That way, items in the same category display in the same section (lumber, tools, appliances, etc.) on the website. There will be times when you add items to the site that may not fit into one of these categories, particularly when you add a new group or section to your inventory. Since these new entries will not have category mapping assigned, there is a Default Category ID to group those items in EvolutionX. You add this Default Category ID to the Inventory Items Sync parameters to reference these ecommerce-enabled items that have no categories mapped for them. The Implementation team and the business manager should discuss this issue to determine whether to use their most popular category as the Default Category ID or the Spruce Root category ID as shown in the Categories section of EvolutionX:
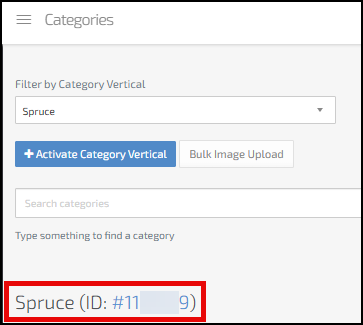
Preventing Data Overwrites
The application data is the “Source of Truth” for all product information in your online store. Any changes you make to product data (after you enabled Inventory Item Sync in the application) will result in changing values on the base product record in the online store. We recommend that you avoid making changes to the products in the online store to avoid settings being overwritten during the syncing process. Changes you make to item settings (item descriptions, pricing, unit of measure settings etc.) in the online store will be overwritten the next time changes are made to the item in the application. Online store-specific settings, such as categories, manufacturers, etc. that are not based in the application will not change based on uploads from the Inventory Item Sync process.
Setting up the Inventory Item Sync Process (Merchant Instructions)
To complete the Inventory Item Sync setup process, the Implementation Specialist needs the list of current products and the Category IDs and Category mapping data from EvolutionX.
To create the Product ID CSV file:
1. In EvolutionX, go to Products > Products and click the Export button.

2. Choose the Own Products option to create the export file.
3. Click the Ellipsis  button at the end of the row and choose Download as CSV.
4. Save this file to your Downloads folder locally and give the file to the Implementation Specialist performing the Inventory Sync set up.
Storing the Product ID data in the database will ensure that updates to specific item records update the appropriate records in the online store.
To create the Category CSV file:
1. In EvolutionX, go to Categories and click the Export button.
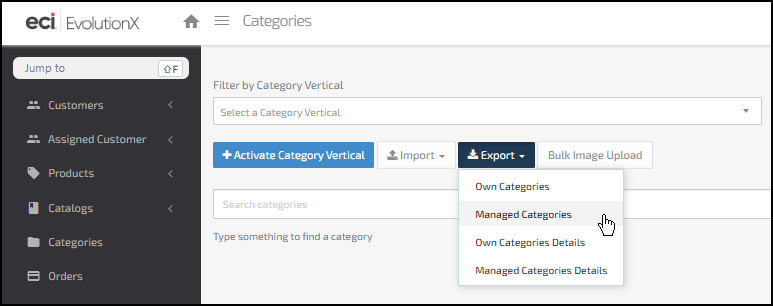
2. Choose Managed Categories from the list to create the export file.
3. Click the Ellipsis  button at the end of the row and choose Download as CSV.
4. Save this file to your Downloads folder locally and give the file to the Spruce Implementation Specialist performing the Inventory Sync set up.
This Category CSV file will link the product groups and sections to the online product categories for the same product groups that have been established for your online store.
Setting up the Inventory Item Sync Process (Implementation Team)
LBMH02-705, LBMH02-1051 – To set up this Inventory Item Sync process, you need the active EvolutionX API key, which you can get from the EvolutionX Implementation team. Merchants need to complete the Category ID Category Mapping, and Product ID import processes before this work begins. We share this information so it is easier for Implementation teams and Merchants to work together to complete this process
Note: The API key has been generated by EvolutionX Implementation team and not in the Support Utilities.
To set up the Inventory Item Sync in your application:
IMPORTANT: Please review the Internal Release Notes for instructions on importing the Product ID and Category record CSV files referenced above in the Merchant instructions. Complete these steps before you begin this process.
1. From the Main Menu, choose Maintenance > Database > Parameters. The Parameter Settings form displays.
2. Choose Point of Sale and the Ecommerce subtab to display the ecommerce parameters.
3. At the bottom of the form are the Inventory Item Syncing fields.

Parameter Settings > POS > Ecommerce Tab > Inventory Item Synching Box
4. Select the Inventory Item Sync check box to enable the other fields and check boxes.
The Inventory Item Sync process reviews this check box each time the update occurs.
5. Complete the following check boxes as meets your business needs:
-
Auto-sync items
Select this check box to sync items you have enabled for ecommerce to the items stored in the Inventory Item Sync data store. If this box is not enabled, inventory product changes will not be sent automatically to the online store and will require manual steps to send product information to the online store. We highly recommend that you enable this check box. -
Auto-publish synched items online
Select this check box to ensure that items that are uploaded to the online store for the first time are published right away. Other product information, such as the disabled status or the eCommerce enabled status additionally affect whether a product is visible in the online store.
Note: If you decide to review or enhance the product information in your online store before making the product available to online customers, uncheck this setting. We recommend that you check this setting otherwise.
-
API Key
In this field, enter the API Key that links the application to your ecommerce website. This key is available from the EvolutionX Implementation team. We recommend the customer store this information offline, securely, in case it is needed in the future.
Note: This is not the API Key that was originally generated in the Support Utilities.
-
API URL
From this list, choose one of the following, depending on the website’s regional location:
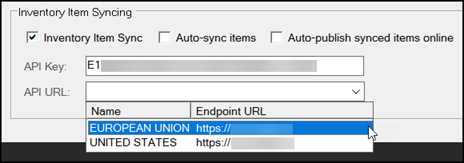
Parameter Settings > POS > Ecommerce Tab > API URL Regional Settings
-
Default Branch
From this list, choose the default branch for the synch process.
The application uses the Default Branch setting to confirm pricing, to identify whether an item is enabled/disabled, and to check the product’s inventory quantity status. See A Note about the Default Branch in Parameters for more information.
-
Supplier ID
In this field, enter the Own Supplier ID in EvolutionX for this entry. You can find this ID in the store’s Admin Dashboard under the Suppliers menu option.
Note: This is not the ID you have set up in the application for your supplier.

-
Default Category ID
In this field, enter your chosen Default Category ID for items that do not naturally fit into the existing list of category verticals in EvolutionX. See A Note about the Default Category ID in Parameters for more about how to choose this ID. We recommend you use the Spruce root category identification number, but the Merchant can select any category they prefer. Products that have been created under this Category can be re-assigned a new Category designation at any time through the online store Admin dashboard.
-
Catalog ID
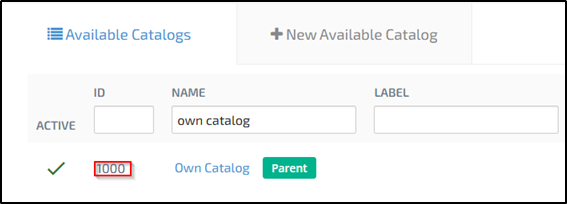
In this field, enter the Own Catalog ID from the Catalogs > Available Catalogs list located in the Admin Dashboard of EvolutionX platform. You can find this ID in the Catalog section of EvolutionX. The Own Catalog identifier must be used for all ecommerce-enabled products in the application. This setting determines which product catalog inventory products are created under during the synchronization process in the online store.
6. When you have completed these entries, choose Process (F12) to save them.
There is a monitoring service that checks to see whether the Inventory Item Sync feature is enabled. When you disable the Inventory Item Sync check box, you disable the connection between the website and the application and the review and update process shuts down. The system is now ready to begin the inventory item sync, after the products are enabled for ecommerce and the item sync settings are completed in the Item Maintenance form or through the Global Item Modify process.
Using Item Global Modify to Enable Ecommerce Sync for All Items
LBMH02-797 – To set the Enable Item Sync for all ecommerce items individually would be time-consuming, so we have added the Cmn – ECommerce Inventory Item Sync option to the Item Global Modify list so you can set this flag for all ecommerce-enabled items in your inventory. You must have Inventory Administrator permissions to complete this work.
To set the Inventory Item Sync flag for all ecommerce items in your inventory:
1. From the Main Menu, choose Inventory > Utilities > Maintenance > Item Global Modify. The Item Global Modify form displays.
2. From the Field Name list, choose Cmn – ECommerce Inventory Item Sync.
3. In the Old Value field, enter N.
4. In the New Value field, enter Y.
5. In the Group/Section list, choose the groups and sections that include ecommerce-enabled items.
6. Choose View (F8) to collect the matching items and add the new Inventory Item Sync value to the item record.
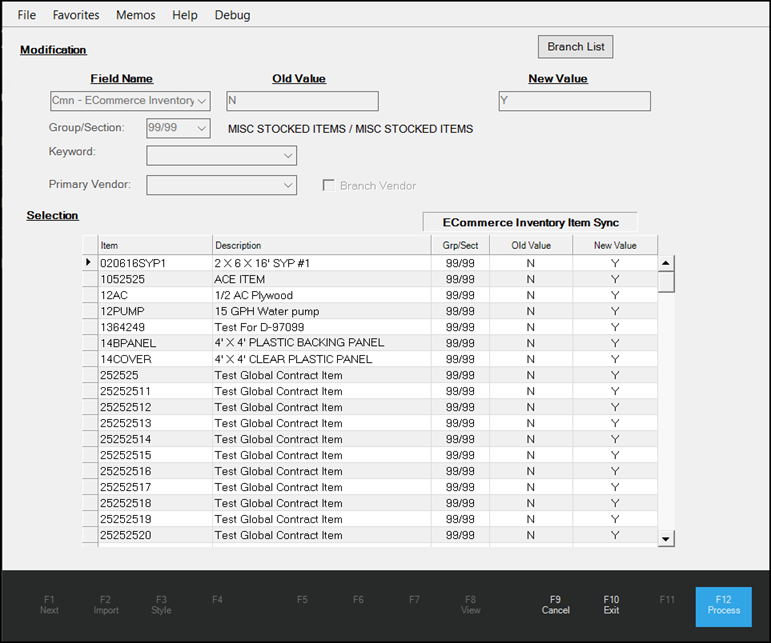
Item Global Modify > Inventory Item Sync Entries Collected
7. Repeat steps 5 and 6 until you have added all the ecommerce items you want to synchronize with your website.
8. Check the list carefully to ensure all the items you want to include in the sync process display in the list.
9. Choose Process (F12) to save the new inventory sync setting to the selected items.
After you select Process, the Inventory Item Sync feature runs in the background to send the selected items to the Spruce eCommerce data store automatically. The initial process sends all of the data in the list at once, including the pricing and item details. You should be able to see them in the Spruce eCommerce Products list shortly after you process this change.
Managing the Sync Process for Individual Items
LBMH02-789 – After you complete and save your Inventory Item Sync parameters, you can update current inventory records so they can sync with the Spruce eCommerce data store individually, using the Item Maintenance form. You can enable this setting for these item types: Standard, Lumber, Sheet Goods, Clothing, Hardwoods, Manufactured items, and Food. In this way, you can set the sync option for all items and disable this setting for individual ecommerce-enabled items in your inventory.
When the Item Sync Enabled check box is selected (checked), any changes you make (description, weight, pricing, etc.) to the item’s settings are synchronized with the website’s data store. If you do not select this check box, your changes are not sent to the data store.
To send your ecommerce item to the EvolutionX online store:
1. From the Main Menu, choose Inventory > Database > Item. The Item Maintenance form displays.
2. Select the item you want to send to the data store from the Item list.
3. Click the Common > Ecommerce tab.
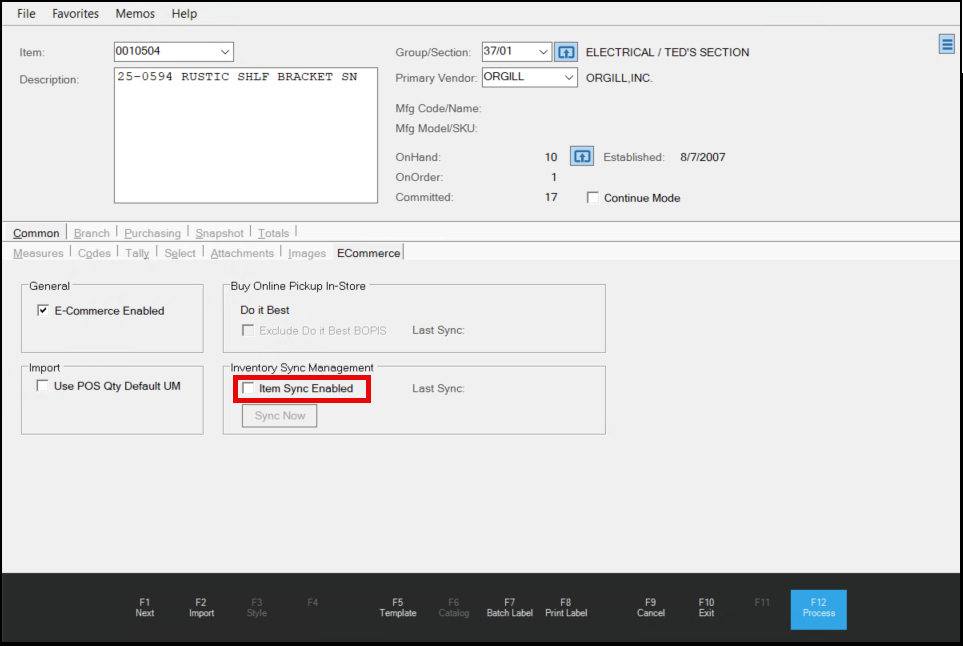
Item Maintenance > Common > ECommerce Tab > Inventory Sync Management Settings
4. Choose the Item Sync Enabled check box.
5. Choose Process (F12) to save this change.
After you select the Process key, the application sends the item information to the remote website data store automatically. When you make changes to this record subsequently, such as description, weight, pricing, etc., they are sent to the website’s remote data store within minutes of your Process (F12) key selection. The application sends:
-
Text-based or check box-type changes to the website’s data store every minute.
-
Price changes, after the initial upload, take nine minutes
Note: This update time can vary based on other background processes that may be happening concurrently, but our testing found that this schedule to be reliable.
After the initial upload of your ecommerce item data, the Sync Now button enables. This allows you to send any subsequent changes you make to the item record to the online store right away. This button is only enabled after the Inventory Item Sync parameter settings and the initial item sync have been configured.
Syncing Item Changes On-Demand
Merchants can queue individual products for inventory item sync on-demand for scenarios where the online store product record has been accidentally removed, has failed to update through the automated process, or when the merchant has disabled the Auto-publish synced items online parameter.
Note: You can only use this on-demand sync process after the item has been uploaded to the online store. You cannot sync to a record that is not there yet.
To sync product data on demand:
1. From the Main Menu, choose Inventory > Database > Item. The Item Maintenance utility screen displays.
2. From the Item list, select the inventory item you want to sync manually.
Note: The inventory item must be enabled for Inventory Item sync.
3. Click the Common > Ecommerce tab.
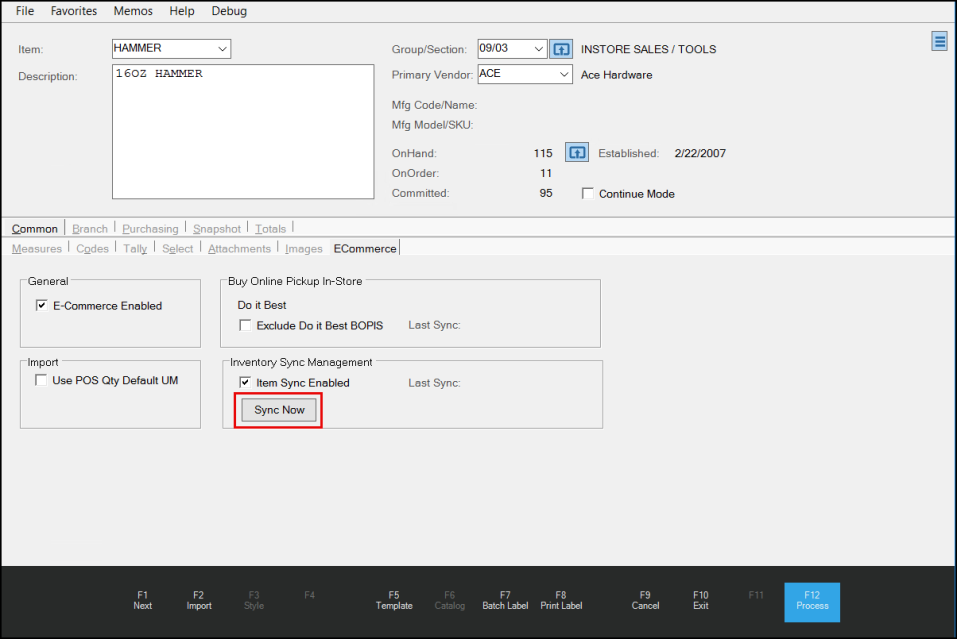
Item Maintenance > Common > Ecommerce > Sync Now
4. Click the Sync Now button to queue the product for upload to the online store. The message, The item has been queued for inventory sync processing displays.
Adding the Inventory Item Sync Settings to Default Templates
When you use the import from the Vendor Catalog or other EDI processes to add new items to your inventory, you may want to enable these items for inventory sync as part of the template process. You can add the ecommerce settings to the default template SKU.
To add inventory item sync and ecommerce enabled settings to default templates:
1. From the Main Menu, choose Inventory > Database > Item. The Item Maintenance form displays.
2. From the Item list, choose the vendor-specific template and press Enter.
3. Choose the Common > ECommerce tab.
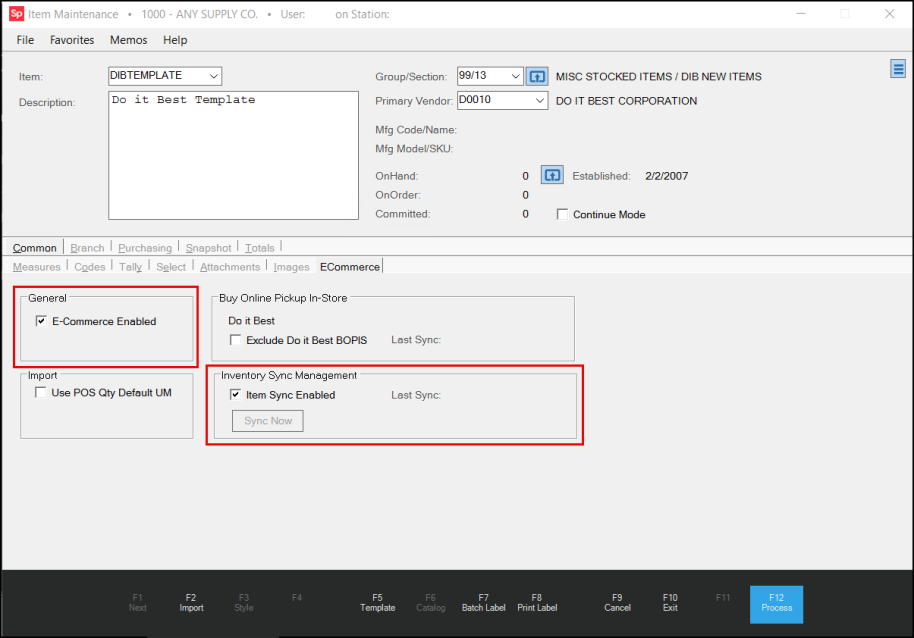
Item Maintenance > Common > Ecommerce > Ecommerce Settings Enabled
4. Choose the E-Commerce Enabled check box to enable all subsequent items for ecommerce and choose Item Sync Enabled to ensure that all items you add using this template are synched with the online store.
These settings are not required and you don’t have to choose both of them. Consider how you want to add new vendor items to your system before making these choices.
5. Choose Process (F12) to save these changes to the database.
By adding these ecommerce settings to the vendor’s item template, the newly added inventory records will include the ecommerce-enabled and inventory sync-enabled settings by default and will upload to the online store as part of the import process. These template SKUs are defined for specific vendors and branch locations and are specified for the branch settings in the EDI tab’s Template item list.

Maintenance > Branches > Branch ID > EDI Tab > Template Item Field
When Merchants import items using the vendor catalog if there is no branch settings defined on the EDI tab, the application uses the Import from Catalog setting in the Inventory Parameters.
Reviewing the Inventory Sync Updates in EvolutionX
After your items are synchronized with your Spruce eCommerce website data store, you can view the changes in the Products section of the EvolutionX platform.
To view item update changes in the EvolutionX system:
1. Log into EvolutionX using your administrator permissions.
2. From the Side Menu, choose Products > Products to display the list of existing items (in numerical order) that you have uploaded to the EvolutionX data store.
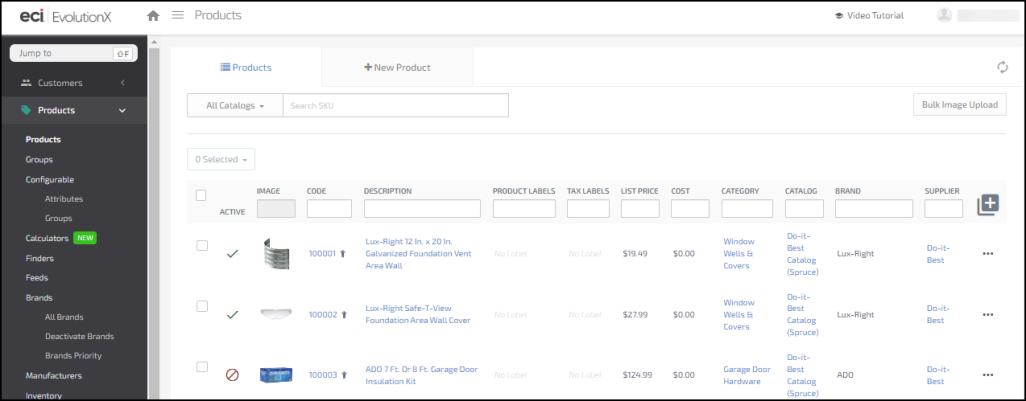
EvolutionX> Products > Products List
3. To find the item you synced to the website data store, enter the item ID in the Search SKU field and press Enter. The item displays below the search fields.

4. To review the item details, click the Code link. The item details display.
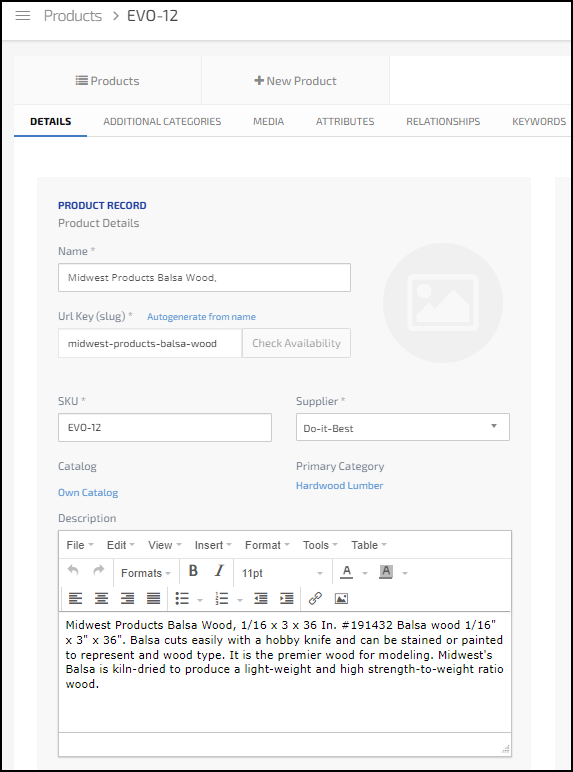
EvolutionX > EVO-12 Item Details > Title and Description
5. Scroll down to see more details that you uploaded from the item record.
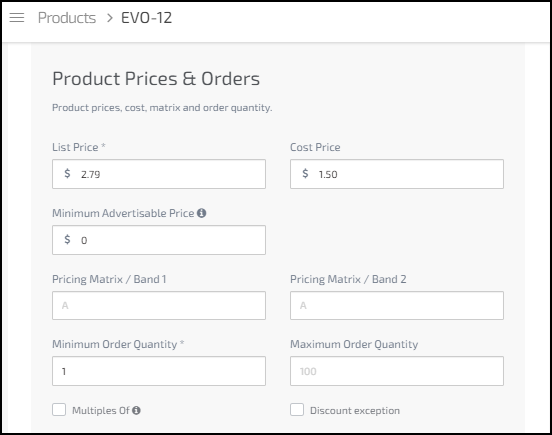
Product Prices and Orders
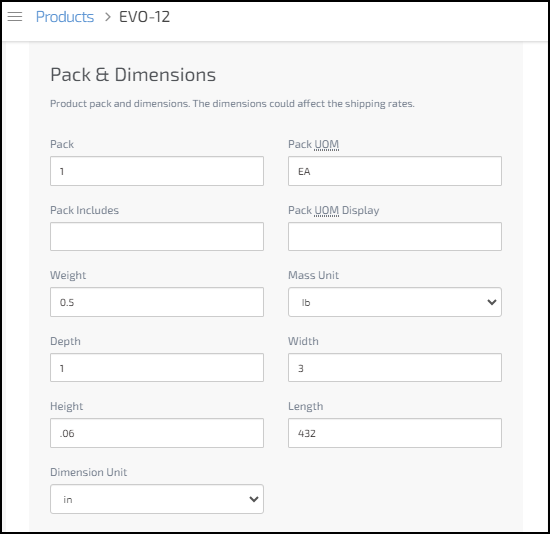
Pack and Dimensions
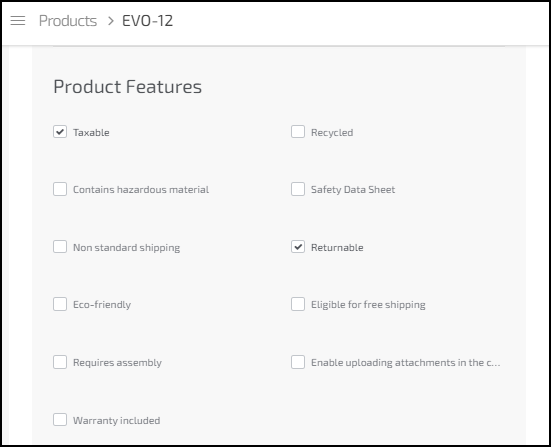
Product Features
6. At the top of the page, click the Keywords heading to display the keywords entered for this item.

Keywords
Inventory Item Sync Report Shows Item and Price Statuses
LBMH02-2439 – We have added a new custom ActiveReport that shows the status of Inventory Item Sync inventory changes sent to the Spruce eCommerce database. This can help you identify what additional EvolutionX changes may be needed to support your online display of these changes.
You might want to use this report to find data from different perspectives, such as:
-
Inventory changes that have occurred between a specific date range
-
Inventory changes that have occurred in a particular group/ section
-
All inventory items that begin with a specific item ID/SKU
You can combine these criteria to create a custom report that shows you the specific changes you need. To display a list of all items that have a sync history with Spruce eCommerce, leave all value fields blank.
To run the Inventory Sync Status report:
1. From the Main Menu, choose Inventory > Reports > Custom Report Library to display the ActiveReports list.
2. Choose the IN_Inventory_Sync_Status entry and choose Preview (F7). The Report Parameters display.
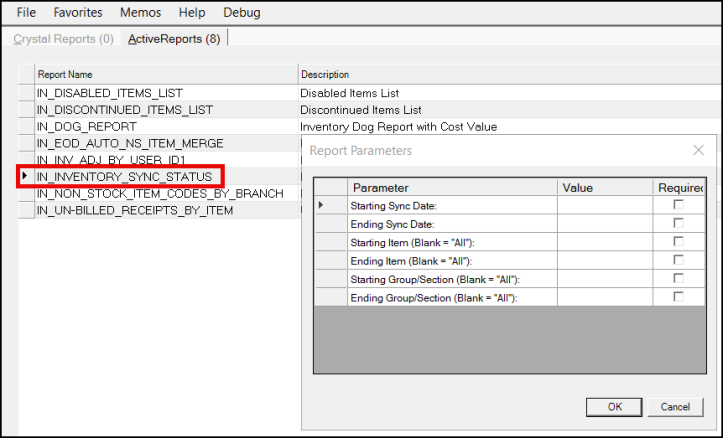
Inventory > Reports > Custom Reports Library > Inventory Sync Status Report Parameters
3. Complete the entries in this form to display the status information you need:
Note: These settings are all optional.
-
Sync Date
Enter the earliest sync date for the inventory you are looking for in this field. -
Ending Sync Date
Enter the latest sync date for the inventory you are looking for in this field. -
Starting Item
Enter the ID/SKU of the first item (numerically or alphabetically) in the range of items you are searching for in this field. Leave this field blank to collect all items that have been updated based on the other criteria. -
Ending Item
Enter the ID/SKU of the last item (numerically or alphabetically) in the range of items you are searching for in this field. Leave this field blank if you left the Starting Item field blank. -
Starting Group/Section
Enter the first Group/Section (numerically) for the items you are searching for in the report. Leave this field blank to display all groups and sections for the criteria you have already entered. -
Ending Group/Section
Enter the last Group/Section (numerically) for the items you are searching for in the report. Leave this field blank if you left the Starting Group/Section field blank.
4. When you have completed these selections, click OK preview the report. The Viewer displays the results.
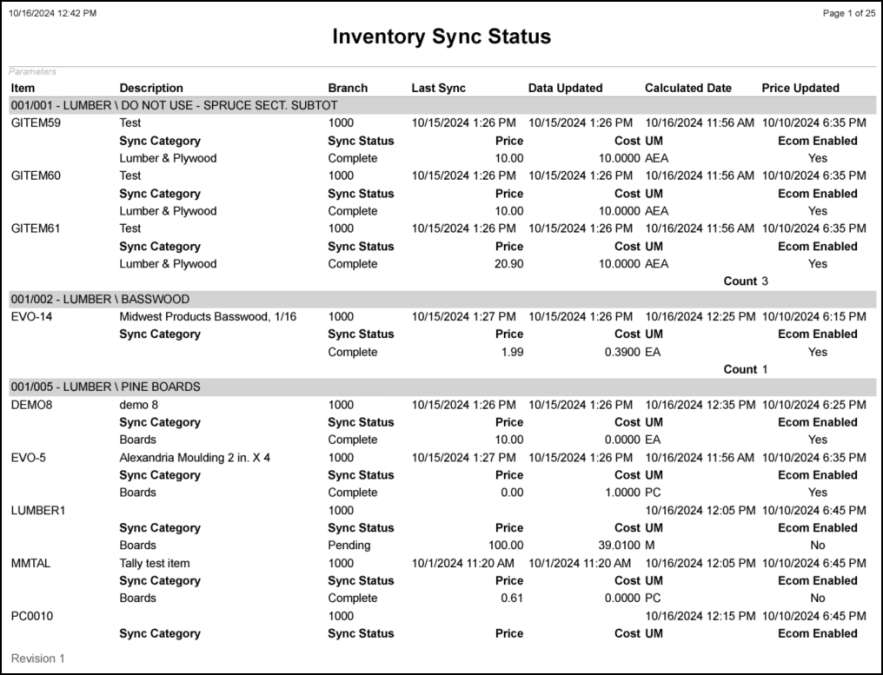
Inventory Sync Status Report
5. Review the entries you need in this report and Process (F12) or Print (F8) as needed.
See Also:
Using the EDI Log to Review Inventory Item Sync Changes
Removing Items from the Spruce eCommerce Online Store
Updates Add Statement and Invoice Discounts to Spruce eCommerce Sites
LBMH02-1071 - Customers ask us to display discount information applicable to their customer’s receivable accounts online. Before this release, the EvolutionX platform did not display statement and invoice discounts on your website, so when customers paid their balances or invoices online, they sometimes overpaid. Now, when your customers with balance forward, open item, and open item terms accounts access their accounts on your website, they will see the applicable discounts for their accounts and invoices. These discounts will expire on the expiration date (including your Grace Period parameter setting) just as they would in and the EvolutionX platform will keep track of those dates to ensure the correct discounts are applied by the due dates set in the application.
Discount information and the ability to make account, job, and invoice payments only display for users with the Enterprise User Role AR/Invoices role.
When you create a user profile for a customer’s account, you can review their account balances the way they would see them. You must have administrative permissions in EvolutionX to do this work.
Creating a User Profile for a Customer Account
To see the discount changes from a customer’s point of view, you can create a user account that is specific to a customer account.
To create a user profile for a customer account:
1. From the EvolutionX menu, choose Customers > Accounts. The list of accounts display.
2. Find the account you want to review the account balances for using the search fields at the top.
If you need more search options, click the ![]() icon and choose the field that works best for you. When you find the account you want to review, click the Company name link to display their Account Dashboard.
icon and choose the field that works best for you. When you find the account you want to review, click the Company name link to display their Account Dashboard.
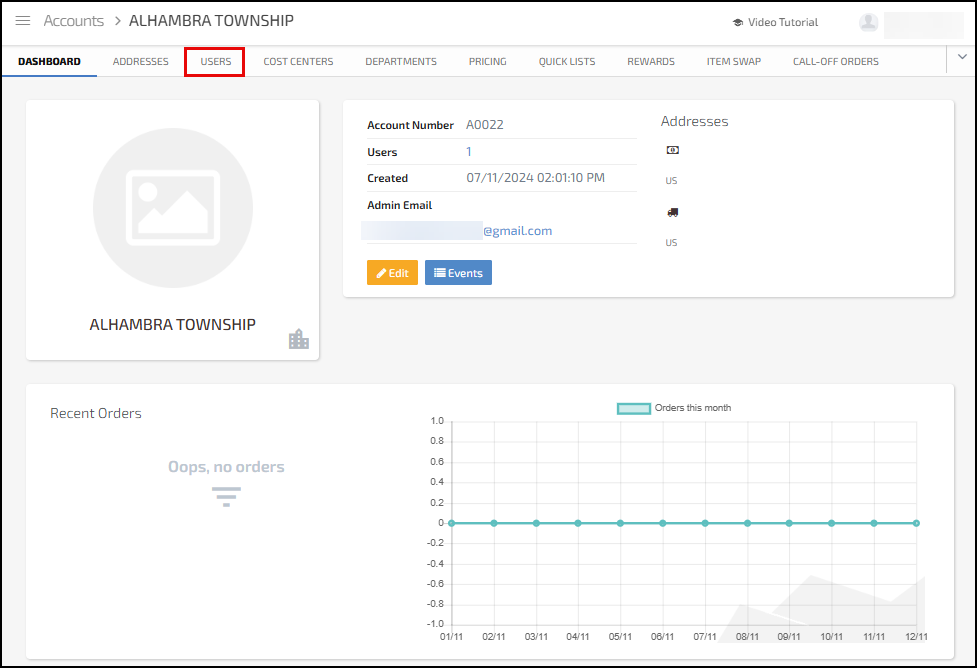
EvolutionX > Account Dashboard with Users Option Highlighted
3. Click the Users option to display the Users list for this account.
If this account already has user profiles, this list will already have entries.
4. Click the + New User option. The New User Profile Details options display.
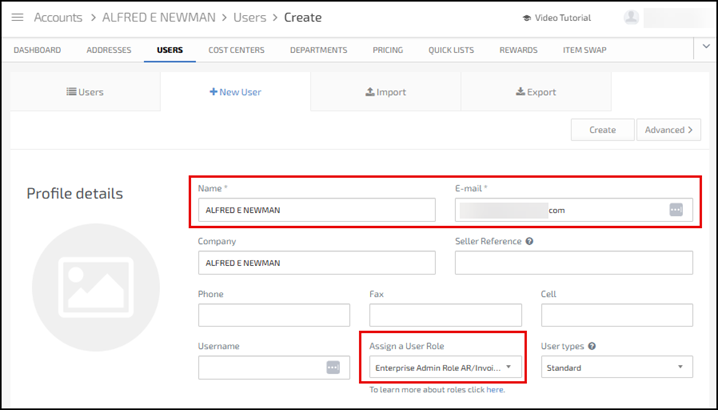
EvolutionX > New User Account > Required Settings
5. In the fields provided, enter a name, a valid email address, and from the Assign a User Role list, choose the Enterprise Admin Role AR/Invoices option.
Note: The application uses the email address to send you an email about this account when you save the user record.
6. Then click the Create button. The Users page updates to show the Login On Storefront option.
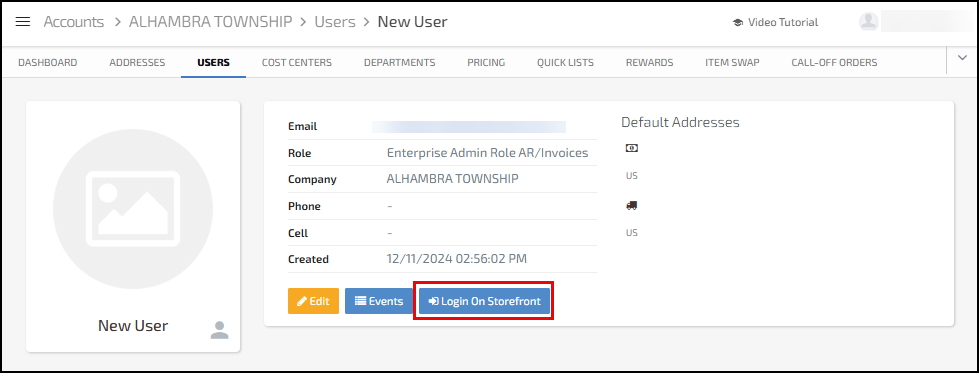
EvolutionX > New User Entry with Login On Storefront Button Highlighted
Typically, when you select the Login On Storefront button, the system displays the account settings as if you are a customer on your website. The Spruce eCommerce application keeps track of the discount dates and the Grace Period settings you have enabled in your parameter settings and displays the discount (and Due Now and Total Amounts) as appropriate to these dates.
When you select the Login On Storefront button, if there is more than one account or job associated with the selected user, you are prompted to select the account you want to review.

EvolutionX > Select Account List
Using this Login On Storefront feature, we will show you how the current discount shows up on each type of billing account. Since each of these billing accounts are slightly different, the discount features display slightly differently as well. The accounts shown in these examples are Quality Assurance accounts.
Reviewing a Balance Forward Account with a Current Discount
When you click the Login On Storefront button to access a Balance Forward account, the website’s Dashboard page displays.
Convenience Fee Note: If convenience fees are enabled for account payments in the application, Spruce eCommerce calculates the convenience fee based on the user selections and adds it to the payment total for any online payment.
To review the balance forward account details and payment options:
1. Choose the Your Account icon to display the menu options on the right column.
2. From the Management Tools Menu, choose Account Overview. The Account Overview page displays the current Account Activity and Account Balance information.
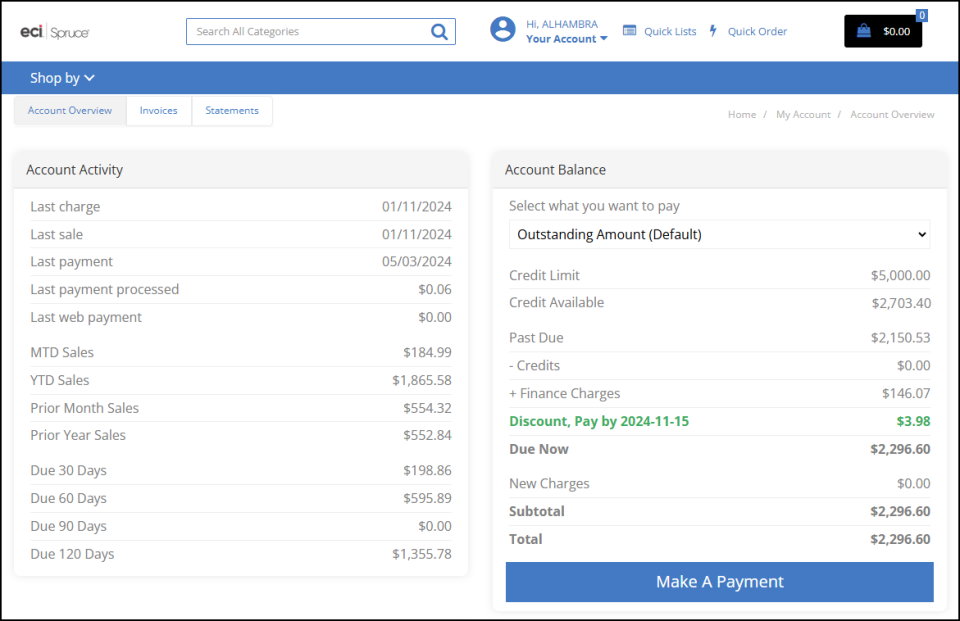
EvolutionX > Balance Forward Account Overview > Discount with Pay Date Shown
Here, the user can make a payment based on the Outstanding Amount, on the Last Statement, or as a Custom Amount, by choosing an option in the Select what you want to pay list.
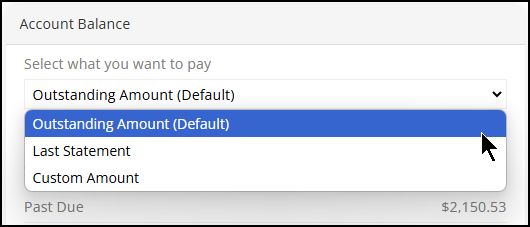
EvolutionX > Balance Forward Account > Select what you want to pay Option
3. Choose one of these payment options from the list:
-
When you select the Outstanding Amount option and choose Make A Payment: this Payment page displays:
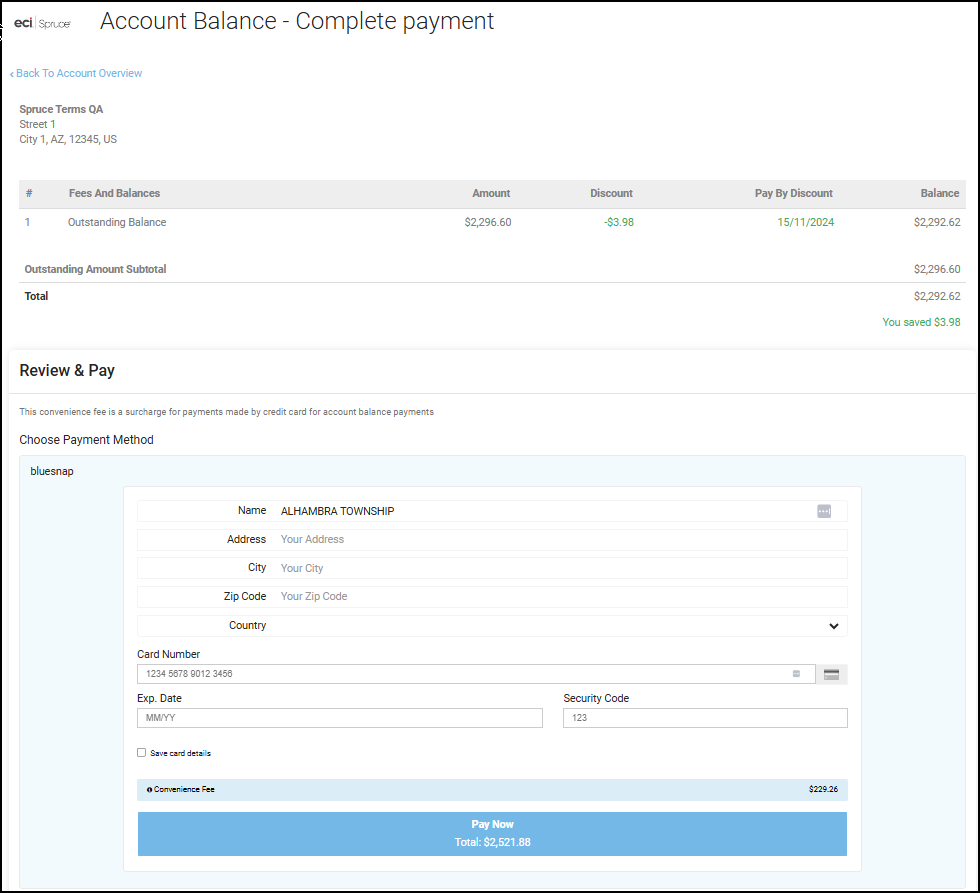
EvolutionX > Complete Payment Page > Balance Forward > Outstanding Amount
Note: The discount amount and the discount due date data displays in green.
-
When you select the Last Statement option and choose Make A Payment, this page displays.
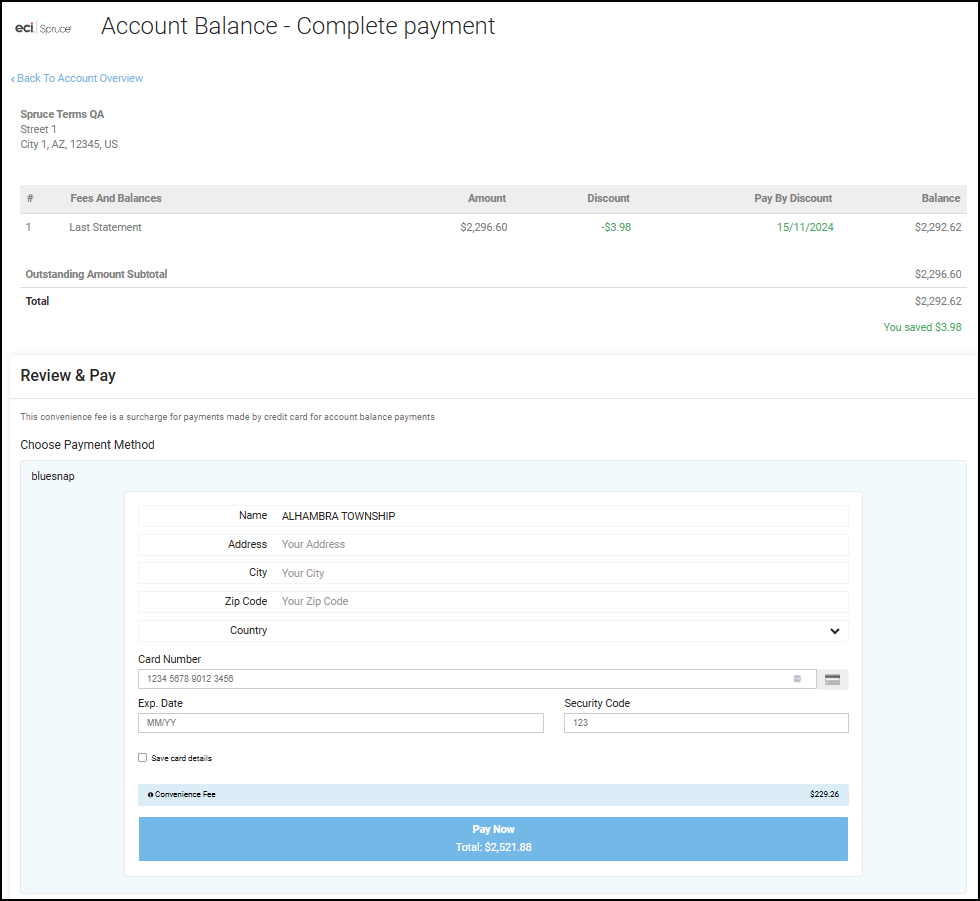
EvolutionX > Complete Payment Page > Balance Forward > Last Statement Amount
Note: The discount amount and the discount due date data displays in green.
-
When you select the Custom Amount option, the Custom Amount field displays.
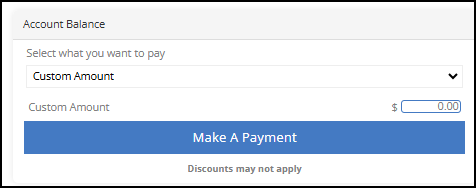
EvolutionX > Custom Amount Entry
a. In the Custom Amount field, enter the payment amount.
b. Click the Make A Payment button. The Complete Payment page displays with the custom amount in it.
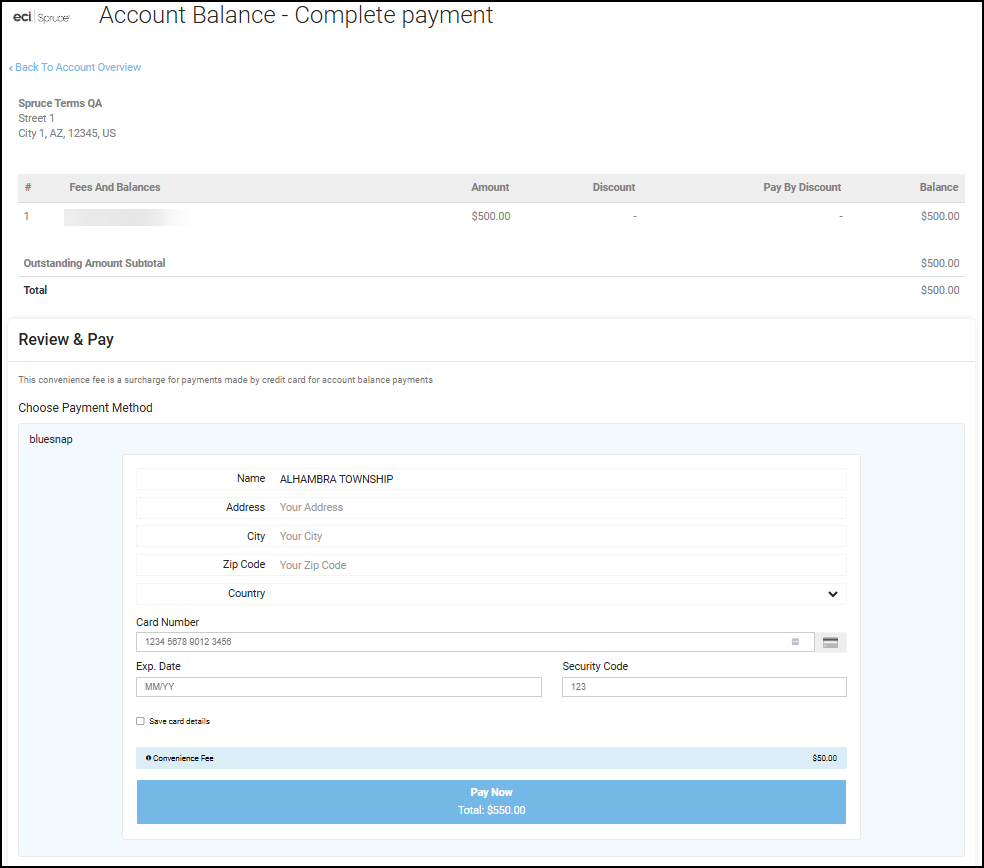
EvolutionX >Complete Payment Page > Balance Forward > Custom Amount
Note: Since this custom amount does not pay off the account’s balance, the application does not apply the discount to the transaction.
4. In the Complete Payment page, for all payment types (Outstanding Amount, Last Statement, and Custom Amount), users enter their credit card information and choose the Pay Now option.
After EvolutionX processes the payment successfully, the Account Overview page redisplays and reflects the payment results. In this case, we paid the Outstanding Balance Amount. The application sends a confirmation email to the email address associated with the user account.
EvolutionX > Account Overview > After Outstanding Balance Payment Process
The convenience fee amount is not referenced in the account activity, since it does not apply to the account balance.
Reviewing a Balance Forward, Job Account with a Current Discount
When you access a balance forward account for a user who has access permissions for only one job, you can use that user’s account to access the account information using the Login On Storefront button. The website’s Dashboard page displays.
To review the balance forward, job discount details:
1. Choose the Your Account icon to display the menu options on the right column.
2. From the Management Tools menu, choose Account Overview.
The discount amount and due date information displays in green.
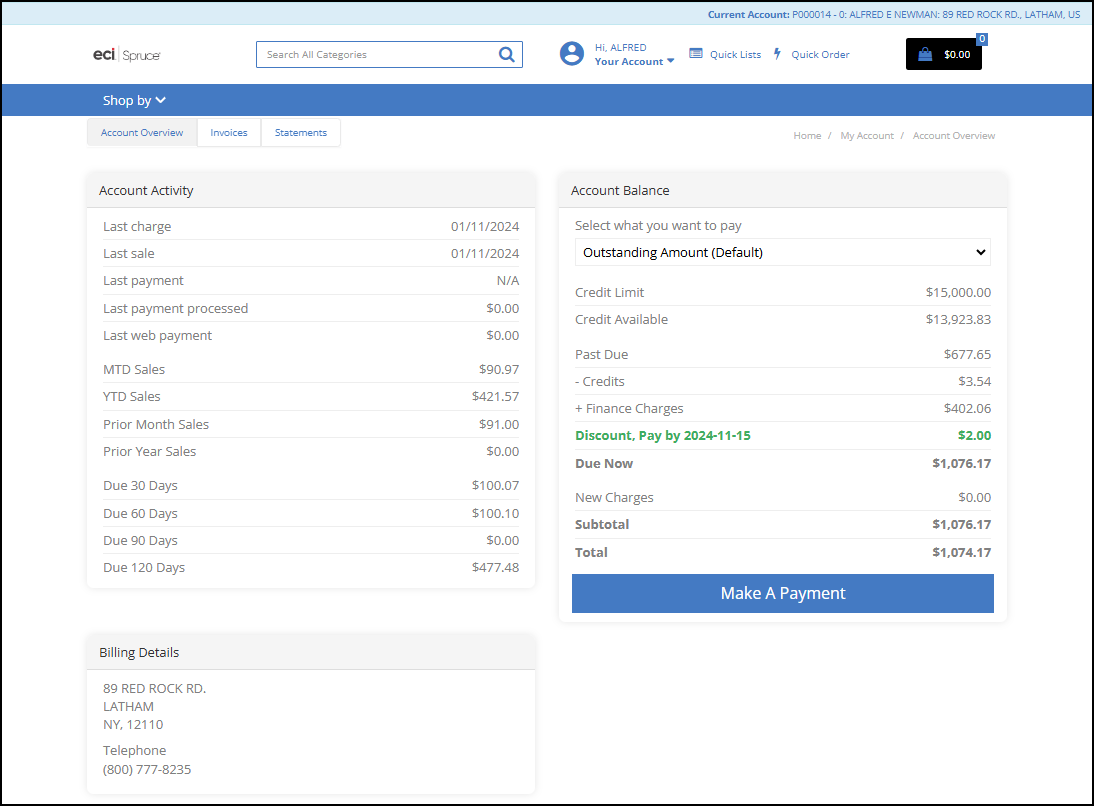
EvolutionX > Account Overview > Consolidated Account > With Discount Amount and Expiration Date
Since this account has many jobs associated with it, and since this user is only authorized to manage the payments for their own job, the Make Payment option does not display.
3. From the Account consolidated list, choose the job that this user is responsible for.
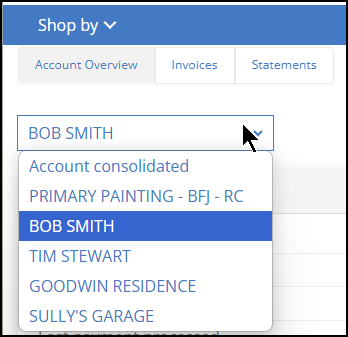
EvolutionX > Account List > Choose Job
The balance details with the discount for the job you selected display.
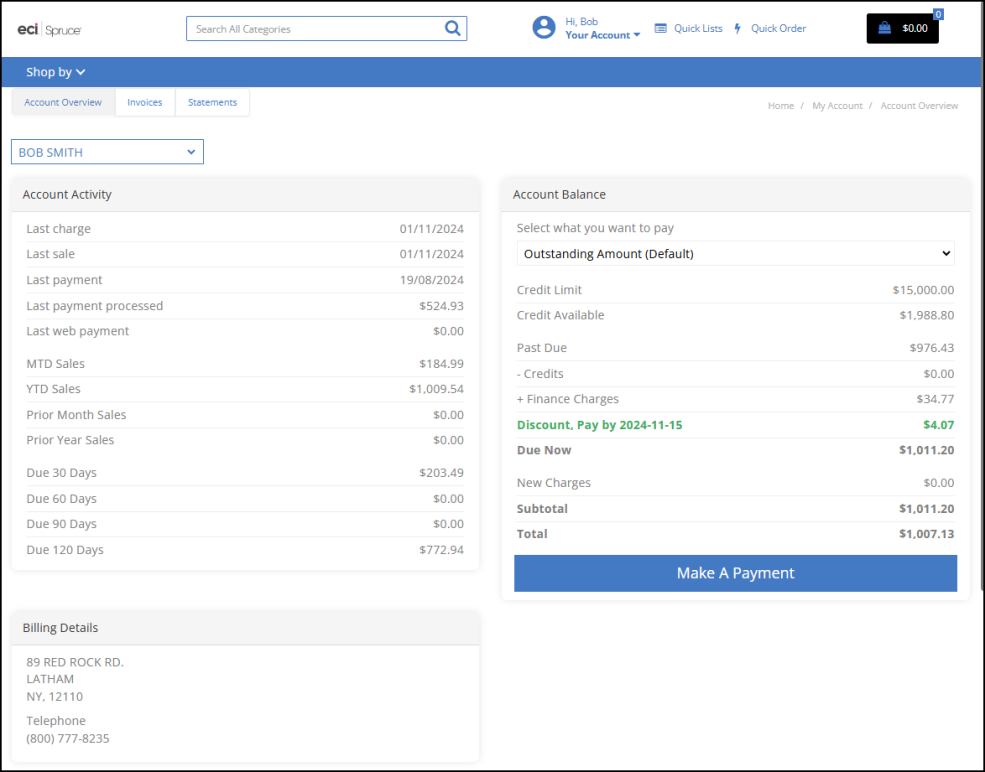
EvolutionX > Job Balance Details with Discount Amount and Expiration Date
The payment options are the same for balance forward jobs as described in the previous section.
Reviewing an Open Item Account with a Current Discount
After you create an Open Item account user, click the Login On Storefront button to display the Account Dashboard.
To review the discounts associated with an open items account and payment options:
1. Choose the Your Account icon to display the menu options on the right column.
2. From the Management Tools menu, choose Account Overview.
When the user has access to more than one account, a pick list displays so they can choose the account they want to access.
In the case of the account below, the user has access to two related accounts. The row at the top highlighted in blue specifies the account you (the user) selected.
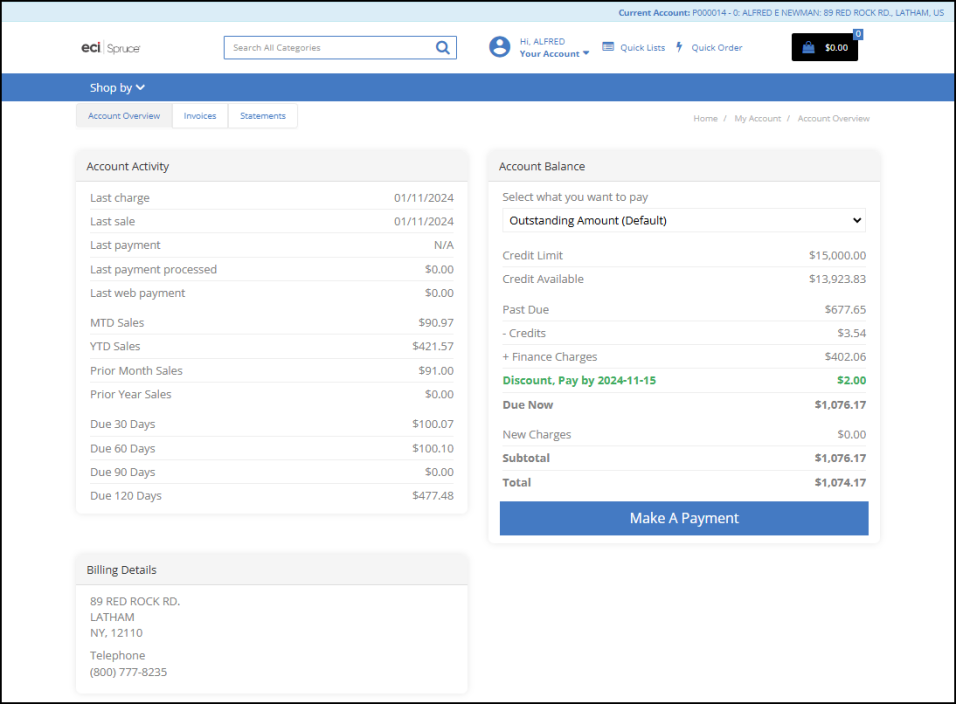
EvolutionX > Open Item Account Overview > Discount with Pay Date Shown
Open Item accounts have different payment options than Balance Forward. When you choose the Select what you want to pay list, these options display.
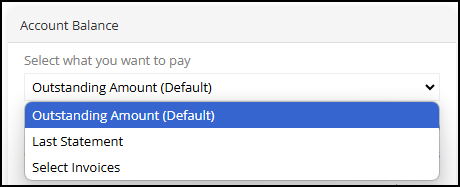
EvolutionX > Open Item > Select what you want to pay Options
3. Choose your payment option from the list:
-
When you select the Outstanding Amount option and choose Make A Payment: this Payment page displays:
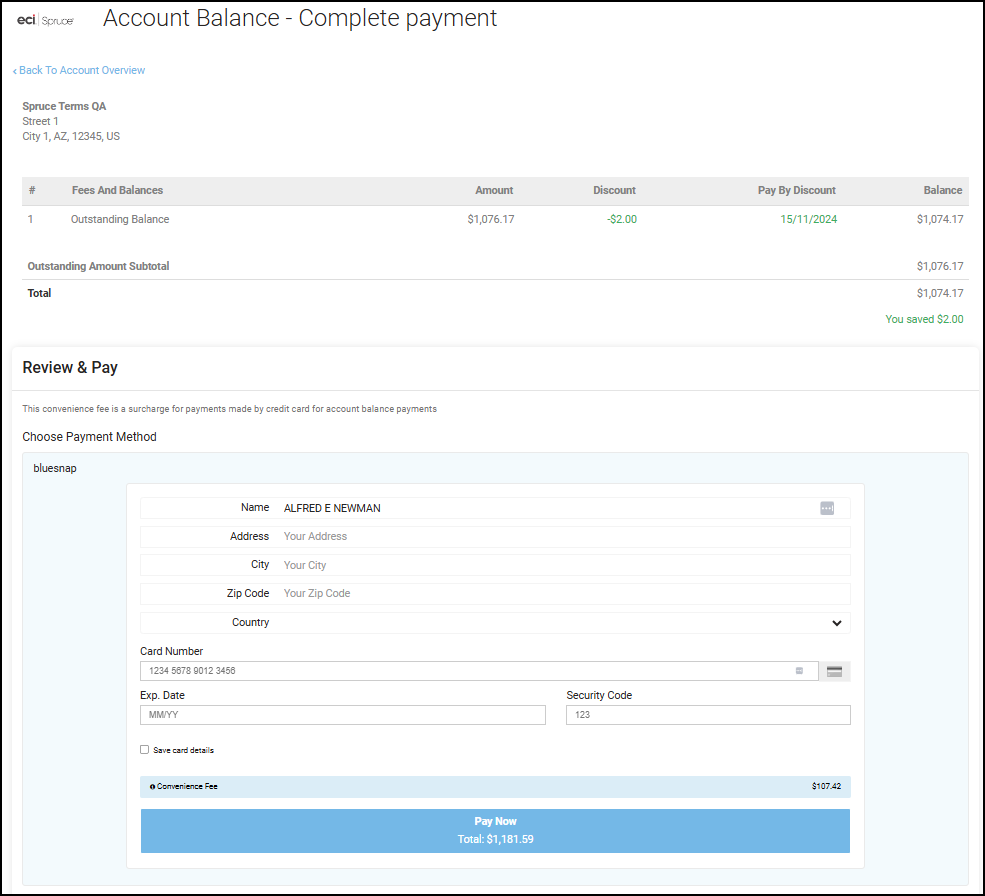
EvolutionX > Complete Payment Page > Open Item > Outstanding Amount
Note: The discount amount and the discount due date data displays in green.
-
When you choose the Select Invoices option, a new Select Invoices button displays.
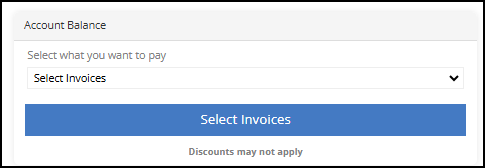
EvolutionX > Open Item > Select Invoices
Note: Because individual invoices may not have current discounts associated with them, discounts may not apply to invoices in the list.
a. Click the Select Invoices button to display the list of invoices associated with this open item account:
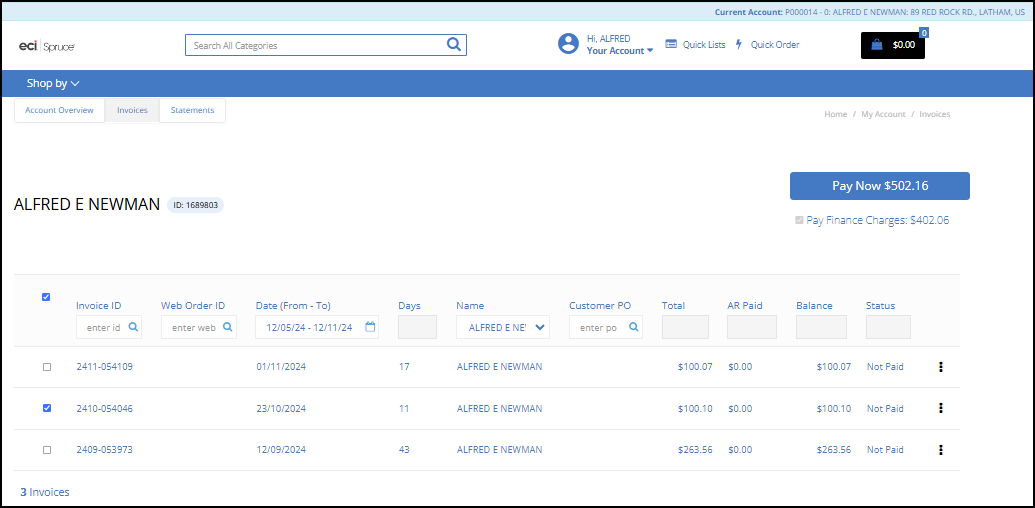
EvolutionX > Open Item > Invoice List
If you have the Pay Finance Charges First parameter enabled in your application, when you select an invoice from the list, the finance charge record is automatically selected by default. The Pay Now button at the top of the page keeps track of the transaction total (minus the convenience fee charges) as you select invoices from the list.
b. Select the check boxes beside the invoice(s) you want to pay.
c. Click Pay Now to continue. The Complete Payment page displays.
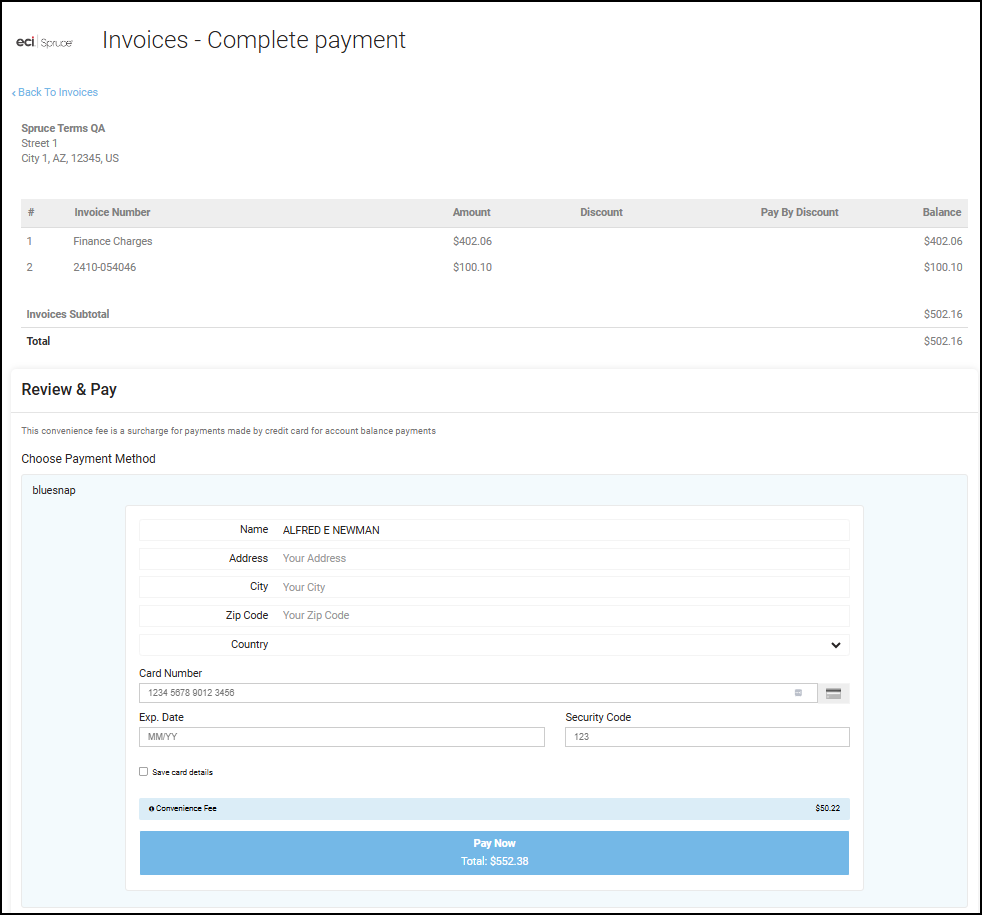
EvolutionX > Complete Payment Page > Open Item > Select Invoices Listed
The list includes the Finance Charges and Invoice(s) you selected. The Convenience Fee amount displays above the Pay Now button.
4. Complete these payment settings with credit card information and choose the Pay Now button.
In this case, we paid the Finance Charge amount and an individual invoice. After Spruce eCommerce processes the payment and it is successful, a message displays listing the invoices that were paid and provides a link to the Invoice History.
The application sends a confirmation email to the email address associated with the user account.
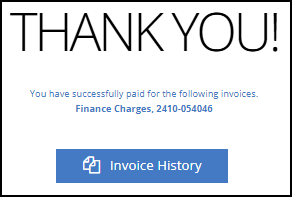
EvolutionX > Open Item > Successful Payment of Individual Invoices Message
When you select the Invoice History button, the application redisplays the invoice list showing the paid invoice.
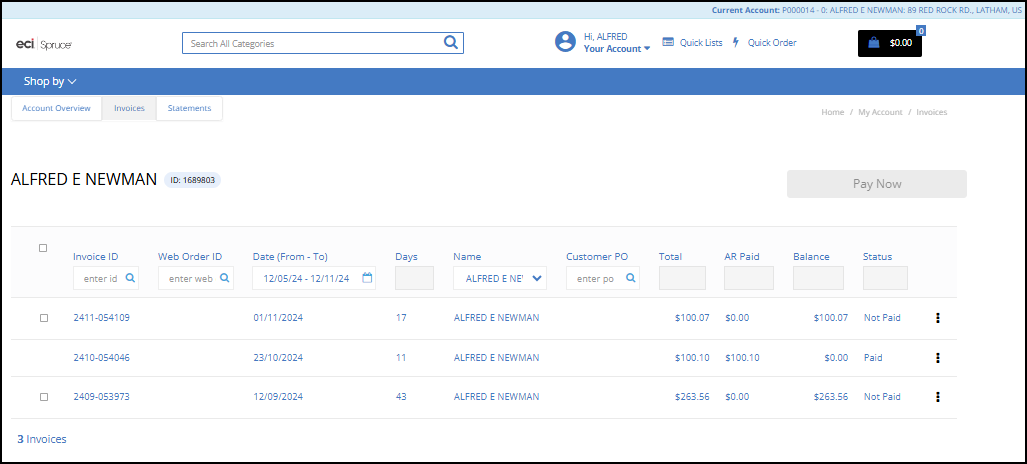
EvolutionX > Open Item > Invoice List after Payment
5. When you return to the Account Overview page, the discount amount and due date entries remain.
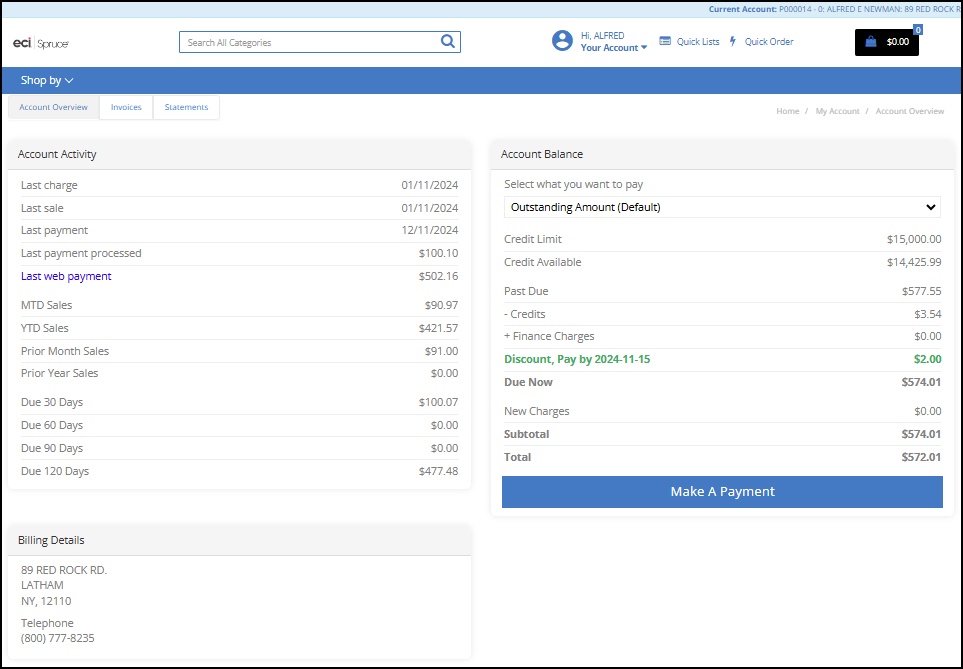
EvolutionX > Open Item > Showing Payment Results
The new Total reflects the amount remaining, minus the paid Finance Charges, the paid invoice amount, and the remaining discount.
Reviewing an Open Item Terms Account with Current Discounts
When you access an Open Item with terms account and click the Login On Storefront button, the website’s Dashboard page displays.
Convenience Fee Note: If convenience fees are enabled for account payments in the application, Spruce eCommerce calculates the convenience fee and adds it to the payment total for any online payment.
To review the open item terms account details and payment options:
1. Choose the Your Account icon to display the menu options on the right column.
2. From the Management Tools menu, choose Account Overview.
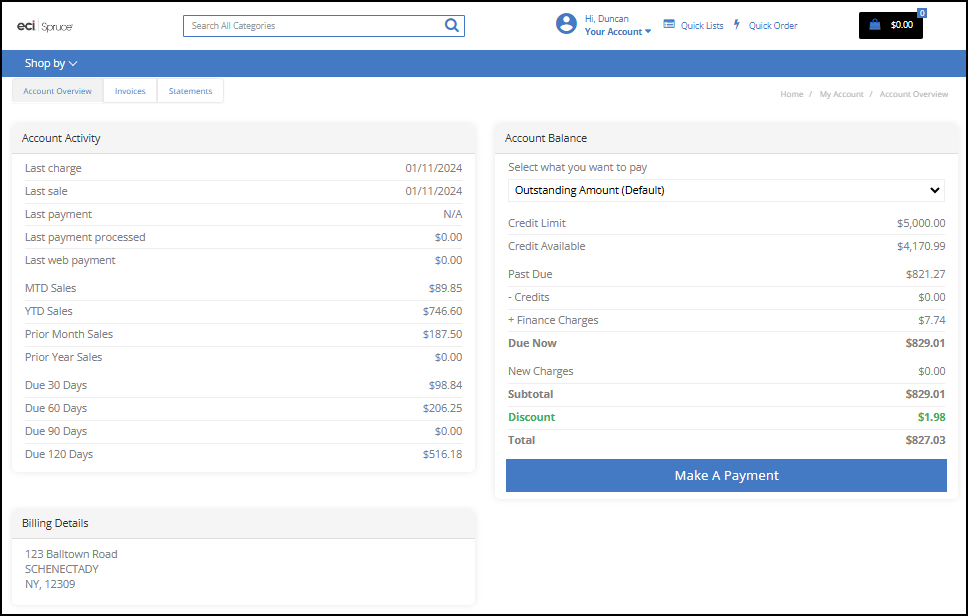
EvolutionX > Open Item Terms > Account Overview Page
For Open Item Terms accounts, the discount only applies if you pay the entire outstanding amount in full. These accounts have different payment options than Open Items accounts do. When you choose the Select what you want to pay list, these options display.

EvolutionX > Open Item Terms Payment Options
3. Choose your payment option from the list to display these options:
-
When you select the Outstanding Amount option and choose Make A Payment: this Payment page displays:
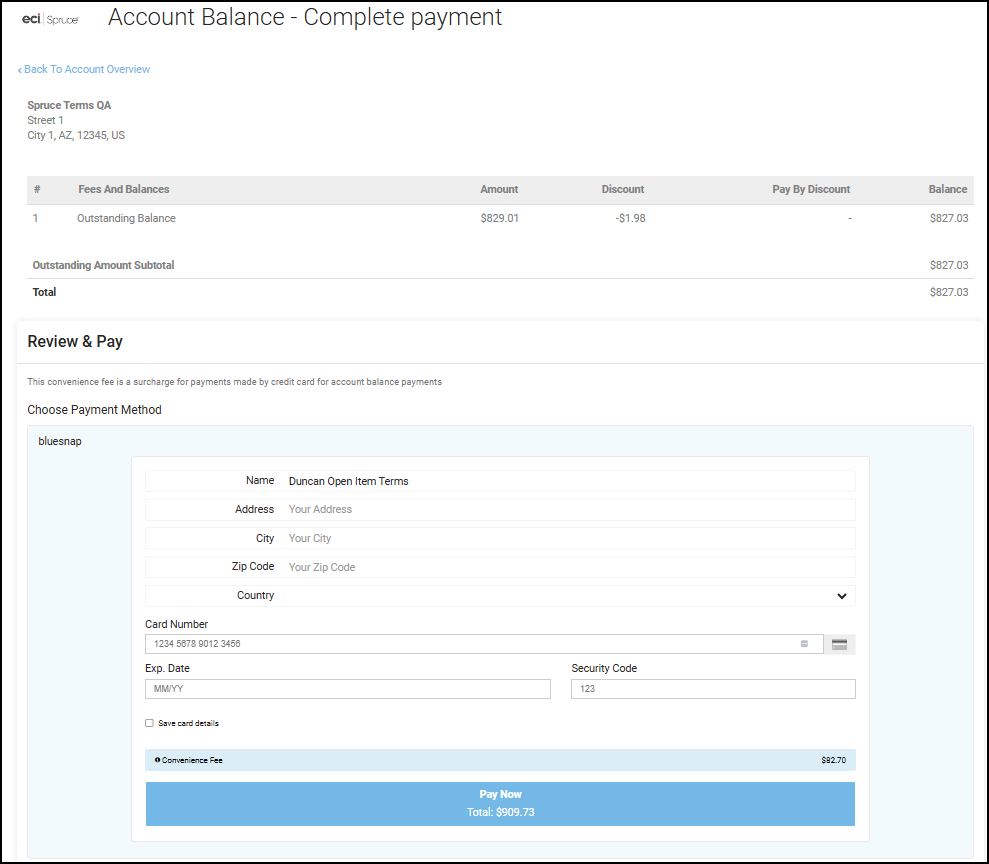
EvolutionX > Open Item Terms > Complete Payment with Outstanding Balance
-
When you choose Select Invoices from the list, the Select Invoices button displays.
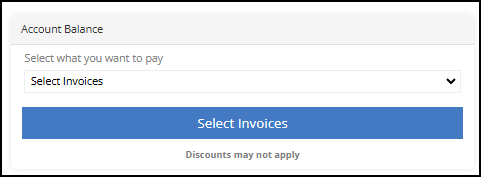
EvolutionX >Open Item Terms > Select Invoices
a. Choose the Select Invoices button to display the list of open invoices associated with this account.
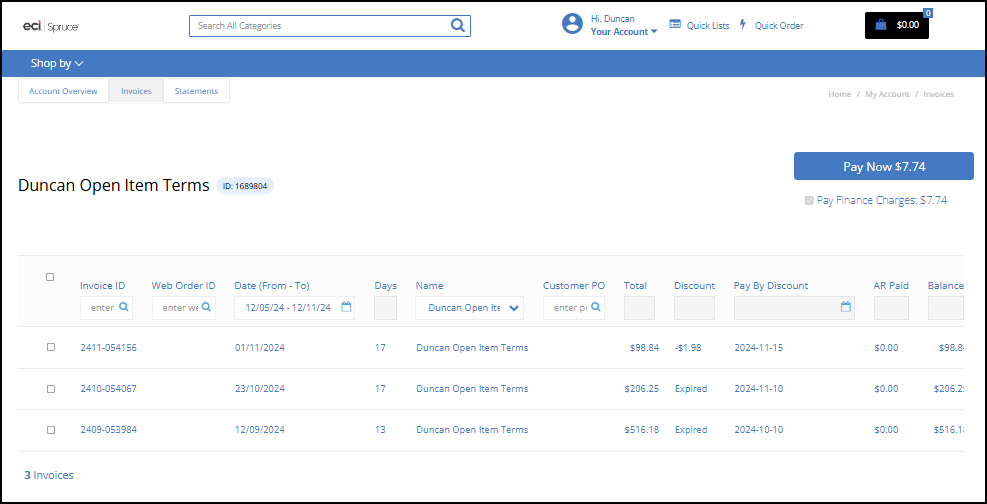
EvolutionX > Open Item Terms > Select Invoices List
If you have the Pay Finance Charges First parameter enabled in your application, when you select an invoice from the list, the finance charge record is automatically selected by default. The Pay Now button at the top of the page keeps track of the transaction total (before convenience fee charges) as you select invoices from the list.
b. Select the check boxes beside the invoices you want to pay.
c. Click Pay Now to display the Complete Payment page. We follow the Invoices payment process in this example. The Outstanding Amount payments are the same for all billing account types.
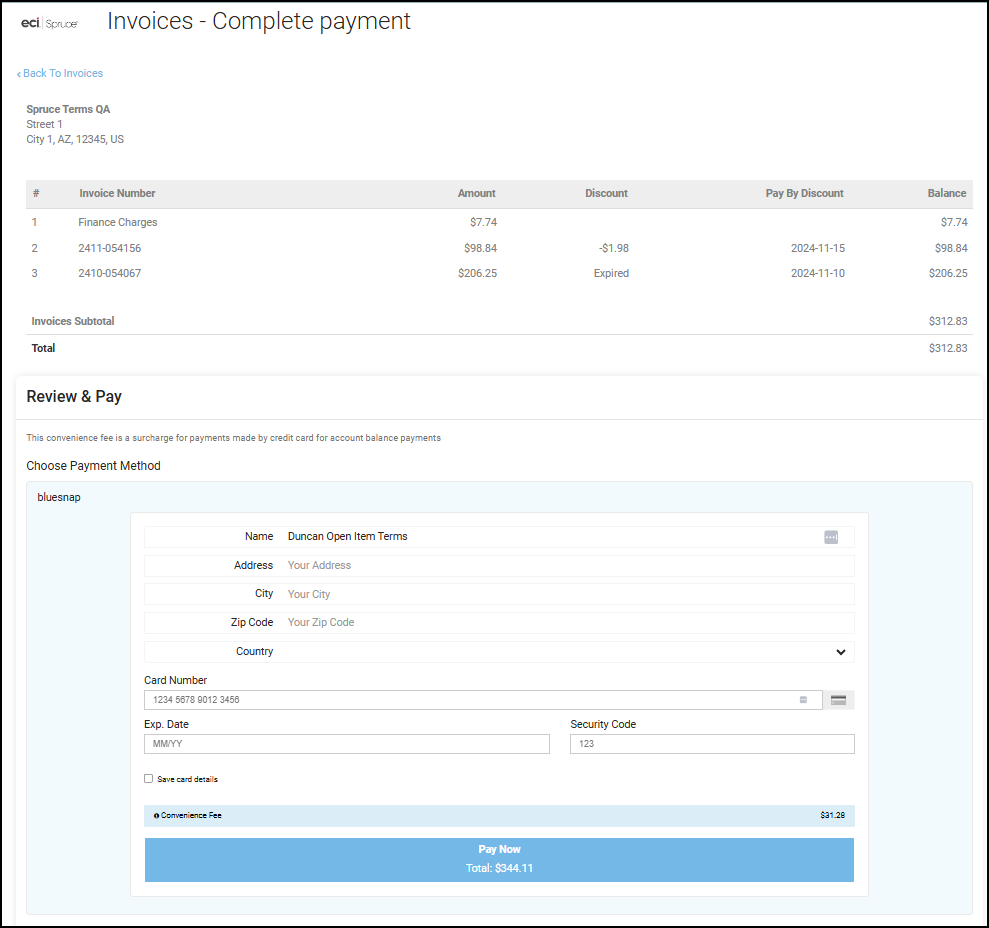
EvolutionX > Complete Payment > Open Item Terms > Invoices Listed
Note: Because you are not paying off all of the invoices, the discount that is listed is not applicable to the transaction.
4. Complete these payment settings with credit card information and choose the Pay Now option.
In this case, we paid the Finance Charge amount and two invoices. After EvolutionX processes the payment and it is successful, a message displays listing the invoices that were paid and provides a link to the Invoice History, similar to the Open Item example.
The application sends a confirmation email to the email address associated with the user account.
5. Click the Invoice History button to display the list of invoices associated with the open item terms account. The remaining invoice shows that the discount has expired.
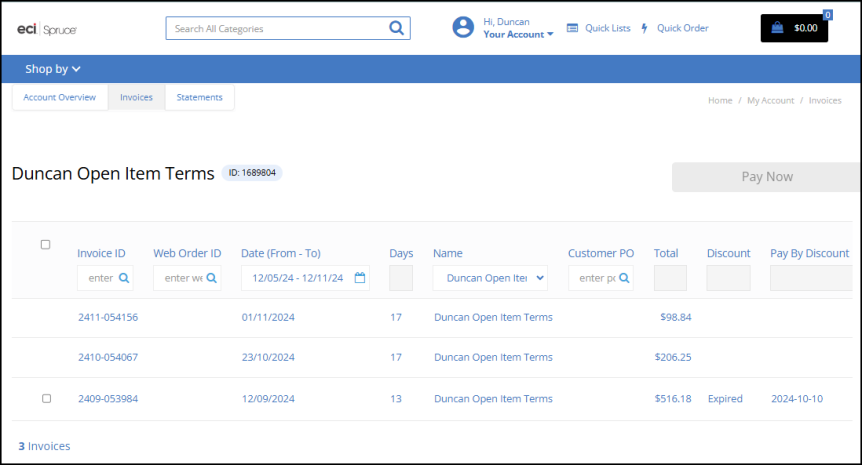
EvolutionX > Open Item Terms > Invoice History with Paid Invoices Listed
6. To review the results of the payment, choose the Account Overview tab.
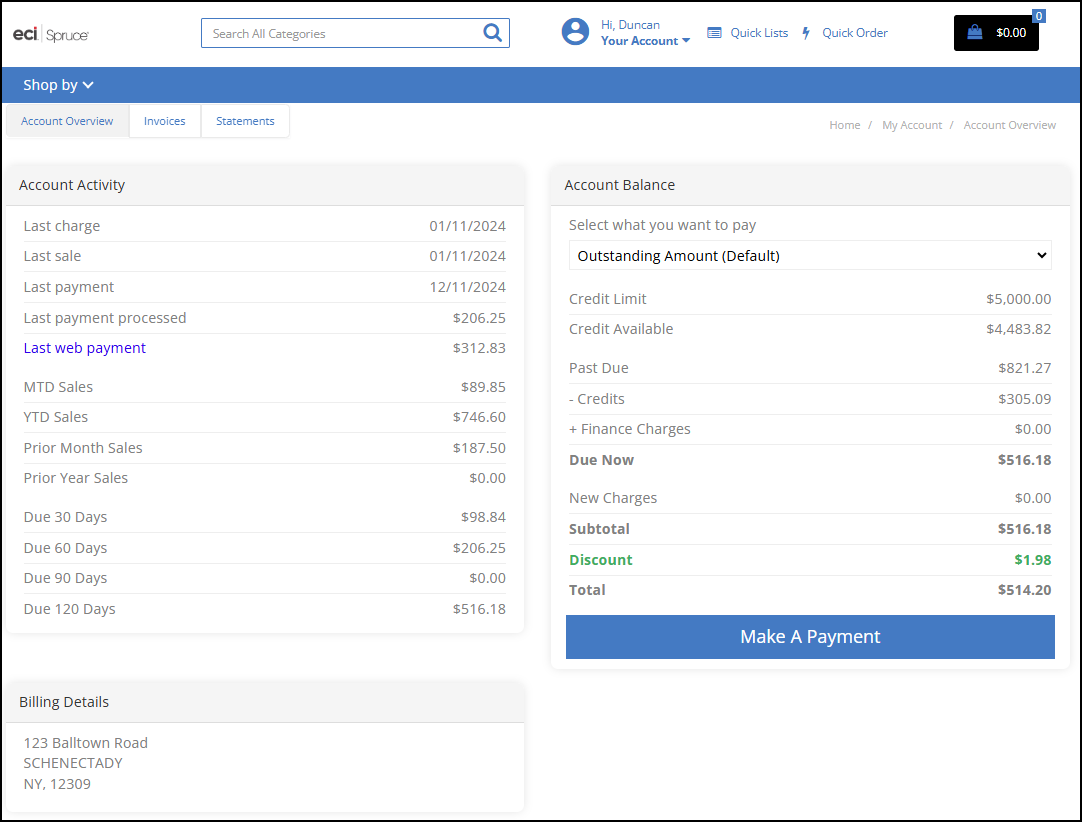
EvolutionX > Account Overview after Payment
The new Total reflects the amount remaining, minus the paid Finance Charges, the paid invoice amounts, and the remaining discount.
End of Year 1099-NEC Update (US Only)
LBMH03-3881 – The Internal Revenue Service has modified the End of Year 1099-NEC form to change how the calendar submission year is entered, so we have modified our form to match. This change gives your business a way to generate this form using the End of Year form utility (Payables > Utilities > EOY 1099-NEC) easily.

Upgraded 1099-NEC Form
Stability Upgrade to Remove Potential Vulnerability
LBMH03-4166 – We work with the Microsoft Security Advisory CVE and other national and international security sources to ensure that our code does not contain vulnerabilities that could be exploited by hackers and malware creators. Based on their recommendations, we have upgraded our code infrastructure to remove potential vulnerabilities they have identified.
Remote Client Update Process Ensures Better Results
The Remote Client runs on each station in your network to assist them in communicating with the devices they need to get their work done, including printers, Point of Sale devices, and scanning equipment (among other hardware). When we make changes to the Remote Client, it is important that all stations get those changes to ensure the best outcome for these connections. We improve the Remote Client process frequently as hardware and software capabilities change to ensure the best connection between the application and these devices.
As we update the Remote Client process, we update all the stations with this new version five minutes after the release is completed, to ensure that all stations have the latest software. What we found was that all the stations were trying to update at the same time (2 a.m.), which caused a huge backup of requests. We have modified this process to ensure that this update process occurs in a more organized way. Each station checks every 45 to 60 minutes to see if a new version of the Remote Client has been deployed and updates to the latest version when the new version has been released. This encourages Remote Client download success and provides more dependable support for the Remote Client process.