Using the Changes in Version 26
This section explains how to use the changes in the version 26 releases. To review defect resolutions for this release, see the Resolution Log.
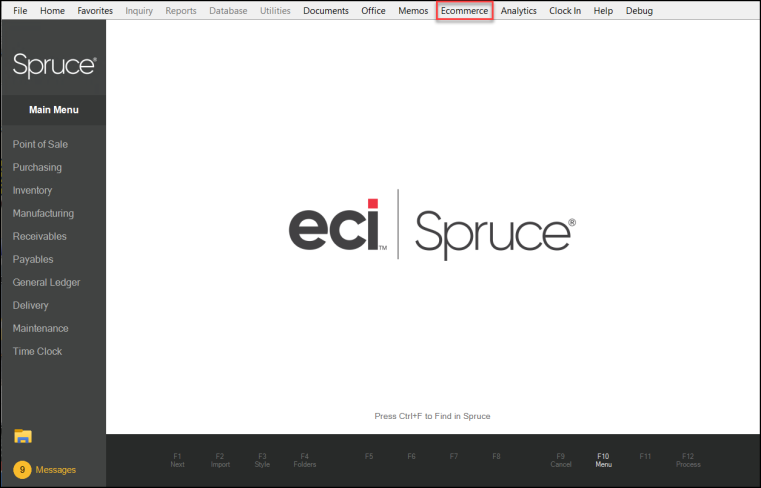
Want to expand your use of ecommerce to sell your stock?
Check out the this link to learn more about how the Spruce eCommerce platform can enhance your online retail website!
Key Features:
New Processes Allow Ace Businesses to Expand EDI Connections
New Search Tools for Finding Items in Data Grids (Hosted Only)
Making Quantity on Hand Adjustments in Inventory Item Maintenance
Using the Orgill FanBuilder Customer Dashboard
Update to Merge Items Process Protects Open Tickets (Advice Notes)
New: Lot Tally Adjustments Feature
Updates to Billing Entry Improve VAT / GST Labelling and Calculation (AU and UK)
Applying a Default UOM when Importing Ecommerce Orders
Support for Fixed Length Tally Items Added to Ecommerce Requests
Managing Account Pricing for Vendor Catalog Items and Alternate SKUs in Spruce eCommerce Requests
New Permissions Allow Changes to Ecommerce Orders
Delivery Route Information Added to Ecommerce Invoices
Order/Quote_ID and Import Source Display on Ecommerce Imports
eCommerce Supports Lot Tally Sales Online
New Ecommerce Parameter Tab Layout
New Ecommerce Top Menu Item Added
Spruce eCommerce Supports Convenience Fees for Account Payments by Credit Card
ActiveReports 17 Upgrade Complete
Accessing the Image Lists no longer Impacted by Scaling (On-Prem Only)
Credit Card Processing Settings Moved (Parameters)
EDI Updates for TimberMart, Ashley Furniture, House-Hasson
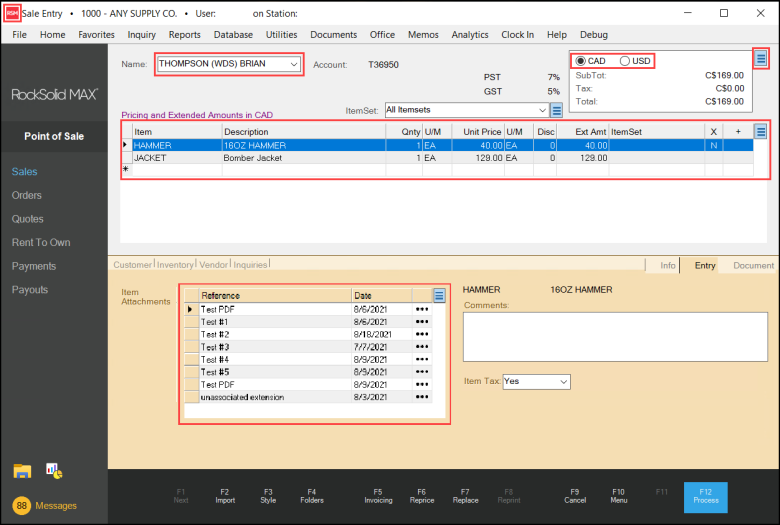
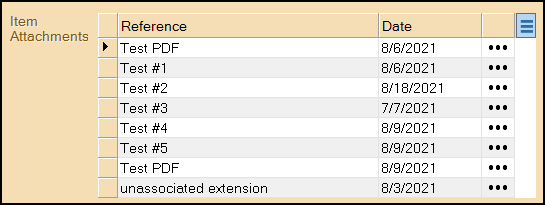
Viewing Attachments from Different Stations Gets Easier
New Application Look and Feel
Support for UPCs Added to a Purchase Order EDI Process
Finding Parameters Gets Easier
Global Updates
New Processes Allow Ace Businesses to Expand EDI Connections
We are adding several Ace upgrades to the version 26.1 release that allow you to prepare for changes they are making to the EDI connection process.
Changes to Ace Rewards ID Numbers Expand Validation Options
B-115522 - To expand the number of valid Ace Rewards ID numbers, Ace changed the validation requirements for scanned and entered Rewards ID numbers. In the past, all Ace Rewards ID numbers contained the sequence 419 (for scanned cards) and 19 for manually entered ID numbers. New scanned card ID numbers will still contain the 41 sequence and the number 1 in manually entered card numbers, but the additional validation number may be any digit… as in:
-
Scanned IDs: 41(1-9)
-
Manually entered IDs: 1(1-9)
The validation process happens in the background so there is nothing additional you need to do to ensure you are looking at a valid Ace Rewards ID number.
Ace EDI Process Changes Require No Changes From You
B-117581, B-117582, B-117745 – Ace is moving toward a new process for distributing hot sheet data to the application, so we have updated our processes to ensure there is no interruption in communication. We are implementing an interim solution to ensure you don’t miss any inventory or rewards transmissions. These changes happen in the background and will not change your work at all.
We have also handled an issue that caused long wait times for Ace requests to process. This also happens in the background, so you don’t have to do anything to see this work.
New Search Tools for Finding Items in Data Grids (ECI-Hosted Only)
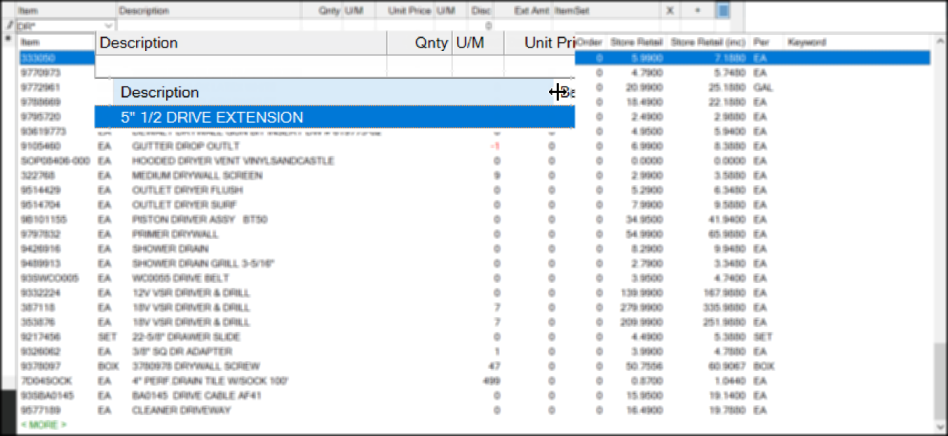
B-113576 – When you are looking for an inventory item and cannot remember the exact name or Item ID, you need tools for searching the item descriptions so you can find the right materials quickly. We have added new Item Description search features to give you those tools. Traditionally, you were restricted to searching for 32 characters when you used a Description search, we have expanded this to 300 characters, when needed. Additionally, we have added additional description search tools, such as using quotes (“Drill Bit”) and using wild cards (Drill B*) to help search for items using their extended item description. The search results show the closest matches at the top and any additional results that match the criteria below.
You can use this feature wherever there is an Item list (Point of Sale, Inquiry, Item Maintenance, etc.). This feature is restricted to ECI Hosted customers only. Adding this feature requires a lot of additional database overhead, which we can manage better in our hosted environment. To enable this feature, reach out to the Implementation or Support teams; as it is disabled by default. Once enabled, there are no special permissions required to use this feature; it is accessible to all users.
Why Do I Need This Feature?
Customers have told us that when their sales and cashier team members are trying to get a customer the materials they need, they cannot always look up the information using the 32-character description we restrict them to. We have used shorter descriptions to better use the space in the data grid. But this limitation should not affect your ability to see the whole description, which ensures you choose the right item for your customers.
Using the Enhanced Item Description Search Feature
We are demonstrating this feature in Point of Sale, but it works anywhere there is an Item list. The new description search strategies include:
-
Entering two words, like (Drill Bit) in the Item field, results in the display of all inventory items that have either Drill Bit or Bit Drill in the Item Description,
-
Entering two words using quotes, like (“Drill Bit”), results in the display of all inventory items with that exact text (as you would see when searching in a web browser), and
-
Entering text with a wild card *, (Drill B*), allows you to search for all items that start with Drill and have B as the next character. This wild card feature can be used more than once, so you could also enter Dr* B* and get all matching results.
Searching using the Exact Text
To search for an item using exact text:
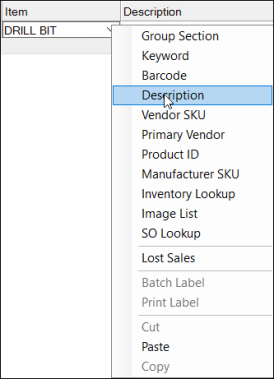
1. In the Item list, type the text you want to search for.
2. Right-click the Item list drop-down  icon to display options and select Description.
The matching results display:
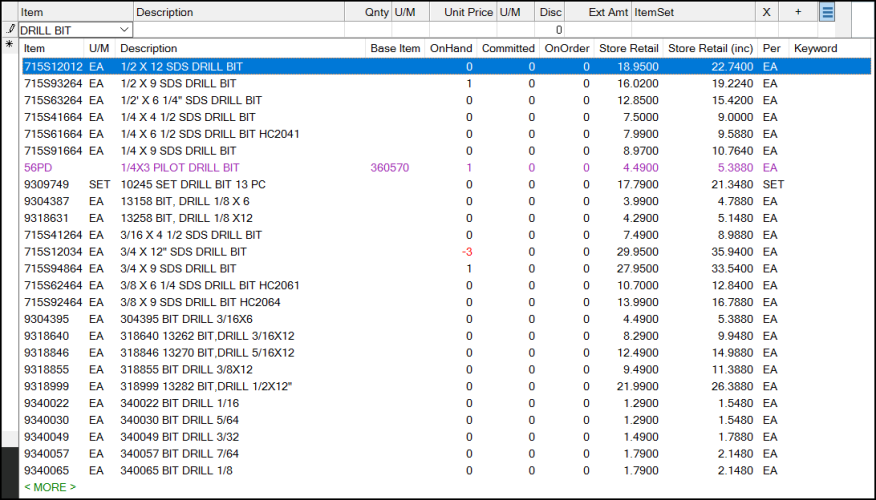
Item Description Search (Entered Text Only)
3. Scroll through this list to find the item you are looking for or click the More option to display additional inventory items.
Searching using Quotes
But, what if you don’t want to see items that don’t contain the words, Drill Bit?
To search for an item using quotes:
1. In the Item list, type the text you want to search for with quotes around it: “Drill Bit”.
2. Right-click the Item list drop-down icon to display options and select Description.
The matching results display:
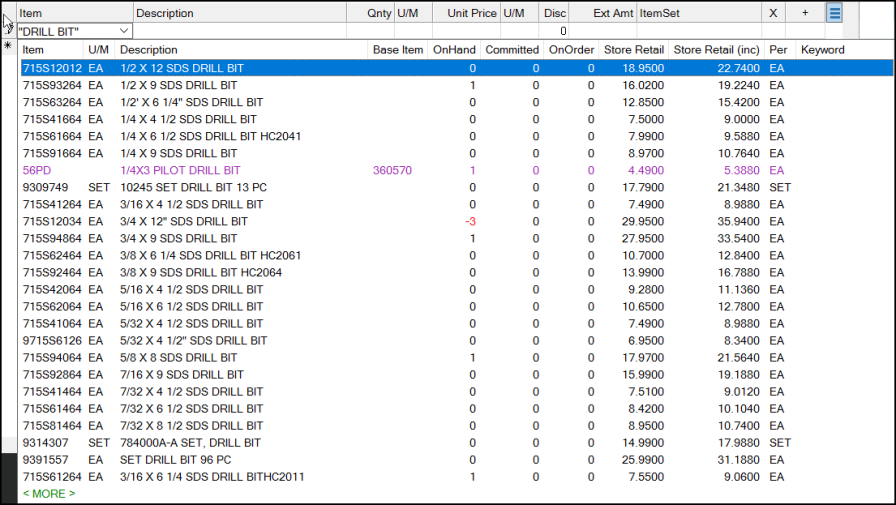
Item Description Search (Using Quotes)
3. Scroll through this list to find the item you are looking for or click the More option to display additional inventory items that match the quotes-based search criteria.
Searching using Wild Cards
To search for an item using one or more wild cards:
1. In the Item list, type the text you want to search for, typing a * after the last character you know: Dri* B*.
2. Right-click the Item list drop-down icon to display options and select Description.
The matching results display:
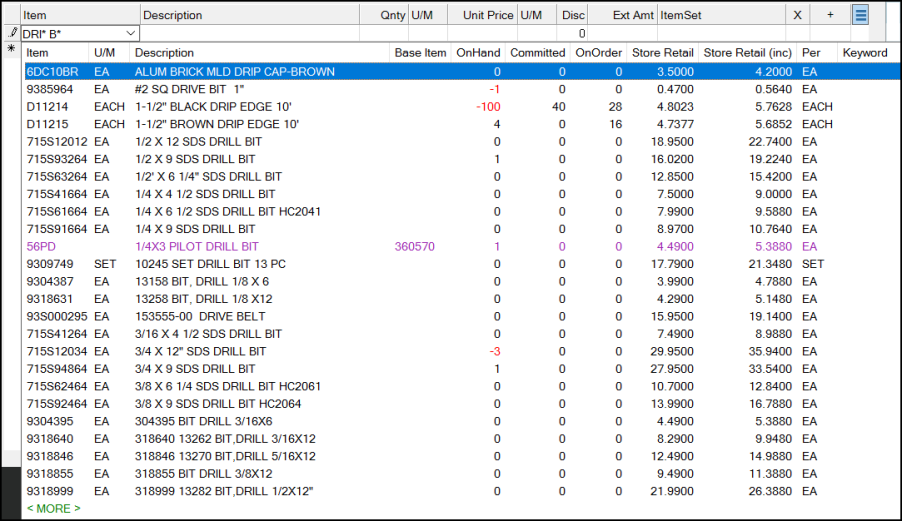
Item Description Search (Using Wild Cards)
3. Scroll through this list to find the item you are looking for or click the More option to display additional inventory items that match the wild card-based search criteria.
Note: If you use the character, * in your Item descriptions, the application does not search for them as characters. So, if you search for Drill*Bit and you are looking for items that have the * in it, the application will not search for that character specifically.
When the items display in the list, if you cannot see all of the characters, you can drag the Description column heading border to display more. This is particularly useful when the information you need is at the end of the description.
Item Description with Drag Icon Displaying
Making Quantity on Hand Adjustments in Inventory Item Maintenance
Customers have asked for a quicker way to adjust the quantity on hand values for inventory items in the application database. Our goal was to ensure that we make these modifications easy but also secure, so you have adequate documentation and protection for these changes. Using these new features, you can keep better track of stock amounts and give the entire team that information when dealing with your customers. Users with permissions to access the Adjustments feature (in the Inventory menu) and access to Inventory > Database > Item will also be able to use the new feature in Item Maintenance. You can still use the Adjustments menu option to perform inventory adjustments as you did before.
Note: You cannot modify the on-hand quantities using this process for lineal tally items, fixed tally items, or other items with the tally group name (such as Pull to Length).
Enabling the QOH Adjustment Parameters
B-115529 – The ability to adjust quantity on hand values for your inventory from Item Maintenance is new and not enabled by default. There are two adjustment values that pertain to this feature:
-
Enable Qty Adjustments via Item Maintenance
Note: Enabling the feature means that only users with specific inventory adjustment permissions can see these tools. Special user permissions are required as discussed here. -
Default GL Mapping for Quantity Adjustments
This setting allows you to choose a default GL account for inventory adjustments made in Item Maintenance. The option you select here shows up as the default reason for the adjustment in the Quantity Adjustment box.
Enabling this feature requires administrative permissions. It would be a good idea to discuss the customer’s preferred GL Mapping for quantity on hand adjustments before you get started.
To set the Quantity On Hand adjustment parameters:
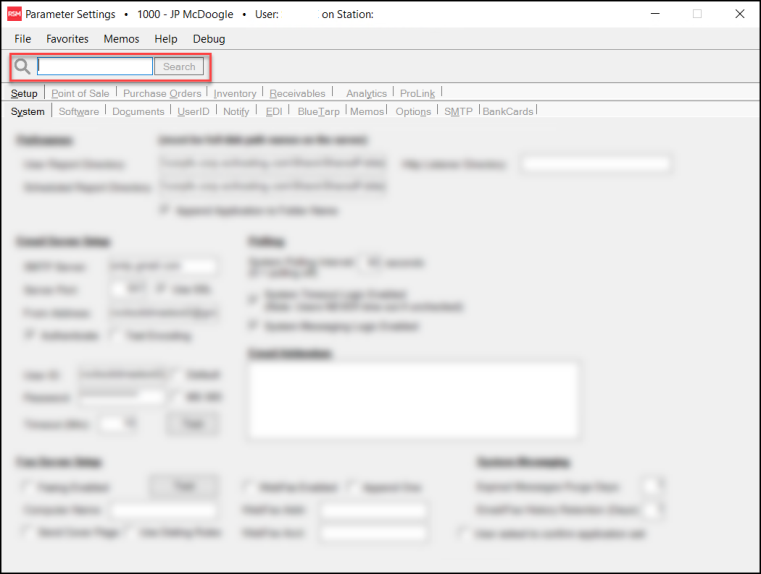
1. From the Main Menu, choose Maintenance > Database > Parameters to display the Parameter Settings form.
2. Choose the Inventory tab to display the Quantity On Hand Adjustment features.

Parameter Settings > Inventory > Quantity On Hand Adjustment Parameters
3. To enable this feature, choose the Enable Qty Adjustments via Item Maintenance check box.
If you do not select this check box, this feature will not be visible to anyone, even someone with Inventory Adjustment permissions.
4. To select the default GL Mapping for these changes, review the options in the Default GL Mapping for Qty Adjustments list and choose the default reason and corresponding journal for tracking these quantity adjustments. This setting is not required.
5. When you have completed these settings choose Process (F12) to save them.
6. Log out of the application and reopen it to ensure this feature is enabled.
Setting the User Permissions for Adjusting QOH in Item Maintenance
B-115532 – After you enable the feature, your team members can access this QOH Adjustments feature using the User ID Maintenance form. You add this setting for each user that needs to make these adjustments. Users who do not have these rights will not see the same icons for making these changes. Users who currently have access to the Adjustments option in the Inventory menu already have permission to use this feature. No additional permissions are required for them.
To add the user permissions to adjust quantity on hand amounts for items:
1. From the Main Menu, choose Maintenance > Database > User IDs to display the User ID Maintenance form.
2. From the User ID field, choose the user ID of the person you want to have quantity on hand adjustment permissions and press Enter.
3. On the Security Options tab, choose the Settings ![]() icon. The Permissions List Code Maintenance list displays.
icon. The Permissions List Code Maintenance list displays.
4. In the Transaction List, under the Inventory > Left-Side Menu choose the Adjustments check box.
5. Choose Apply and Return to redisplay the User ID Maintenance permissions.
6. Choose the Process (F12) function to save this setting.
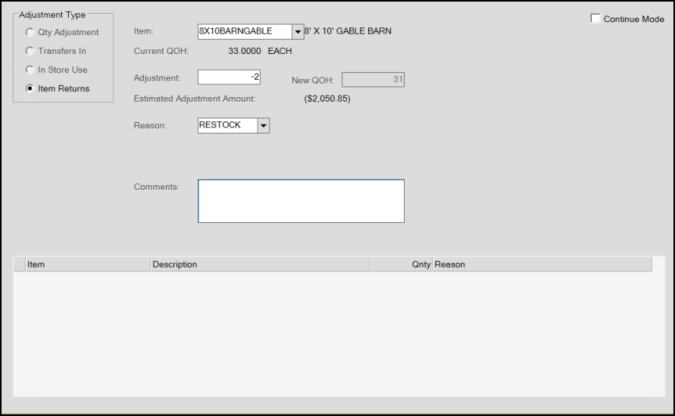
Adjusting the Quantity on Hand for Inventory Items in Item Maintenance
B-115531 – When the feature is enabled and the user permissions are complete, you are ready to use this feature to adjust the quantity of items in inventory in the Item Maintenance form. Typically, these adjustments occur when you receive new items using the Purchasing features, customers return items they do not need, or when you move materials from location to location. This feature is probably best used for other small changes to inventory that can occur during the normal business changes not covered by those transactions. If you make an adjustment after processing these transactions, you risk double counting inventory changes.
To adjust the quantity of an item in inventory in the Item Maintenance form:
1. From the Main Menu, choose Inventory > Database > Item to display the Item Maintenance form.
2. From the Item list, choose the item you want to adjust the inventory amount for and press Enter to display the existing settings for this item.
Note: If you select an item type that cannot be adjusted using this feature, the Settings icon does not display.
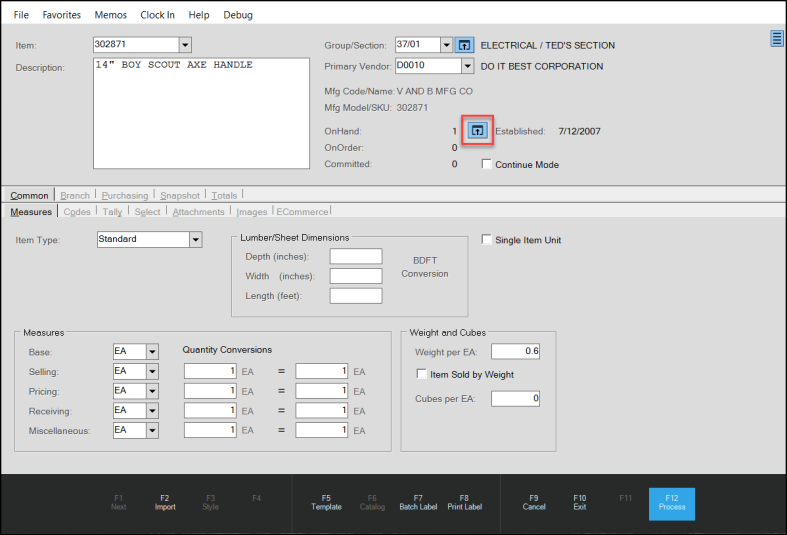
Item Maintenance > Inventory Adjustments Settings Icon Highlighted
Note: You can adjust the number of disabled items that you have in inventory, but a warning message displays reminding you that the item is disabled.
3. To adjust the quantity on hand value for the selected item, beside the OnHand entry choose the Settings ![]() icon.
icon.
The Quantity Adjustment box for the selected branch displays.
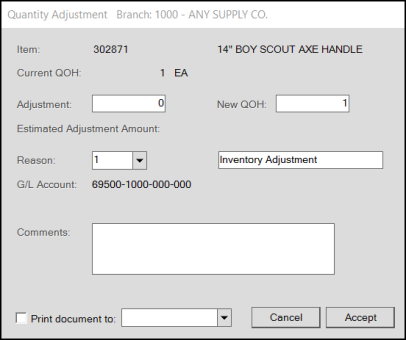
Quantity Adjustment Box (Current Branch)
You can record either a positive (for additions) or a negative (for removals) adjustment in the Adjustment field.
4. In the Adjustment field, enter the number of items of this type you are adding or removing to/from inventory.
The New QOH field updates to reflect the change in the inventory quantity. The application also updates the Estimated Adjustment Amount value by multiplying the item price times the quantity entered in the Adjustment field.
5. The Reason field prefills with the GL mapping option that was selected in parameters.
You can change this entry if you have permission to do so. Changing the label will not change the default GL mapping label for the journal you selected.
6. In the Comments field, it makes sense to enter the reason you are updating the inventory amount, but this entry is not required.
7. To print a record of this transaction, select the Print document to check box and select an authorized printer from the list. This is not required.
The application keeps a record of the transaction in the Documents section.
Note: If you choose to print the document, the application prompts you to choose a document name, location, and a format for the document. Choose the document name, location, and document format and choose Save to print the record.
8. When you have completed your changes to the inventory quantity on hand for this item, choose Accept. This saves the inventory adjustment to the database.
When you return to the Item Maintenance form, the application displays the updated OnHand quantity for the item.
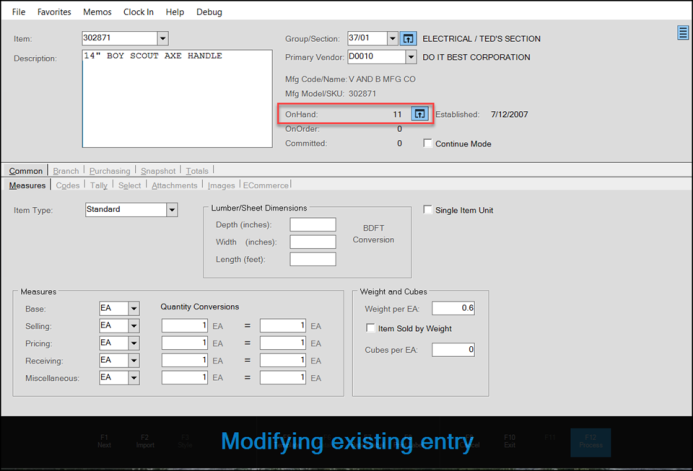
Item Maintenance with Updated Quantity On Hand Setting
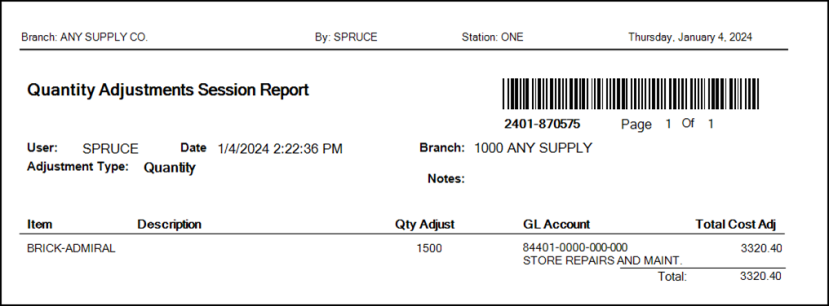
9. To see the inventory adjustments documentation, from the Toolbar, choose Documents to display the Documents form.
10. From the Document # list, choose the inventory adjustment record that you just created.
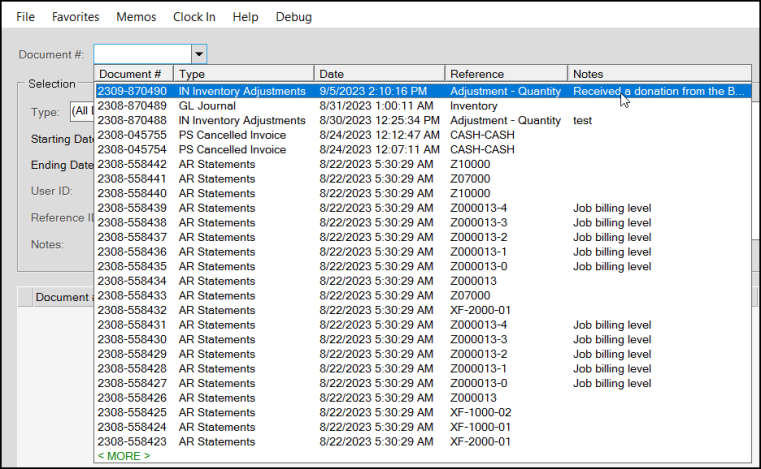
Documents > Inventory Adjustments Document Selection
The document displays.
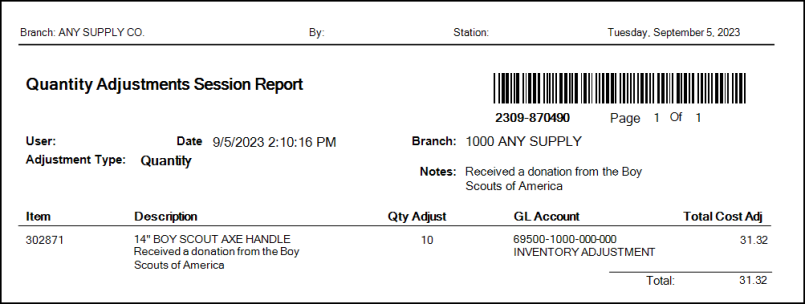
Documents > Quantity Adjustments Session Report
Adjusting Lot/Location Tally Item Types Using this Process
You cannot adjust quantities for lineal tally and group tally items, like pull to lengths and fixed lengths, which are linked to child items using the process discussed above. You must adjust these item type quantities at the child item level. However, you can adjust the quantities for Lot/Location tally items using this new feature.
To adjust the quantity for lot#/location tally items:
1. From the Main Menu, choose Inventory > Database > Item to display the Item Maintenance form.
2. From the Item list, choose the lot/location item you want to adjust the inventory amount for and press Enter to display the existing settings for this item.
3. To adjust the inventory for this item type, choose the OnHand Settings ![]() icon.
icon.
For Lot Tally or Lot/Location Tally items, you can also specify the location at which the on-hand quantity has changed. This box displays:
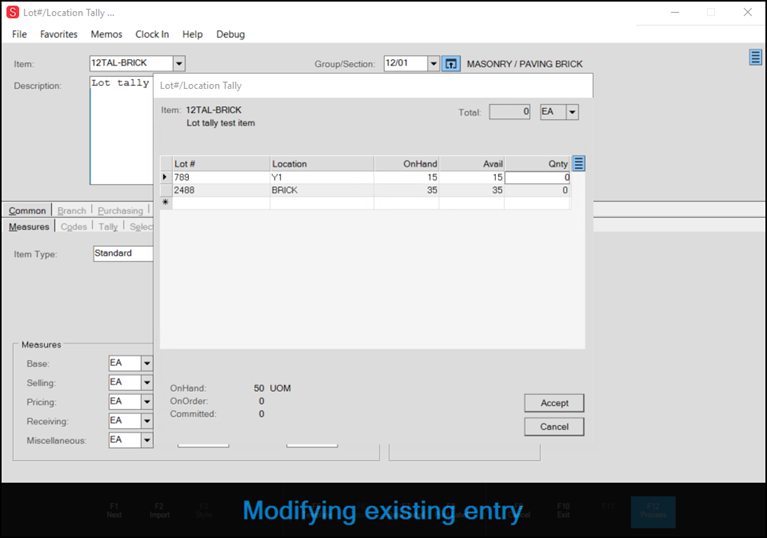
Lot#/Location Tally with Empty Qnty Columns
4. To update these records, in the Qnty column, enter the amount of inventory you have added or lost and choose Accept.
5. Choose the Process (F12) function key to make the change.
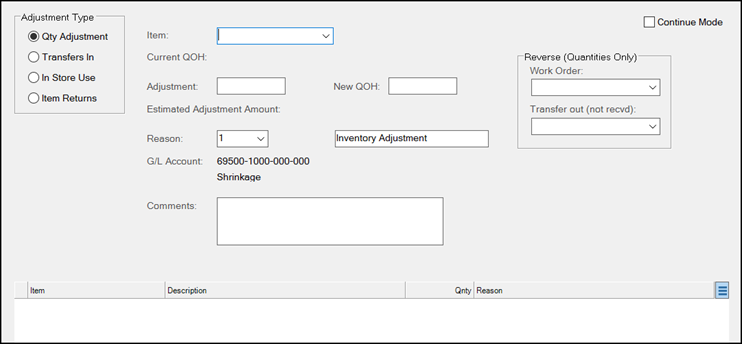
Updates to the Inventory Adjustments Form
We have also modified the layout of the Inventory Adjustments forms to make them easier to work in. There is no change to the functionality in this form, but the look and organization of it has. From the Main Menu, select Inventory > Adjustments to see the changes in the Adjustments form and subforms.

Inventory > Adjustments > Quantity Adjustment Option
![]()
Inventory > Adjustments > Transfers In
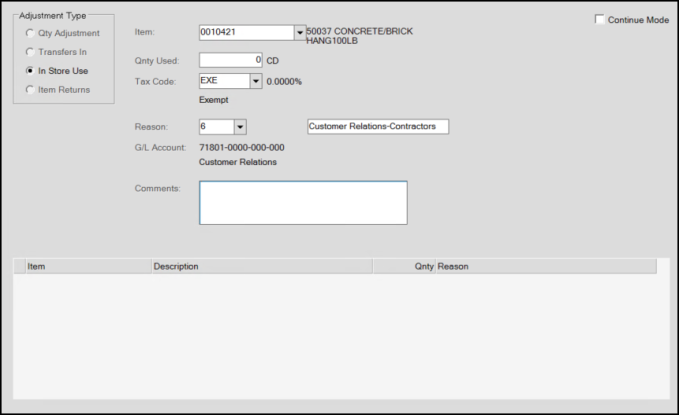
Inventory > Adjustments > In Store Use
Inventory > Adjustments > Item Returns
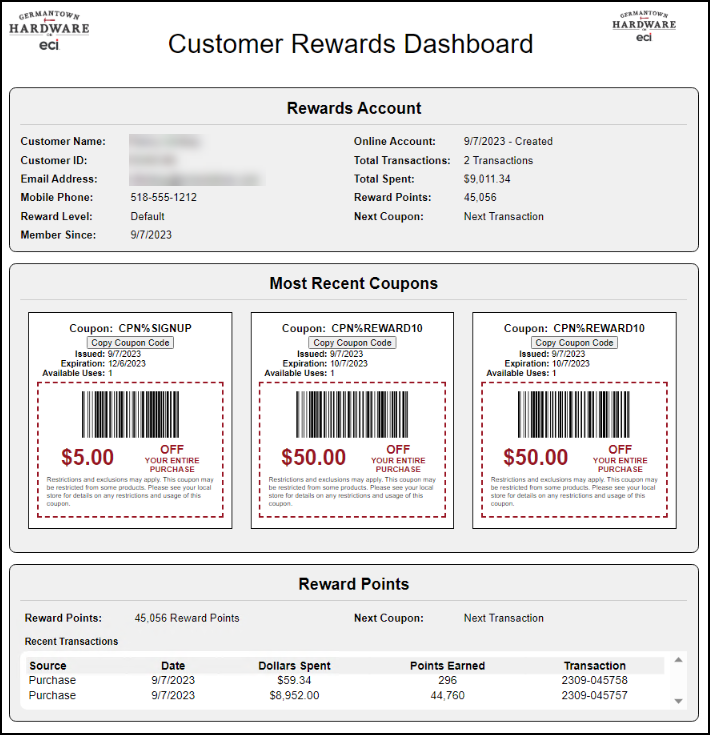
Using the Orgill FanBuilder Customer Dashboard
The Orgill FanBuilder Customer Dashboard gives you access to the Orgill FanBuilder Rewards website so you can look up a customer’s current points balance and coupons. You can access this information in the account’s Loyalty tab or in the account’s Folders in the Point of Sale areas form. Access to the FanBuilder site is based on the parameter settings you have already established, and there is no change to those settings.
In addition to a summary of the coupons and points, the Customer Rewards Dashboard displays the customer’s name, ID, contact information, and application-specific details like transaction codes, transaction amounts, and dates. The instructions below assume the following setup is complete:
-
You have worked with Support to enable the FanBuilder parameters
-
You have completed the Orgill EDI settings in the Branch Setup tab for each branch that supports FanBuilder Coupons and Rewards (so you can send and retrieve rewards information)
-
You have completed the FanBuilder settings in the Branch Setup tab for each branch that supports FanBuilder Coupons and Rewards (so you have enabled the FanBuilder program and customized the account number and coupon template settings)
-
You have customers who have enrolled in the Orgill FanBuilder program or can set them up at Point of Sale
Note: Instructions for these settings are in the Help System.
Customers who have not enrolled in the FanBuilder Loyalty program can do so at Point of Sale. Cashiers can choose <Ctrl R> to display the Loyalty Program options.
Accessing an Account’s FanBuilder Rewards Dashboard
B-113728, B-113732, B-116589 – We have added new API calls behind the scenes to allow the application to retrieve coupons and rewards information specific to each FanBuilder customer from the Orgill website. You can do this in the Sale Entry form (using the Loyalty folder) or in the Account Maintenance form (on the FanBuilder Loyalty tab).
Note: We have added additional security to the Customer Rewards Dashboard to safeguard the application from hackers.
From Account Maintenance
B-113730 – You might want to look up the account’s FanBuilder rewards and coupons from Account Maintenance if you have them on the phone.
To access an account’s FanBuilder Customer Dashboard from Account Maintenance:
1. From the Main Menu, choose Point of Sale > Database > Account to display the Account Maintenance form.
2. From the Account list, choose an account that has enrolled in the FanBuilder rewards program.
3. Select the Loyalty > Orgill FanBuilder (or the rewards program name you have selected) tab. The FanBuilder Customer Dashboard button displays on the tab.
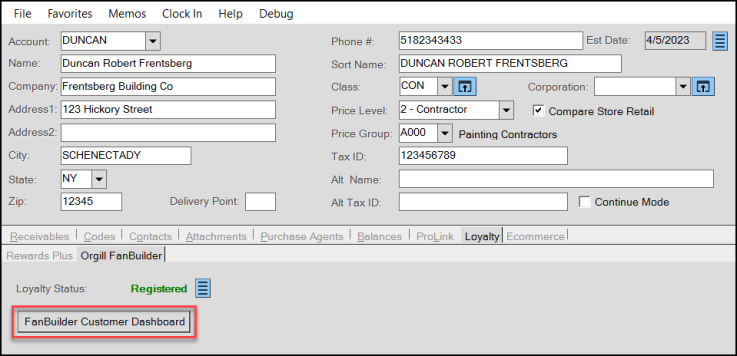
4. Click the FanBuilder Customer Dashboard button to display the account’s accumulated coupons and rewards points:
Note: The branding that displays on this form reflects your business’s account settings on the Orgill site.
5. To close the Dashboard, click the X in the upper right corner.
Note: If you do not close the dashboard, it remains open until the Cashier logs out of the application.
From Sale Entry
To access an account’s FanBuilder Customer Dashboard during a Sale Entry transaction:
1. From the Main Menu, choose Point of Sale > Sales to display the Sale Entry form.
2. From the Name list, choose an account that has enrolled in the FanBuilder rewards program.
3. Choose Folders (F4) to display the related account folders.
4. Select the Loyalty > Orgill FanBuilder (or the rewards program name you have selected) tab. The FanBuilder Customer Dashboard button displays on the tab.
5. Click the FanBuilder Customer Dashboard button to display the account’s accumulated points and coupons. Closing the dashboard works the same as described above.
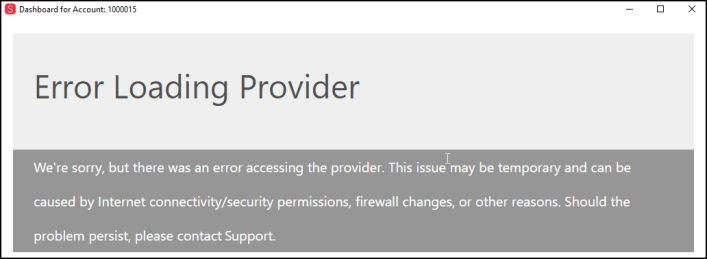
B-116870 – If the FanBuilder URL has not been added to your system parameters or if there is some reason why the URL is not accessible when you choose the FanBuilder Customer Dashboard button, the application displays a warning message.
Update to Merge Items Process Protects Open Tickets (Advice Notes)
B-72417 – When you merge items in Inventory, the application now checks to see if you have one or more open tickets with those items in them. If open tickets are tied to these items, the application displays a warning message and updates the ticket with the new Item ID. You can change the task list setting of this message from a warning to an error if you want to prevent the merge from occurring. The message considers the region setting, so displays Advice Notes rather than Open Tickets in the messaging, for regions that use this naming convention.
Note: Keep in mind that when you merge items, you will lose the turn and GMROI data for these items, but we show the combined year-over-year values from both items in the merged item results.
To see this change:
1. From the Main Menu choose Inventory > Utilities > Maintenance > Merge/Rename Item to display the Merge Rename Item form.
2. In the Merge from Item list, enter or find the item you want to merge or rename.
3. In the Merge to/Rename Item list, do one of the following:
-
To merge two items, enter or find the item you want to merge the selected item with in the Merge to/Rename Item field.
-
To rename the item you specified, enter the new name in the Merge to/Rename Item field.

Merge/Rename Item Form with Merge Entries
Note: The application distinguishes between a merge and a rename process by looking up the item entered in the Merge To/Rename Item list.
-
If the item in the Merge to/Rename Item entry already exists in inventory, the application considers the process a merge.
-
If the item in the Merge to/Rename Item entry does not exist in inventory, the application assumes it is a rename.
4. Review the Base UM Relationship settings to ensure they are compatible.
If you are merging two items, we recommend that you manage the base UM settings so that they match before you begin this process.
5. Choose Process (F12) to merge or rename the item(s) as specified.
Note: If you are processing a merge or renaming an item that is in an Open Ticket (Advice Note) this type of message displays:
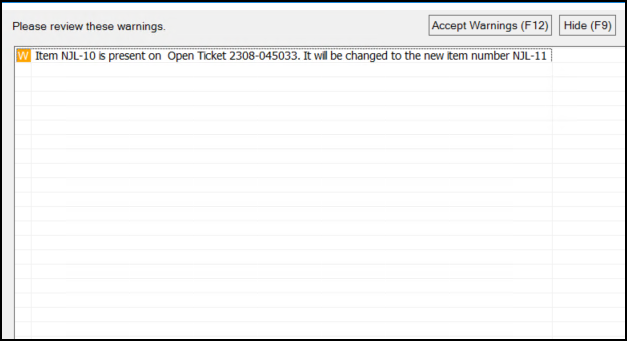
Warning Message (Merge Rename with Open Ticket / Advice Note Message)
This message replaces the term Open Ticket with Open Advice Note when displayed in a non-US region.
6. Do one of the following:
-
To accept the warning (and change the Item number in the open ticket/advice note to the new entry), choose Accept Warnings (F12).
-
To return to the transaction without making this change, choose Hide (F9). The rest of the merge/rename process (selecting the branches and continuing after confirming the status) remains the same.
New: Lot Tally Adjustments Feature
LBMH03-155 – If you sell lot tally items and the On Hand values of these items in Item Inquiry/Maintenance forms do not match the sum of these quantities in each location, you need a way to account for this discrepancy, both in terms of the On Hand Quantities that display in these forms and financially in your GL accounts. Typically, these discrepancies occur when someone adds a lot tally item quantity in the detail box and then modifies the quantity in the data grid.
We have added a new feature that collects the lot tally items with On-Hand quantity discrepancies, updates these values based on the actual sum of its quantities in each location, and debits the GL account you select to track this shortage accordingly.
To adjust mismatched lot tally item quantities and apply the missing quantities to the appropriate GL account:
1. From the Main Menu, choose Inventory and from the Left Menu, choose Adjustments. The Inventory Adjustments form displays with the Quantity Adjustment type selected by default.
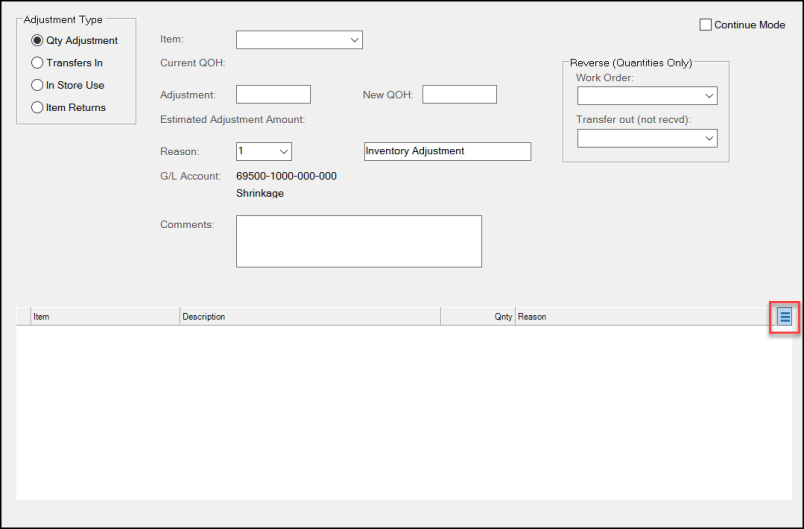
Inventory Adjustments with Menu Marker Icon Highlighted
2. From the Reason list, choose the GL Account to which you want to apply the quantity on hand change amount.
3. To find the lot tally items that require adjustments, click the new Menu Marker  that displays at the top of the data grid and choose the option Load Lot Tally – OnHand Auto Adjustments.

Inventory Adjustments Menu Marker Load Lot Tally Option Highlighted
When you select this option, the application collects the lot tally items that have discrepancies and displays them in the data grid.

Inventory Adjustments Showing Lot Tally Items with Discrepancies
The GL Account that will account for this inventory change appears in the Reason column.
4. To see the current detail of the lot tally item in the list, highlight the item and double-click it to display the Lot#/Location Tally box for that item. You cannot make changes in this dialog box. Click Accept to close it.
5. When you have completed your review and you are ready to update these records, choose Process (F12) to adjust the GL Accounts and the total on-hand quantity amounts you selected. The form resets to the default entries.
Inventory Adjustments After Processing
If you collect several Lot Tally items in the list and decide that you need to apply a different GL account to one or more of the collected item(s), delete the item(s) that should not apply to the selected GL account from the list, and process the change for the remaining item(s). Then, you can choose a different GL account, recollect the list, and apply the newly selected GL account to the remaining item(s).
For example, in the previous instructions, if you applied the Store Repairs and Maint GL account to the Brick-Admiral item, (rather than the default Inventory Adjustment Shrinkage GL account option), the Adjustments document would look like this:
Inventory Adjustments for Lot Tally Item
Regional Update
Updates to Billing Entry Improve VAT / GST Labelling and Calculation (AU and UK)
LBMHA01-37793 –Customers in Australia and the UK alerted us to several issues that were specific to the Billing Entry form, which we have corrected in this version. We have resolved the following issues in the Billing Entry form for Australia and UK users:
-
We have moved the VAT and GST labels closer to the tax field associated with the transaction
-
The VAT and GST label name in the Billing Entry form is defined using the Tax Code setting in the Tax Location field in the Branch Setup form
-
When the selected Receipts in the Billing Entry form do not have tax exempt or partial receipt selections, the application calculates the payment’s tax amount based on the standard logic and adds the Accrued GL entry accordingly
-
When any of the selected Receipts in the Billing Entry form have a different default tax code or there are partial receipt selections, the default VAT or GST value may be blank and the following message displays. The application and waits until a valid amount is entered to save the invoice:
- Manual <VAT/GST> entry required
Note: The VAT/GST text in this message defaults to the Branch Tax setting in Branch Setup form
- When a manual tax entry message displays, the cursor is set to the Amount field so you can enter an appropriate tax amount.
- You can enter 0 if it is appropriate but it must be entered manually.
- If you enter a non-zero value, the application updates the GL Debit and Credit entries accordingly.When a manual tax entry message displays, the cursor is set to the Amount field so you can enter an appropriate tax amount.
-
We have also corrected the reported issue where tax-exempt items were calculating GST tax amounts anyway.
Ecommerce Updates
ECI now provides two platforms to support your ecommerce website. The original API-based ecommerce platform, which we call the Ecommerce API, and the Spruce eCommerce platform, which integrates
Applying a Default UOM when Importing Ecommerce Orders
B-116453, B-117371 – When you sell construction materials, you know that you can categorize the amount of those materials in a variety of ways. When your customer orders materials online using a lineal unit of measure and you want to convert that order to a different unit of measure for the yard employees, there is now a process that ensures that the application converts this material and its associated pricing correctly. This new process ensures this conversion is successful and makes it easier to fulfill online orders.
For example, ABC Construction purchases boards by the lineal foot (or meters) online, but you want the inventory team to know how many boards that translates to in the yard.
This need requires a conversion process that takes into account the item pricing for both units of measure and ensures that the conversion doesn’t affect the order’s cost but respects the Default Unit of Measure for Point of Sale Quantities (as specified in the Branch > Codes tab).
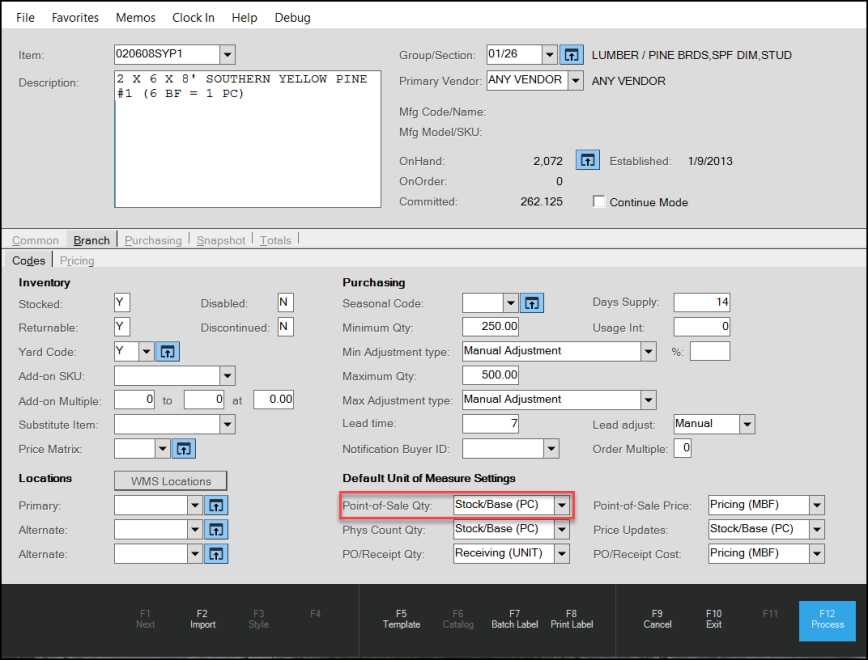
Item Maintenance > Branch > Codes > Default Unit of Measure Settings > POS Quantity
To ensure this works correctly, we have added a new import option on the Item Maintenance form in the Common > ECommerce tab: Use POS Qty Default UM.

When this check box is enabled (checked) for a particular item, and you import an ecommerce order with that item using a different unit of measure than is stored in the Default Unit of Measure Settings > POS Quantity field, the application will convert that unit of measure and adjust the quantity for internal teams. This will not change the pricing values of the imported order. You can set this option for some items and not others, if you wish.
Note: This setting is not required unless you want to use this conversion process for the internal collection of order materials. This check box is not enabled by default.
Setting the Use POS Qty Default UM for Multiple Items
To set this option for multiple items in your inventory:
1. From the Main Menu, choose Inventory > Utilities > Maintenance > Item Global Modify to display the Item Global Modify form.
2. From the Field Name list, choose the Cmn – ECommerce Use POS QtyUM option.
3. In the Old Value field enter N for No.
4. In the New Value field, enter Y for Yes.
5. Use the Group/Section, Keyword, and Primary Vendor list entries to collect the items you want to apply this setting to.
You can remove individual items from the list if you do not want this new setting to apply.
6. When the list contains only the items you want this setting to apply to, choose Process (F12) to save the setting to the Common > Ecommerce form for those items.
New Permissions Allow Changes to Ecommerce Orders
B-117223 – When you import ecommerce orders, there are times when the team members need to make changes to fulfill the order request. We added new permissions to the POS in the User ID Maintenance form so you can give specific users those capabilities. This is for ecommerce orders that are open documents and have not yet been invoiced. Users without these permissions will not be able to review ecommerce orders in the Selection list.
To add these new permissions to a user group or an individual user:
1. From the Main Menu, choose Maintenance > Database > User IDs. The User ID Maintenance form displays.
2. From the User ID list, choose the user or user group you want to add ecommerce modification permissions to and press Enter.
3. On the Security Options tab, beside the Application Security field, choose the Settings ![]() icon. The POS Permissions List Code Maintenance box displays.
icon. The POS Permissions List Code Maintenance box displays.
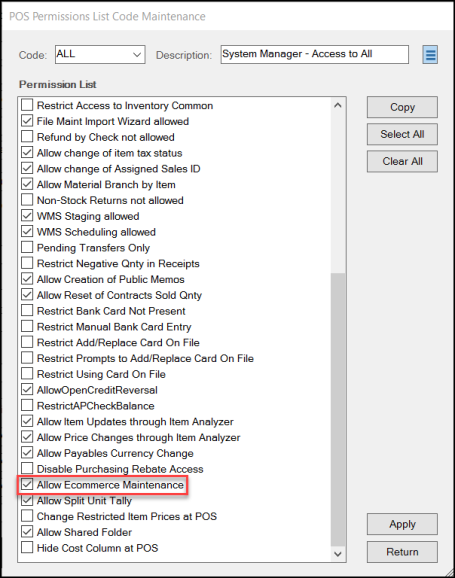
User ID Maintenance > Application Security > POS Permissions List Code Maintenance
4. Enable (select) the Allow Ecommerce Maintenance check box.
5. Choose Apply and then Return.
6. Choose Process (F12) to save this change to the user record.
Support for Fixed Length Tally Items Added to Ecommerce Requests
B-117819 – Your online customers can add Fixed Length Tally Items to their ecommerce order requests and quotes as long as they specify the Total Quantity information only. Spruce eCommerce and the ecommerce API will capture the quantity and length information of the materials that the customer orders as item comments, so your team can (are required to) add that information when they import and process the order in the application.
The Fixed Length Tally items must have ecommerce enabled in the Item Maintenance form. The order/quote items can be processed using the manual import process or when you have enabled the auto-process order process. We have tested this process to ensure the correct pricing of the fixed-length tally items and the regionally applicable tax. The application uses the CartVerify method to ensure the tax applies consistently to these transactions. The application checks the item quantity to ensure that the tally details match successfully. We tested the order, quote, and invoice documentation to ensure that these records are created successfully.
Managing Account Pricing for Vendor Catalog Items and Alternate SKUs in Ecommerce Requests (Spruce eCommerce Only)
B-118031 – We have added enhancements to the Spruce eCommerce platform and to the application to better handle Account Pricing in specific circumstances. When you work with a vendor that has a large catalog or your online customer purchases a product online using an Alternate SKU that uses a different unit of measure, it is important that the appropriate pricing displays and is applied for those materials on your site. Let’s look at these issues individually:
-
Account Pricing for Vendor Catalog Items.
Some businesses are making more of the items in their vendor’s catalog available to online accounts without keeping those items in stock. It can be a way of finding out which items are useful to the customer base before investing in those items directly. It is important that the pricing for these items reflect the appropriate pricing for the account, based on their price levels and contracts.
-
Account Pricing for Alternate SKUs.
Some businesses use alternate SKUs to give customers a way to purchase the same materials online using a different unit of measure. The application and the Spruce eCommerce platform need a way to recalculate the transaction using the appropriate unit of measure based on the pricing that the account has negotiated for the materials.
To give you those options, we have updated and extended the application and the API to ensure that the account pricing for vendor catalog items and the alternate SKU orders and quotes are accurate for the account that is purchasing them. Whenever the pricing from the vendor catalog comes in, the application applies the specific discounts or markups based on the account placing the order. Additionally, if you have alternate SKUs for the same item, the pricing must be specific to the unit type and the unit of measure for that item SKU.
Delivery Route Information Added to Ecommerce Invoices
B-118321 – We have added a new field to the GetInvoiceDetailResult and the GetOrderDetail models to provide delivery route information to customers on their ecommerce invoice documents. This new field is part of the SOAP API so it works for eCommerce API and Spruce eCommerce-based businesses.
Order / Quote ID and Import Source Display on Ecommerce Imports
B-118076 , B-118629 – In Order and Quote Entry, when you import an ecommerce order, we now display the Request ID (the ecommerce order number) and the Source (Ecommerce, Spruce eCommerce, etc.) information on the entry form.

Order Entry > Imported Order Details Added
Spruce eCommerce Calculates Add-On SKU Amounts
LBMH02-482 – When an inventory item has an add-on SKU (for discounts, additional costs, tax reasons, etc.), it’s important that when your customers request that item online, the platform calculates the add-on SKU price for that item. We have updated the Spruce eCommerce platform to ensure that the add-on SKUs adjustment amount is calculated for these requests. This new feature uses the add-on SKU’s pricing and quantity values but does not use the requested item’s submitted unit of measure.
When the requested item quantity matches or exceeds the quantity specified in the add-on SKU, Spruce eCommerce calculates the appropriate add-on SKU amount for the item. If the requested item quantity does not meet the quantity requirement of the add-on SKU, the add-on SKU amount is not calculated for the item.
Consider these scenarios:
-
If the request is for one Hammer and this item has an add-on SKU that adds $1 for each Hammer, the new feature would calculate the add-on SKU amount of $1 for the request. If the request is for 1 Box of Hammers, the feature does not consider the unit of measure, only the quantity; so the feature would calculate the add-on SKU amount of $1 for the request.
-
If the request is for one Hammer, but the add-on SKU specifies adding $1 for every 10 Hammers, the new feature would not calculate the add-on SKU amount for the item. When the customer requests 20 Hammers, the new feature would calculate a $2 add-on SKU amount for the requested item. If the request is for 1 Box of Hammers, even if there are 10 Hammers in the box, the new feature would not calculate the add-on SKU for this request.
eCommerce Supports Lot Tally Sales Online
LBMH02-383 – You can now sell and quote lot tally items online using both the Spruce eCommerce and ecommerce API platforms. When you import ecommerce orders or quotes into the application, the lot tally items import correctly and the auto process for these types of transactions works as expected as well. Invoicing imported orders with lot tally items has been tested and works correctly too. As with the Fixed Length Tally changes, Lot Tally item ecommerce transactions rely on the Total Quantity entry only. Any transactions that include length/width information for lot tally items will cause an error (and a corresponding error message explaining the issue).
Customers can put length information in the Comments section of the order for manual processing. When you auto-process these orders, the inventory team can look up the length information in the Comments in the order documentation.
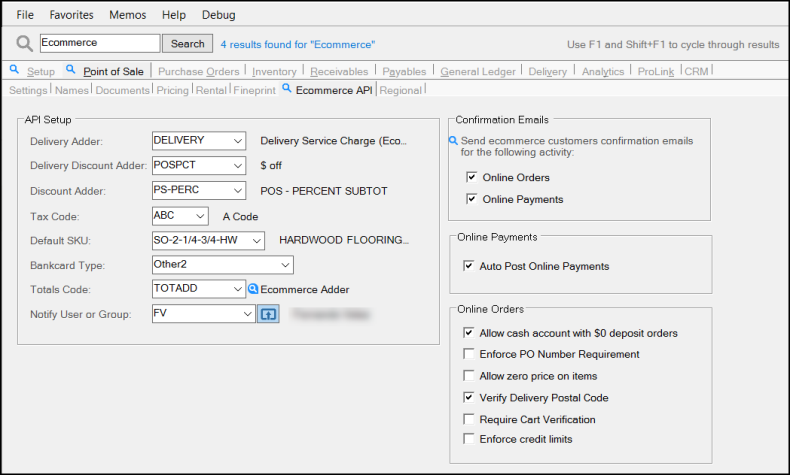
New Ecommerce Parameter Tab Layout
LBMH02-744 – As an Ecommerce user, you can see layout changes in the Ecommerce API tab, which we have renamed Ecommerce. For Ecommerce API users, the layout changes won’t really affect you and you will not see the Spruce Commerce box shown below. Spruce eCommerce users can see the Spruce eCommerce -specific settings that apply to your website.
To access the Ecommerce tab:
1. From the Main Menu, choose Maintenance > Database > Parameters. The Parameter Settings form displays.
2. Select Point of Sale > Ecommerce to display the ecommerce settings.
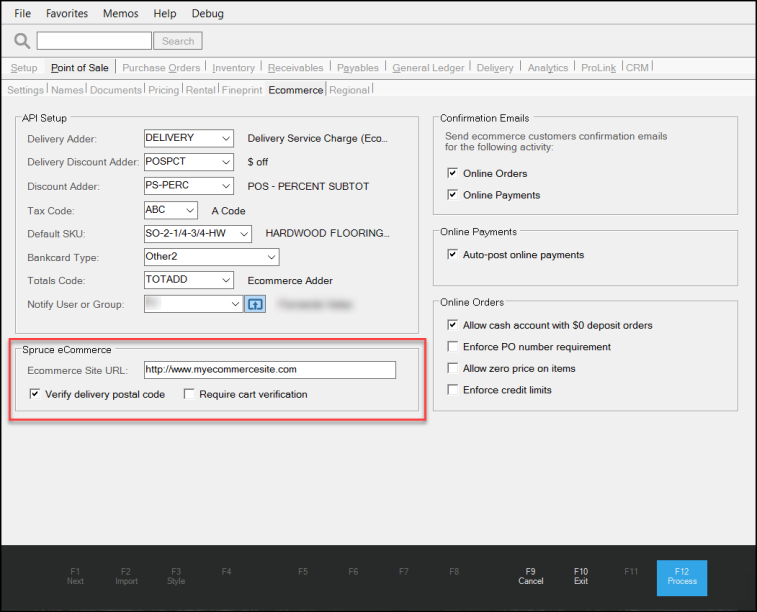
Parameter Settings > Point of Sale > Ecommerce
Note: Your EvolutionX API key must be active to display the Spruce eCommerce box shown in this figure.
We have moved the Spruce eCommerce-specific Online Order settings to the new box. The Ecommerce Site URL field, which will typically be set up for you by the ECI Product team, contains the URL of your EvolutionX-based site. This entry is required to access your Spruce eCommerce site through the new Top Menu option. When your EvolutionX API key is active, you can use the instructions below to access your ecommerce site directly to review and update your online settings.
New Ecommerce Toolbar Menu Item Added
LBMH02-744 – The Toolbar Menu may have a new Ecommerce option, which will work differently for customers who have Spruce eCommerce and those who do not. This setting is based on whether you have the Ecommerce parameter set (those that do not have it won't see the toolbar option) and the type of API key (ECommerce or EvolutionX) your website uses to collect information from the application.
-
As a Spruce eCommerce user, choose the Ecommerce toolbar menu option to display your Spruce eCommerce website. From here, you can review the changes you have made in the application and how they appear on the website.

Spruce eCommerce-Based Website
-
As a non-Spruce eCommerce user, choose the Ecommerce toolbar menu option to display a page showing you the benefits of the Spruce eCommerce solution. This page is under construction, so the Ecommerce menu option may not display for you until the web page is complete.

Applying Statement Discounts to Ecommerce Account Payments
LBMH02-1010 – When your customers pay using an online process, you want to be able to provide them with the same statement discounts that would apply if they paid by the discount date in person or by mail. We have updated our APIs to ensure that the application applies these discounts to ecommerce account payments, whether they are processed manually or using the automatic process. We added three additional fields of information:
-
Discount Date
This specifies the last date that the discount applies. (This allows the API to compare the discount date to the date the payment is being made to ensure the discount can be applied.) -
Discount Amount
The calculated amount of the discount. (This provides the amount of the discount, which the API can subtract from the ROA payment balance.) -
Outstanding Amount Discount
The original payment amount that can be discounted, minus the discount amount, and minus the customer’s account payment, minus any additional discounts not included above.
Additional details are available in the API Guide.
Spruce eCommerce Supports Convenience Fees for Account Payments by Credit Card
LBMHA01-36317 – When a customer pays their account balance using a credit card online, it costs your business more. Convenience fees help you recoup those losses, so if you have set up credit card convenience fees for your branches, you can apply those fees to your Spruce eCommerce account payment transactions online. The site displays the convenience fee amount and label to the customer during the payment process. This is how it works:
-
When the customer submits an account payment request and they use a credit card you have set up for the branch that services the account, the site applies the convenience fee override for that card to their Spruce eCommerce transaction.
-
When the payment request does not have a branch assigned to it, the site applies the branch convenience fee settings and card overrides that are not disabled.
-
When the customer submits an account payment request using a card you do not have an override for, the site applies the default convenience fee percentage.
-
If the customer supplies a credit card type that you have not set up a fee for, the site applies the default bankcard setting in the Ecommerce parameters. If you do not have a bankcard setting in the Ecommerce parameters, the site does not apply a convenience fee.
Note: Convenience Fees are already supported in the ecommerce API platform.
Security Updates
We have made the following updates to ensure better security and functionality for the new release.
ActiveReports 17 Upgrade Complete
B-111523 – We have upgraded the ActiveReports platform to version 17 to ensure you stay current with the latest technology in your application-based reports. We have thoroughly tested the existing reports, including the Custom Reports Library for each application area and in each region we support. We have made the necessary modifications to ensure that your reports work as they did before. There should be no change in your reports due to this upgrade.
Accessing the Image Lists no longer Impacted by Scaling. (On-Prem Only)
B-112528 – An on-premises customer reported that when they tried to access the Image Lists (Inventory > Database > Image Lists), they received a message:
-
We've detected that you have any application scaling set to a value other than 100% (normal size.) Please disable screen scaling (set the scale to 100%) prior to using this utility. You can reset your scaling back after completing your changes. Scaling does not affect other users of the Image List.
We resolved this issue by ensuring that the Image Lists Maintenance form supports both display scaling and form scaling. This issue did not occur for hosted customers.
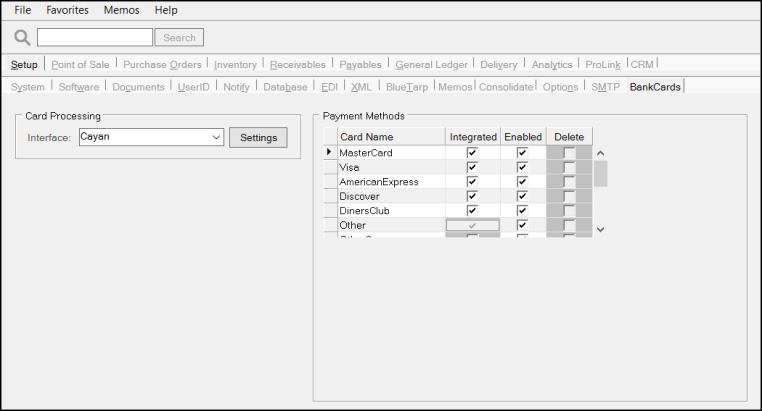
Credit Card Processing Settings Moved (Parameters)
You may notice that we have moved the Credit Card Processing settings from the Parameter Settings > Setup > Software tab to a new tab, Parameter Settings > Setup > BankCards.
EDI Updates for TimberMart, Ashley Furniture, and House-Hasson
B-114959, B-114355 – Distributors TimberMart, Ashley Furniture, and/or House-Hasson are moving to new and more secure processes for EDI data transmission and we are changing our processes behind the scenes to support these changes. You will not see any changes to your functionality or work processes due to this upgrade. These modifications have been thoroughly tested by our development teams to ensure quality and security.
Viewing Attachments from Different Stations Gets Easier
B-117496 – When your staff views attachments from their workstations, they should be able to view the same attachment at the same time. We have made changes to the Remote Client Utility to ensure that this capability is available and does not result in the application closing down.
New Application Look and Feel
B-115196 – We have updated the way your RockSolid MAX application windows and controls display to use more modern Windows 10 styling. These changes won’t affect the way your application works, but they do make some features more visible.
Sale Entry Form with New UI Changes Highlighted
First, you may notice that the icon in the upper left corner of the form and in your system tray is new. We have updated our logo for the application:
These are some of the other new features you may notice:
• The data grid entries stand out better, displaying with a dark blue background and white text when the row is selected.
• The new radio buttons  are more visible than before
  .
.
• The new drop-down list ![]() icons have a more modern look than before
icons have a more modern look than before ![]() .
.
• The Menu Marker ![]() icons and other settings buttons are more pronounced, and when you hover over them
icons and other settings buttons are more pronounced, and when you hover over them![]() , they darken to show they are affected by the selection.
, they darken to show they are affected by the selection.
• Folder data grids have a white background to make them more visible:
The visual changes are not just in Point of Sale. Other forms and features such as the file browse input/selectors match the new look for drop down controls:
• Text boxes, when they are in focus, have a blue border to highlight them.
• Check boxes have a more modern style  than before
  .
.
And you can see that we have lightened the background of the form to make entries more visible.
• Messages that display in the Function Key area display using an Info icon for better focus and readability.

• The file browse input/selector matches the new look for drop down controls. The Browse ![]() icon reacts to mouse hover in the same way the Arrow button does.
icon reacts to mouse hover in the same way the Arrow button does.
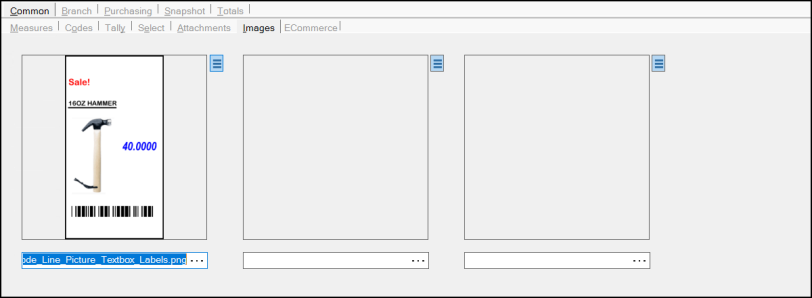
Item Maintenance > Common > Images
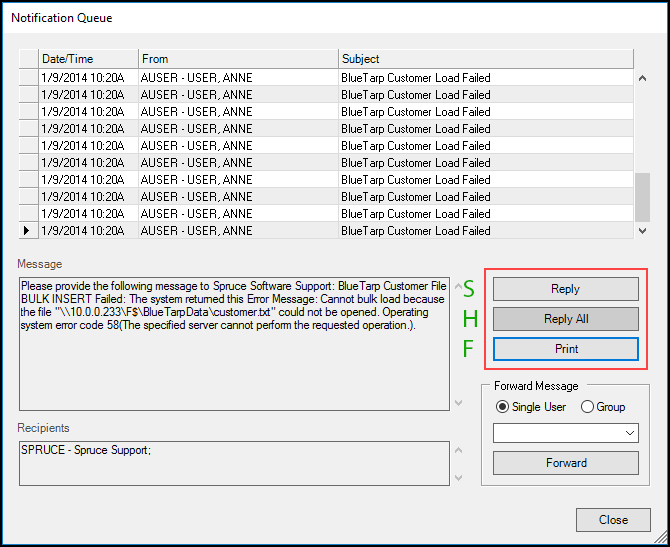
Notification Queue > Button Display Options Highlighted
• S – Buttons that are not hovered over or do not have focus display like this.
• H – Buttons that are hovered over have a darker background and display like this.
• F – Buttons that have focus have a two-pixel blue border and display like this.
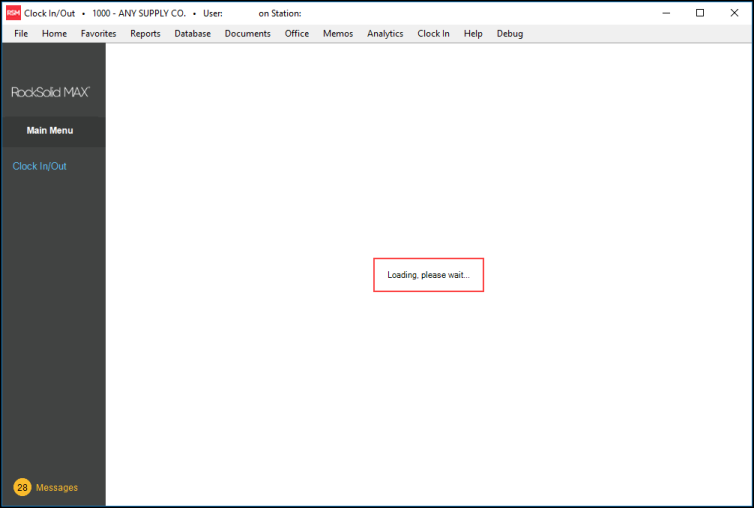
Time Clock users will notice that we have added a new message that displays when a user opens Time Clock and before the web view loads.
Support for UPCs Added to a Purchase Order EDI Process
B-118633 – When you purchase materials from Benjamin Moore Paints (using the current vendor tie ins) you can now send the item’s universal pricing code (UPC) when you purchase materials. This is the number format that Benjamin Moore wants to use going forward to ensure that they send the right materials that you order. We have modified our processes to provide this information in the purchase orders we send.
Note: You can use the instructions we describe below for other vendors and with other tie in options other than those referenced here. We recommend that you include the ECI Support team if you want to do this.
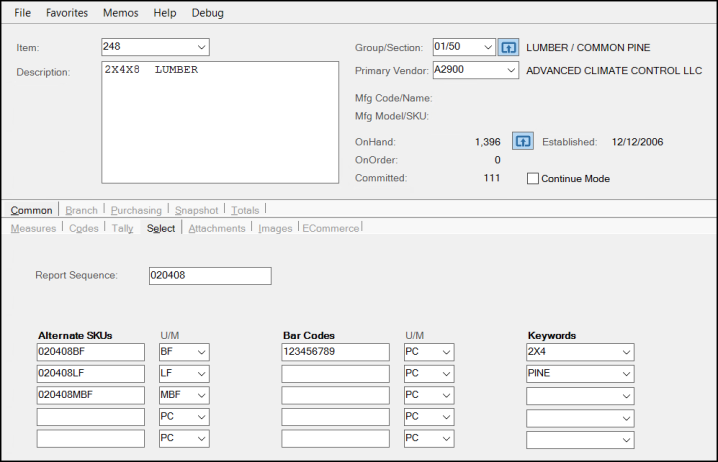
IMPORTANT: To use this feature, you must store each Benjamin Moore item’s UPC in the first Barcode field on the Item Maintenance form (Common > Select tab) to ensure this process works correctly.
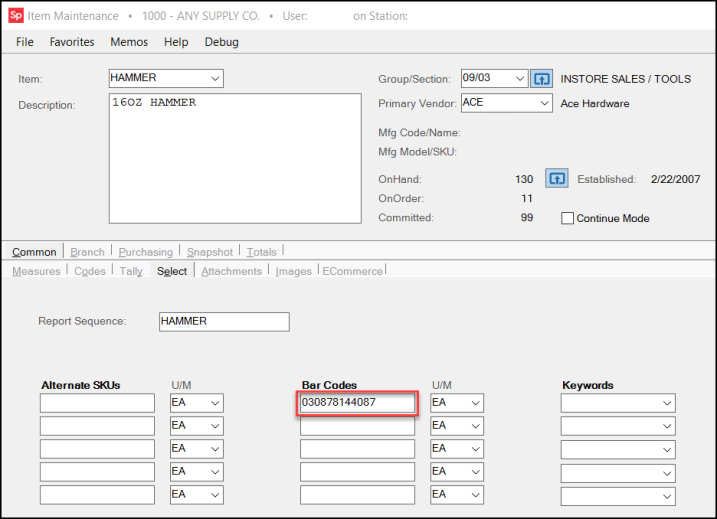
Item Maintenance > Common > Select > UPC Barcode Field
We have added a new mapping override format, PO 850 Ben Moore, to facilitate the item order so the application can send the item’s UPC in the first position when processing your purchase orders. Make sure the EDI default directory is set.
Note: To use this feature, you must have a Benjamin Moore Paints vendor record entered as described in the Help System.
The branch’s Vendor EDI settings must be current to use this feature.
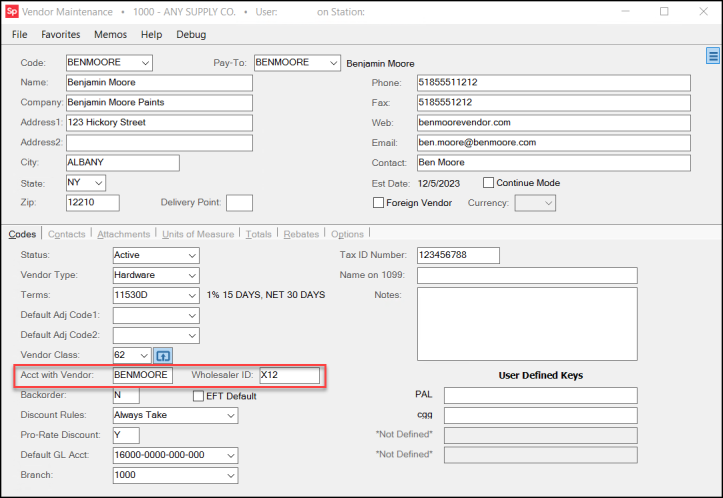
Vendor Maintenance > Settings Needed to Define the X12/X12B Vendor Box Information
To complete the setup for this feature:
1. Make sure the X12 and/or X12B Wholesaler Tie Ins are enabled in the application parameters or follow the steps below to enable the tie in.
a. From the Main Menu, choose Maintenance > Database > Parameters. The Parameter Settings form displays.
b. From the Setup tab, choose EDI to display the EDI subtab settings.
c. In the Installed Wholesaler Tie-Ins list, scroll to the bottom to make sure that the X12 or the X12B options are selected.
-
If selected, move on to the next step.
-
If not, select the check box beside the X12 or X12B tie-in entry you use to send purchase orders to the vendor. Then, continue to the next step.
d. Choose Process (F12) to save this change to your settings.
2. From the Main Menu, choose Maintenance > Database > Branches. The Branch Setup form displays.
3. For each branch that needs to use this tie in, follow these steps:
Note: You must process each branch setting separately.
a. In the Branch ID list, select the branch you want to add this tie-in setting to.
b. Click the EDI tab for this branch.
c. From the Settings for list, choose whichever tie-in the branch uses.
d. From the Vendor list, do one of the following:
• If the vendor record already exists in the list, choose this option from the list, and continue to Step e.
• If the vendor record is not in the list, continue as follows:
-
Right click the Vendor Menu Marker
and choose the Add Vendor option. The Add Vendor Settings box displays. -
Click the Vendor list down arrow, choose the Benjamin Moore vendor record and click Accept. The application searches for the appropriate vendor settings and displays the Settings for X12 Vendor box.
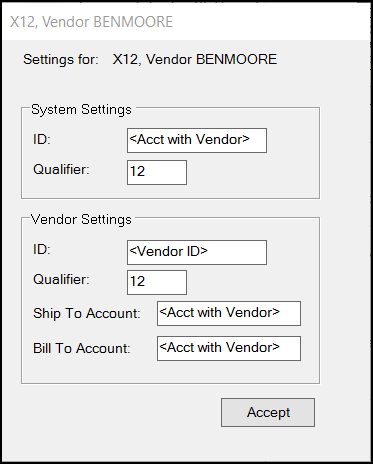
Settings for X12 Vendor (Benjamin Moore)
-
Complete the X12 Vendor settings based on the Acct with Vendor and Vendor ID entries in the Benjamin Moore Vendor record and click Accept.
(You can look up these settings in Purchasing > Database > Vendor and find the Benjamin Moore record). -
Continue to Step e. You are ready to choose the new mapping override setting for the Benjamin Moore X12 transmissions.
e. On the EDI tab, with the Benjamin Moore vendor record selected, right-click the Vendor Menu Marker and choose the Mapping Overrides option.
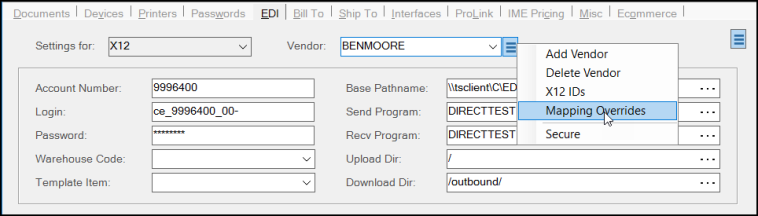
Branch Setup > EDI Tab > Mapping Overrides Selection
The Mapping Overrides for the Benjamin Moore X12 record display
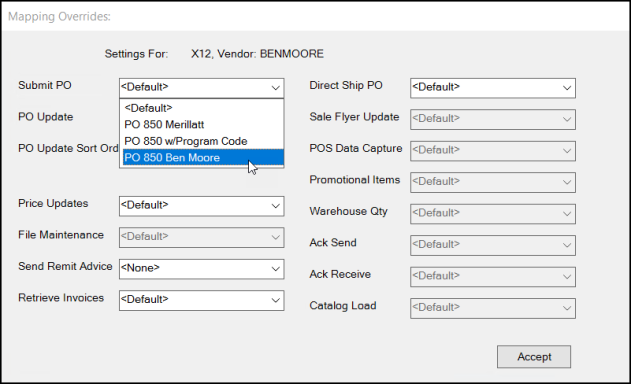
Benjamin Moore Mapping Overrides
f. From the Submit PO list, choose the PO 850 Ben Moore option and click Accept. The Branch Setup form redisplays.
4. Choose Process (F12) to save these settings.
Repeat Steps 3 and 4 for each branch that requires the Benjamin Moore X12/X12B settings.
After this process is complete, the application will use the new mapping override to send the item’s UPC when you use the X12 or X12B transmission method for Benjamin Moore purchase orders through the Vendor EDI process. This process has not changed, but the contents of the file you are sending do.
To review the purchase order record before sending it to the vendor:
1. Create the Benjamin Moore purchase order in Order Entry.
2. Choose Purchasing > Vendor EDI. The Vendor EDI Communications form displays.
3. Choose the Submit Purchase Orders button.
4. From the EDI Interface list, choose X12 or X12B, depending upon the setting you enabled for the Benjamin Moore vendor.
5. From the Vendor list, choose the Benjamin Moore vendor record. The application displays the Purchase Orders that match the vendor.
6. Double-click the row header to preview the record. The application displays the item detail that is scheduled to go in the PO send.
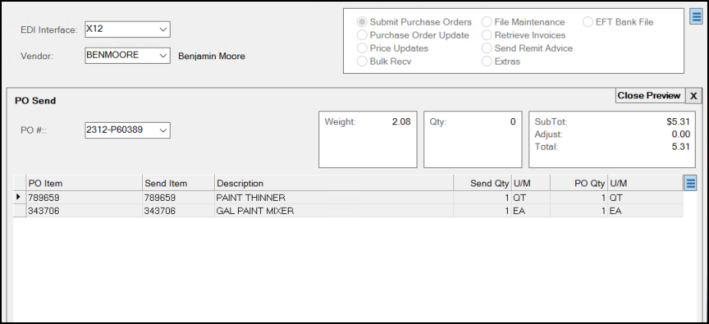
Vendor EDI Communications > PO Send Detail
7. Right-click the data grid’s Menu Marker and click the Preview Transmit Data option.
The application uses your default notepad app to display the transmission details as they will be sent to the vendor:
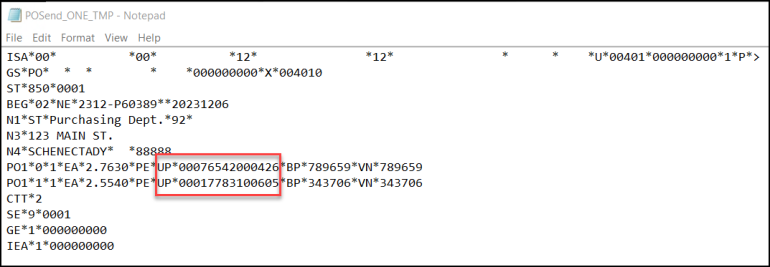
NotePad > PO Send Content > UPC Code Highlighted
The UP qualifier stands for the UPC code label and the next number is the UPC code for the ordered product. The BP qualifier precedes the branch’s SKU, and the VN qualifier precedes the vendor’s SKU for the ordered item.
Parameter Settings Search Added
LBMHA01-44973 – The Parameter settings have a big impact on the features you have access to and how the application runs. It is easy to lose track of the settings there because there are so many of them. To help with that, we have added a Parameter Settings Search feature. You must have permission to review the Parameter Settings to use this feature. Not all settings can be changed.
To search for a parameter setting in the application:
1. From the Main Menu, choose Maintenance > Database > Parameters. The Parameter Settings form displays.
Parameter Settings > Search Field Highlighted
2. In the Search field, enter the name of the feature you are looking for and click Search or press Enter. The results display and the application shows the field you requested.
Parameter Search with Entry and Results
3. When you enter a search that has more than one result, the application displays the first option, and provides instructions for seeing the others. Choose F1 to go to the next matching parameter or <Shift F1> to return to the previous matching parameter setting.
Parameter Search with Four Results - #1
Parameter Search with Four Results - #2, #3, #4