Create, Receive and Close a Customs Manifest
The following will walk you through the steps required to create and print a customs manifest. For more information on how to configure your system to use Customs Manifest, go to Configuration on the Customs Manifest page.
Create a Purchase Order
Create a Purchase Order (PO). Select a vendor that was designated as a Foreign Vendor. While you enter items in the PO, you can view the Entry tab (F4 Folders) and confirm that a commodity code has been assigned to every item. If an item does not have a commodity code or country of origin, you may enter the information from the Entry tab; once the PO is processed, the commodity code and country of origin you entered will automatically be added to the item. If you need to change a commodity code for an item, you may do so from the Entry tab as well; however, the commodity code will not be changed in Item Maintenance. If you need to permanently change an existing commodity code, you will need to do so through Item Maintenance. If Adjustment Codes are included in the PO, the user will be prompted to confirm that the adjustments should be imported into the Manifest. Once you click Yes, the adjustment codes will be listed into the Adjustments grid on the Orders tab.
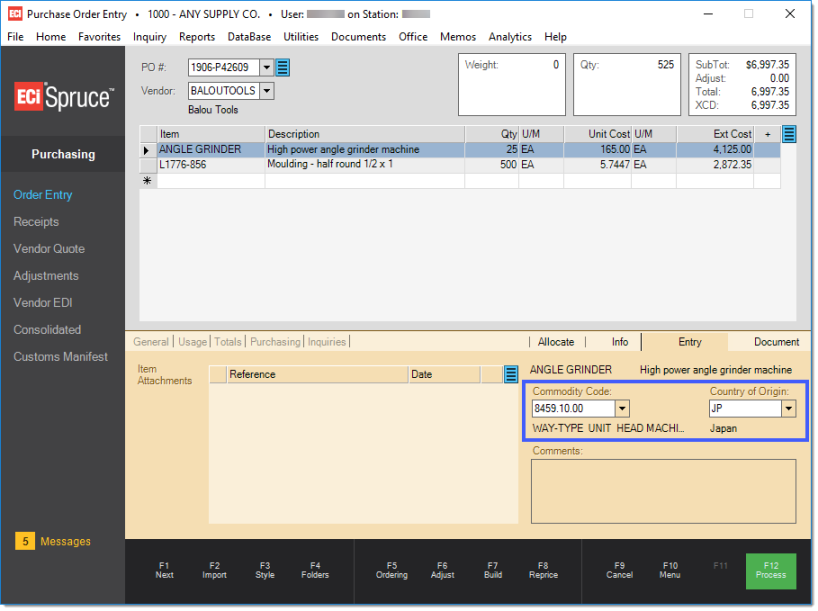
After all items have been entered, and you have confirmed that they all have a commodity code and country of origin, press F12 to process the PO.
Once the PO has been processed and the shipment/cargo is en route or at the destination, it is time to create the Customs Manifest. You can use the Style (F3), commodity grid to view all commodity codes associated with the items.
Create a Customs Manifest
Create a new Customs Manifest by selecting "New" in the Declaration ID field. The Declarant Number field will automatically be populated with the default value. The Reference # is a number provided by the trader's register and it must be entered in the Reference # field. This reference number can be used by the trader to retrieve or modify the declaration. The Status field is optional and can be populated by the information entered in Status Codes.

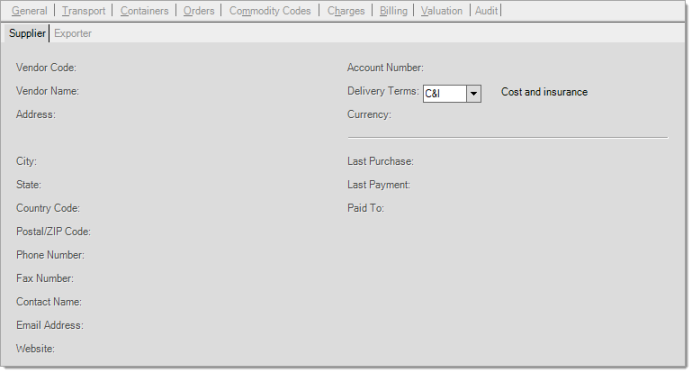
General / Supplier tab
The General Supplier tab will provide you with the Shipper's (Vendor) details which are based on the information provided in Vendor Maintenance. As a default, the Delivery terms will default to "C&I - Cost and Insurance". It is possible to select a different option from the "Delivery Terms" drop-down list.
General / Exporter tab
The General Exporter tab details automatically default to the same information displayed on the General / Supplier tab. Typically, the Supplier and Exporter information is similar, but in the event that it is different, uncheck the "Same as Supplier" checkbox, and select a different "Vendor Code" from the drop-down list.
Transport tab
This is where information about the transport vessel, customs and loading office, export country, etc. is entered. The Branch ID, Consignee ID and Consignee Name fields are automatically populated with the values entered at the Branch level on the Customs tab. Fill out the remaining fields with all the relevant information pertaining to your shipment.
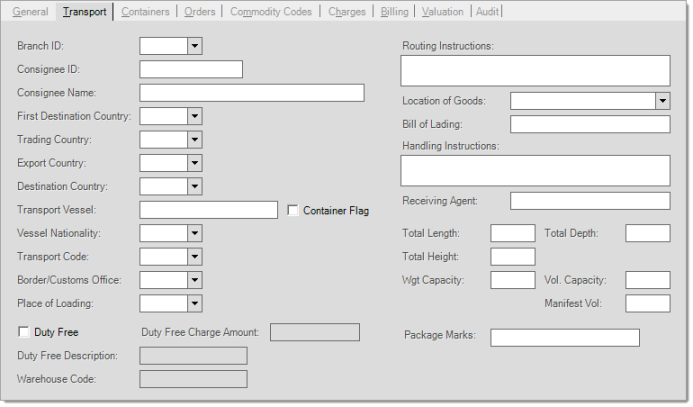
First Destination Country: Select the country in which the goods have been manufactured or produced.
Trading Country: Select the country in which the trade (deal) was done.
Export Country: Select the country in which the goods are dispatched from.
Destination Country: Select the country to which a shipment is to be delivered to its last consignee (recipient).
Transport Vessel / Vessel Nationality: Enter the transport vessel's name and nationality in the designated fields. Select the "Container Flag" checkbox if shipment is in a container.
Transport Code: Select the transport code from the drop-down list. Options provided are: sea, rail, road, air, postal, multimodal, transport on fixed inst., inland waterways, and unknown.
Border/Customs Office: Select the customs office where the goods will enter the customs territory of destination. The selection options are as defined in Office Codes.
Place of Loading: Select the loading office from the drop-down list. The selection options are as defined in Office Codes.
Routing Instructions: Enter any routing instructions you wish to include on the documents. This is not a required field.
Location of Goods: Select the name of the place where the items are located and eventual location where a physical inspection might take place. The selection options are as defined in Office Codes.
Bill of Lading: Enter the Bill of Lading number. A Bill of Lading is a document issued by a carrier or their agent acknowledging receipt of cargo for shipment.
Handling Instructions: Enter any handling instructions you wish to include on the documents. This is not a required field.
Receiving Agent: The agent who receives, inspects, and certifies the identity, quantity, and conditions upon receipt.
Units: You may enter the shipment's units of measure in the designated fields. These are not required by ASYCUDA, but Spruce does require a value in the fields. You can tab through to enter a default value of 0.
Duty Information: If the shipment is Duty free, select the Duty Free checkbox and enter the Duty Free Charge Amount, description and warehouse codes (duty free items typically are routed to a specific warehouse).
Package Marks: Enter identifiable markings that are on the package(s), such as your company's name.
Containers tab
Information pertaining to the container is entered on this tab. Enter the reference number or identification for the container, select the container type from the drop-down list. Enter the container's gross weight, amount of packages within the container, the package type and weight. It is possible to have more than one container on a customs manifest, enter the information for each individual container.

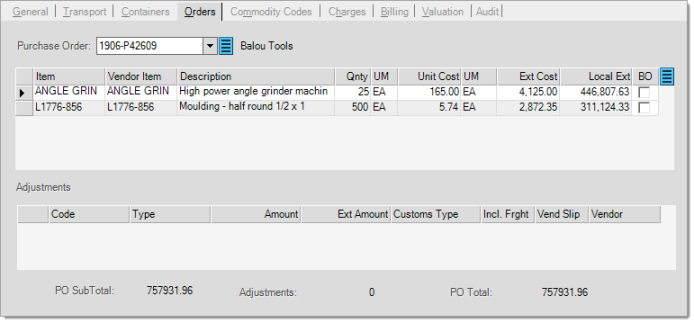
Orders tab
Select the purchase orders to add to the customs manifest by clicking on the menu marker ![]() and selecting "Add PO to Manifest" and selecting (or typing in) the PO number. You can attach multiple POs to a customs manifest by selecting "Add to PO to Manifest" again and selecting a different PO#. The data grid will only show the information of one PO at a one time, to view the items on a different PO, select a different PO for the Purchase Order field. You may also remove a purchase order, by first selecting the PO to remove and then clicking on the menu marker and selecting "Remove PO from Manifest". If a purchase order has any adjustment codes, they will be visible in the Adjustments grid.
and selecting "Add PO to Manifest" and selecting (or typing in) the PO number. You can attach multiple POs to a customs manifest by selecting "Add to PO to Manifest" again and selecting a different PO#. The data grid will only show the information of one PO at a one time, to view the items on a different PO, select a different PO for the Purchase Order field. You may also remove a purchase order, by first selecting the PO to remove and then clicking on the menu marker and selecting "Remove PO from Manifest". If a purchase order has any adjustment codes, they will be visible in the Adjustments grid.
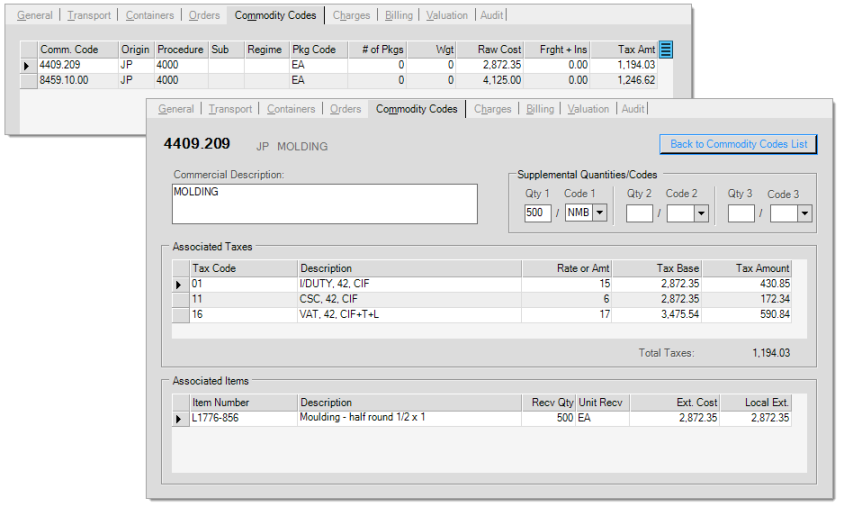
Commodity Codes tab
The Commodity Codes will list every commodity code associated with every item. Each commodity code will only be listed once, even if it is associated to multiple items. The Procedure, Pkg Code, # of Pkgs and Wgt columns are editable fields. You can view the associated taxes and items for a commodity code by double-clicking on the arrow ![]() at the beginning of the row. From this view, you can edit the Commercial Description as well as add/edit the fields in the Supplemental Quantities/Codes section.
at the beginning of the row. From this view, you can edit the Commercial Description as well as add/edit the fields in the Supplemental Quantities/Codes section.
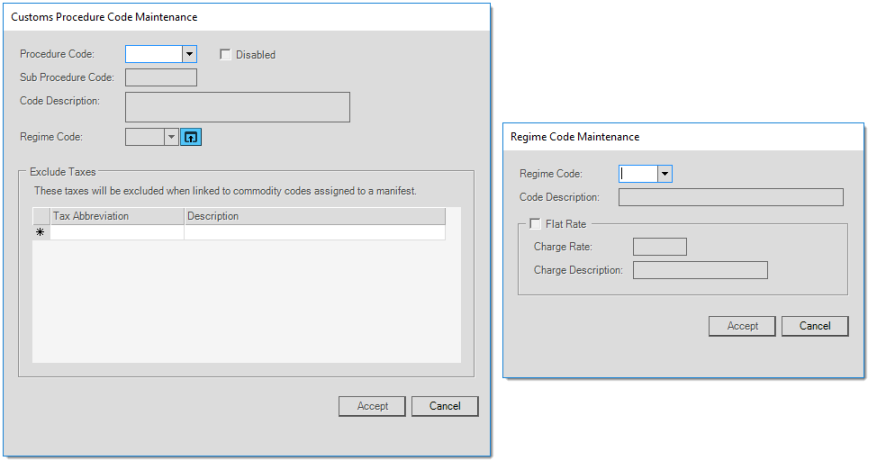
You can create/edit procedure codes by clicking the menu marker ![]() and selecting Add/Edit Procedure Codes from the Commodity Codes List view. From the Customs Procedure Code Maintenance form, you may also add Regime Codes by clicking on the special form icon
and selecting Add/Edit Procedure Codes from the Commodity Codes List view. From the Customs Procedure Code Maintenance form, you may also add Regime Codes by clicking on the special form icon ![]() .
.
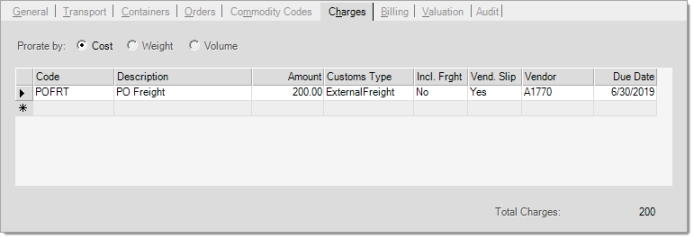
Charges tab
Charges can be added to the Customs Manifest such as freight, fuel surcharge, etc. by selecting a code from data grid and updating the amount, customs type, Incl. Frght, Vend. Slip, Vendor, and due date fields. These additional charges are setup in Purchasing > Database > Adjustment Code.
Billing tab
The Billing tab is used for duties and taxes details. You will first select the billing currency code (local currency) and then enter the tax voucher due date and voucher number. If the tax voucher was pre-paid, you would select the check box and enter the Vendor Invoice Number. In the Financial Information, select your bank, terms of payment, and mode of payment. The taxes fields are automatically populated based on information entered.

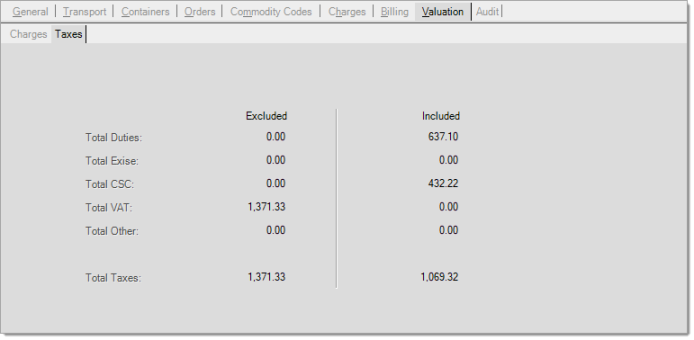
Valuation tab
The Valuation tab is where you can view the breakdown of various charges for cost, freight, insurance, other costs, etc., in your local and foreign currencies. This tab is for viewing purposes only. You can also view the breakdown of excluded and included taxes by selecting the Taxes tab.
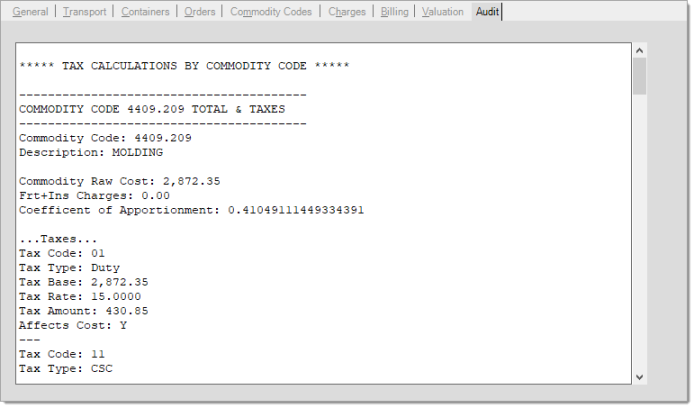
Audit tab
The Audit tab allows to quickly view the breakdown of the tax code.
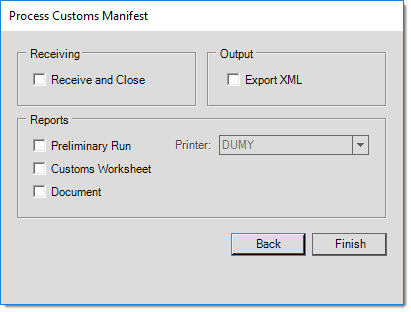
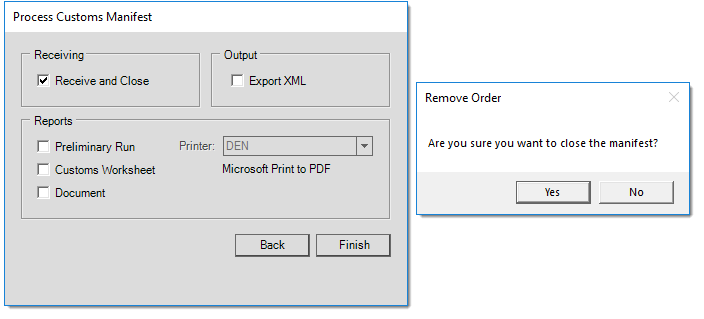
Process (F12)
Once all the information has been entered, press F12 Process to proceed with the creating the Customs Manifest. From the Process Customs Manifest form, you will be given different options. You may print a preliminary run, a worksheet, and/or the ASYCUDA document. Select your desired options and press Finish.
Output examples
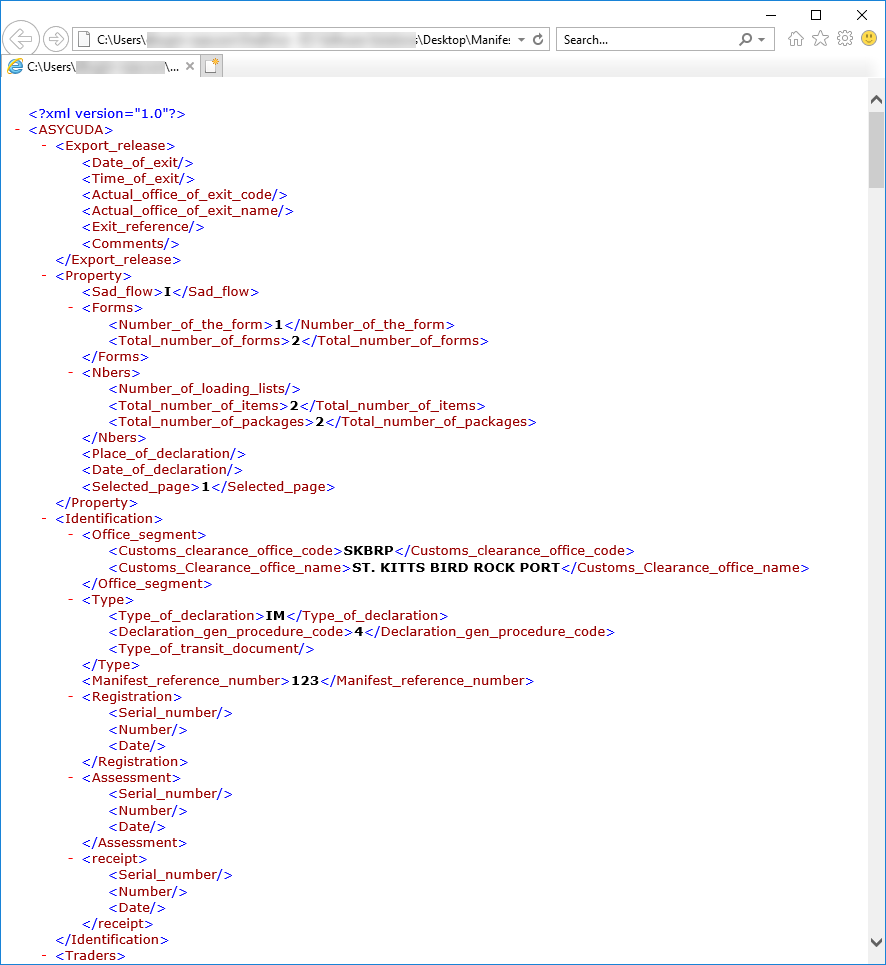
XML Output : You can export the customs manifest to an XML by selecting the Export XML option. The "Save Manifest XML File" window will appear, select the file location and press Save. View an example of an XML output by clicking ![]() here. Once the file has been created, you can upload the file to the ASYCUDA website tool to validate content and submit.
here. Once the file has been created, you can upload the file to the ASYCUDA website tool to validate content and submit.
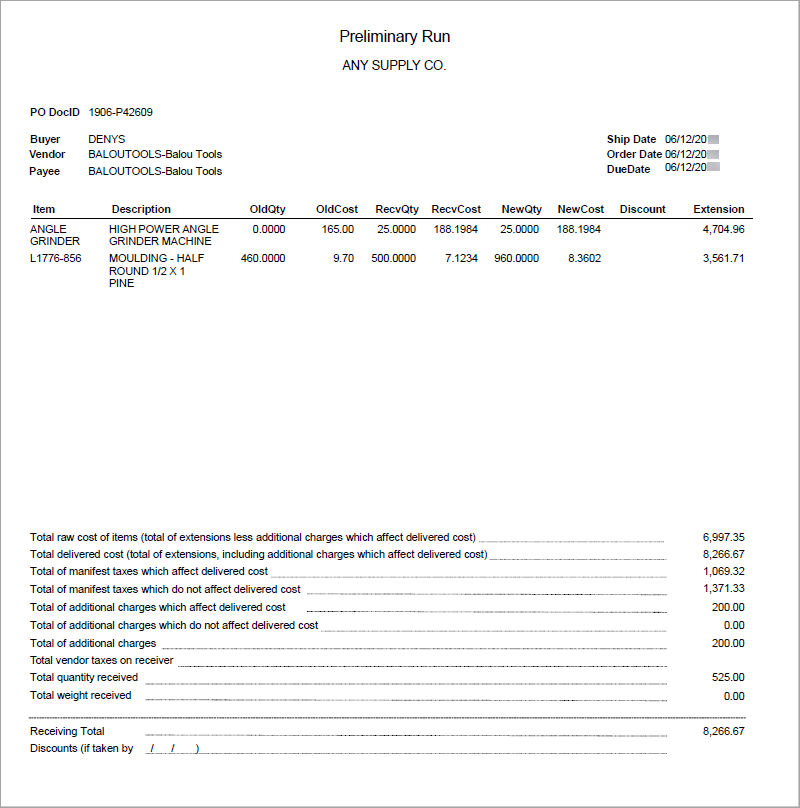
Preliminary Run: The Preliminary Run will show what the delivered cost/weighted average calculations will be for each item as well as the summary of raw cost, delivered costs, taxes and other charges.View an example of a preliminary run by clicking ![]() here.
here.
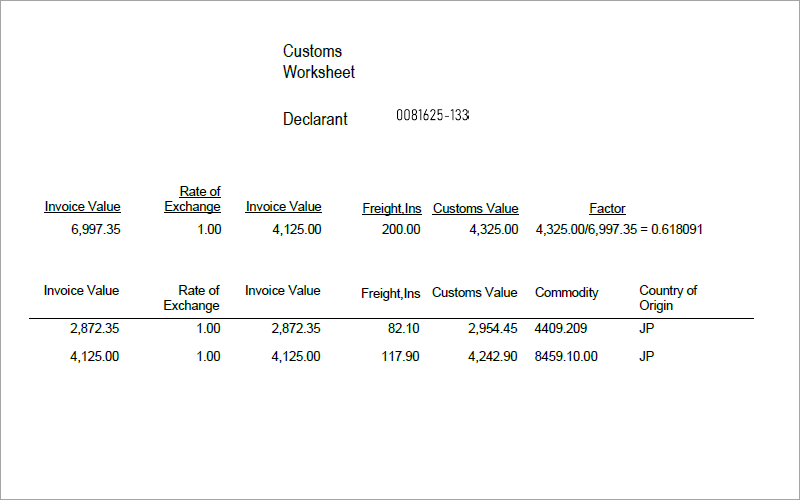
Customs Worksheet: View an example of a Customs Worksheet by clicking ![]() here.
here.
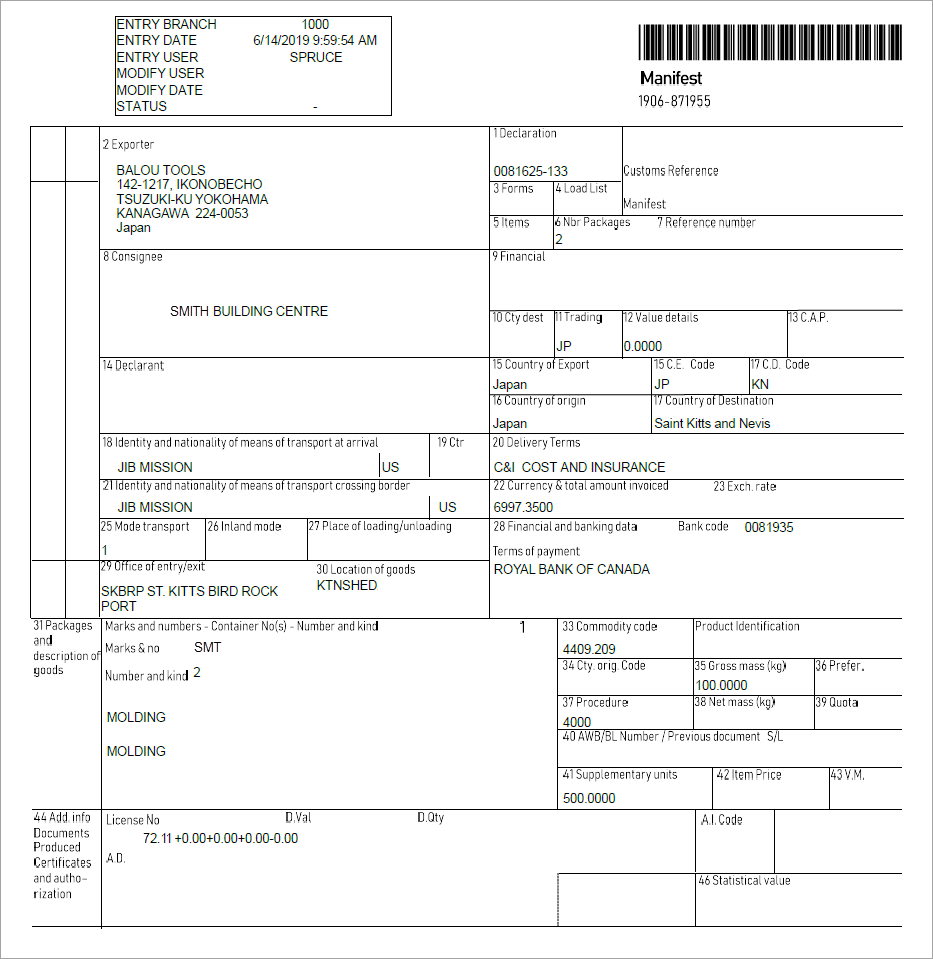
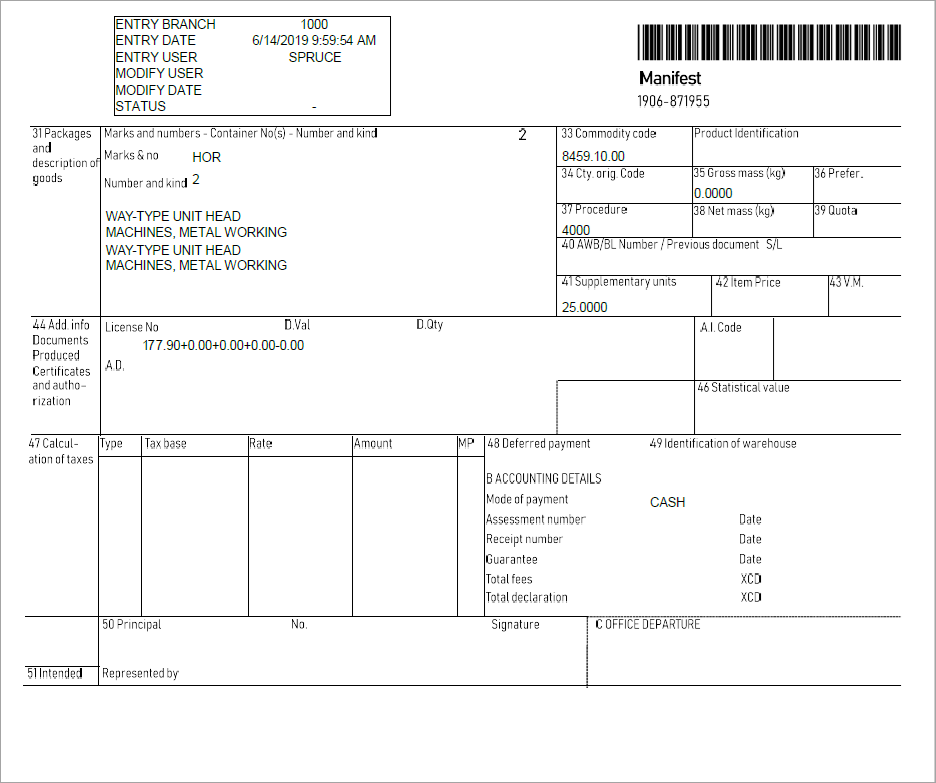
Document: The Document represents what is on the ASYCUDA Declaration document. View an example of a Manifest document by clicking ![]() here.
here.
Receive and Close the Manifest
Once you have confirmed that the Manifest is correct by having reviewed the Preliminary Run, Customs Worksheet & Document, select the "Receive and Close" option to close the Manifest and press Finish. Click "Yes" to confirm you want to close the manifest, but remember that once the Manifest is closed, changes or edits can no longer be made.
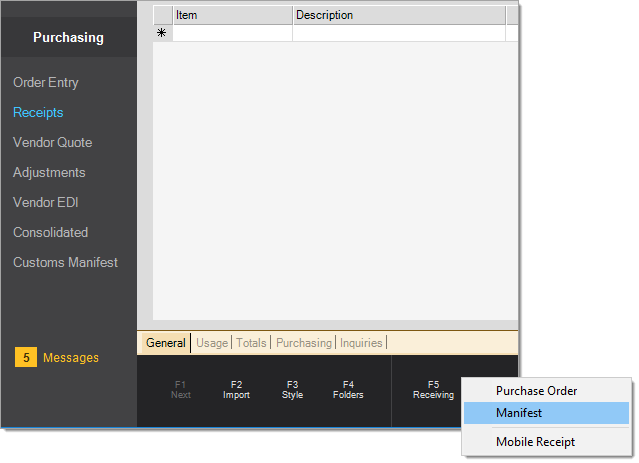
The final step in the Customs Manifest process is to "receive" the Purchase Order(s) linked to the Manifest. Navigate to Purchasing > Receipts, click on F5 Receipts and select Manifest. Purchase Orders that are linked to a manifest cannot be received directly without using the Manifest option.
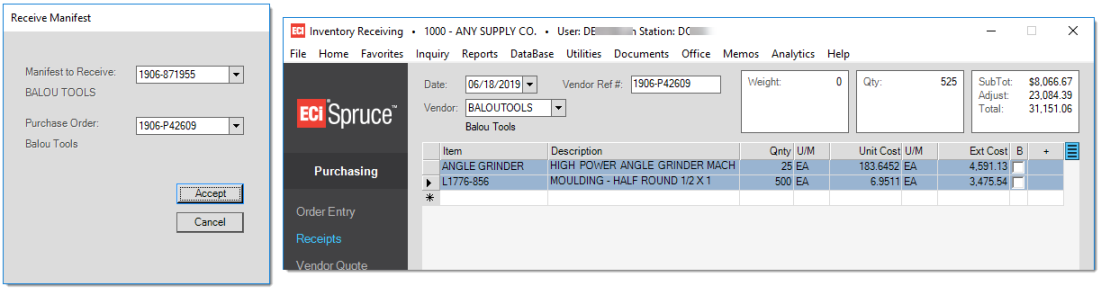
From the Receive Manifest form, you will select the manifest number from the drop-down list and the purchase order you are receiving. All of the items included in the PO will show in the data grid. You can view any adjustments associated to manifest and/or purchase order by clicking on F6 Adjust. Once any required changes to the PO have been made, you will click F12 Process to complete the process. At this time, the items/goods have been received into inventory and vouchers have been created in Accounts Payables.
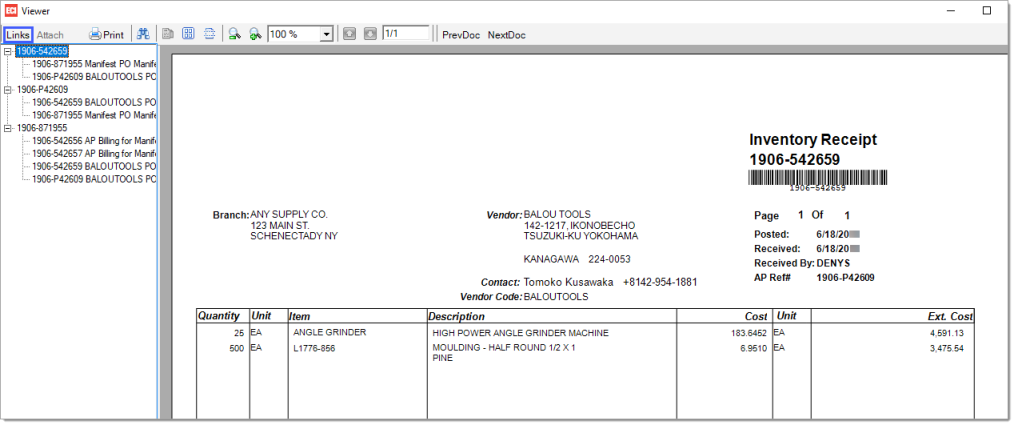
Navigate to Documents to view the various documents generated when you closed the manifest and received the PO. Find and select the "PO Inventory Receipts" document, click on "Links" to easily navigate through all the associated documents. Click ![]() here to view an example of the PO Inventory Receipt.
here to view an example of the PO Inventory Receipt.