True Value® - truStart2 Setup
|
Please Note: This topic is included for legacy support only. truStart2 is no longer required if using the "direct" EDI option available with release 12 (and later). |
This topic explains the setup necessary to integrate EDI (Electronic Data Interchange) processing using the True Value truStart2 software as opposed to the "direct" option which doesn't require the truStart2 software. Most new implementations will use the newer "direct" method; however, truStart2 can still be used.
For the Spruce application to work best with your True Value®truStart2 software, some settings in the truStart2 application may need to be changed or set. This includes adjusting the permissions of some directories (folders) in Windows on the PC hosting the truStart2 software.
Please perform all of the following steps at the computer installed with the truStart2 software:
I.True Value truStart2 Settings
1. Open the truStart2 software.
2. Locate and open the Member Information window:
a.From the Catalog Find Item window, select Preferences from the menu bar.
b.From the Preferences drop down listing, choose Member Information.
3. Write down the Member Number (No.) __________________ and RDC (Retail Distribution Center) ___________________. These are needed for EDI setup in the Spruce application.
Retail Distribution Centers (RDC) locations are identified by a 2-digit numeric code. Please see the reference table below:
Code
Location
01
Harvard, IL
02
Cleveland, OH
03
Manchester, NH
04
Atlanta, GA
05
Allentown, PA
07
Kansas City, MO
08
Kingman, AZ
09
Corsicana, TX
10
Mankato, MN
12
Denver, CO
13
Woodland, CA
26
Springfield, OR
41
Central Ship, IL
4. Close the Member Information window by clicking Cancel or the "X" button in the upper right-hand corner of the window.
5. Select Miscellaneous from the Preferences menu found on the Order Entry menu bar. This should open the "Order Entry Preferences -- Misc Preferences" dialog.

Order Entry Preferences -- Misc Preferences
6. If not checked already, check the "Create Export Folder from Downloaded Data" and "Clean Up Downloaded Data and Remove XcelFile Folders" options. Set the "Number of Days to Keep Downloaded Data" to thirty (30). These options must be set in order for the Spruce software to be able to retrieve files and data from the truStart2software.
7. Choose OK to save any changes and close the dialog.
8. Close the truStart2 application as well as any other programs.
9. Locate the "TruStart 2 Scheduler" program on the computer. The method for doing this can vary based on your version of the Microsoft® Windows® operating system. The following should work on versions of Windows below 8.0/8.1:
a. From the desktop in Windows 7 or earlier, click the Start button.
b. Choose All Programs.
c. From the expanding list, select TruStart2.
d. From the menu provided, expand the Utilities menu.
e. From the Utilities menu, choose "TruStart2 Scheduler."

Scheduler Main Menu
f. Once the Scheduler's Main Menu opens, click on the Task Editor button.
g. A form window titled, "Scheduler," should now be open. The task editor, which now should be visible, allows the truStart2 application to automatically communicate with True Value Company and keep your catalog up-to-date.

Scheduler
10. If there is an entry for downloading files, select the row and choose "Modify Task" then compare the task to the settings listed below; otherwise, if there aren't any entries for downloading files, click the "Add Task" button and do the following:

Add New Scheduled Task
a. In the "Task" group panel, enter a description of "Download All Files" or something similar.
b. Below the description, choose "All Files Download" from the drop down selection list.
c. Check the "Active" check box.
d. In the "Schedule" group panel, choose the "Daily" radio button.
e. In the "Time" group panel, set a time of day when this computer will be on (running) and no one will be using it.
f. Choose the "Save" button.
11.Close all of the TruStart2 scheduler windows and forms.
II.Computer (PC) Settings
The following changes to Windows settings provide the ability for the Spruce application and other users to access data shared with the truStart2 application. This provides access to catalog images by users other than the computer where the truStart2 application is installed, for one example.
From Windows 7, do the following:
•Choose Start and Control Panel.
From the desktop view in Windows 8.1, choose "Control Panel" from the alternate menu on the "start" button (usually a right click). In "tile" mode and/or Windows 8, go to "apps" find the "Windows System" category and choose "Control Panel." You can also type "Control Panel" using the search feature.
•If a window opens in "category" view, choose "System and Security" and then select "System."
•Look for the "Full Computer Name" and write it down ___________________________________.
•Choose Cancel or close the "Control Panel" window.
•Open Windows (File) Explorer. In Windows 7, or earlier, you can right-click on the start button and choose "Open Windows Explorer." In Windows 8/8.1, there is a folder icon next to the start button in desktop mode (you can also right-click on the "start" button and choose File Explorer).
•In the address bar, type the following: C:\TruStart2

•Locate a folder named "resources."
•In Windows 7, select the "resources" folder and choose "Share with" either from the context menu (usually a right-click) or the window's menu bar. In Windows 8/8.1, choose the "Share" tab near the top of the File Explorer window.
•Select "Specific People."
•In the dialog, choose "Everyone" from the drop down listing.
•Click the "Add" button.
•Next, change the "Permission Level" from "Read" to "Read/Write."
•Click the "Share" button.
•Click "Done" if another dialog is shown to confirm the changes.
•Right click on the "resources" folder and choose "Properties."
•Select the "Sharing" tab.
•Click the "Advanced Sharing" button.
•From the Advanced Sharing dialog, click the Add button. Enter a share name of the following: TSResources
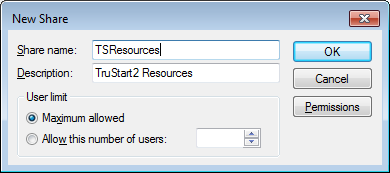
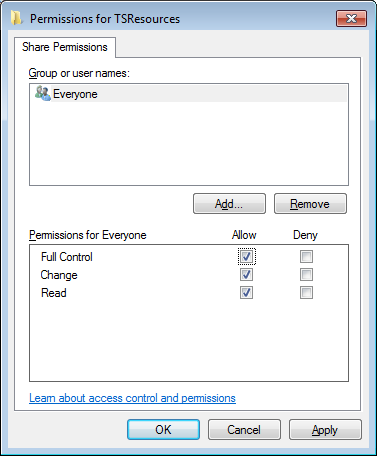
•Click the Permissions button and make sure Full Control, Change, and Read are all set to Allow. If not check the boxes below the "allow" column, choose "apply" and then "OK" to close the dialog.
•Back on the Advanced Sharing window, choose the "Apply" and then "OK" buttons.
•If the resources folder properties window is still open, click "OK" to close the window.
•In the address bar, type the following: C:\XcelFile
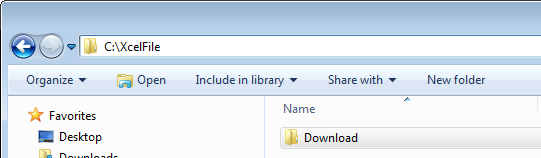
•Locate the folder named "Download."
•In Windows 7, select the "download" folder and then choose "Share with" either from the context menu (usually a right-click) or the window's menu bar. In Windows 8/8.1/10, choose the "Share with" tab near the top of the File Explorer window.
•Select "Specific People."
•In the dialog, choose "Everyone" from the drop down listing.
•Click the "Add" button.
•Next, change the "Permission Level" from "Read" to "Read/Write."
•Click the "Share" button.
•Click "Done" if another dialog is shown to confirm the changes.
•Right click on the "resources" folder and choose "Properties."
•Select the "Sharing" tab.
•Click the "Advanced Sharing" button.
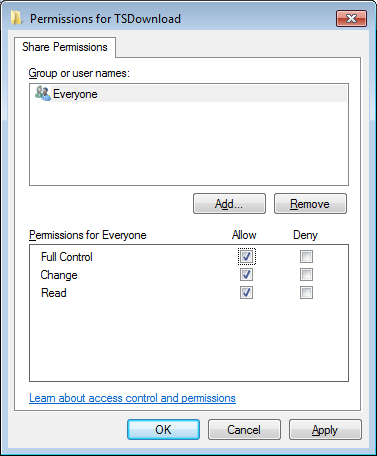
•From the Advanced Sharing dialog, click the Add button. Enter a share name of the following: TSDownload
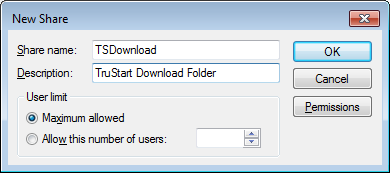
•Click the Permissions button and make sure Full Control, Change, and Read are all set to Allow. If not check the boxes below the "allow" column, choose "apply" and then "OK" to close the dialog.
•Back on the Advanced Sharing window, choose the "Apply" and then "OK" buttons.
•If the resources folder properties window is still open, click "OK" to close the window.
•Close any Windows (File) Explorer windows that remain open.
III.Spruce Setup
1. Branch
Once the True Value EDI (tie-in) has been enabled for the Spruce software by Support, the next step is configuring Branch EDI settings. These settings are accessed from the Branches option found on the Database menu in the Maintenance area (Main Menu > Maintenance > Database > Branches). Choose the EDI tab and select "TruServ" from the drop down listing. Settings must be completed and saved (via the Process (F12) function) for each branch location that will communicate with the truStart2software at that location.

Complete the following based on the information previously collected and the instructions that follow:
Account Number
This is your store location's member number (see part I, #3).
Member Numbers (True Value)
This is your store location's member number. True Value account numbers are sometimes represented using a number of different formats. The account number must be 5-characters long. For members with a 6-digit account that does not begin with a zero, conversion is necessary. This involves replacing the first digits of the full account number with a character. The last digit in the account number is a check digit and may be indicated by a dash (do not include the dash). If the first digit of your account number is zero (0), you just drop the first zero (for example, "001234" would be entered as "01234" instead).
The following is taken from True Value documentation on the subject:
"If you have a 6-digit member number (for example: 12345-6), this must be converted to a 5 character member number for the parameter file. To convert a 6-digit member number to a 5-digit character number, simply take the first two digits of the 6-digit member number and use the chart below to determine the alphabet letter that should be used in their place.
Example: The 6-digit True Value member number is 12345-6.
The first two numbers are “12”.
Based on chart below, “12” corresponds with the letter “A”.
The 5-character True Value member number is A345-6.
A3456 must be used in the parameter file for the True Value member number (the dash must not be used with the parameter file)."
IF THE FIRST TWO DIGITS ARE:
REPLACE THESE FIRST TWO DIGITS WITH THE LETTER:
10
M
11
H
12
A
13
B
14
C
15
D
16
E
17
F
18
G
19
I
20
J
21
K
22
L
23
N
24
O
25
P
26
Q
27
R
28
S
29
T
30
U
31
V
32
W
33
X
34
Y
35
Z
Login
Not used.
Password
Not used.
Warehouse Code
This is your store location's retail distribution center number (see part I, #3).
Template Item
A template item is used when updating a purchase order with receiving data and an item in the data received is not located in the item database. The template's item settings are used for any settings or information that are not provided in the data so that the application can add the item to the Item database. This item is also used when adding new inventory items using Catalog data for the EDI vendor. You can name this item whatever you prefer.
Base Pathname
This directory (folder) is used on the local computer for certain EDI functions. If a directory is specified that does not exist, the application will prompt the user when necessary to add it.
Send Program
The "send" program refers to either an application or script used for sending data to the vendor. The script is located in the application's installation folder (C:\Spruce\Library\EDIScripts). In the case of the truStart2software, we are moving files between locations, so this would be the script that takes a data file created from the Spruce application and moves to the truStart2software's Import directory (C:\TruStart2\Resources\Import\).
Receive (Recv) Program
The "receive" program refers to either an application or script used for retrieving data from the vendor. In the case of the truStart2software, we are moving files between locations, so this would be the script that takes a data file created from truStart2software (C:\Xcelfile\Download\) and moves it to a location accessible by the Spruce application (this location is indicated using the Base path name field above).
Upload Directory (Dir)
This setting indicates the network share or local directory for the truStart2 software's "resources" directory (C:\TruStart2\Resources\). The name of the network share would be "TSResources" if you were following the instructions in part II. If you are using a network share (rather than a local directory), you can designate the directory using either a full computer name (suggested) or static IP address:
\\{FullComputerName}\TSResources
If using a name, replace the text "{FullComputerName}" with the name you wrote down in section II. Use of the name issuggested since computer names won't typically change over time. IP addresses, if dynamic (DHCP), can change whenever the computer or network equipment is reset.
Download Directory (Dir)
This setting indicates the network share or local directory for the truStart2 software's "export" directory (C:\XcelFile\Download\). The name of the network share would be "TSDownload" if you were following the instructions in part II. If you are using a network share (rather than a local directory), you can designate the directory using either a full computer name (suggested) or static IP address:
\\{FullComputerName}\TSDownload
If using a name, replace the text "{FullComputerName}" with the name you wrote down in section II. Use of the name issuggested since computer names won't typically change over time. IP addresses, if dynamic (DHCP), can change whenever the computer or network equipment is reset.
Once settings changes are completed, choose Process (F12) to save the EDI settings for the branch. Repeat for any other branch locations as needed.
2.Vendor
If you don't already have a vendor defined for use with True Value Company, you will need to add one. The vendor code can be anything your company prefers. The only fields that are important for EDI function are the account with vendor and wholesaler ID. The wholesaler ID for True Value should be set to the following:
TRUSERV
In order to load the True Value product catalog, you must contact True Value and have them queue two (2) files: All Item Tiered Maintenance Load and All Item Tiered Pricing Maintenance Load so that they may be download by the truStart2 software. Download the files to a location you will have later access to. The files are typically compressed ZIP archive files, so you should "extract" the two (2) files before continuing. The downloaded ZIP archive files should match the following names:
ALLTM131.ZIP
ALLTPRCE.ZIP
Once extracted, you should also see two (2) additional files with the following or similar names:
ALLTM_13.DAT (All Item Load)
TP0{MEMBER#}.DAT (Pricing Maintenance Load)
Make sure all the preceding steps have been done prior to continuing. These steps should be done from the computer where the truStart2software is installed. Processing can take some time and you will not be able to use the Spruce application session for other activities during this time, so please keep this in mind before beginning. These steps take some time, but only need to be done once. Smaller file maintenance updates will keep catalog data up-to-date in the future.
1. From the main menu in the Spruce application, go to Purchasing and choose Vendor EDI from the menu.
2. Enter the "EDI Interface" of TRUSERV and set the "Vendor" to match the vendor code you defined or modified in section III, step 2.
3. Select "File Maintenance" from the list of options (radio buttons). Do not choose "extras" and "catalog" for this option.
4. Disable scripting using the context menu available from the marker icon  .
.

Enable/Disable Scripting for EDI
5. Select the Retrieve (F5) function.
6. The standard Windows "open file" dialog will be shown. Browse to the file named ALLTM_13.DAT (This is the file name after extracting files from the ZIP archive) and choose "Open."
7. A progress dialog will appear that reports the status of processing. Due to the size of the file, this process can take ten (10) or more minutes to complete. You will not be able to use the Spruce software during this time.
")
Processing (Dialog)
8.After the first file completes, the "Processing" window will say "100%" and will remain open.
9.Look for another second Windows "open file" dialog. Do not close the window. Browse to the file named TP0{MEMBER#}.DAT and choose "Open."
10.The progress dialog will refresh and show progress. This second file tends to complete faster.
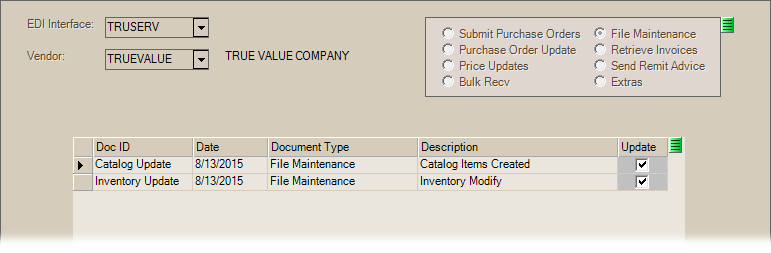
11.Once both files are processed, the data grid will populate with both a "Catalog Update" and "Inventory Update." You should see the following information (the date will match the current date, however).
12.Make sure the "Update" check box is checked for both rows and choose Process (F12) to add the item's from the data to the vendor catalog for the Spruce application. Again, this process can take some time, so please be patient.
13.Once processing has completed, your catalog should now include all True Value products. There is one more step to do before the catalog items will reflect your pricing, so don't be concerned if you don't see pricing or the pricing doesn't match what you expect. To check this, go to the Database menu and choose "Catalog." Enter the vendor code you use or chose for True Value Company and select the drop down labeled "Catalog."
V. Updating the Catalog with Image IDs
One thing the previous step did not do is update the catalog with Image ID data. These identifiers correspond with image file names found on the truStart2 computer (PC) in the resources directory under a folder named "CatalogImages." Image identifiers do not match the vendor's item SKU numbering. The "CatalogImages" folder (directory) contains many numbered sub-folders that each contain a range of images. The bottom of the range is indicated by the folder name. Each of the numbered folders contains hundreds of images.
Weekly updates will help keep item images up-to-date; however, you may need to request an image mapping file with all catalog image IDs. Weekly update files are named LONGDnnn.DAT (where "nnn" is a sequence number).
To update images using the weekly file, do the following:
1. From the main menu in the Spruce application, go to Purchasing and choose Vendor EDI from the menu.
2. Enter the "EDI Interface" of TRUSERV and set the "Vendor" to match the vendor code you defined or modified in section III, step 2.
3. Choose the "Extras" radio button and choose "Images Download" from the drop down control for this option.
4. If you already have a file, disable scripting using the context menu available from the marker icon ; otherwise, allow scripting to retrieve any files for you.
5. Choose the Retrieve (F5) function.
6. If you are prompted to select a file using the Windows file dialog, do so. Once you've selected the appropriate DAT file, click the "Open" button.