Transaction Forms
We are using the term "transaction" to refer to any feature that is accessible from the (navigation) menu. Here are a few points about transactions:
•Only one transaction can be accessed at the same time from the same instance of the application.*
•Transactions must be processed, canceled, or suspended prior to navigating to another transaction.
•Most transactions generate some type of document or involve processing related to transaction documents.
•Folders, where offered, can generally be hidden (minimized) or shown (maximized). Folder information only populates when shown. This uses additional resources.
*You can run more than one instance of the application. Each instance uses its own license(s) and runs independently as a separate Windows application (a separate application icon would be listed in the Windows task bar and a main application window would open for each instance).
The largest area of the main application window is dedicated to transaction forms. Until a transaction is selected, your company's logo is typically displayed in this area. Once a transaction is selected from the menu (displayed along the left-hand side of the main form), a transaction form is displayed in this area.
Most transactions have three (3) sections: form, grid, and folders. The upper area or "form" area contains controls used for primary information or required selections that apply to the entire transaction as a whole. Many transactions also involve a data grid. Often this encompasses the middle to lower portion of the form. The data grid is used for specifying the details regarding the transaction (items, payments, etc.). The last commonly seen form section are "folders." In transactions available from the main form, these can usually be shown or minimized. Folder information is only populated if the folders are displayed maximized by using the Folders (F4) function (functions are listed along the bottom of the main application window). Maximizing (showing) the folders typically resizes the data grid area accordingly (when applicable).

Transaction Form Elements
Form Area
The form area is where either required or primary information related to the transaction overall is designated. Every transaction has some type of form entry area. Use either the mouse or TAB key on the keyboard to move from one form field (control) to the next. Only one control (or input) can have focus (be active) at the same time. To navigate backwards through a form using your keyboard, use SHIFT-TAB instead. Forms are comprised of either primary or secondary fields (controls).
|
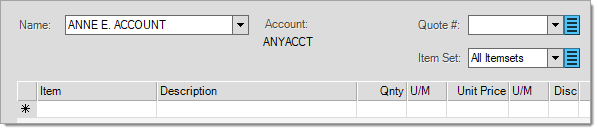
Primary vs. Secondary Form Controls For an example, we'll take a look at the form used for processing Quotes found in the Point of Sale area. The Quotes transaction offers a minimum of three (3) input fields on the form: Name, Quote #, and ItemSet. For customer accounts with jobs, a fourth control is displayed for job selection (not shown). The Name and Quote # drop down controls are considered "primary" since they are required for entry. These are assigned a TAB order in the form structure. For example, if the TAB key is pressed from the "Name" drop down, the active input will change from "Name" to "Quote #." Pressing TAB once more will change the focus (active control) to the data grid (as long as all primary or required fields have been addressed). Entry or selection may be required before you can "tab" to the next field. The third input, "ItemSet," is not always necessary. For this reason, it is considered a "secondary" control or input and is not part of the normal "tab" sequence. If needed, the "ItemSet" control can still be accessed with the mouse or keyboard at any time. When using SHIFT-TAB to navigate backwards, navigation includes the entire form including secondary controls. By the way, an "ItemSet" provides a way of grouping certain items on a transaction together. Both quotes and orders allow grouping by "ItemSet" and these groups can be selected for invoicing (via Sales) separately from each other.
Use either the mouse or the TAB key to move between primary fields. Primary fields may show a default input (dates are a common example). When you see a down arrow button |
Primary fields are used for information that is required for processing a transaction. These are generally included in the "tab" order of the form. In some cases, secondary fields are provided that may be accessed only when needed. These are usually not included in the "tab" order when using the keyboard to navigate a form. Forms may also contain display-only text areas relevant to the selected activity such as "totals."
Grid
Grids are used for data entry and are where you specify details associated with the transaction. Grid formatting varies by activity with regard to the type of data displayed in the columns; however, the basic function and navigation of a grid remains the same. Grids can be sorted by clicking on a heading column. Sorted grids are temporarily made to be read-only, so no changes or additions may be made until the default sort is resumed (by pressing the ESC key). In many cases, alternate grid entry formats are also available using the F3 (view) function.
Folders
Folders can be displayed or hidden (by pressing F4) and display extra inquiry information related to the task at hand. They can also be used to add information or link documents to the transaction using the input and attachments tabs. These allow the user to add comments, etc. and attach/view documents related to this activity.