The Sale Entry form is for entering and processing sales and returns using a variety of payment methods including:
You can also use the Sales transaction to invoice customer orders, quotes, rental contracts, and mobile tickets (rental contracts and mobile tickets have additional requirements and may not apply to your company). Sales usually produce a PS Invoice document or a PS Charge Returns document when the net sale is negative. The application produces other documents when the transaction involves a customer uses a receivables account to charge the sale to their account.
Sale transactions must be paid in full, using one or more of the payment methods listed above. If the customer does not pay the full amount and you process the transaction, the error message M864, Outstanding Balance Remaining displays.
PRO TIP: We highly recommend that you do not combine returns with new charges on the same transaction. It makes item cost corrections more complicated unnecessarily. This is particularly important for keeping track of General Ledger credits and debits. We recommend that you process two transactions, one for the new sale and the other for any item returns.
Processing a Sale Entry Transaction
As a sales person or clerk, you may have different credentials that affect your ability to process a Sale Entry transaction. This set of instructions shows the simplest transaction process you will use most of the time to complete a sale. More options for finding information are discussed below and we recommend you use them for the circumstances you may encounter.
To complete a sale:
1. From the Main Menu, choose Point of Sale > Sales. The Sale Entry form displays.
Note: In some cases the Loyalty Program Selection box displays by default. If it does not, continue to step 3.
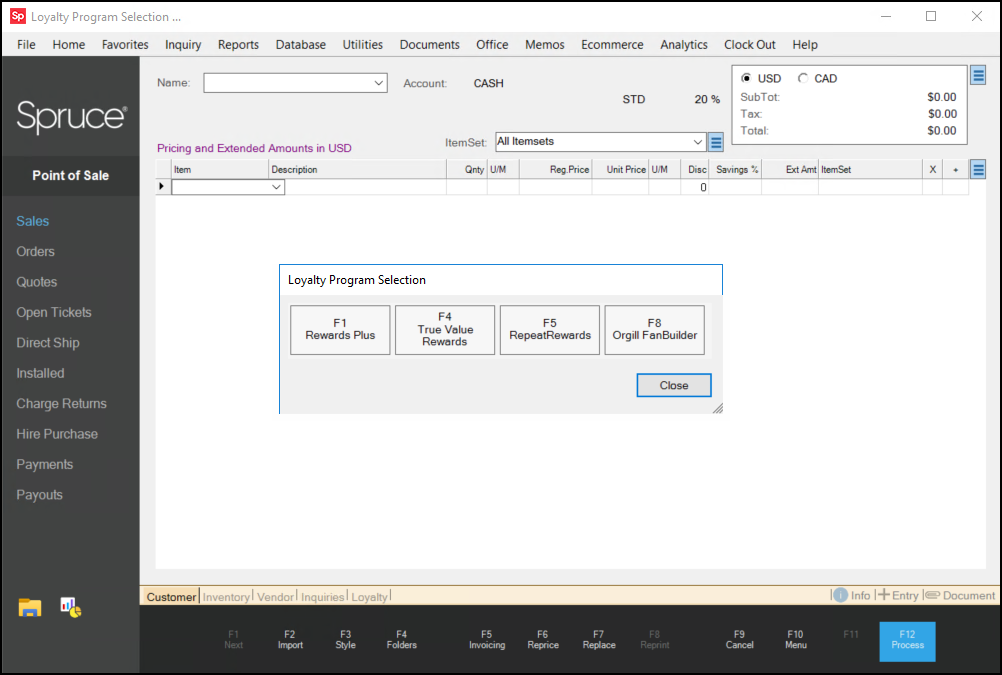
2. Do one of the following:
-
If the customer wants to apply rewards points to the transaction, click the rewards program icon they use and follow the prompts to collect the information you need to apply the points to the transaction.
-
If the customer does not have a rewards ID and they want to enroll, continue to the next step.
-
If the customer does not want to use reward points in the transaction, continue to the next step.
3. From the Name list, choose an account for the customer's transaction as follows:
-
If the customer does not have a receivables account, leave this field blank to use the Cash account setting.
-
If the customer has a receivables account, choose their account from the Name list.
There are many ways to find the account you are looking for. Review the Selecting an Account section below to learn more.
4. If the receivables account you chose has a job associated with it that the customer wants to apply this transaction to, choose the job from the Job list. See the Selecting a Job section below to learn more.
If the customer does not want to use a job, continue to the next step.
5. Add the items the customer wants to purchase to the data grid in one of these ways:
-
Use the scanner to scan the items into the list. See Scanning Items into a Data Grid below to learn more about this process.
-
From the Item list, choose the first item the customer wants to buy. See Data Grid and Item Entry to learn more about adding items to the data grid.
-
To import items from another transaction or from an external list, choose Import (F2).
6. Review the unit of measure settings for the selected items to determine if they are right for this transaction. You can change unit of measure settings if needed. See Reviewing the Unit of Measure Entries section for more information.
7. Review the pricing settings for the items in this transaction to see if they are appropriate for this customer. If the customer has pricing contracts with your business, these prices are typically set automatically, but it is useful to review these settings before you process the transaction. See Understanding and Defining Item Prices below to learn more about these settings.
8. If the customer wants to have items delivered on a schedule, it may be useful to assign ItemSets to these items to group them for delivery. See Working with ItemSets to learn more about this feature.
9. When you have completed the item entries and you are ready to process the transaction, choose Process (F12) to display the Process Invoice Document form. The layout of this form depends upon the parameter settings you have enabled, such as Multi-Currency.
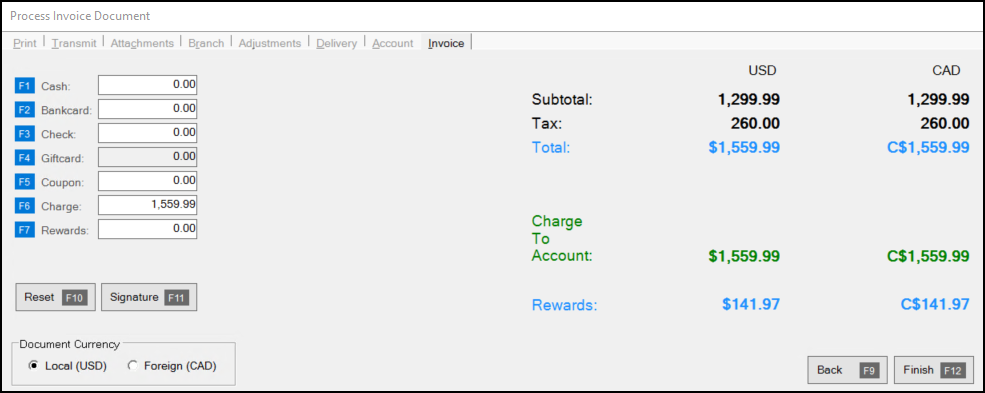
You can learn more about the processing a Sale transaction in the Sales > Process Form topic.
Selecting an Account
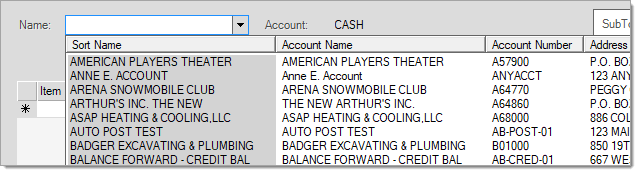
In the Point of Sale Name list, you can either enter the Sort Name (from the Account Maintenance form) or the account ID. Most Point of Sale transactions involve selecting an account and sometimes job (when applicable) first. For Sales, you can scan or enter the items into the data grid first, but for other transaction types (Orders, Quotes, Tickets, etc.), you choose an initial account first. If you know the customer participating in the transaction, there is usually no need to choose an alternate menu, just type either the sort name or the account number/ID.
When a customer has their own charge account, we recommend that you enter their name in the Name list. You can change it to a different account, if needed, before processing.
There are some additional search options you can use, based on other information you know at the time of your search. You can review these options here
more...
Other Account Search Options
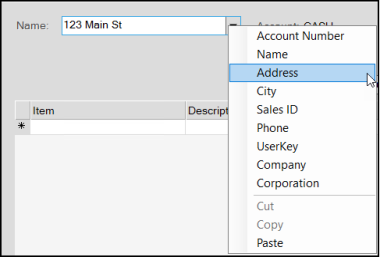
To see additional search options, enter the text you know (address, phone number, etc.) in the Name field and right-click the down arrow beside the field to see additional search options.
Note: The application includes the Account ID and the Sort Name in the search by default, so you do not need to select these options from the list.
If you do not enter any text or you enter text that matches more than one account, the application sorts the list by the field (Address, City, etc.) you selected. You can click the column headings to sort the list in a different order. In some cases, only those account's with a value for the selected field(s) will be included.
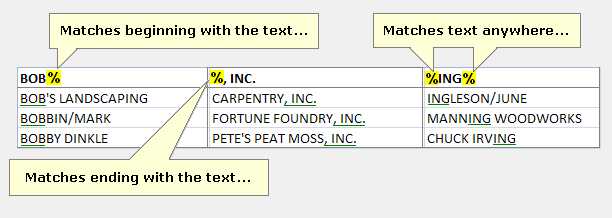
If the Enhanced Look Up option is not enabled, you can also use a "wildcard" (using a % character/symbol) to represent unknown characters to perform a search. A wildcard can represent any character or set of characters before and/or after the text you enter to find records that may match (see the examples below).
You can use wildcards to look for account matches using the alternate menu selections as well.
For example, in the Name list, you could enter %1234 and choose Phone to search for accounts that have 1234 as the last four digits of their phone number.
Searching for an Account Using the Customer's Rewards or Loyalty Card
If your company participates with the Do it Best® Loyalty Rewards program, Best Rewards™, or other loyalty rewards programs, you can scan the customer's rewards card ID or enter the customer's card ID in the Name list and choose the UserKey option to perform the search.
We should point out that as long as a Loyalty ID is assigned to the customer correctly and the customer's account is used for the transaction, there is no need to scan their card to associate a transaction with the program. All sales transactions will be associated with their rewards ID automatically regardless of whether or not a card was scanned or loyalty ID was used for selection.
For ACE Rewards™, choose <CTRL-R> to scan or enter the customer's rewards ID unless it has been associated with the customer's account. In the latter case, the customer's rewards ID is automatically associated and displayed in a Point of Sale, Sales transaction. Other transactions (Orders, Quotes, Open Tickets, etc.) do not support ACE Rewards promotions and these transactions are intentionally not associated with the customer's ACE Rewards ID. Scanning of the customer's ACE Rewards card is not supported except when the ACE Rewards dialog is shown. For more information about using ACE Rewards at Point of Sale, search for the ACE Rewards topic in the Help System.
|
When the Enhanced Look Up feature is enabled, you have more selection options, but the account's Sort Name field entry is still the primary match field. The application only shows you account number matches if no sort name matches are found. If matches for both the sort name and account number exist, only the entries with the name display.
Using the Enhanced Account Look Up Feature to Find an Account
When enabled, the Enhanced Look Up feature searches using the account number, sort name, address (line 1), and company name automatically. For each row, the cell matching the look up text contains a gray background color. Even when more than one column for the same row (account) has a match, the application only highlights the column with the first look up match. Typically, the more text you enter, the shorter and more useful the list of matching results will be. With enhanced look up, there is a maximum number of matches (up to 70). There is no <<More>> option, which means that if more than 70 matches exist, you may have to either enter additional text to narrow the search or enter new search information instead.
Note: You cannot use the % character as a wild card when using the Enhanced Look Up feature.

The Enhanced Look Up feature can be enabled by Support upon request. The team sets up parameters and uses a Support Utility to populate tables with the data you have already entered into the application. If you decide you do not want to use this feature after it is enabled, Support needs to reset these tables and the application returns tothe original methods for search. You can request to re-enable this feature in the future if you choose. Key look up data is removed when account or items are modified if you disable the enhanced look-up feature.
After you select an account from the list, the account type displays beside the list. There are three types of accounts:
-
A Cash account is a customer-specific account that does not allow receivables charges.
-
A Charge account is also a customer-specific account that allow receivables charges to accumulate.
-
A System account is a general-use account that is not customer-specific. A System account does not have a credit limit or allow charges.
All companies must have a system account named CASH. Except in the case of Tickets* (Advice Notes) and Charge Returns, the default account, "CASH," is the default when no specific account is indicated.
To select the System account, press TAB . In addition, this type of account requires the entry of a delivery name when used with non-sale type transactions (orders, quotes, etc.). more...
Understanding System Accounts vs. Cash Accounts
System accounts are used for cash and carry transactions, where the customer doesn't have their own account. Your company can create more than one System account; however, most companies only have one.
By contrast, Cash accounts require additional information, such as the customer's name (or other information), for certain payment types and in cases of delivery. When you begin a transaction using a system account, you can create a new "cash-only" account directly using the Delivery tab on the Process form (when applicable). Cash-only and System accounts are not the same.
|
Selecting a Job
Accounts may be linked to one or more jobs; every account has at least one job, known as the master job (0). You can add additional jobs to any account to track account activity separately from the account. You are only prompted to select a job if the account has multiple jobs (more than the required job "zero"); otherwise, all activity is assumed to be for the master job. In Point of Sale, disabled and closed jobs are not included in selection list. You may be able to add new jobs during the transaction processing (on the Delivery tab of the Process (F12) form).*

*Your security settings may prevent you from adding jobs during processing.
Note: In other Point of Sale areas (such as Order or Sale Entry) you can also add a job in the Delivery tab. This option is not available in Tickets/Advice Notes.
Working with ItemSets
An ItemSet is a classification tool used for Sales, Orders, and Quotes where you can assign items to groups, or "sets" so you can sort, invoice, and/or deliver them separately.
For example, if you are adding a large order, and the customer wants specific goods delivered at different times, ItemSets are an excellent way of keeping track of the customer's delivery needs while maintaining a single order at the same time.
 more...
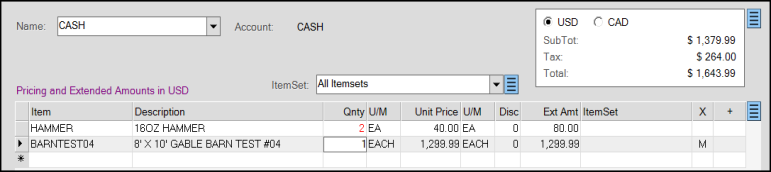
Using the ItemSet Control
The ItemSet field (located above the data grid on Sale, Order, and Quote forms) allows you to filter items based on the ItemSets assigned to an item. The default setting is All Itemsets, which displays all grid items regardless of their assigned ItemSet (if any). If you choose the None option from the ItemSets list, only the items that have not been assigned to any ItemSet. This setting only works if some of your items have been assigned ItemSets.
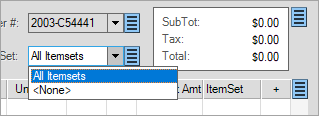
If any ItemSets are assigned to items in the data grid, they will be listed as selections in the ItemSet list:
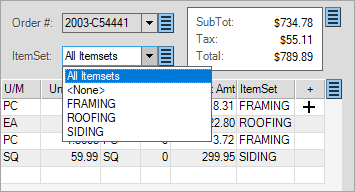
ItemSet designations (if any) also display in the grid under the "ItemSet" column and can be modified from the grid as needed.

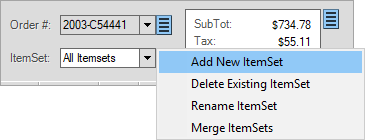
Click the Menu Marker  beside the ItemSet list to add, delete, rename, and merge ItemSets. The Menu Marker may not display if you do not have user credentials for the ItemSet feature. beside the ItemSet list to add, delete, rename, and merge ItemSets. The Menu Marker may not display if you do not have user credentials for the ItemSet feature.
If your business uses ItemSets frequently, they may have set up ItemSet defaults in the Parameters > Point of Sale > Names tab, which will display in the Add ItemSet list. You can select one of these existing ItemSet types or add a new one, if you need to.
Adding an ItemSet to a Sale, Order, or Quote
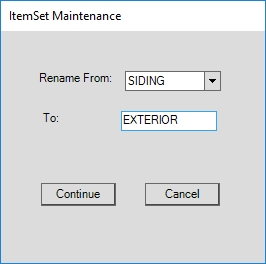
To add an ItemSet to a sale, order, or quote, choose Add New ItemSet entry from the Menu Marker list. The ItemSet Maintenance form displays. Select an existing ItemSet from the listing of presets (if any) or type in a name in the Add ItemSet field provided. ItemSets are limited to 30-characters.
Note: New ItemSets you add here don't become presets for future transactions.
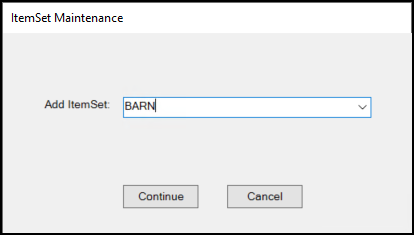
Then click Continue. Add the items to the data grid that you want to be associated with this ItemSet.
The ItemSet column displays the assigned ItemSet setting for the new item.

Deleting an ItemSet from the Transaction
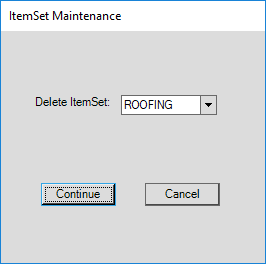
You cannot delete an existing ItemSet from the sale, order, or quote if there are still items with this ItemSet assigned to it. You must have ItemSet credentials to delete an ItemSet. Also, deleting an ItemSet does not delete it from the list of ItemSet defaults.
To delete an ItemSet from a transaction, from the Menu Marker list, choose Delete Existing ItemSet, choose the ItemSet you want to delete from the list, and click Continue.
-
If there are no items assigned to the ItemSet, the application will delete it from the transaction and it will no longer display in the ItemSet list.
-
If there are items are currently assigned to the name, no changes will be made.
Renaming an ItemSet
You can rename an ItemSet to change the name of it for all items that has it assigned. You might do this if the purpose of the selected ItemSet has changed.
To rename an ItemSet for a sale, order, or quote, choose Rename ItemSet entry from the ItemSet Menu Marker list. The ItemSet Maintenance form displays. From the Rename From list, choose the ItemSet you want to rename. In the To field, enter the new name for the ItemSet and click Continue.
Merging ItemSets
You can merge ItemSets to combine two ItemSets into one, with all occurrences of one existing ItemSet renamed to the other. There must be two different ItemSets with items assigned to them to perform this task.
To merge two ItemSets for a sale, order, or quote, choose Merge ItemSet entry from the ItemSet Menu Marker list. The ItemSet Maintenance form displays. From the Merge From list, choose the ItemSet you want to merge into the new one. In the Into list, choose the new ItemSet and click Continue.

The Merge From ItemSet is automatically removed (deleted) from the transaction and the new ItemSet name displays for the existing items.

|
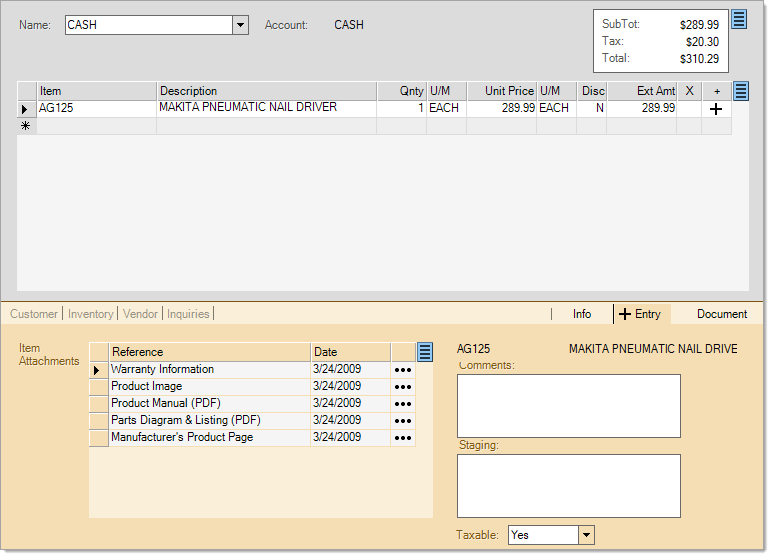
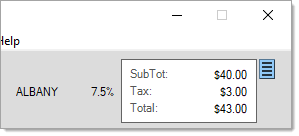
Totals Panel
The upper right-hand area of the form includes a display-only panel showing the transaction's current sub-total, sales tax, and total. The tax location and rate (percentage) are displayed to the left of the panel when enough room is available (the tax location and rate can be viewed in the Process (F12) form otherwise). These figures will automatically update as changes are made. Figures also update to reflect any adjustments (adders/discounts, etc.) applied on the Process (F12) form.
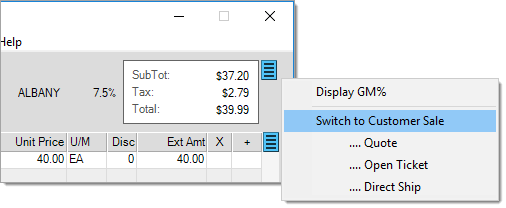
The menu marker (to the right of the totals panel) offers additional options allowing the user to switch to a different transaction type (sale, quote, ticket) or display the current GM% (gross margin percentage) for the entire transaction.
|
 Canadian Settings Canadian Settings
|
|
Users in Canada can double click on the tax amount to display the split provincial (PST) and GST tax dollar amounts. For Canadian provinces with both PST and GST taxes, both locations (and rates) are displayed to the left of the totals panel. HST (Harmonized Sales Tax) locations (used for the Maritime provinces) combine the GST and any local amounts together into one tax rate, so no split is provided in those cases.

Tax Details (Canada Only)
|
Using "Switch to" to Change Transactions*
If you have administrative credentials, you can change a Point of Sale transaction from one type to another (such as a Sale to an Order) when your customer needs to do that. This allows you to convert the existing transaction to a new type while retaining much of the information from the original. This process preserves all items (and item comments), pricing, customer-job selection, customer PO#, and deliveryinformation. Other information is not maintained unless it is permanently associated with the account or job. This includes a number of fields located on the Process (F12) form such as Print and Transmit options, Adjustments, and any manually entered information such as a Tax Exempt number or Purchase Agent.
To switch transactions, use the Menu Marker next to the Totals panel in the upper right corner of the application window and choose the new transaction type from the list. The original transaction was a Sale in this case.:
more...
|
Changing transactions is not how a previously saved transaction is completed or converted. For example, you would not use this process to invoice an existing order or quote (via the Sales transaction). Invoicing is usually done via the Sales transaction by using the Invoicing (F5) function.
The same is true for converting a quote to an order, etc. The "Switch to" option is used to create an entirely new transaction using most (not all) of the information from the prior transaction. It is provided primarily for situation where one transaction is begun, but needs to be completed as a different type.
Here's a specific example:
A customer asks for a price on a particular product or service. The sales clerk begins the transaction initially as a quote. At some point during the quote entry process, the customer decides that they are ready to order the products. The "switch to" option allows the user to cancel the original quote and create an order instead.
Note: If you previously saved a quote for the customer, you would instead use the Ordering (F5) function in Orders to create a customer order from the original quote, not the "switch to" option. Switching transactions produces no links or any other relationship between the original and new transaction.
Some information is set back to defaults when beginning a new transaction and certain transaction types have requirements that may not match the prior transaction. For this reason, it is possible to lose certain information during a switch.
One specific example of this is when switching to an Open Ticket (named "Advice Note" in the UK) from a "cash" sale, order, or quote. In this case, tickets require a "charge" customer and cannot be processed for a generic "cash" or system account, so any delivery address information would be lost in this case even though it would usually be retained for other types of transactions. As a basic rule, information that does not apply to the "new" transaction isn't retained.
|
*Security settings can block a user from viewing, and therefore accessing, any Menu Marker options.
Data Grid & Item Entry
The grid area is used for specifying the items that are being sold or returned. Products may be scanned at any time, manually entered, or selected using a variety of alternate menu methods. The default quantity for an item is one (1). Some types of items (tallies, description required, non-stock returns, comment, etc.) will prompt the user for additional information or selections by opening a new form. This occurs immediately after the product is scanned or entered in the grid.
This column provides a combo drop down control that allows a user to enter text or select from a listing of items (products). This control supports scanning. For scanning to function properly, the supported scanner device must be programmed appropriately. The item selection control also offers a number of additional look-up features accessible from the alternate menu (usually a "right-click").
To learn more about item description search techniques, click here.
Search Tools for Finding Items in Data Grids (ECI-Hosted Only)
When you are looking for an inventory item and cannot remember the exact name or Item ID, you need tools for searching the item descriptions so you can find the right materials quickly. There are Item Description search features to give you those tools. There are description search tools, such as using quotes (“Drill Bit”) and using wild cards (Drill B*) to help search for items using their extended item description. The search results show the closest matches at the top and any additional results that match the criteria below.
You can use this feature wherever there is an Item list (Point of Sale, Inquiry, Item Maintenance, etc.). This feature is restricted to ECI Hosted customers only. Adding this feature requires a lot of additional database overhead, which we can manage better in our hosted environment. To enable this feature, reach out to the Implementation or Support teams; as it is disabled by default. Once enabled, there are no special permissions required to use this feature; it is accessible to all users.
Using the Enhanced Item Description Search Feature
We are demonstrating this feature in Point of Sale, but it works anywhere there is an Item list. The new description search strategies include:
-
Entering two words, like (Drill Bit) in the Item field, results in the display of all inventory items that have either Drill Bit or Bit Drill in the Item Description,
-
Entering two words using quotes, like (“Drill Bit”), results in the display of all inventory items with that exact text (as you would see when searching in a web browser), and
-
Entering text with a wild card *, (Drill B*), allows you to search for all items that start with Drill and have B as the next character. This wild card feature can be used more than once, so you could also enter Dr* B* and get all matching results.
Searching using the Exact Text
To search for an item using exact text:
1. In the Item list, type the text you want to search for.
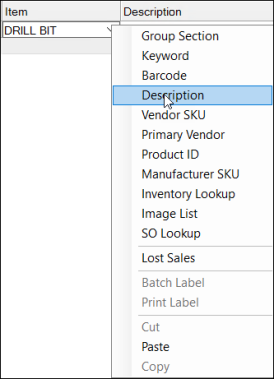
2. Right-click the Item list drop-down  icon to display options and select Description.
The matching results display:
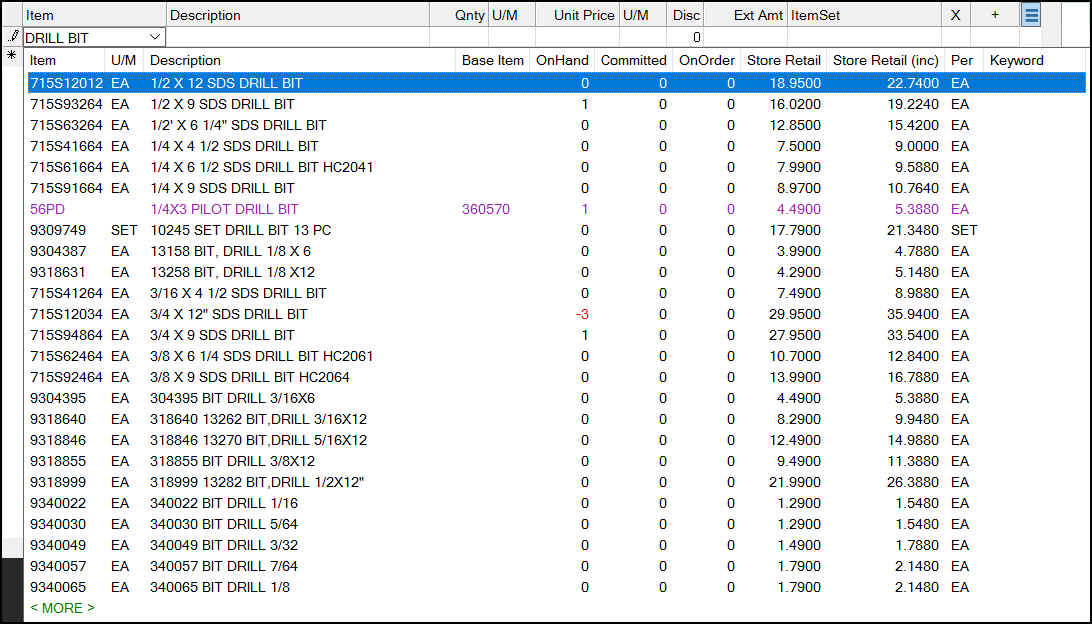
Item Description Search (Entered Text Only)
3. Scroll through this list to find the item you are looking for or click the More option to display additional inventory items.
Searching using Quotes
But, what if you don’t want to see items that don’t contain the words, Drill Bit?
To search for an item using quotes:
1. In the Item list, type the text you want to search for with quotes around it: “Drill Bit”.
2. Right-click the Item list drop-down icon to display options and select Description.
The matching results display:
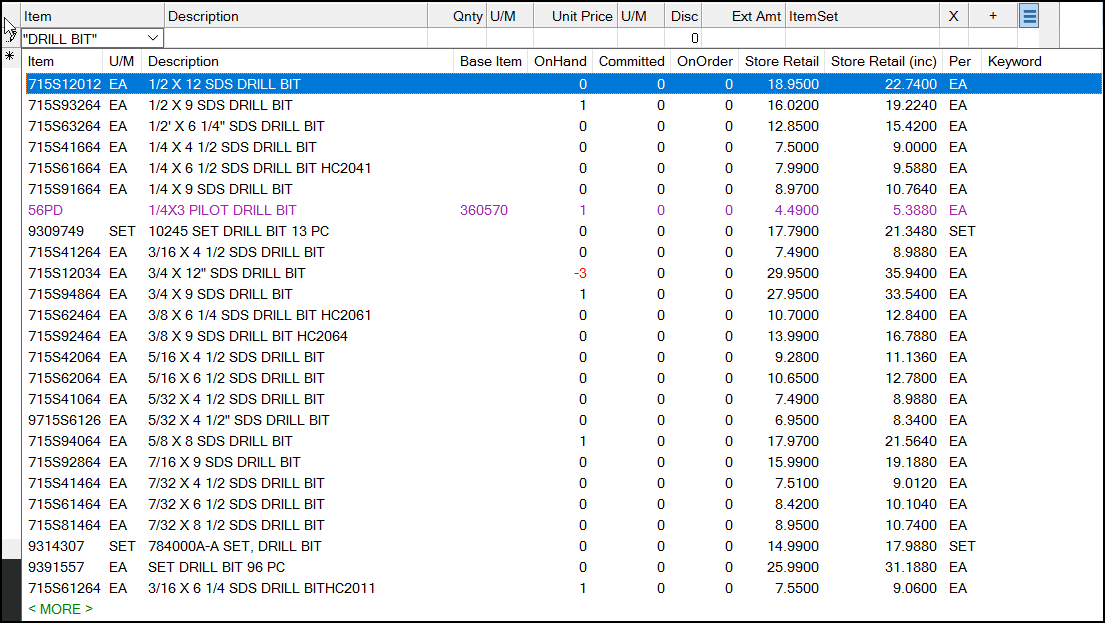
Item Description Search (Using Quotes)
3. Scroll through this list to find the item you are looking for or click the More option to display additional inventory items that match the quotes-based search criteria.
Searching using Wild Cards
To search for an item using one or more wild cards:
1. In the Item list, type the text you want to search for, typing a * after the last character you know: Dri* B*.
2. Right-click the Item list drop-down icon to display options and select Description.
The matching results display:
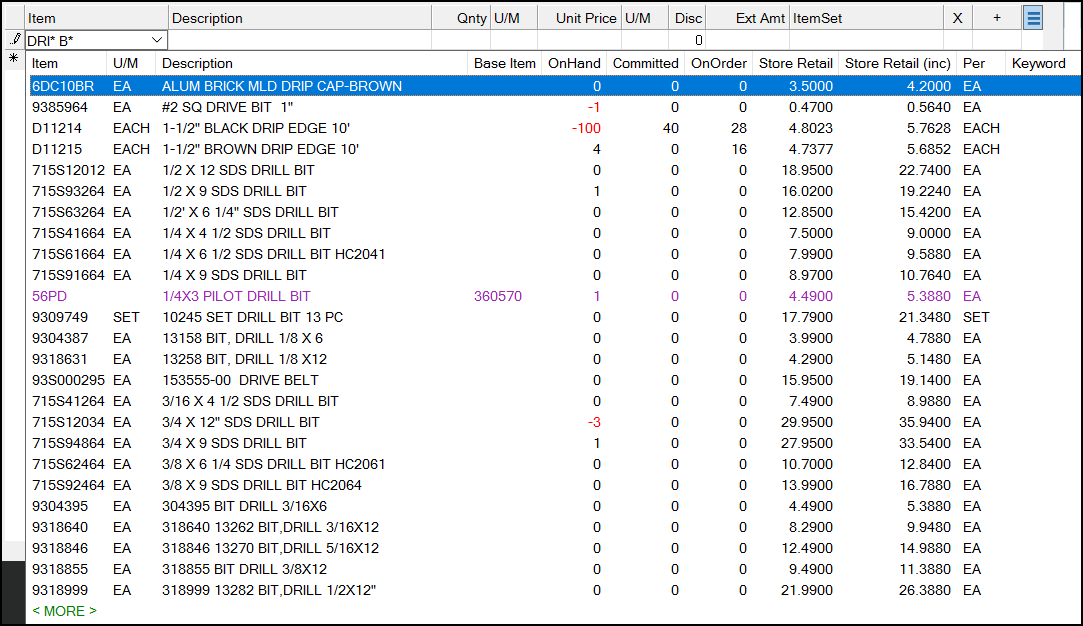
Item Description Search (Using Wild Cards)
3. Scroll through this list to find the item you are looking for or click the More option to display additional inventory items that match the wild card-based search criteria.
Note: If you use the character, * in your Item descriptions, the application does not search for them as characters. So, if you search for Drill*Bit and you are looking for items that have the * in it, the application will not search for that character specifically.
When the items display in the list, if you cannot see all of the characters, you can drag the Description column heading border to display more. This is particularly useful when the information you need is at the end of the description.
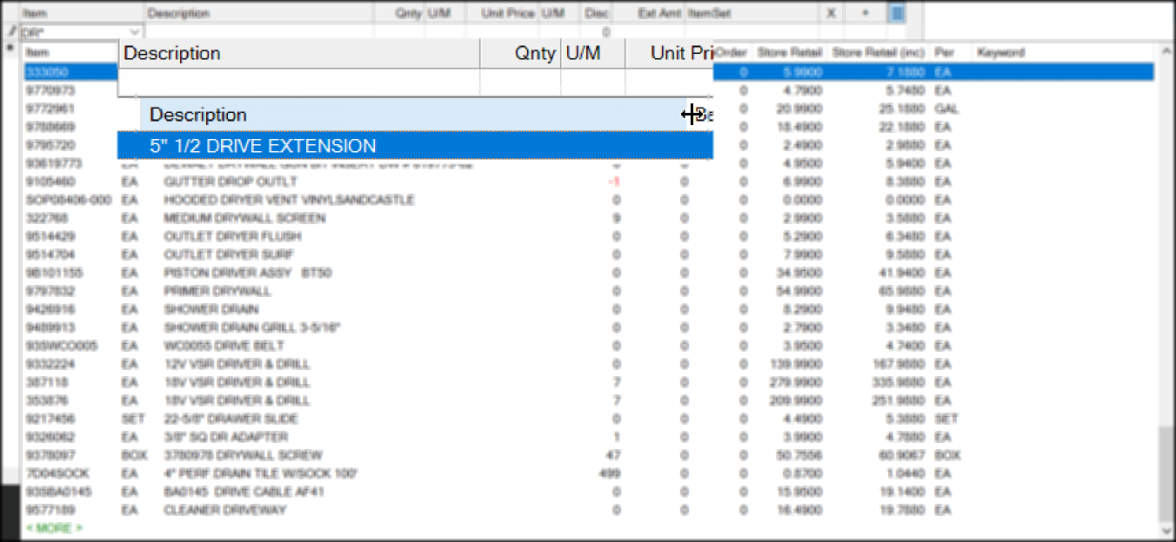
Item Description with Drag Icon Displaying
To learn more about item entry and selection, click here.
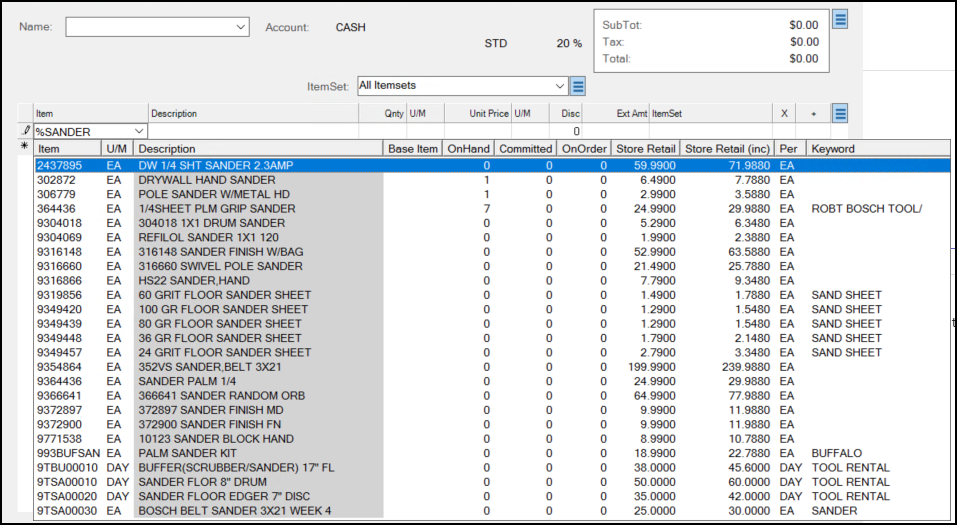
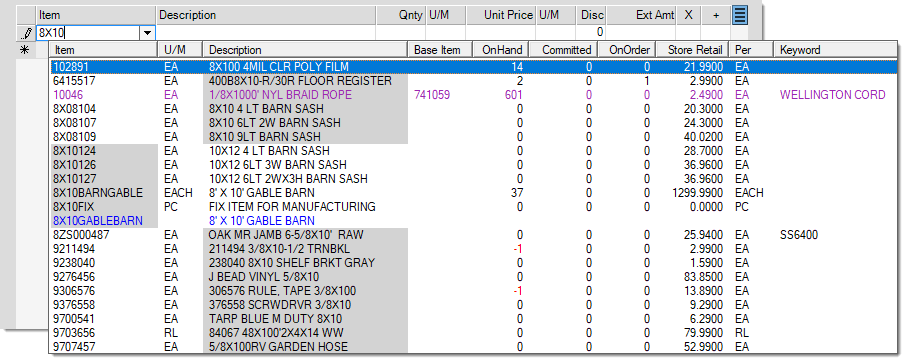
One of the most important features of a retail software solution is Item Entry. When the item is physically present, scanning the item's barcode is the easiest and fastest way to enter it into the application. If you don't have a scanner or the item has no barcode, you can always enter a full or partial item number if it's available. When entering text that partially matches existing item codes, the application displays a list of items that match. Items in selection lists are color coded to help distinguish between item numbers and alternate SKUs (in purple). On-hand quantities in a selection list are also color coded when an item has a negative on-hand (red).
There are cases when you may not be working with any physical item, such as when you are building an order or quote, so scanning or manual item entry isn't always a realistic option. For these situations, you can enter the information you want to search for and right-click the Item list icon to display a list of search options.
All of the following alternate selection choices are used to build a selection list matching the criteria you either enter or select. Based upon your selections, you can wind up with a list that contains a few items, many items, or one item. In addition, it's possible for your selection to produce no matches.
Selection listings are assigned a set "page" size. Usually, this initial listing or page is limited to the first 25 records. When more items match the criteria than the page size, a "<<<MORE>>>" option is displayed at the bottom. Clicking "more" populates the selection listing with the next page of items. Previous records (items in this case) remain in the listing and can be viewed by moving the scroll bar on the right-hand side of the listing.

|
If you want to add more than one item in the list to the data grid, you can hold down the CTRL (Control) or SHIFT key and click the items you want to add as follows:
After you select the items you want, press the Enter key. Then, use the Next (F1) key to add the items you selected to the data grid one-at-a-time.
Selected items are not automatically copied into a grid. This feature works this way because not all selections made using these keys end up in a data grid.
|
Selecting Items using Group Section
Since all items must be assigned to a group and section, you can use the Group Section settings to find an item. Groups and sections are numbered (1-255), but are also assigned a text description. In almost all cases, the text description is shown along with the numbers. Numbers are used because they take up less space and also makes sorting and searching data more efficient in the database. Each company can choose how it wants to organize its inventory.
Group/Section Selection List
Group and section selection uses an expandable navigation "tree." Each group listed in the tree can be expanded to display the sections within the group. You can make multiple selections. For example, you can create a selection list of all the items in three different groups -- or -- just a few sections within one or more groups.
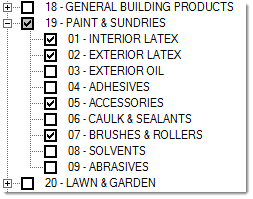
When all the items in either a group or section are selected, the check box background is displayed in white  . If you select some but not all sections within the same group, the group's check box background is changed to gray
  . Use the Select All button to select all groups and sections. Use the Clear All button to clear all check boxes. Choose Accept to build a selection list based upon the groups and/or sections you have chosen (checked). Or, click Cancel to close the window and not build a selection list.
Selecting Items using a Keyword
Items may be assigned up to five keywords. Keywords are meant to be a common and intuitive word that generally describes the product. It's best to use a word rather than a phrase and to not get overly specific. Keyword matches are not case-sensitive (you can type them using upper and/or lowercase letters). Some examples of good keywords are: TRUSS, PAINT, SINK, DRILL, BRICK, etc. The more specific the keyword, the less intuitive, and less likely that it will be used. Keywords are not required on items. Try using the Description search as an alternative if you are unsuccessful.
There are two ways to use the Keyword selection to find an item you are looking for:
1. In the Item column, type in the word or number you want to search for and right-click the drop-down arrow. Choose the Keyword option to display a list of items that contain the word or number you entered.
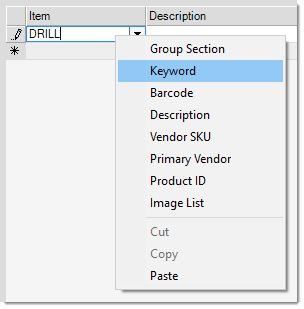
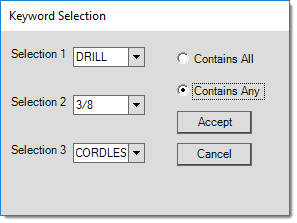
2. In the Item column right-click the down arrow and choose the Keyword selection option first (before you type anything in the Item field). The application displays a Keyword Select list where you can specify up to three keywords at the same time. You can choose to match on either ALL or ANY keywords. If you choose "Contains All", only items assigned to all the keywords will be included in the selection list. If you choose "Contains Any", items with any of the keywords specified will be included.
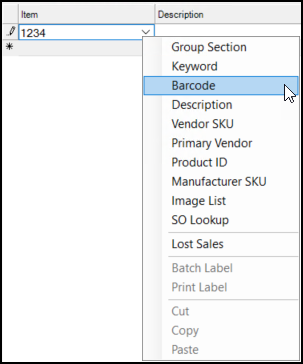
Selecting Items using a Barcode
You can assign up to five different barcodes to each item. You can use these different barcodes to distinguish different units of measure (BOX vs. EACH, for example), so it's important to pay attention to the unit of measure that displays when entering quantities. This selection tool can be used with either a full or partial match on an item's barcode. Partial matches are made beginning with the first non-zero number in the barcode. Leading zeros are not considered.
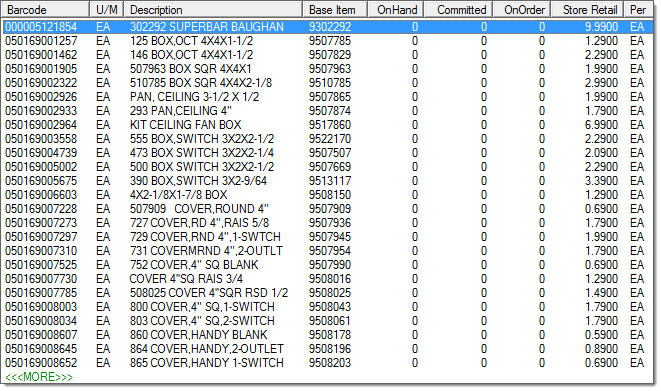
When using the barcode selection option, products are listed in order of barcode. The "base item" column contains your company's SKU for the item.
Selecting the Item using the Description
Use the Description search to find items using the words or numbers in the item's description. Matches are not case-sensitive (so it doesn't matter whether you use upper or lower case letters). The text can be located anywhere in the item's description (beginning, end, or middle); however, the entire text is matched together as a phrase, not as independent words. For example, if you type in "FAN KIT" but the item's description is "KIT CEILING FAN BOX," the application would not find the match, despite the fact that both words do exist in the item's description.
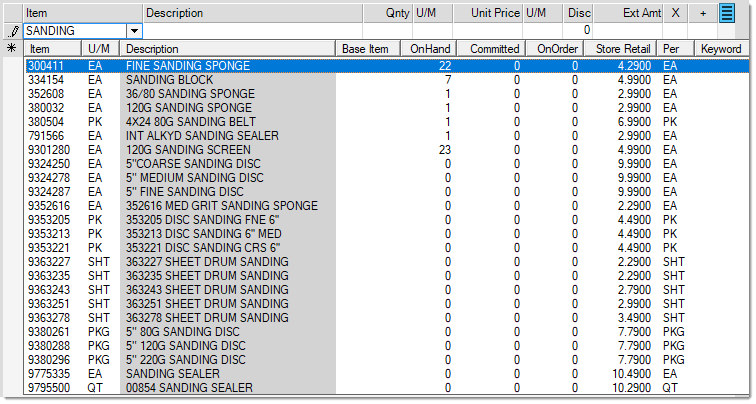
You may notice that some items populated in the selection listing don't appear to include the word you typed in the "description" column. Why is this? Items may have very long descriptions (up to 1088-characters, including spaces); however, we use a shorter truncated description for selection lists that is only 32-characters. This is done to keep selection listings a reasonable size and for database performance. The description used for locating matches is a special "search" description that is essentially the item's full description with any sequential spaces between words removed (this description also doesn't include line feed, carriage return, and other non-printing characters that might prohibit matches).
Pro Tip: If you type the character % and then the text your are searching for in any text field in a data grid, the application will restrict the search results to the records that contain that text.
Selecting Items using a Vendor SKU
Use the SKU (Stock Keeping Unit) to describe the numbers or identifiers assigned to products. Your company may use its own item numbers (codes), it may use the same codes as a supplier/wholesaler, or a mix of both of these. Each item can be assigned up to three different vendor items (or SKUs). These identifiers are used when ordering products from the vendors (wholesalers, manufacturers, buying group, co-op, etc.).
Enter in the vendor's item number (SKU) in the item drop down and choose Vendor SKU from the alternate menu. If a match is located, the matching item (or items) will display. This option only works if an exact match is located. Partial matches are not returned.
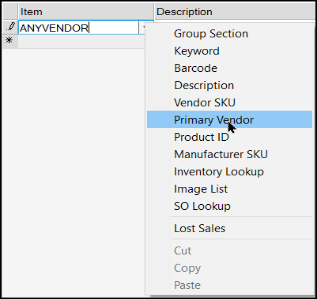
Selecting Items using the Primary Vendor
Each item may be assigned one primary vendor. The primary vendor can be different for each branch (store location). To use this selection option, enter the full vendor code associated with the vendor. This option only accepts an exact match for an existing vendor code. All items in the current branch assigned to the vendor as a primary vendor will be included in the selection listing.
Selecting the Item using the Product ID
You can use the Product ID as a classification tool to either create custom product IDs (groups) for your related items or, if you are a Do it Best® member, you can use them to mirror the Do it Best product departments, categories, sub-categories, and product groups. You can use a combination of both custom and Do it Best product IDs; however, only one ID may be assigned per product. The same product ID may be associated with as many items as you like.
If you want to define your own product IDs, this is done from the Code Definitions form (Inventory > Database > Code Definitions) (select the "Product ID" tab from this form). To use Do it Best product categories, you must first retrieve the classifications using EDI (from the Purchasing area, choose the Vendor EDI transaction, Extras (radio button), and choose "Classification Maint."). Once this information has been populated successfully using EDI. Once completed, a "DIB" check box will appear on the Product ID selection form. This check box is hidden unless the categories table is populated with data.

Do it Best Product Classifications
If checked, the form allows you to choose either a department, category, sub-category, or product group to produce an item selection listing. If you pick a department, all items assigned to the categories, sub-categories, or product groups within that department will be included in the selection listing, for example. Items may be assigned to any level; however, it's usually best if they are assigned to a product group (the lowest level). To choose a level in the tree, double click on the node to select it.
Selecting the Item using the Manufacturer SKU
When you search for a particular item and you know the item’s manufacturer's SKU, you can use that SKU to find the item. We call this enhanced search. The enhanced search feature must be set up before you use this feature. We have added the Manufacturer’s SKU to the default enhanced search options as well.
To search by the Manufacturer SKU, enter the SKU in the Item field, select the down arrow beside the item field, and choose the Manufacturer SKU option. The application displays the list of items that match the SKU you entered.

Sale Entry Form with Manufacturer SKU Search Results
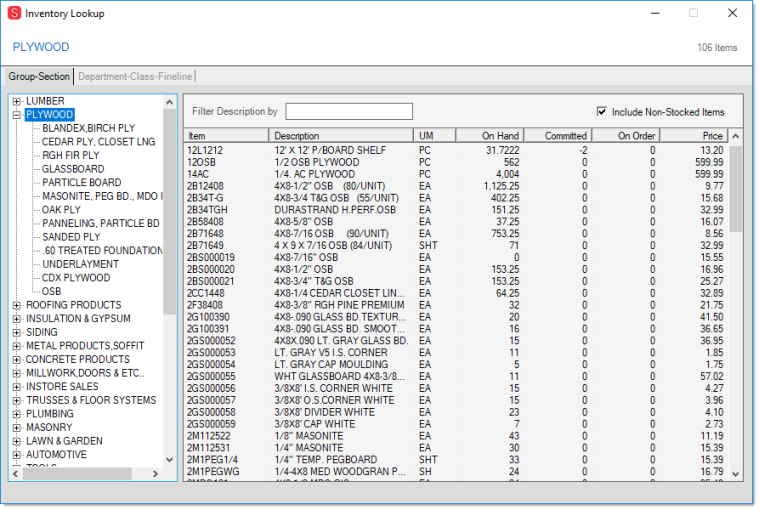
Selecting the Item using Inventory Look up
Selecting Inventory Look up will open a Utility that searches for items by Group-Section or Department - Class - Fineline.
Note: This listing includes Disabled Items.
Inventory Lookup : Group-Section
In order to search by Group-Section, all items must be assigned to a group and section. Your company may define between 1 and 255 groups and also between 1 and 255 sections within each group. Groups and sections are numbered (again 1 - 255), but are also assigned a text description. In almost all cases, the text description is shown along with the numbers. Numbers are used because they take up less space and also makes sorting and searching data more efficient in the database. Each company can choose how it wants to organize its inventory.
Select a group to view all item within that group. You may then narrow down the list by selecting the section. Click on an Item to add it to the data grid. The main dialog window will become active as soon as you select an item, at which point you can adjust quantity and price as well as continue adding items. The Inventory Lookup Utility window will remain open in the background, facilitating navigation between the windows.
You may also use the "Filter Description by" field by typing in the item number or Description. The list will narrow down as you type in more characters in the field. Check the "Include Non-Stocked Items" to include all items, included items you don't currently carry.
Inventory Lookup : Department - Class - Fineline
There are three merchandising classes available: class, department, and fineline (sometimes named "subclass"). These can be used as a selection tool. Merchandising codes are typically reserved for codes provided by vendors and may be updated by EDI processing or when adding items using a vendor's catalog.
Select a Department to view all item within that department. You may then narrow down the list by selecting the Class and then the Fineline. Click on an Item to add it to the data grid. The main dialog window will become active as soon as you select an item, at which point you can adjust quantity and price as well as continue adding items. The Inventory Lookup Utility window will remain open in the background, facilitating navigation between the windows.
You may also use the Filter Description by field by typing in the item number or the description. The list will narrow down as you type in more characters in the field. Check the Include Non-Stocked Items box to include all items, included items you don't currently carry.
Selecting Items using the Image List Selection
The Image List feature provides a visual method for item selection. Before using the Image List feature, your company must define an Image List from the Image List Maintenance form available from the database menu in the Inventory area. There is one consolidated image list for your company. This list can have many different categories and sub-lists, however. Up to five layers of organization are permitted from the "start" location. The list should be organized from less to more specific categories and ending with items as the last level. Once a user opens the list, the list remains open in the background and retains the user's last location in the list if they re-open the list again. This is done until the user logs off, closes the application, or changes branch locations.
There are two types of content in the Image List: lists and items. Lists are indicated by either a yellow or an antique-white (light-yellow) background color. Items are indicated by a light or dark green color. The darker colors indicate the current selection. Keyboard navigation can be used as well as the mouse (single click) and touch screen if available.
Along the top of the form, navigation links are provided. Click on these to return to the "start" location or a prior list level.
Selecting Items using SO Lookup
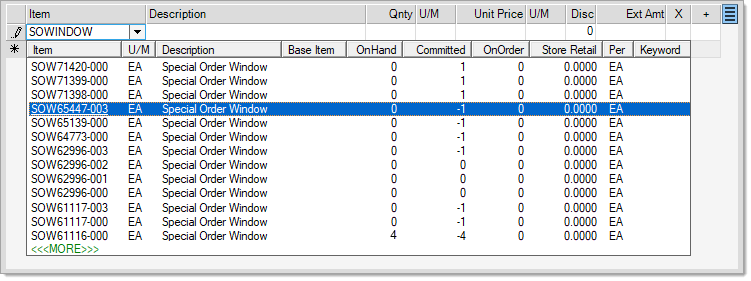
Search for renumbered Special Order (SO) items by entering a full or partial SO item number in the data grid, right-click and select SO Lookup. In the example below, we are searching for an item called "SOWindow". A list of all "SOWindow" items will be returned; click on the <<<MORE>>> link to view additional items of the special order renumbered SKUs. Item are listed in descending order.
Selecting Items using Lost Sales
You can track your Lost Sales using the Inventory > Utilities > Lost Sales utility form as well as from any Item selection grid or Catalog selection control anywhere in the application. Search for the Lost Sales search to find out more about this functionality.
Can't Find the Items I am Looking For, Any Other Ideas?
There are two additional search features you can use to find items quickly in Point of Sale or Inventory. Both of these features must be enabled by Implementation or Support team members. These features are discussed below.
Using the Enhanced Item Look Up Feature
When Enhanced Item look up is enabled, item selection automatically involves the following fields: item number, description, and keyword(s). The column cells matching the look up text are indicated by a gray background color. With Enhanced Item look up enabled, there is no "more" option provided and the maximum number of matches shown is 70. This means that if more than 70 matches exist, not all will be shown, and you may have to either enter additional text to narrow the selection or use other (alternate) selection options instead. Item number matches are given a preference over description and keyword matches (since alternate methods do exist for selection by description and keyword if necessary); however, the listing is finally re-ordered by Item SKU so the item matches may not necessarily appear first.
Exact matches on an item SKU do not provide a selection list.
Selection with no entry in the text area as well as selection involving the alternate menu do not use the enhanced look up feature. In these cases, item selection does provide the "more" option, and works as expected.
Typically, the more text entered, the shorter the listing of matching results will be.
The Enhanced Item Look Up feature requires setup by ECI Support personnel. Support enables a parameter and populates a special look up table using a support utility. This is only done upon request. After the Enhanced Look Up feature is enabled, ALL users and ALL locations can use it for item searches in all data grids that include items.
You can disable this feature at any time by contacting Support. If for some reason, an "enhanced" search is disabled, the tables will need to be repopulated again if it is re-enabled in the future.
Wild card searches (using the % character) are not supported when using the Enhanced Look Up features.
We have updated the ecommerce API to support the transmission of three additional fields of information:
• Discount Date
This specifies the last date that the discount applies. (This allows the API to compare the discount date to the date the payment is being made to ensure the discount can be applied.)
• Discount Amount
The calculated amount of the discount. (This provides the amount of the discount, which the API can subtract from the ROA payment balance.)
• Outstanding Amount Discount
The original amount that can be discounted, minus the discount amount, and minus the customer’s account payment, minus any additional discounts not included above.
Additional details are available in the API Guide.
Using the Enhanced Item Description Look Up Feature
When you are looking for an inventory item and cannot remember the exact name or Item ID, you can use a tool for searching the item descriptions to find the right materials quickly. The Enhanced Item Description Search features to give you those tools. Traditionally, you were restricted to searching for 32 characters when you used a Description search, we have expanded this to 300 characters, when needed. Additionally, we have added additional description search tools, such as using quotes (“Drill Bit”) and using wild cards (Drill B*) to help search for items using their extended item description. The search results show the closest matches at the top and any additional results that match the criteria below.
You can use this feature wherever there is an Item list (Point of Sale > Inquiry > Item Maintenance, etc.) and is restricted to ECI Hosted customers only. Adding this feature requires a lot of additional database overhead, which we can manage better in our hosted environment. To enable this feature, reach out to the Implementation or Support teams; as it is disabled by default. Once enabled, there are no special permissions required to use this feature; it is accessible to all users.
Search for the Enhanced Item Description topic for more information.
|
Additional Menu Marker Options
There are a number of additional options available from the context Menu Marker : Remove Order, Remove Quote, Mark as Net, Merge Items, and Reverse Quantities. The "merge items" and "reverse quantities" options are available in release 12 and later.
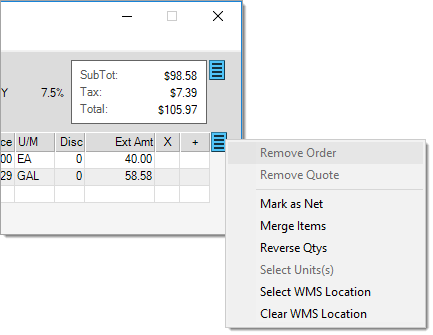
This option allows you to remove a customer order that was selected using the Invoicing (F5) function (does not apply to document import). This option is only enabled once one or more orders have been associated with the transaction.
This option allows you to remove a customer quote that was selected using the Invoicing (F5) function (does not apply to document import). This option is only enabled once one or more quotes have been associated with the transaction.
When selected, this marks the selected row or rows with a discountable code of "N" (net).
This feature combines duplicate items with the same measures and pricing together. Duplicate items with different measures or pricing are not combined. Tally items, serial number items (Tag ID), zero quantity items, special order items, material list, "hidden" items, add-on SKUs, and items eligible for ACE Rewards promotions are not eligible for merging. In addition, items being invoiced from a customer order or quote may be excluded depending upon the situation (if both items are linked, neither would be merged, but if only one is, the non-linked item would be merged with the item linked to another document). Additional restrictions may be added in the future as necessary.
When selected, all quantities in the data grid will be reversed (for items that allow returns).
Returning Items
When a customer is returning an item, specify a negative quantity for the item. Security preferences can prevent or limit a user's ability to process returns. Mixing returns with items being sold on the same transaction can also be prevented (optionally).*
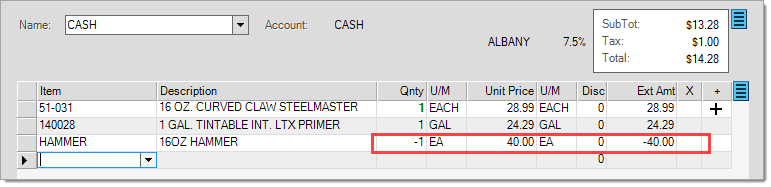
*Identifying specific item returns when the entire transaction is a credit may be easier when looking at a customer's account or searching documents.
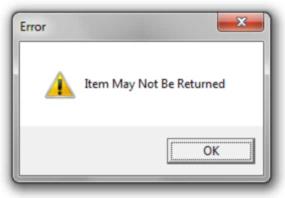
Some items don't allow returns, if this is the case, a warning message appears and the item's quantity will change back to a positive number.
If the optional enhanced item return feature is enabled, the Point of Sale user is presented with additional options on both stocked and non-stocked product returns.
Click here for more information on enhanced item returns...
Handling Stocked Item Returns (when the Stocked Item Return Info Parameter is Enabled)
When the Stocked Item Return Info parameter is enabled (Maintenance > Database > Parameters > Point of Sale > Settings tab), you can choose to restock or create a vendor return when a customer returns an item. In this case, returns generate a document for each returned item that is not a "restock item". The "Item Return" form appears when returning an item so you can specify the original sale invoice, the reason for the return, whether the return is a "restock item," and to optionally add a more detailed note regarding the reason the item is being returned. If you are creating a customer order rather than a sale or charge return, this information will be saved along with the item until the order is invoiced (completing the return).

Item Return for Stocked Item
Original Sale Invoice
This is a list of this account's invoices that contain this item. The selection listing includes the Document ID, the transaction date, the account, the job, the account name, and the invoice total.
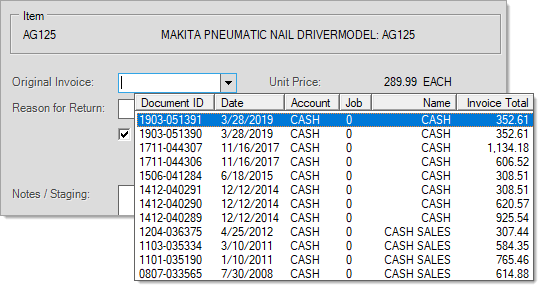
Unit Price
This is the unit price from the selected "Original Sale Invoice". The price of the return will be set to equal this price when you reference the original sale invoice.
Unit Cost
This is the unit cost from the selected "Original Sale Invoice". This cost will be used as the cost of the item for the return.
Return Reason
This is a drop down containing preset selections for return reasons. Your company determines the selections (these are defined in the Code Maintenance form's "Returns" tab -- available from the Inventory area's Database menu). If your company has not yet or chooses not to populate preset return reasons, reason selection is not required. Users can type their own reason in the drop down text area as well (space is limited to 10-characters, however).
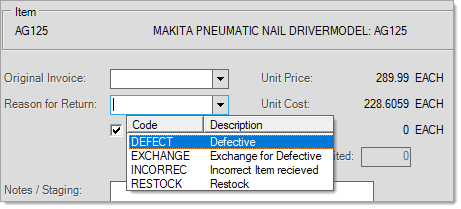
Restock
This check box determines whether to immediately return the item to inventory (increase the on-hand) or to instead generate a vendor return for the item. If you select (check) the Restock check box, the application does not create a vendor return document.
Note: The vendor return may be designated for restock by later processing.
Notes/Staging
If needed, use this field to add more details about the return. The application saves this information using the same process as the staging notes are saved; items may be printed on the return document.
Scanning Items to add them to a Sale
|
Most transactions that support item entry allow either manually entry or scanning. Some transactions allow you to scan items at any time; however, others require other entry before scanning is allowed. Scanning isn't just for items, scanning can be used along with documents, gift cards, and certain rewards programs as well.
Scanning Items into a Data Grid
Using a supported barcode scanner is one of the easiest way to add items to a data grid. Scanning a barcode to add the product to a data grid produces one of three possible results:
-
When the application finds a matching item in the database, the item is added to the data grid.
The default quantity will be one, except when the item is a credit-type SKU. In the case of a credit SKU, the default quantity is negative one (-1).
-
When the selected row or prior row (row above the selected row) matches the item scanned, the application increments the quantity rather than adding a new row.
For credit-type SKU items, the application would reduce the quantities by one (qty - 1) each time for each successive scan. Other item types with an original positive (+) quantity are increased by a quantity of one (qty + 1) for each successive scan. Other item types that have an original quantity that is negative are not adjusted. In these cases, a new row is added with a default quantity of one.
-
If the item is not found, no item is added to the grid.
The application may prompt the user to add the barcode manually in certain cases (see more below).
During a sale, the software recognizes the signal from the scanner and will place the scanned items in the grid regardless of your active position in the activity. For example, if the "name" field is active and an item is scanned, the item will appear in the grid, not the name field. In this case, users still are able to select a customer at any point before processing. This is also true of some other areas such as receiving; however, there are also other activities that do require form completion prior to scanning (or grid entry).
Items that are scanned will default to a quantity of one, and after scanning, the cursor is placed on the Quantity field automatically so you can type a quantity in when needed. If the quantity of one is correct, you can immediately scan the next item. There is no need to press TAB or the Enter (or Return) key. When there are multiple quantities of the same item, you can either repeatedly scan the item or enter the quantity by hand.
Use whatever method makes more sense based on the situation. For example, scanning small quantities of the same item is often easier than specifying the quantity manually; however, scanning larger quantities is usually not as easy as simply modifying the quantity in the grid one time.
Adding New Barcodes
For scanning to function as a method for item selection, you must associate one or more barcodes with the item. There are a number of ways this may be done. Barcodes can be individually assigned to items from the Item Maintenance form (done from the Common and Select tabs under the "Bar Codes" label). The software also offers a Barcode Entry utility program allowing you to associate barcodes with items all at one time by using a file that contains a delimited listing of item numbers (SKUs) and associated barcode numbers. EDI may also keep barcode information up to date for you. In some cases, support staff may also be able to assist to load barcode information from external data.
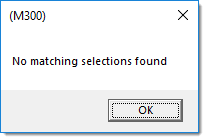
Once the item database has barcodes, existing codes will occasionally change and new items may be added without any barcode. When a new barcode is encountered, a form will pop-up notifying you that the scanned code was not found.
Barcode Not Found
When scanning, if an item that matches the barcode scanned is not found, if you have permission to access the Barcode Entry Utility (Point of Sale > Utilities > Barcode Entry), the application will prompt you to enter the SKU of the item to associate with it. This function is only provided when a scanner device has been assigned to the station being used (Note: It is possible for a scanner to function even if it is not assigned to the station). Security is controlled by the user's assigned "Permissions List" (Maintenance > Database > User IDs), which sets the user's navigation permissions to various areas in the application.

Barcode Not Found
If you are not sure of the item number, you can try using the alternate menu to locate the item or choose Cancel (Alt-C) and find the item's stock number using some other method. This alternate menu is available from most drop down type selections throughout the software.

Barcode Not Found: Context Menu
There are a wide variety of barcode formats in existence. The application uses and reads certain formats, but not all. Below are some details regarding formats we use and accept.

Sample 39 Extended
- Lengths of 12 use UPCA (if there is a valid check digit).* This format only supports numeric barcodes.

Sample UPC
- Lengths of 13 use EAN13 (European Article Numbering System).

Sample EAN13
- Lengths of 14 or more or codes that don't meet the requirements for UPCA or EAN13 use 128B (this format supports upper and lower case characters, punctuation, and numbers).

Sample 128B
Random Weight Barcode Scanning -
Random weight barcode scanning is a custom feature where the content of the barcode itself determines the output of the scan into Point of Sale forms, such as Sales. UPC-A (12 digits) barcodes are used for weighted items, and you must use the following formatting:

Sample UPC-A - Produce
-
The first digit must be a 2. If it isn’t, the barcode will be treated as a regular barcode, and the software will attempt a normal look up by barcode.
-
The next five digits (“98765”) correspond to the item SKU. This is why the item being set up must have a five-digit number for a name. If an item isn’t found from these five digits, the barcode will be treated as a normal barcode.
-
The seventh digit serves no purpose. That could change depending on future requirements, but as of now it doesn’t affect anything but still must be included.
-
The next four digits (“8799”) correspond to the extended price of the item, with a decimal point inserted in the middle. In this example, the extended price is $87.99.
-
The final digit is a check digit that all UPC-A barcodes have. The first 11 digits must conform to a formula whose result is the final digit – otherwise, the barcode is invalid. This digit has no impact on the feature itself.
Items to be used for this feature must first be setup in Item Maintenance. There are instructions for setting up items for Random Weight barcode scans below.
Setting up a Random Weight Barcode
To setup up items to use the random weight barcode:
1. From the Main Menu, choose Point of Sale > Database > Item. The Item Maintenance form displays.
2. In the Item field, enter an unique five-digit name, and choose the other required entries for this item.
3. On the Common > Measures tab, in the Item Type list, choose Variable Weight.
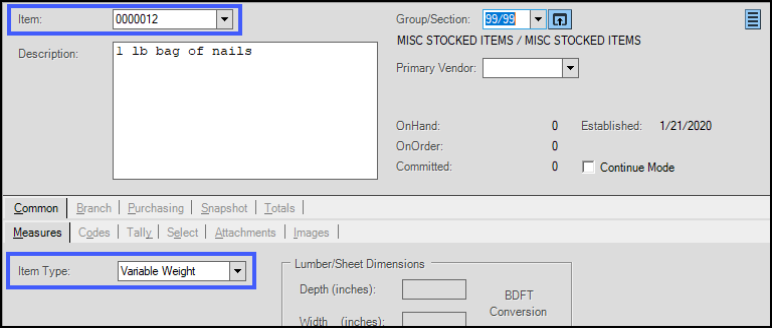
4. On the Branch > Pricing tab, in the Suggested List field, enter a unit price. No Price Levels are permitted for these items.
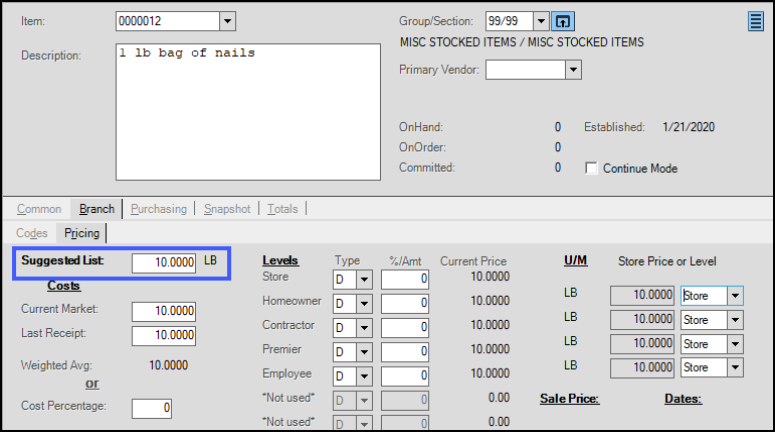
5. Choose Process (F12) to save this entry.
|
Supported scanners programmed according to our specifications should be able to scan any of these formats. We don't support all the possible formats available. It may be possible to program a scanner to accept other formats or to ignore certain digits of a barcode; however, your company is solely responsible for this effort if your barcodes don't match one of our supported formats.
*For 12-digit UPCA barcodes, the first digit indicates the number system (or type of code) and the last digit is a check digit that is calculated from the other eleven (11) digits. If a barcode is 12-digits, but the check digit isn't valid, the UPCA format won't be used. 128B is used in this case.
|
In some cases, you'll see quantities displayed in either red or green text. This color coding reflects the availability of the product. Items with a green quantity indicate that if sold, the quantity remaining would be below the quantity available (on-hand less any quantity reserved for customer orders, manufacturing, etc.). Items with a red quantity indicate that if sold, the quantity remaining would be below the quantity on-hand.
Navigating the Data Grid
The grid in sales has many columns; however, some columns are primarily used for displaying information, not entry, and others are accessed rarely. Primary fields are those grid columns that need to be accessed most often. Columns that are less commonly used are considered secondary and default to be skipped when using the TAB key to navigate the grid.
Primary fields include all columns except the item description, extended amount, exceptions (X), and additional information (+). The remaining primary fields are accessible using forward "TAB" navigation.
The Enter key is not usually used for moving between cells or fields. When you are in a grid cell, pressing the Enter key does one of two (2) things:
1.On text-only input fields, pressing Enter completes that row and moves the cursor to the next row (below the current one).
2.On drop down type fields, pressing Enter displays the drop down selections. If there is a partial entry, only matches for that entry are displayed.
Reviewing Unit of Measure Changes to Item Entries
Quantities and pricing reflect the unit of measure displayed. Changing the unit of measure (U/M) to a measure with some other value (other than 1:1) will usually modify the related quantity or price. In most cases, changing the quantity unit of measure will result in the unit price being updated to reflect the price in the same terms.* For example, if an item defaults to be sold and priced by the "PC" but you modify the quantity measure to "BOX," the price will be adjusted to reflect the "BOX" price.
Your company can set the default quantity and pricing measure for each item you maintain as well as the default pricing for each customer. If you find that you regularly need to modify pricing on an item, consider changing the Point of Sale defaults for the item (or the customer's pricing default if that is the issue).
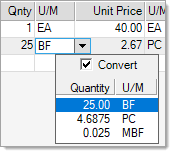
If security permission permits you to modify pricing measures and the "convert" box is checked  , the existing quantity or price will be converted to a value equal to the current value (displayed in the drop down). The "convert" option will not change existing extended amounts. If the "convert" option is not checked, the existing quantity or price will not change, and will be used to re-calculate extended amounts. This can result in human error if pricing is not set properly, so some companies prefer to not allow manual changes to pricing units of measure in Point of Sale.
*If the original and new measures are both equivalent (a 1:1 relationship), pricing won't be updated to match the new UM because it would not result in any change.
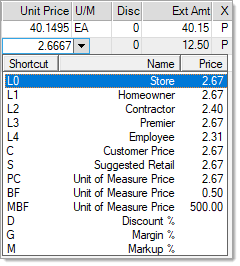
Managing Pricing Changes
There are a number of ways to affect pricing if you are allowed to do so (pricing changes can be limited by user security). Users can modify the price by typing another in, select a reprice option (F6), type a discount, or select an alternate price from the input drop-down. Typed keyboard shortcuts are also available. For example, type L2 in the unit price field to use the level 2 price, or D20 to do a 20% discount.
Price changes are flagged as exceptions and can be reported on by your company's management.
Understanding and Defining Item Prices
Determining the price for an item involves some pretty extensive work because there are so many factors in the software that can affect an item's price. Here is a list of the many things that are considered when determining the price used for an item at Point of Sale:
•Level Pricing
•Volume Discounts
•Unit of Measure (UM) Prices
•Sale Pricing
•Contract Pricing
•Price Groups
•Price Rounding Rules
•Unit of Measure Relationships (Conversions)
•Unit of Measure Defaults
•Account Settings
Some or even ALL of these may be factors when determining an item's price at Point of Sale. As a general rule, we try to use the lowest price that an account is eligible for (for example, an account that is eligible to receive sale pricing on an item might be better off receiving their regular price if that price is lower than the sale price); however, there are several exceptions.
The common exceptions to this rule are: contract pricing, price groups, and in some cases, Unit of Measure (UM) pricing. Contract pricing and Price Groups are always used regardless of whether they result in a lower price. In cases when both a contract price and price group are applicable to an item, the contract price is used instead of the price group. UM prices, when eligible, can indicate either a higher or lower price than the account’s default level pricing or item’s volume pricing.
Unit of Measure (UM) pricing and volume discounts are only considered IF the account’s level pricing is being used for the price calculation. This means that the account and item don't qualify for contract pricing or price group pricing, and if the item is on sale, that the sale price is not lower than the account’s default level price. Given this, it is technically possible for an account to receive a sale price higher than the designated UM Price or Volume Discount price if their normal level price for the product is higher than the sale price.
Keep in Mind: When you change accounts in a Point of Sale area when there are already items in the data grid, the account's settings can affect the unit of measure and item's price settings. Consider carefully the appropriate unit of measure settings when you reprice an item under these circumstances. The results could be confusing for the customer in the resulting transaction documentation.
The following chart describes the basic flow of how pricing is usually determined for items. The following logic is bypassed when "alternate" SKUs, such as barcodes, are used which are linked with specific units of measure :
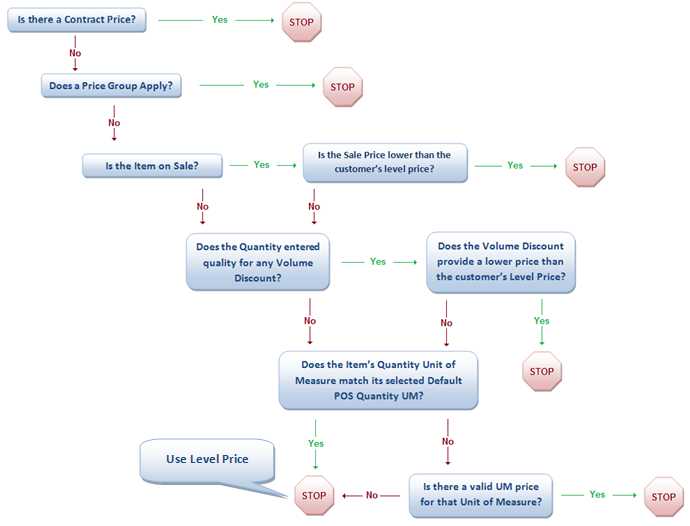
Click Here for more information about Pricing...
Level Pricing
Your company may define one or more price levels to be used with inventory items. The first level (0) is named "store retail" and is the only level with a preset name. You can add up to seven pricing levels; however, you can choose to use fewer if you prefer. You can either manually set each level by designating a price for the item based upon either some type of calculation or a specified price --or-- assign the item to a "matrix" that automatically sets the levels to match the code's definition.
You must assign accounts to a particular level; however, there are several types of pricing that can override the level price (including: Contract Pricing and Price Groups always override the level price, Sale prices override the level price if they result in a lower price, and Volume discounts and UM pricing can sometimes override the account's pricing level).
The application can calculate level prices based upon variable factors such as a percentage markup or margin that uses one of the item's costs (last receipt, market, or weighted average), which may change over time. In addition, levels may be a specific dollar figure or a discount calculated using either the item’s suggested list or store retail level prices.
Most of the same options are also possible when you apply a matrix; however, matrices set pricing using "multipliers" not percentages. In the case of cost-based pricing, the price changes whenever the associated cost increases or decreases. In addition to cost-based pricing, the application may use a discount percentage off the suggested list, discount off the store retail level (available for the other levels only), or a specific price to define standard level pricing.
Out of all of the various types of pricing, level prices are only used when none of the other types of pricing apply.
Volume Discounts (Quantity Break)
In addition to price levels, each item may be assigned up to four levels of volume discounts. Volume discounts are triggered by a specific quantity threshold (always in BASE terms) at Point of Sale. If the quantity meets or exceeds the quantity required, the volume price is given, but only as long as the volume price is also lower than the account’s level pricing. Pricing resulting from a volume discount (or sale price) will be colored blue in the grid.
Volume pricing can be determined using the same options as are provided for use with level pricing. In addition to cost based margin/markup calculations and list discounts, volume prices can be based upon a dollar amount off the price, a discount off the account's regular price, or a discount off the "store retail" price level.1
Unit of Measure Prices
An item's "pricing unit of measure" can be based on the item's Suggested List price, item's costs, and the prices displayed for each of the product’s price levels. The other four units of measure (Base, Selling, Receiving, and Miscellaneous) can sometimes be assigned to either a specific price or a price level. Whether UM Prices are based upon levels or set prices is determined by the item setting "Auto Update UM Pricing" (located on the Common and Codes tabs in Item Maintenance). The item's default UM used for Point of Sale Quantities (Branch, Codes tab in Item Maintenance) determines which of an item's units of measure are eligible to be considered for UM Pricing (if any).
If the Auto Update UM Pricing is set to N (No), specific prices are designated for each of these four other units of measure. If this setting is set to Y (Yes), the units of measure may instead be assigned to a price level other than store retail (store retail is not considered a UM price and indicates the use of standard level pricing). Measures assigned to store retail are provided only for reference. In either case, only those measures that don't match the item's default POS Quantity UM will be considered.
Note: If you enable the Always Use UM Pricing parameter setting in the Parameters > Point of Sale tab, it will override the Levels settings in this Pricing tab and the account's selected price level too.
There are three ways an item's UM Price settings are triggered:
1. The item is entered using an Alternate SKU linked to a Unit of Measure with a valid UM price that is not the same as the item's default UM for Point of Sale quantities.
2. The item is scanned or selected using a bar code linked to a Unit of Measure with a valid UM price that is not the same as the item's default UM for Point of Sale quantities.
3. The item's quantity Unit of Measure is modified at Point of Sale, does NOT match the item's POS Quantity UM, and there is a valid UM price for the new UM.
In these three cases, the UM price is used regardless of whether or not the account's level price would be lower.
UM Prices set to the Store Retail level (level 0) are not considered "valid" UM Prices (this would only apply when "Auto Update UM Pricing" is set to "Y"). If a price is manually changed prior to modifying the quantity's unit of measure, no changes to pricing will be made automatically due to UM pricing. In this case, we assume that if a user has overridden the price manually, and it was their intention to use that price.
Sale Pricing
Sale Pricing can be designated from the Price Updates transaction located on the Inventory menu. Pricing must be applied before it will take effect and an account or job must be enabled for Sale Pricing to receive it. Each item can have up to two concurrent (same time) sale prices. When two sales overlap, the application applies the lower sale price. Sale pricing is only given if lower than the account's level pricing (the only exception are "contract" and "price group" pricing). UM prices are only considered if the sale price is higher than the account's default level price. Sale prices (and volume discount prices) display in blue text in Point of Sale.
Contract Pricing
Contract pricing provides a way of designating special pricing with date and optional quantity expiration. This means that you can decide how long the special pricing is provided to the account as well as a maximum quantity that may be purchased at the contract price (optional).
Contract Pricing overrides all other pricing even if it's higher than another available price for an item.
Prices resulting from a contract display in green text in Point of Sale. Contract Pricing may be designated from the Contracts selection on the Point of Sale > Database menu. You cannot designate different contract pricing for different units of measure for the same item.
Price Groups
Price Groups are codes each linked to a pricing structure your company defines for one or more inventory groups or group-sections. Once setup, the code may be assigned to one or more accounts. A code's structure is determined by assigning (1) level pricing and/or (2) margin/markup/discount pricing to groups or sections within a group. Different types of pricing may be used with different groups and/or sections for the same code. For example, it’s possible to create one price group where group 02 is assigned to "Level 3" and group 04 is a 2% discount off the suggested list price.
Similar to contract pricing, price group pricing is used regardless of whether it is the lowest price the account might be eligible for (if a contract price also exists, the contract will be used instead of the price group pricing). Price groups may be added from the Price Groups maintenance form (on the Point of Sale > Database menu).
Price Rounding Rules
Price rounding doesn't affect how a price is selected but it is sometimes applied after the process of determining the price. Rounding is not applied when a price is explicitly set (rounding is not used when the pricing originates from a source requiring that a specific price be designated).
For example, both Sale Prices (from the Price Updates transaction) and Contract Pricing involve entering one specific price for an item. In these cases, the price is not rounded. It is assumed that the sale or contract price would be entered using whatever rounding you prefer in these cases. UM Prices are not rounded except in cases where the price assigned to a specific price level rather than a specific dollar amount. Price rounding is applied in most other cases. This can change the price slightly from what is designated in Item Maintenance.
How units of measure affect pricing...
You can assign an account a specific inventory unit of measure for their pricing (optionally). In addition, you can designate the measure (UM) to be used for Point of Sale pricing and quantities by item. If an account is assigned to a specific price UM, most item pricing will be presented in the unit of measure designated for the account; otherwise, the item's settings are used.
Units of measure maintain numeric relationships to one another as defined for the item. The ways these conversions or numeric relationships are designated can sometimes have an effect on pricing.
In many cases, we must calculate a price for a specific unit of measure (UM) using a price designated in a different measure. All application pricing and quantities extend out to four decimal places which is fine for most common items; however, products with significantly larger or smaller differences between values can lose a certain degree of accuracy when converted. Here's an example...
A lumber item is priced at 899.5781 per MBF (thousand-board foot). "MBF" is a measure based on volume, not length or quantity. For our example, we'll assume that the number of board feet (BF) in a single PC of our lumber item is 5.3333 (maybe your typical "2 x 4"). To calculate a PC price for our lumber item, we'd do the following:
($899.5781 ÷ 1,000) × 5.3333 = $4.79771988073 PC
OK, this gives a price per PC, but remember, we only have four decimal places, so we'll round our result to four decimals or a price of $4.7977 per PC.
Now, look what happens, however, if we try to calculate the MBF price back from this "rounded" figure...
($4.7977 ÷ 5.3333) × 1,000 = $899.5743723398271 MBF
Notice that the rounded MBF price is close to the original, but not exactly the same.
$899.5781 - $899.5744 = $.0037
Due to the limited number of decimal places, it's generally more accurate to convert pricing from a larger value to a smaller one than the reverse. This is because more decimal places are required to accurately take a smaller number and convert it back to a larger one. For reasons of rounding, we suggest that an item's BASE measure be the smallest commonly sold unit and that pricing be the highest measure. The BASE unit of measure is also used for maintaining quantities and usage for the item which is also important to consider.
Item Default Units of Measure
Your company can decide on an item-by-item basis the default unit of measure to be used for Point of Sale quantities as well as pricing. These settings are located on the Branch and Codes tab of the Item Maintenance form. These are branch specific settings. Unless changed, an item’s default Unit of Measure for Point of Sale will be its BASE unit of measure (the same measure that on-hand and other quantities are reflected in). A product’s default measure for pricing is its PRICING unit of measure. Account settings can determine a preferred Unit of Measure for pricing at Point of Sale, but this does not apply to the measures used for quantities.
When someone changes an item’s default measure for Pricing, it can affect how prices are displayed; however, it won’t change the resulting extended price for the item. Changing the item’s default quantity measure, however, can actually affect how the prices for the item are applied. UM Pricing uses the item’s default quantity unit of measure for Point of Sale for deciding whether or not to apply a UM Price. UM Prices that don't match the item’s default quantity unit of measure for Point of Sale and are not linked to the store retail level will be used instead of the item’s level or volume pricing.
Account Settings that affect Pricing
There are four account settings that affect pricing: Level, Price Group, Sale Pricing (Flag), and the account’s default POS UM (default Unit of Measure used for POS prices). The POS UM only affects the display of pricing, not how the price is determined. Selection of a price Level is required (defaults to store retail). You can disable Sale Pricing and Price Group pricing is optional.
|
The "Disc" column is used for line item discounts. These discounts will only affect pricing on "discountable" items. Use the Inventory and Codes tabs in the folders (F4) to view the current item's discount status. Pricing for "net" items will not change when a discount is entered; however, reprice functions (F6) don't consider an items discount status.
The "X" or exception column displays pricing exceptions when encountered. There are six exception codes used: L, M, N, P, X, and Z. A maximum of two codes may be displayed for any item. When more than two exceptions occur, the letter "X" appears in the Exceptions column. Please see the following table for an explanation of these codes:
|
|
Line Discount
Users may be allowed to discount specific items by typing a discount percentage in the discount column of the data grid. When this has been done, the discount percentage is shown and the exception code "L" is set. Net items also use the discount column and will display an "N" in place of any discount (net items don't allow line discounts).
|
|
|
Margin Out of Limits
Every item may optionally be assigned an expected % (margin) and minimum % (margin). These are located on the Branch (Alt-B) and Pricing (Alt-P) tabs in the Item Maintenance (database) form. When an item's margin falls below the minimum %, it is flagged as a "Margin Out of Limits."
|
|
|
Negative Margin
An item has a negative margin when its cost is higher than its selling price. This can happen for a number of reasons. One example is if the item's price is lowered too much by a discount or repriced too low. Receiving errors can cause an item's cost to be inflated.
|
|
|
Price Change
This exception is set as a result of the sales clerk's (user's) actions. If a price is either modified manually or by using one of the Reprice (F6) functions, this flag will be set. This allows company or store management to review manual pricing changes.
|
|
|
More than Two (2) Exceptions Encountered.
The column has room to display up to two (2) exception codes. In cases where three (3) or more codes apply, an "X" is displayed. To find the exact exceptions, either run the Exceptions report or view the document and choose Format and File Copy from the alternate menu.
|
|
|
Zero Cost
Certain items can have a zero cost for legitimate reasons in some cases (this is common with non-stocked items and some special use items); however, most other items should be associated with a cost. Comment type items would not normally have a cost, so they are excluded from exception flagging.
|
Exceptions are reported in the grid immediately, so Point of Sale users should be trained to notice exceptions and to notify the appropriate party or make changes in the transaction to prevent the exception (if unexpected). In addition, company or store management should make a practice of reviewing exceptions to catch issues with pricing and costs on inventory. The Exceptions Report can be useful for reviewing transactions for possible issues that need to be addressed.
Additional Information (+)
An item may have additional information associated with it. This can include attachments, comments, and staging locations. A large plus (+) symbol appears in the column when any of these conditions are met. This "+" also appears on next to the word "Entry" on the Entry folder tab (F4) when a row with item attachments is selected in the grid. This allows entry of comments and/or staging information as well as access to an item's attachments. For attachments that allow printing at Point of Sale, you can select and print attachments from the Process (F12) form as well.