Rewards Plus
Rewards Plus is a points-based loyalty program operated by ECI Software Solutions, Inc.. Businesses that participate in the Rewards Plus program can associate a customer's rewards number with a transaction and an account directly at Point of Sale using a Rewards Membership form. Points are awarded on a per-transaction basis, not on cumulative sales. Please contact your aftermarket sales representative to enable this feature.
Setting up the Rewards Plus Parameter
Setting Up the Required Journal Types
Setting Up the Rewards Defaults
Excluding Items from the Rewards Plus Program
Enrolling Accounts in the Rewards Plus Program
Enrolling in the Rewards Plus Program from Account Maintenance
Enrolling in the Rewards Plus Program from Point of Sale
Adding Rewards Plus at Point of Sale
Redeeming Rewards Plus Points
Handling Returns with Rewards Plus
Maintaining your Rewards Plus Program
Setting up the Rewards Plus Parameter
Reach out to your ECI Support team to enable the Rewards Plus feature. You must set this up first to see the other options.
To enable the Rewards Plus parameter:
1. From the Main Menu, choose Maintenance > Database > Parameters to display the Parameter Settings form.
2. Choose the Software tab.
3. In the Installed Software list, select the Rewards Plus check box.
Note: Customers with administrative privileges may see these options but not change them.
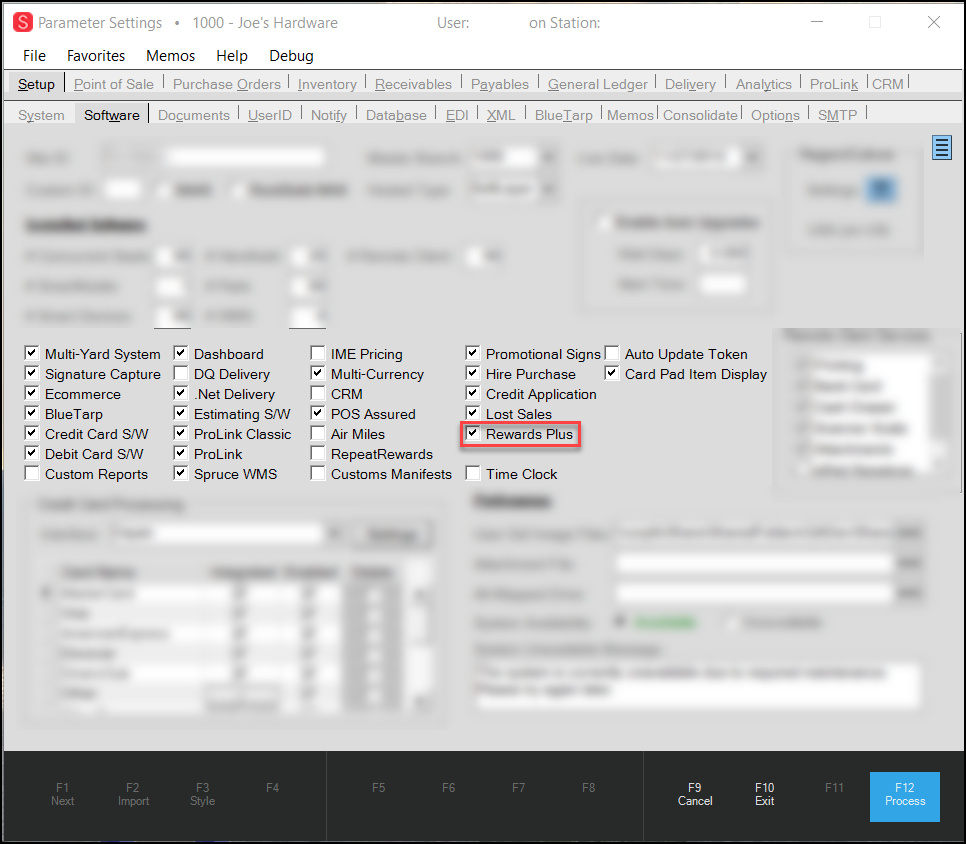
4. Choose Process (F12) to save this setting.
5. Choose File > Log Out to log out of the application. Log back in to continue.
Changes to parameters don't activate immediately; it requires a restart.
Setting up the Required Journal Types
After the Rewards Plus parameter is set, to ensure you are keeping track of the rewards values, you need to set up journal types as we show you below. We recommend a set at Point of Sale that captures the use of the rewards plus amounts for sales and returns and an Accounts Receivable set for the debits and credits associated with the reward status.
1. From the Main Menu, choose General Ledger > Database > System Journals. The System Journal Setup form displays.
2. From the Journal Type list, choose Point of Sale.
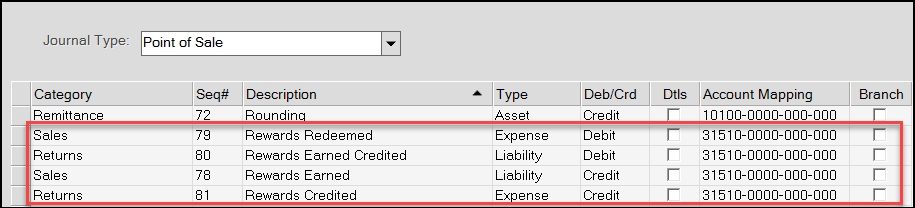
Note: To group the rewards journals together, click the Description heading.
3. Select the Rewards categories shown in the figure above and make sure the account mapping is right.
Select the Branch check box if the rewards should be tracked by branch.
4. If you make changes to these journal settings, choose Process (F12) to save them. If not, continue to the next step.
5. From the Journal Type list, choose the Accounts Receivables journal entries.

6. Select the items shown in the figure above to verify they are correct.
Select the Branch check box if you want to track the rewards amounts by branch.
7. If you make changes to these journal settings, choose Process (F12) to save them.
Setting the Rewards Plus Defaults
After the Rewards Plus parameter is set
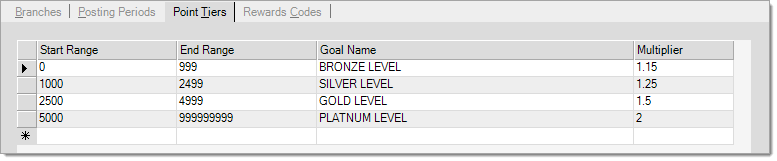
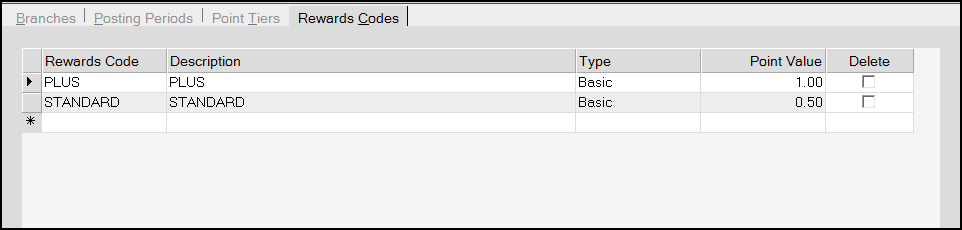
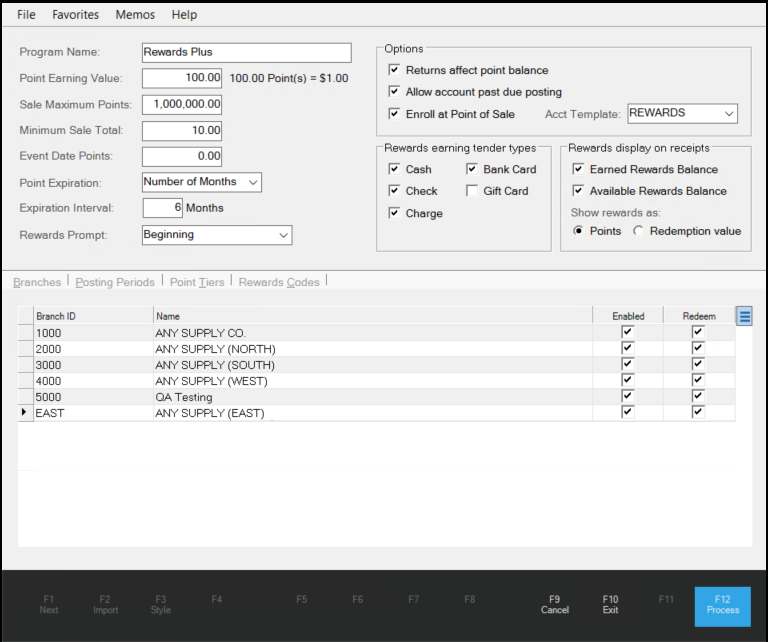
Here you define the defaults for your rewards program, including the Reward Program name, point earning values, branches affected, etc.
To set up your Rewards Plus defaults:
1. From the Main Menu, choose Receivables > Database > Rewards Plus Setup. The Rewards Plus Setup form displays.
2. Choose the settings for your business's Rewards Plus program. To learn more about Rewards Plus Setup fields and default options, ![]() click here.
click here.


3. When you have completed these settings, choose Process (F12) to save them.
Excluding Items from the Rewards Plus Program
As a default, all items are eligible for the Rewards Plus program, however, there may be items in your inventory that you want to exclude from it. You can exclude items individually (using Method 1 described below), or you can collect a group of items and exclude them all using Method 2.
Excluding Individual Items from the Rewards Plus Program (Method 1)
To exclude individual item from the Rewards Plus program:
1. From the Main Menu, choose Inventory > Database > Item and from the Item list, choose the item you want to exclude from the Rewards Plus program.
2. Choose the Common > Codes tab and select the Rewards Excluded check box.
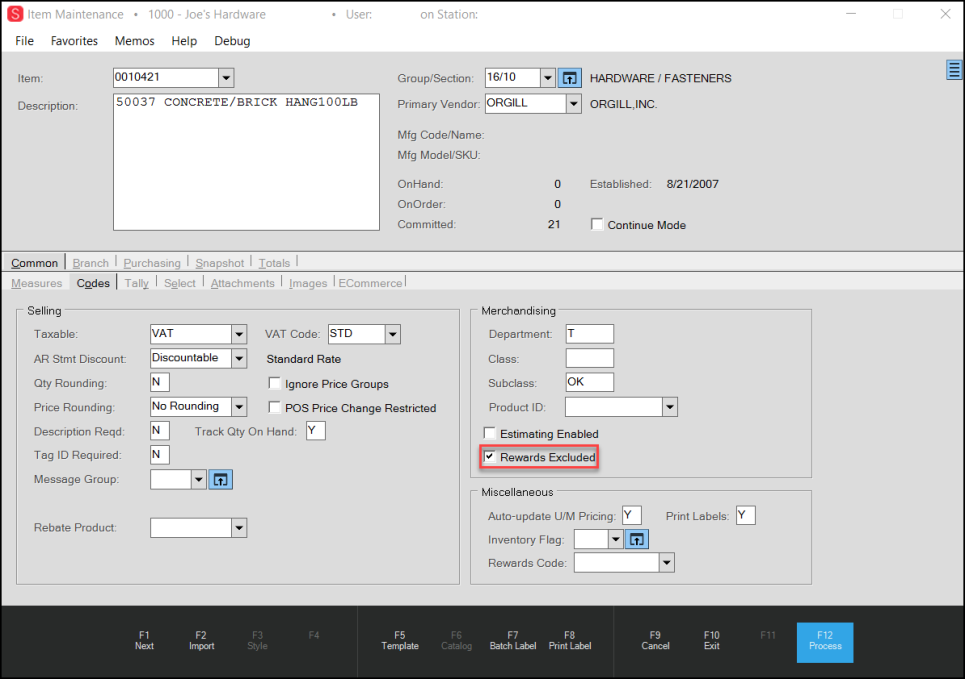
3. When you have completed your change, choose Process (F12) to save it.
Excluding Several Items from the Rewards Plus Program (Method 2)
You can use the Global Modify Utility to exclude a group of selected items from the Rewards Plus Program. Rewards will be awarded to all items unless you exclude the item(s) individually or using the Item Global Modify utility.
To exclude multiple items from the Rewards Plus Program:
1. From the Main Menu, choose Inventory > Utilities > Maintenance > Item Global Modify.
2. From the Field Name list, choose the Cmn - Rewards Exclude entry.
3. In the Old Value field, enter N.
4. In the New Value field, enter Y.
5. Use the Group/Section, Keyword, and Primary Vendor lists to find the items you want to exclude.
6. Choose View (F8) to add the items you collected to the data grid.
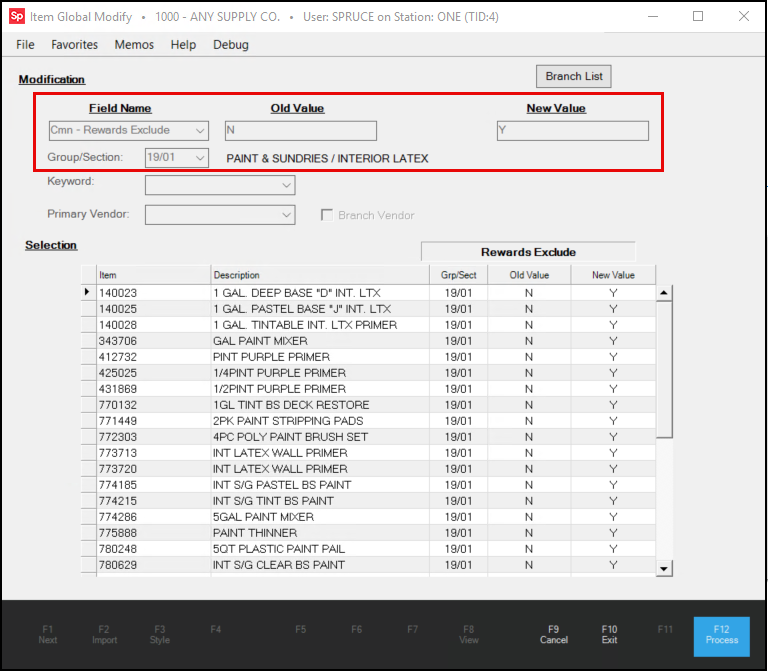
7. Review the items in the list and remove the items you do not want to exclude from the Rewards Plus program.
8. When you have the final list defined, choose Process (F12) to exclude the items in the list from the Rewards Plus program.
Enrolling Accounts in the Rewards Plus Program
After the setup listed above is complete, you are ready to enroll accounts into the Rewards Plus program so you can start offering rewards to your customers.
There are two ways you can enroll an account in the Rewards Plus program.
-
If you set up the Enroll at Point of Sale option (described here), the customer can enroll the account during the Point of Sale process.
-
If you want to reach out to the customer directly, you can update their account record directly using the instructions below.
Enrolling in the Rewards Plus Program from Account Maintenance
Before you get started, make sure that you have completed the setup required to successfully add Rewards Plus to your accounts. After you have signed the account up, you can return to this form to see the rewards the account has earned (points that the customer is due based on their purchases), posted (points that have been credited to the account), and redeemed (points the customer has already used).
To enroll an account in the Rewards Plus program from Account Maintenance:
1. From the Main Menu, choose Point of Sale > Database > Account to display the Account Maintenance form.
Note: You can also access this form from Receivables > Database > Account.
2. From the Account list, choose the account you want to add the Rewards Plus program to.
3. Choose the Loyalty tab.
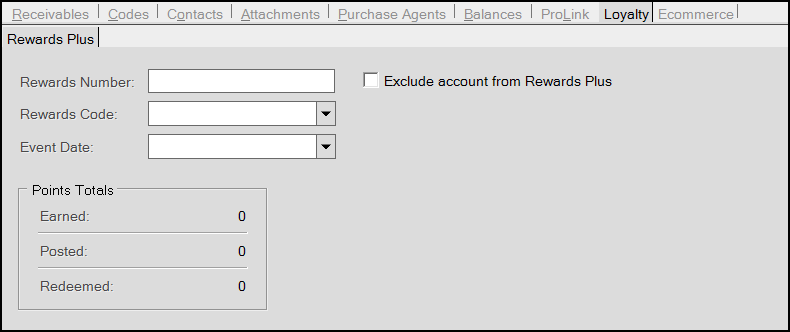
4. Complete the entries in this tab to enroll the account in the Rewards Plus program.
Note: If you want to exclude the account from the program, select the Exclude account from Rewards Plus check box.
-
Rewards Number
Enter a unique Rewards number for the account in this field. -
Rewards Code
To apply a specific reward code to this account (which will override the default setting in the Point Value earned field) choose the code from the list. -
Event Date
Select a date that the application will use to add additional rewards points to the account. Typically, this is either a birthday or the anniversary of the creation of the Rewards Plus record.
Note: After the account is enrolled in the program, you will be able to see the accumulated points earned, posted, and redeemed in this box.
5. When you have completed these settings, choose Process (F12) to save them to the account record.
Enrolling an Account in the Rewards Plus Program from Point of Sale
Cashiers can enroll accounts into the Rewards Plus program during the Point of Sale process if you selected the Enroll at Point of Sale option during the set up process (in the Rewards Plus Setup form).
If you set up the Rewards Prompt to Beginning, End, or Beginning and End, the application will prompt the Cashier to ask the customer if they want to join during the Point of Sale process, if they do not already have a rewards number. If you set the Rewards Prompt to Never, the Cashier can choose <Ctrl R> to pop up the Rewards sign up sheet discussed below. For purposes of these instructions, we only discuss the enrollment steps of this process.
Note: Many businesses create a set of enrollment cards with their custom logos and information on them. Each of these cards would have an unique ID number already printed on them, sometimes, with a barcode for scanning. Each account must have a unique Rewards number to ensure the successful points tracking.
To enroll an account into the Rewards Plus program at Point of Sale:
1. From the Main Menu, choose Point of Sale > Sales to display the Sale Entry form.
At some point, due to the setup options or because the Cashier has selected <Ctrl R>, the Rewards Plus box displays.
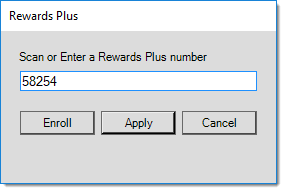
2. Scan or enter the Rewards Plus number in the entry field and click Enroll. The Rewards Membership box displays with the number scanned or entered in the Card Number field.
3. Use this box to look up the customer's account information or click New if the customer has a Cash account.

Note: The New button is only visible if auto Account Numbering is setup on the Receivables tab in Parameter Settings. You can enter the non-required information manually if it does not prefill.
-
If you select the account from the list, the application fills in the required fields based on the entries in the account record.
-
If you select the New button, the application updates the Account field with a new account ID.
4. Complete the entries for the fields in this box. Fields with an asterisk * are required.
For a description of all fields, ![]() click here
click here
5. When you have completed these entries choose Save. The application saves the Rewards Plus details to the account record.
Applying Rewards Plus Points to an Account at Point of Sale
After the Rewards Plus information is saved to the account record, the Cashier can retrieve it during the Sales Entry process by selecting <Ctrl R>.
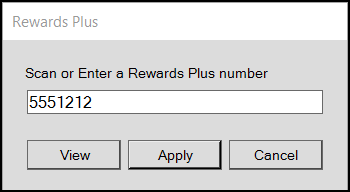
The dialog window may automatically appear at the start of a transaction, end of transaction or both depending on default settings set in Rewards Plus Setup. Additionally, if you've associated a customer's Reward ID with their account, you can simply scan their Rewards card to select their account automatically.
The Enroll button is only enabled if a card number sequence is supplied and is not linked to an existing account.
Click the Apply button to accept the scanned or entered rewards number, and to apply it to the current sale.
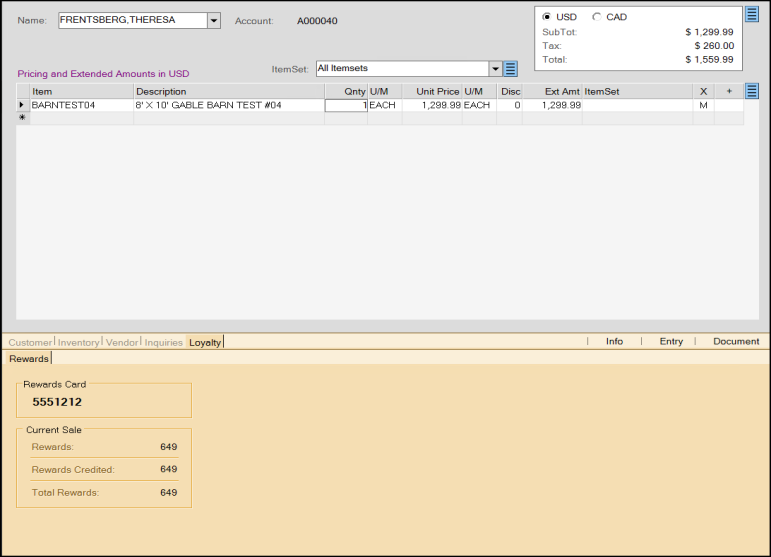
Rewards points are calculated on rewards eligible items. Adjusting the item quantity will increase or decrease rewards point values accordingly.
Redeeming Rewards Plus Points
To redeem rewards at Point of Sale, the "Redeem" option must be turned on at the branch level in Rewards Plus Setup. Please note that customers can only redeem Posted rewards points.

To redeem Rewards Plus points at Point of Sale:
1. In the Sales Entry form, select a Rewards Plus account and enter the sales items in the data grid.
2. Choose Process (F12) to process the transaction (see Using Rewards Plus). The Process Invoice Document box displays. The Rewards field displays the available rewards for this transaction ($12.98).
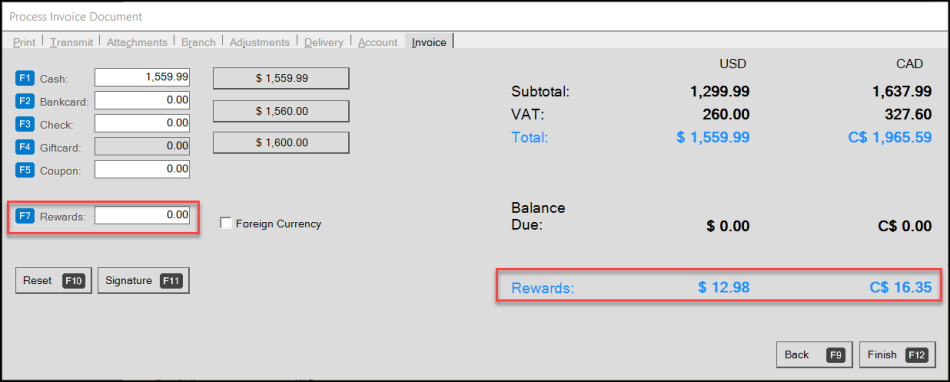
3. In the Rewards field, enter the amount you want to apply to the current transaction ($12.98), and press Enter.
The Balance Due and the Quick Entry amounts update to reflect the discount.
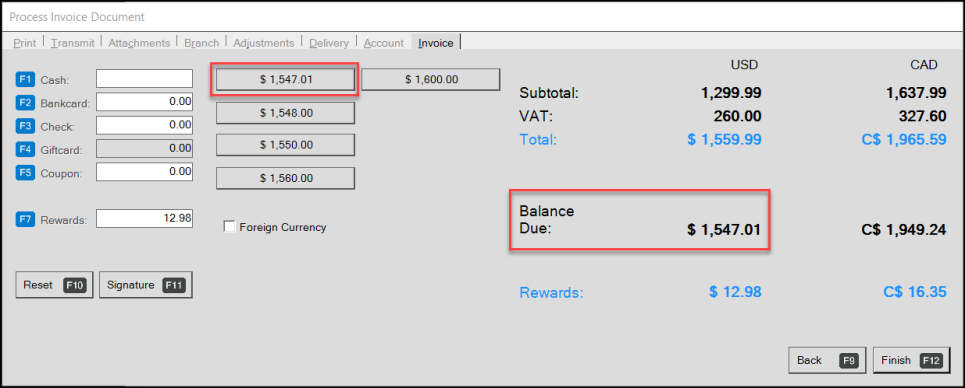
4. Enter the remaining amount in the tender fields (Cash, Bankcard, Check, Coupon), and choose Finish (F12). The application updates the Rewards balance when the transaction is complete. The correct Rewards Balance displays on the receipt.
Handling Returns with Rewards Plus
Returns work differently based on whether your company is using the Enhanced Return option or not.
Rewards returns are only credited if a Reward ID is entered for the return.
If "Enhanced Return" is off, there are things we don't know if an original sale isn't being referenced or there's no receipt:
•The customer's Rewards Offer code could have changed.
•The original sale may not have involved rewards.
•Items may no longer be eligible for the Rewards Program.
For these reasons, we strongly suggest enabling "Enhanced Returns" for returns.
With "enhanced" returns, we can tell the original rewards allocated for each item purchased originally. In this case, we know the original Rewards Code, reward earned, item eligibility at time of sale, etc.
If you mix a sale with a return (positive quantities and negative) the net difference is what will be issued. You could also wind up with negative rewards on a "positive" sale as well as the reverse due to item eligibility.
Maintaining your Rewards Plus Program
Using the Rewards Plus Maintenance utility, you can manually post earned points, award bonus points, and expire posted points to specific accounts or to all accounts that participate in your program.
To use the Rewards Plus Maintenance utility:
1. From the Main Menu choose Receivables > Utilities > Rewards Plus Maintenance. The Rewards Plus Maintenance form displays.
2. Continue based on the manual points update you want to make:
-
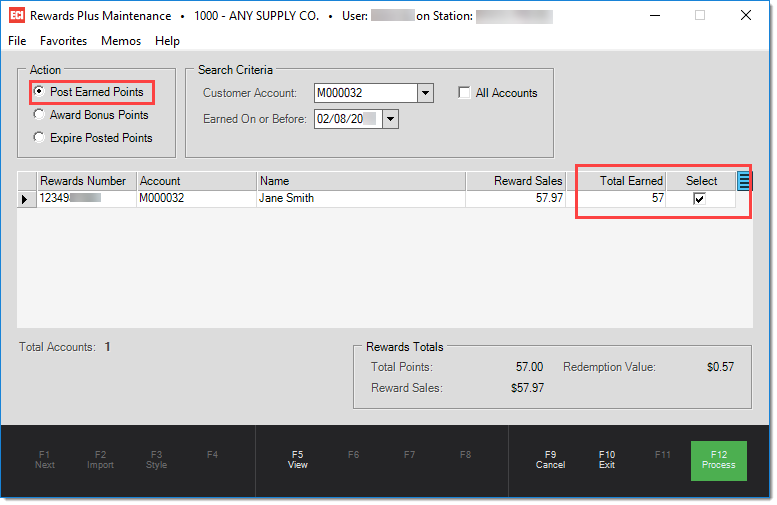
To post earned points to an account
a. Choose the Post Earned Points action button.
b. From the Customer Account list, choose the account you want to post their earned points to or choose the All Accounts check box to apply earned points to all enrolled accounts.
-
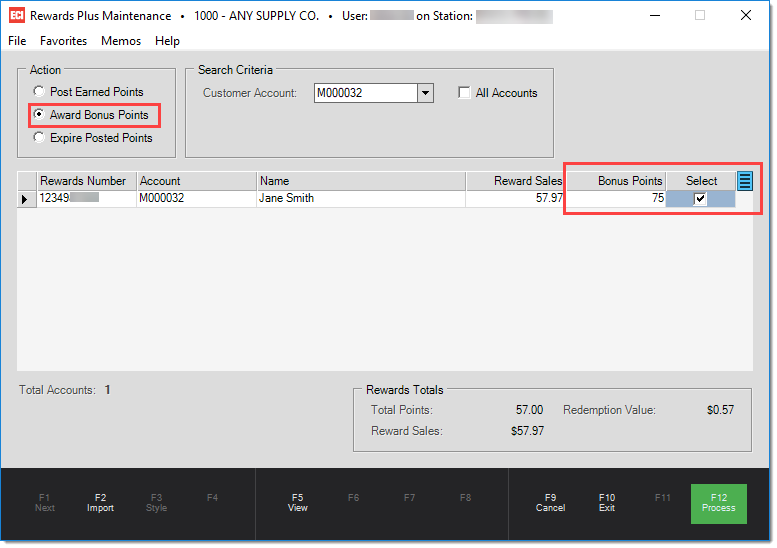
To post award bonus points to an account
a. Choose the Award Bonus Points action button.
b. From the Customer Account list, choose the account you want to post bonus points to or choose the All Accounts check box to apply bonus points to all enrolled accounts.
Remember to add the number of bonus points in the Bonus Points field provided after you collect the accounts you chose.
-
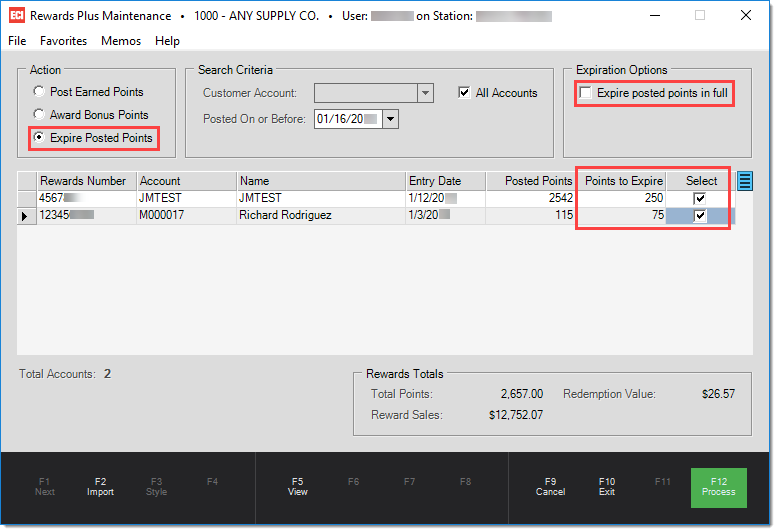
To expire points awarded to one or more accounts:
a. Choose the Expire PostedPoints action button.
b. From the Customer Account list, choose the account you want to expire points for or choose the All Accounts check box to expire points for all enrolled accounts.
Note: You can also select the Expire posted points in full check box to remove all posted points or you can use the Points to Expire column to specify the number of points you want to expire from a particular entry date.
3. After you select the Action and the Search Criteria options, choose View (F5) function key to collect the accounts that match your search criteria.
4. Make any changes or updates to the collected records in the list you need to, to award or expire the points you have specified.
5. Choose the Select check box at the end of each account row you want to include in the process.
6. Choose Process (F12) to save the point changes to the database.