POS Assured
POS Assured™ is an offline option for
For multi-branch (location) companies, you need a POS Assured appliance at each location. Each station in the branch can access the POS Assured device as long as valid credentials and the POS Assured station is enabled.
You need to install the Remote Client application/service and run it on a user’s local PC. It is the same software used for remote or VPN-less printing. The Remote Client can be used to open the Offline POS solution in the event of an outage. Please contact your ECI Aftermarket Sales Representative to discuss enabling this feature.
Launching POS Assured
You can launch POS Assured from the Remote Client Utility’s context menu. If Internet connectivity is lost, the icon will be red.
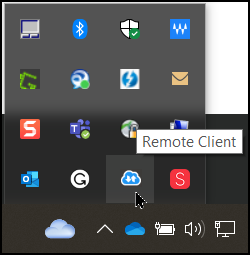
1. Open the System Tray at the bottom of your computer screen, click the up arrow to open the hidden icons.
2. Double-click the Remote Client  icon. The Remote Client Utility box displays.
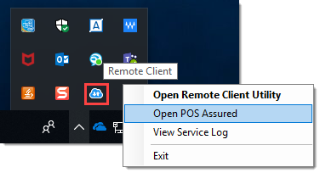
3. Right-click the icon to display the context menu and select Open POS Assured.
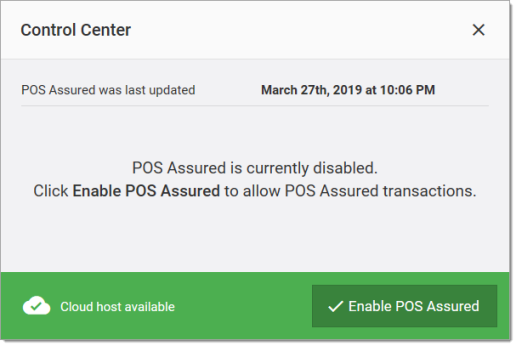
Note: When Offline POS is disabled, users cannot login and a message displays. The “cloud” icon indicates the status of your connection to the cloud host.
Enabling Offline POS Assured Access
Offline POS Assured must be enabled by an administrator before users can log in and process offline transactions.
Set up a station specific to the POS Assurance Appliance that has the Remote Client Enabled and set to POS Assured Appliance. Include an Alias ID.
This is done by accessing the dashboard from the “cloud” icon and clicking the “Enable POS Assured” button.
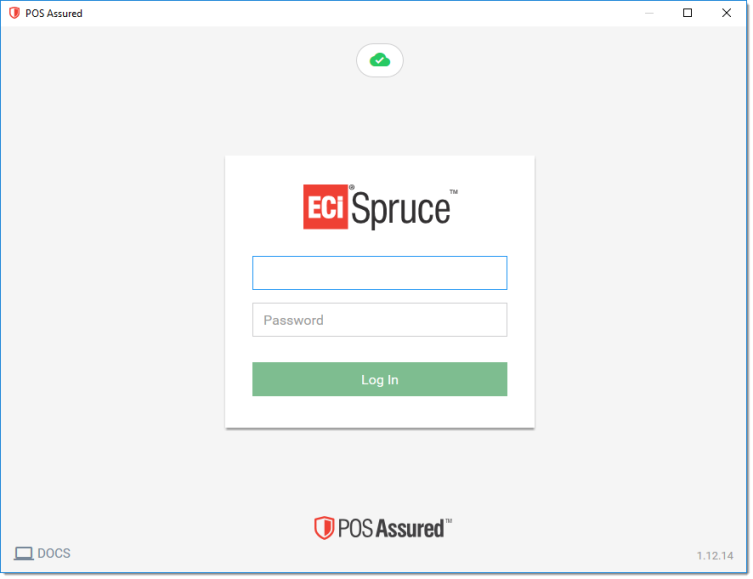
Logging into POS Assured
After you open POS Assured, you can use your normal system login and password (as if you were on your station) to access POS Assured.
The station is retained after initial save if the user logs off.
The Cloud icon indicates whether the cloud host is accessible or not. It is also used for accessing the Offline POS Dashboard.
A green cloud icon  indicates that there is connection, while a red cloud
  indicates a loss of connection.
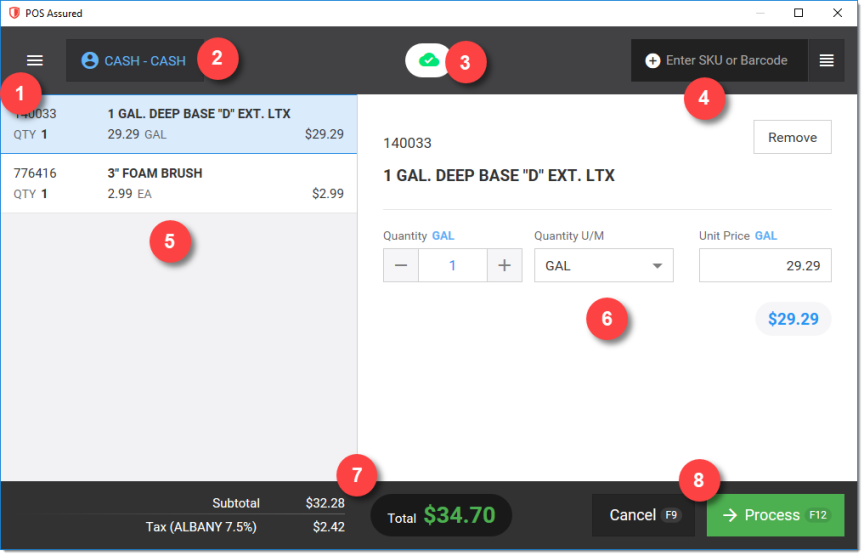
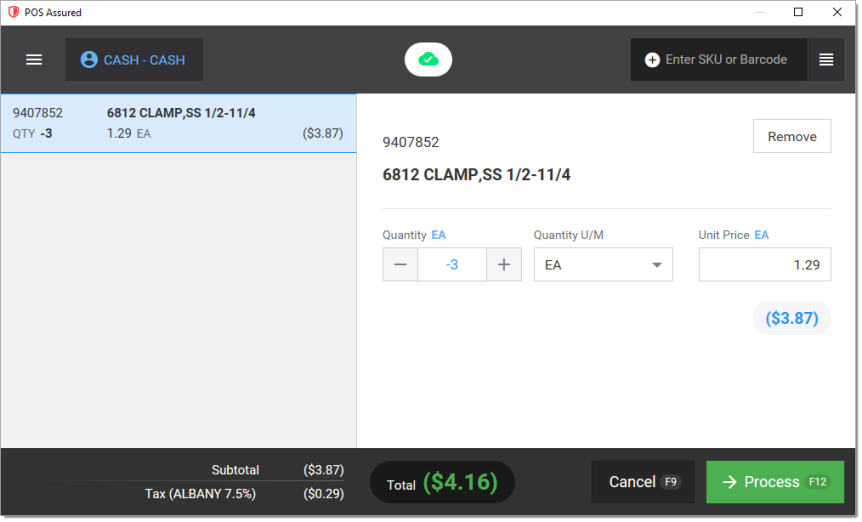
Learning the POS Assured Interface
|
|
Menu – Clicking on the menu icon will show the logged in user, station name, branch location, allow the use to re-print an invoice, and logout option. |
|
|
Customer Account field – Select a “cash” or “charge” account. |
|
|
Control Center – To access the POS Assured Control Center, click on the Cloud icon. |
|
|
Item Selection – Enter the product SKU or UPC, or alternately scan the item’s barcode. |
|
|
Item List – Items entered or scanned will show in this area. |
|
|
Item Details – The quantity sold, units of measure, and unit price can be modified for each item. |
|
|
Totals Panel – Display-only panel showing the transaction’s current sub-total, sales tax, and total. |
|
|
Cancel (F9) & Process (F12) – Cancel or Process the current transaction by clicking the button or pressing F9 or F12 on the keyboard. |
Using POS Assured
You can use POS Assured for Point of Sale Invoice transactions only, including Cash, Return, and House Charge transactions. When your internet connection is restored, the system administrator must sync all the transactions back to the Cloud host. Please note that Tally items, Special Order items, Manufactured items and Material Lists cannot be used in POS Assured. The POS Assured device does support the following item types:
-
Standard (stocked) lumber, sheet goods, clothing,
-
Labor, Freight, Manufactured items (if stocked),
-
Deposits, and
-
Comment Types. Stocked miscellaneous description items, including comment types, are supported and prompt for an item description.
Items that are non-stocked, and that don't maintain on-hand are considered “special order” and are not permitted.
Companies should define at least two (2) miscellaneous items: one taxable, one non-taxable. These would be used for any items that aren’t supported or for coupons, etc.
A “miscellaneous” item is the only item permitted to have negative quantities mixed with positive sale quantities in a transaction. The reason for this is to provide a way of supporting coupons rather than actual items being returned. Returns should be processed as a separate transaction.
Items which aren’t available for selection are still listed; however, they are disabled in the selection list. Disabled items are indicated by gray color and cannot be selected. An exact match on an unsupported item type results in an “unsupported” message.
Pricing is always converted to match the quantity of measure. When the Quantity U/M is changed, the price is automatically updated to match the quantity UM. The item’s store retail (level zero) price is used unless the item’s “Auto Update UM Pricing” flag is set to N (false). In that case, the item’s specific Unit of Measure (UM) prices are used. Since we only support one level price during offline transactions, we adjust the pricing during import for charge (receivables) customers to match their pricing and add automatic adjustments to make up any difference on cash-type transactions.
In addition to the account and job, we include the tax location and tax-exempt ID being used for the transaction. There is no “delivery” specification, so the tax location defaults to the branch location’s default tax code except when the customer account or job is assigned to either an “always” exempt or “empire zone” tax code. If a different tax location or exempt ID should be necessary, the cashier can set it either initially or at any time during the transaction (before processing).
A tax-exempt ID will be listed if assigned. This sets the tax rate to zero regardless of the tax location being used.
The word “EXEMPT” is listed next to the tax location whenever the customer is treated as exempt. In addition, non-taxable items display the “NT” flag after entry.
The following taxable item flags are supported:
•Taxable
•Non-taxable (NT)
•Always Taxable
Note:
•Regional Tax settings are now supported.
•Partially taxable food and clothing type items are supported.
•The California lumber tax surcharge is also supported.
Processing a Payment-Based Transaction
To process a transaction using POS Assured:
1. Enter the customer information as follows:
-
If the transaction is Cash, leave this option selected. The Customer Account field defaults to Cash.
-
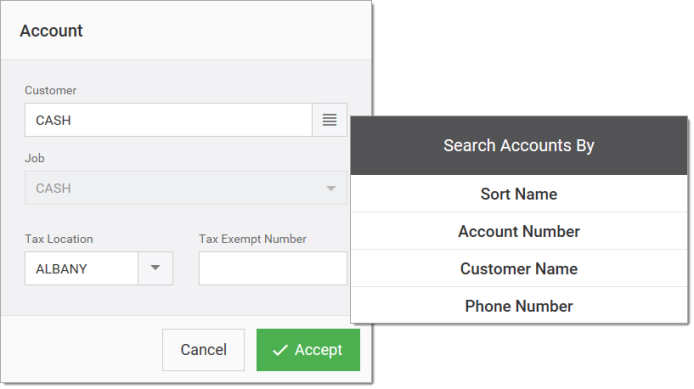
If the customer has an account, in the Customer Account field, enter the information you know and click the Menu icon
 to select an alternate search method. When you find the account , click Accept.
Note: You can change the account at any point in the transaction prior to processing.
2. Add each item to the transaction by entering a SKU number or UPC in the Enter SKU or Barcode field, or scan each item's barcode.
You may optionally click the Menu  icon in the Enter SKU or Barcode field to search by Item ID or Item Description.
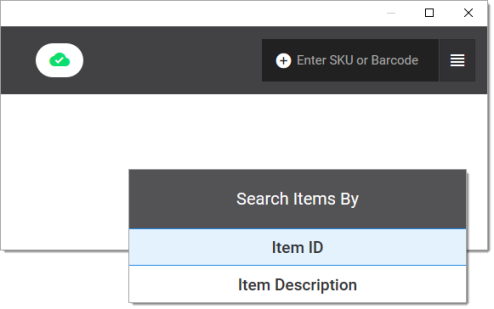
After the item has been entered or scanned, POS Assured adds it to the Item list.
You can modify the quantity, price, and unit price in the Item Details section. You can also adjust quantities by scanning the same item multiple times. A quantity of zero (0) removes the item, or you click the Remove button.
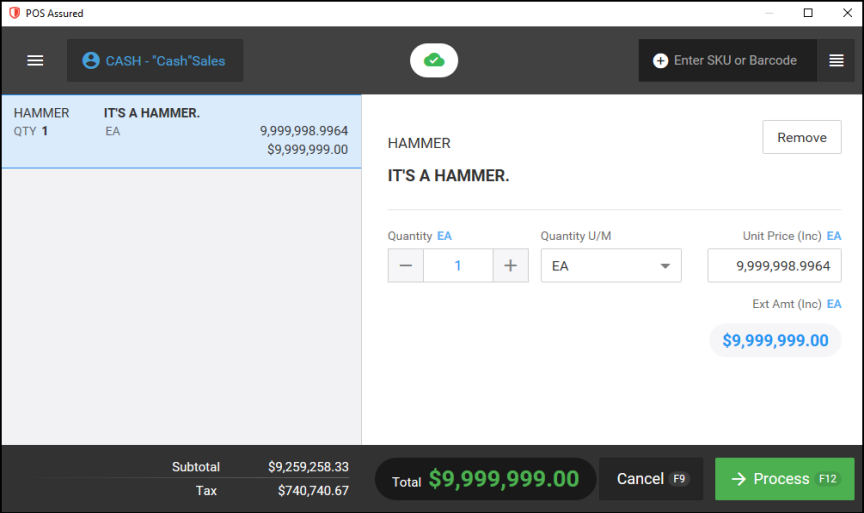
Note: We have expanded the unit pricing fields to accommodate larger amounts that are appropriate for different regional currencies.
Throughout the transaction, the subtotal, tax and total are updated as items are added or removed from the item list.
For exempt customers, the word “EXEMPT” is shown next to the tax location (EX to select an exempt customer account by name).
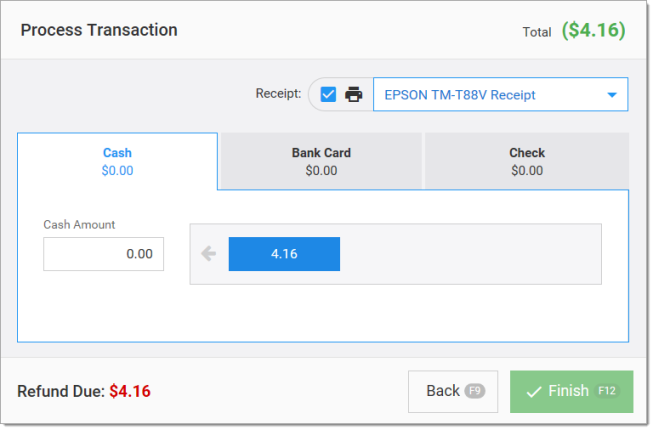
3. When you have added all the items, choose Process (F12) to save the transaction or to cancel the transaction, choose Cancel (F9). When you choose Process (F12), the Process Transaction box displays.
4. From here, there are four payment options.
As with application-based transactions, payment methods can be mixed (some cash, some check, etc.). POS Assured does not enable the Finish (F12) button until a minimum payment matching the transaction total has been entered. Cash payments can involve change due and an additional dialog is shown in these cases. Charge amounts cannot exceed the total due.
-
Cash
If you select Cash as the payment method, three (3) shortcut buttons with default payment increments will be displayed: exact change, nearest dollar, and nearest 20 dollars. You may select one of these options or entered the amount tendered in the Cash Amount field.
Change due will be calculated based on the remittance amount selected or entered in the Cash Amount field. If change is due, the Balance Due amount will be replaced with the Change Due amount.
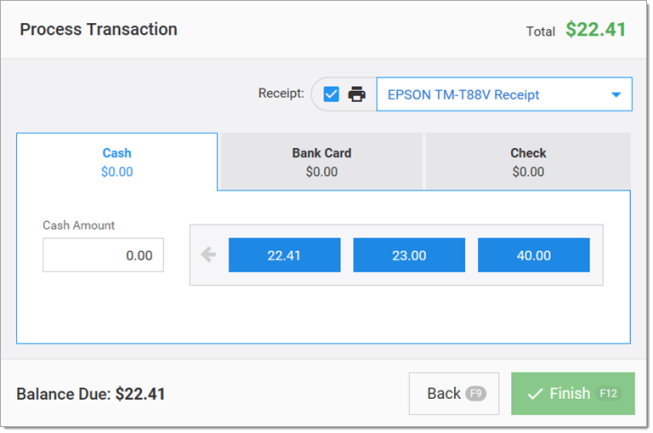

If a transaction involves change, the Change Due dialog box displays and remains open until you click the Close button. Then, the receipt will print.
This is to ensure that the change amount remains displayed for the sales clerk's reference until it is no longer needed.
-
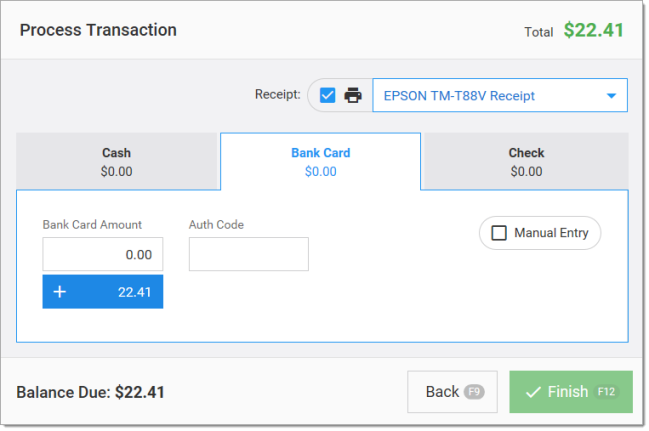
Bank Card
POS Assured is not integrated with any card processing options. To record card payments that are processed outside of the application (such as when using the TSYS or Moneris online customer portals) you can enter the bank card amount and type in the authorization code provided by the card processor. The authorization code will upload with the transaction information when you sync the POS Assured transaction to the application, when your station is back online. You can use the Manual Entry option to provide alternate card processing options like PayPal Mobile or the Square Mobile Payment System.
-
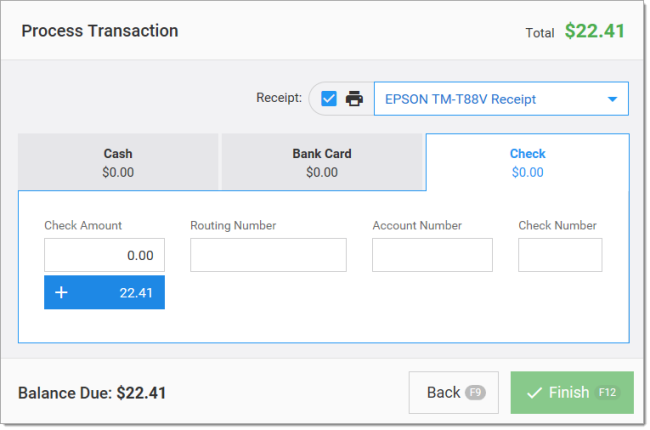
Check
When accepting a check as a payment method, enter an amount in the Check Amount field or click on the shortcut button. Enter the routing number, account number and check number in the designated fields.
-
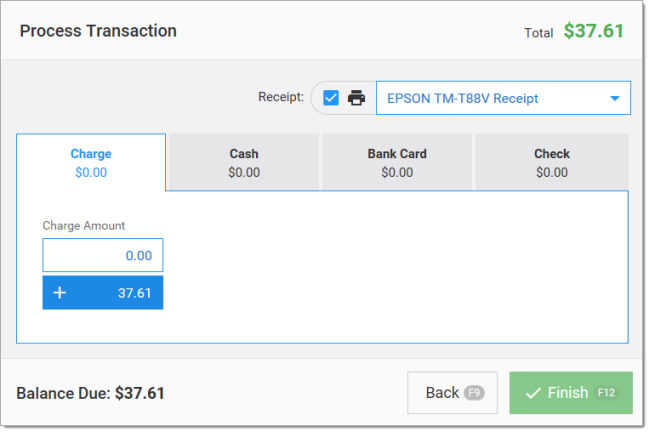
Charge
The Charge option will only appear if the selected account is a Receivables customer. Click on the payment shortcut option or enter the amount manually. The amount cannot exceed the Balance Due amount.
5. When you have completed the payment settings, choose Finish (F12) to complete the transactions.
Charges (receivables) are adjusted to match the customer’s normal pricing when the transactions are synced to the application once connection is restored. The amount they will eventually be billed may differ from the offline transaction.
Processing a Return Transaction
By returns (credits), we mean transactions where the overall total is negative, meaning there is a net-refund amount. The individual quantity sold (or returned) for each item on a transaction is not considered. If the overall total is negative (-), even if some items are being sold, the transaction is recorded as either Charge Credits or Cash Credits (depending upon the selected refund method). On the other hand, if the overall total is positive (+), the entire transaction is recorded as either Charge Sales or Cash Sales type transaction.
To process a return transaction:
1. Enter the customer information as follows:
-
If the transaction is Cash, leave this option selected. The Customer Account field defaults to Cash.
-
If the customer has an account, in the Customer Account field, enter the information you know and click the Menu icon
to select an alternate search method. When you find the account , click Accept.
Note: You can change the account at any point in the transaction prior to processing.
2. Enter the item that is being returned.
3. In the Quantity field, enter the appropriate negative amount.
4. Choose the Process (F12) button to complete the transaction.
5. Select whether the transaction will be a Cash or Credit Return.
Enter the Total amount in the designated Amount field by using the shortcut button or by typing in the value.
6. Choose the Finish (F12) button to complete the transaction.
Pushing your POS Assured Transactions to the Application
When the connection has been restored with
To push the transactions to the application:
1. Click the POS Assured ![]() icon to begin the push to the application. The Control Center box displays.
icon to begin the push to the application. The Control Center box displays.
The Control Center panel displays showing when the POS Assured database last synced to the cloud host database, the amount of transactions processed through POS Assured, as well as the Active Stations.
Note: Follow this step and the next only if you added an Administrator Key in the Parameters Settings form: Setup > Options > Point of Sale > Administrator Key field.
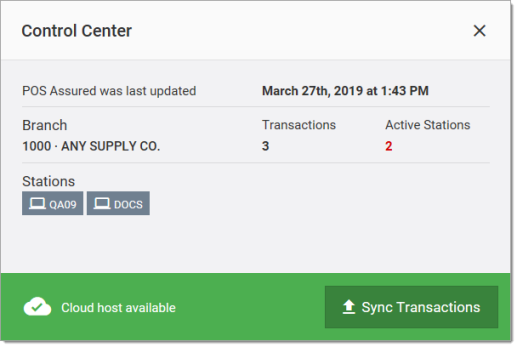
2. Click on the Sync Transactions button to upload the offline transactions to the Cloud host database.
A warning will appear advising you that performing this action will disconnect all active stations.
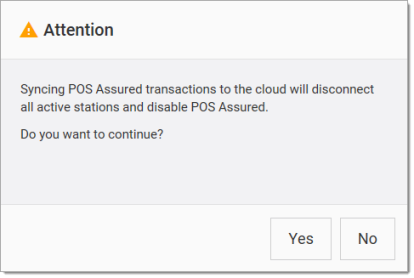
3. Select Yes to continue.
Processing the Invoices in the Application
After the transactions have been synchronized, you are ready to process the invoices/returns in the application.
-
For receivables accounts, the application updates the account with the submitted charges and, if applicable, replaces the amount with the customer’s normal (contract) pricing. In these cases, the amount the customer is billed may differ from the offline transaction. This would typically be less assuming that their pricing would often be better than the store retail level.
-
For Cash accounts, the application does not reprice sales, so the application applies an automatic adjustment to record any differences between the offline sale and resulting invoice. The offline adjustment code can be set via a parameter.
To process the POS Assured transactions:
1. Log into the application.
2. From the Main Menu, choose Point of Sale > Utilities > Invoice POS Assured Sales. The Invoice POS Assured Sales form displays.
3. Click the Selection button to select your search criteria.
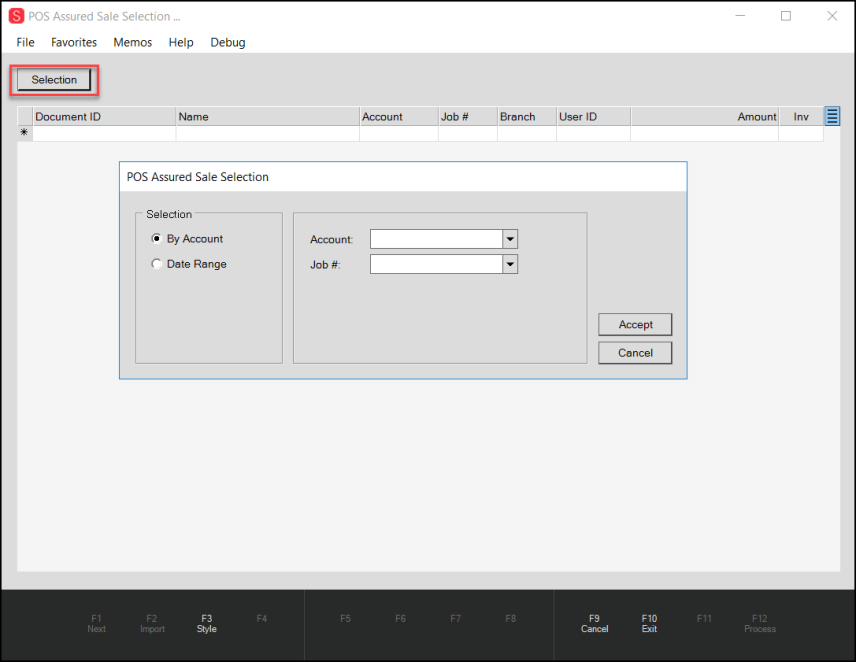
Invoice POS Assured Sales showing Selection Options
4. Continue based on the transactions you want to process:
-
To import the transactions for a particular account/job, leave the By Account option selected and use the Account and Job lists to specify the transaction.
The account selection limits the orders reported to a specific customer. Type the account ID or click the down arrow button to select from a listing.
The selection listing includes the account code (number), customer name, status, class, and phone number for reference. -
To import all transactions as once, choose the Date Range button and enter the Starting and Ending dates in the fields provided.
There are some other selection options such as Entry and Delivery Dates options, and Sale type options you can also consider.
Use the selection marker to pick from a preset list of dates including: today, yesterday, current month, last month, current year, last year, last 30 days, current fiscal year, and last fiscal year.
5. When you have completed these selections, press Accept. The transactions you specified display in the list.
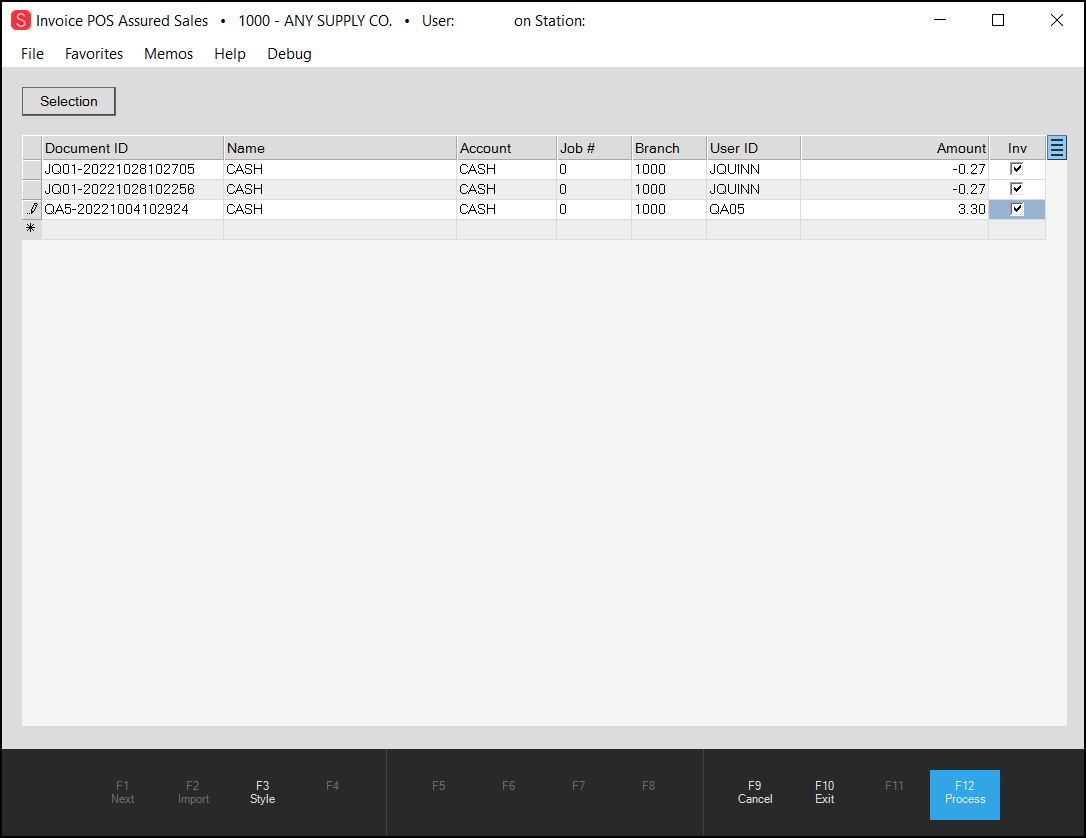
Invoice POS Assured Sales with Entries
6. Select the Inv check box beside each transaction you want to add to the application.
7. Choose the Process (F12) button to process these transactions as on online Invoice document. After processing the offline transactions are cleared. The resulting invoices are converted and added to the Documents list.