Physical Counts (Stock Check)
This activity is used for entering physical inventory ("Stock Check" in the United Kingdom) counts for the purpose of making corrections to on-hand quantities. Saving counts does not immediately update the on-hand for an item. Saved counts must be "posted" using a utility to adjust the on-hand. Counts are cumulative until "posted." This means that counts entered for the same item are combined together until that item's counts are posted. Negative counts can be saved to "fix" mistakes if needed. The "name" and "location" text areas are used for printing and document purposes only. During processing (F12), you can print or save the report as a file. In addition, a "physical count entry" document is created (saved) for future reference each time counts are processed.

Physical Counts
The default grid style displays the item, description, quantity on-hand (QOH), unit of measure (U/M), count, previous (count), and the item's group and section. Each item in your inventory has a default unit of measure for inventory counts (Item Maintenance, Branch, Codes tab). This unit of measure is used regardless of any other considerations. This including scanning barcodes which may be linked with a different unit of measure. After quantities are specified, the quantity entered is immediately converted to the item's BASE unit of measure. This is done because on-hand and all other quantities are maintained using the BASE measure only.
The + column is used to indicate if there are any record-based attachments associated with the item. Item and count are the only input areas. Counts are cumulative until posting occurs, so counts saved at different times will be combined together. The total of all previously saved (processed) counts is displayed under the "previous" column.
Folders in Inventory areas are similar to those found in the "Purchasing" application except that a "pricing" tab replaces "vendor." Click here for information regarding the folder contents.
Data Grid
There are a number of columns provided in the default style for data entry. Some are more obvious than others.
Sold/Recv
The net change in on-hand quantity since the item was either initialized or the first count for the item was saved. Counts should be taken before any inventory movement is allowed after counts are initialized. When cycle counting, and an item exists in more than one location, it's important to count all locations before any stock movement is allowed. The software always assumes that any activity affecting the on-hand occurred after the counts were saved.
Diff %
The difference (%) column is calculated based on the following:
(“net” on-hand – (count + previous)) / “net” on-hand * 100
*The calculation is only done when the net on-hand isn’t zero.
The “net” means that the on-hand is adjusted by the adjustment cell quantity (sales and receipts that happened after initializing counts or since the first count was saved.
Procedures & Best Practices
There are really two (2) primary methods companies use for physical inventory: cycle counts and a full physical inventory. The best practice is to do at least one full physical inventory each year (most companies prefer to do this near the end of their fiscal year) and regular cycle counts on select areas of inventory throughout the year.
For the best results when conducting a "full physical" inventory, the location being counted should be closed for business. The less stock movement occurring during counting, the more accurate the counts will be. It is important so that quantities don't change while the count is in progress.
Why is being open during counting an issue?
Counting is a manual process and occurs over an extended time period. If a company was open during counting, the software would need to track the timing of when every count is done in relation to every sale, receipt, adjustment, transfer of an item. Remember sales, receipts, etc. can occur both before and after counting, plus multiple counts for the same item (different locations, etc.) can be taken at different times too. Although, it is technically possible for software and data to handle this, it would be extremely cumbersome and data intensive (plus it could never account for the time periods between when a customer might remove an item and when it's actually processed as a sale in relation to counting). Furthermore, being open while counting makes researching discrepancies for a particular count based upon an item's activity nearly impossible.
Full Physical Inventory
Here is a procedure for a "full" physical inventory while closed during counting:
1. Make sure all inventory that will be counted has been received. If this isn't possible for some reason, don't count the non-received inventory and receive the goods after counting has been completed.
2. Immediately prior to counting, initialize counts. This does 3 things, it enables tracking of on-hand changes (this does not zero counts which is optional), clears any existing counts and adjustment quantities to zero, and sets a status flag on items that they are in the process of being counted. don't initialize while open for business. If you already did this, just initialize again prior to counting to clear any adjustment quantities that may have been recorded. It is always assumed that counts are taken prior to changes to on-hand from sales, receipts, etc. (when initializing). If sales or other changes to on-hand occur after initializing but before counting, the adjustment will be wrong. For this reason, it's important that users don't initialize until after all stock movement has been stopped for items being counted (or not initialize at all).
3. Count all inventory either on paper (worksheets) or directly enter the counts into the software (PC, SpruceMobile.NET device, etc.). During the counting process don't do any sales, transfers, adjustments, or receiving. Anything that would affect item quantities should be avoided. If counts are being entered as they are taken (not on worksheets) and quantities other than zero (0) appear in the Sold/Recv column during count entry, the item was sold, received, transferred, or adjusted after counts were initialized. When following this procedure and if entering counts while closed, the Sold/Recv column should always show a zero.
If both counting and data entry is complete (all counts are saved, use the "All Uncounted" Import (F2) option in Physical Counts. You may optionally default uncounted items with an on-hand to either zero or the current on-hand (using the Menu Marker ![]() options). In addition, it's a good idea to zero the counts on any negative counts (if any). To do this, it's necessary to first Import either all items or groups of inventory into the Physical Counts grid for processing. Items should not have negative counts at this time.
options). In addition, it's a good idea to zero the counts on any negative counts (if any). To do this, it's necessary to first Import either all items or groups of inventory into the Physical Counts grid for processing. Items should not have negative counts at this time.
If counting is completed and all counts were entered and saved during counting, skip to step 5 (Steps 5 and 6 may be done while open for business). If data entry of counts still needs to be done, follow the instructions in step 4.
4. This step should be done if counts have not yet been entered/saved but after the counting process is completed (on worksheets, etc.).
If using worksheets and all counting has been completed, it's ok to re-open and perform all business operations as normal. Enter counts and save them from the Physical Counts form located in the Inventory area. Counts can be entered by multiple users and stations. Counts for the same item are cumulative, so counts taken in different areas for the same item will be added together until the counts are posted. Save counts regularly. Prior counts for items will show up in the Physical Counts item grid. If you are re-opening for business while entering counts, the Sold/Recv column in the item grid may show quantities other than zero for items. In this case, quantities reflect activity after counting, so quantities are normal and should be expected.
Once data entry is complete (all counts are saved, use the "All Uncounted" Import (F2) option in Physical Counts. You may optionally default uncounted items with an on-hand to either zero or the current on-hand (using the Menu Marker ![]() options). In addition, it's a good idea to zero the counts on any negative counts (if any). To do this, it's necessary to first Import either all items or groups of inventory into the Physical Counts grid for processing. Items should not have negative counts at this time.
options). In addition, it's a good idea to zero the counts on any negative counts (if any). To do this, it's necessary to first Import either all items or groups of inventory into the Physical Counts grid for processing. Items should not have negative counts at this time.
5. Review the counts. There are a couple of ways to do this. This can be done by copying either all inventory or groups of inventory (suggested to keep it manageable if you have a larger inventory) and then using the menu marker "Count < QOH" and "Difference > N%" filters to check discrepancies. Additionally, the Style (F3) function offers a "Variance Display" selection which shows the total cost adjustment by item (the grid can be sorted by this column to view items with the greatest cost adjustments first). Another option for reviewing counts is to use the report, Count Variance, which offers several different filters for review.
6. Post all counts. This adjusts the on-hand values of items when the sum of the count and any adjustment quantity does not match the item's recorded on-hand.
Should I "Initialize" or not?
Both initializing and saving counts for an item enables an audit feature that records changes to item's on-hand temporarily until counts are posted. The purpose and intention of initializing prior to a physical inventory is to provide the ability to allow stock movement after counting completes but during data entry of counts.
If you plan on counting while open for business, initializing ALL inventory is usually not a good idea. If you are able to isolate a small section of inventory that is being counted, and also count and post the counts in a short period of time, it is ok to initialize. In order to initialize, the items being counted must have something in common (same group/section, location, keyword, etc.). Often, it's best to not initialize when cycle counting. The audit function is enabled when a count is entered anyhow, so it provided limited benefit in this case.
Regardless of whether you are doing a full physical inventory or just cycle counts, it's important to isolate what's being counted so that there is no stock movement occurring for the items being counted. If the data entry of counts will be done after counting, initializing can make physical inventory a smoother process because the focus is just on taking counts and data entry can be done later and over several days.
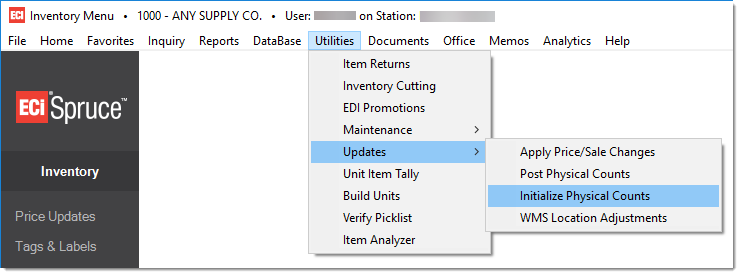
Initialize Physical Counts and Post Physical Counts are located under the Utilities drop down menu on the tool bar (located near the top of the application window). Both the initialize and post functions can be used for either (1) all inventory, or (2) limited sections of inventory at a time using selections based on group/section, location, keyword, and classification.
Cycle counts are used to verify the quantities of isolated groups of inventory. It's a good idea to isolate the inventory to be counted and carefully track any stock movement (sales, etc.) carefully so that counts are accurate. Since isolating the inventory makes accurate counting easier, companies who do so should use location codes with the item database.
Counting & Entering Items
There are a number of ways to count inventory, so a company must choose the method that will work best for them. Fortunately, technology has increased your options. Here are some options:
Using Worksheets
In the past, most businesses would print out inventory worksheets (often by location) then send staff out to count all the items and mark the counts on the paper worksheets. Later, these counts would be entered from the worksheets. One positive aspect to this method is that many people can be counting at the same time and there are no technology limitations due to physical access, wiring, need for special devices, etc. A negative aspect to this method is that the counting and data entry are done in two (2) separate stages making the process longer from start to end.
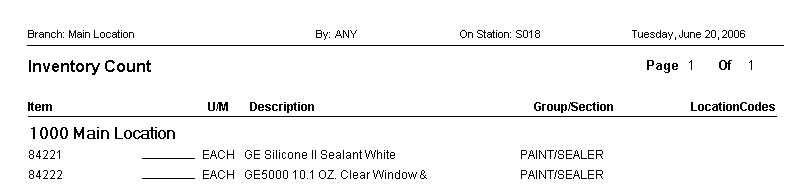
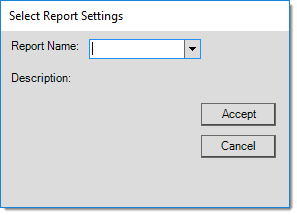
When using printed worksheets (Main Menu > Inventory > Reports > Count Worksheets), several selection choices are available. To make count entry easier, we suggest using the Import (F2), Worksheet function to copy items into the grid. To use this option, the report settings for each worksheet must be saved from the report form using the Save (F5) function. Since you may have many worksheets, you should consider using the Report Lists feature to save your worksheets as a list so that they can be processed (printed) at the same time. For easier data entry, it's best if the order of items printed on the worksheets is the same as their order in the data grid, and this method ensures that.
Import (F2) Options
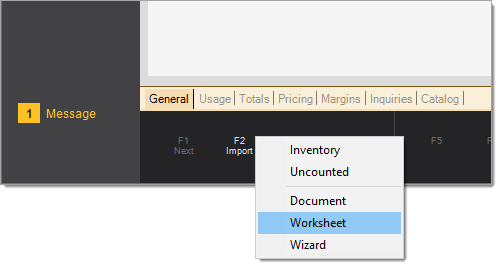
Whether using work sheets or not, it can be useful to copy a list of items into the grid for review or count entry. There are five separate Import (F2) functions to choose from: Inventory, Uncounted, Document, Worksheet, and Wizard. You can use these options more than once as well as combine options together if desired.
|
Warning! We advise against attempting to import ALL inventory at one time. Importing large numbers of items at once can cause problems... especially if your company has a large inventory. It's best to only import manageable groups of items at any given time. |
|
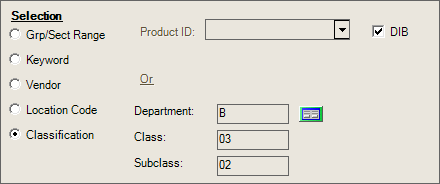
Inventory The Import (F2) option for inventory offers a variety of options for selecting and copying inventory items into a transaction's data grid. Selection choices include the following: group/section range, keyword, location code, and classification. 
The Selection control used here matches the control used by inventory reports and functions identically. For more detailed information about selection by inventory, Uncounted This option allows selection limited to "uncounted" items. An uncounted item is an item where no count quantity (including a zero count) has been saved. Note: saving a "zero" quantity is considered a saved count. This option also opens a selection form that allows "uncounted" selection by group-section, keyword, location, and/or classification (refer to the "Inventory" import described above for additional details). Document This option allows you to import items from a selected document. Only certain documents are included in this listing, including PO Inventory Receipts and PO Purchase Orders. Worksheet The Worksheet selection allows you to choose a "saved" Count Worksheet report and import the items based on the saved report's settings. Report settings can be saved using the Save (F6) function found on the report's utility form.
Wizard The Import (F2), Wizard option provides a generic way to import data into a transaction. There are two methods for data selection: document and Windows file. The document option allows you to select any document. The "Windows File" option can be used to import data from a delimited file or spreadsheet, for example. Different transactions have different requirements. As one example, the wizard may be used for copying inventory items into a transaction's data grid. In this case, copying inventory items is only possible if the source document or data selected contains item information. The Grid Mapping section changes based on the transaction and is used for determining which data columns (listed in the "Preview Data" panel) are to be used from the source (document or file). The source document or file will contain some columns that apply to the transaction specific "mapping" and some that don't. Mapping selections can be saved for future use. This is suggested if you repeatedly copy data from the same document type or file source. 
Import From... Depending upon the transaction that uses the Import Wizard, additional conditions may be applied to the data after the user chooses Process. Choosing cancel clears and closes the form without importing any data. Due to the mapping feature, the Wizard frequently can be used as a work around when other more specific Import functions are not provided. The "Remove Invalid Items" check box can be used to permit processing when one or more valid item rows are present in the data. For example, if you had ten (10) items and two (2) of the items had errors, checking the "remove invalid items" would produce a Task List with a "warning" and "accept warnings" button instead of a hard error. This would allow processing of the eight (8) item rows without any errors. The Import (F2), Wizard closes immediately after processing, so you'd want to "export" your errors before processing if you want to review and fix the items with errors later on. If you forget, you can always import the same file, export the errors and then cancel the import. |


Direct Entry
The "direct" entry method means that the counts are being entered as the counting occurs. Worksheets are not necessary. This method requires that there be some way of entering counts at the location where counting is being done. One of the easiest ways to accomplish this is to use laptops on a wireless network or by using an Android™ platform device running the AnyWare app. The laptops or hand held device can be moved from location to location and counts can be entered immediately. A bar code scanner can also be used with the laptop to cut down on keyboard entry time (supported mobile PC devices come with a built-in scanner). In place of wireless connections, hard-wired connections can also be used, but this will require running network cables to the necessary locations.
We've also added the ability to use random or pull-to-length type tally items in Physical Counts.
Additional Options
The Physical Counts activity offers choices for item (row) selection and functions for automatically setting the count quantities for items in the grid. These options are available from the Menu Marker ![]() located next to the grid. Security access to menu markers can be limited by user.
located next to the grid. Security access to menu markers can be limited by user.
|
|
|
Row (Item) Selection Options
The following settings select rows in the data grid that match the criteria specified. Row selection can be used along with the grid's right click options for printing, deleting, and saving. Choices neither affect nor carry over to the Physical Count document which will include all items included in the grid area.
Count < QOH
This choice selects those items (rows) where the count and the on-hand are not equal.
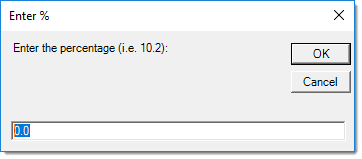
Difference > N%
This option selects those items (rows) when the difference between the item's count quantity and the on-hand is greater than a percentage you designate. Selecting this option will prompt you to specify the percentage.
When used, any rows (items) are indicated by a blue background. Right click from any selected row in the grid to view additional data grid options. Sort and search by options apply to all rows in the data grid and will undo any selection if chosen. The most useful options when using row selection are cut, copy, print, print preview, save as, and delete. Rows are selected by clicking on the row header (block) column on the left-hand side. To select a range of rows after choosing a starting row, hold the SHIFT key and click the last row in the range. To select more than one row when the rows are not in sequence, hold the CTRL key down while making your selections using the mouse.
Count Quantity Options
The remaining options allow updates to the count quantities for items entered or imported into the grid area. It's important to point out that the following options only affects items when no prior counts have been saved for the items (even if the saved count was zero). Only items with a current count status of "not counted" (indicated by a blank count) will be affected. Once a "set" function has been used, it overwrites any previously entered count quantities. If a set function is selected accidentally, users can Cancel (F10) the transaction and start over. These features are most used after importing item data into the grid area using the Import (F2) function.
Set blank counts to 0 (zero)
This updates the count quantity (column) for items in the data grid area with blank counts to a zero. A "blank" count indicates no count is designated for the item. A "zero" count is considered a valid count and indicates that the item should be adjusted to zero should the zero count be posted. This would be one way of clearing the on-hand quantities for an item or items. It's important to point out that, as a matter of procedure,it is neither required nor typically necessary to zero out the on-hand for any physical inventory process. The usual procedure for beginning a new cycle count or full physical inventory involves clearing "count" quantities only!
Set blank counts to QOH (Quantity On-hand)
This updates any blank (empty) counts (in the count column) for items in the data grid area to match with the item's current quantity on-hand. This will be done regardless of whether the item's on-hand is a negative or positive figure. If counts were posted immediately after using this option, and no other counts were in effect for the items, the result would be no change or adjustment in the items' on-hands or values. Why would this be done/used? For one example, this would be used in the following circumstance:
A cycle count is being done on a particular group of items. Only some of the items will be counted; however, but you are importing the entire group for reference. After counts for the items you are counting are entered, you could use the "set blank counts to QOH" option to set the remaining uncounted items to their current on-hand to ensure that no adjustments are made.
Set Negative counts to 0 (zero)
For previously uncounted items, this updates any negative counts, not on-hand values, to zero count quantities (in the count column of the data grid). The count column in the data grid would only reflect a negative value if either the value was manually typed in or the "set blank counts to QOH" (Quantity on Hand) option was used and some or the items had a negative on-hand. Any "zero" counts that are saved are considered valid and indicate that the items should be adjusted to zero should that zero count be posted and no other counts exist for the items. This would be one way of clearing the on-hand quantities for an item or items (which typically is not necessary). In reality, any negative count indicates some type of error since there is no way for your company to maintain less than zero quantity for an item.
Since all counts are cumulative until posted, negative counts are sometimes used to correct errors with previously saved counts. No distinction is made between counts that are entered as a correction vs. those resulting from setting counts to match a quantity on-hand (using the "set blank counts to QOH" option described above). For this reason, negative counts that need to be used for a correction should be done after using the "set blank counts to QOH" option so that the correction counts are not reset.
View (F3) Options
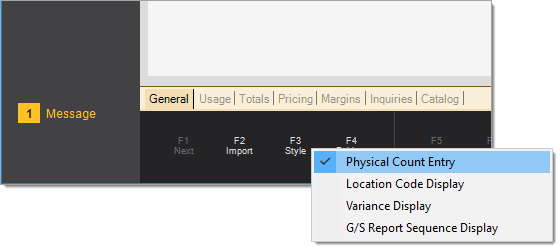
View options determine what type of information (columns) is presented in the data grid. Typically, when view selections are offered there is one default grid format that is used for editing (making changes) and other grid "views" that are read-only and used for inquiry purposes. These views can be useful for permanently sorting the default grid using information that isn't included in that grid (using the "sort by" option on the grid's alternate menu to do a "permanent" sort). The Physical Counts form currently offers the following View selections:
Physical Count Entry
This is the default view for item entry and editing. The following columns are displayed: item, description, on-hand (QOH), previous (count), count (new), U/M (quantity unit of measure), Sold/Received (adjustments since either counts were initialized or entered... whichever came first), group/section, and difference percentage (Diff%).
Location Code Display
This is a read-only view that displays the following columns: item, description, on-hand (QOH), U/M (quantity unit of measure), count (new), previous (prior count), and the locations to which the item is assigned (between 0 and 3 location codes may be listed).
Variance Display
This is a read-only view that displays the following columns: item, description, group/section (Grp/Sect), count (new), previous (count), adjustment quantity (Adj Qty), on-hand, and the estimated applied cost adjustment (App. Cost Adj). The "applied cost adjustment" column is an estimate of what the overall value of the adjustment (up or down) would be if counts were posted now. This assumes a count of zero if no count has been entered for an item. The total estimated adjustment is displayed above the grid area (toward the right side of the form). This would typically be used along with a sort of the grid by value to check the items with the largest adjustments (either as a negative or positive figure). This can help catch possible mistakes. Value is calculated using the items' weighted average costs which is the same cost that would be used for actual physical count adjustments.
G/S Report Sequence Display
This is a read-only view that provides the following columns: item, description, on-hand (QOH), U/M (quantity unit of measure), count (new), previous (count), and a column including the numeric group-section codes followed by a dash and each item's report sequence. If no special report sequence was specified, the default would be the item's stock number.
Processing
Use the Process (F12) function to save the counts entered. Processing creates a document which may be printed as a record or viewed later.