Parameters > Point of Sale > Regional Tab
The Regional tab allows you to set regional currency, value-added tax, and cash remittance rounding rules for the entire application. After you make these choices, these settings affect all of your Point of Sale transactions, purchasing documents,
This tab is also home to the settings for regions that require the collection of the consumer's tax ID at the point of sale. This is described in Understanding the Save Tax ID Options for Point of Sale Transactions. There are also instructions for Setting up the Save Tax ID Parameter, Setting the Tax ID Option for an Account, and Setting the Tax ID Option for a Group of Accounts. When the Tax ID options are set, Using the Tax ID Changes in Point of Sale shows you how to use them during the Point of Sale process.
IMPORTANT: When these options are set, they are set for all Point of Sale transactions.
Understanding the Regional Tab Settings
This is a description of the fields in this tab:
ISO Currency Code
This is a three-character currency code developed by the International Standards Organization to represent your local currency. The application uses this code to define the local currency. All future transactions will be based on this code, except when multi-currency is turned on for an account and the account has a different currency from the one entered here.
Currency Remittance Rounding
If your local currency has cash rounding requirements (as when your currency has zero decimal digits or has discontinued coin or note denominations), you can select a currency rounding options that affect the amounts in the Processing tab. Currency Rounding options include:
-
A nearest .05 rounding parameter (a "penny/pence rounding" option)
-
A down to .05 rounding parameter (a "penny/pence rounding" option)
-
An up to .05 rounding parameter (a "penny/pence rounding" option)
-
A nearest integer parameter (one note rounding option)
-
A nearest 5.00 parameter (5 note rounding option)
-
A nearest 10 parameter (ten note rounding option)
-
A nearest 100 parameter (100 note rounding option)
-
A nearest 1000 parameter (1000 note rounding option)
IMPORTANT: See the Remittance entry in Point of Sale GL System Journal Mapping topic to learn more about this setting. Adding a Remittance Point of Sale System Journal Mapping is required before enabling this feature for a setting other than None.
Corporate Tax ID (ACN)
For Australian businesses, enter the ACN (corporate tax ID) number.
Calculate VAT/GST Each Line
For value-added tax regions, select this check box to ensure the application calculates the VAT/GST amount for each row in the data grid. Skip this check box if your government does not require a value-added (VAT/GST) tax.
Canada GST Tax Code
For Canadian businesses, enter your GST tax code in this field.
Customer Tax IDs
This section contains the settings required to collect a customer's (consumer's) tax ID at the Point of Sale and choose to either save these IDs or not. These settings also determine whether the tax ID is masked for the cashier and whether the Tax ID is printed on the invoice. Further, there is a setting to allow you to choose which types of accounts the tax ID is collected for.
Request Customer's Tax ID at POS
Select this check box if you want to prompt the Cashier to ask for the customer's (consumer's) tax ID during any Point of Sale transaction. This check box is required if you need to collect the tax ID for Point of Sale transactions.
Minimum Length/Maximum Length
Enter the minimum and maximum lengths that the Tax ID can be. These settings are not required.
Secure (Mask Value)?
Select this check box if you want to hide the tax ID from the account's Account Maintenance form from the cashier.
Print on Invoice
Select this check box to print the tax ID on the customer's (consumer's) invoice.
Enabled Account Types: Cash, Charge, System
Choose the account types that this tax ID should be collected for. Options include: Cash, Charge, and System (for transactions that aren't linked to a specific account).
Note: When you enable the “System” type, set the “Do not Save” option, since this account type is used for many different consumers.
Setting a Regional Currency Code, Regional Tax, and Cash Rounding Options
We recommend the following settings to define your regional currency, cash remittance rounding options, and to set value-added tax options.
IMPORTANT: When you set the Currency Remittance Rounding parameter to something other than None, you must add a Point of Sale Remittance system journal mapping to ensure that Point of Sale calculations stay in sync. We recommend that you create this journal mapping before enabling this Currency Remittance Rounding parameter.
To set the native currency code and other regional options for your business:
1. From the Main Menu, go to Maintenance > Database > Parameters > Point of Sale > Regional tab to display these options:
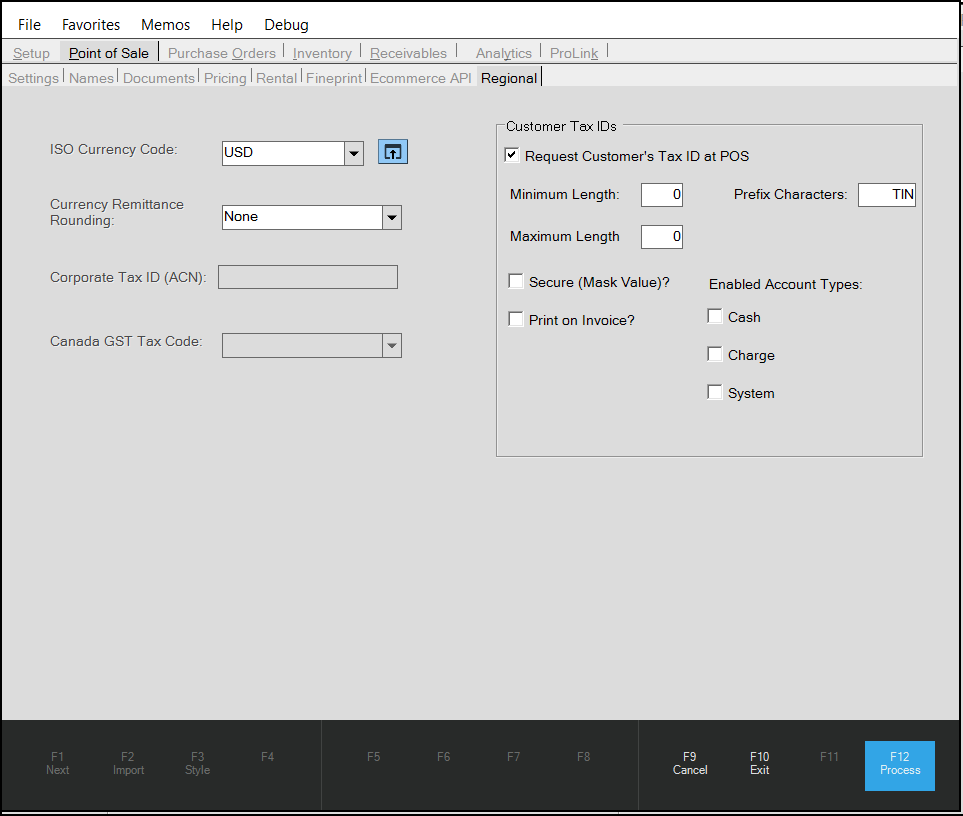
Parameters > Point of Sale > Regional Tab (CAD)
Note: The fields and lists on this form depend on the currency and regional/cultural settings that have been established for your system.
2. Begin in the ISO Currency Code list. Type the appropriate three-character ISO currency code to specify your business's local currency and press Enter.
3. If your currency uses currency rounding, in the Currency Remittance Rounding field, select one of these options for cash remittance:
-
A nearest .05 rounding parameter (a "penny/pence rounding" option)
-
A down to .05 rounding parameter (a "penny/pence rounding" option)
-
An up to .05 rounding parameter (a "penny/pence rounding" option)
-
A nearest integer parameter (one note rounding option)
-
A nearest 5.00 parameter (5 note rounding option)
-
A nearest 10 parameter (ten note rounding option)
-
A nearest 100 parameter (100 note rounding option)
-
A nearest 1000 parameter (1000 note rounding option)
4. In the Corporate Tax ID (ACN) field, enter the corporation's tax ID.
Note: This is only valid for Australian-set regions.
5. For regions with value-added tax requirements, consider the Calculate VAT/GST Each Line check box option and choose one of the following:
-
If your business has value-added tax requirements, check this option to ensure the system calculates the value-added tax for unit prices and extended amounts on each line of the Point of Sale data grid.
-
If your business does not have value-added tax requirements, leave this check box unselected.
6. For Canadian businesses, select the appropriate tax code option from the Canadian GST Tax Code list.
7. Click Process (F12) to save these selections.
Understanding the Save Tax ID Options for Point of Sale Transactions
In some regions, consumer tax IDs are required on Point of Sale documents. Additionally, for some consumers, or types of accounts (CASH, for example), the tax ID may vary and need to be supplied during each transaction. Consumer tax information may or may not be considered sensitive depending upon the region. To meet this need, we have added a feature to display, request, and retain the consumer's tax ID at time of Point of Sale processing. This gives your business control over this optional feature, which can be enabled for any region that requires it.
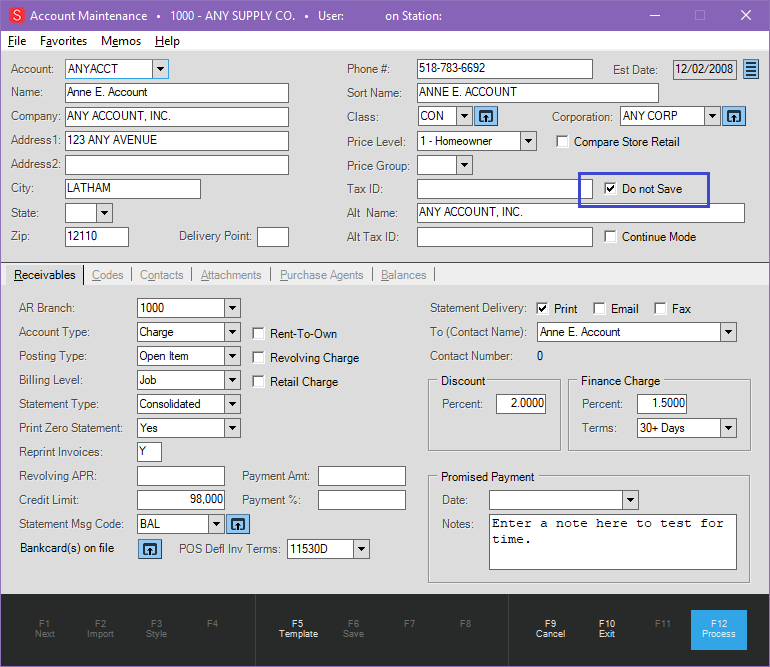
Account Maintenance Form with Do not Save Option Highlighted
When the feature is enabled in the Account Maintenance form, a new check box, Do not Save, displays beside the primary Tax ID field.
Note: If you do not set up the Do not Save functionality as described in this section, the check box does not display in this form.
When you check the Do not Save check box, the application does not save the tax ID that is collected during the Point of Sale process or retain it for future use.
You can set the Tax ID behavior that works best for your business or meets the requirements of your region by following these guidelines:
-
To use the account's primary tax ID for every transaction:
Enter the account's primary tax ID in the Tax ID field and do not check the "Do not Save" check box.
-
To require the entry of a tax ID for each transaction on the account:
Leave the Tax ID field blank and check the "Do not Save" check box.
When the option to require Tax ID is enabled and the cashier selects the print option, the application adds the Tax ID information to the sale, and the tax ID is printed on the documents below the billing address.
During a transaction, if the Tax ID field is left empty, a warning message displays to prompt the cashier to fill the field. Management can escalate this warning to an error if they choose. More information about this feature is covered in the next section.
Note: Tax ID may not appear on receipts where the sales tax is not final (as with an interim statement or down payment).
Another Note: You decide how the tax ID settings are set and then work with the Implementation or Support team to complete the setup process. Then, you choose the accounts where these settings are applied by following the instructions in Setting the Tax ID Option for a Group of Accounts. You can set the Tax ID option for a single account using the instructions in Setting the Tax ID Option for an Account.
Setting up the Save Tax ID Parameter
These instructions describe the setup process for displaying the "Do not Save" check box and Tax ID options for an account in Point of Sale.
To set up the customer Tax IDs options and add Tax ID and "Do not Save" check box functions:
1. From the Main Menu, go to Maintenance > Database > Parameters > Point of Sale > Regional to display the Regional Parameters options.
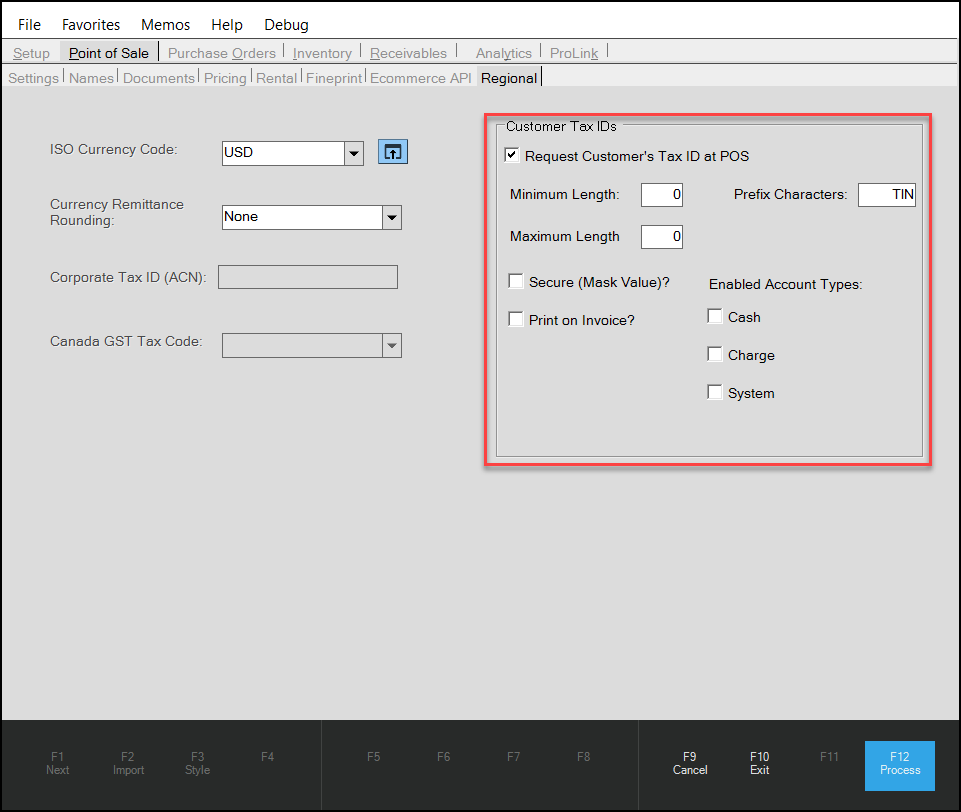
Point of Sale > Regional Tab – Customer Tax IDs Parameter Settings
Note: The fields in this tab depend upon the Region selections in the Parameters > Setup > Software subtab, which may need to be set by ECI team members.
2. To prompt the collection of the consumer’s tax ID at POS, complete the following selections:
-
Request Customer's Tax ID at POS
Click this check box to prompt a cashier to collect the tax ID at the Point of Sale.
Note: If you leave this check box unchecked, the Tax ID field will not display in the Process Invoice Document, and the tax ID will not display on the invoice.
-
Minimum/Maximum Length
Consider the number of digits required in the Tax ID field and enter the Minimum and Maximum length amounts. These entries are not necessary and can remain 0 by default.
-
Secure (Mask Value)?
Select this check box to display the Tax ID field with the ID number masked in the Process Invoice Document at the point of sale.
If you select this option, the cashier can still change the tax ID entry, if necessary.
Note: Cashiers with secure permissions can select the Tax ID menu button, and click Show Tax ID, which allows them to view and change the customer's tax ID.
Cashiers without secure permissions can still type in a new Tax ID entry if there is no tax ID in the Account Maintenance form.
-
Print on Invoice
Click this check box to add the tax ID to the invoice.
Leave this check box unchecked to prevent the tax ID from printing on the invoice.
Note: To set up the application to print the tax ID on the invoices, tickets, or other POS-related documents, set the printer configuration (Maintenance > Database > Devices) to "print to file" printer. If you have physical receipt printers, you can use those devices instead.
-
Enable Account Types: Cash, Charge, System
Choose the account types that this tax ID should be collected for.
Options include: Cash, Charge, and System (for transactions that aren't linked to a specific account).
Note: When you enable the “System” type, set the “Do not Save” option, since this account type is used for many different consumers.
3. When you have completed these selections, click Process (F12).
Setting the Tax ID Option for an Account
When you use the "Do not Save" check box, you can either enter a primary tax ID that the application uses for each transaction, or the cashier can enter the tax ID manually for each transaction.
To see the changes in the Account Maintenance form:
1. From the Main Menu, go to Point of Sale > Database > Account. The Account Maintenance form displays.
2. From the Account list, select the account that you need to set the Tax ID Do not Save check box for.
Account Maintenance Form – "Do not Save" Check Box Highlighted
WARNING: If you select "Do not Save" in the Account Maintenance form and the cashier enters a new Tax ID during a transaction, the application will not save the new tax ID to the account record. If you do not select "Do not Save" and the cashier enters a new tax ID during the transaction, the application saves the new tax ID to the account record.
3. Choose one of these options:
-
To save a tax ID for this account and use it in future transactions, enter the primary tax ID and leave the "Do not Save" check box unselected.
-
To prompt the cashier to ask for a new tax ID for each new transaction, leave the Tax ID field blank. The application displays a warning message if the cashier tries to complete the transaction without the Tax ID entry.
4. Then, click Process (F12) to save your change.
Setting the Tax ID Option for a Group of Accounts
To add the Tax ID field changes to a group of accounts:
1. From the Main Menu, go to Receivables > Utilities > Maintenance > Account Global Modify.
The Account Global Modify form displays. Two new options are provided in the Field Name List:
-
Do not save Tax IDs
Selecting this option adds the "Do not Save" check box (beside the Tax ID entry) in the Account Maintenance form.
-
Tax ID
Selecting this option allows you to select the accounts for which the Tax ID field is a required entry field.
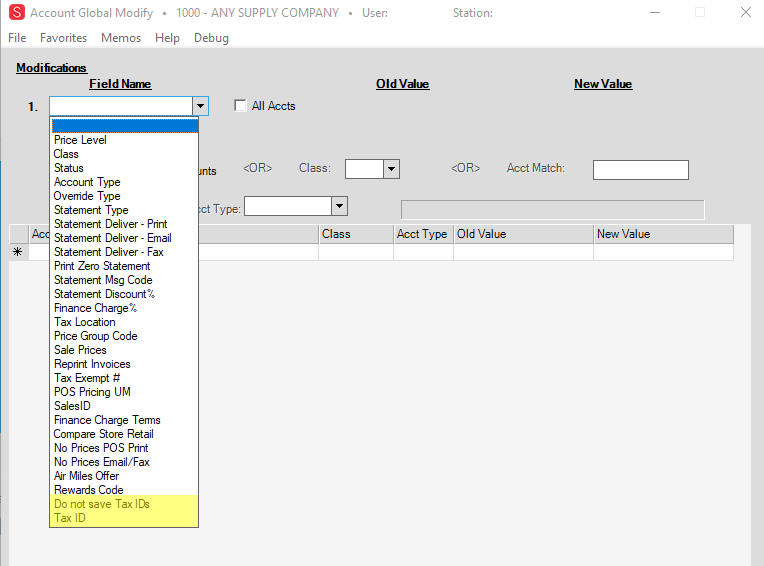
Account Global Modify Form – Do not save Tax IDs and Tax ID Fields
2. From the Field Name list, choose the Do not save Tax IDs entry.
3. In the New Value field, type N.
4. Select the filter criteria to display the accounts that should have this check box. To display the "Do not Save" check box:
-
For all accounts, in the Filter section, leave the All Accounts check box selected.
-
For a particular class of accounts, choose the appropriate class from the Class list in the Filter section.
-
For a particular account type, choose the account type from the Acct Type list in the Filter section.
5. Then, click View (F8) to display the list of accounts that match your filter criteria.
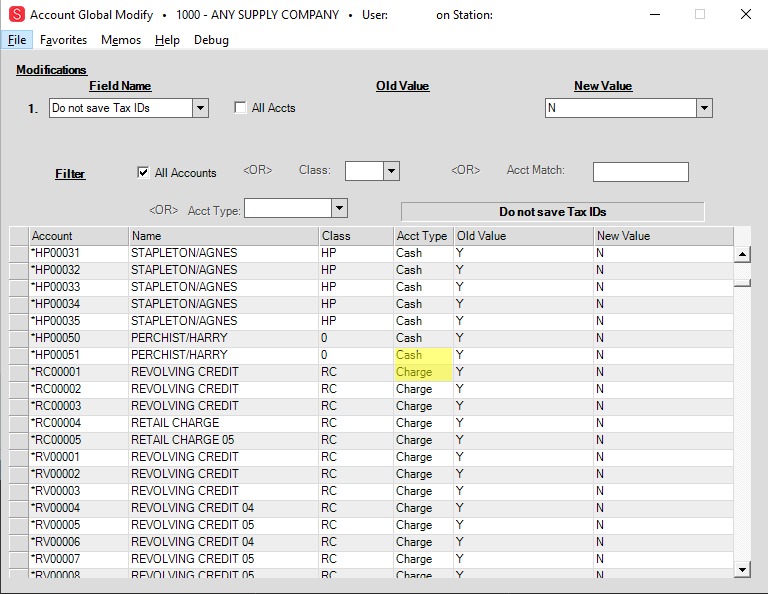
Account Global Modify Form with Do not Save Account Entries
6. When you have confirmed your selections in this list, click Process (F12) to save these settings.
7. Return to the Field Name list and choose the Tax ID entry.
8. In the New Value field, type Y.
9. Select the filter criteria to choose the accounts for which you want to display the Tax ID field.
To display the Tax ID field:
-
For all accounts, in the Filter section, leave the All Accounts check box selected.
-
For a particular class of accounts, in the Filter section, choose the appropriate class from the Class list.
-
For a particular account type, in the Filter section, choose the account type from the Acct Type list.
Note: You cannot display filtered accounts if the Tax ID field does not display in the Account tab of the Process (F12) form.
10. When you have selected these options, click View (F8) to display the list of accounts that match your filter criteria. Here, you can add or remove any accounts that you do not want to apply this setting to.
11. When you have confirmed the entries in this list, click Process (F12) to save these settings.
Using the Tax ID Changes in Point of Sale
When the Tax ID field setup and account settings are complete, a cashier with appropriate permissions can enter a new tax ID whenever they process a sale, order, quote, open ticket, or direct ship invoice for an updated account.
At the end of the transaction process, the Process (F12) form displays and the tax ID is located on the Account tab. The display behavior of the Tax ID field depends upon the cashier's permissions and the Tax ID and account settings:
-
If the cashier does not have permission to view the tax ID number, the field is not editable, and the application masks the tax ID number. The primary tax ID stored in the Account Maintenance Tax ID field for every transaction.
-
If the cashier has edit permissions, they can view/change the tax ID number entry. When they change the tax ID:
If you checked the "Do not Save" check box for the account, the application uses the new tax ID number for this transaction only. The tax ID number is not saved to the Account Maintenance form.
If you did not check the "Do not Save" check box for the account, the application uses the new tax ID number for the transaction and updates the account's primary tax ID in the Account Maintenance form. This new ID number will display for the next account transaction.
To review and update the tax ID for an account in Point of Sale:
On the Account tab, the Tax ID field displays but whether the entries are viewable/editable depends upon the setup options and the user rights. If the user has permission to change the Tax ID, the Local Menu icon displays.
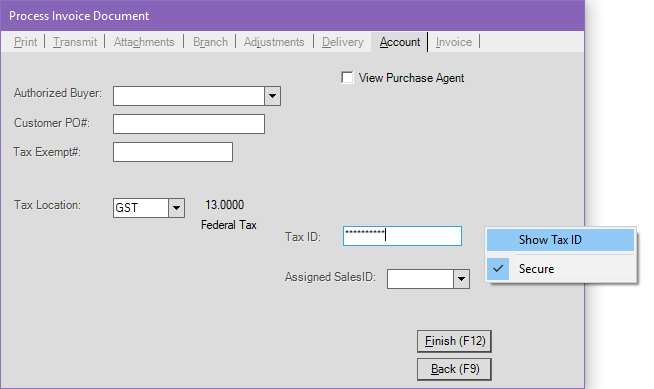
Process Invoice Document Form with Tax ID Local Menu
2. To change the tax ID, click the Menu Marker  icon, click Show Tax ID, and enter your password.
The current tax ID for the account displays in the Tax ID field.
3. In the Tax ID field, type the new tax ID.
4. Click Finish (F12).
The updated tax ID prints/displays on invoices, tickets, and return documents if enabled.