Work Order
The Work Order transaction is used for indicating which items are being removed from inventory, adjustments applied to the cost of the manufactured item, and the finished or manufactured output item. In addition, this transaction can be used to track the progress of manufacturing progress if stages of processing are defined.
Types of Manufacturing
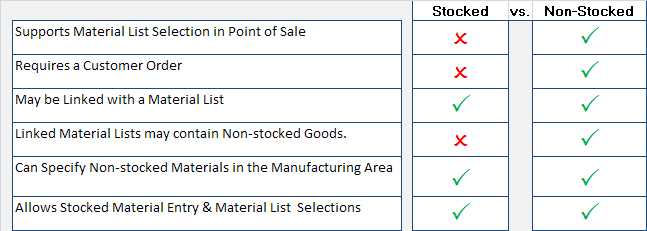
There are two types of manufactured goods: stocked and non-stocked. Procedures vary slightly for each. Here's a side-by-side summary comparison between the two types:
Manufacturing Goods for Stock
Stocked manufacturing is used when producing goods that will maintain their own on-hand and other quantities. These items can be sold with or without a customer order just like any other stocked item your company maintains inventory for. Processes can be used with stocked manufacturing, but aren't required. Although a process isn't required, a "work order" document is associated with the manufacturing process. The work order may originate with Point of Sale processing of a customer order with non-stocked manufactured items.
For a new work order, begin by assigning a work order number for the manufacturing session (press TAB for a new number); otherwise, choose an existing work order from the drop down. If using a "manufacturing process," enter the process ID at this time. Your company can define processes from the Manufacturing Process maintenance form. Processes are optional and are used for defining stages and default adjustments used with specific types of manufacturing (so that they do not need to be manually specified if used).
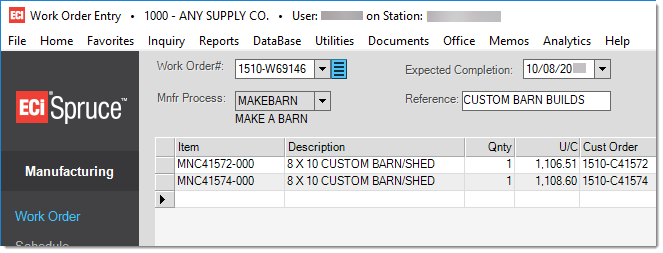
Next, either manually enter the manufactured item SKU that is to be produced in the upper grid or use the Build (F5) function to automatically select manufactured items meeting the build criteria selected. Manufactured items may optionally be linked to a material list. During manual entry, any material list associated with the manufactured SKU is displayed immediately upon entry. Material lists may require selections and entry before continuing (you can make changes to your selections later as long as they are done before completion). If no material list is used or after choosing material list options, enter the quantity being manufactured.

Manufacturing: Material List Selections
Later modifications to the material list selections can be made by choosing the Materials (F6) function and clicking on the material list item's description in the materials grid.
NOTE: If the material list form opens and a user chooses "Cancel," the material list will not be added to the Materials grid; however, the material list can be added manually if needed.
Once a quantity has been specified, use the Materials (F6), Adjustments (F7), and Staging (F8) as needed.
Manufacturing Non-stocked
When manufacturing a non-stocked item, the process begins with an Order created in the Point of Sale area. Just as with any non-stocked product being ordered, a special pop-up form is used. This form varies somewhat based upon whether the manufactured item in linked with a material list or not. For more information about Point of Sale ordering for manufactured items, see the topic Manufactured Non-stock Item.
Manufacturing a non-stocked item begins the same way as a stocked item. Assign a work order number (press TAB) and specify the process ID (if any) then choose a completion date. Next, choose the Build function and use either the Customer Order Non-Stocked or Customer Order All Manufactured option.
UOM Conversion for Work Orders
To display the correct Extended Cost information for Work Order items, we found that when the item’s branch default unit of measure setting (set in the Item Maintenance Form > Branch > Codes tab) was different from the item’s base unit of measure, the application was not applying a conversion. This resulted in incorrect Extended Costs for these materials in Work Orders.
The application now converts the item’s unit of measure to calculate the correct Extended Cost. You can see this change in the Work Order Entry form when you display the Materials list. This change is valid for stocked and non-stocked items.
In this example, the 1 FT unit of measure equals the 30 LB unit of measure; therefore, the Ext Cost value is the same. If you multiply each value (1 FT and 30 LB) by 22, you see that the quantities and Extended Cost values match as they should.
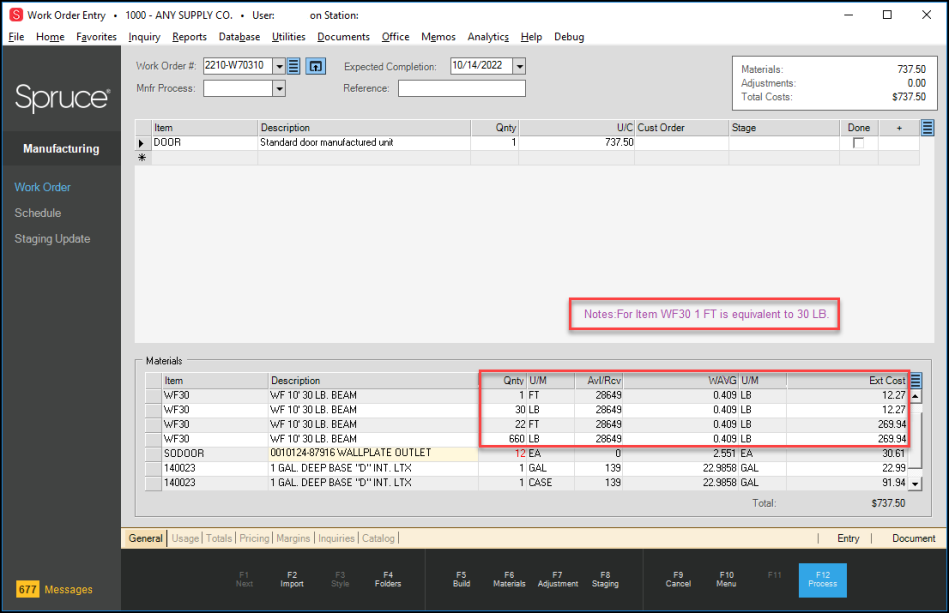
Work Order Entry Form with Changes Highlighted
Using the Build (F5) Function
This function can be used to retrieve manufactured items associated with a specific customer order (either just the non-stocked manufactured items or all the manufactured items) or to retrieve all "stocked" manufactured items with an available quantity below the minimum quantity that meet the build criteria the user specifies.

Each of these three (3) build options is explained in more detail below:
Customer Order Non-stocked
This option is used when manufacturing the eligible non-stocked manufactured items from a specific customer order. Begin by selecting the customer order containing the items you want to manufacture. Any available non-stocked manufactured items will be listed. Click in the check box under the "Select" column next to any items to be manufactured at this time and choose Accept. Choose Cancel to not select any items from the current order and return to the manufacturing activity.

Manufacturing: Select Order Non-stock
Customer Order All Manufactured
This option is used when manufacturing any eligible non-stocked and stocked manufactured items from a specific customer order. Begin by selecting the customer order containing the items you want to manufacture. Any available manufactured items will be listed. Click in the check box under the "Select" column next to any items to be manufactured at this time and choose Accept. Choose Cancel to not select any items from the current order and return to the manufacturing activity.

Manufacturing: Select Order ALL Manufactured
Inventory Stock
This option is similar in function to the "build" option found in Purchasing. A number of selection methods are provided for your use: group-section, keyword, location code, and selected items. Only one selection criteria may be chosen at a time. You can either consider or ignore any seasonal codes associated with the items using the "Ignore Seasonal Codes" check box.

Manufacturing: Build for Inventory Stock
Builds for stocked manufactured products are processed in a similar way to how builds in Purchasing are done. The item must meet the following conditions to be considered:
1. The Item Type must be Manufactured.
2. The manufactured item must also be stocked.
3. The Item must have a minimum quantity greater than 0 (zero).
4. The Item's available quantity (on-hand + on-order - committed) must be below the minimum.
5. The item must be seasonal if seasonal codes are being considered.
The build quantity is calculated using the following method:
Build Quantity = Maximum - Available
This is a bit simpler than the standard PO build calculation since vendor purchase settings and a few other things are not considered.
After Specifying Manufactured Goods
At this point, there are several things a user can choose to do. Along the bottom of the form, there are several functions that open a secondary grid area below where the user enters their manufactured item SKU(s). These are Materials (F6), Adjustments (F7), and Staging (F8).
Materials (F6)
A third possible action is the Materials (F6) function that is for specifying which items are to be used during manufacturing. When manufacturing is completed, these items are (a) deducted from inventory (if they maintain on-hand quantities) and (b) the total cost of the items is added to the cost of the manufactured item(s).
If a manufactured item is linked to a material list, that material list item automatically is included in the material's grid. Otherwise, the user must enter the items to be used for manufacturing manually. Items that are not a part of a material list linked with the manufactured item may still be added manually in the materials grid.
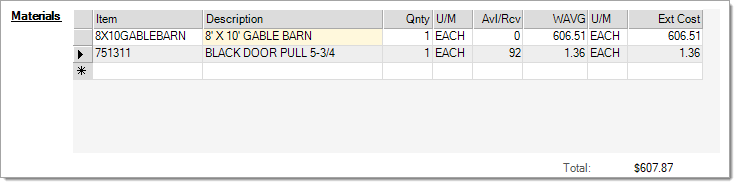
When a material list item is linked, notice that the description of that item appears with a different colored background (see the 1st item in the grid in the example above). This background indicates that the item has additional information/function that can be accessed by clicking on the description. After clicking on the description, a new form will open that allows the user to modify/access the contents of the material list item.

Manufacturing: Material List Selection
Use the tree to select or deselect material list options as they relate to the item you are manufacturing. The Reset button can be used to undo any changes and return the material list to the default selections. Choose Accept to finalize (save) changes or Cancel to close the material list window without saving any changes.
Using the Import (F2) Wizard for Materials
The Materials grid supports the use of the Import Wizard allowing either a Windows-based file (spreadsheet, delimited file, etc.) or existing Document containing item information to be copied into the grid. Users must map the data or document to the appropriate columns.
Material Lists with Non-stocked Selections
Material lists that will be associated with a non-stocked manufactured-type item may contain non-stocked items and stocked items. Material lists to be used with a stocked manufactured-type item may contain stocked goods only (although the comment/prompt functions in the material list are available). For non-stocked manufacturing, material list selection is intended to be done at the point of ordering (customer order). With stocked manufacturing, materials are designated in the Manufacturing activity, not Point of Sale. Special order items can be specified as materials for stocked manufactured goods, but this must be done independently from a material list.
When non-stocked goods in a material list were selected during ordering at Point of Sale, they will be added to the materials grid as re-numbered items separately from the material list during manufacturing. Once in the manufacturing activity, further selection of non-stock items using the original material list is prohibited.
Non-stock manufactured-type items begin with a customer order. When a material list linked with the non-stocked manufactured item also contains non-stocked goods, material list selection is a bit different. For each special order item, users can enter descriptions, set quantities, and enter pricing. The extended prices for the selected goods are accumulated in the "List Total" which may be used to determine a preliminary or estimated price for the manufactured item.
As mentioned, once the order is copied into the Manufacturing activity, any selected special order goods are added to the material grid separately and the material list is included just for reference. Special order items are renumbered for tracking purposes at this time. Costs default to zero because there is no cost entry done at Point of Sale, just pricing.
In addition, more detailed information specific to each non-stocked item should now be entered regarding vendors, PO numbers, etc. for ordering purposes. This is done by clicking on the non-stock item from the Materials (F6) grid. Any initial costs are temporary and used for ordering. Cost pricing will be updated once the non-stocked goods are received.
Comment-type items will not function in a material list used with either non-stocked or stocked manufactured items; however, users can add pre-determined comments and prompts to a material list, use the staging location to add comments, or add comment type items to the Materials (F6) grid during Manufacturing. If comment type items are added to the grid manually, users cannot modify the description after the comment item form is closed. Should this be necessary, delete the existing comment and add a new one.
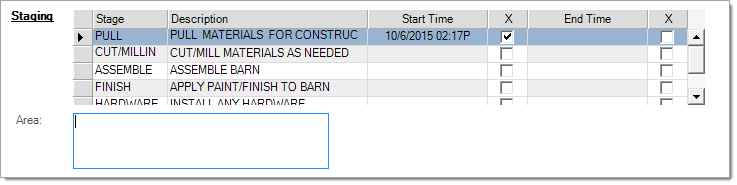
Staging (F8)
If using a process, the process may be set up with stages used for the purposes of tracking the progress of manufacturing. A process does not have to have defined stages; however, if your process does, you can use the Staging (F8) function to update the stages. Click in the check box (below the X columns) to the right of either the Start Time or End Time columns to update the date/times.
Note: dates and times default to the current date/time only. Users may not modify the date or time. Stages are for reference and manual tracking purposes only, updating a stage doesn't perform any data changes or processing in the software beyond updating the start/end date and time. A manufactured item may be completed immediately and/or without ever updating the stages by clicking on the Done box (upper grid) and processing (F12).
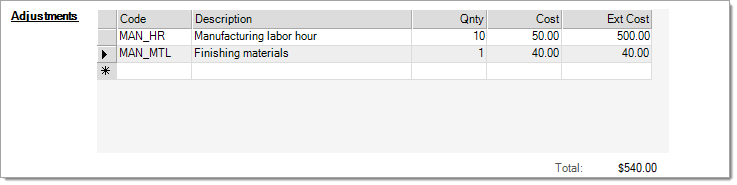
Adjustments (F7)
Another function that can be done is Adjustments (F7). Similar to adjustments in Point of Sale and Purchasing, manufacturing adjustment types are also available. All types of adjustment codes are set up in the same area (see the topic Adjustment Code for more information). Adjustments are typically used to add to the finished cost of the manufactured item and are typically used to record labor and any expenses involved in manufacturing (other than items being used). Adjustments are applied to the cost of the manufactured item when the manufacturing procedure is completed (marked "done" and processed).
There are two (2) distinct types of adjustment codes that can be defined for use with Work Orders: Manufacturing and Mfg Market types. The first type, manufacturing, are typical adjustments representing manufacturing expenses which are added to the cost of the finished materials. The second type of adjustment named, "mfg market," is used as a way to reserve cost similar to a "Do Not AP bill" type adjustment used with purchasing. These adjustments use the difference between the market cost of the manufactured item and the total of raw materials and other adjustments as a basis for a cost reserve adjustment.
Manufacturing & Item Quantities
Whether stocked or non-stocked manufacturing, most items involved maintain quantities (on-hand, committed, etc.) at least temporarily. Quantities are updated in a similar fashion to other items. Here's a breakdown:
•When a manufactured item is linked to a customer order, the manufactured item's committed quantity is increased by the quantity ordered by the customer.
•Once the ordered item or stocked manufactured item is linked with a work order (aka. a manufacturing process), that item's on-order quantity is increased by the quantity designated for manufacturing (similar to how it would function were the item ordered from a vendor using a purchase order). Also at this time, any items designated for use by the manufacturing process are designated as "committed."
•If special order (non-stock) items are being included as materials, the item's "ordered" quantities will be updates once they are assigned to a purchase order in the Manufacturing area. After non-stocked goods are received, these "re-numbered" items will reflect an increase in on-hand and decrease in their "on-order" quantities.
•At the time goods are manufactured (final processing), items used for the manufacturing process are removed from inventory and their committed quantities are in turn reduced, and the items used (materials) for manufacturing also reflect an increase in usage. The manufactured item(s) reflects an increase in on-hand and a reduction in the on-order quantity. Those manufactured items that are linked with a customer order will maintain a 'committed' quantity until that customer order is sold, however.
•When the manufactured item is sold, the item's on-hand will be reduced, usage updated, and if the item is linked to a customer order, the item's committed quantity will be decreased by the quantity sold from the order.
Items manufactured for stock don't have to be part of an order. If used with an order, the customer order is not necessarily a part of the manufacturing procedure in this case.
Processing (F12)
Processing creates a document that can be accessed later or printed for reference. Varying levels of detail are available when creating the document initially. Processing can be used for both manufacturing completion or merely to record the advancement of a stage of manufacturing (only available if using a "process").
Voiding, Closing, and Reversing Work Orders
The context menu on the Menu Marker  icon provides the ability to either close or void an existing work order.
Voiding removes the work order.
Closing marks the status of the document as closed, preventing further access other than by viewing the document. Restrictions apply.
Work orders can be reversed using from the Adjustments transaction found in the Inventory area.