Lot/Location Tally Items
You can use the Lot/Location Tally Item type to manage a single product that has a lot of variations. You can use this item type to track and maintain quantity information for "lots" and "locations" of the product. The original design for this item type was for bricks, but you can use it for other items with similar properties. Using brick as an example, a particular brick product can have slight variations due to the conditions at the time it was manufactured. For this reason, a lot/location tally provides a way of keeping bricks with similar qualities together. Here are some quick facts about this type of tally item:
•New Lots are specified during receiving, not ordering (PO).
•A new Lot/Location tally item must be received prior to sale or inclusion on customer orders.
•The same Lot may be assigned to different locations. In this case, each would be assigned quantities separately.
•On-hand and available quantities are tracked by Lot and Location.
•Before final sale, users must pick quantities to be sold from lots and locations. Customer orders do allow an overall quantity to be specified which isn't allocated to specific lot/locations. If the lot/locations haven't been designated on the order, they will have to be during or prior to the sale of an order containing lot/location tally items.
•Physical Counts can be used to change Lot/Location Quantities.
•Older lots in the grid can be filtered using the menu marker options.
•Any decimal quantities entered for lot/locations are automatically rounded to whole numbers (integers).
•A Lot Inquiry under Point of Sale is available for viewing either Sale/Return or Order/Quote information related to Lots.
Using the Lot/Location Tally Form
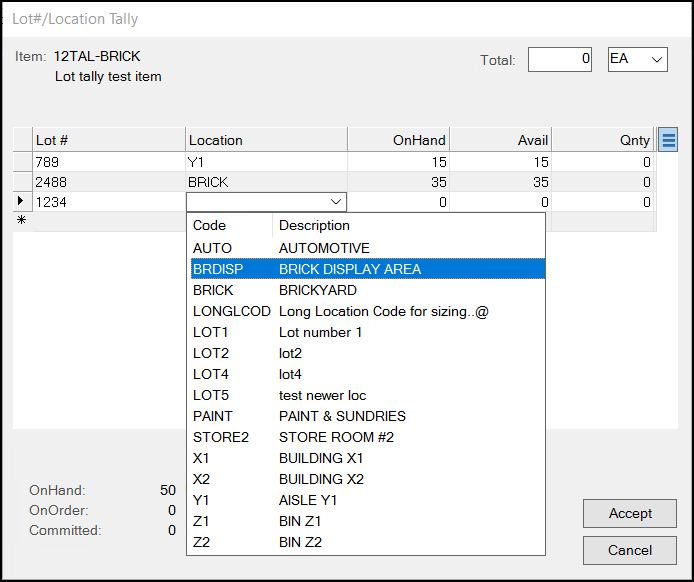
You can choose or specify quantities for both a lot and location when receiving or selling, for example. The same lot can have multiple locations; however, we do not allow the user to enter the same lot # and location combination more than one time. A previously entered lot/location can be adjusted if needed.

Notes:
-
In the top right corner, the default Unit of Measure displays. This value can change based on the selected activity (sale, receipt, etc.) and may not always match the BASE measurement used for on-hand, on-order, and available quantities.
-
The Qnty column is where you specify the quantity you are selling, receiving, ordering, etc. The OnHand and Avail columns show the lot/location quantities using the BASE measurement terms only. Quantities should always match the measure shown.
As soon as the Tally item is entered in an item grid, the Lot/Location Tally form opens. The item's description is shown as well as a listing of any existing lot/locations for the item. The on-hand, available, and committed quantities in the form always are shown in the item's BASE measure terms. This will not necessarily match the quantity entry measure shown. The Total in the upper area of the form is read-only and is used for displaying a running total for any quantities entered.
Adding Lot/Location Tally Items
You can add new Lot/Locations Tally Items in two areas: Receipts (under Purchasing) and Adjustments (under Inventory). In Point of Sale you can choose quantities from an existing lot/location only.
To add a new lot/location for an existing item, click in an empty row. Next to the "*" or "pen" icon, click in an empty Lot # column cell.
Next, enter or choose an ID for the lot, choose an existing location code, and enter the starting quantity. Each Lot/Location combination must be unique. The "Lot #" can include alpha or numeric characters (our examples just show numbers). Locations must be added prior to use.
You can modify the Lot/Location prior to choosing the Accept button or you can select Cancel if you make a mistake. Cancel won't save any newly added lots nor will it retain any quantities specified for the item. If you cancel, enter the item quantity again.
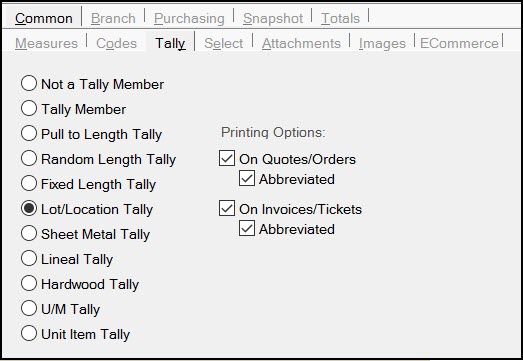
These items can be added directly in Item Maintenance just like any other item. We've added a Tally tab to the form's folders due to the growing number of tally type items. Choosing the "Lot/Location Tally" radio button displays the options for the type and designates the item for Lot/Location use. The "Printing Options" section can be used to designate whether details are printed for selected documents and if so, how lot/location references print on (a) both quotes and orders or (b) both invoices and tickets. On all other documents, lot/location tally item details always print and use the "abbreviated" format.
When printed, references to the lot and location are added below the item's standard description on documents. Printing details regarding lots and locations is optional and can be disabled. This additional text can be printed as either "abbreviated" or not. Here are some examples showing the differences using the same item.
-
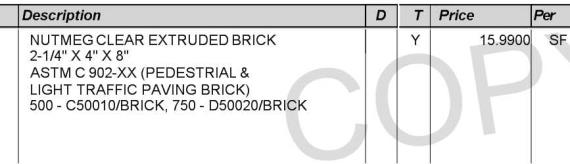
Abbreviated
The abbreviated version appears as shown below. When the document refers to more than one lot/location, the application prints each lot/location separated by a comma and the quantity is listed followed by a dash (-) and the lot/location code.
-
Not Abbreviated
When you do not select Abbreviated, the document displays the quantities and lot/location references on separate lines.
Adjusting Lot/Location Tally Items Using the Item Maintenance QOH Process
You cannot adjust quantities for lineal tally and group tally items, like pull to lengths and fixed lengths, which are linked to child items using the Item Maintenance Quantity On Hand Adjustment process. You must adjust these item type quantities at the child item level. However, you can adjust the quantities for Lot/Location tally items using this new feature.
To adjust the quantity for lot#/location tally items:
1. From the Main Menu, choose Inventory > Database > Item to display the Item Maintenance form.
2. From the Item list, choose the lot/location item you want to adjust the inventory amount for and press Enter to display the existing settings for this item.
3. To adjust the inventory for this item type, choose the OnHand Settings ![]() icon.
icon.
For Lot Tally or Lot/Location Tally items, you can also specify the location at which the on-hand quantity has changed. This box displays:
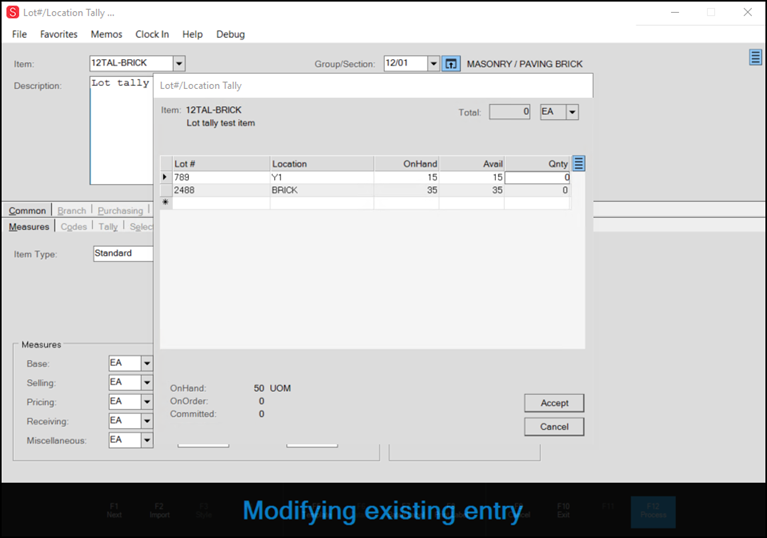
Lot#/Location Tally with Empty Qnty Columns
4. To update these records, in the Qnty column, enter the amount of inventory you have added or lost and choose Accept.
5. Choose the Process (F12) function key to make the change.
Using the Lot Tally Adjustments Feature
If you sell lot tally items and the On Hand values of these items in Item Inquiry/Maintenance forms do not match the sum of these quantities in each location, you need a way to account for this discrepancy, both in terms of the On Hand Quantities that display in these forms and financially in your GL accounts. Typically, these discrepancies occur when someone adds a lot tally item quantity in the detail box and then modifies the quantity in the data grid.
We have added a new feature that collects the lot tally items with On-Hand quantity discrepancies, updates these values based on the actual sum of its quantities in each location, and debits the GL account you select to track this shortage accordingly.
To adjust mismatched lot tally item quantities and apply the missing quantities to the appropriate GL account:
1. From the Main Menu, choose Inventory and from the Left Menu, choose Adjustments. The Inventory Adjustments form displays with the Quantity Adjustment type selected by default.
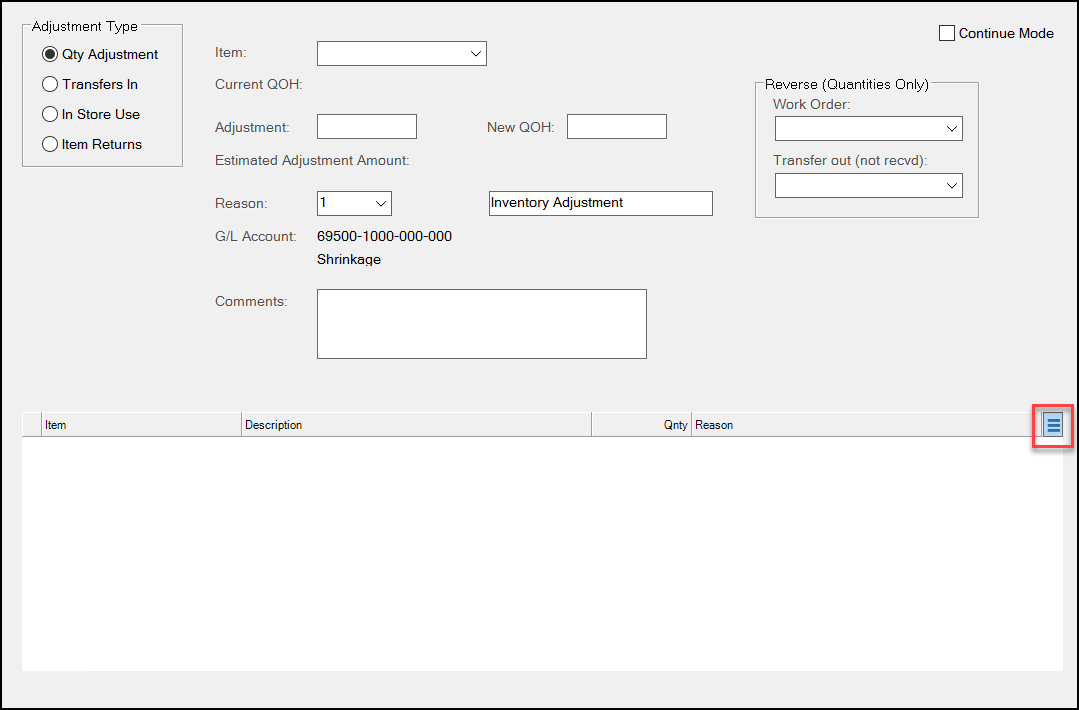
Inventory Adjustments with Menu Marker Icon Highlighted
2. From the Reason list, choose the GL Account to which you want to apply the quantity on hand change amount.
3. To find the lot tally items that require adjustments, click the new Menu Marker  that displays at the top of the data grid and choose the option Load Lot Tally – OnHand Auto Adjustments.

Inventory Adjustments Menu Marker Option Highlighted
When you select this option, the application collects the lot tally items that have discrepancies and displays them in the data grid.
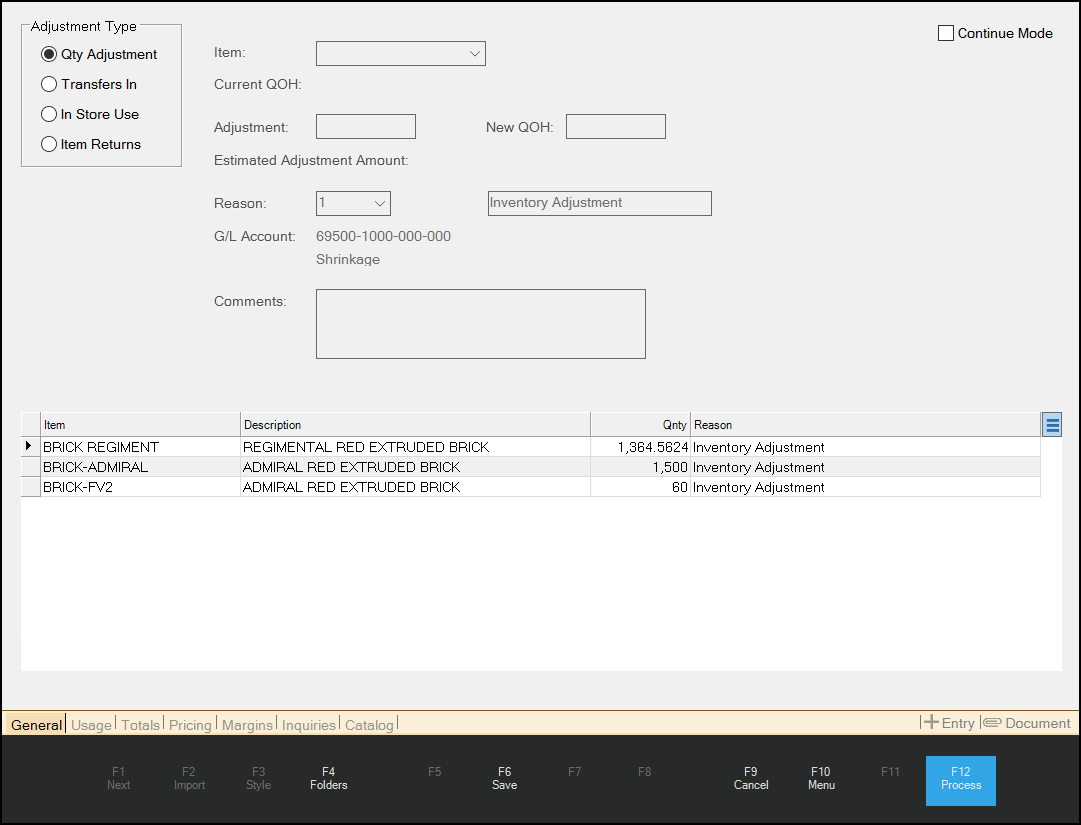
Inventory Adjustments Showing Lot Tally Items with Discrepancies
The GL Account that will account for this inventory change appears in the Reason column.
4. To see the current detail of the lot tally item in the list, highlight the item and double-click it to display the Lot#/Location Tally box for that item. You cannot make changes in this dialog box. Click Accept to close it.
5. When you have completed your review and you are ready to update these records, choose Process (F12) to adjust the GL Accounts and the total on-hand quantity amounts you selected. The form resets to the default entries.
If you collect several Lot Tally items in the list and decide that you need to apply a different GL account to one or more of the collected item(s), delete the item(s) that should not apply to the selected GL account from the list, and process the change for the remaining item(s). Then, you can choose a different GL account, recollect the list, and apply the newly selected GL account to the remaining item(s).
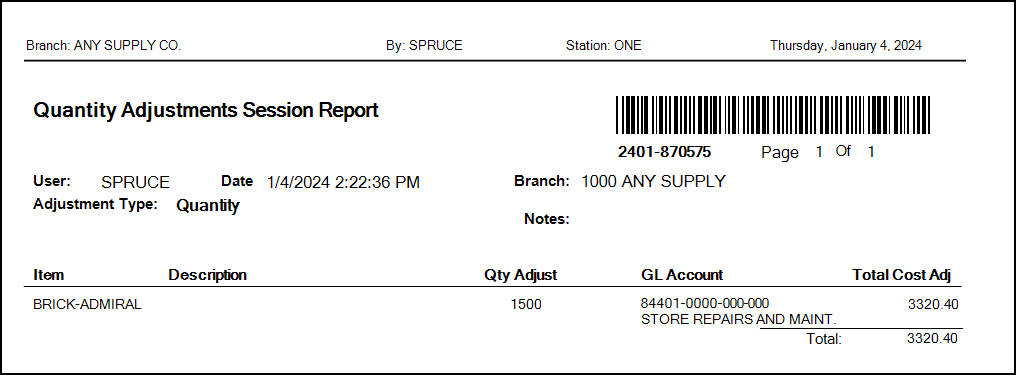
For example, in the previous instructions, if you applied the Store Repairs and Maint GL account to the Brick-Admiral item, (rather than the default Inventory Adjustment Shrinkage GL account option), the Adjustments document would look like this: