ePad-vision Signature Capture Devices
If you want to capture the customer’s signature on transactions you are processing (in Australia, Canada, and the Caribbean), the ePad-vision (VP9808) signature capture device may be a good tool for you.

ePad-vision Devices
When the system is configured for the ePad-vision signature capture device, customers can use the signature pad for Sales, Orders, Open Tickets, Direct Shipments, Charge Returns, and Account Payments in the Point of Sale area. The application encrypts the signatures submitted during the Process Document procedure and adds the signature to the process document (and ticket). You can use this device with a Linkly device in the APAC region or other devices in Canada and the Caribbean.
Discuss this feature with your ECI Support or Implementation team as there is some remote client setup that is required. They will need your Station IDs and your hosting URL.
Adding an ePad-vision Device to a Station
When you are ready to add a signature capture device like the ePad, you may need to work with some ECI Implementation or Support team members to get started. Typically, the remote client services ePad Signature Capture parameter is set by default, but if you experience any issues during setup, we recommend you contact Support and ask about this setting.
Note: We have tested this signature pad and validated that it works with Clover and Linkly devices, although only Linkly displays here. The setup for these card pad devices remains the same.
IMPORTANT: You must use the 32-bit version of the ePad driver, even if the station has a 64-bit system, so we recommend that you use this ePad Universal Installer and not the 13.3.12490 .Net version. Download and install this on each system that accesses an ePad device.
To add an ePad Vision device to a station:
1. On the station, download and run the ePad Universal Installer to complete the ePad software installation process (including the 32-bit driver).
2. In the user's task bar, open the hidden icons and double-click the Remote Client ![]() icon.
icon.
3. Click the Settings tab and in the Hosted URL field, make sure the rcws URL displays (and not the SpruceWeb version).
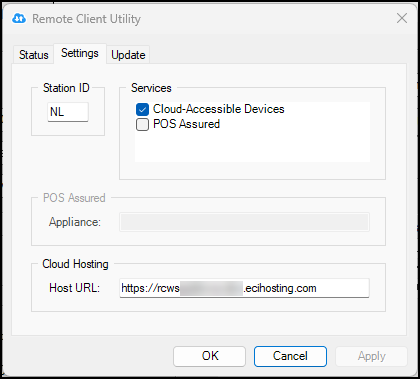
4. Click OK to confirm this setting.
5. From the Main Menu, choose Maintenance > Database > Parameters > Setup > Software to display the Software parameter options.
6. In the Installed Software list, make sure the Signature Capture check box is selected.
7. Choose Process (F12).
8. Return to the Database menu and choose Devices to display the Device Maintenance form.
9. In the Device Name field, choose the station to add the ePad Vision device to. The settings for the station update.
10. In the Remote Client section, select the Enabled check box.
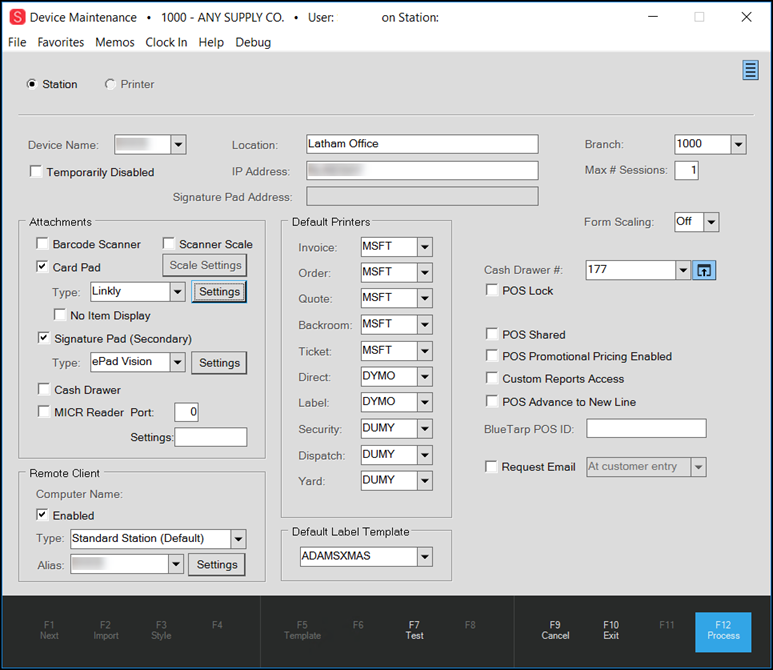
Device Maintenance with Signature Pad Settings
11. Choose Process (F12) to save these settings and accept any warnings that display.
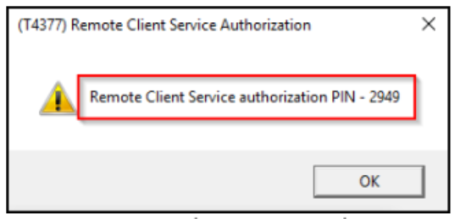
The Remote Client Service Authorization box displays a prompt with a PIN code.
The Remote Client Web Service displays the Enter PIN prompt a moment later.
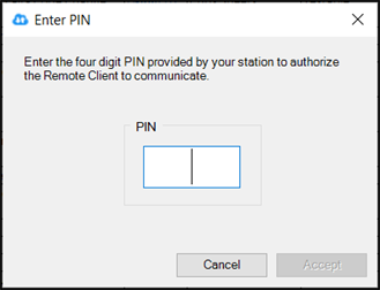
Remote Client PIN Prompt
12. In the Enter PIN box, enter the PIN number listed in the Remote Client Service Authorization box and click OK.
13. Return to the Remote Client Utility and click the Status tab.
14. In the Cloud Host section, choose the Reconnect button. The Status updates to Connected.
15. Return to the Device Maintenance form, reselect the station from the Device list, and in the Attachments section, select the Signature Pad (Secondary) check box.
16. In the Type List, choose ePad Vision. The ePad Vision Settings options display.
17. Choose Process (F12) to save these settings and accept any warnings that display.
Note: Taking this step before setting up the ePad settings ensures that the Test and Advanced buttons display correctly in the steps below.
18. In the Device list, choose the same station again.
19. Choose the Settings button to display the ePad Vision Settings options.
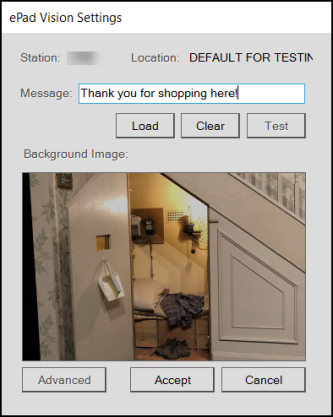
ePad Vision Settings
20. In the Message field, enter the message you want to display on the device when a transaction is not in process.
Note: The message you enter here appears above the Signature prompt and on the ePad device too.
21. To add pictures and other settings to the device:
a. Click the Load button to add the main picture to the device. The File Explorer opens.
b. Navigate to a picture you want to display on the device and click Open.
c. Click Test to display the image in the signature entry window.
d. Click Update Background on the signature box. The Loading Background Image message displays on the ePad screen. This may take time, some say, a long time. In the background, we are accessing the ePad-vision utility, and the image transfer takes a while.
e. After the image displays on the ePad, click Accept on the signature pad box.
f. Click Test again to test a signature. You may get a The ePad Signature request has timed out message. Click OK to continue.
g. When you have completed these settings, choose OK to return to the original ePad Vision Settings list.
Note: To add a slide show to your ePad device, see Adding a Slide Show to your ePad Device.
22. Click Accept to store your settings.
23. Click Process (F12) to save the settings to the device and accept any warnings.
Now, you are ready to use the ePad-vision device for signature captures.
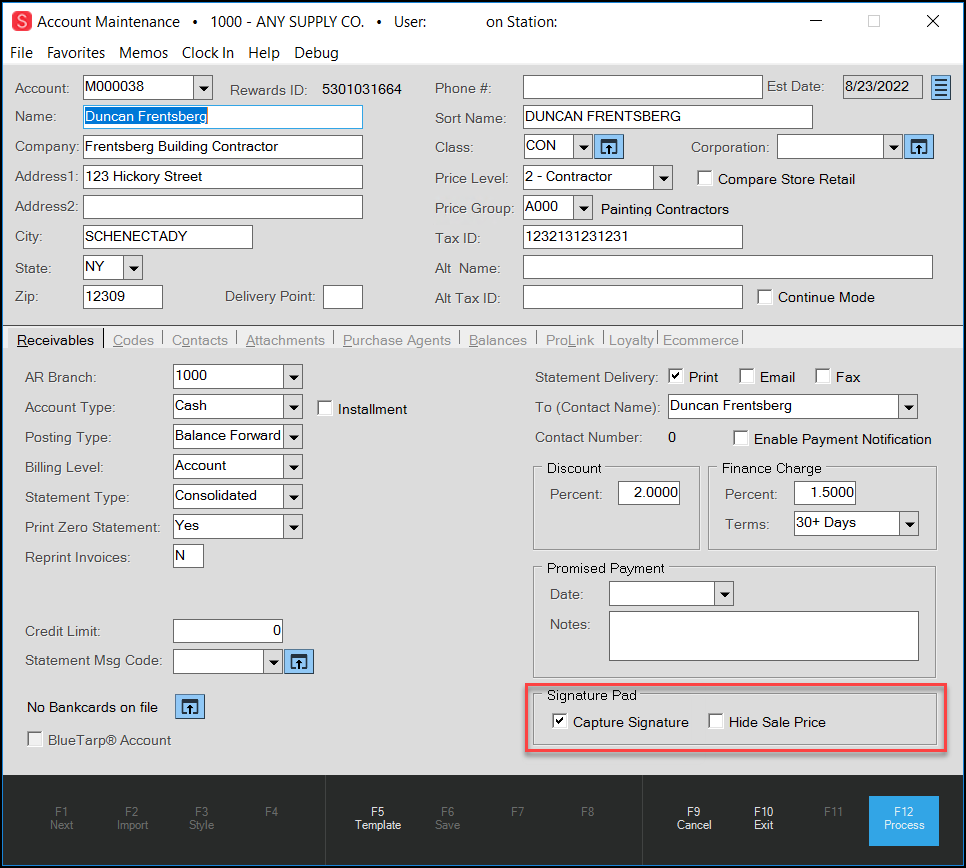
Adding the Signature Capture Settings to an Account
When you have an ePad-vision device, you can add an account setting that requires a prompt for a signature for account purchases and payments. Customers may want this to be able to check on purchases made on their account. If this setting is not added, the ePad Vision signature prompt does not display during the Process Document procedure. When this option is enabled, it displays when the account processes Sales, Orders, Direct Shipments, Tickets, Account Payments, and Returns.
To add the ePad-vision capture signature settings to an account.
1. From the Main Menu, choose Point of Sale > Database > Account to display the Account Maintenance form.
2. In the Account list, choose the account for which you want to set the signature capture option. The account details display.
Account Maintenance > Capture Signature Pad Options Highlighted
3. On the Receivables tab, select the Capture Signature check box.
4. Consider whether you would like to hide or display the price on the Signature prompt.
-
If you would like to display the Signature prompt with the sale price, (as in this figure), leave the Hide Sale Price box unchecked.
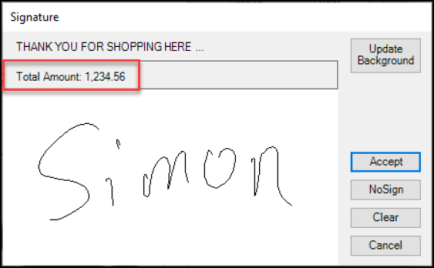
Signature Prompt with Sale Price
-
If you would like to display the Signature prompt without the sale price, check the Hide Sale Price check box.

Signature Prompt without Sale Price
5. Choose Process (F12) to save these changes.
Using the ePad Vision in a Point of Sale Transaction
After you have set up the device and the account settings, you are ready to use the ePad Vision to collect signatures during the charge to account process. Typically, the signature prompt only displays when the customer of a prepared account is charging the transaction to their account. You can use this process in the Sale Entry and Order Entry transactions.
To see the ePad Vision device in action:
1. From the Main Menu, choose Point of Sale > Sales to display the Sale Entry form.
2. From the Name field, choose an account that has the Signature Capture settings enabled.
3. Add items to the data grid as you normally would and select Process (F12) to complete the transaction.
4. Handle the tender process as you normally would and select Finish (F12).
If the customer is charging the transaction to the account, the ePad Signature device displays the signature prompt. The customer adds their signature and clicks Accept.
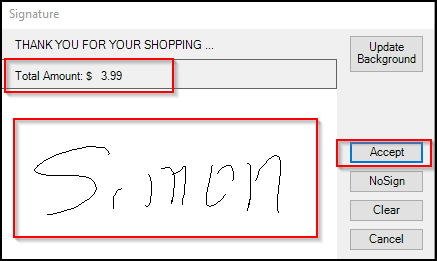
ePad Vision Signature Prompt
The application saves the signature and displays it on the Point of Sale document and on the ticket.
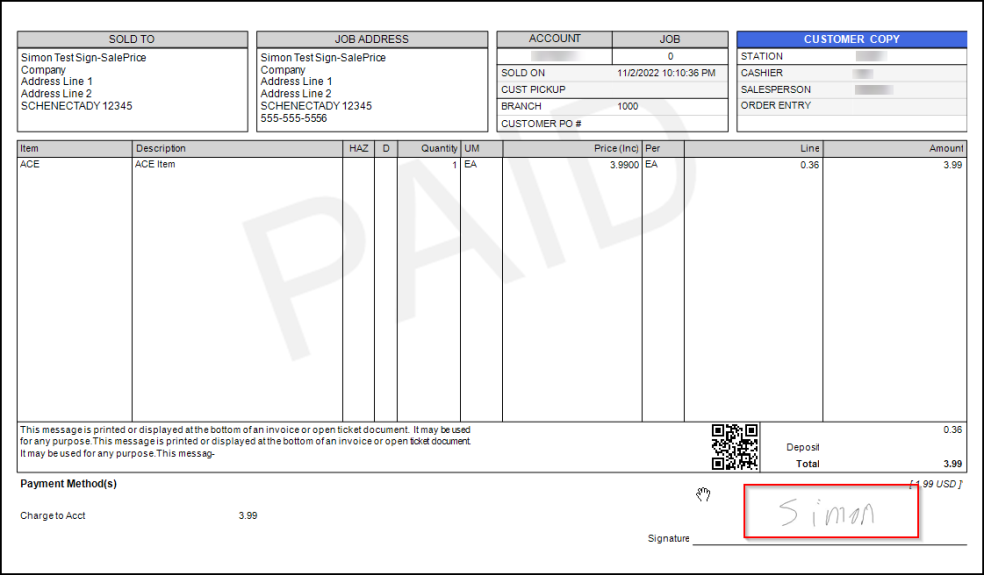
Point of Sale Document with ePad Vision Signature
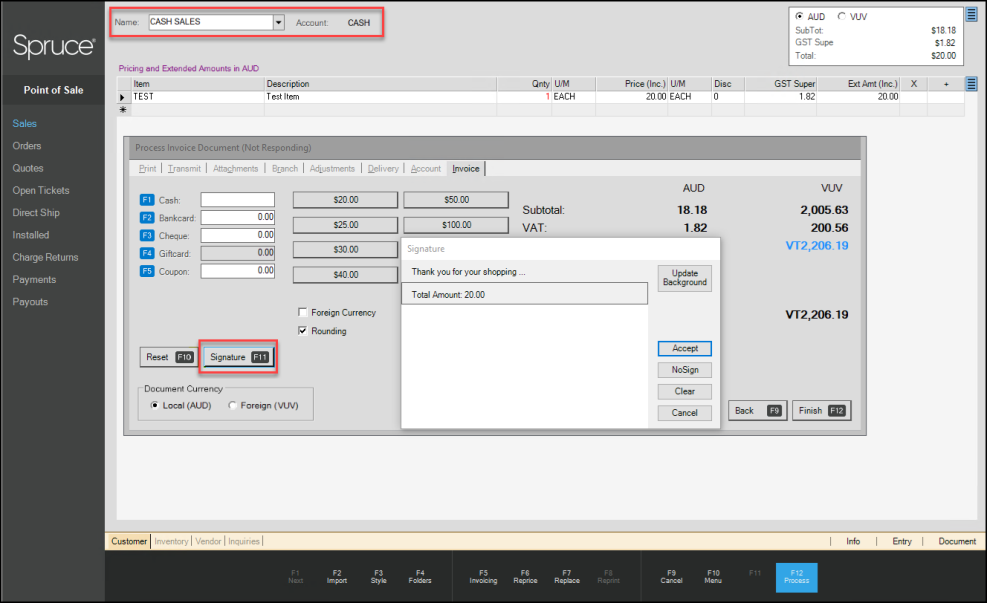
Note: You can also use the ePad signature pad for cash sales by selecting the Signature button on the Process Invoice Document box.
Adding a Slide Show to the ePad-vision Device
To add a slide show to an ePad device:
1. Store the images for your slide show in an accessible directory.
2. From the Control Panel, select ePad-vision (32-bit).
3. When the Select Images box displays, browse to the directory you saved the images in and select them.
A confirmation message displays and tells you how long it will take to load the images (it takes longer, but they do load).
4. When the Transferring Images box disappears you can preview the slide show on the ePad device.