Data Structure and Reporting

This section may be useful for users who do custom reporting or would like to understand the "behind-the-scenes" handling of documents in the application data. This information is more technically advanced and not necessary for most users of the software. Cloud hosted systems won't have direct database access, so for those users, some information may be of limited use. Custom reporting is not necessarily included with your software plan.

Before continuing, please read the important information listed below:

Important!

On premise customers may choose to use SQL queries for reporting and mining information from the data collected by the application; however, all queries should be used with extreme caution. Cloud-hosted companies have no direct database access; however, large queries can be initiated from custom reports and other sources. Users should never attempt to issue any queries that insert, update, or delete data from database tables used by the software, nor should any changes be made to existing tables, procedures, functions, or views. Any external changes to the data can cause serious problems and downtime that affects your business negatively and that may be extremely difficult or impossible to correct. We reserve the right to immediately terminate support if we find evidence of any tampering or manipulation of the data or data structure used by the software.

For your protection, and upon request, we can provide on premise companies with a read-only user name and password to the SQL database server. This should be used for reporting and any queries or other external access to the database.

Even queries that SELECT information can have a negative impact on performance and can potentially "lock" data which can cause long delays in processing or even block the ability to process some or all transactions in the application. Make sure that queries do not lock records (by using the "(NOLOCK)" argument) and limit your queries to reasonable amounts of data by using WHERE conditions.

Please note that application performance is affected by Crystal Reports® or ActiveReports® reporting as well as other software products such as Microsoft® Office® Access® or Microsoft SQL Management Studio when used for accessing large quantities of data. Beyond this documentation, we do not provide support or training in SQL or any third-party software applications; however, there are many outside resources are available to users who want to learn more.

What is SQL?

In order to understand and make use of reporting and data mining, it's best to have some understanding of how a database works and specifically, how the application data is organized.

The application data is maintained in a SQL database. SQL is an abbreviation of "Structured Query Language." A "query" is a text command that selects, inserts, updates, or deletes data residing in a database table. If you decide to use queries in reports or independently, only use queries that SELECT when accessing the application's data. If you need to change data, do so in the software or contact support for assistance.

Data in the SQL database is organized into tables. Each table is dedicated to maintaining a specific type of data. Here's an example of a query command that selects all customers...

SELECT * FROM [dbo].[CustomerMaster] WITH(NOLOCK)

The asterisk (*) selects ALL columns.

Tables contain data records. Each table's records have a predefined structure that all records in that table must use. Different tables may have different structures but all records within the same table must match that table's defined structure. When executing a query command, such as in the example above, records are commonly returned as rows in a grid. This format may be familiar if you've ever seen or used spreadsheet software (such as Microsoft Excel). In many areas of the software, data is also displayed in grids.*

Query ALL Records

Query ALL Records

*Some type of software must be used to present data in format we can view. In this case, we're using a grid and a program designed for data access called SQL Management Studio. It's helpful to think about the data in the SQL database in the format of tables, rows, and columns.

Every row (horizontal) in the table represents an individual data record. Each record, or row, contains information organized by named columns (vertical). The type of data that each column maintains (dates, numbers, text, etc.) is predefined. Columns are given names and can be individually selected and updated. If you look at the example (above), you'll notice column names at the top of each column (AuditTime, CustomerName, etc.). If we only wanted to retrieve the customer's account ID and name from the table, we'd use the following query, for example:

SELECT [AccountNum],[CustomerName] FROM [dbo].[CustomerMaster] WITH(NOLOCK)

Using the same data, the results would be similar to what's shown below:

Query Limited to Selected Columns

Query Limited to Selected Columns

These are extremely basic examples. Queries can get much more complicated.

We mentioned that a database has "tables." The queries previously given as examples only gave us data from one table. This table is named CustomerMaster and maintains some of the general information about customers. The software's SQL database contains approximately 300 different tables. Some tables maintain large amounts of data, others store very little data.

Although each table is designed to store different data or information (customers, inventory, users, etc.), the data in all these different tables often must be related or linked together in some fashion. For example, one customer account may be linked with one or more jobs. The account information is stored in one table, the jobs in another. In order for data in tables to be linked together, there must be something in the data that is a common factor in both or all the tables. In the case of accounts and jobs, the account number is the common factor used to link jobs to a particular customer's account. Both tables include the customer's account number so that this linking may be accomplished.

How are Documents handled in the SQL Database?

Documents are usually linked with some type of transaction such as a purchase order or sale, for example. There are over thirty (30) different types of documents used with the software. Many tables are linked directly with documents, some are not linked at all, and others are only referenced indirectly by other data making up a document (such as customers, vendors, items, etc.).

All documents, regardless of type, share a common basic structure. From this common shared structure, the type of the given document determines what additional data is accessed. For example, an order document has some information that is shared by all other documents but also links with tables that are specifically used for customer order data. There are 2 tables that maintain most of the basic shared information about documents: Documents and DocumentLinks.

dbo.Documents

This table is used by all documents. Information that applies to documents only is maintained here, not any transaction specific information. For example, the documents table contains the type of document, branch, entry user, entry date, modify date, etc.

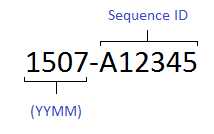
The Documents table (dbo.Documents) also contains an "internal" document ID. This internal ID is very important because it's what's used for linking a document to all other types of data (customer orders, invoices, etc.). This internal id ("DocIDInternal" is the actual column name) is not the same as the document ID visible to users in the software. The ID that users see is actually a combination of two separate columns in the dbo.Documents table and is never used to link data together.

If you are writing reports, always use the DocIDInternal to link the documents table with other data. To display the document ID visible to users, you must use the columns DocYYMM and DocSeq to do this. The column DocYYMM maintains the year-month digits that prefix the document number (these are always numbers). The DocSeq column maintains the characters (alpha or numeric) that comprise the second half of the document ID.

Document_ID

When using the Crystal Reports® software, it's easiest to create a formula to represent the Document ID used in the software on reports. Here's an example of how this would be done. (Note: your report must reference the Documents table to do this)

Crystal Reports: Formula Workship

Crystal Reports: Formula Workship

DocIDInternal is always an integer (number) and is automatically assigned as new records are added to the document table. It is always unique to each document, no two documents will share the same DocIDInternal. To find the DocIDInternal for a specific application document using a SQL query, you could use a command similar to the following:

SELECT [DocIDInternal] FROM [dbo].[Documents] WITH(NOLOCK) WHERE [DocYYMM]=1407 AND [DocSeq]='A12345'

dbo.DocumentLinks

This table is used by any documents that are linked with other documents. Some documents do not have links, but most do. Links are usually created when a document is referenced by some other transaction (selling a customer order, for example) or as a result of some type of external processing (receivables billing, end of day processing, etc.). This table references the DocIDInternal and also a LinkDocIDInternal. Both columns are populated with "internal" document IDs; however, the DocIDInternal represents the document the link belongs to (parent), the LinkDocIDInternal is the internal ID of the "child" document linked with the parent. One parent document may have many children. The following SQL query would select all links to the document ID 123456:

SELECT * FROM [dbo].[DocumentLinks] WITH(NOLOCK) WHERE [DocIDInternal]=123456

Linking Documents to Other Data

Once you have the DocIDInternal, you can link the document to other data because each table that links with documents will also have a DocIDInternal column.

Document Types

It is likely that you will want to view information about a particular type of document, not all documents. The type of document is indicated by the column named DocType which holds a numeric (integer) value. Unless you have a list of what the DocType numbers represent, these aren't much use. Thankfully, a table named DocumentTypes is provided that includes information about each document type. The following query gives a listing of all document types in numerical order:

SELECT [DocType],[DocTypeDesc] FROM [dbo].[DocumentTypes] WITH(NOLOCK) ORDER BY [DocType] ASC

This query returns a listing similar to the following table which you may use for reference:

1

IN Receipt Cost Corrections

2

IN Inventory Adjustments

3

PO Inventory Receipts

4

IN Physical Counts Entry

5

IN Price Updates

6

IN Sale Flyers

7

IN Physical Counts Posting

8

PO Purchase Orders

9

PS Customer Orders

10

PS Sale Invoices

11

PS Cash Payments

12

PO Vendor Quotes

13

IN Yard Transfers In

14

IN Yard Transfers Out

15

IN Item Cost Corrections

16

PS Customer Quotes

17

PS Open Tickets

18

PS Charge Returns

19

PS Cash Payouts

20

AR Statements

21

AR Credit Adjustments

22

AR Debit Adjustments

23

AR Payment Entry Session

24

AR Payment Posting Session

25

AP Billing Invoice

26

AP Vendor Credit

27

AP Check Run

28

GL Journal

29

GL Posting

30

IN Work Order

31

PS Canceled Invoice

32

PS Open Direct Inv

33

PS Direct Invoice

34

PS Installed Sale

35

DD Manifest

36

IN Vendor Return

From the listing above, we can see that type nine (9) is used for customer orders. To select just customer orders, we limit our query to records with a DocType of 9 (we will also limit our query to the "top" 10 records to keep the query results manageable):

SELECT TOP 10 * FROM [dbo].[Documents] WITH(NOLOCK) WHERE [DocType]=9

Document data alone doesn't provide much (if any) useful information about customer orders beyond that an order document exists. If we want to link the Documents table with some specific fields from the OrdersHdr (Customer Orders Header) table, we can use a "JOIN" statement in our query:

SELECT TOP 10

  [dbo].[Documents].[DocIDInternal]

  ,[dbo].[Documents].[DocType]

  ,[dbo].[Documents].[DocYYMM]

  ,[dbo].[Documents].[DocSeq]

  ,[dbo].[OrdersHdr].[OrderType]

  ,[dbo].[OrdersHdr].[Account]

  ,[dbo].[OrdersHdr].[Job]

  ,[dbo].[OrdersHdr].[Name]

  ,[dbo].[OrdersHdr].[OrderUser]

  ,[dbo].[OrdersHdr].[OrderDate]

  ,[dbo].[OrdersHdr].[OrderTotal]

FROM [dbo].[Documents] WITH(NOLOCK)

INNER JOIN [dbo].[OrdersHdr] WITH(NOLOCK)

ON [dbo].[Documents].[DocIDInternal]=[dbo].[OrdersHdr].[DocIDInternal]

WHERE [dbo].[Documents].[DocType]=9

This query gives us information from two (2) tables and uses the DocIDInternal columns to match document data with the appropriate customer order data.

There are a number of different ways to use a JOIN statement. "INNER JOIN" (same as just "JOIN") requires that for the query to return any record, there must be records matching the criteria in both tables. For example, if there was a DocIDInternal in the Documents table for an order that did not exist in the OrdersHdr table for some reason, the SELECT query wouldn't return a record for that document. There are also LEFT, RIGHT, and FULL type JOIN operators. Each of these handle the linking of tables somewhat differently.

There are other ways to link tables together without using a "JOIN" command. It's possible to assign an alias to each table listed in the FROM statement and then use those aliases to identify which table each column references. In this case, the linking columns are specified in the WHERE section instead of using the join command's "ON" operator.

Here's a different way of doing a query similar to the one above without using "JOIN"...

SELECT TOP 10

  doc.DocIDInternal

  ,doc.DocType

  ,doc.DocYYMM

  ,doc.DocSeq

  ,ord.OrderType

  ,ord.Account

  ,ord.Job

  ,ord.Name

  ,ord.OrderUser

  ,ord.OrderDate

  ,ord.OrderTotal

FROM [dbo].[Documents] doc WITH(NOLOCK), [dbo].[OrdersHdr] ord WITH(NOLOCK)

WHERE doc.DocType=9 AND doc.DocIDInternal=ord.DocIDInternal

The query shown above designates an alias for each table in the query: doc and ord. The alias is then used in place of the full table name to designate which table each column is being selected from. A different alias must be used for each table. The length of the alias can vary. For example, we could have used a single character such as d instead of doc.

Whenever the same column name exists in multiple tables, it's necessary to explicitly reference which table the column name is being queried from. In the application's database, a few columns, such as DocIDInternal and others, are used with many different tables. If you attempt to run a query where the same column exists in multiple tables and the parent tables are not explicitly referenced, an "ambiguous column" type error will be reported.

Linking Documents to Data in Crystal Reports

Queries can be used with the Crystal Reports software in place of standard table selection, but there are also ways in the Crystal Reports application to link data from tables without using a query. In the Crystal Reports software, the Database Expert is used for establishing a connection to a database, for choosing the tables or views you want to use, and for establishing how those tables should be linked.

Here's a step-by-step example of how you would create a report that uses documents and customer order data together using Crystal Reports:

1. Open the Crystal Reports software (one license is included with the majority of contracts).

2. Choose "Blank Report" or "Standard Report Wizard." We use "Blank Report" for our examples, but the report wizard is very similar.

If necessary, choose Database Expert from the Database menu. The Database Expert may have already been displayed as soon as you chose "Blank Report."

3. From the tree on the left, choose "Create New Connection." This displays a list of connection options.

Crystal Reports: Database Expert - Creating a New Connection

Crystal Reports: Database Expert - Creating a New Connection

4. Click the + next to OLE DB (ADO). Another dialog titled, "OLE DB (ADO)," should open.

5. If your company has its own server that's available from your LAN (Local Area Network), you can either (1) directly connect to the server or (2) use a "data link" file with the connection information. To directly connect, choose "Microsoft OLE DB Provider for SQL Server" from the "Provider" listing and click the Next > button. You must know the server's address or name and database name as well as a valid SQL user name and password. If you are cloud hosted, you will not be able to connect directly must use a data link instead.

Crystal Reports: Choosing the OLE DB Provider

Crystal Reports: Choosing the OLE DB Provider

6. The OLE DB (ADO) window will display advanced information. Click the Finish button to attempt to establish a connection to the database. If the connection fails, verify the information, check network availability, etc. and try again. If you are unable to establish a connection, consult your company's IT professional for assistance (cloud hosted systems should contact Support). Verify the IP address of the SQL server, database name, and your user ID/password (the default read-only user name and password are spruceuser and spruceuser$ respectively for locally installed servers; for cloud-hosted applications, the user information will vary and won't be necessary if you have a valid data link).

8. If the connection was successful, the server will be listed within the tree on the right along with the database name (usually "<something>DotNet" or something similar).

Crystal Reports: Database Expert

Crystal Reports: Database Expert

9. At this point, you can access the SQL data using a few different methods. One option is to choose tables and/or views from the database for your report. Another option is to use the "Add Command" option to specify an existing SQL query (more advanced). Using a SQL command or view is preferred to using tables directly (which may cause locking).
 
To continue our example, we will choose some tables by clicking the + to expand the Tables or Views node (a view is a previously saved selection query that accesses selected information from one or more tables). This should list all of the tables in the application database.

10. From the listing of tables, click on the following three (3) tables and either drag them to the Selected Tables panel on the right or click the ">" button after selecting each table: Documents, OrdersHdr, and OrdersDtl. This will allow us to include any of the data in these tables with our report.

Crystal Reports: Database Expert - Choosing Tables

Crystal Reports: Database Expert - Choosing Tables

11. After choosing the tables, click the Links tab (the "Links" tab should appear after selecting more than one table). The Crystal Reports software may establish links for you automatically based upon the structure of the database and column names. If not, you can create your own links between tables or view by selecting a field in one table and dragging that to the corresponding field in another table (or view) window using your mouse. Once links have been established between all three (3) tables using the DocIDInternal column, click OK.

Crystal Reports: Database Expert - Links

Crystal Reports: Database Expert - Links

Congratulations! If you've made it this far, you've established a connection and are ready to begin writing a report using information about documents and customer orders. Use the Field Explorer panel and Database Fields node to choose the information from the database tables you want included on the report. For more instructions on a basic customer orders report, continue reading below.

Crystal Reports: Report before Adding Fields

Crystal Reports: Report before Adding Fields

Adding Fields

When writing reports, it's best to begin with the most detailed information and then add the summary information later on. Information is added to the report by choosing the fields you want to include on the report from the Field Explorer panel and dragging & dropping them in the appropriate section in the Design or Preview tab.

We strongly suggest using the Design tab for any changes you make to the report, it's much easier. Fields can be moved around and re-sized once dropped in the appropriate area. In addition, the Crystal Reports software will create column "headers" for each field you add automatically. These can be removed, re-sized, and/or modified to your preference.

A basic report begins with a selection of defined sections: report header, page header, details, report footer, and page footer. Let's assume our report is listing customer order details (items) but we also want to include some summary information about the customer order like the customer's name and the document ID, for example.

Adding Database Fields in the Design Tab

Adding Database Fields in the Design Tab

We can add these along with item details to the "Details" section; however, our customer's name and document ID will be repeated over and over for each item on each order. This repetition is a waste of space and takes up room that we could use for more information about the items ordered.

Preview after Adding Database Fields

Preview after Adding Database Fields

Groups and Report Sections

Instead of adding this information to the details section, create a new section using the group tool.

Crystal Reports: Insert Group

Crystal Reports: Insert Group

Choose the field to group records by. In this case, we'll use our document ID (DocID is a formula we created using the DocYYMM and DocSeq fields from the Documents table).

Crystal_Reports_Add_Group

A new group "section" now appears in the design and preview tab panels. Our details section remains the same, but now all the items for each order are grouped together.

Report Preview with Group

Using the Design tab, remove the DocID from the details section, and move the other summary fields (account, job, and name) from the details section to the group section. This will make room for additional detail about each item ordered such as the description, units of measure, and price.

Notice how the group we added has both a "header" and "footer" section. It is possible to "hide" both used and unused sections, so if you didn't want the "footer" to display it can be hidden, for example. You can also adjust the size of any section by moving the horizontal bars located between sections either up or down in the Design tab.

Crystal_Report_Design_Group

If you now view the Preview of the report, it will look a bit different...

Crystal_Report_Preview_Group

Notice how we have moved the repetitive information to the group area so that it only prints once per document. This left us room to add more information about our items. One downside to adding sections is that each new section will increase the length of the report. Our example report went from 58 to 106 pages by adding just one group for instance.

Adding a Summary

Summaries can be added to your report for a number of reasons but are probably most often used for providing totals. Some other ways summaries might be used are for calculating averages and for displaying the minimum or maximum values for whatever field you are summarizing. To make adding a summary easier, click the field on the report you want to summarize and then click the "Insert Summary" button ().

Crystal_Insert_Summary

A window opens when adding a summary. If you previously selected a field, it will be the selected field to summarize; otherwise, select the field you want to create a summary of. Choose a method for calculating the summary (use SUM for a total). Next, choose the location for the summary. In the case of our report, we'll place the summary in our DocID Group. If your report doesn't already have a group, you can create a new group for the summary from this form using the Insert Group button. You can add as many summaries as you want and you can create different summaries for the same field (this would be done if you wanted both a group summary and also a report summary, for instance).

Crystal_Reports_Insert_Summary

After clicking the OK button, the summary field is added to the footer section of the selected location. In this case, our new summary field will be placed in our group footer area below the field we chose to summarize. Summary fields default to be displayed in bold text. The appearance of any field or text, including summaries, can be adjusted (this includes modifications to the display area size, font, boldness, italics, font size, color, etc.).

Creating Parameters for Selection

It's pretty likely that with most document based reports, you are going to want to limit information to a specific time period. It's equally likely that the time period won't always be the same. To make this possible, you need to create parameters. Parameters request some type of information from the person running the report (could be date ranges, user names, account ID, etc.). The information supplied can be used for record and group selection.

We will create two parameters for our report, starting date and ending date. To add a new parameter, choose New from the alternate menu for Parameter Fields in the Field Explorer panel (as shown below).

The "Create New Parameter" form will open.

Crystal_Reports_Create_New_Parameter

Change the parameter name to Starting Date and modify the Type to Date. The form should appear similar to the example below. Click the OK button.

Crystal_Reports_StartingDate

Add a second parameter following the same instructions only name it Ending Date. You should now see two (2) parameters listed if you expand the "Parameter Fields" node in the Field Explorer panel.

Parameters won't do anything on their own, the report must use them in some way. Often, parameters are used for record or group selection. These options allow you to add additional conditions to the data being retrieved. For example, selection options could be used to filter out sold orders and only include open orders on our report. We are going to use the group selection option for our report. This can be done from the Report menu, Selection Formulas, and Group options in the Crystal Reports software.

The Formula Workshop form will open. This allows us to specify conditions for group selection. In our case, we are going to limit the groups (in this case order documents) to just list those with an Order Date between or including our parameter dates (Starting and Ending). Basically, the formula panel is on the bottom-right. The three (3) panels above the formula panel are used for picking report/database fields, functions, and operators. We only need to use the first option (Report & Database fields) to add our condition in this case. Multiple conditions can be included by using "AND" between each statement.

Click the Save and close button at the top of the form. When done, the report will immediately prompt you to specify the new parameters (because they are now required for group selection).

Crystal_Reports_Parameters

Choose a range of dates, and click OK. The report data should now refresh and only show orders between the dates you selected.

Congratulations Again! If you've made it this far, you've written a report that includes data from multiple tables, groups detail records by document, provides totals, and requests parameters for date range selection.

What did we leave out?

We left out a lot. The Crystal Reports software is a powerful tool and there are entire books and training courses dedicated to its use. We are unable to duplicate what's already available and adequately support the software at the same time, so it's your job to seek out any additional resources for learning more about the Crystal Reports application. However, this section should give you an idea about how application data is organized, and some basic instructions for creating a report using some of that data.

Given this, we should mention that beyond the most basic reports, report writing is a complex and time consuming task. It's not for everyone. Many users won't find the time to learn how to write reports. Learning reporting takes time, and without some instruction or reference materials, it can be frustrating for some.

As an alternative, support staff can write reports for your company but we bill for our time. In addition, our web site's support area has over 130 reports that you can download and use for free. Any of these reports may be modified to meet your needs. Existing reports can also be useful as examples when writing your own reports.

Crystal Reports is a trademark of SAP Business Objects.

Crystal Reports is not a product of ECI Software Solutions, Inc. and we are not affiliated with SAP Business Objects in any way. Custom reports software is not necessarily included with every Spruce contract. We are unable to provide training or support for third party products beyond any documentation we may offer. A number of resources are available for learning about Crystal Reports that are provided by other sources.