Foreign Currencies
Working with foreign currencies is an important part of being able to compete in a global marketplace. This section contains information about setting up your system to handle foreign currency transactions and processing foreign currency transactions at the Point of Sale. Check with your ECI Implementation or Support team to see if your system is set up for multi-currency or customs manifest before you begin.
Setting up a Foreign Currency
To add a new foreign currency to your application:
1. From the Main Menu, go to Point of Sale > Database > Currency Codes to display the Currency Code Maintenance form.
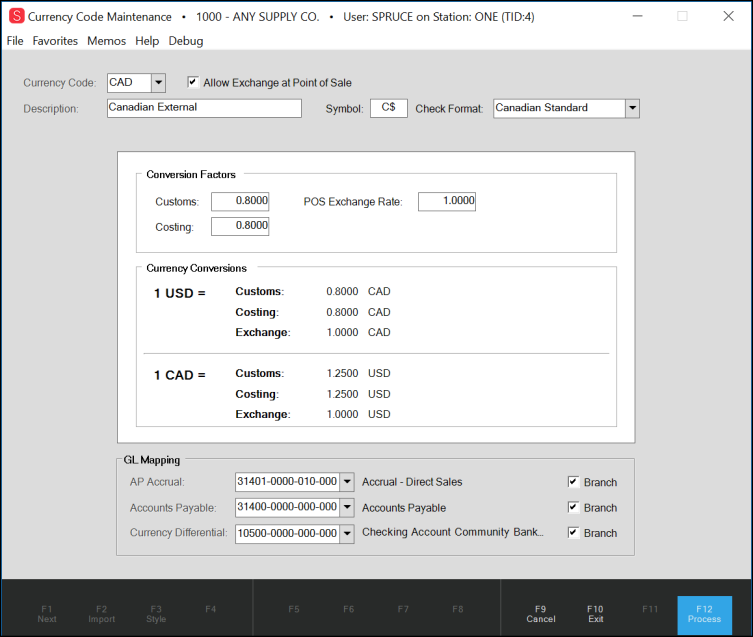
Currency Maintenance Code Form with Entries
2. Complete the fields in this list using the currency information appropriate for the currency you are adding:
-
Currency Code
Type the ISO Currency Code for the currency you are adding to your application. Some currency codes have been added already.
Note: If you select a currency from the list, many of the fields of the options will prefill with the existing settings. You can choose new options for these entries if appropriate.
-
Allow Exchange at Point of Sale
Select this check box to ensure that the currency change is supported in the Point of Sale data grids. If you do not select this check box, the application still displays the multicurrency options in Purchasing and Payments. -
Description
Enter a description for this currency type, if needed. -
Symbol
This is the currency symbol the application uses to identify the foreign currency. You can enter up to four characters in this field. -
Check Format
Choose the appropriate check format based on the currency you are adding. -
Conversion Factor: Customs, Costing
Conversion factors define how the application evaluates the difference between your native currency and the currency you are adding. If you are using the Customs Manifest, you would enter the exchange rate for both the Customs and Costing fields. If you are using Multi-Currency, you would only enter the exchange rate in the Costing field. -
Conversion Factor: POS Exchange Rate
Enter the exchange rate for the new currency in the POS Exchange Rate field; the application will use this rate to determine to calculate the cost of materials in the Point of Sale data grids.
After you complete these conversion factor entries, the application displays examples of these calculations in the Currency Conversions table. -
GL Mapping: AP Accrual, Accounts Payable, Currency Differential
Use these fields to identify the GL accounts you want these transactions to be maintained in. Select the Branch check box to track these entries by branch.
3. When you have completed these entries, click Process (F12) to save your entries.
Calculating/Displaying Foreign Currencies in Point of Sale/Documents
If you have consumer accounts that use a currency different from your own, you can reset their accounts to recognize and use their foreign currency. This change allows the application to display all Point of Sale information in your consumer's local currency and produce Point of Sale documents that reflect their currency amounts.
When you make this change, the foreign currency shows in the Point of Sale forms and the documents that result, including sales invoices, orders, quotes, direct ship documents, and returns. You must have multi-currency enabled and currency conversion parameters (described below) set up before using this feature.
ECI Implementation and Support teams can set regional currency options for your application so that when you are working with accounts that use a foreign currency, you can provide pricing and documents (including tickets/receipts) in your consumer's local currency. These settings are based on the International Organization of Standardization guidelines and should not be reset independently. After these options are set, foreign currency settings can be shut off, but not modified.
Adding a Foreign Currency Type to a Group of Accounts
There are two new field name options in the Account Global Modify form that allow you to modify the currency settings for a single account or a group of accounts to show the consumer's foreign currency in the Point of Sale data grid and related documents. The field name options are:
-
Currency Code allows you to specify the code you want to change the consumer's account to
-
Currency Pricing POS allows you to apply this currency code setting to the Point of Sale data grids and documents in the consumer's account.
Changing an account's default currency code and applying it to the Point of Sale infrastructure allows the application calculate and quote prices in sales, orders, etc. using the consumer's own currency. This makes it much easier for them to see their actual costs.
These instructions explain how to set up these two field name options for a group of accounts. You can follow the instructions for a single account as well.
TIP: You may want to go through your list of accounts and group the accounts that will use the same currency code either as a class or an account type before you start this process.
To set up foreign currency codes for one or more account(s):
1. Check with your ECI Implementation or Support team to ensure that Multi-Currency is turned on for your application and the currency conversions have been set up for the consumer's foreign currency.
2. From the Main Menu, go to Point of Sale > Utilities > Maintenance > Account Global Modify to display the Account Global Modify form.
3. From the Field Name list, choose Currency Code.
4. From the Old Value list, choose the default currency code you currently use for the accounts.
5. From the New Value list, choose the account's foreign currency code from the currencies you have defined.
6. From the Filter options, consider the accounts you want to change the currency code for and choose the appropriate instructions to search for those accounts:
-
To change the currency code for a particular class of accounts, choose the class that contains those accounts from the Class list.
-
To change the currency code for consumers with a particular account type, choose that account type from the Account Type list.
-
To change the currency code of a single account, enter the account number in the Acct Match field.
7. When you have completed your account type selection, click View (F8) to display the list of accounts that match your search criteria.
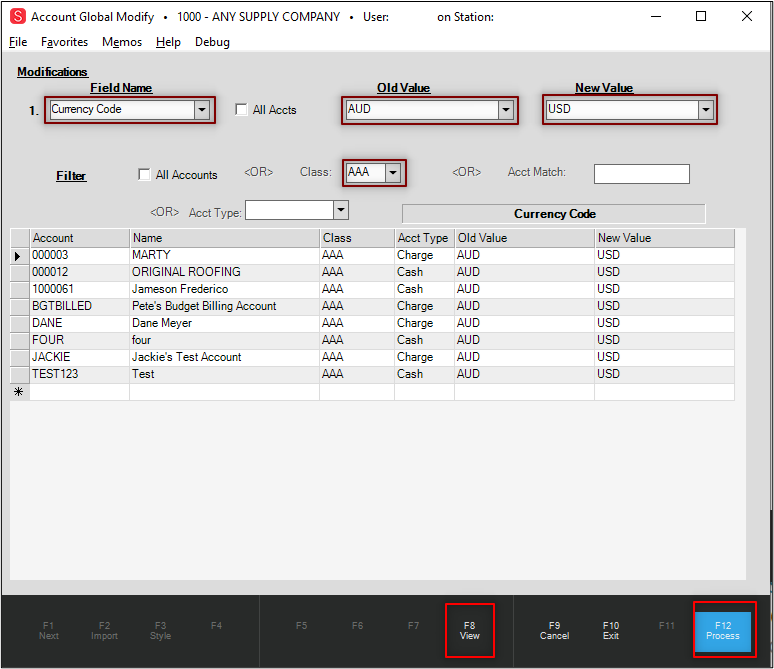
Account Global Modify Form with Account Search Results
8. Review the accounts in the list to ensure this is the list of accounts to which you want to apply the new currency code.
9. Click Process (F12) to apply the currency code to those accounts.
10. Return to the Field Name list and choose Currency Pricing POS.
11. From the Old Value list, type N.
12. From the New Value list, type Y.
13. As you did in step 6, choose the same filter options to display the same group of accounts.
-
To change the currency pricing in the POS for a particular class of accounts, choose the class that reflects those accounts from the Class list.
-
To change the currency pricing in the POS for a particular account type, choose the account type of those accounts from the Account Type list.
-
To change the currency pricing in the POS for a single account, enter the account number in the Acct Match field.
14. After you have made your account selection, click View (F8) to display the list of accounts that match your search criteria.
15. Review the accounts in the list to ensure this is the list of accounts to which you want to apply the new currency pricing.
16. Click Process (F12) to apply the currency pricing change to those accounts.
For the accounts you selected, the currency settings have been reset and the consumer's currency should display in the Point of Sale data grids and documents.
Setting a Foreign Currency for an Account
After you complete the currency settings for a particular foreign currency, you can apply that foreign currency to a particular account. When you do, you can use the application to create sales, orders, quotes, returns, etc. for the consumer in their own currency.
To set the foreign currency for an account:
1. From the Main Menu, go to Point of Sale > Database > Account to display the Account Maintenance form.
2. In the Account list, find the account you want to work with. The account record displays.
3. Click the Codes tab to display the option codes.
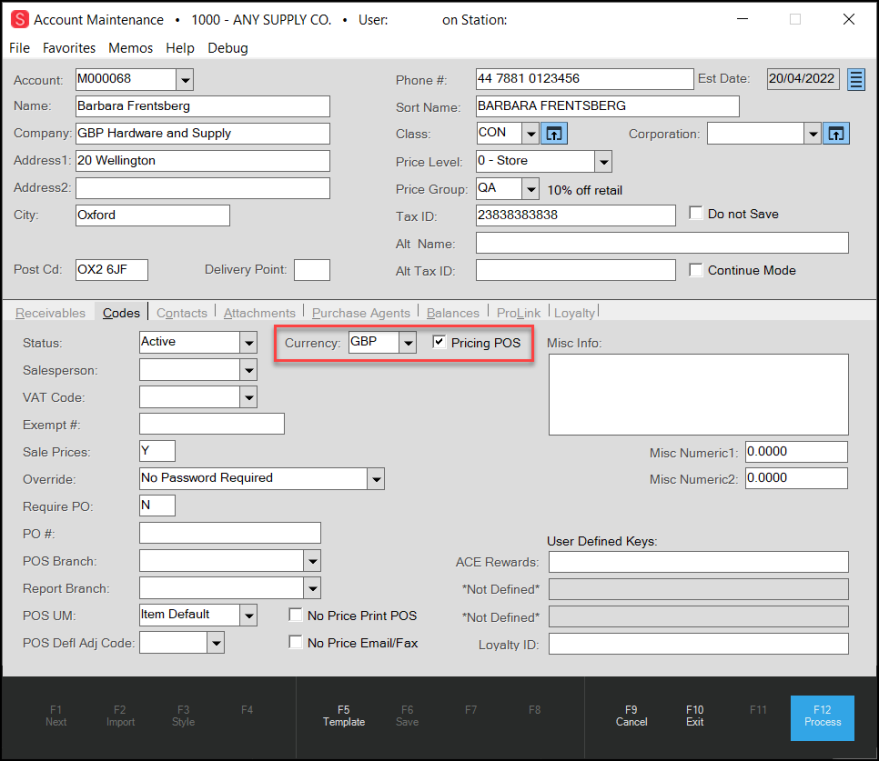
Account Maintenance Form with Currency List Highlighted
4. From the Currency list, choose the currency that this account uses to do business with you.
5. To use this currency setting in the Point of Sale system, select the Pricing POS check box.
6. When you have completed your entry, click Process (F12) to save this setting.
New Support for Regional Currency Denominations (Notes and Coins)
In this release, we have created the infrastructure to support the addition of new currency denominations. These denomination settings (currency notes and coins) help you record end-of-day cash drawer amounts better.
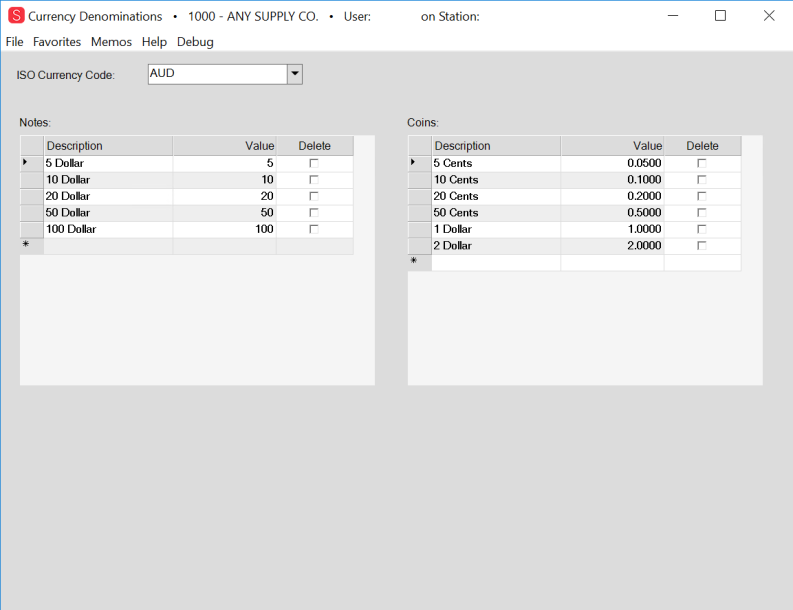
Currency Denominations Form
We have established denomination records for our currently supported currencies; however, as you expand into new markets, you can add denominations that meet your needs.
Note: These currency denomination values are based on ISO-4217 Currency Codes (https://www.iso.org/iso-4217-currency-codes.html).
Important Note about Setting up Currency Code Maintenance
When you need to use foreign currencies, your Implementation and Support teams need to configure several application areas to ensure that the application manages these currencies correctly. We recommend that you work with them to complete this setup before you begin to use them.
Reviewing your Account's Currency Denomination Settings
For more about setting up your regional currency code, see Setting a Regional Currency Code, Regional Tax, and Cash Remittance Rounding Options. These settings are required for regions that do not use the US Dollar as a standard currency.
To review an account's currency denomination settings:
1. From the Main Menu, go to Maintenance > Database > Parameters > Point of Sale > Regional tab to display these options:
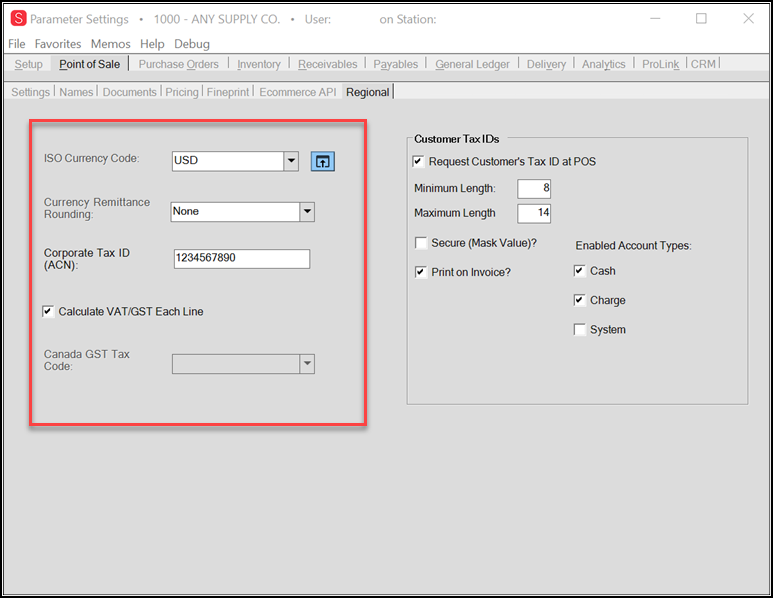
Parameter Settings – Point of Sale – Regional Settings
Note: The entries in this form depend on the Region settings that have been entered for this account in the Region Setup Utility form.
2. In the ISO Currency Code field, choose the three-character ISO Currency Code for the account’s native currency. Typically, one of these currency code options is selected, but our team can set up other currencies as your market needs expand:
-
AUD = Australian Dollar
-
CAD = Canadian Dollar
-
GBP = Great Britain Pound Sterling
-
PGK = Papua New Guinea Kina
-
XCD = St. Kitts and Nevis East Caribbean Dollar
-
TZS = Tanzanian Shilling
-
USD = US Dollar
-
VUV = Vanuatu Vatu
3. To see the denominations associated with the selected ISO currency, click the Settings  icon beside the ISO Currency Code. The Currency Denomination form displays. This list shows the note and coin denominations of the currency.

Currency Denominations Form
4. Click Close to return to the Regional tab.
Currently, there are pre-defined denomination settings for currencies in the following regions: United States, Canada, Great Britain, Australia, St. Kitts & Nevis, Vanuatu, Tanzania, and Papua New Guinea.
Getting Permission to Set up a Currency Denomination
If you need to add new denominations (notes and coins), use the instructions below to see the Currency Denomination options.
To add currency denomination settings to a user’s (or user group’s) permissions:
1. From the Main Menu, go to Maintenance > Database > User IDs to display the User ID Maintenance form.
2. On the Security Options tab click the Permissions List button to display the Permissions List Code Maintenance dialog box.
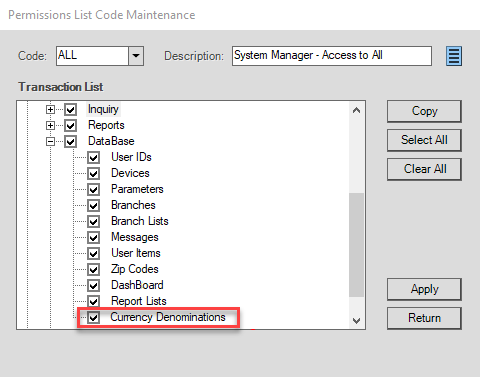
Permissions List Code Maintenance with Currency Denominations Highlighted
3. In the Code list, choose the user ID or group you want to set the permissions for to ensure you are adding permissions for the appropriate user/type.
4. Under the Maintenance > Database node, click the Currency Denominations check box and click Apply.
This adds the Currency Denominations option to the user's Database menu.
Note: You may have to exit and re-enter the application to ensure this change takes effect.
Setting up a New Currency Denomination
By default, we include currency denominations for the following regions: United States, Canada, United Kingdom, Australia, St. Kitts & Nevis, Vanuatu, Tanzania, and Papua New Guinea in our software. If you are adding a new currency that requires new currency denominations, use these instructions.
To set up new currency notes and coins for a new currency type:
1. Complete the instructions in Getting Permission to Set up a Currency Denomination first.
2. From the Main Menu, go to Maintenance > Database > Currency Denominations option. The Currency Denominations form displays.
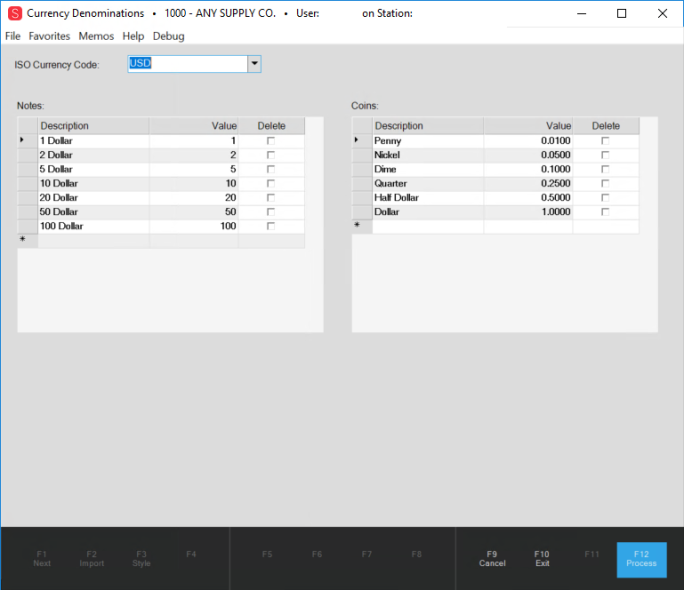
Currency Denominations – US Currency Example
In this form, we maintain a list of the notes and coins and their values associated with each currency type used by the customers we serve. We use this information in rounding and in the Cash Drawer Tally tracking feature, as well as for the quick cash options in the Point of Sale process forms.
3. To add denominations for a new currency, in the ISO Currency Code field, type the three-character currency code of the currency you want to add and press Enter.
A reliable list of ISO 4217 Currency Codes is available here. The Notes and Coins lists refresh with blank fields.
4. In the Notes list Description field, enter the name of the currency denomination by typing the number and name of the denomination.
For example: 1 Dollar
5. Press Tab and in the Value field, enter the value of this denomination using numbers and decimal values, if decimal values apply to this currency.
6. Continue to enter additional increasing denominations using steps 4 and 5 and repeat these steps in the Coins list if the currency uses coins.
We have added the currency for Bermuda (BMD) as an example:
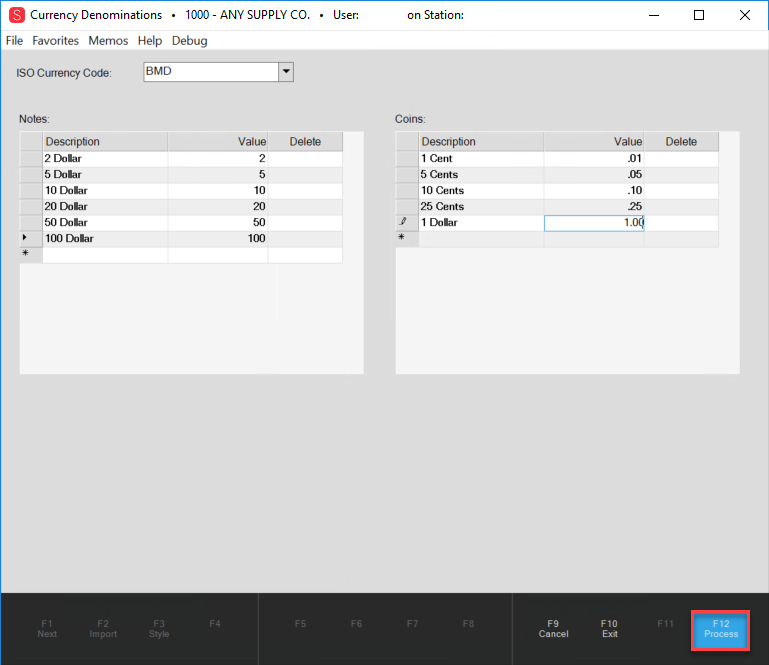
Currency Denominations Form – Bermuda (BMD) Currency Entered
7. After your entries are complete, click Process (F12), to save your denomination entries.
After your currency settings and denominations are configured, the Cash Drawer Tally feature will use the denominations for tallying the end-of-day cash drawer totals.