Handling Expiring Card On File Settings
Cayan’s auto-update service (CAU) queries the secure databases of the major credit cards (Mastercard/Visa/Amex/Discover) to find expiring Card On File records and updates the card settings as they become available automatically. If your business does not subscribe to this service, it may be difficult to stay on top of these client account’s Card On File updates. There is a Auto Update Token feature that provides a safety net for Cayan users that retrieve card expiration information and updates that data in the application. This update runs nightly, when this feature is enabled. While this does not include support for cards that customers deactivate or new cards that a customer obtains, it ensures that your customers can continue to use their current tokenized payment method at Point of Sale and that the card data is updated before the Card On File token expires. This feature is available to businesses that use Cayan devices for Sales, Orders, Direct Shipments, Payment, and Payout transactions. The payment types we are supporting using this feature are Receive on Account, Order deposits, and Direct Shipment deposits. We also provide a Token Update Tool that allows you to review tokens that are expiring and update the expiration date and even the postal (ZIP) code, if needed.
Behind the scenes, we are breaking out some information that the application stores in the Cayan card token’s Description field, including card type (Mastercard, Visa, etc.) and the last four digits of the card itself. This allows the application to refer to this information specifically when reviewing card on file information in the Cayan API (which tracks the status of the Card On File token information). We also added a new system check that runs nightly to query the Cayan API to update the matching Cayan tokens with the latest card type, last four digits, the card expiration date, and the card holder name. When you enable the Auto-Update Token feature, the system check runs the same evening. This system check information is available on the Universal Log.
Work with your ECI Account Management team members about pricing so they can enable this feature for you. They will work with your ECI Implementation or Support team member to enable the features discussed in this section.
Card On File Expiration Report Shows Expiration Data
We have added a new report, the Card On File Expiration Report, to help you collect Card On File tokens that are about to expire or that have expired. This report gives you a way to have the conversation with your customer so you can collect the updated credit card information so you can update your token. This report is only available when you have the Auto Update Token parameter set as discussed in Enabling the Auto Update Token Feature for Cayan Implementations.
To run the Card on File Expiration ActiveReport:
1. From the Main Menu, choose Point of Sale > Reports > Custom Report Library > ActiveReports tab to display the Point of Sale Custom ActiveReports list.
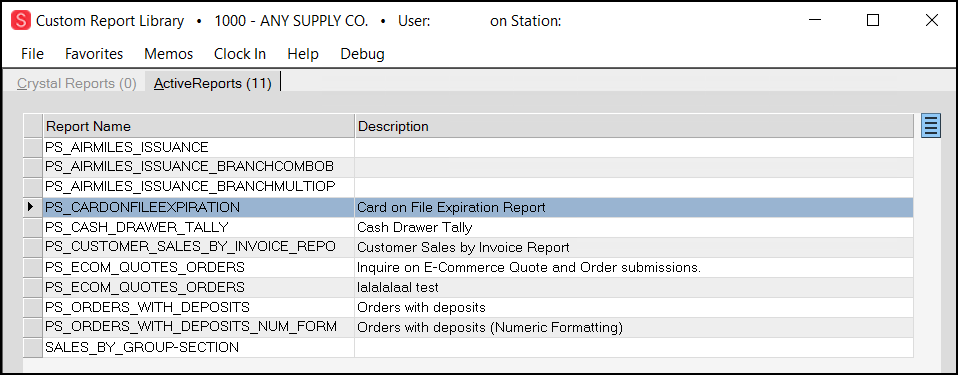
Custom Report Library > PS Card On File Expiration Report Highlighted
2. Double-click the Card on File Expiration Report entry in the list to display the report parameters:
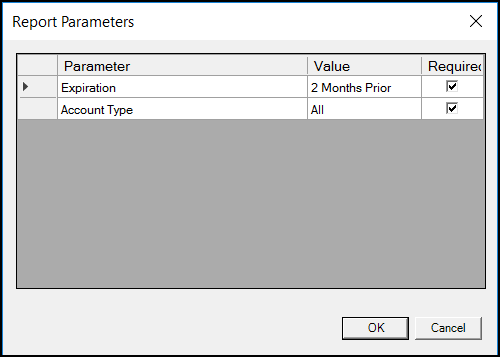
Card On File Expiration Report Parameters (Both Entries Required)
3. Choose the report parameters from the Value drop-down lists. The report collects the token records based on this criteria.
-
Expiration
Choose the expiration date value you want for this report. Options include Expired, 1 Month Prior, or 2 Months Prior. -
Account Type
Choose the type of account you want to collect the report values for. Options include All, Cash, or Charge.
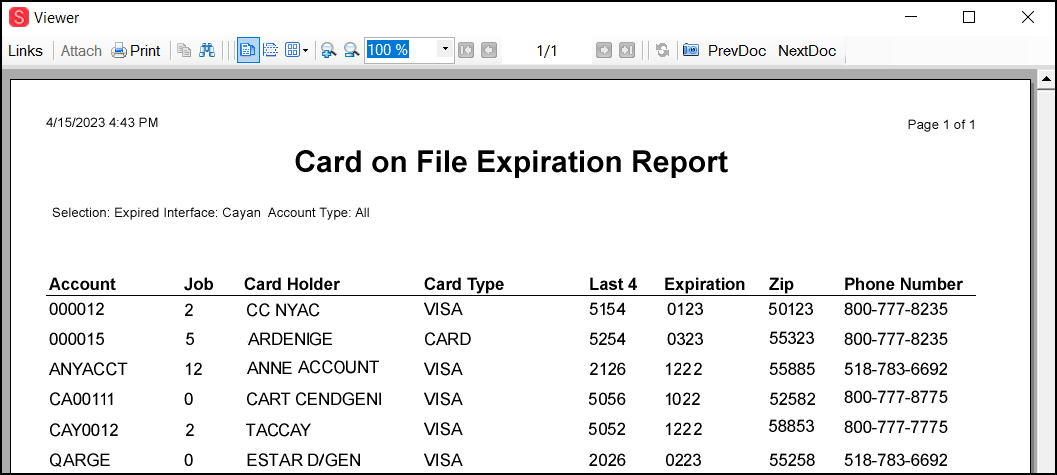
4. When you have completed your selections, choose OK. The application collects the records that match your criteria and displays the results in a Viewer window.
5. From here, you have these options:
-
To print, save as an output file, or transmit this report, choose Print (F8). The Document Print box displays so you can choose the options that work best for you. Select the options and settings you want and choose Finish (F12) to execute them.
-
To print the report using the standard settings, choose Process (F12). The application uses your standard settings to print, save, or transmit the report as you usually do.
Updating the Card On File Token Information Manually
After you have collected the customer’s updated token information, you can use the Card On File Token Update Utility to update Cayan Card On File token information in the application. To use this tool, make sure the Auto Update Token parameter is enabled and the user working with this utility does not have the Restrict Add/Replace Card On File permission (in their User ID > Application Security settings) checked. Management must also grant access to this utility specifically, as defined in Restricting Access to the Token Update Utility.
If a customer asks you to remove the Card On File token from their account, you can do that in this utility too. If you choose this option, the application deletes the token from the account when you process the changes.
To review and update Card on File tokens:
1. From the Main Menu, choose Maintenance > Utilities > BankCard Maintenance. The BankCard Maintenance form displays.
![]()
BankCard Maintenance Form
2. Use the Expiration filter to display the records that you want to review:
-
Expired
Select this option to display the token records that have already expired.
Note: It makes sense to use this filter in the beginning. Using the other filters help you stay ahead of the customer’s expiration date. -
One Month Prior
Select this option to display the token records that are set to expire within one month. -
Two Months Prior
Select this option to display the token records that are set to expire within two months.
3. When you have selected the expiration filter you want, choose Apply Filter.
The token records that math your filter criteria display.

BankCard Maintenance List with Expired Records
You can sort this list by selecting a column heading.
4. From here, you have two options:
-
To update the expiration date and/or postal (Zip Code) for a Card On File record in the list, place your cursor in the appropriate field and enter the new information.
-
To delete a Card on File token from an account, select the Delete check box beside the account record.
Note: When you delete this record, you cannot undo it and the customer cannot use the token again. You would have to re-add the token again.
5. When you have made your selections and changes, choose Process (F12) to save them.
The Results column updates to describe the changes you made. The application deletes the tokens you specified, when applicable, from the database.
Restricting Access to the Token Update Utility
The Token Update Utility is a powerful tool that gives authorized users a way to maintain your customers Card On File tokens so they are ready for use at Point of Sale. To ensure security, we have added a new setting to the User ID maintenance form to ensure that only the users you authorize have access to this utility. You must have administrative permissions to enable this Token Update Utility access. Users who are not given access to this utility, will not see the BankCard Maintenance option in the Maintenance > Utilities list.
To enable access to the Token Update Utility:
1. From the Main Menu, choose Maintenance > Database > User IDs to display the User ID Maintenance form.
2. From the User ID list, choose the ID of the person who you want to enable Token Update Utility access for.
3. In the Security Options tab, click the Permissions List Settings ![]() icon to display the Permission List Code Maintenance box.
icon to display the Permission List Code Maintenance box.
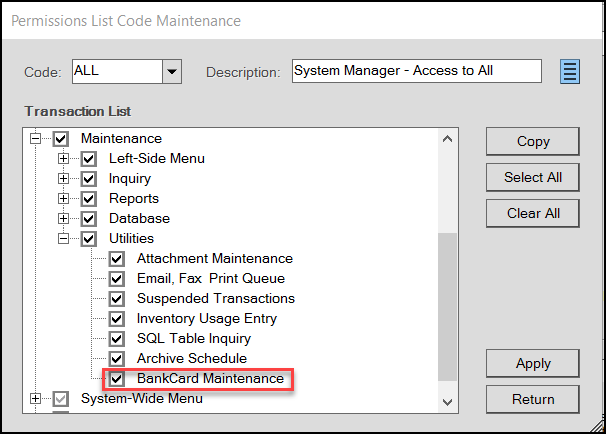
Permissions List Code Maintenance > BankCard Maintenance Setting
4. Scroll down to the Maintenance list and choose the + sign next to Utilities.
5. Select the BankCard Maintenance check box to enable access to the Token Update Utility.
6. Choose Apply and Return.
7. Choose Process (F12) to save this permission to the user’s record.
Reviewing Card On File Information in Audit Inquiry
When you have enabled the Card On File and Audit Inquiry parameters, you have new audit inquiry options available to you. After the nightly system check runs, you can view the changes in the customer’s Audit Inquiry records.
To use the Card On File changes in Audit Inquiry to see changes in a customer’s account:
1. From the Main Menu, choose Maintenance > Inquiry > Audit Inquiry to display the Audit Inquiry form.
2. From the Inquiry Type list, choose Customer Card on File.
Note: If this option is not available, check to see you have enabled the Auto Update Token setting and Audit Inquiry setting in parameters set by the Support team.
3. Use the Selection and Filter options to find the account record(s) you are looking for.
-
Customer
Choose the customer account from this Selection list. -
Job
To see the card associated with a particular job associated with this customer, choose the job record from the list. -
User ID
To see the records associated with a particular User ID, choose the ID from this list. -
Starting Date/Ending Date
From these lists, choose the date range of the audit search.
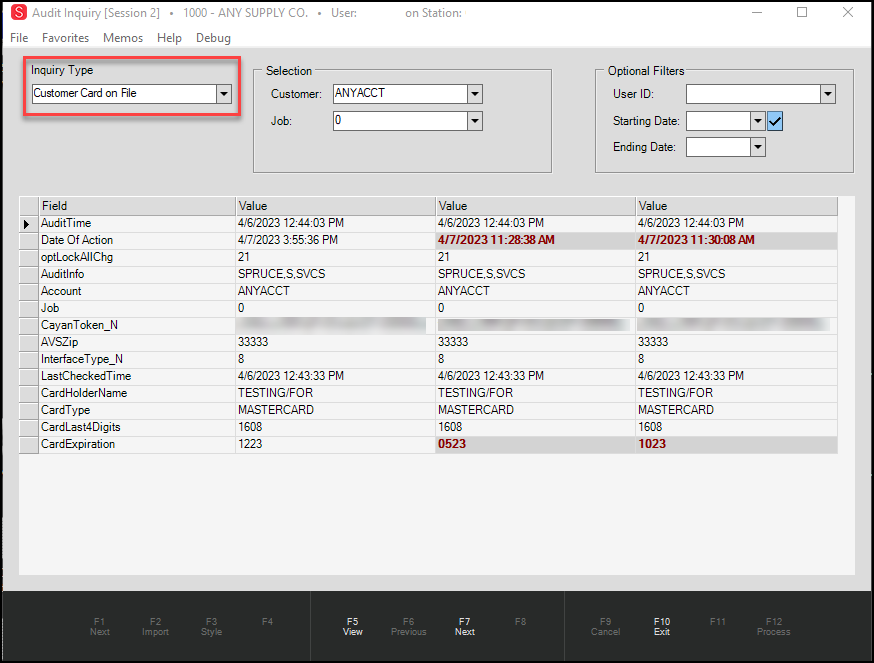
Audit Inquiry > Customer Card on File Type > AnyAccount Record Displaying
4. To see the matching records, choose View (F5).
The data grid updates to show the first record that matches your selection and filter criteria. The entries in red reflect the changes to the record.
5. To view additional records, choose Next (F7). This function option does not display if there are not additional records that match your search criteria.
Updates to Customer PayWare Contracts for FiServ-based Devices (Linkly/Clover)
We updated the way we store information in the application database for businesses that use the Hosted Payment Page for Clover (UK only) and Linkly (AU only) devices. We now update the following Customer PayWare Contract fields internally to ensure secure and successful payment processing:
-
AVSZip (bzip)
This is the five-digit postal (Zip) code associated with the customer’s credit card. -
CardType (ccbrand)
This is the card brand of the customer’s credit card, such as Visa, Mastercard, etc. -
CardExpiration
This record is made up of two entries; a two-digit expmonth (expiration month) entry and a four-digit expyear (expiration year) entry. -
CardLast4Digits (cardnumber)
This record is a four-digit number that is the last four digits of a customer’s credit card.
Behind the scenes, we are breaking out some information that the application stores in the Cayan card token’s Description field, including card type (Mastercard, Visa, etc.) and the last four digits of the card itself. This allows the application to refer to this information specifically when reviewing card on file information in the Cayan API (which tracks the status of the Card On File token information). We also added a new system check that runs nightly to query the Cayan API to update the matching Cayan tokens with the latest card type, last four digits, the card expiration date, and the card holder name. When you enable the Auto-Update Token feature, the system check runs the same evening. This system check information is available on the Universal Log.
Work with your ECI Account Management team members about pricing so they can enable this feature for you. They will work with your ECI Implementation or Support team member to enable the features discussed in this section.