Global Payments (Canada) with Verifone
Global Payments, Inc. is an international company providing electronic payment processing solutions (https://www.globalpaymentsinc.com/en/canada). The software offers integrated card processing using Global Payments, Inc. along with VeriFone® Vx Series payment devices for our customers located in Canada. This is primarily a device driven solution with minimal interaction between the software and the device. Manual settlement, done solely using the pad, is required, and this must be done from each pad with transaction activity for the day.
Devices
We currently support the VeriFone Vx 810 model counter top device. These are hand held devices that do not support signature capture, so any signature collection must be done using the printed receipt for transactions requiring a signature. Devices do support debit cards. This device connects to your PC via either USB (using a serial RS-232 to USB converter) or serial RS-232 pinned COM port connection. Most new computers are not sold with serial communication ports, so either a separately purchased serial card or USB adapter will be necessary. This device can be purchased with an optional built-in printer; however, we don't support the printer option. Devices must be purchased or leased directly from a processor and come configured with the necessary connection information. Each device has a password which is required for certain functions. ECI Software Solutions, Inc. does not sell the hardware nor do we configure the devices. Only users with an attached counter top device will be able to process card transactions.
|
ECI does not sell, resell, or provide any level of support for VeriFone Vx 810 terminals except for this documentation regarding their supported use with the software. Any hardware issues with the devices should be directed to the party who provided the devices (usually the processor). Due to the type of connection (serial), these devices should not be expected to operate within a Remote Desktop (Terminal Services) environment. This includes our cloud-hosting environment. As an alternative, companies can use these devices as a stand-alone (non-integrated) option; however, there will be no link between the software application and any device processing in that case. |
Setup
There are two (2) steps required for setting up Global Payments. Both require access to the Maintenance area. The first step must be done by support personnel.
Parameters (Maintenance, Database, Parameters)
First, payment processing for Global Payments must be enabled by support from the Parameters form's, Setup, and Software tabs (Main Menu > Maintenance > Database > Parameters). This is done by support personnel.
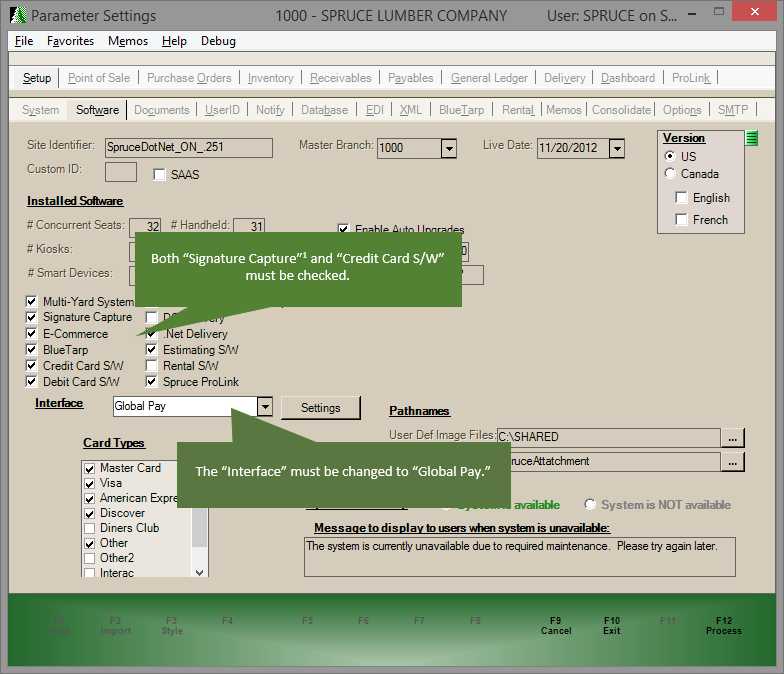
Parameters: Setup and Software
Support will change the "Interface" drop down to "Global Pay" and make sure that both the "Signature Capture" and "Credit Card S/W (Software)" check boxes are checked. There are currently no additional settings as most communication is done via the device which comes pre-configured to do so.
1Signature Capture must be checked despite the fact that signature capture isn't supported. This is due to some code that is shared with other payment interfaces supporting signature capture.
Station Setup (Maintenance, Database, Devices)
For each station that will have a VeriFone device (devices may not be shared), changes will need to be made. We suggest doing this step from the actual station after installing the device on an available serial COM port.
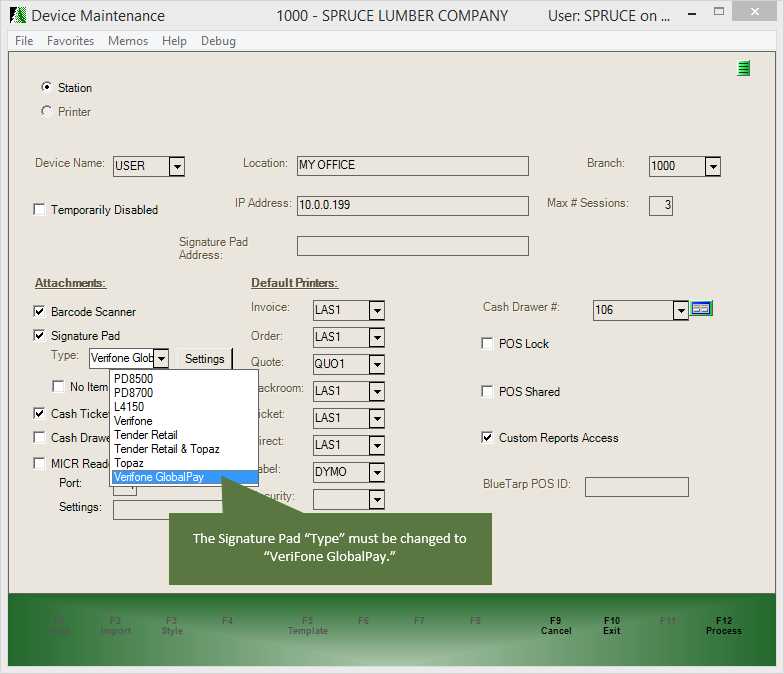
Device Maintenance
After changing the signature pad type to "VeriFone GlobalPay" using the drop down control, the "settings" form will display. To otherwise access this form, click the "Settings" button.
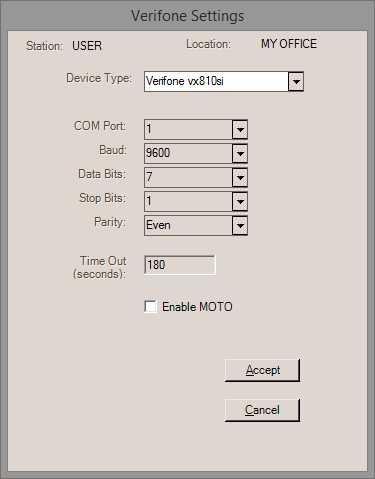
In the "VeriFone Settings" form, you may need to change the following settings:
•Device Type
Select the type matching the model being connected. Currently, the only model we are selling and supporting is the VeriFone Vx 810 SI model.
•COM Port
Choose the COM port assigned to the USB connection. This will only be shown while the device is connected and may potentially change if the device is disconnected or the computer is restarted. To find the COM port, use the Device Manager feature in Windows and expand the "Ports (COM & LPT)" node to see which COM ports have been assigned to USB connections. You may need to install drivers for USB - RS-232 adapters (if used) before the COM port will be listed.
•Time Out (Seconds)
This value should be set to approximately three (3) minutes. The "time out" is the amount of time that the pad waits for the customer to act. It should be set to a reasonable amount of time to allow the customer to enter their information.
•Enable MOTO (Optional)
The "MOTO" option refers to the ability to process phone orders when a card isn't present. In this case, the procedure for processing is somewhat different. When checked, the "phone order" option is enabled; otherwise, the phone order option during Point of Sale processing will be disabled.
Using Global Payments Devices at Point of Sale
Card processing with Global Payments® is handled mostly by the pad itself. Card information is never displayed in the software and is not available until after the card transaction has completed. Processing a bank card payment will look significantly different from other bank card features when Global Payments is enabled and the station has a pad assigned. For general information about Global Payments implementation, search for the topic VeriFone Global Payments.
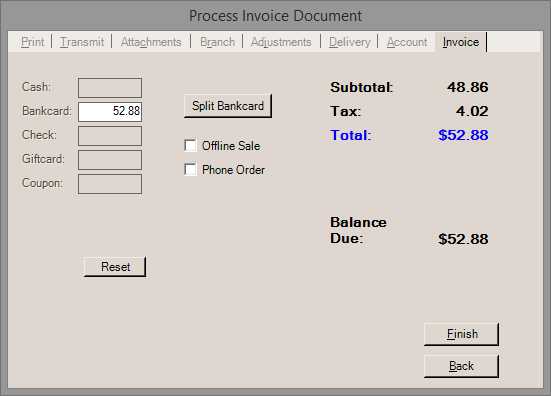
Process Invoice Document (Global Payments)
Split Bankcard
Click this button to allow individual (sequential) processing of different card transactions that don't exceed the total due. Each transaction is individually processed using the terminal device.
Offline Sale
This "Offline Sale" option should only be used in cases where the terminal cannot communicate with the processor (Internet down, etc.) and the card transaction has been manually (voice) authorized by contacting the processor and receiving a valid authorization code (which must be entered on the terminal).
Phone Order
This option is only displayed when the "Enable MOTO" feature has been enabled for the device (this is done from Maintenance, Database, and Devices). This allows card processing without the customer (or card) being present. Manual entry of the card is required using the terminal.
Using the Pad
After you click the Finish (Alt-F) button on the Process (F12) form after specifying a bank card amount, the sale total is displayed on the terminal. The terminal prompts the customer to swipe or insert their card. After swiping a card, the on-screen instructions may be in either English or French depending upon the card language. It is assumed that this type of counter top device is being operated by the customer, not the sales clerk.
Should a customer decide not to pay by card after terminal (device) activation, they can choose the red cancel (X) button (lower left-hand corner below the numeric key pad).
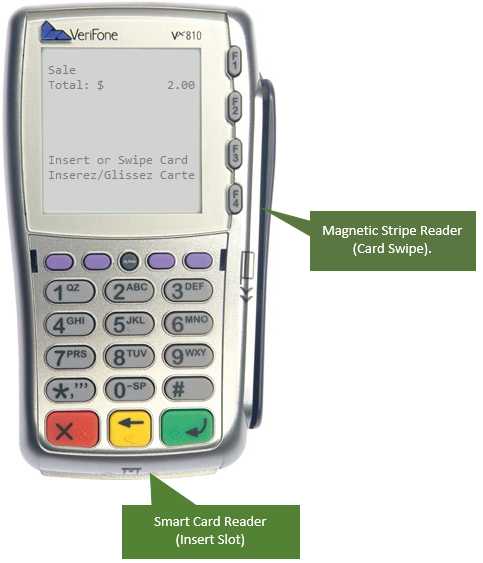
Once the customer's card has been read (swiped or inserted), the display changes and asks for confirmation of the purchase amount. To confirm the amount, the customer must press the green button (in the lower right-hand corner of the device below the numeric key pad).
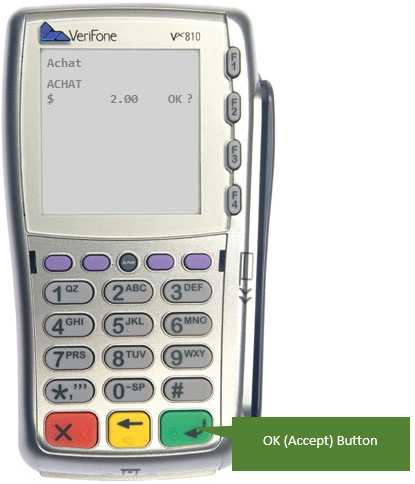
What happens next depends upon whether or not the card is a debit card or credit card. Debit cards require entry of the customer's PIN. For debit cards, the customer is asked to choose the account (checking or savings) to debit.
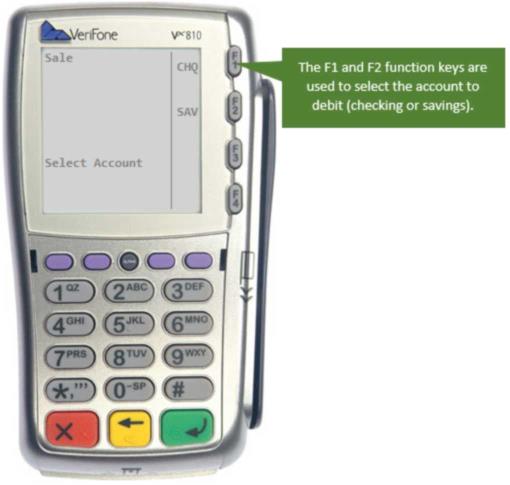
After selecting the account to debit, the customer must enter their PIN and choose OK.
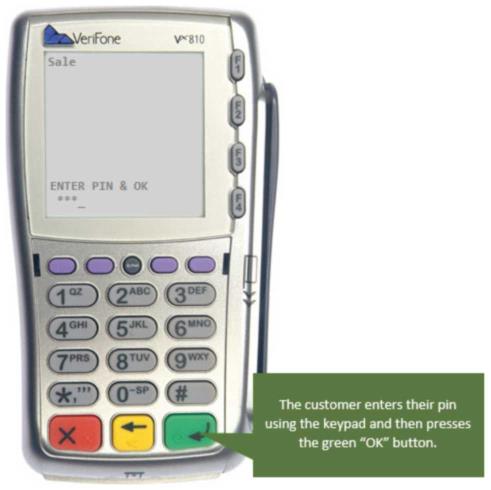
At this time, the customer will see a series of status messages appear at the bottom of the display. Typically, these messages appear very briefly. Messages may appear in either French or English.
Please Wait...
Connected...
Transmitting...
Receiving...
Approved
Once card authorization has completed, the following message appears in either English or French to the customer:
PRESS OK
HAND TERMINAL TO
MERCHANT
At this point, the transaction will complete processing. If a cash-ticket receipt is printed, information regarding the card payment(s) will appear at the end of the ticket (see the example below showing both a debit and credit (Sale-MasterCard) amount using the split transaction feature). A signature copy is also printed for credit card transactions.
PAYMENT METHOD[S]:
SALE-MasterCard 1.00
DEBIT SALE-Interac 2.00
ACCT:###8102 APPROVED: DEMO01
Note: the appearance of the cash ticket is somewhat different from the standard format when Global Payments is enabled.
Voiding a Card Transaction
There are two ways to void a card transaction. A "void" cancels a card transaction before settlement and is not the same as a return or card refund. Voiding eliminates the original transaction. Both require use of the same VeriFone Vx 810 device that processed the original transaction.
One option is to do an invoice reversal (Point of Sale, Utilities, Invoice Reversal) for the sale. In this case, the card information linked to the invoice is displayed at the same time the device is activated allowing a void. Again, this would need to be done prior to settlement (usually the same day as the original sale). When the original sale (being voided) is selected and the user chooses Process (F12), the bankcard information will be displayed (if any) for each card associated with the transaction. Only the last 4-digits of the card are shown. This information is provided as reference while using the terminal to void the transaction(s).
Voiding Using the VeriFone Device
When reversing a transaction involving a Global Payments card transaction, the terminal will automatically display the "Void" form. Do the following steps to complete the void:
•Unless the transaction being voided was the last (most recent) transaction processed using the device, choose "No" (F2) at the prompt "Void Last Transaction."
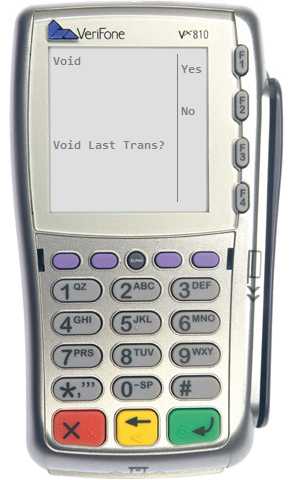
Void Last Transaction
•At the prompt "Retrieve By," choose "Acct#" (F2). We do not choose "Inv#" because the invoice number on the device is not the same as the document identifier. "Acct#" refers to the customer's card number (last 4-digits only).
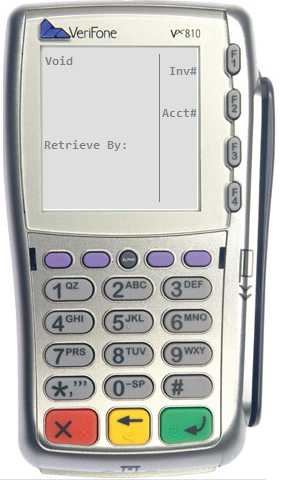
•The device will display the prompt "Last 4 digits:" at which point, the user keys the last 4-digits of the card number being voided.
•If one or more matching transactions are found for the card number, the first will be displayed. Choose "next" if the transaction is not the one being voided. Choose "yes" for the transaction that does match the one being voided. "No" cancels the void operation.
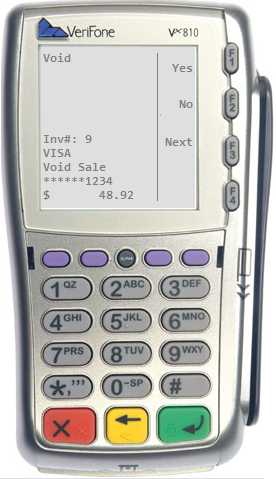
|
Note: Voiding a debit card transaction requires the card be swiped and the pin be entered. Voiding a credit card does not require a card swipe. |
•In the case of a "split" card transaction where more than one card was associated with the same document, the device will automatically return to the "Void Last Trans" prompt and the Invoice Reversal form (in the software) will display the next card's information.
•Once all cards have been voided, the device will return to the home screen and the software will complete the reversal of the selected document.
The second method involves processing a return for the merchandise from Point of Sale on the same terminal device and choosing the "void" check box on the Process (F12) form. In this case, the original sale isn't available so users must browse to find the transaction that needs to be voided. This method must also be done prior to settlement. One difference in this case is that the original card information is not shown.
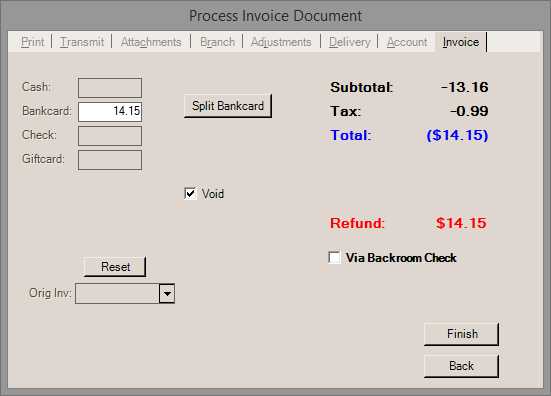
Process Invoice Document (Global Payments - Credit Sale)
Voiding the transaction cannot be done after settlement; however, creating a second transaction that processes a negating sale to the card would be required in these cases. This would require the customer's card in all cases.
Split Bankcard
Split bankcard offer the ability to use multiple cards as well as a mix of other payment methods for a single transaction. This is done using the "Split Bankcard" button found on the Process (F12) form. To use this feature, we suggest processing any card amounts first before any other payment methods (cash, etc.).
1.Enter the first amount in the text area next to "Bankcard" (amount must be equal or lower than the total due).
2.Select the "Split Bankcard" button (except for the final card if it is completing the payment due).
3.At this point, the customer swipes or inserts their first card using the terminal.
4.The customer follows the prompts on the device (will vary based on whether the card is credit or debit) until completing the transaction.
5.Once each card transaction processes a separate cash ticket receipt is printed.
6.After each card, the Process (F12) form displays a total paid amount and the previously entered card amount is cleared.
7.Repeat for each card being used as a partial payment (unless the card is being used to pay the entire remaining balance due).
8.After all partial card amounts have been processed, specify the remaining payment methods (including bankcard) and complete processing by choosing "Finish."
Off-line Transactions
Off-line transactions are only necessary when the countertop device cannot process cards due to either some type of local issue (a loss of Internet connectivity, for example) or some issue with the processor. In these cases, you may be able to authorize the card independently by placing a call to the processor (voice auth) or some other method. Processing off-line transactions will require that the user know the terminal's password. If you don't know the password for your device, contact the supplier. Our support personnel don't have access to this information.
Once and if an approval has been granted, the processor will supply you with an authorization code. This code is necessary for completing an "off-line" transaction using the countertop device. This assumes that the countertop device is operable. The off-line transaction is registered with the device so that the settlement will include it.
To process an "offline" transaction, you choose the "Offline Sale" option from the Process (F12) form on a station with an attached Vx 810 terminal.
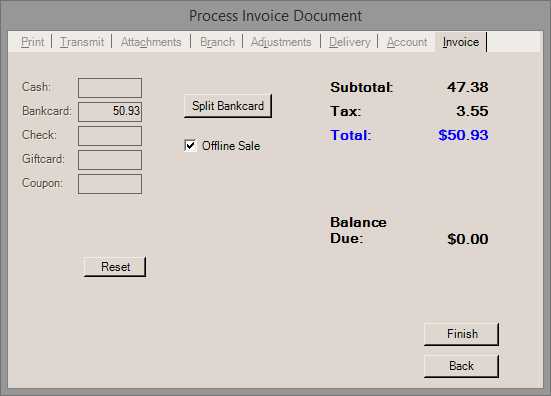
The terminal will request the card number (acct) and expiration date for off-line processing. Press the green (OK) button after each entry is complete. Card information must be typed in.
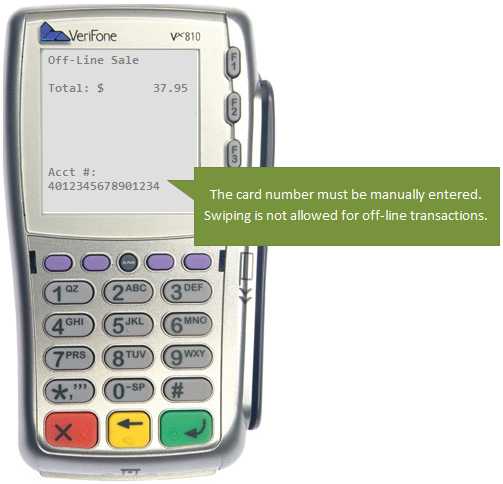
Off-line Sale: Acct # (Card Number)
After entry of the card's expiration date, the terminal will request the device password. Enter the password and press the green (OK) button. The password should be included with the materials shipped with the device (unless reset).
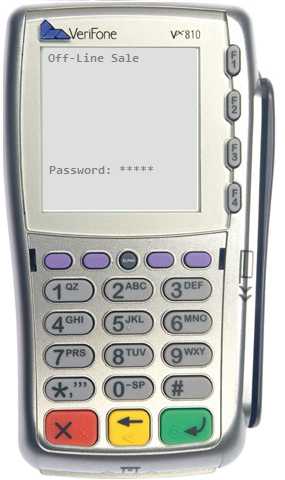
Off-lin Sale: Enter Terminal (Device) Password
Assuming the password is correct, a message appears instructing the user to take an imprint of the card (using a traditional sliding carbon paper imprint device).
Imprint Card
Press Enter Key
After taking an imprint, press the green (OK) button (enter key).
Next, the terminal will ask for entry of the approval code.
Appr Code:
The approval code is the authorization code (number) received from the bank (processor) when you contacted them for the authorization. It is very important that the code be entered accurately or else the transaction may not settle.
After entering the approval (authorization) code, press the green (OK) button and the transaction will be saved with the current settlement batch. At this time, processing for the transaction will complete. The cash ticket receipt will say "OFFLINE SALE" (see the example below).
PAYMENT METHOD[S]:
OFFLINE SALE-Visa 37.95
ACCT:###1234 APPROVED: DEMO01
Phone Order Transactions
In the case of a phone order, we assume that the customer and card are not present, but are being provided over the telephone, Internet, etc. In order to process a "phone" transaction the "enable MOTO" check box must be checked for the terminal assigned to the station (Maintenance, Database, and Devices). This is an optional feature that is available in both the Sales and Orders transactions. The check box is only shown if enabled for the station's terminal.
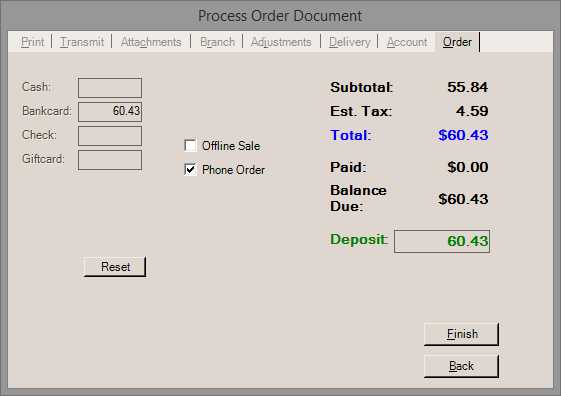
Order Process Document (Global Payments, Phone)
Phone orders are similar to the off-line transaction in that the card information must be manually entered (swiping is not allowed). There are usually only two prompts for the phone order processing on the terminal. The first asks for the "Acct #" which is the card number. The second prompts for the expiration date ("Exp Date(MMYY)") as the 2-digit month followed by the 2-digit year. Press the green (OK) button after each entry.
Batch Settlement
Batch settlement is a manual process that must be done solely using each terminal. The software is not involved in this procedure. Users should do the settlement procedure on a daily basis (usually at the end of the business day).
1.Choose Settlement from the Terminal's home menu using the appropriate function key (the keys along the right-hand side of the device).
2.Enter the terminal's password when prompted and press the green (OK) button.
3.Totals will be displayed for the current batch and the message "Press Enter to Confirm" will be shown:
•Press the green (OK) button to confirm the totals.
•Press the red cancel (X) button to cancel the settlement.
4.A series of messages will display indicating the success or failure of the settlement. In the event of a failure, contact your bank/processor for assistance. The following messages would be typically displayed (sequentially) as an example of a successful settlement:
Settle-Global
Connected...
Transmitting...
Receiving...
Settle Success
Calculating Totals...
Batch Deleted
5.Repeat these steps (above) on each terminal that had activity.
After the settlement, the totals are reset and the prior batch (transaction details) are deleted from the device.