Selection Trees
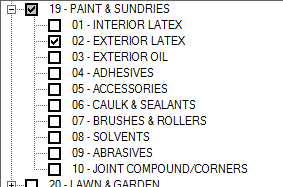
A selection tree control is found in some areas. The most common use of the tree control is for choosing groups and/or individual sections when performing inventory reporting and selection.

This selection tool is named a "tree" because it "branches" into more detailed parts or nodes. With inventory product groups and sections, there are two (2) levels to the tree. The group is the primary level, and the section is a sub-level of the group. Whenever further levels exist in a tree, a ![]() button appears next to the node. Clicking on the
button appears next to the node. Clicking on the ![]() expands the tree so that any sub-level nodes become visible. While expanded, the
expands the tree so that any sub-level nodes become visible. While expanded, the ![]() changes to a
changes to a ![]() (minus) to indicate that the node is currently expanded. To minimize the tree back down (hide the sub-level data), click on the
(minus) to indicate that the node is currently expanded. To minimize the tree back down (hide the sub-level data), click on the ![]() (minus). Multiple nodes within the tree can be expanded at the same time. The right and left arrow keys can also be used to expand or collapse nodes.
(minus). Multiple nodes within the tree can be expanded at the same time. The right and left arrow keys can also be used to expand or collapse nodes.
Trees also utilize check boxes for selection. Checking the primary level (group in our example) using your mouse or the space bar selects all sub-levels (sections) nodes branching from that primary selection. A check will appear if any or all sub-levels are selected for a primary level. If only some sub-levels are selected and not others, the check box will appear gray ![]() . If all sub-levels are selected, the box will not be shaded
. If all sub-levels are selected, the box will not be shaded ![]() .
.

As with other areas, the keyboard may be used without the mouse during tree selection. Tab to the selection tree control to begin. Once a tree area is active, use the keyboard's arrow keys to move up ![]() or down
or down ![]() . The right arrow
. The right arrow ![]() expands a tree showing more detail. The left arrow
expands a tree showing more detail. The left arrow ![]() closes (minimizes) a tree level. Additionally, the Page Up and Page Down buttons may be used to move more rapidly through the frame. Use the space bar for selection or to clear a prior selection. Use the TAB key to leave the tree and move to the next input in the tab sequence (if any).
closes (minimizes) a tree level. Additionally, the Page Up and Page Down buttons may be used to move more rapidly through the frame. Use the space bar for selection or to clear a prior selection. Use the TAB key to leave the tree and move to the next input in the tab sequence (if any).