Orgill - Setup
After the EDI option for Orgill, Inc. has been enabled by Support, the next step in setup is done in the Branch Maintenance form (Main Menu > Maintenance > Database > Branches) on the EDI tab. This will need to be done for each store location that will use EDI with Orgill. Every store location would have its own account and login. You must contact Orgill to set up electronic access if this is not already in place for your company. Contact: Linda Jamison l.jamison@orgill.com, or Brandy Morasch brandym@orgill.com to request an account. To use EDI with Orgill, Inc. both MOVEit® Freely and 7-Zip are required (must be installed on any computer where EDI processing will be done from). The vendor you use with Orgill, Inc. must also be set with a wholesaler ID of "ORGILL" prior to use.
Additional SoftwareFor some EDI features, additional software is required. For our cloud-hosted customers, additional software does not have to be installed locally, as they are already installed on the server. In the case of our cloud deployments, your application runs remotely from the server, not locally from your PC or other device. A third-party application, MOVEit Freely® software, must be loaded on any client PC or server that will perform EDI functions. "Automation" features generally require this be installed on the server (as well as 7-zip). Computers from where EDI procedures are done must have high-speed Internet access. Below is a link to Standard Networks web site where users can download MOVEit Freely software (the software is available free of charge; however, there is a registration form): https://www.ipswitch.com/resources/free-tools/moveit-freely In some cases, EDI also requires software that can extract zipped (archived/compressed) files from a command line. This is sometimes necessary with larger files to keep download and upload times manageable. When required, this should also be installed on any local PC or server that will do either manual or automated EDI processing. http://www.7-zip.org
|
To save changes, you must choose Process (F12) in the Branch Maintenance form after completing any form and dialogs settings.
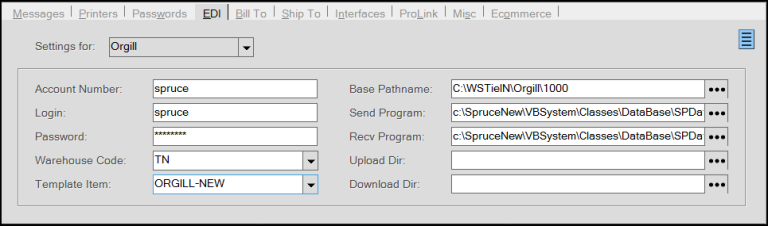
EDI Tab - Orgill Settings
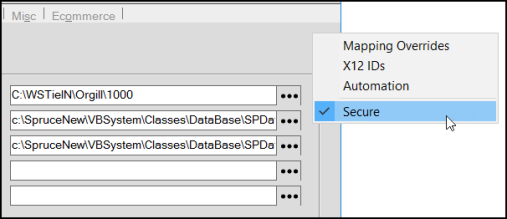
A context menu linked to the menu marker icon provides access to additional features and settings: Mapping Overrides, X12 IDs, and Automation. The "Mapping Overrides" option must be used to set your pricing structure (VP1, VP2, or ADV). VP1 is the default if no other selections are made. Variations are offered as the selected override, based on your pricing, also determines whether certain inventory information, such as item descriptions, are also updated by File Maintenance updates.
Begin by selecting "Orgill" from the drop down control labeled "Settings for."
Note: When you set up the Orgill FanBuilder program, an additional entry displays in this list (with the program name) so you can add additional settings.
Account Number
The number/ID for your store (location) assigned by Orgill, Inc.
Login
The "login" is used for electronic access to your mailbox and may be different from the account. This information would be provided by Orgill.
Password
This is the password provided by Orgill for electronic access to your mailbox.
Warehouse Code
Use the drop down to select the Orgill warehouse that ships to your branch (store) location. Orgill may provide warehouses as numbers; however, don't enter a number in the text area. Instead, select the code matching your warehouse location.
Template Item
The template item is used for any new items added by EDI processing. For example, if you order an item from the vendor that you don't stock, the item may be added automatically upon receipt. The "template" provides the settings that the vendor would does not. Catalog information, when available, is also used when adding new items. Typically, new items need to be reviewed and modified to update their group/section, or other aspects as needed. You can use any SKU for the template item code, it does not have to match our example.
Base Pathname
The base path name determines where data files being transmitted to or received from the vendor will be located. If your company has more than one location that will use EDI with Orgill, Inc. and EDI processing for both branches is being done from the same computer, or a server (in the case of cloud based installations), you should set the branch ID in the path for each location's settings so that files are not overwritten.
C:\WSTieIn\ORGILL\1000
Send Program
To enable sending and retrieval of data via the Internet (web), you must set the Send Program value to the path to the OrgillSend.bat file available from the local SpruceWare.NET installation directory. The default path (which may not match your computer) would usually be the following:
C:\SpruceWare.NET\Library\EDIScipts\OrgillSend.bat
Use the Elipsis ( ) button to verify the directory and file location before saving from any computer that will perform EDI operations.
Recv Program
The "Recv Program" must be set to a specific directory located in the application's installation directory. Set the Receive Program value to the path to the OrgillRecv.bat file available from the local SpruceWare.NET installation directory. The default path (which may not match your computer) would usually be the following:
C:\SpruceWare.NET\Library\EDIScipts\OrgillRecv.bat
Use the Elipsis () button to verify the directory and file location before saving from any computer that will perform EDI operations.
To learn how EDI settings are used in the Orgill FanBuilder program, click here.
Upload Directory
Not required.
Download Directory
Not required.