E-Blast
The E-Blast (Mass Emailing) feature provides a simple tool to send a group of related emails using the contact information already available in your software. Basically, this form allows you to access customer and vendor contact information for sending a plain-text email with one attachment (required). You can use this to send an email message to one or many different contacts at the same time. All contact addresses associated with the email are sent as BCC (Blind Carbon Copy) recipients to protect their privacy. Because a limited number of (email) addresses may be stored with any given email record, a single message may be split into batches. The number in each batch may vary due to the varying lengths of the addresses.
Here, we supply the instructions and extra details for sending these messages.
To access the E-Blast feature and send E-Blast messages:
1. From the Main Menu choose Office > E-Blast. The Mass E-mailing form displays.
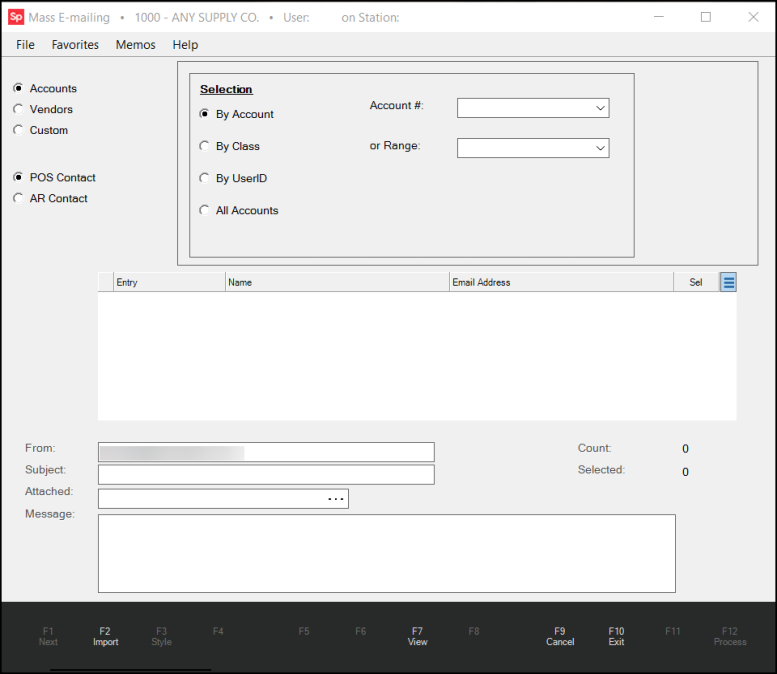
2. Choose the audience for your E-Blast by selecting one of these radio buttons:
-
Accounts
Choose this option if you want to send the E-Blast to one or more accounts.
Then choose either the POS Contact or AR Contact radio button depending on the responsibilities of the person you want to receive the E-Blast. These contact options are only available for Accounts and Custom E-Blasts. -
Vendors
Choose this option if you want to send the E-Blast to one or more vendors. -
Custom
Choose this option to send the E-Blast to a wider group that may include both Accounts and Vendors.
If you are adding Accounts to the list of recipients, choose either the POS Contact or AR Contact radio button depending on the responsibilities of the person you want to receive the E-Blast.
As you choose from these options, new selection options are available. These selection options are discussed in detail below in the Selecting the E-Blast Recipients section.
3. When you have completed your selection entries and settings, choose the View (F7) key to populate the list of E-Blast recipients you have specified.

4. Review the list of recipients and click the Sel check box beside each email entry you want to receive the E-Blast.
See Populating the Distribution List for more about this task.
5. Then complete the additional fields required to send the E-Blast.
-
From
Typically, this field prefills with the email address of the user who is creating the E-Blast, but you can enter the reply to address you want the recipient to have for this communication. -
Subject
Enter the Subject line text as you want it to display for the recipients. This entry is required. -
Attached
Click the Ellipsis button and navigate to the folder that contains the attachment you want to add to the E-Blast. Select the file from the list and choose Open.
 -
Message
Enter the message you want to appear in the E-Blast, which conveys the reason for the communication.
For more information about these entries, see the Message Fields section below.
6. When you have completed these entries and settings and you are ready to send the E-Blast, choose Process (F12). The application reports any warnings or errors, if any. If there are no task list items, the messages will be added to the standard email queue for immediate processing. The application creates batches for E-Blasts with a large number of recipients. The number of recipients per message will vary based on the combined lengths of the addresses (recipients up to 1024-characters in total are allowed). Just so you don't send an email before you're ready, a confirmation "Yes/No" prompt is provided when processing.
The Email, Fax & Print Queue utility can be used to check the status of E-Blast messages (a separate check box is provided so that these can be separated from other email).
Selecting the E-Blast Recipients
Accounts or vendor contacts can be selected by two different methods. There are three radio buttons in the upper left-hand corner of the form labeled: Accounts, Vendors, and Custom. The accounts and vendors selections offer basic selection options similar to what you would find on reports that involve either customers (accounts) or vendors. With the "accounts" selection, you have the ability to choose from either the POS (Point of Sale) Contact (from the job #0 record) or the AR Contact (from the "master" or "main" account record). The custom option allows you to specify additional criteria based on a choice of field selections, operators, and values. For example, you could use the "custom" option to only select customers who have a credit limit > 0 and a last sale date greater than the end of the prior year. As many "custom" conditions may be added as you need.
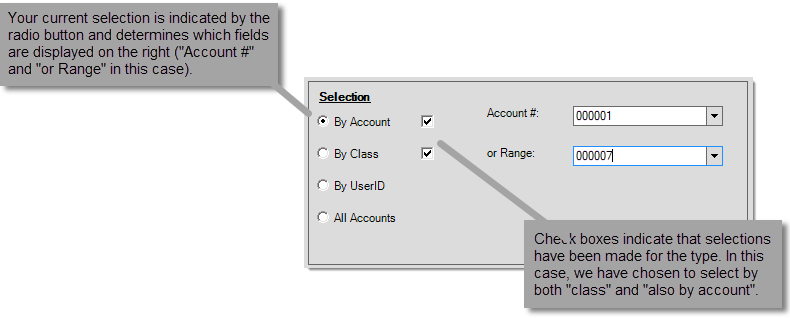
Selecting Account(s)The account-job selection panel typically offers four radio buttons: By Account, By Class, By UserID, and All Accounts. You can select more than one check box at the same time to collect a smaller list of results. When you specify criteria for any of the four selection options, a check box For example, when you select the By Account radio button, the application displays the fields for specifying an account number or range.
By AccountSelect this option to choose either a single account or a range of accounts. If you want to limit the report to a specific job and account, use the "Job #" option instead. Account selection should either be done either from this option (By Account) or from the "Job #" option, not both. Accounts are selected based on the alpha-numeric values of the account identifier in ascending order. Some companies may use numeric account numbers; however, regardless of whether the actual account is numeric or not, the value is always treated as alpha-numeric (because alpha characters are allowed whether your company uses them or not). For this reason, accounts are always sorted "alphabetically" rather than numerically (the left-most character position is sorted first followed by the next position moving from left to right). For example, if you enter a starting range of "1" and an ending range of "1999," any accounts beginning with a digit other than "1" will not be included (the values: 2, 30, and "000722" would not be part of the selection even though they would fall numerically within the range).* ")
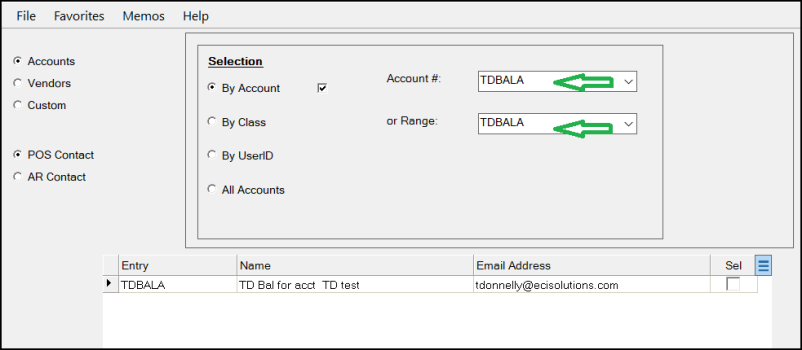
*For this reason, we strongly advise that account numbers be the same length in characters and if numeric values are being used, we advise padding any numbers with leading zeros (on the left) such as "000089" instead of "89" to maintain a consistent length and to force accounts to be sorted the same as their numeric sort order would indicate. For ranges, the upper text area (drop down) is the lower range value and the bottom area is for the upper or higher range value (in ascending order 0-9, A-Z). The form won't allow you to enter an invalid range. Additionally, it is not possible to specify an upper (bottom) range without also a lower (top) range. To send an E-Blast to a single account, enter/choose the same account number in the Account # list as in the or Range list.
By ClassClass selection may also be used to build a list of customer accounts for reporting and other purposes. One customer class code may be selected from the drop down. Classes can be used for grouping certain types of customers together. Customer class is an optional classification tool that may be used along with accounts. This feature involves defining codes that maintain a description and then assigning them to customer accounts (jobs don't have a class code assigned to them). If you add selection criteria based on customer class, only accounts assigned to that class code will be included in the selection. 
By UserIDThe "By UserID" selection option only includes accounts where the "assigned" sales person (Account Maintenance, Codes tab, Salesperson field) matches your selection. An option (check box) for "Current User ID" is also provided. 
All AccountsThe All Accounts option allows you to collect the data you need by account type (Cash-only, Charge, Retail* and/or Rent to Own*). Users can check one or more when using account type as a selection method. Due to the nature of this option, the application returns a large number of account records if you use it on its own, so it is best to only use this selection with one of the other three options. *Note that the "Retail (Revolving Charge) and Rent to Own (Hire Purchase)" options will only be visible if those features are turned on in Parameters. The "Rent to Own" terminology is customizable, therefore your captions may differ from what is shown in the example below. 
|
All Accounts
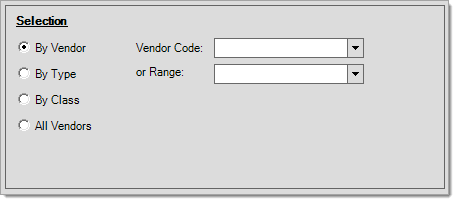
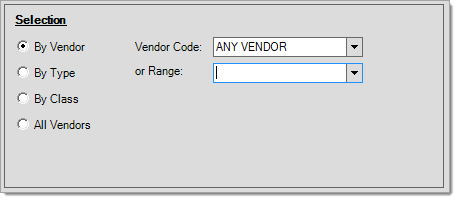
Selecting VendorsThis control, primarily used with reporting, provides several options for vendor selection. Currently, four options, selected by using the radio buttons, are provided: vendor (or range), type, class, and all vendors. The current selection determines which fields are displayed in the area of the panel to the right. For example, when the "By Vendor" radio button is the active selection, fields for specifying an vendor code or range of codes are shown.
By VendorVendors may be selected individually by specifying or selecting the vendor's code in the upper text-area. It's also possible to specify a range of vendors. The range is defined by the values in both the upper and lower text areas (drop downs). The lower value must be specified in the upper text area ("Vendor Code") and the higher value in the lower text area ("or Range"). Ranges will include any vendors that fall within the listing of vendors sorted alpha-numerically in ascending order (0-9, A-Z) between the two values.
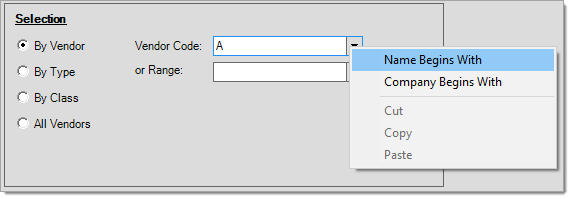
Use the alternate menu to select a vendor by the name or company instead of the code in either text area.
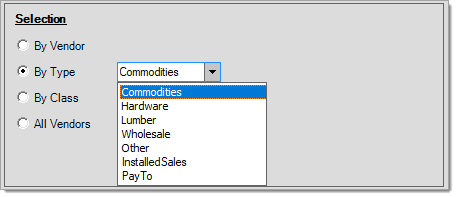
By TypeThere are preset types that may be assigned to vendors for classification reasons. A few, if used, such as "pay to" and "installed sales" are used to either filter out or include the vendor in certain areas of the software; however, most are just provided for your own classification reasons and are not required.
By ClassClass is another optional classification tool provided for vendors. In this case, there are no pre-defined values, so your company would decide whether or not and in which way these would be implemented.
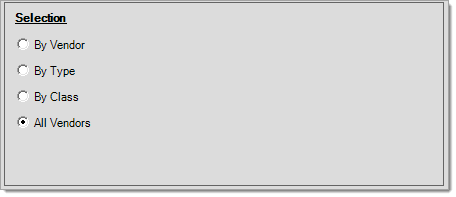
All VendorsThe "all vendors" radio button will include all vendor records in the selection. Depending upon the number of vendors your company uses, this may be a significant number of records.
|

Custom
The custom selection option still requires a choice of either customer or vendor records; however, it also permits you to define "Custom" conditions to which to apply to the selection of records. Each rule involves three parts:
•A "data field" that a some value you define will be compared with. Data fields are all assigned a "type" that defines what kind of values the field maintains (dates, numbers, text, etc.).
•An "operator" that determines how the comparison is made (equal to, greater than, etc.). Different operators will be offered depending upon the type of data the field represents.
•A "value" that is the same data type as the "data field" you selected (date, integer, string, Boolean (true/false), etc.).
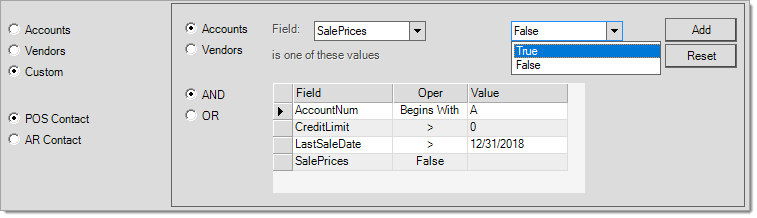
When you specify more than one "custom" rule, you also must decide whether (a) the new rule is to be applied in addition to and including the previous rule (AND) or (b) if either rule should be applied to selection (OR). Two radio buttons ("AND" and "OR") are presented for this purpose. The appropriate choice should be made prior to adding the rule. The default is "AND."
Here's an example using a sample list of customers...
|
Account # |
Credit Limit |
Outstanding Balance |
|---|---|---|
|
000010 |
0 |
$ 25.92 |
|
000046 |
10,000 |
$ 0.00 |
|
001019 |
5,999 |
$ 3,251.84 |
|
090051 |
7,500 |
$ 7,5819.00 |
If we were to establish two custom selection criteria of the following:
Credit Limit > 0 AND OutStanding Balance > 0
The result would be a selection of the two accounts: 001019 and 090051. This is because they are the only accounts that meet both selection criteria.
Instead, if we use the same criteria but an "OR" comparison, the results would include all 4 accounts because each account meets either or both of the criteria.
Credit Limit > 0 OR OutStanding Balance > 0
Conditions or "rules" are evaluated from top-to-bottom (the same order as they were entered) in relationship to the grid.
Conditions may be deleted by choosing "delete" from the alternate menu on the grid or selecting a row and pressing the "delete" key on your keyboard.
Populating the Distribution List
The middle area of the form has a grid control that will list any contacts matching the criteria you specify. This grid is only populated after using the View (F7) function key. The only contacts who are included with be either the primary AR (Receivables) contact for the account or POS (Point of Sale) contact for the master job. Accounts may have other contacts who are not assigned to either.
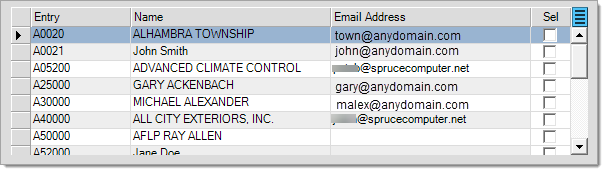
Contacts are added to the grid regardless of whether or not an email address is linked with the contact; however, when selecting recipients, you can only select a contact (row) that has an email address.
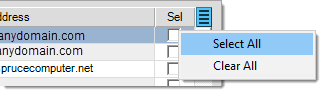
The "Sel" (select) column contains check boxes which are used to indicate which contacts are to be included as recipients for the email message. Selection may be done either manually or by using the "Select All" or "Clear All" options available on the Menu Marker's ![]() context menu. Only contacts with a value in the "Email Address" column may be selected in either case. Email addresses are not checked as to whether they are valid, so it's suggested that the user scan through the listing and clear the check box for any invalid entries.
context menu. Only contacts with a value in the "Email Address" column may be selected in either case. Email addresses are not checked as to whether they are valid, so it's suggested that the user scan through the listing and clear the check box for any invalid entries.
Message Fields
The text fields in the lower area of the form are used for defining the message and adding an attachment (required). The number of contacts ("Count") and number of possible recipients ("Selected") are also shown for reference in this area.
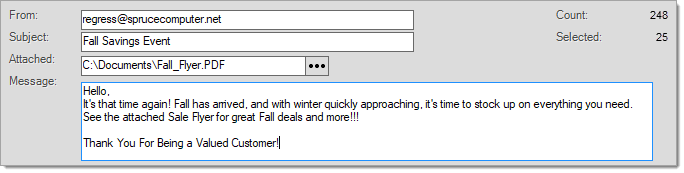
From
The "from" address is the address used as both the "from" and default "reply-to" address when the email is sent. It's possible and suggested that you include both a name and address. Another aspect to consider is that any replies from recipients or rejected messages (bounce-backs) will also use the same address. The address should therefore be a valid email account that the user sending the messages has access to.
Subject
A subject is required. Email recipients typically select mail messages based on the subject and/or from address. The length of the subject is limited to 50-characters.
Attached
The attachment is really the point of the message and is required. This may be a sales flier, letter, etc. You should consider the format of the files you transmit especially in regard to whether the recipients will be able to access them. For example, if you attach a Microsoft Word document, recipients with out Microsoft Office (and the correct version in some cases) won't be able to open/read the attachment. PDF (Portable Document File) formats are commonly used for documents and require free software (Adobe Reader), so that is a good choice in most cases. Plain text or HTML files are other possible formats that would be compatible with a variety of devices and operating systems. It's best to avoid extremely large attachments or any unusual file types since these may be rejected by some mail servers. Attachments for hosted customers will be in their "workresources/shared folder" as this is where they must save files.
Message
The "message" area is for defining the body or text of the email. Email is sent with plain text formatting, so you should not use any type of formatting or HTML within the body text. The message length is limited to 512-characters (including any control or other characters such as carriage returns, spaces, etc.) so it's best to keep messages as short as possible. If you want to send a longer message, consider including the message as part of the attachment.
*If you have defined addendum text in the Parameters form, it will be added to the end of any message you send. This can be used to include "opt-out", privacy, or any other information as needed.