Release Details for Version 22
This section contains the detailed content for the version 22 and 22.1 release.
Key Updates:
Using Time Clock to Track and Report Employee Work Time
Using the Price Group Import Wizard
Cash Drawer Tally Updated to Support Saving and Reporting Cash Drawer Data
Removing Capital One Trade Credit (BlueTarp) Deposit Holds from Any Branch
AP Update: 2022 1099-NEC Updates to Prepare for EOY
GL Update: General Ledger Inventory Reconciliation Report Updates
More Space Available in Point of Sale/PO Document Footers
Moved: Vendor Item Load Added to Inventory Utilities
Group and Section Values Expanded in Item Maintenance
Tags & Labels Upgrades Improve Printing and Design
True Value Rewards More Visible to Customers
Using Linkly Devices at Point of Sale (Australia)
Printing Purchasing and Reports Documents In A4 Format Improved
Displaying Store Retail Pricing in VAT/GST Locations
Setting up Branches for E-Commerce and User Notification
Confirmation Email Options Added for E-Commerce Customers
New: Closing E-Commerce Customer Orders
New API Method Gives Your Customers a Way to Pay You Online
E-Commerce Payment Process Now Supports Card on File
New Statuses Added for E-Commerce Orders
Updating the Off Set Hours for Special Time Differences
Displaying DIB Price Update Information (Better)
Inventory Sales Analysis Report Improved
Excel Import No Longer Relies on having Excel on your Device
EJD File Processing Enhancements Prevent Errors
Crowdstrike Inspired Updates Improve ProLink Security
Point of Sale Updates
Using Time Clock to Track and Report Employee Work Time
B-105296 – The Time Clock feature gives hosted businesses a way to collect and report the amount of time employees work, including breaks, mealtimes, or other down times, and generate reports using the data. Employees clock in when they begin working and clock out when they take a break or end their shift. Detailed security settings ensure that users with different permissions see only the information they have legitimate access to and can enter and view their time-reporting data as needed. You are in control of these settings and can change them as your employees’ responsibilities change. Your employees do not necessarily need access to the application or use login credentials. One report lists each employee’s hours for a specified pay period so they can sign and confirm their submitted hours. The other provides a roll-up of all work hours that management can use to calculate payroll.
Are you interested in this feature? Please contact your ECI after-market salesperson to discuss pricing and purchase information. Then work with your ECI Implementation or Support team to enable the Time Clock feature for you.

Time Clock: Clock Out Form
Important: When you discuss this feature with your ECI team member, let them know whether you want to prompt your employees to log into the Time Clock feature each time they Clock In/Clock out. If you do not want your employees to log into this feature specifically, there is an extra step in the configuration process. This setting is turned on (meaning employees must log in every time) by default. We recommend that you use the login feature, even if the employee only uses one station to safeguard employee information.
Setting up the Time Clock Records
B-99502, B-105196 – Time Clock requires three new record types to work. The ECI team runs a database script when you sign up for this feature to create Employee records from the existing User ID records in the application database. This script includes employee-specific identification information and compensation data. Initially, the compensation data entry will be generic, until you decide whether and when to populate this information. To these records you can add Gender (Male, Female, Unknown), Full Name (for searching), the employee’s work Status (Active, Terminated, Retired, Temporary, etc.), and their phone number. To add new or update existing Employee records, see Adding New Employee Records and Editing Employee Records.
Note: After the Time Clock feature is enabled, whenever you add a new User ID, a prompt displays asking if you want to create a new employee record for this user ID. Click Yes to create a new record if you want to track the user’s Time Clock records.
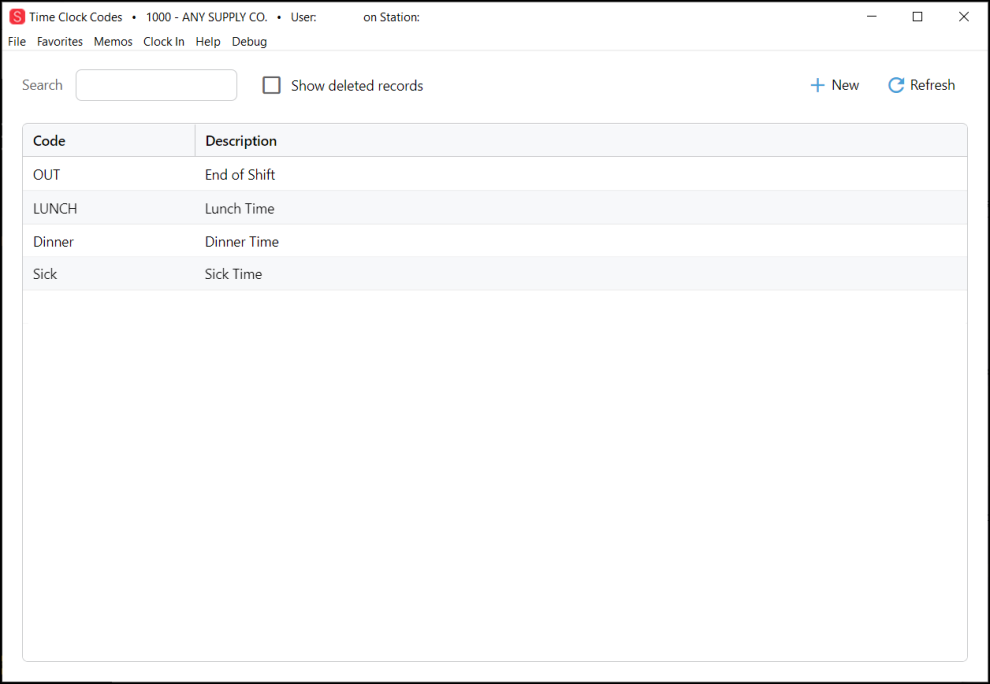
Time Clock Code records allow you to specify the types of clock out types, such as End of Shift, Break, Lunch, or Dinner etc. You can customize these entries based on the needs of your business. Once you create these records and associate them with Employee records, you can disable them, but you cannot entirely delete them. They appear in the list as red and crossed out. To edit existing time clock code records, see Modifying Time Clock Code Records.
Compensation Type records will be used to help you keep track of basic payroll information. Some of these entries are required. See Adding Compensation Types to Time Clock.
Access to the Time Clock records is regulated very carefully, using the same processes you are used to in the system. See Setting up Time Clock Permissions for Individuals and Groups.
Setting Up Time Clock Permissions for Individuals and Groups
B-99455 – To set up Time Clock permissions, you must have administrator rights to the application. Time Clock permissions are added to an employee’s existing User ID settings.
To add Time Clock permissions to an employee’s record:
1. Log in as an administrator.
2. From the Main Menu, choose Maintenance > Database > User IDs to display the User ID Maintenance form.
3. From the User ID field, choose the ID of a person you want to add Time Clock permissions for.
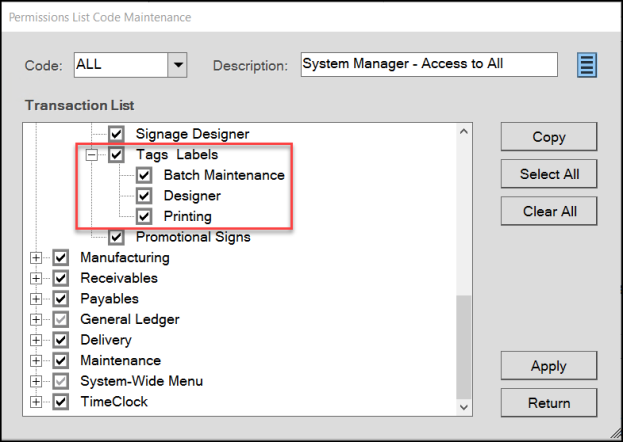
4. On the Security Options tab, click the Permissions List Settings ![]() icon. The Permissions List Code Maintenance dialog box displays.
icon. The Permissions List Code Maintenance dialog box displays.
5. Scroll down to the Time Clock menu and select the check box beside it.
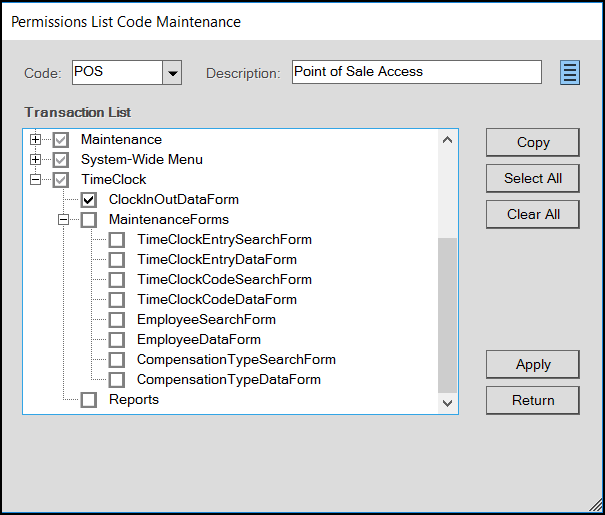
Permissions List Code Maintenance with Time Clock Menu Options
Note: The options you select for this user’s code type apply to all users with the same code type. For example, the POS code refers to users who have Point of Sale permissions. When you select Time Clock forms that this code has access to, all users with the POS code type will have access to the same Time Clock forms.
6. Consider the permissions required for this employee’s code type in the list. Then, select the check boxes beside the forms this user type needs access to. Options include:
-
ClockInClockOutDataForm
Select this check box for all user/user groups that need(s) to record their work hours using the Time Clock feature. -
MaintenanceForms
Select this check box if the user/user groups requiring access to these Time Clock Maintenance forms. Then, choose the appropriate check boxes beside any forms that this any user/user group needs to access. -
TimeClockEntrySearchForm
Select this check box for any user/user group that needs to search for an employee’s time clock entries. -
TimeClockEntryDataForm
Select this check box for any user/user group that needs to modify an employee’s Time Clock entry. -
TimeClockCodeSearchForm
Time Clock Codes refer to the type of Clock Out codes your business uses. Typically, there is a Clock Out at end of day and either mealtime or break options. Selecting this check box allows the user/user group to search the list of Clock Out Codes. -
TimeClockCodeDataForm
Select this check box to allow the user/user group to add/modify time clock codes that employees can select when they Clock Out of the Time Clock. -
EmployeeSearchForm
Select this check box for any user/user group that needs to search for employee records. -
EmployeeDataForm
Select this check box for any user/user group that needs to add/modify employee’s data records. -
CompensationTypeSearchForm
Select this check box for any user/user group that needs to search for compensation type records in the Compensation Types list. -
CompensationTypeDataForm
Select this check box for any user/user group that needs to add/modify compensation type records in the Compensation Types list. -
Reports
Select this check box if this user/user group needs to generate Time Clock reports.
7. When the settings for this code type are complete, click Apply and then Return. The Database Updated message displays.
8. Above the Security Options tab, the Login Prompt Type list displays. This option allows you to choose whether your employees are prompted to login before choosing Clock In. Choose one of these options:
-
Choose Off to prevent the application from prompting your employees to login before choosing Clock In/Clock Out.
-
Choose System Settings to prompt your employees to log in before they Clock In/Clock Out. Note: The Login Prompt Type is a per-user setting. The ECI team sets the global log in setting as you directed, but if you want this user to have different settings, set the permissions for the code group.
9. When you have completed these settings, choose Process (F12) to save your changes.
10. Repeat this process for each user group type to specify the access they have to the Time Clock features.
Editing Employee Records
B-99570 – You can edit employee records in the Time Clock area but you cannot delete them. Only associates with EmployeeSearchForm and EmployeeDataForm permissions settings as defined in Setting Up Time Clock Permissions for Individuals and Groups can access the Employees list in Time Clock. The ECI support team runs a script to create Employee records from User ID records already in the system when you sign up for this feature.
To edit an employee record in Time Clock:
1. Log into the application with your administrative rights.
2. Choose Time Clock > Database > Employees to display the Employees form.
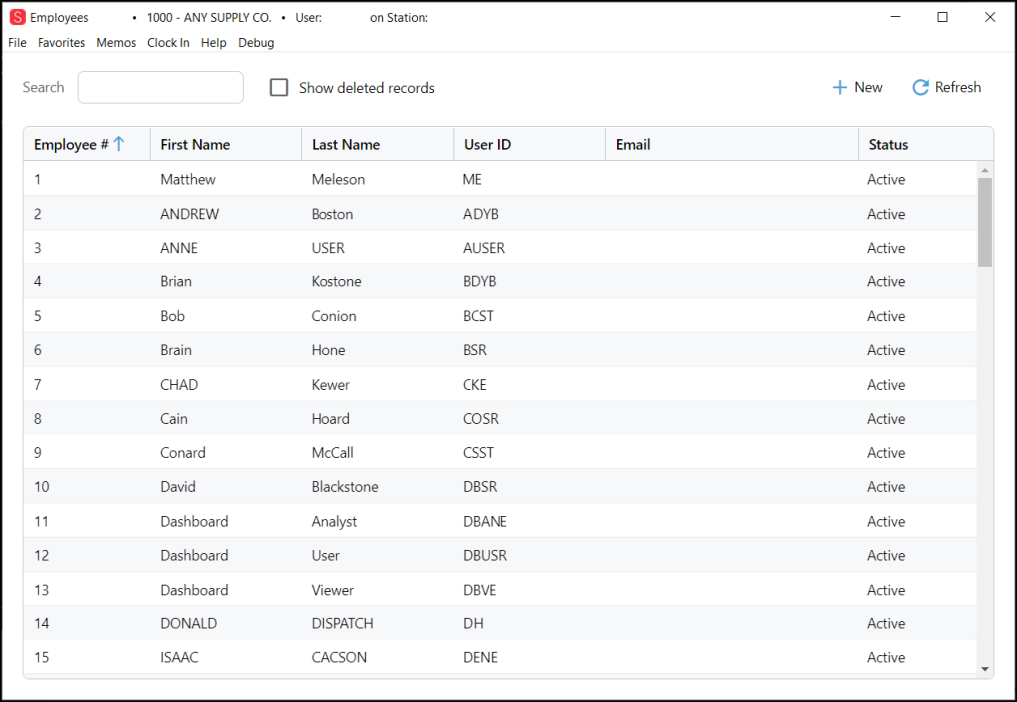
Employees Form with Converted Entries
Note: This list displays alphabetically by first name by default. To sort the list alphabetically or numerically, click a column heading.
3. To search for an employee record, in the Search field, enter the employee number, the first, last, or full name, and press Enter. The application displays the records that match your search.
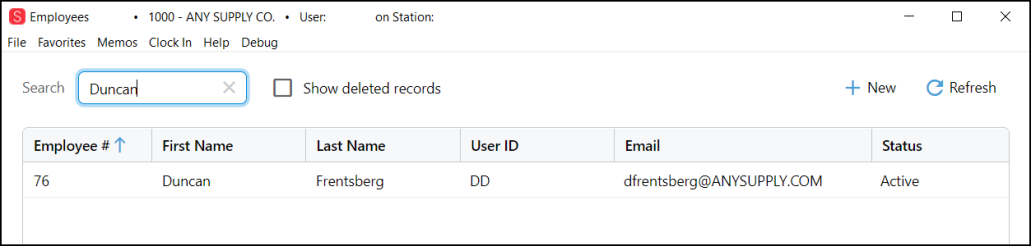
Employee Search Results
4. To edit the employee record, double-click it in the list to display the Employee record.
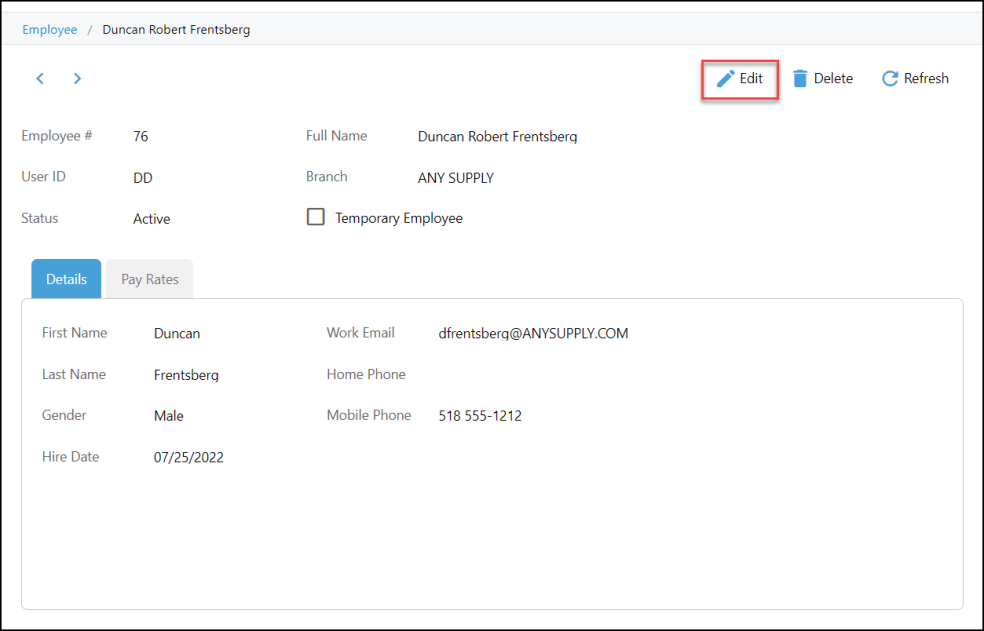
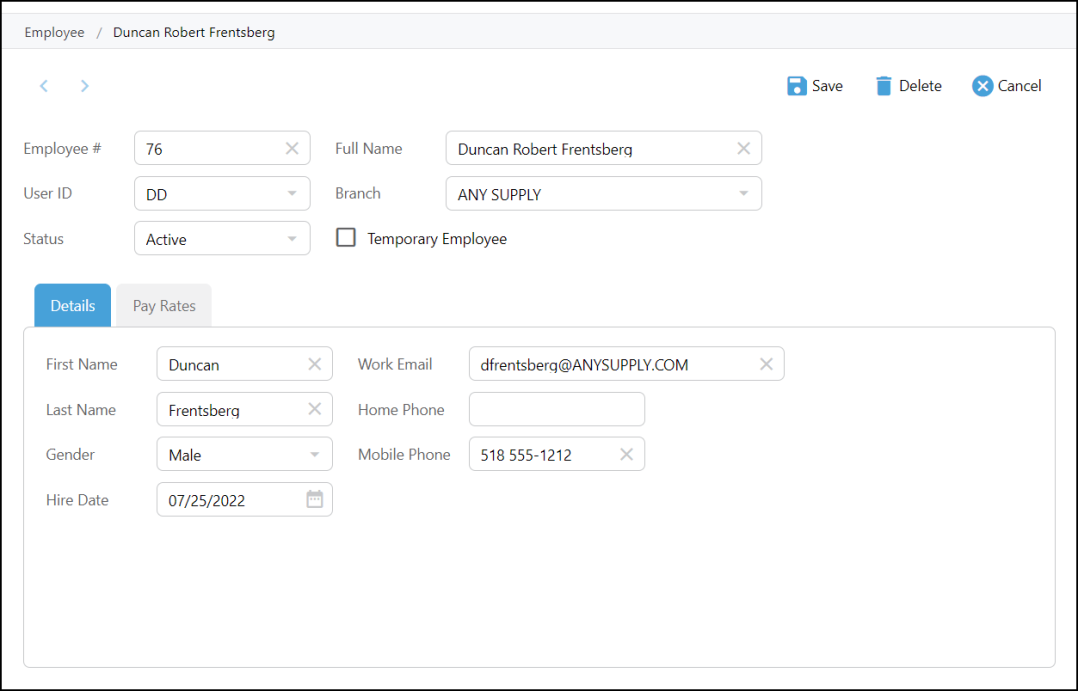
Employee Form
5. Select the Edit button. The editable fields enable.
-
Employee #
This field requires a numeric entry only and is typically populated when the record is entered the first time. Once this entry is made, you edit it, but it will revert to the original entry when you save the change. -
Full Name
This field contains the employee’s full name, if you need more than their first and last name.
Typically, this is used when a person’s official name is not how they are known in the business. -
User ID
If this entry is not filled, select the employee’s User ID from the list. Typically, this information is imported from the User ID record when the employee record is created. -
Branch
If the employee’s branch has changed, select the new branch from the list. -
Status
If the employee’s status has changed, choose the new status from the list. -
Temporary Employee
Select or clear this check box if the employee’s temporary status has changed. -
Details Tab: First / Last Name, Gender, Hire Date, Work Email, Home Phone, Mobile Phone
Type over the entries in these fields if the employee’s personal information has changed. Typically, this information is imported from the User ID record, if available, when the employee record is created.
Employee Form (Details Tab)
If you decide you do not want to keep the changes, click Cancel. The application prompts you to confirm that you do not want to save the changes. Click Yes to confirm.
6. Click the Pay Rates tab to enter a new employee pay rate record. Choose this option only if the employee’s rate information has changed. This information is not required at this time.
7. Click the Plus  icon to add a new pay rate record. The New Pay Rate box displays.
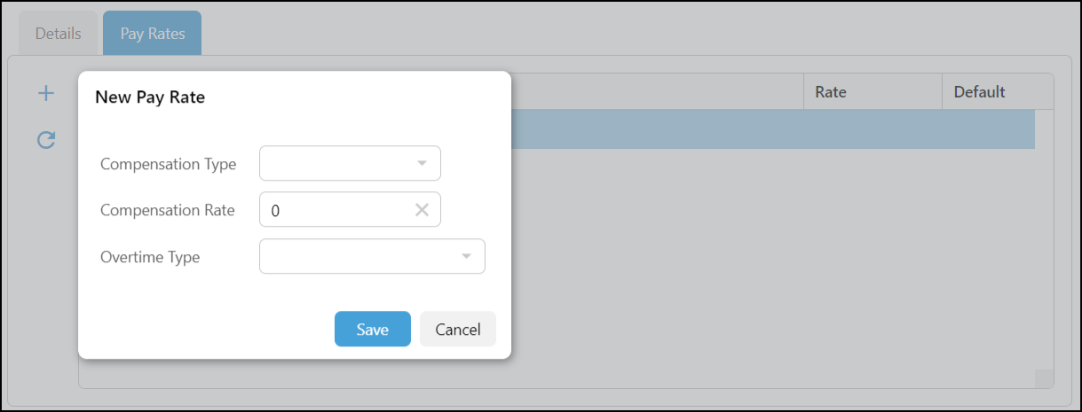
Pay Rates Tab with New Pay Rate Box Displaying
8. Choose or enter the following in each field:
-
Type
Choose the payment type from the list. This is the Compensation Type entry described in Adding Compensation Types to Time Clock. -
Rate
Enter the pay rate for this employee. -
Overtime Type
There are only two options in this list at this time. This will likely change over time.
9. When you have completed these entries, click Save. The employee record redisplays.
10. Edit or select the appropriate options for each editable field and choose the Save  button to save your changes.
Adding New Employee Records
To edit an employee record in Time Clock:
1. Log into the application with your administrative rights.
2. Choose Time Clock > Database > Employees to display the Employees form.
3. Select the New  button to display the New Employee dialog box.
![]()
Add Employee Dialog Box
4. Complete the fields in this box, using the information appropriate for the employee:
-
Employee #
Enter the company assigned employee ID number. (Required)This must be numeric only and can only be assigned once. -
Full Name
Enter the employee’s full name. Often this is the name they are known by rather than their official, given name. (Required) -
User ID
This is the ID the employee uses to log into the Time Clock.
Note: If an employee has more than one position at your business (for which they are paid different rates), they may have more than one user ID. -
Branch
Select the Branch they work in from the list. (Required) -
Details Tab: First Name, Last Name
In the Details tab, enter the employee’s official first and last name in these fields. -
Details Tab: Work Email
Enter the employee’s email address. (Required) -
Details Tab: Mobile #, Home #
One of these contact numbers for the employee is required. -
Details Tab: Gender
Enter the employee’s gender, if known. (Required) -
Details Tab: Hire Date
Choose the Calendar icon to and add the employee’s hire date. (Required)
5. Click the Pay Rates tab to enter the employee pay rate details information.
This information is not required at this time.
6. Click the Plus icon to add a new pay rate record. The New Pay Rate box displays.
New Pay Rate Box Dialog Box
7. Choose or enter the following in each field:
-
Type
Choose the payment type from the list. This is the Compensation Type entry described in Adding Compensation Types to Time Clock. -
Rate
Enter the pay rate for this employee. -
Overtime Type
There are only two options in this list at this time. This will likely change over time.
8. When you have completed these entries, click Save. The employee record redisplays.
9. Choose the Save button to save this new employee record.
Modifying Time Clock Code Records
The application comes with default Time Clock Codes that you can modify to meet the needs of your business. Only associates with TimeClockCodeSearchForm and TimeClockCodeDataForm permissions settings as defined in Setting Up Time Clock Permissions can add/modify time clock code entries. Once used in the application, Time Clock Codes can be disabled but not deleted. Deleted records till display in the list, but crossed out.
To modify Time Clock Code records:
1. Log into the application with your administrative rights.
2. Choose Time Clock > Database > Time Clock Code to display the Time Clock Codes form.
![]()
Time Clock Codes Form
3. To edit an existing code, double-click it in the list to display the record.
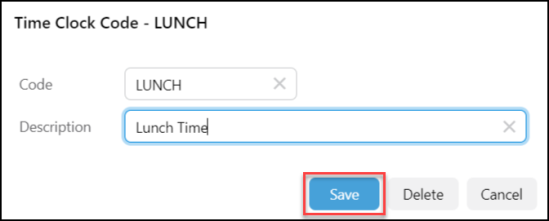
Time Clock Code (Edit)
4. Type in the change you want to see and click Save.
5. To add a new Time Clock Code, from the Time Clock Codes form, click the New button. The New Time Clock Code box displays.
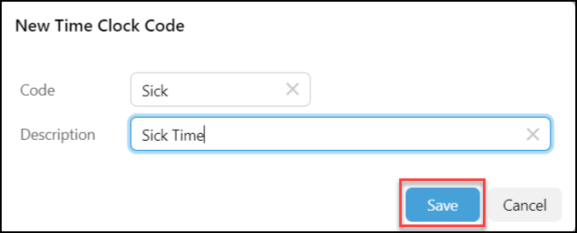
New Time Clock Code Entry
6. Enter the code and the description in the fields provided and click Save.
Time Clock List with New Entries
Adding Compensation Types to Time Clock
One of ECI's goals is to provide you with tools to help you manage your business, so we have created compensation types that allow you to provide support for your payroll process. Here you can add entries that reflect your business's compensation structure. As in other places within the Time Clock system, you can delete entries, but these entries still display in the list, they are just crossed out.
To add a compensation type to the Time Clock record:
1. Log in as an administrator.
2. From the Main Menu, choose Maintenance > Database > Compensation Types to display the Compensation Types form.
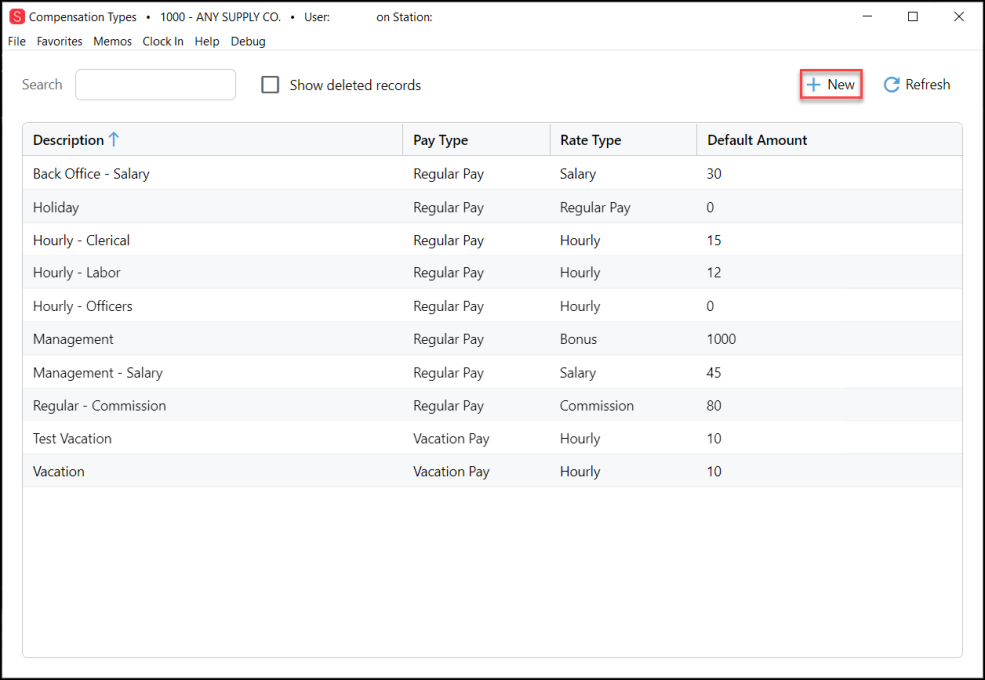
Time Clock Compensation Type List
3. Select the New button to display the New Compensation Type dialog box.
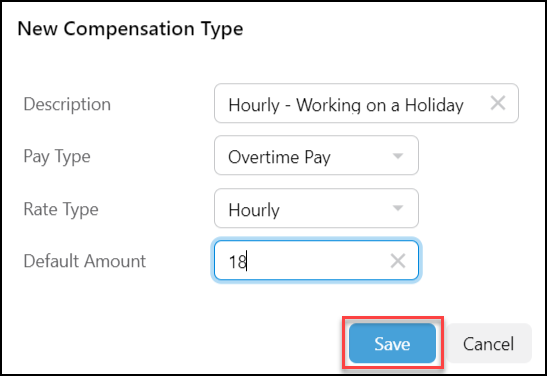
New Compensation Type Dialog Box with Entries
4. Complete the fields in this box based on the compensation type you want to add:
-
Description
Enter the description for the compensation type in this field. -
Pay Type
Choose the pay type option from the list. Options include: Regular Pay, Overtime Pay, Sick Pay, or Vacation Pay. -
Rate Type
Choose how the pay is calculated using this list. Options include: Hourly, Salary, Commission, or Bonus. -
Default Amount
Enter the default amount for this compensation type.
5. When you have completed these entries, click Save.
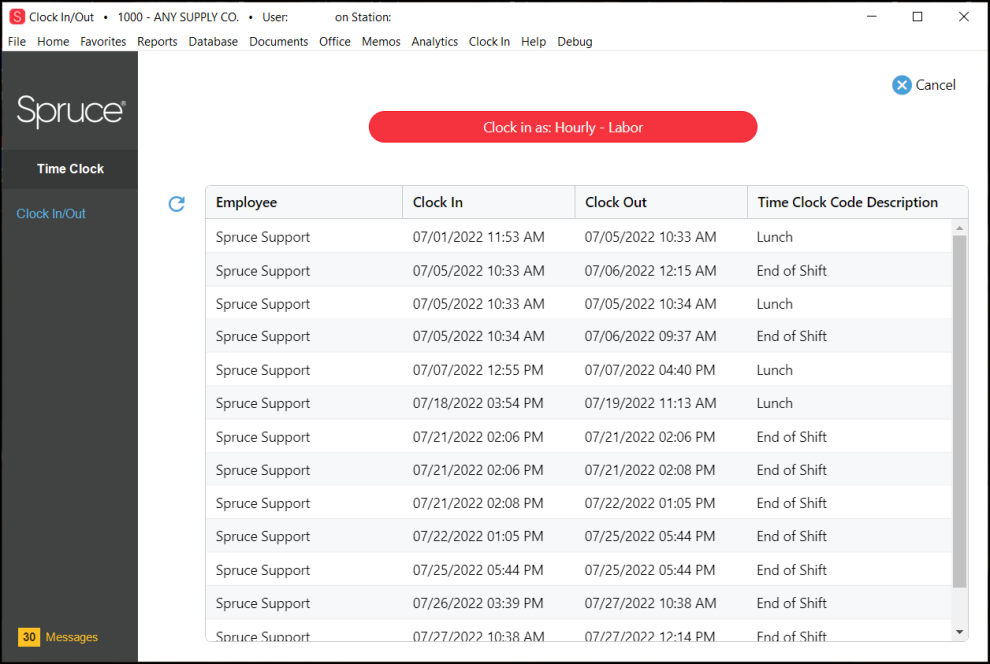
Clocking In and Clocking Out of Time Clock
B-99523, B-105140 – When the feature is enabled and you have set your employees’ Time Clock permissions, they can clock in at the beginning and end of every shift. They can clock out temporarily for breaks or meals as well. The Clock In/Clock Out feature uses the branch’s local time for the employee’s time entry.
Note: Time Clock reports are based on the time setting of the application database server, so if the server is in a different time zone, reports indicate that time zone instead. The employee sees the time settings in local time always.
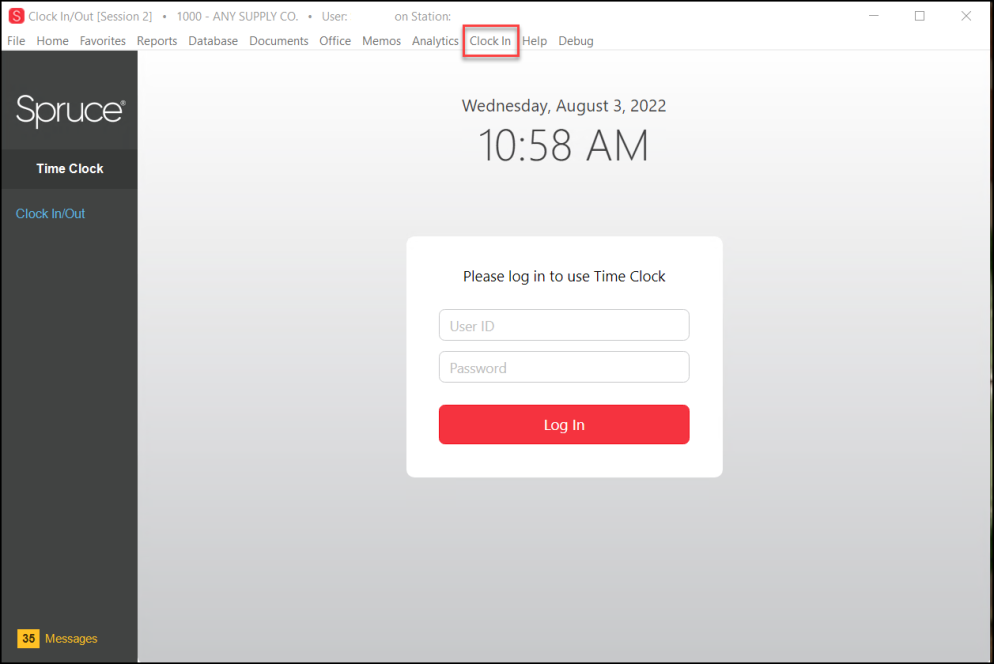
Clock In Option with Login Fields
If you asked the ECI team to prompt each employee to log into the Time Clock feature before Clock In/Clock Out, the log in form displays. If not, the employee can click Clock In and the Time Clock form displays.
To clock into the Time Clock:
1. From the Menu Bar (at the top of the application), choose Clock In.
If the Login options display, the user enters their user name and password (same as when they log into the application) and chooses Log In to continue.
Time Clock Form with Clock In History for this Employee
This form shows the existing Clock In and Clock Out dates and times for this employee. They display in most recent date order by default. If you click Cancel, the Time Clock form closes.
2. Choose Clock In as <Time Clock Code Type> to clock in.
The application records the clock in date and time and adds it to the list. The Login page redisplays.
3. Choose the Main Menu to begin work.
To clock out of the Time Clock:
1. From the Menu Bar (at the top of the application), choose Clock In.
If the Login options display, the user enters their user name and password (same as when they log into the application) and chooses Login to continue.
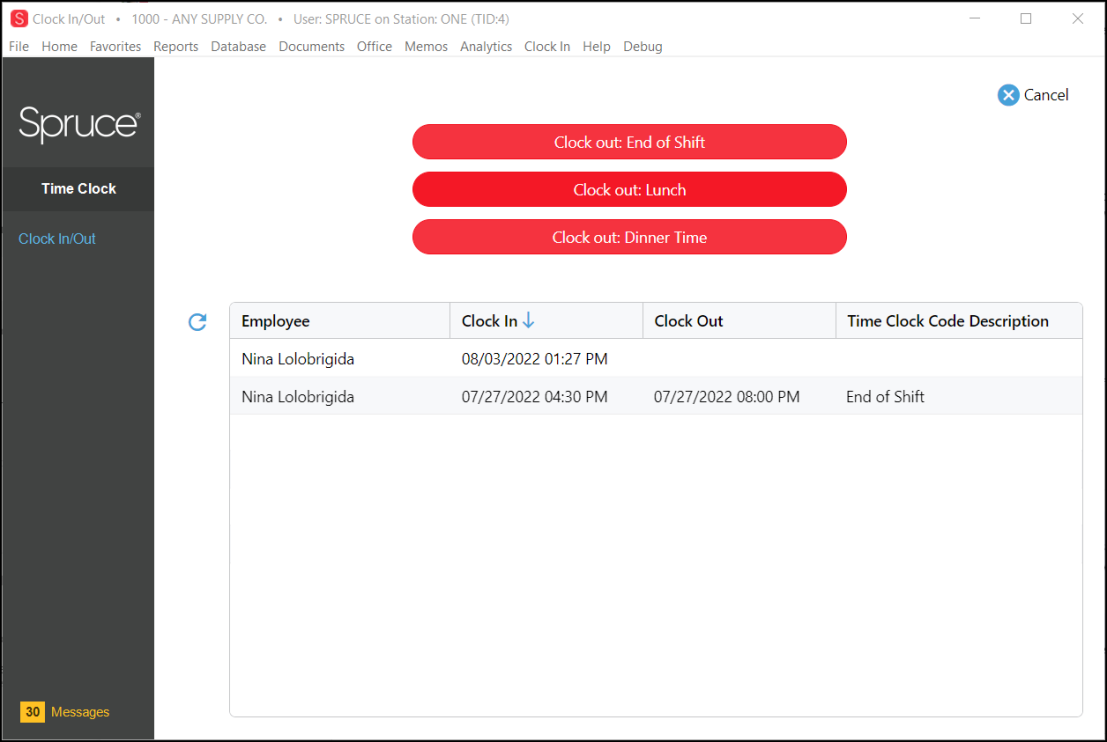
Time Clock - Clock Out Options
The Clock Out options listed here (Clock out: End of Shift, Lunch, and Dinner Time) are defined in the Modifying Time Clock Code Records section.
2. Choose the Clock Out option that is appropriate for the time off. The clock out time is added to the list and the Time Clock form closes.
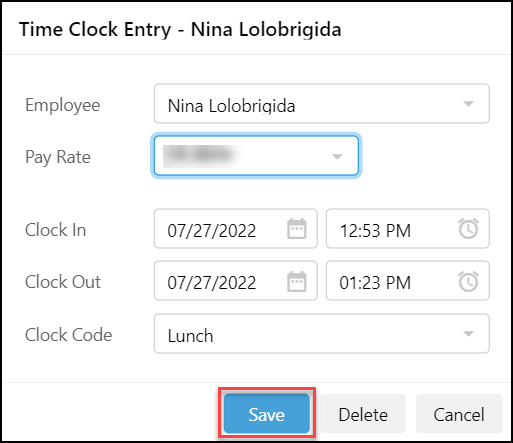
Adding a New Time Clock Entry for an Employee
B-99584 – If an employee forgets to clock in/out and has already left, users with administrative rights can add the records themselves. Only associates with TimeClockEntrySearchForm and TimeClockEntryDataForm permissions settings as defined in Setting Up Time Clock Permissions for Individuals and Groups can add new time clock entries.
To add a new time clock entry for an employee:
1. Log in as an administrator.
2. From the Main Menu, choose Maintenance > Database > Time Clock Entries to display the Time Clock Entries form.
3. Select the New button to display the Time Clock Entry box.
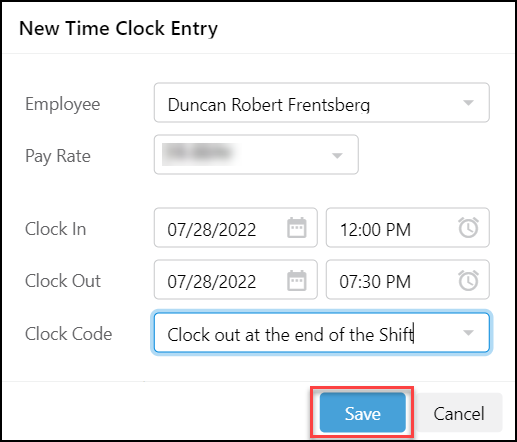
New Time Clock Entry Dialog Box
4. Complete the fields for the employee, choosing their name, pay rate description, clock in and/or clock out dates / times, and a clock code.
Note: You can enter only one Clock In or Clock Out time, if you need to. Make sure the Clock Code matches the clock setting you choose.
5. Click Save to save your changes.
Editing Employee Time Clock Records
When an employee forgets to Clock In/Out, supervisors or managers may need to add or edit time clock entries. Only associates with TimeClockEntrySearchForm and TimeClockEntryDataForm permissions settings as defined in Setting Up Time Clock Permissions for Individuals and Groups can search for and modify the employee time clock entries.
To edit an employee’s time clock record:
1. Log in as an administrator.
2. From the Main Menu, choose Maintenance > Database > Time Clock Entries to display the Time Clock Entries form.
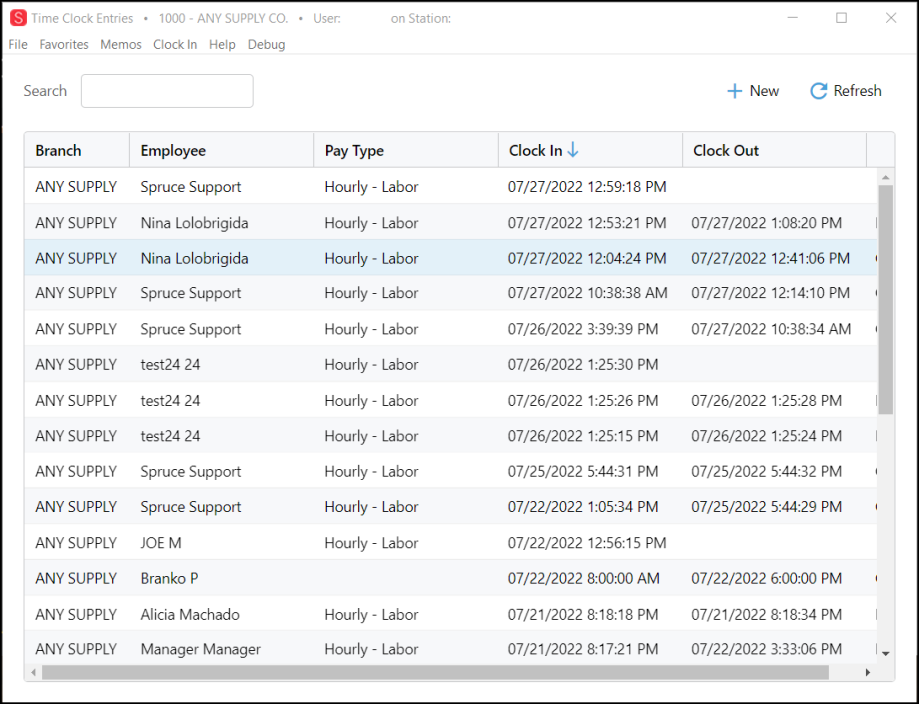
Time Clock Entries Form
This list displays in the order the records were entered by default.
To sort the list, click a column heading and the list will reorder alphabetically or numerically according to the entries in that column.
To add a new time click entry, click the New button and a similar Time Clock Entry box displays as is shown below. Complete the entries and click Save to save them.
3. To edit an entry in the list, double-click it and update the entry as you need to.
Time Clock Entry (Employee) Edit Mode
4. Click Save to save your changes.
You can delete records with errors, so the application does not use these records in reporting. However, deleted entries still display in the Time Clock Entries list.
Running Time Clock Reports
B-99516, B-105347 – After your employees use the Clock In/Clock Out feature, you can run reports to retrieve work records and verify the worktime of each employee within a specific date range. These reports require that an employee has both clocked in and clocked out for at least one shift within the report period.
Note: To run these reports, you must have Report permissions set in the User ID Maintenance form.
We use custom ActiveReports templates to create these standard Time Clock reports:
-
The Time Clock Detail Report (Portrait and Landscape Orientation) shows the work record of each employee over a specific date range. This report is broken down into individual pages for each employee so they can sign off on the number of hours they worked in the reporting period. On the last page, the report also provides a total of all hours worked in the date range by all employees.
-
The Time Clock Daily Summary Report shows a summary of the time reporting records for each employee for the selected date range. On the last page, the report also provides a total of all employee hours during the date range.
To run the Time Clock reports:
1. Log in as an administrator.
2. From the Main Menu, choose Time Clock > Reports > Custom Report Library.
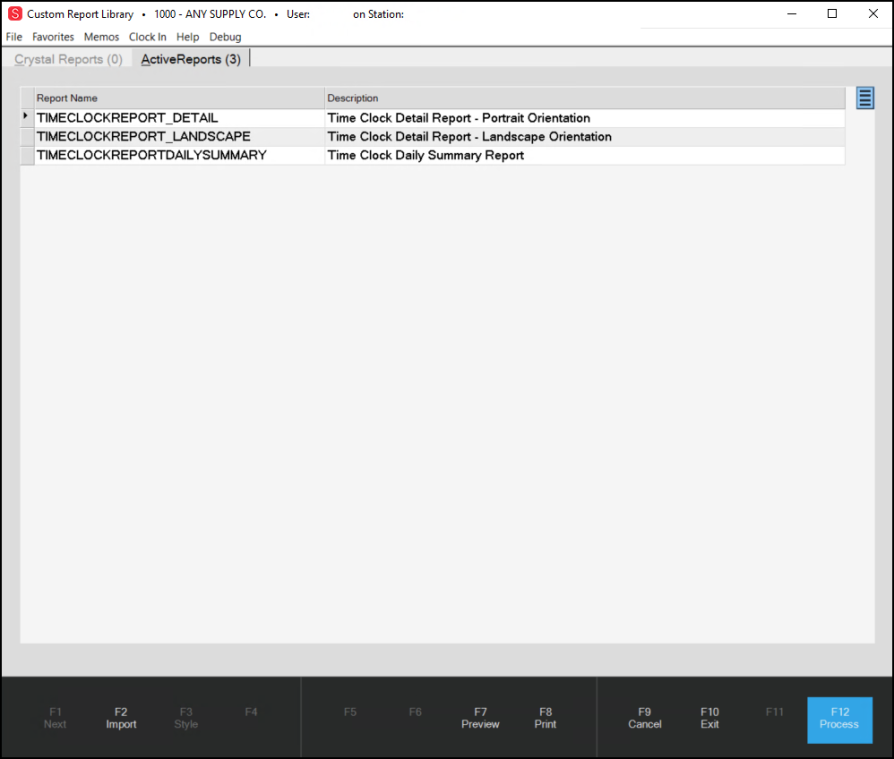
Time Clock > Custom Report Library with Report Options Displaying
Note: The parameters and required fields are the same for these reports. The output is different.
3. Choose the Time Clock Detail Report - Portrait Orientation, Time Clock Detail Report – Landscape Orientation, or Time Clock Report Daily Summary Report from the list and click Preview (F7). The Report Parameters options display.
Note: The parameters are the same for all three reports.
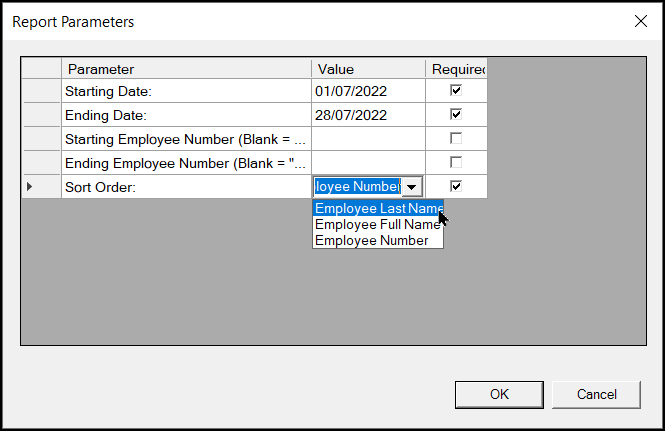
Time Clock Detail Report Parameters
4. Choose a Starting Date and Ending Date for this report (Required).
5. Continue based on the kind of report you want to generate:
-
To generate the report for a range of employees, enter the first employee number in the Starting Employee Number Value field and the last employee number in the Ending Employee Number Value field.
-
To generate the report for all employees who submitted time in the date range, leave these fields blank.
6. Select the sort order from one of these options: Employee Last Name, Employee Full Name, or Employee Number. This report runs by Employee Number by default. (Required).
7. Click OK to preview the report.
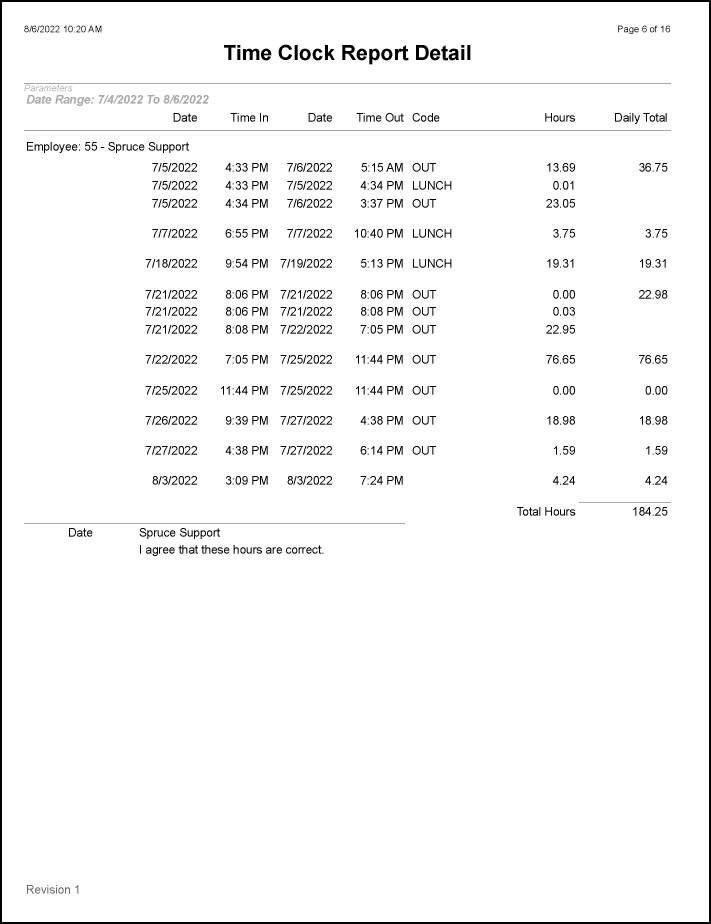
Time Clock Report Detail (Portrait)
Time Clock Detail Report (Landscape)
Time Clock Summary Report
Using the Price Group Import Wizard
B-103603, B-103605 – Price Groups help you establish pricing overrides for groups of customers that have the similar needs. If you keep track of your price group information in a spreadsheet, you can now import that information into the application. Typically, the spreadsheet includes the following information which is used to map the price group information into the application:
-
Price Group (Required)
An unique identifier (code) for the price group (One to Four characters). -
Description (Optional)
A text description of the price group. (Alpha-numeric entries) -
Group (Required)
The Inventory Group that this price group needs. (Two or three digit entries) -
Section (Optional)
The Inventory Section that applies to this price group. (Two to three digit entries)Note: Additionally, these entries can also be (Null), Empty or -1 to mean all items in the group. -
Price (Required)
Enter a valid price code based on these options below. Enter the Price Code (V, D, S, etc.) and then the amount of discount, margin, or markup in decimal or integer format:
| Price Code | Description | Examples of Valid Formats |
|---|---|---|
| V# | Customer Price Levels based on your defined settings:such as Contractor, Premier, Employee, etc. |
V0 (Retail/Store Price), V1, V2, V3, V4, V5, or V6 |
| D# | Discount off Suggested List Price |
D22.44; D24.5; D15 |
| S# | Discount off Store Retail Level |
S22.44; S24.5; S15 |
| C# | Margin Percent on Current Market Cost |
C22.44; C24.5; C15 |
| R# | Margin Percent on Last Receipt Cost |
R22.44; R24.5; R15 |
| A# | Margin Percent on Weighted Average Cost |
A22.44; A24.5; A15 |
| B# | Margin Percent Higher of Market or Average |
B22.44; BB24.5; B15 |
| M# | Markup Percent over Current Market Cost |
M22.44; M24.5; M15 |
| L# | Markup Percent over Last Receipt Cost |
L22.44; L24.5; L15 |
| W# | Markup Percent over Weighted Average Cost |
W22.44; W24.5; W15 |
| X# | Markup Percent Higher of Market or Average |
X22.44; X24.5; X15 |
| CLEAR |
Resets the Group and Section and deletes any existing Price Group settings for that Group/Section. Must specify Group. |
You may get errors if your spreadsheet entries do not conform to these specifications. You can change the spreadsheet entries and click the Preview button to update the Preview data grid.
To import your price group spreadsheet into the application:
1. From the Main Menu, choose Point of Sale > Database > Price Groups to display the Price Group Maintenance form.
2. Choose Import (F2) to display the Import Wizard options.
3. In the Windows Field, click the Ellipsis  button and navigate to the file you want to import. The Sheet list displays.
4. Choose the worksheet in the spreadsheet you want to import from the list.
5. To specify the delimiters of this spreadsheet, do the following:
Note: This is not required. If you use a spreadsheet in the .xls or .xlsx format, delimiters are not used. If you use a .csv text format, delimiters are required.
-
Choose the Menu Marker beside the Use Mapping list to display the Maintain option.

The Import Wizard Mapping box displays.
-
In the Code field, enter a unique name for this spreadsheet delimiter mapping style.
-
In the Description field, enter a description for this mapping style.
-
In the Path field, click the Ellipsis
button and navigate to the folder you want to store this delimiter mapping file. -
From the Delimiter list, choose the delimiter that the spreadsheet uses to parse the data and click Add.
Note: This step is not required.
6. Select the Skip First Line for Headings check box if your spreadsheet has a header row.
Price Group Import Wizard Box with Entries
The application populates the data from the spreadsheet in the Preview Data data grid.
7. In the Price Group, Description, Group, Section, and Price mapping field lists, choose the corresponding column heading from the data grid. You must select a field for each mapping list.
8. Click Process to validate the entries in the data grid.
The application saves a copy of this spreadsheet in the User Report Directory specified in your system parameters.
Note: Errors display if the contents of the spreadsheet do not conform to the expected entries. You can fix the field entries in the spreadsheet and click Preview to update the entries in the data grid and choose Process again.
9. When the process is successful, you can return to the Price Group Maintenance form and choose the price group code you imported from the Price Group Code list and expand the Group Section table to see the Group/Section entries you added.
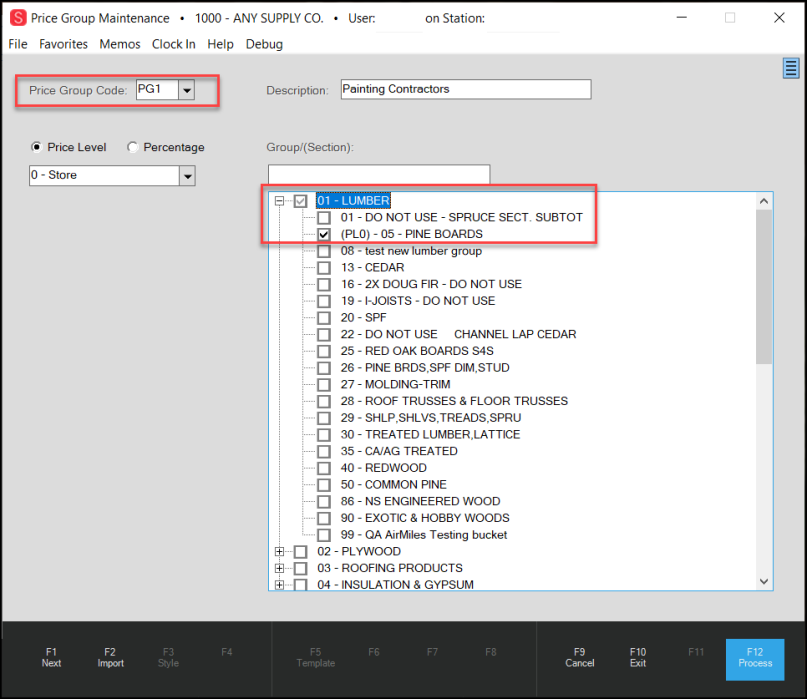
Price Group Maintenance Form with Imported Record
Cash Drawer Tally Feature Updated to Save Data, Create Report
B-91830, B-105520 – We have improved the Cash Drawer Tally process to save the count of bills and coins in a cashiers drawer at the end of their shifts. This new process gives your business a way to look up this information in the future and provide reports for audit purposes. After a cashier closes a cash drawer session, they cannot overwrite or resave the bill and coin quantity values. This process works for all regional currency denominations.
To see this change, complete these steps at the end of a shift:
1. From the Main Menu, choose Point of Sale > Utilities > Cash Drawer to display the Cash Drawer Handler.
2. From the Drawer # list, choose your cash drawer.
3. From the Session Activated list, choose the active session for that drawer.
4. Choose Tally (F6) to display the Cash Drawer Tally dialog box.
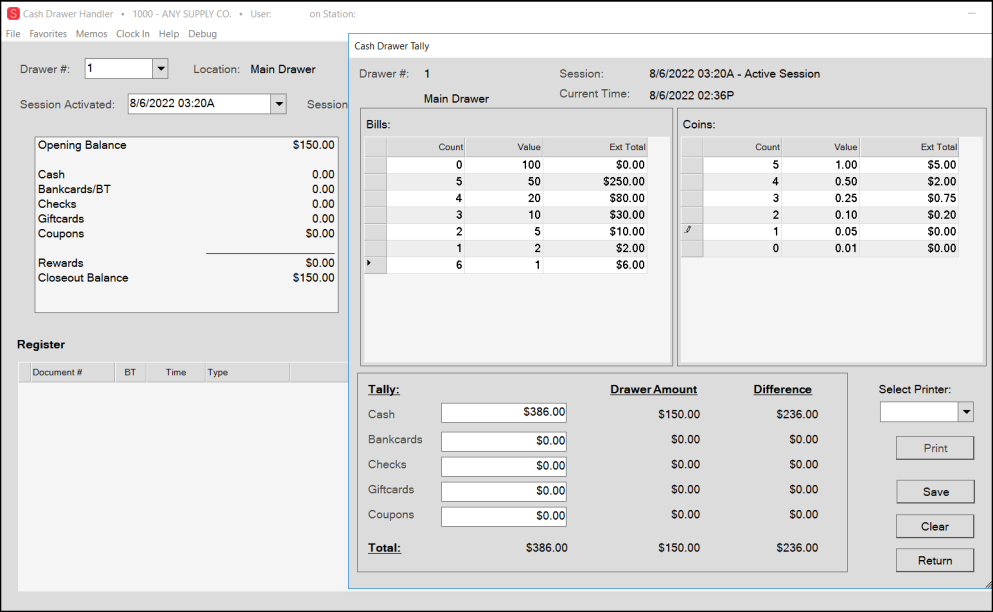
Cash Drawer Tally Box with Cash Drawer Handler Form in the Background
The denominations in the Cash Drawer Tally list reflect the local currency denominations.
5. In the Count column of the Bills and Coins lists, enter the number of bills and coins of each denomination.
The application totals the amounts you enter in the Cash field.
6. When you have completed your entries, click Save.
The message Cash Drawer tally totals updated displays. The Cash Drawer Handler form redisplays.
7. Choose Process (F12) to display the Process Cash Drawer box.
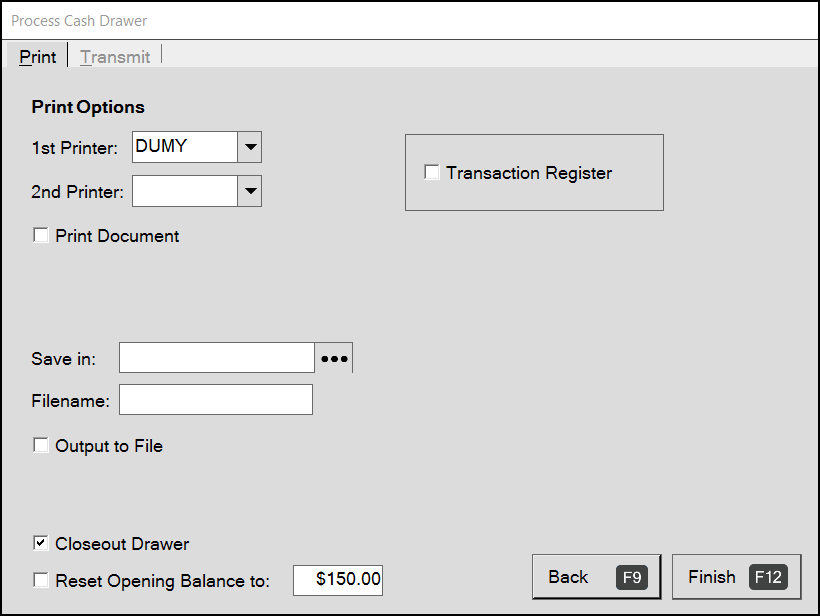
Process Cash Drawer
8. Continue based on management’s requirements:
-
To print the cash drawer report, select the Print Document check box and select the appropriate printer.
-
To save the cash drawer report as a file, select the Output to File check box and enter the filename and folder information to save the document.
9. Select the Closeout Drawer check box to add the tally denominations to the database. (Required)
10. When you have completed these selections choose Finish (F12).
Note: After you select Finish, you cannot make changes to the tally denomination values.
If you choose the same drawer and closed session again, you can still view the session information including the denomination detail, but you cannot make any changes to the entries. If you try to save a new session that does not have any tally information reported for it, a warning message displays.
-
There is no tally information saved for this drawer’s session.
When you print or save the report, the results reflect the cash drawer values you saved:
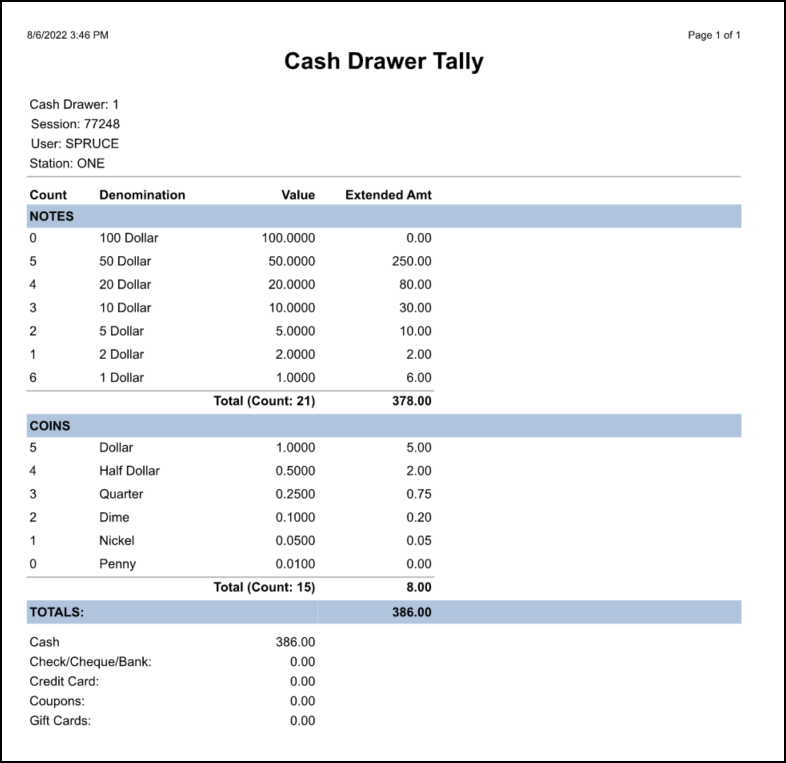
Cash Drawer Tally Report
B-107743 – Cash Drawer Tally Update.
At the request of a customer, we are updating the cash drawer tally handling when there are no existing tally values. Cashiers can enter and save the Cash Drawer Tally even if the drawer is closed. We also learned that some businesses close cash drawers automatically or before counting, particularly at shift change, and the cashier is not always the person counting the tally. When the Cash Drawer is closed, an authorized user can choose Tally (F6) in the Cash Drawer Handler form to update the cash drawer tally.
More Space Available in Point of Sale / PO Document Footers
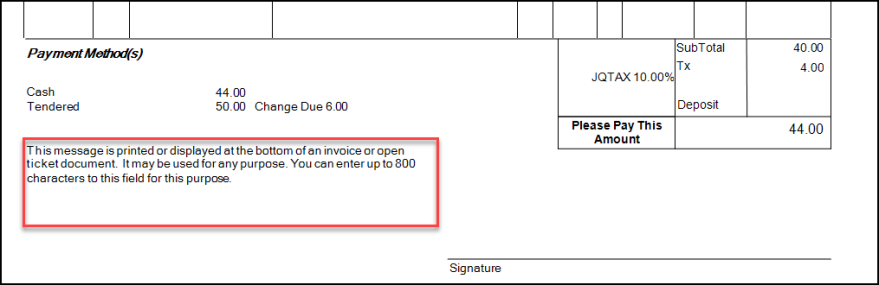
B-104345 – Customers have asked us to provide more room to add additional static text at the bottom of their Point of Sale documents, including Invoices, Orders, Quotes, Open Ticket, and Purchase Order documents. To make this change, we have expanded these fields in the Point of Sale and Purchase Order Document Parameter settings. Only users with administrative rights can make these changes to the content. The new fields have an 800-character limit. If the text you need to add is more than that, we include it, but we shrink the text to fit into the space available..
To make these changes in the Point of Sale and Purchase Order documents:
1. From the Main Menu, choose Maintenance > Database > Parameters to display the Parameter Settings form.
2. Choose the Point of Sale > Documents tabs to display the Point of Sale Footer fields.
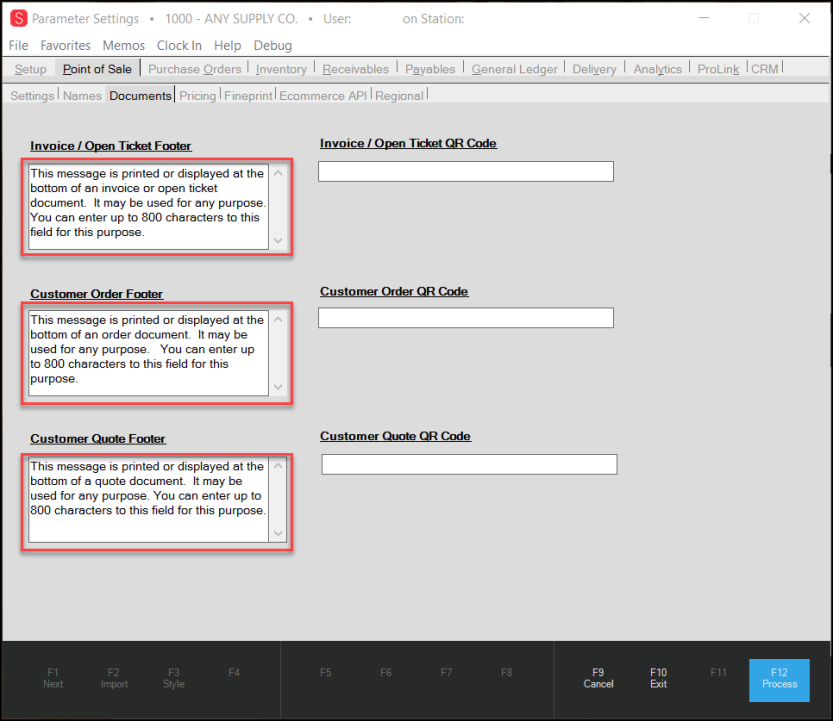
Parameter Settings > Point of Sale > Documents Tab with Footer Fields Highlighted
3. In the Footer fields, enter the content you want to display at the bottom of the Invoice/Open Ticket, Customer Order, and Customer Quote documents. There is a character limit of 800 characters.
4. Click the Purchase Orders tab to display the Purchase Order options.
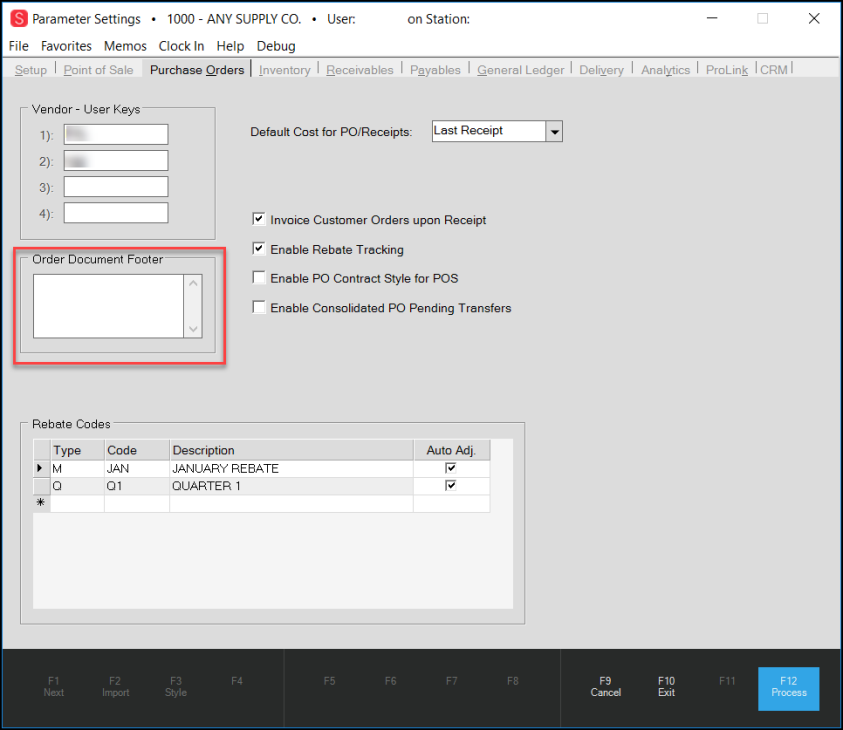
Parameter Settings > Purchase Orders > Order Documents Footer Field Highlighted
5. In the Order Document Footer, enter up to 800 characters of text to the footer of your purchase order documents.
6. When you have updated these footer fields, choose Process (F12) to save the changes.
When you process the transactions and display the results, the updated message displays in the footer of the Point of Sale or Purchase Order document:
Invoice Footer with Updated Message
Note: If you enter more content than would normally fit in this space, the application reduces the size of the print to ensure that it displays properly.
Removing Capital One Trade Credit (BlueTarp) Deposit Holds from Any Branch
B-94608 – If you work with customers with Capital One Trade Credit (formerly BlueTarp) credit accounts, you know that a popular feature of this service is the Deposit Hold. Customers can apply the Deposit Hold when placing orders (or sales) to put a credit hold on their account. The Deposit Hold amount is typically applied at the account’s main branch even when an account uses more than one branch for their transactions.
Update: If you void or close an order that has a deposit hold, the application voids the hold as part of the process. If the hold is not removed due to some other issue, use the instructions below to remove the deposit hold from the account.
Businesses ran into issues when the customer canceled the order (or invoice) because the application did not have a way to cancel the Deposit Hold at the same time. This was particularly an issue when the customer canceled the order in a branch that was different from their main branch. We have modified this process so that you can void the deposit hold when your customer wants to cancel a BlueTarp Deposit Hold order and then close or void the order as requested.
Note: The Capital One Trade Credit (formerly BlueTarp) web service is only available Monday-Friday during business hours in the United States. It is frequently shut down for maintenance at other times, including weekends.
To remove a Capital One Trade Credit (formerly BlueTarp) deposit hold:
1. From the Main Menu, choose Point of Sale > Orders and select an account with a Capital One Trade Credit (formerly BlueTarp) credit account.
Point of Sale > Order Entry > Account with BlueTarp Credit
2. Add items to the data grid and choose Process (F12) to display the Process Order Document.
Process Order Document with BlueTarp Settings Displaying
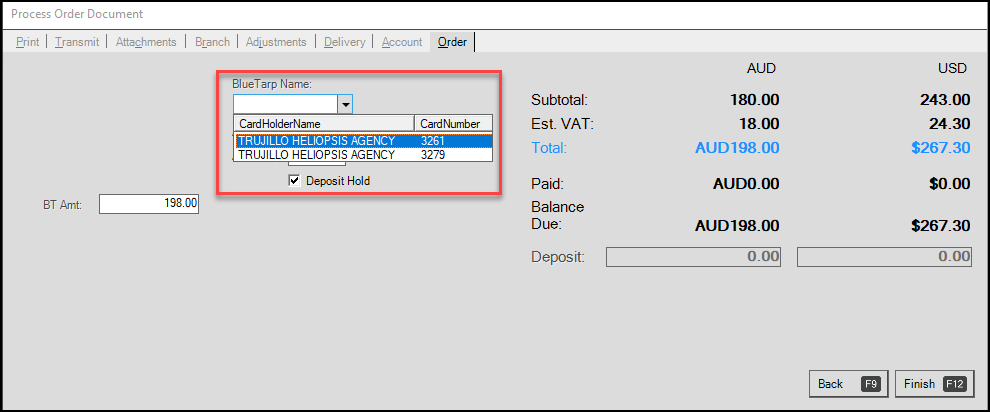
3. From the BlueTarp Name list, choose the account to apply the Deposit Hold to and choose the Deposit Hold check box.
The BT Amount field shows the BlueTarp deposit hold amount.
4. Choose Finish (F12) to save this order.
5. To see this BlueTarp deposit hold, choose Utilities > BlueTarp Deposit to display the BlueTarp Deposit Hold form.
6. In the Account # list, choose the account you chose in Step 1.
The account details display.
7. Find the order you just created in the list to see the Deposit Hold record including the Deposit Hold amount and the BlueTarp Sequence ID that links it to the account on the Capital One Trade Credit account.
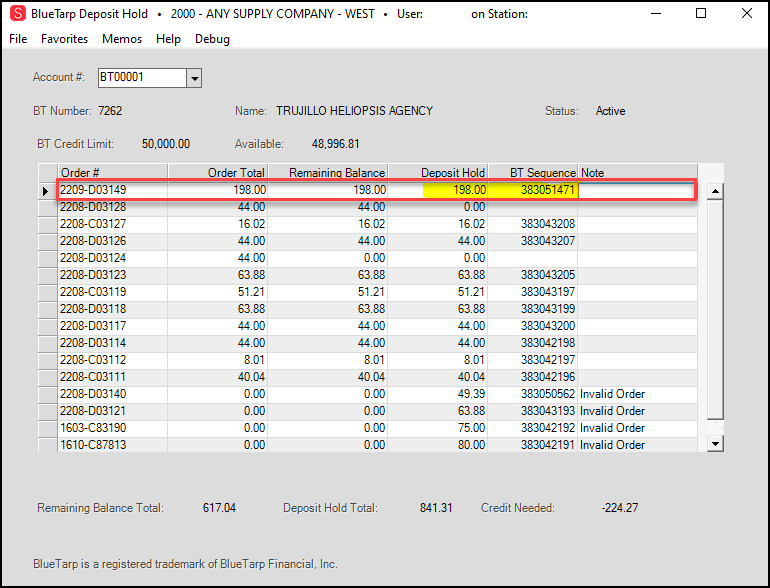
BlueTarp Deposit Hold Form with new Transaction Highlighted
Note: If you close this form and change the branch, you can return to this form, select the account again, and the Deposit Hold displays the same way. Using any branch setting you can now void this Deposit Hold.
8. Choose Void (F6). When the branch the hold was placed on is different from the branch that is requesting the void, a new prompt displays:
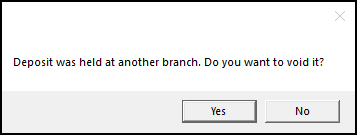
Deposit was held at another branch Message
9. To void the BlueTarp deposit hold, choose Yes. The BlueTarp Deposit Void box displays.
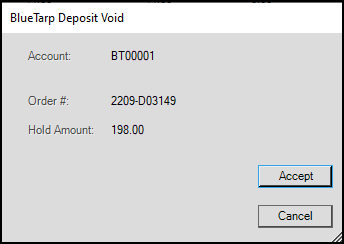
BlueTarp Deposit Void Confirmation
10. Choose Accept to void the credit hold on the customer’s BlueTarp account.
The application updates the BlueTarp Deposit Hold form to remove the Deposit Hold amount and the BlueTarp Sequence ID. The application sends a confirmation to the Capital One Trade Credit (formerly BlueTarp) system to update the record.
Blue Tarp Deposit Hold Form with Voided Hold Showing
11. Choose Process (F12) to save this change.
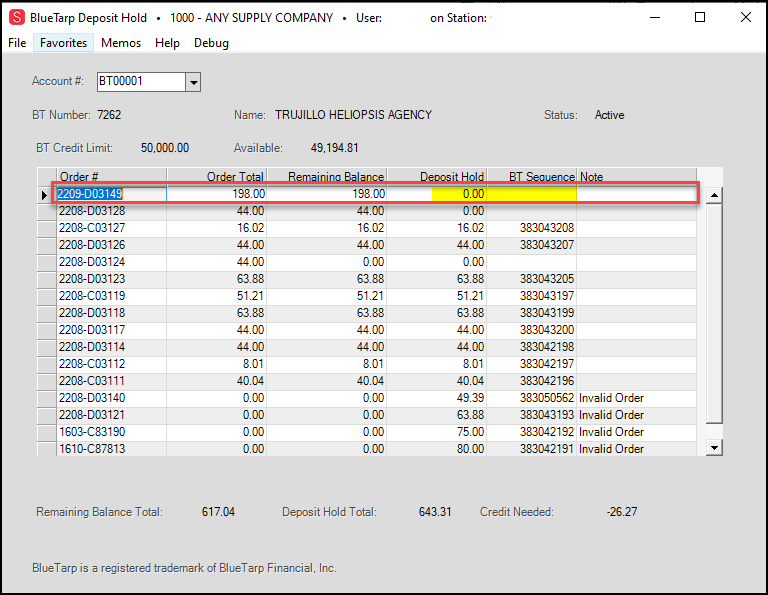
12. After you void the hold, you can close or void the order in Point of Sale using the Order # Menu Marker  .
.
Point of Sale > (Sale or Order) > Close or Void Order
Note: When you remove the closed or voided order, the Order and the Hold records no longer display in the BlueTarp Deposit Hold list.
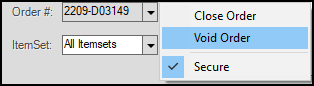
To add a deposit hold to an order on the account after the order has been processed, you can return to the BlueTarp Deposit Hold form.
1. Choose Utilities > BlueTarp Deposit to display the BlueTarp Deposit Hold form.
2. In the Account # list, choose the account you want to add the BlueTarp Deposit Hold to.
The account’s orders display.
3. Choose the row that contains the order you want to add the Deposit Hold record to.
4. Choose Hold (F5). The BlueTarp Deposit Hold box displays.
BlueTarp Deposit Hold with New Entry
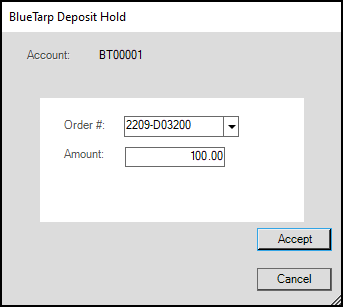
5. Choose the Accept button to update the order record with the new BlueTarp Deposit Hold.
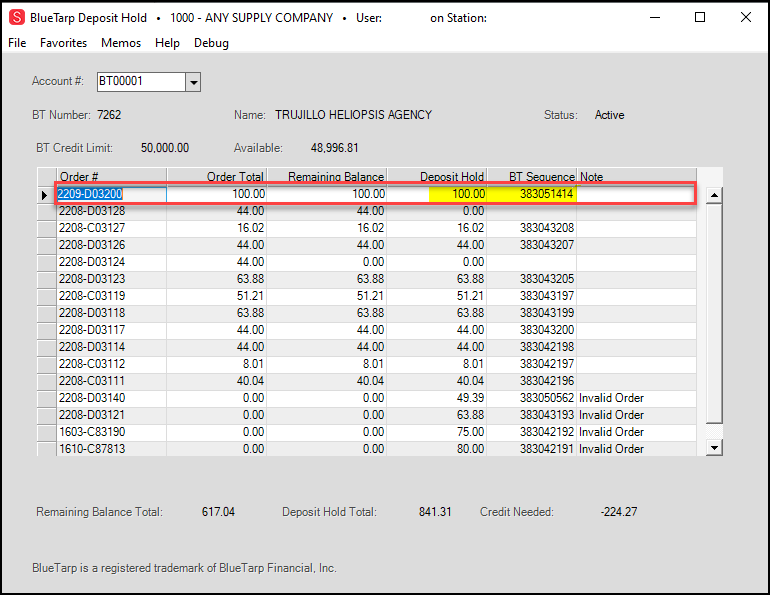
New Blue Tarp Deposit Hold Entry
6. Choose Process (F12) to save this deposit hold.
Accounts Payable Update
2022 1099-NEC Form Updates to Prepare for the EOY Reporting
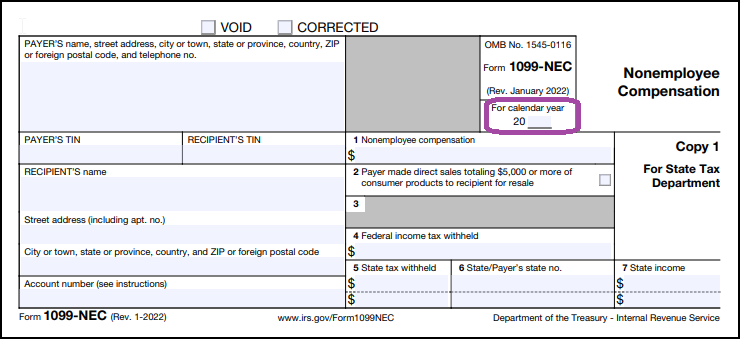
B-106932 – The IRS has updated the 1099-NEC Non-Employee Compensation form for 2022 and we have updated our application to accommodate this change. The calendar year entry will now print correctly when you print your EOY 1099 form. The 2021 version looked like this:
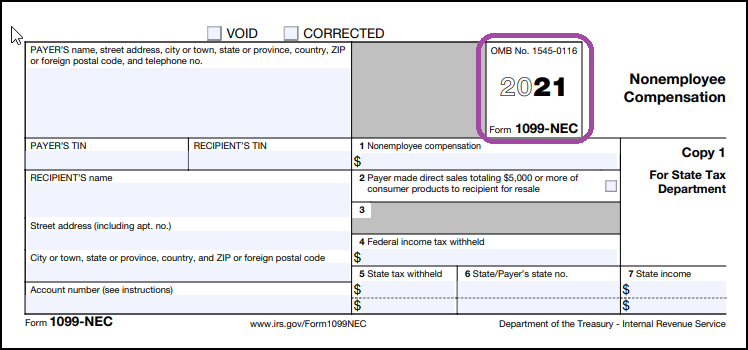
The 2022 1099-NEC Form looks like this:
General Ledger Update
General Ledger Inventory Reconciliation Report Updates
B-100651 – Customers asked us to update the popular General Ledger Inventory Reconciliation report to take date range parameters and alert them when they have certain reconciliation issues, such as:
-
Negative Receipts
-
Transactions that include SKUs that are stocked but you do not track the quantity on hand
-
Manual Journal entries that affect inventory GL accounts
In the second section of the report, the application defaults the sort to Branch and Transaction type, then Date, with Subtotal overrides allowing sort by discrepancy amount, branch, group/section, date, and transaction type. Document-related entries include the Document ID in the description and subtotals are calculated based on the selected sorting options. We also were able to improve the performance of the report (so it takes less time to run).
We are also updated the code to account for the changes to Cost Corrections. Cost Corrections for Transfer Ins display correctly as well as Cost Corrections for Receipts.
Inventory Updates
Up to 6 Vendor Records Available in Item Maintenance
B-102372 – There are now more options for storing vendor information in the Item Maintenance form. In response to customer suggestions, we have added three more alternate vendor tabs to expand the number of sources you can record for the materials you purchase.
Item Maintenance Form > Purchasing >Alternate Vendors Tab # 6
Moved: Vendor Item Load Added to Inventory Utilities
B-105813 – We moved the Add Vendor Item Load process from the Catalog Utility to the Inventory Utility and improved the usability of the function. After you update a catalog entry for one or more items, it is useful to update those item records in inventory so you can see the impact of the cost changes of these items.
To facilitate this, we have added the Inventory Utility, Load Vendor Items, which allows you to load catalog items received through the EDI process. The vendor items you are loading data for must be in the catalog to use this feature.
To enable this feature, you need to add this permission to the user rights of the person performing this task.
To set the user permissions for the Vendor Item Load feature:
1. From the Main Menu choose Maintenance > Database > User IDs to display the User ID Maintenance form.
2. In the User ID field, enter the User ID of the person you are adding this permission to.
3. Choose the Permissions List Settings ![]() button to display the Permissions List Code Maintenance box.
button to display the Permissions List Code Maintenance box.
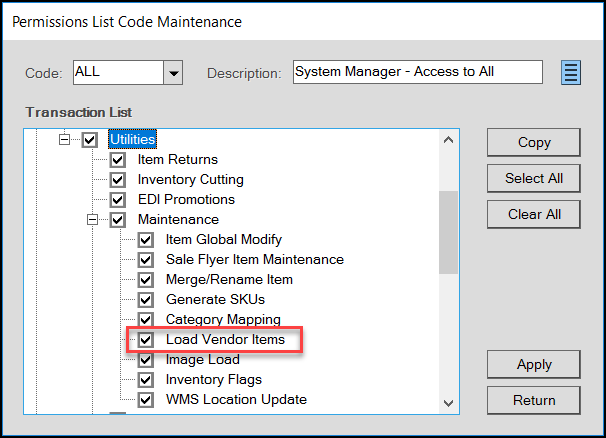
Permissions List Code Maintenance > Utilities > Maintenance > Load Vendor Items Option
4. Scroll down to the Inventory section > Utilities > Maintenance and select the Load Vendor Items check box.
5. Choose Apply and Return.
6. Choose Process (F12) to save this change.
Note: Log out of the application and come back in to enable this feature.
To load vendor catalog item data into the application:
1. From the Main Menu, choose Inventory > Utilities > Maintenance > Load Vendor Items to display the Load Vendor Items box.
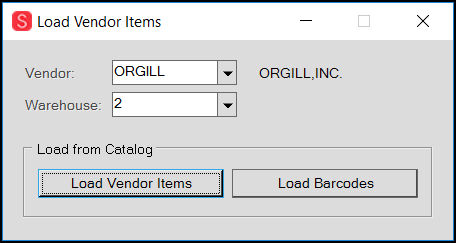
Load Vendor Items Box
2. From the Vendor list, choose the vendor that sent the item information from the list.
3. From the Warehouse list, choose the warehouse that is the source of the items (if applicable).
4. When you have completed your selections, choose one of the following:
-
Load Vendor Items
If the data you are loading is not barcode related choose this option. -
Load Barcodes
Choose this option if the data you are loading is based on barcode information.
When you choose one of these options, a relevant prompt displays to confirm that you want to load and update your current data using this information.
5. Consider this question and choose one of the following:
-
Choose Yes to update your vendor data. A confirmation message displays. Click OK to continue.
-
Choose No to make another choice. The Load Vendor Items options redisplay.
After you complete this process, you can review the relevant vendor tab in Item Maintenance for the items you loaded data and/or barcodes for.
Group and Section Values Expanded to 255 from 99
B-104347 – Many customers have asked us to give them a way to add more group and section numbers to accommodate the new kinds of merchandise they sell. You can now add group and section code entries between 100 and 255 in the Group/Section Maintenance box of the Item Maintenance form.
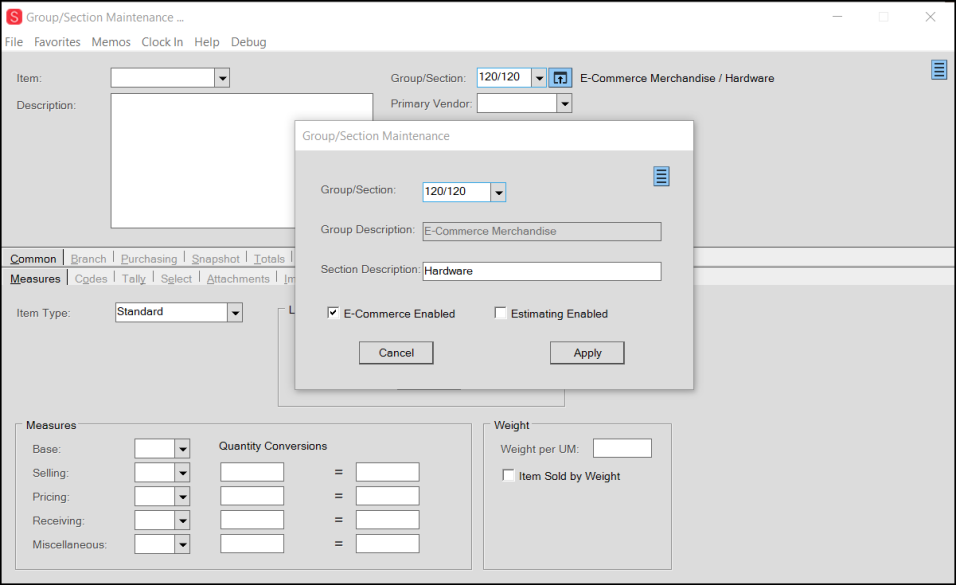
Item Maintenance Form > Group/Section Maintenance Box
Tags & Labels Upgrades Improve Print and Designer Options
B-98833, B-99859, B-102626 – Customers have told us over the years that they want more control over the Tags and Label creation process, more choices of where they can print the tags and labels, and the ability to create batches of labels for printing later. Based on this feedback, we expanded the Tags & Labels Utility into three pieces: the Designer, where you design and create the templates you use for Tags & Label production; Print, where you use the template you designed to print the tags and labels throughout the application, and the Batch Maintenance Utility, which allows you to collect and print labels using the new custom templates. We have also enhanced the AnyWare app to provide more support for these expanded features. Features we have added include:
-
Setting a default label type for stations that print the same custom label type consistently, see here.
-
Changing how you print and retain or empty the data grid in the Printing feature.
Now, you use the Print (F8) key to retain the entries in the grid and choose Print (12) to clear the items from the grid -
Enhancing the preview for tag/label items before printing to confirm that they display as you expect
-
Printing tags and labels from the Process Document in Point of Sale
-
Modifying label batches to remove batched items, increase or decrease the label counts, or even consolidate multiple batches into a single batch to make printing easier
-
Creating the Tags & Labels Menu to provide permission-based access to Batch Maintenance, Designer, and Printing features
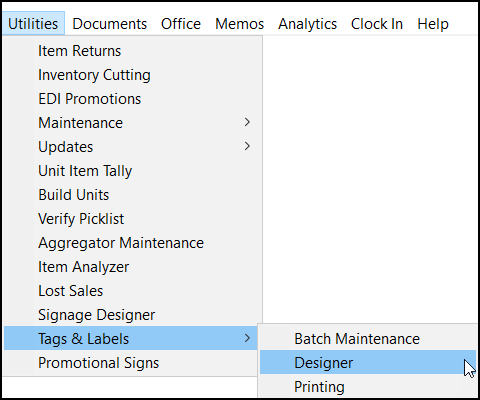
Tags & Labels Menu
Important: To make the new Tags & Labels features work, we have converted your existing templates to a new format. This new format gives you more flexibility in printing and managing the entries in these labels but may affect the way these labels display in the Designer. We have added extra support for legacy template fields. We recommend that you preview your content before printing to ensure that tags and labels display how you expect to prevent wasted paper stock.
Setting the Tags & Labels Permissions
B-98833 – The new Tags & Labels features require specific permissions for all users. With the new features, Inventory and Sales employees with label printing responsibilities can create their own label batches, but you may want to restrict who can design the labels. Use these instructions to add batch maintenance, label designer, and printing permissions to individual User IDs or groups as works best for your business. User IDs that do not have permission will not see some Tags and Labels menu options.
To add Tags & Labels permissions to a user ID:
1. Log into the application with administrator permissions.
2. Go to Maintenance > Database > User IDs to display the User ID Maintenance form.
3. In the User ID field, choose the User ID of the person or group you want to add Tags & Labels permissions to.
4. In the Security Options tab, select the Permissions Settings ![]() box to display the Permissions List Code Maintenance options.
box to display the Permissions List Code Maintenance options.
5. Scroll down and select the + icon beside the Utilities option. The feature list displays.
6. Scroll down and select the + icon beside the Tags Labels option. The Tags and Labels options display.
Permissions List Code Maintenance Box with Tags & Labels Settings Highlighted
7. Choose the Batch Maintenance, Designer, and/or Printing check boxes as appropriate for this ID.
Note: Selecting the check boxes in this list displays the menu option for this/these user(s).
8. Choose Apply. The message Database Updated displays.
9. Choose Return to redisplay the User ID Maintenance form.
10. Choose Process (F12) to save these permissions.
Setting a Default Label Type for a Station
B-98901, B-102293, B-102312 – When a station prints the same labels every time, you can add a default label template to the station record. You can change this setting locally if you need to, but once you set this option, it displays by default.
To set the default label type for a station:
1. Log into the application with administrator rights.
2. From the Main Menu, choose Maintenance > Database > Devices to display the Devices Maintenance form.
3. From the Device Name field, select the station you want to set the default label template for.
The fields update to show the default settings for the station.
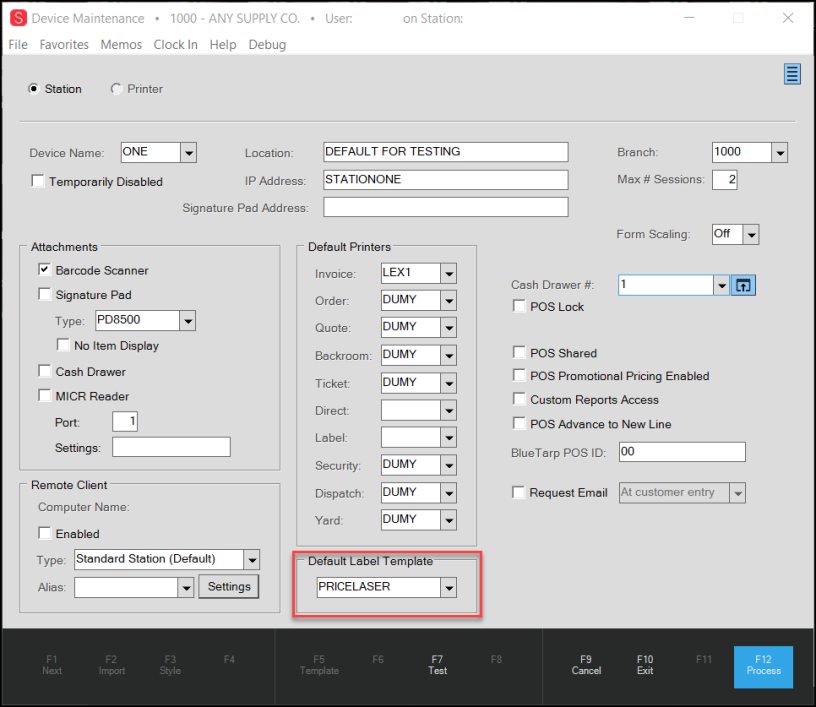
Device Maintenance Form with Default Label Template Highlighted
4. From the Default Label Template list, choose the template you want to use by default for this station.
5. Choose Process (F12) to save this setting.
Designing Tags & Labels
B-98844, B-98850, B-98857, B-98879, B-98893 – We have redesigned the Tags and Labels Designer to give you more control over the layout, design, and content of the labels and tags you create. You can base these tags and labels on existing templates or create new templates that work for your business. You can modify Vendor templates as well. Using this new feature, you can create tags and labels for:
-
Price tags,
-
Bin labels,
-
Special order item labels for individual order items,
-
Unit tally item labels and tags,
-
Price update tags and labels, and
-
Sale price tags and labels
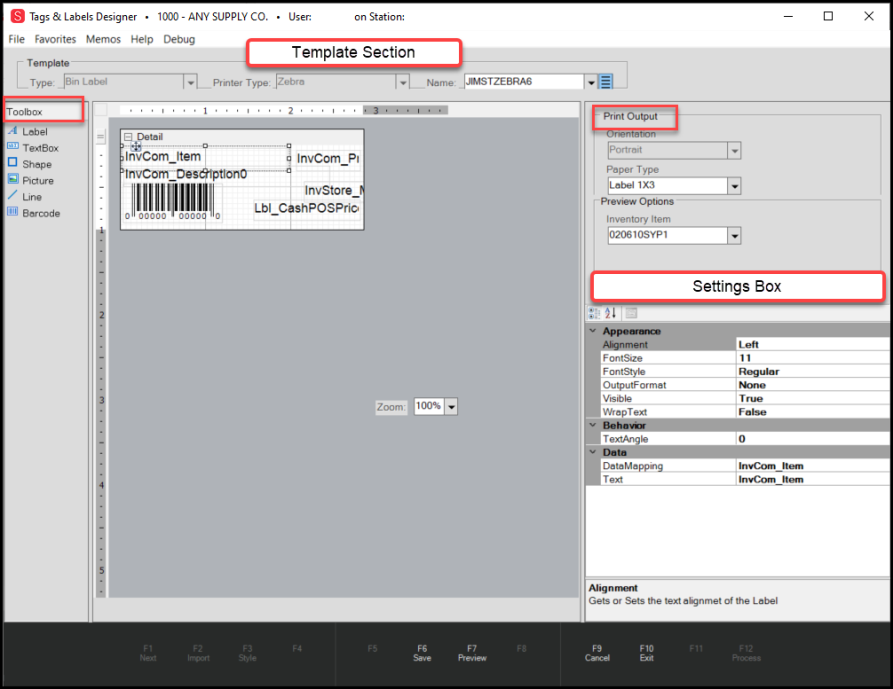
Tags & Labels Designer Form
Layout of the Tags and Labels Designer
The Tags & Labels Designer gives you a clean slate to create new bin labels, price tags, special order item labels, unit tally item labels, price update labels, and sales price labels. The appearance and layout features are customized based on the type of printer (Zebra, Dymo, or Laser printer) you use to produce your tags and labels. Let’s take a look at the layout of the Designer. The page defaults to 8.5 x 11, but you can customize it to your template needs.
Template Section
The Template section shows you the options for designing your tag or label.
Designer > Template Type Options
Here, you select the Template type, the Printer Type, and the template's name. If you are editing an existing template, you can choose it from the list. If you want to create a new label or tag, type a new name in the Name field instead.

Designer > Printer Type Options
The design options you can access are defined by the printer you use to print your content.
From the Template Name list, you can choose the templates you have already created.
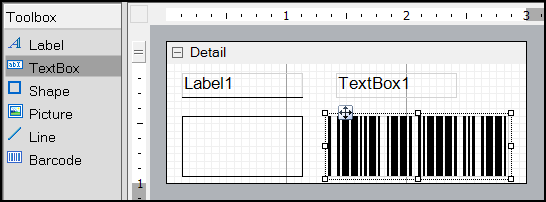
Toolbox
After you pick a template type and printer type, you can access the features on the Toolbox.

Toolbox Feature
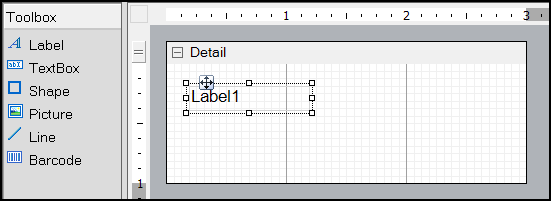
Label
Drag this option to the Detail tab to add data from the application to your tags or labels. This can include item information, price, quantity, account information, branch-location information, etc. In the past, you were limited to the options the application selected for you. Now you can choose any data you have added to the Item Maintenance form, Point of Sale records, or even tally item info. To learn more about the Label options, see What is Data Mapping?
TextBox
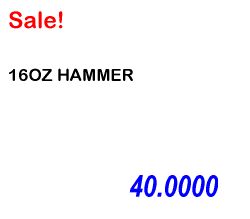
Drag this option to the Detail tab and type the text you want in the box, such as Sale! or Coming Soon!
Picture
Drag this option to the Detail tab and in the Data field of the Settings box, click the Ellipsis button. Navigate to the picture you want to display in the label. After the image displays, you can drag the image to the spot you want and resize the image to fit.

Line
Drag this option to the Detail tab and position it as you want it on the tag or label. Use the options in the settings box to change the color and size of the line.

Barcode
Drag this option to the Detail box to add a Barcode for easy scanning. You can resize this box to fit.
When you print the label, the barcode will be specific to the items you select in the Printing data grid. To learn more about the barcode options, see What are the Settings for Barcodes?

Shape
Drag this option to the Detail box to and drag the edges to add a box around your label or tag. Putting a box around a price label makes it more visible.

The template you select determines the box size of the template.
To use a toolbox feature, use your mouse to click the tool you want to add to the label and drag it to the Detail box.
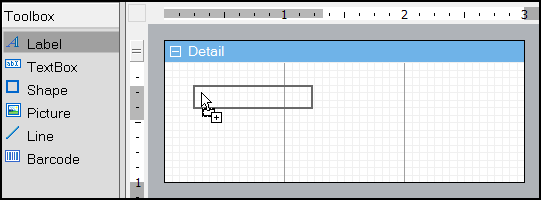
Add new features to your label as you need them:
Designer > Bin Label with More Tools Added
Settings Box
Using the Settings box, you configure the labels and the barcodes with the data from the application. The settings options (such as Appearance, Behavior, and Data) determine what the labels you drag to the worksheet mean and how they look. The Settings options vary based on the type of printer you use. Some of the label options are the same for different printer types.

Zebra Appearance Label Options > DYMO Appearance Label Options > Laser Appearance Label Options
When you click in the right corner of the second column, you can select options for each setting type. Here are the Appearance settings options for Designer labels.
Not all Appearance, Behavior, and Data settings are available for all Printer types.
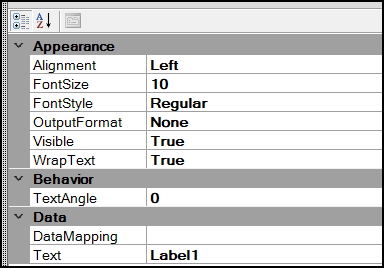
Appearance and Behavior Options
| Title | Settings Options | Printer Type |
|---|---|---|
| Alignment | Left, Center, Right, Justify |
Zebra, Dymo, Laser |
| BackColor | Full range of colors from Transparent, Black, Grays, Reds, Yellows, Greens, Blues, Purples, and Pinks |
Dymo, Laser |
| Font | Windows standard fonts, styles, sizes 8 pt. to 72 pt. |
Dymo, Laser |
| FontSize | 8 pt to 72 pt |
Zebra |
| FontStyle | Regular, Bold | Zebra |
| ForeColor | Full range of colors from Transparent, Black, Grays, Reds, Yellows, Greens, Blues, Purples, and Pinks |
Dymo, Laser |
| OutputFormat | International Currency formats (with/without symbols), Extended Price, Percent, Quantity, Date Formats (various), Unit Price, Weight, None |
Zebra, Dymo, Laser |
| TextAngle | 0 to 359 |
Zebra, Dymo |
| TextJustify | Auto, Distribute, Distribute All Lines |
Dymo, Laser |
| VerticalAlignment | Top, Middle, Bottom |
Dymo, Laser |
| Visible | True or False |
Zebra, Dymo, Laser |
| WrapMode | No Wrap, Word Wrap, Character Wrap |
Dymo, Laser |
| WrapText | True or False | Zebra |
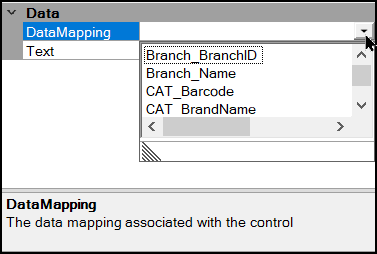
Data Mapping Options
If you open your existing templates, you will find that we have converted the label settings to data mapping codes. These codes are tied to the information saved in the application about your inventory items, sales, orders, etc., and your business. With this update, you can add all of this data to your tags and labels.
To select a Data Mapping code, select the down arrow in the second column in the Data Mapping row.
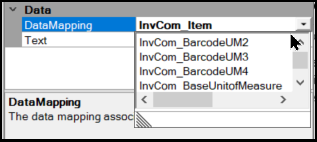
Designer > Settings Box > Data Mapping Drop-Down List
In this list is every setting available to you in the database. Select the appropriate data mapping code for the label you are adding. Then, enter a name for this code in the corresponding Text field.
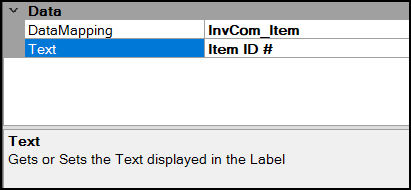
Designer > Settings Box > Data Mapping Detail
This will help you know what this data mapping code means to you. After you enter the text, the name on the label updates with your entry.
To make it easier to figure out what data mapping code refers to what information, we have added tables in the What is Data Mapping? section that contain the most commonly used data mapping codes currently used in Tags & Labels. We also provide some coaching so you can figure out other codes that may be useful to you in your business.
Print Output Settings
The printer type you use also determines the Print Output settings and the Template type you select in the Template Section.
For example, when you don’t select a template, and you choose either the Zebra or Dymo Printer type, these options are enabled:
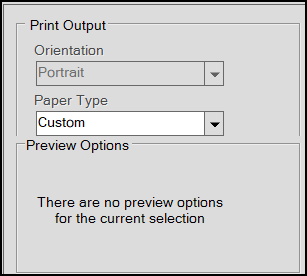
Print Output Settings when Zebra and Dymo Printer Types are Selected
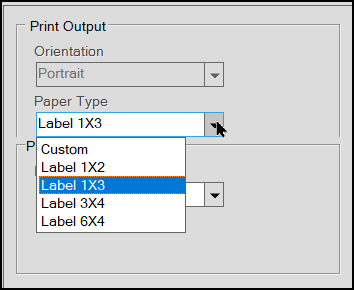
The Orientation option is fixed at Portrait for these printer types, but the Paper Type options vary:
-
Zebra Printer type has these options: Custom, 1x2, 1x3, 3x4, or 6x4
-
Dymo Printer type has these options: Custom, Dymo Shipping (30323), Dymo Address (30252), or Dymo Multipurpose (30336)
The Print Output settings for a Laser printer are different, including Orientation and Paper Type settings:
-
Orientation options: Portrait or Landscape
-
Paper Type options: Letter, A4, or Custom
Note: When you select the Custom paper type option for any of these printer types, you can manually set the dimensions of your tag or label.
When you add a template type to the Print Output settings, more options display, but these template settings also inherit the Printer Type settings.
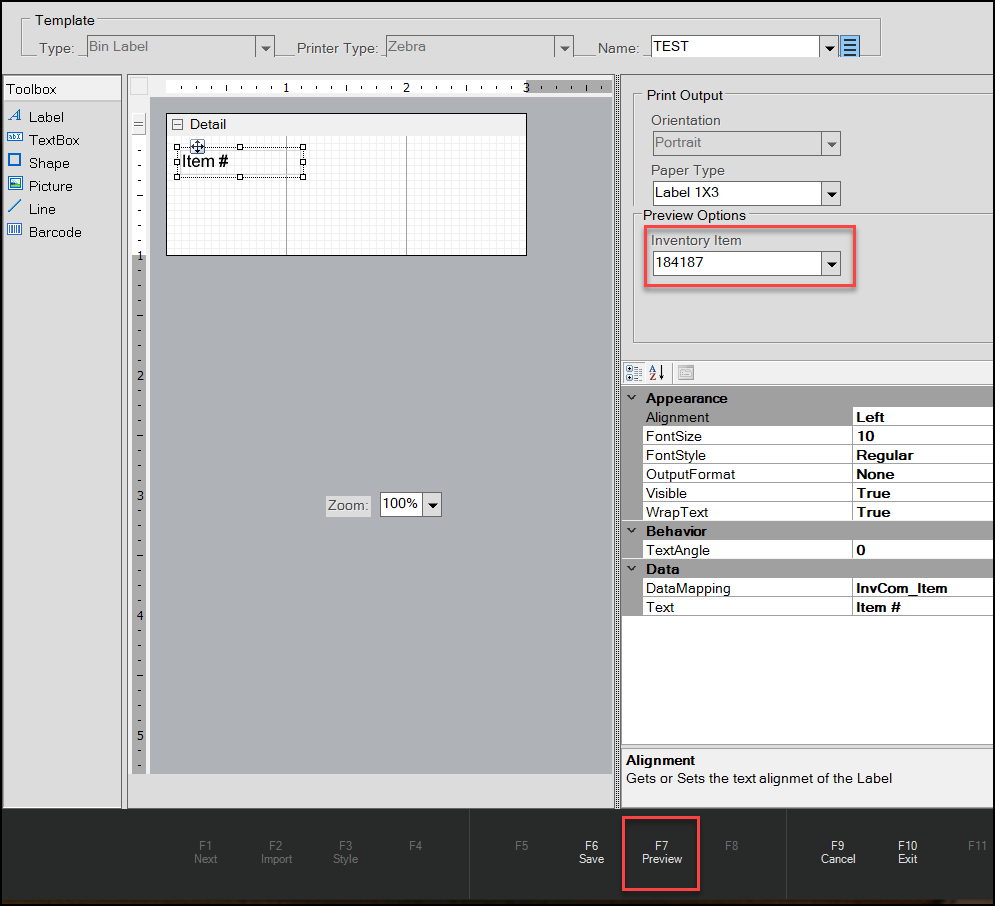
For example, when you select the Price Tag, Bin Label, Price Updates, and Sale Price template types, the Inventory Item list also displays. This allows you to create a tag or label for a specific item you have in inventory. It is also helpful to see how the actual item settings display when you preview a tag or label before printing.
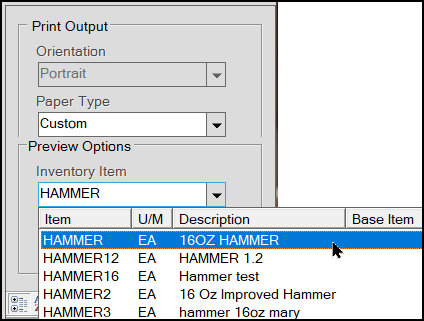
Designer > Print Output Options > Preview Options > Inventory Item
For Special Order item templates, a different set of Print Output options display. The application defaults to the last customer order record selected, but you can choose another.
Designer > Print Output Options >Preview Options for Special Order Templates
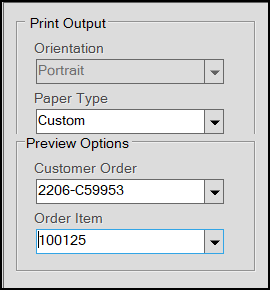
You can choose a specific Unit Tally item from the Preview Options list for Unit Tally templates. The application defaults to the previously selected tally item, but you can choose another.
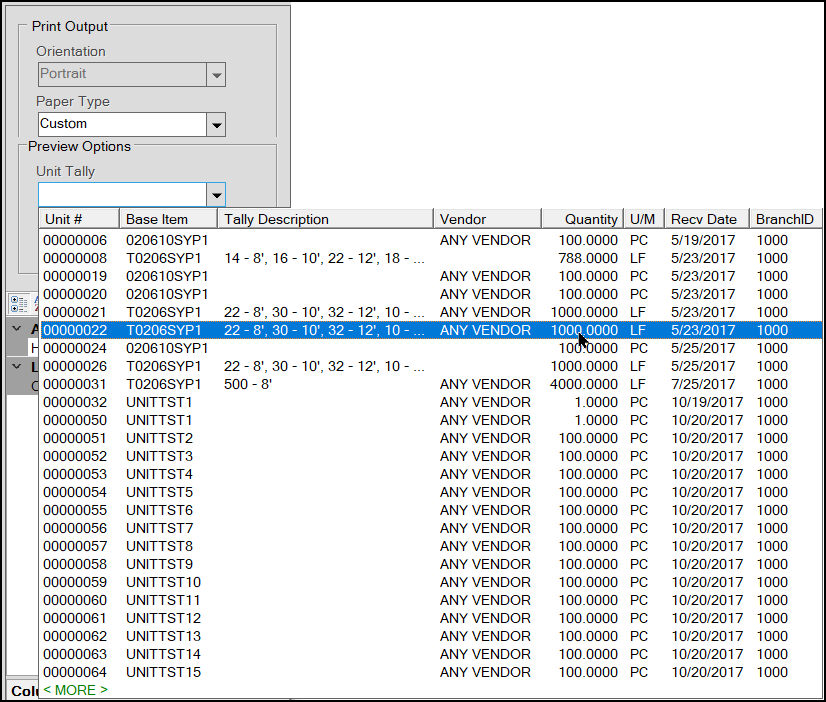
Designer > Print Output Options >Preview Options for Unit Tally Templates
What is Data Mapping?
The application stores your inventory, business, and Point of Sale information in database tables that you can access using the Designer data mapping codes. Here, we provide the tools you need to identify which data you want to display in your tags and labels and choose a data mapping code that matches. The data mapping codes that are available depend on the template type you choose; not all data mapping codes display for all template types. For example, Special Order item templates have more document and order options than bin labels do, which are more focused on inventory information.
To learn more about the meaning of the labels in the Data Mapping Codes list, look at the structure of the entries. Entries in the Data Mapping Code lists follow the pattern:
-
prefix_specific data
Typically, the prefix for anything that begins Branch_, CAT_, Documents_, InvCom_, InvStore_, OrdersDtl, OrdersHdr, or Vendor refers to specific tables in the ECI data dictionary. Similarly, Job_ entries can refer to invoices, orders, adjustments, etc., depending upon the context of the data. The application Data Dictionary is available on the Customer Portal.
Data mapping codes that begin with Lbl refer to labels created over the years that hold specific information and are not listed in the data dictionary.
Unit tally item labels have two additional data mapping options (UnitsHdr and UnitsDtl) that are specific to the structure and use of unit tally items. The specific data section name largely explains these.
| Prefix | Data Dictionary Table |
|---|---|
| Branch | Branches |
| CAT | Vendor Catalog (some items, not all) |
| Documents | Documents |
| InvCom | Inventory Common |
| InvStore | Inventory Store |
| OrdersDtl | Orders Detail |
| OrdersHdr | Orders Header |
| Vendor | Vendor Catalog or Vendor Items |
The following sections contain lists of the most frequently used Data Mapping codes and associated descriptions.
Some of these names will be familiar to you from the Item Maintenance and Point of Sale forms.
Inventory Data Mapping
Inventory Data Mapping codes are typically related to fields in the Item Maintenance form.
Item Maintenance Form Reference
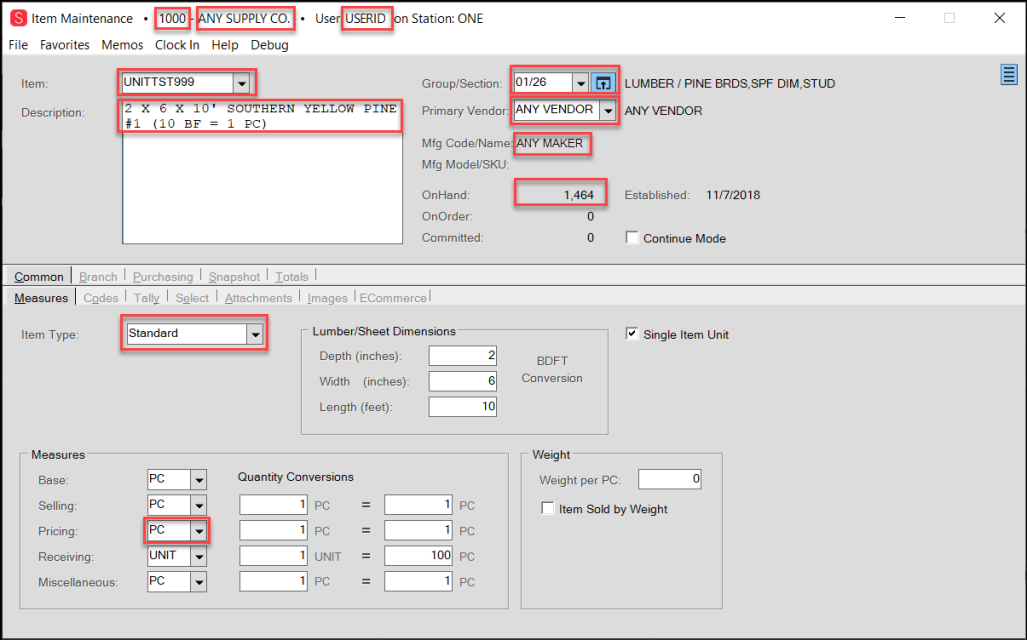
The Sample entries in the table below refer to fields in the Item Maintenance Form Reference figure above.
| Data Mapping Code | Description | Sample in the Item Maintenace Form |
|---|---|---|
| Branch_BranchID | Branch Number | 1000 |
| Branch_Name | Name of the Branch | ANY SUPPLY CO. |
| CAT_Manufacturer | Name of Product Manufacturer | ANY MAKER |
| Customer_CustomerName | Name entered in the Account Maintenance form | Anne E. Customer |
| Documents_Notes | Stored notes from Item Maintenance Entry tab | |
| InvCom_Department | Merchandising Department entry (Item Maintenance > Snapshot Tab) | |
| InvCom_Description | Description entry (Item Maintenance form) | 2 X 6 X 10' SOUTHERN YELLOW PINE #1 (10 BF = 1 PC) |
| InvCom_Description0 | First line of Item Description (Item Maintenance form) | 2 X 6 X 10' SOUTHERN YELLOW PINE |
| InvCom_FineLineCode | Merchandising Fineline entry (Item Maintenance > Snapshot Tab) | |
| InvCom_Group | Group entry in the Group/Section list (Item Maintenance form) (can be up to 3 digits) | 01 |
| InvCom_Item | Item ID (Item Maintenance form) | UNITTST999 |
| InvCom_ItemType | Item Type entry (Item Maintenance > Common > Measures tab) | Standard |
| InvCom_PricingUnitofMeasure | Entry in the Pricing list (Item Maintenance > Common > Measures tab) | PC |
| InvCom_PrimaryVendorCode | Vendor ID (Item Maintenance form) | ANY VENDOR |
| InvCom_Receipts | On Hand entry (Item Maintenance form) | 1,464 |
| InvCom_Section | Section entry in the Group/Section list (can be up to 3 digits) | 26 |
| InvStore_LastReceiptDate | Last Receipt Date (Item Maintenance > Snapshot tab) | 11/7/2018 |
| InvStore_MaximumQty | Maximum Quantities entry (Item Maintenance > Snapshot tab) | 400.00 |
| InvStore_MinimumQty | Minimum Quantities entry (Item Maintenance > Snapshot tab) | 200.00 |
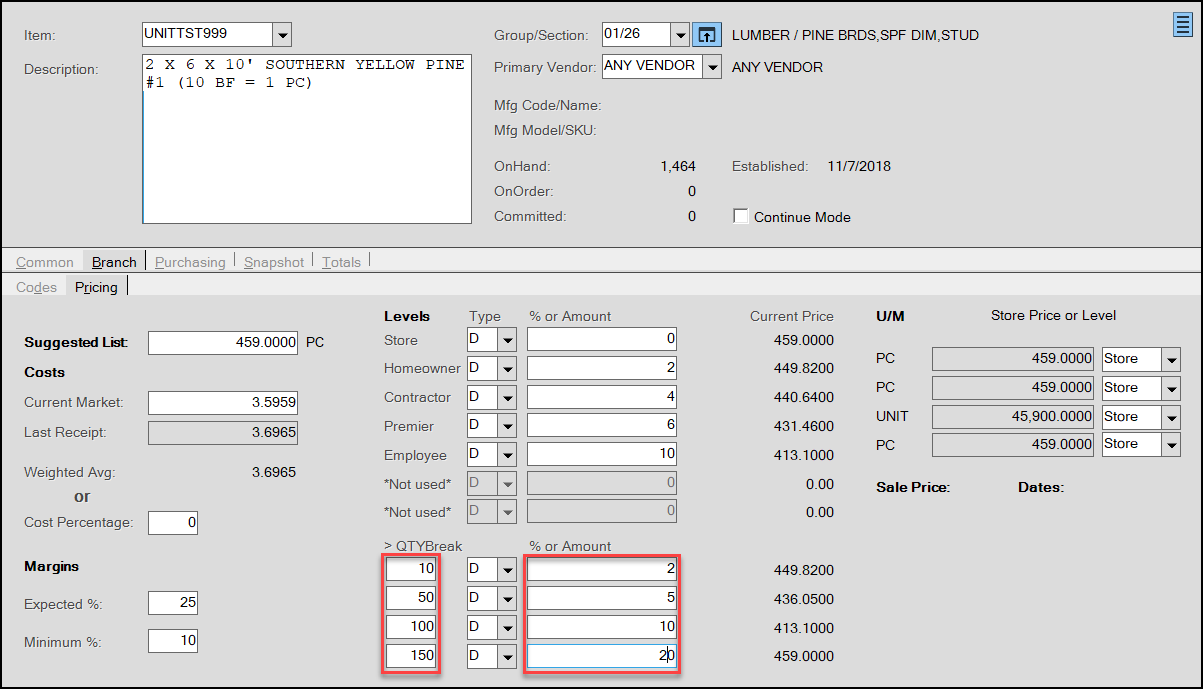
Item Maintenance Form > Branch > Pricing Tab with Quantity 0-3 and Price 0-3 Highlighted
Additionally, we added some new data mapping codes so you can print quantity break price information on your tags and labels.
| Data Mapping Code | Description | Sample in the Branch Pricing Tab |
|---|---|---|
| InvStore_QtyBreak0 | First Quantity Break entry in Branch Pricing Tab for selected Item |
10 |
| InvStore_QtyBreak1 | Second Quantity Break entry in Branch Pricing Tab for selected Item |
50 |
| InvStore_QtyBreak2 |
Third Quantity Break entry in Branch Pricing Tab for selected Item |
100 |
| InvStore_QtyBreak3 | Fourth Quantity Break entry in Branch Pricing Tab for selected Item | 150 |
| InvStore_QtyCurrent Price0 |
First Quantity Break Price % in Branch Pricing Tab for a selected item |
2 |
| InvStore_QtyCurrent Price1 |
Second Quantity Break Price %in Branch Pricing Tab for a selected item |
5 |
| InvStore_QtyCurrent Price2 |
Third Quantity Break Price % in Branch Pricing Tab for a selected item |
10 |
| InvStore_QtyCurrent Price3 |
Fourth Quantity Break Price % in Branch Pricing Tab for a selected item |
20 |
Label Data Mapping
Here is a list of the most commonly used label data mapping codes and their meanings.
| Data Mapping Code | Description |
|---|---|
| Lbl_CashPOSPrice | Price of the item based on cash account (store) pricing |
| Lbl_CashPOSPriceUM | Item’s unit of measure associated with the cash account (store) price |
| Lbl_Excl_Vat_Desc | Displays the text “Ex VAT,” indicating the item price excludes VAT |
| Lbl_Group_Section | Displays the item’s group and section labels |
| Lbl_Inc_Vat | Displays the price of the item based on cash account (store) pricing, including VAT |
| Lbl_Inc_Vat_Desc | Displays the text “Inc Tax” to indicate that the item price includes VAT |
| Lbl_Inc_Vat_Prc0 | Displays an item’s price at price level 0, including VAT |
| Lbl_Inc_Vat_Prc1 | Displays an item’s price at price level 1, including VAT |
| Lbl_Inc_Vat_Prc2 | Displays an item’s price at price level 2, including VAT |
| Lbl_Inc_Vat_Prc3 | Displays an item’s price at price level 3, including VAT |
| Lbl_Inc_Vat_Prc4 | Displays an item’s price at price level 4, including VAT |
| Lbl_Inc_Vat_Prc5 | Displays an item’s price at price level 5, including VAT |
| Lbl_Inc_Vat_Prc6 | Displays an item’s price at price level 6, including VAT |
| Lbl_Item_Locations | Displays an item’s primary and alternate location codes separated by commas |
| Lbl_Item_Status | Displays item availability status. A indicates Available, D indicates Discontinued. |
| Lbl_Label_Date | Date and time the label was generated. |
| Lbl_Package_Qty | Vendor item package quantity and retail quantity UM code |
| Lbl_Store_Price_Foreign | Displays an item’s cash (store) price converted to the system-defined foreign currency |
| Lbl_Store_Price_Local | Displays an item’s cash (store) price in local currency |
| Lbl_UPC | Displays the item’s UPC based on the selected Barcode UM selected in the Tags & Labels Print Utility data grid |
Order Data Mapping
Order Data Mapping codes are specific to a particular sale, order, etc., and can appear in different parts of the data record. Some entries come from the saved data grid entries, entry folders, and some, such as delivery settings, are visible in the Delivery tab of the Process Document.
| Dat Mapping Code | Description |
|---|---|
| OrdersDtl_PODocID | Purchase Order document ID of the transaction |
| OrdersDtl_QtyOrdered | Quantity ordered associated with the selected transaction |
| OrdersDtl_SOStaging | Special order staging notes saved in the Entry tab. Typically contains the location of the item to be delivered or picked up. |
| OrdersHdr_Account | The account ID linked to the transaction |
| OrdersHdr_DeliveryDate | The delivery date associated with the transaction |
| OrdersHdr_DocID | Document ID number of the transaction. |
| OrdersHdr_OrderUser | The user ID of the person assigned to the transaction |
| OrdersHdr_PhoneNumber | Phone number on the Delivery tab of the Process Document |
| OrdersHdr_ShippingName | Name listed on the Delivery tab of the Process Document |
There are fewer label options for a barcode, as you might expect. To learn more about Barcode settings, see What are the Settings for Barcodes? in the next section.
What are the Settings for Barcodes?
Barcode settings are very different from typical Tags & Labels Designer fields.
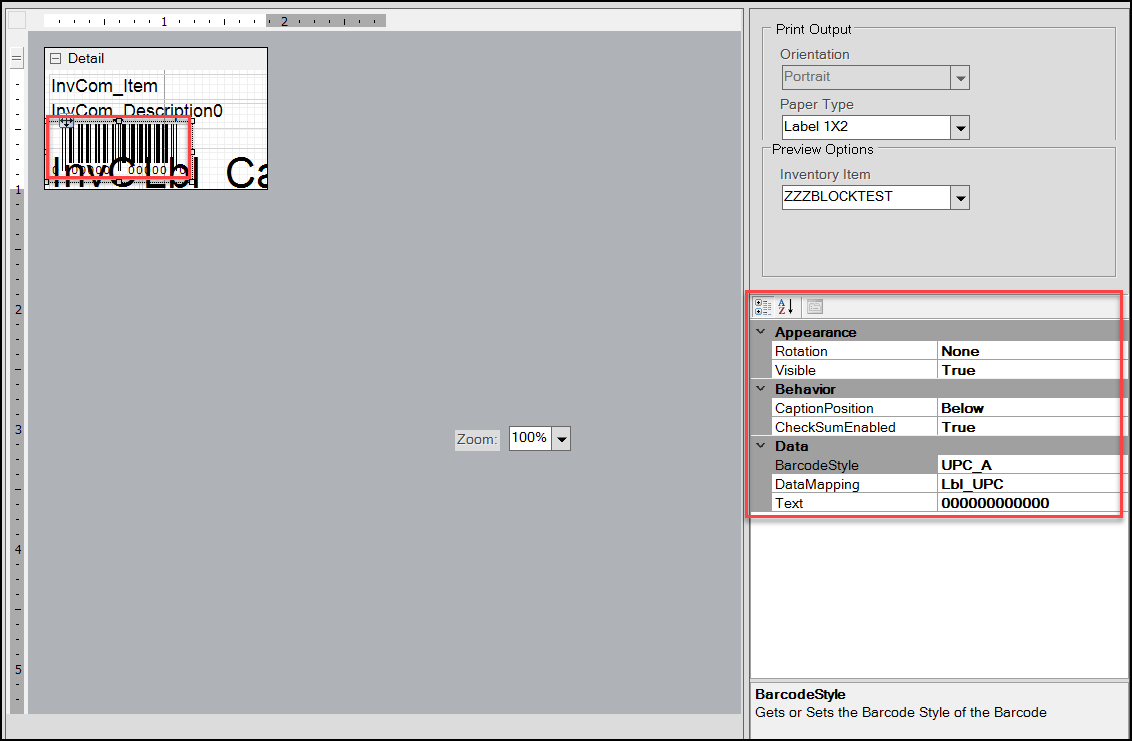
Tags & Labels Designer with Barcode Settings
Appearance setting options for barcodes:
-
Rotation
These options specify the rotation options for barcodes.
Options include: None, Rotate180Degrees, Rotate90Degrees, or Rotate270Degrees. -
Visible
Determines whether the barcode is visible (True) or not (False).
Behavior setting options for barcodes:
-
CaptionPosition
This option defines where the caption for the barcode displays.
Options include: None, Below, or Above. -
CheckSumEnabled
This option indicates whether the barcode’s checksum is calculated and included in the barcode (when applicable).
Options include: True (checksum is calculated and included) or False (checksum is not calculated or included).
Data settings for barcodes:
-
BarcodeStyle
This option indicates the style used to create the barcode.
Options include: Code_128_B, Code39, Code93X, EAN_13, EAN_8, QRCode, or UPC_A. -
DataMapping
This is the data mapping associated with the barcode control. From this list, you choose the source of the barcode.
See the What is Data Mapping? section for more information. -
Text
The text for barcodes needs to be a series of zeros (0) that match the number of columns in the barcode. The zero entries protect the barcode length and ensure the barcode displays correctly on the tag or label.
- For 8 column barcodes, the text entry should be eight zeros: 00000000
- For 12 column barcodes, the text entry should be twelve zeros: 000000000000
- For 13 column barcodes, the text entry should be thirteen zeros: 0000000000000
Adding a Tag or Label Template
B-102682 – Any template you have already created has been converted to a new format and contains your current Data Mapping code settings. It may make sense to play with your existing templates first to get a feel for the data mappings you already use. You can change these mappings by choosing a different option.
To add a new tag or label template:
1. From the Main Menu, choose Inventory > Utilities > Tags & Labels > Designer to display the Tags & Labels Designer form.
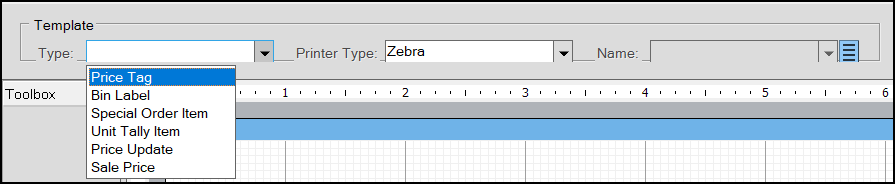
2. In the Templates Type List, choose the template type you want to create.
Options include: Price Tag, Bin Label, Special Order Item, Unit Tally Item, Price Update, or Sale Price.
3. In the Printer Type list, choose the printer type (Zebra, Dymo, or Laser) you use to print the new tag or label.
4. In the Print Output section, choose the format of the tag or label you are going to create from the Paper Type list.
Tags & Labels Designer Form > Print Output Detail
After you select these options, you are ready to get started.
Tags & Labels Designer with New Label Detail Template
5. In the Name field, type a name for the new template.
The Creating New Template message displays.
6. From the Toolbox, drag the Label and Barcode options you want to add to the detail tab first. You can add the TextBox, Shape, Picture, and Line options when the label and/or barcodes are positioned the way you want them.
7. When you drag a label option onto the Detail box, the Settings box updates the Appearance, Behavior, and Data settings for the label. Since we have a Zebra printer type selected, the design options are based on the Zebra settings.
Settings Box > Zebra Settings
8. Begin by choosing the Data Mapping to define the content of the tag or label you are creating. In the second column, select the down arrow at the end of the Data Mapping field to see the list of options.
Settings Box > Data Mapping List
9. Choose the data mapping code that contains the information you want to display on the label.
The label text updates to reflect the Data Mapping code you selected.
See What is Data Mapping? to learn more about the meaning of the options in this list.
10. In the Text field below the Data Mapping field, enter the text you want to use to refer to this label entry.
On the Detail Label Template, the Data Mapping code updates to reflect the text entry you added.
Template Detail with Detail Template Label Entry Renamed
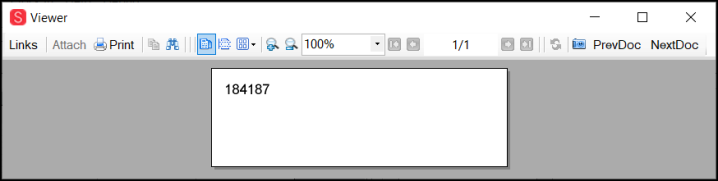
11. To see how this new entry looks, select an Inventory item from the Preview Options list in the Print Output section and choose Preview (F7). The application displays the new label in the Viewer.
Label Viewer with Item ID
12. Click the X in the right corner of the Viewer page to return to the Designer form.
13. You can use the other Appearance features to choose the size of the font, the location of the text in the label, how the text wraps, and the text angle of the label. These features are described fully in Step 8 in the next section.
14. Drag and add the other labels and toolbox features you want onto this label and preview it before you print it.
15. When the template is complete, choose Save (F6).
Editing a Tag or Label Template
If you have a tag or label template that works for you and you want to make changes to it, you can use the Tag & Label Designer to make these changes. The design options are based on the Printer type you use (Zebra, Dymo, or Laser).
To make changes to an existing tag or label template:
1. From the Main Menu, choose Inventory > Utilities > Tags & Labels > Designer to display the Tags & Labels Designer form.
![]()
Tags & Labels Designer Form
2. From the Template Type list, choose the type of label or tag (Price Tag, Bin Label, Special Order Item, Unit Tally Item, Price Update, or Sale Price) you want to modify.
3. From the Printer Type List, choose the Printer used for printing tags and labels (Zebra, Dymo, or Laser).
Note: Your existing templates have a printer type associated with them.
4. From the Name list, choose the name of the template you want to modify. The options in the list depend upon the Template Type and Printer Type settings you selected. The label template you selected displays in the Design area.

Tags & Label Designer Form with Zebra-Based Bin Label Template Displaying
The Print Output section on the right side of the form updates the Paper Type field to reflect the existing label’s dimensions.
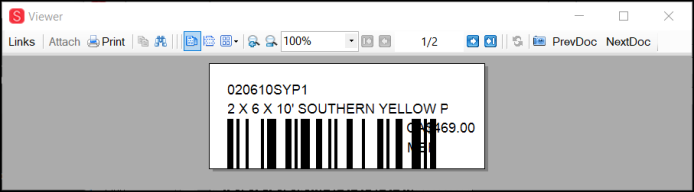
5. Select an inventory item from the Preview Options list to preview this label and choose Preview (F7). The application displays the sample.
Bin Label Preview (Original)
Click the X in the right corner to close the Viewer.
6. Click a field on the tag to see the field label boundaries.
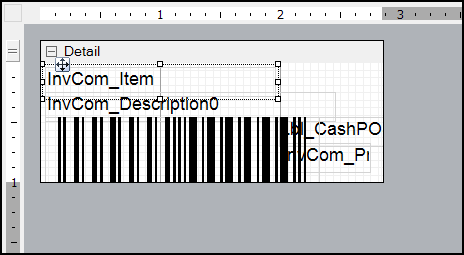
Bin Label Field Selected
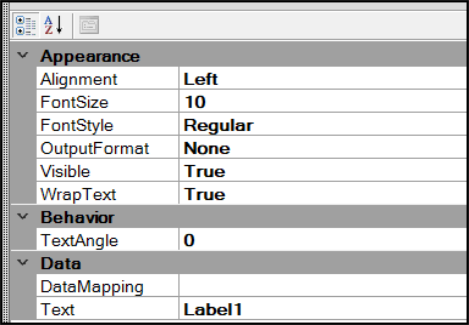
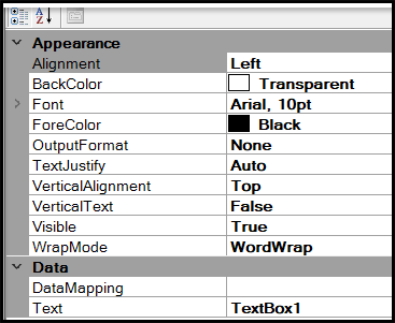
7. When you select a field, the Appearance, Behavior, and Data settings for that field display in the Details Section. These options change based on the type of field you select.
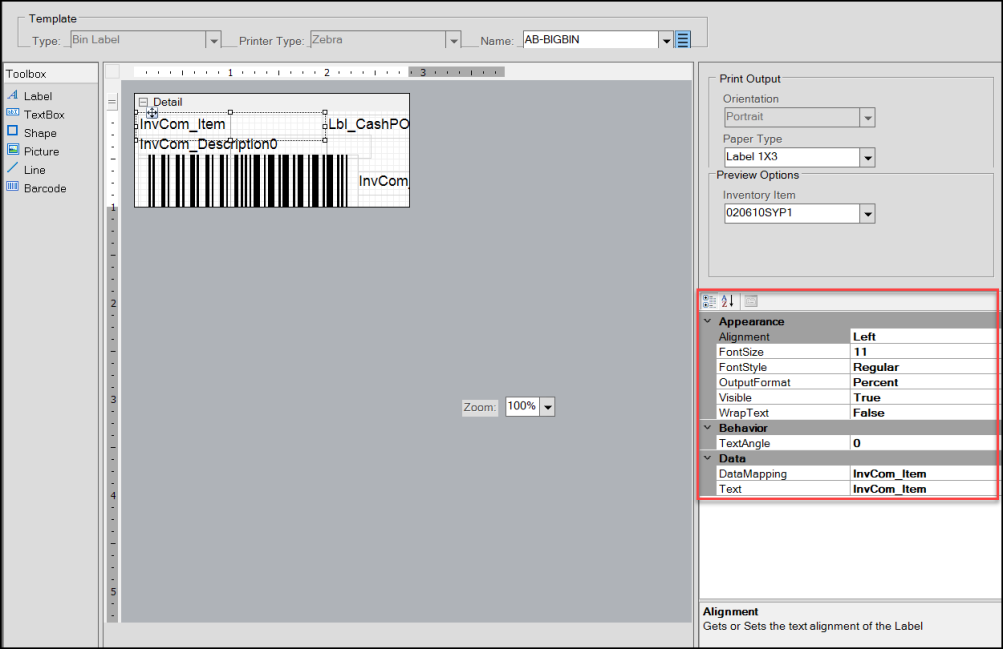
Designer Showing the Field-Specific Details (Zebra Label Format)
The default display for this tag/label is 100%, but you can zoom in or zoom out using the Zoom control.
8. Review these details to consider the changes you want to make to this template.
In the Appearance section, you can change the following for text or numeric-based fields:
-
Alignment
Use this option to define how the text displays within the field.
Options include: Left, Right, Center, and Justified. -
BackColor
Use this option to choose a background color for the tag or label text.
Dymo and Laser Printers only. -
Font
Use this option to choose the font (Arial, Calibri, etc.), the font style (Regular, Bold, Italic, etc.), and the size (8 pt. to 72 pt.) of the text for the selected tag or label.
Dymo and Laser Printers only. -
FontSize
Use this option to select the font size of the text in the field. Options include: 8 pt. to 72 pt. font sizes. For Zebra Printers only. -
FontStyle
Use this option to choose whether the text is Regular or Bold. For Zebra Printers only. -
ForeColor
Use this option to choose the color of the text. For Dymo and Laser Printers only. -
OutputFormat
Use this option to choose the format of the entry for this field. Options can include regional currency settings (with or without symbols), extended or unit price, date and time settings, percent setting, quantity, or weight. -
VerticalAlignment
Use this option to specify whether the label should display at the Top, Middle, or Bottom of the label field you have drawn. Dymo and Laser Printers only. -
VerticalText
Use this option to specify whether to print the text vertically or horizontally (in the context of the Portrait printed label). Choose True to print the label vertically or False to print the label horizontally. Dymo and Laser Printers only. -
Visible
Use this option to indicate whether this field is visible (True) or not (False). -
WrapText
Use this option to indicate whether this field should wrap the text to another line (True) or not (False). For Zebra Printers only. -
WrapMode
Use this option to indicate whether the label contents should wrap to another line if needed. Options include: NoWrap, WordWrap, or CharWrap. Dymo and Laser Printers only.
9. In the Behavior section, choose the text angle that the label text should display. Options include: 0 (to indicate no text angle), 90, 180, or 270.
10. In the Data section, you can choose these options:
-
Data Mapping
Use this option to choose a control item from the list. In this case, InvCom_Item refers to the Item ID in the Item Maintenance window. Selecting a new data mapping control option can let you change pricing from local to foreign currency, change the unit of measure used for a specific item, or the applied tax values. See What is Data Mapping? to learn more about this setting. -
Text
Use this option to set a custom label for this data mapping. The label text in the Details box updates to reflect your entry. The application saves this text with the label.
11. To make any additional changes in the design and layout of this template:
-
Add/Remove Labels
From the Toolbox drag new labels onto the Detail box to add them; click the label entries on the Detail box and click the Delete button to remove them. -
Move Labels
Click and drag a label on the Detail box to move the label and reposition it on the form. -
Change Label Display
Use the options in the Appearance box to change the look of the labels in the Detail box. -
Add text, lines, and images that fit the label/tag
Drag Text, Line, Barcode, and Image options from the Toolbox as you need them and play with the Appearance options until they display the way you want them to.
12. When you are ready to save your template changes, choose Save (F6).
Note: To save this template as a new template, type a new name in the Name field before saving.
13. Choose Preview (F7) to display the updated sample.
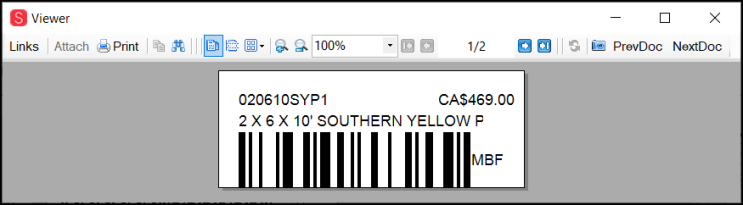
Bin Label Preview (Updated)
Printing Tags & Labels
B-98830, B-102309, B-102555 – Use the Tags & Labels Print Utility to print and retain or empty the list of items in the data grid. This feature has changed. You use the Print (F8) option to maintain the list of items in the data grid and the Process (F12) to reset (empty) the list of items from the data grid.
Note: There is a setting that allows you to prevent a label from printing for a particular inventory item. You can find those instructions in Preventing Items from Batching and Printing.
Printing using the Custom Templates Option
To use custom templates to print item-based tags and labels:
1. From the Main Menu, choose Inventory > Utilities > Tags & Labels > Printing to display the Tags & Labels Printing form.

Tags & Labels Printing Form > Custom Templates Option
This form works differently from the original utility. Here, the label and printer types are tied to the Custom Template you develop in the Designer. Therefore, the Label and Printer Type entries are filled based on the template settings you created in the Designer. When you select the template, you cannot change the Template filter settings.
2. Select the Custom Templates option when you want to use a template created in the Tags & Labels Designer.
Note: We describe the Vendor Templates option in this section.
3. From the Template Selection list, choose the template you want to use to specify the printing style. The Template Filters update based on the template you selected.
4. In the data grid, enter the items you want to print labels for and choose the count number.
Alternatively, you can choose the Import (F2) option and import your current batch. See Importing a Batch in Printing for these instructions.
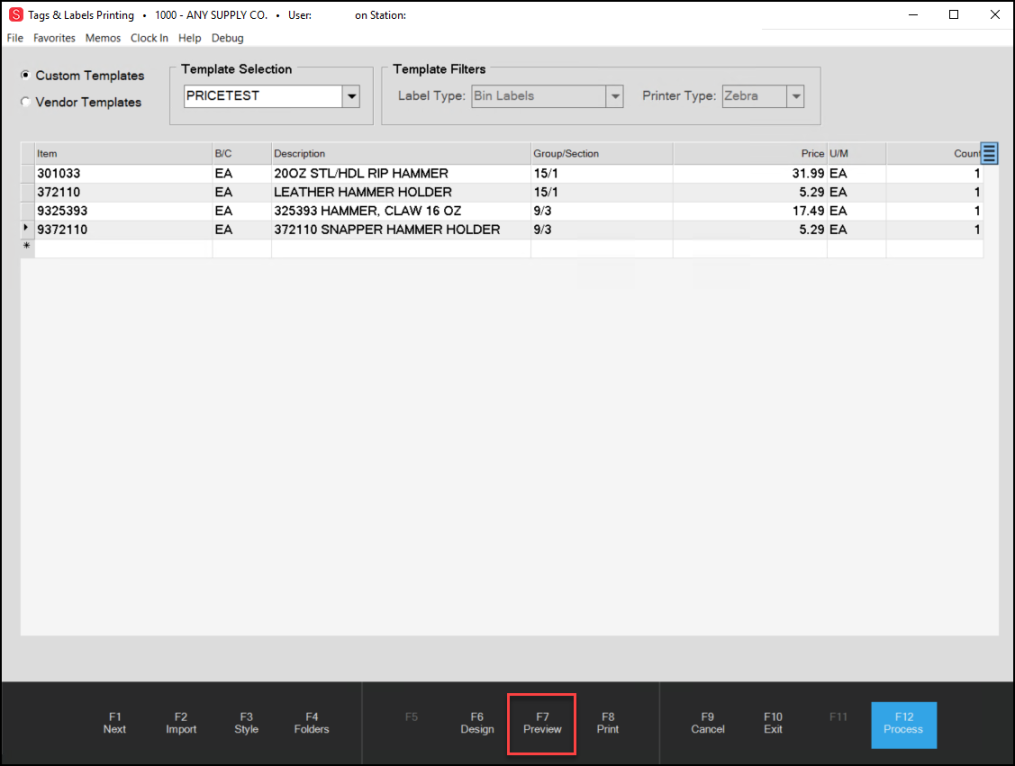
Tags & Labels Printing Form with Print Preview Option Highlighted
Note: We have changed the column order slightly to put the Count column at the end. The Menu Marker still provides access to the Set Count options 1, Quantity on Hand, on Order, and New Counts. Further, if you open Tags & Labels from Item Maintenance or Purchasing/Receiving, the default count may reflect the settings from those data grids instead.
Unit of Measure Note: The unit of measure you specify in the data grid overwrites the unit of measure defined in the template when the label prints.
5. To preview the tags/labels, choose Preview (F7).
The Viewer displays the tag/label for the first item in the data grid.
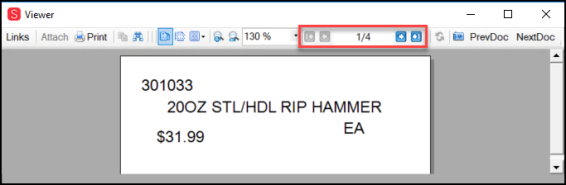
Tags & Labels Printing Form Confirmation Prompt
7. Choose the appropriate option depending upon the printing results.
-
Choose Yes if the printing was successful. When you select this option, if you chose Print (F8), the items will remain in the list; if you chose Process (F12), the application clears the entries from the data grid.
-
Choose No if the printing was not successful. When you select this option, the application retains the entries in the data grid without regard to your Print or Process selection.
Printing using the Vendor Templates Option
To print vendor template tags and labels based on items in the data grid:
1. From the Main Menu, choose Inventory > Utilities > Tags & Labels > Printing to display the Tags & Labels Printing form.
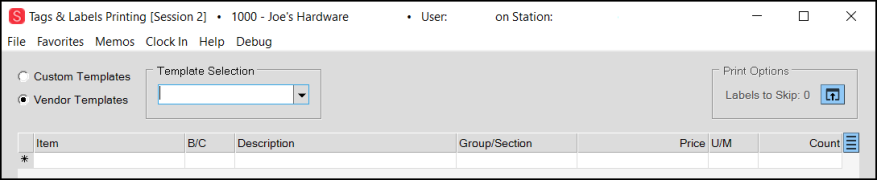
Tags & Labels Printing Form > Vendor Templates Option
2. Choose the Vendor Templates option to display the Template Selection list. This list contains the vendor labels stored in your application.
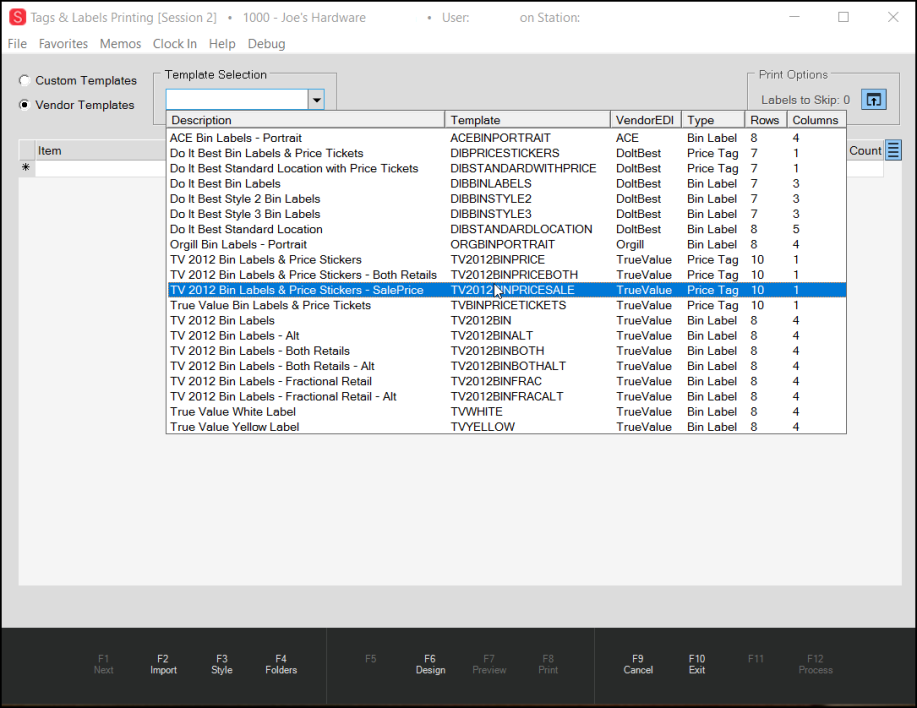
Tags & Labels Printing Form with Template Selection Entries
3. Choose the vendor label you want to use to produce the tags or labels you need.
4. In the data grid, add the items you want to use to create the tags or labels.
5. If you are printing labels on a page where some labels have already been printed, choose the Labels to Skip Settings ![]() button in the Print Options box. The Label Layout box displays.
button in the Print Options box. The Label Layout box displays.

Label Layout Box with O Labels to Skip and 3 Labels to Skip Selected
-
Choose the number of rows you want the printer to skip and click OK.
This step is not required if you do not need to skip labels.
6. When you are ready to preview your labels, choose Preview (F7). The Viewer displays the tags/labels you selected for the items in the data grid.
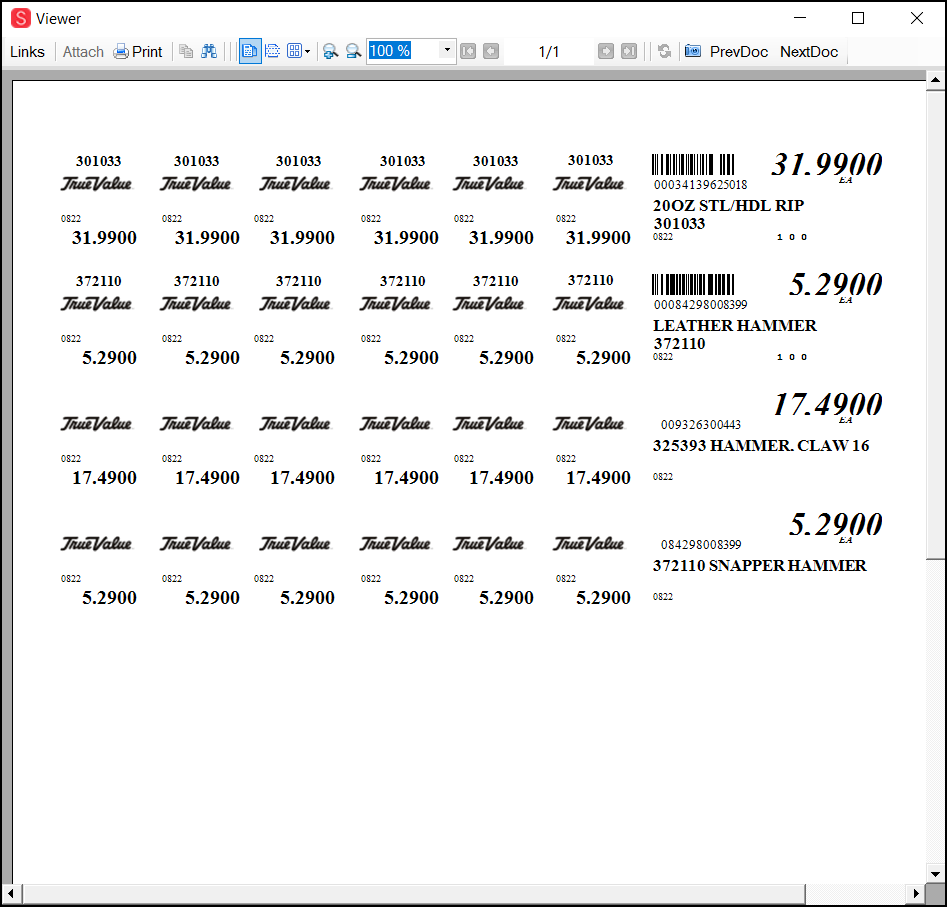
Viewer with Vendor Tags/Labels based on Items in the Data Grid
7. When you are ready to print, choose the appropriate option:
-
To print and retain the list of items in the data grid, click Print (F8)
-
To print and clear the list of items in the data grid, click Process (F12).
IMPORTANT: We have changed the way these two functional keys work! Retain the List with Print (F8) and Clear the List with Process (F12).
When printing is complete, a confirmation prompt displays:
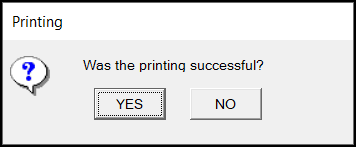
Tags & Labels Printing Form Confirmation Prompt
8. Choose the appropriate option depending upon the printing results.
-
Choose Yes if the printing was successful. When you select this option, if you chose Print (F8), the items will remain in the list; if you chose Process (F12), the application clears the entries from the data grid.
-
Choose No if the printing was not successful. When you select this option, the application retains the entries in the data grid without regard to your Print or Process selection.
Importing a Batch in Printing
B-98830 – The next section discusses the batch process, so we only discuss importing batches you created in this section. You can use this process to import price updates, orders, work details, etc. The process is essentially the same, although the prompts are different depending upon the type of information you are importing.
To import a label batch in Tags & Labels Printing:
1. From the Main Menu, choose Inventory > Utilities > Tags & Labels > Printing to display the Tags & Labels Printing form.
2. Select the Custom or Vendor Templates option as needed.
3. From the Template Selection list, choose the template you want to use to specify the printing style. The Template Filters update based on the template you selected.
4. To import the current batch of labels or tags, choose Import (F2). The Import menu displays.
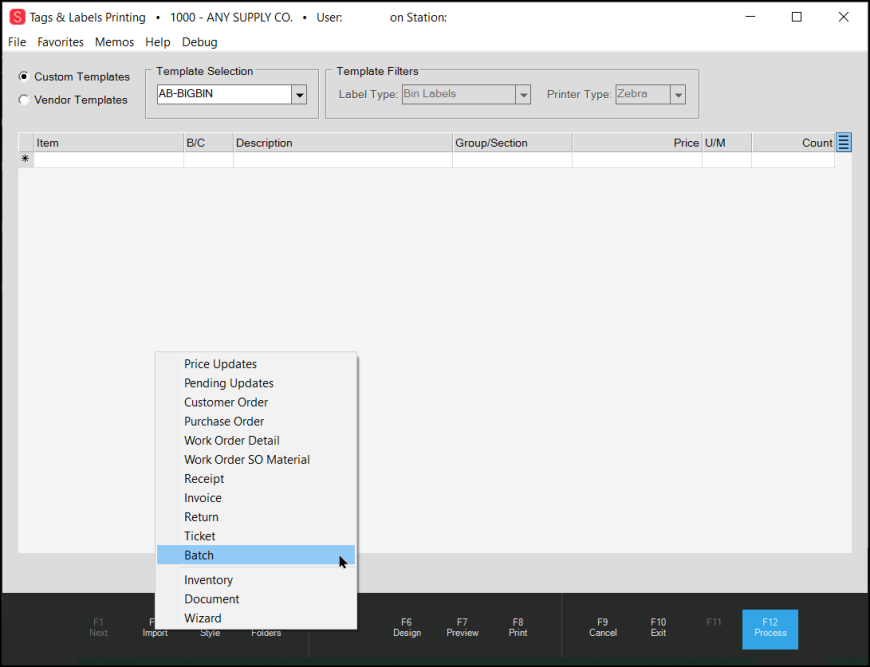
Tags & Labels Printing Form with Import Menu Displaying
5. Choose the Batch option in the menu. The Select Queued Label Batch list displays.
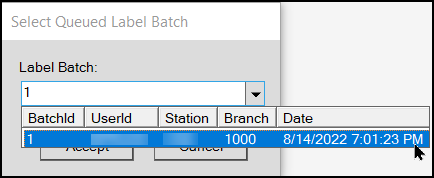
Tags & Labels Select Queued Label Batch Box with Options
The application saves your batches based on your user ID and station settings for the current branch location.
6. Click Accept to import the batch entries. The data grid updates with the items from the batch list.
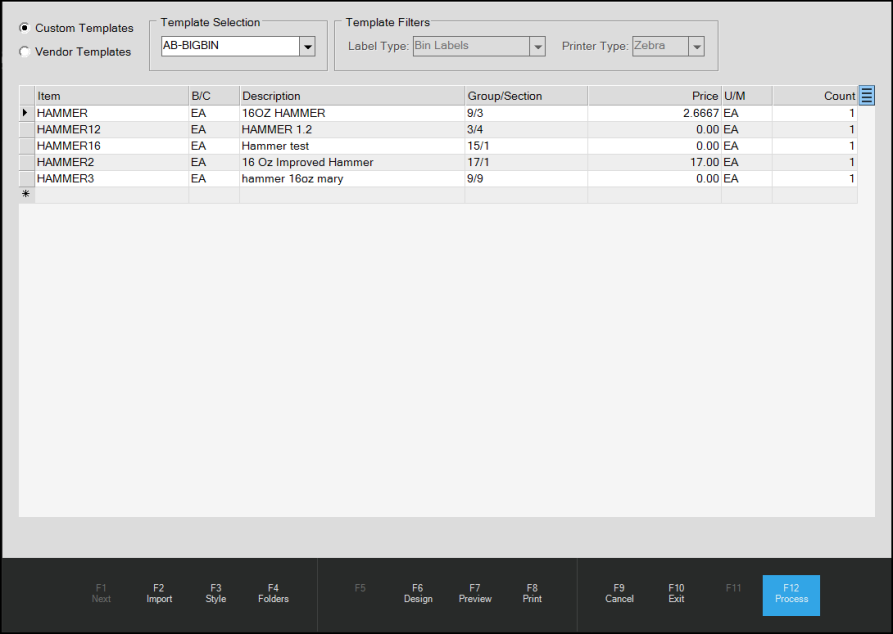
Tags & Labels Printing Form with Imported Batch Entries
7. From here, you can add new entries or delete existing entries before you print them.
Working with the Tags & Labels Batch Maintenance Utility
The Batch Maintenance Utility allows you to consolidate and manage your tag and label batches and batch items, which you specify in the Item Maintenance and Inventory Receipts forms. When you add an item to a batch list, that setting is saved by branch, date, and user ID so that each user with batch permissions can create their own batch list. Special permissions are required to access this utility. If you log into a different branch, you save the items to a different batch, even if it is tied to your User ID.
Adding Items to a Batch and Printing Labels (Item Maintenance)
B-98910 – For users who have Batch Maintenance permissions, we have updated the Item Maintenance form to add two new features. These users can add items to their Tags and Labels batch list and print labels for a specific item directly from this form.
To add an item to a batch and/or print tags/labels for an inventory item:
1. From the Main Menu, choose Inventory > Database > Item to display the Item Maintenance form.
2. From the Item list, select the item you want to add to a batch or print a tag or label for. The item details display.

Item Maintenance Form with Tags & Labels Features Highlighted
3. To add this item to your current batch, click Batch Label (F7).
A confirmation message displays when the item is successfully added to the user’s batch list.
Note: You can also select this option by right-clicking the Item drop-down arrow and selecting Batch Label from the list.
4. To print a label for this item, choose Print Label (F8).
Note: You can also select this option by right-clicking the Item drop-down arrow and selecting Print Label from the list.
One of the following happens:
-
If the station does not have a default label template selected, the application displays the Label Template Selection box.
From the list, choose the default label template you want to use to print this item label and click Accept. The application saves this template as the station’s default template and uses it to print the label for the item. -
If the station has a default label template selected, the application prints the label using that template setting.
A confirmation message displays when printing has completed successfully.
Adding Items to a Batch (Inventory Receiving) and Printing Receipts
B-98905 – You may want to create labels or add items you receive to a batch during the receiving process. Ensure your station has correct label printer settings before you start, or the Print Labels check box may not display.
To add a received item to a batch and/or print tags/labels for a received item:
1. From the Main Menu, choose Purchasing > Receipts to display the Inventory Receiving form.
2. From the Vendor list, choose the vendor whose items you are receiving.
3. Import or receive the appropriate Purchase Order to display the received items in the data grid.
4. Choose Process (F12) to process the receipt. The Process Session Document displays.
Process Session Document with Batch Labels and Print Labels Check Boxes Selected
5. To add the items in the data grid to a batch, choose the Batch Labels check box and in the # Labels field, enter the number of labels you want to add to the batch.
6. To print labels for the items in the data grid, click the Print Labels check box and in the # Labels field, enter the number of labels you want to print.
7. When you have completed these selections, choose Finish (F12).
Preventing Items from Batching and Printing
B-102315 – If you do not want to batch and print an inventory item, there is also a setting in the Item Maintenance form to prevent that.
To prevent the application from batching and printing an item:
1. From the Main Menu, choose Inventory > Database > Item to display the Item Maintenance form.
2. In the Item list, choose the item you want to prevent the batch and print settings for.
3. Choose the Codes tab.
4. Enter N in the Print Labels box to prevent this item from being added to a print batch.
Item Maintenance Form > Codes Tab > Print Labels Box Highlighted
5. When you have completed this setting, choose Process (F12) to save this change.
Working with Tags and Labels Batches
B-102725 – After you have created your batches and are ready to work with them, use the Batch Maintenance Utility. Batches are tied to your User ID and are typically restricted by branch.
To work with your tags and label batches:
1. From the Main Menu, choose Inventory > Utilities > Tags & Labels > Batch Maintenance to display the Batch Maintenance form.
![]()
Batch Maintenance Form with Some Entries
The application selects Branch 1000 by default.
2. Choose the following depending upon the batch items you want to display:
-
Branch
In this list, select a check box beside the branch that contains the batch(es) you want to view. You can choose any branches you have access to and save batch items to. No items display if you do not have items associated with a selected branch or do not have access to that branch. (Required) -
Starting Date, Ending Date
Enter/select the date range of the batch in the fields provided. -
User ID
Choose your user ID from the list to display your batch items, or leave this field blank to show all selected batch items for that date range and selected branch(es).
3. Choose View (F7) to display the saved batch items.
Batch Maintenance Form with Entries
If more than one batch meets your search criteria, more batches display in the list at the top of the page. The list at the bottom of the page reflects the items in the selected batch. To see the folder details of an item in the list, click the item and choose the Folders (F4) option to display the folder details.
4. From here, you can manage the list of items for printing, consolidating, and deleting items you no longer need to print.
-
To delete an item in the batch, select the Delete check box in the row of the item you want to delete.
-
To delete a batch, choose the Delete check box beside the batch label at the top of the page.
-
If more than one batch displays and you want to consolidate the entries in the list into one batch, choose the Consolidate (F8) option. A prompt displays.
-
Choose Yes to Consolidate the batches or
-
Choose No to leave them separate.
The application makes this change and displays a confirmation message. If you select Cancel after consolidating batches, the application returns the batch items to the original batches.
5. When you are ready to process your changes, choose Process (F12). The application makes your changes in the list. You cannot retrieve deleted entries, but you can add them to another batch and consolidate them into the batch again.
Using the New Tags & Labels Options in AnyWare
B-103058, B-103059 – We have updated AnyWare to ensure that you can print from your handheld devices using the new Remote Client options. Before starting, ensure you have the latest Remote Client service version. Work with your ECI Implementation or Support team member:
-
To find the latest version of the Remote Client service
-
To verify your server URL (specific to your business)
You may also want to check that the printers that AnyWare users need to access have the same names.
To set up the Remote Client service to which the AnyWare devices can connect to:
1. If needed, download the most recent remote client installer from a local computer.
If you have the most recent version installed, skip Step 3.
2. Right-click the installer and run the installer as administrator, following the Setup Wizard instructions.
3. On the station computer, double-click the application link to display the login form.
4. Log in to the application using administrative rights.
5. From the Main Menu, choose Maintenance > Database > Devices to display the Devices Maintenance form. The application selects the Station option by default.
6. In the Device Name field, choose the device name and press Enter.
7. In the Branch field, review the branch this station is associated with.
8. Open the System Tray and double-click the Remote Client  icon. The Remote Client Utility box displays.
9. Click the Settings tab, and in the Station ID field, enter the Device Name from Step 6.
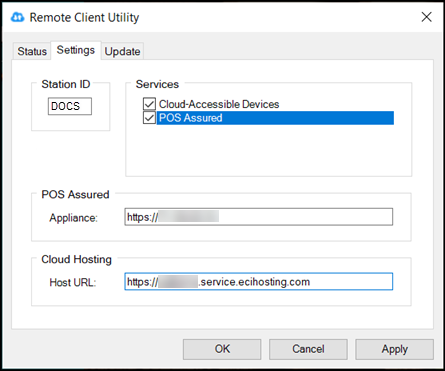
Remote Client Utility > Settings Tab with Device Name in Station ID Field
10. Select the Cloud-Accessible Devices check box.
11. If you use POS Assured, select the POS Assured check box and enter https:// and the IP address of the device in the Appliance field. (Not needed if you do not use POS Assured).
12. In the Host URL field, enter: https://XXX.service.ecihosting.com
Note: This is the URL you discussed with your ECI team member above.
13. When you have completed these entries, select Apply.
14. In the Remote Client Utility box, choose the Status tab to verify the Remote Client is running and that the cloud host is connected.
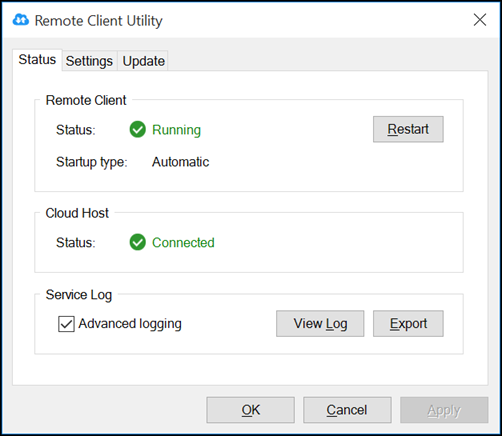
Remote Client Utility . Status Tab
15. Return to the application and log out.
16. Log in to the application again using the ID associated with the Device name/Station ID you used in Step 9.
17. From the Main Menu, choose Maintenance > Database > Devices to display the Devices Maintenance form.
18. In the Device Name field, choose the Device Name from Step 6 and press Enter.
19. In the Remote Client box, select the Enabled check box.
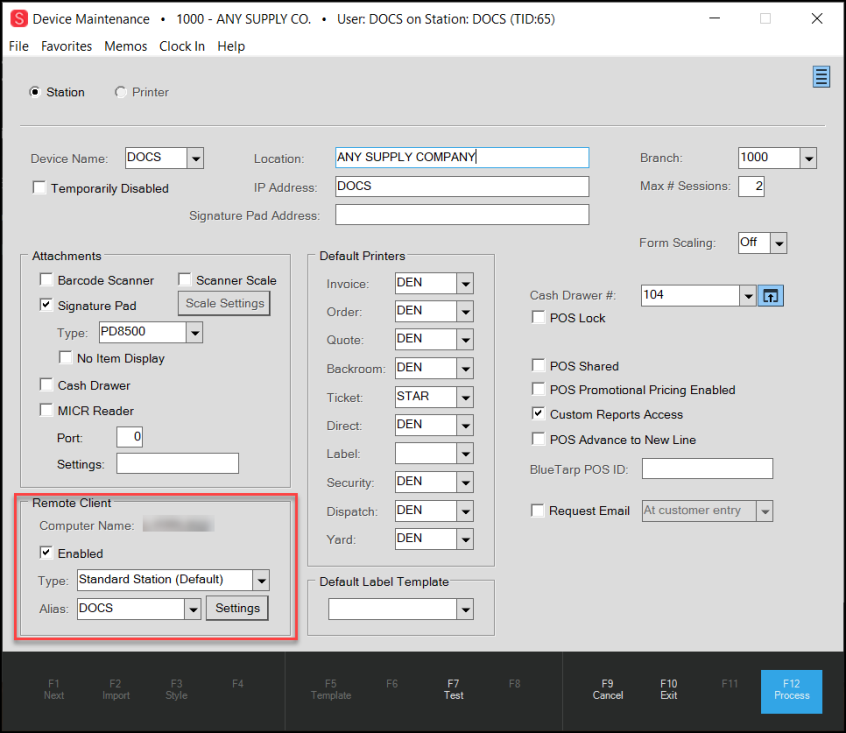
Device Maintenance Form with Enabled Check Box Highlighted
20. In the Alias field, enter an Alias ID, which your AnyWare devices can use to access the remote client-connected printers.
21. Choose Process (F12) to save this setting.
Accept any non-fatal task warnings. The Remote Authorization PIN box displays a number.
-
Remove Client Service authorization PIN - ####
The Remote Client Service prompts you for a PIN.
-
Enter the four digit PIN provided by your station to authorize the Remote Client to communicate.
22. Enter the PIN the application provided in the field and click Accept.
23. Return to the application and log off.
24. Log back in and choose Maintenance > Database > Devices to display the Device Maintenance form.
25. Click the Printer button and review the Windows Printer list to ensure that the list of printers is the local list you expect.
Device Maintenance Form with Windows Printers Displaying
26. To test this connection, add a new printer, and print a Point of Sale document from it.
After you set up the remote client connection for the station, you can use the station alias to set up the AnyWare device to use the remote client printers.
For each AnyWare device:
1. From the Main Menu, choose Maintenance > Database > Devices to display the Device Maintenance form.
2. Create a station that is unique for the AnyWare Device.
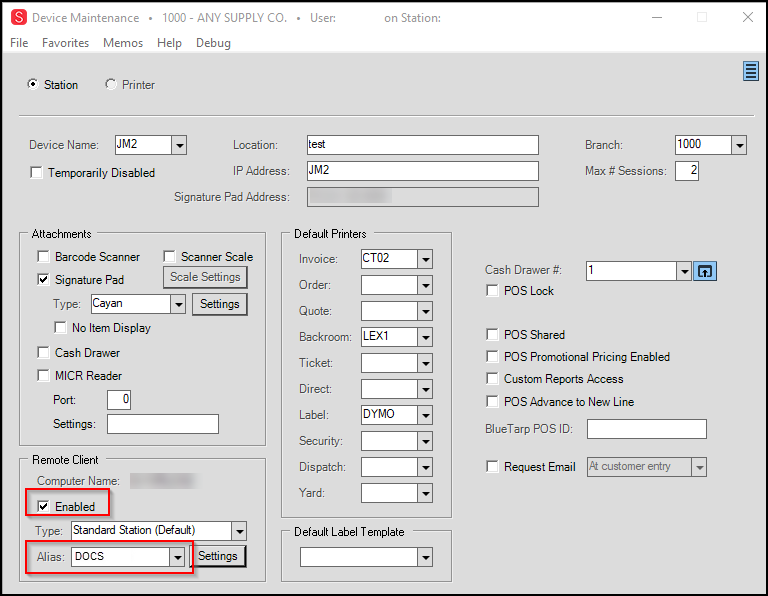
Device Maintenance Form > AnyWare Settings
3. In the Remote Client section, choose the Enabled check box and the Alias setting from the previous instructions.
4. Choose Process (F12) to save these settings.
5. Open the application on the corresponding AnyWare device and choose the Menu  icon in the upper right corner.
AnyWare with Menu and Settings Highlighted
6. Click the Settings option. The AnyWare Configuration list displays.
7. Click the Station option.
AnyWare with Station Entry
8. Enter the same Station ID from Step 2 and click OK.
9. Go to the AnyWare Homepage, choose the Menu icon again, and sign in.
10. In the upper left corner, choose the Logo ![]() icon to display the Login Status options.
icon to display the Login Status options.
11. Choose the Refresh Printers button. This enables access to the remote client printers.
When you print documents using the AnyWare app, remote printer options are available in the list.
Purchasing Updates
Make Points More Visible to True Value Rewards Customers
Your customers' lives are busy. They can’t always stay on top of their True Value Rewards and can miss out on coupons they earned if they don’t have them when they check out. Further, without going online, there is no way for them to keep track of the points they have earned toward the next reward. These new features alert the cashier that the customer has a valid coupon to apply to their transaction (when applicable), and the cash ticket will optionally provide them with an accounting of the points they accumulated and the points they need to earn their next reward. These amounts are valid from the previous day’s update from True Value. Using these new features, you can take care of your customers and give them the benefits they have earned at your store.
Discuss the following with your Support team to enable them to set this feature up for you. Let them know:
-
Whether your coupons should be taxable by default (this is not new)
-
Whether incoming coupons should be added to inventory
-
Advise them to enable True Value Limited Use Coupons and Coupon Details
-
Let them know which Rewards Points should display on the receipt (ticket). You can select one or both:
-
Print prior-day rewards balance on cash tickets
Select this option to print the customer’s rewards balance as of the previous evening on their cash ticket (receipt).Note: Printed balances do not reflect the current day’s transaction amounts.
-
Print prior-day point to next reward on cash tickets.
Select this option to print the number of points until the customer is eligible for the next coupon/reward on their cash ticket (receipt).
Note: These balances do not reflect the current day’s transaction amounts.
-
-
Choose when to display coupons in the True Value Rewards Loyalty folder.
Options include: Rewards ID Found, End, or Never
Note: Since we set these options by branch, let them know whether you want these changes to be the same for each branch, if applicable.
Applying Rewards to a Transaction (without Physical Coupon)
B-98747, B-98756, B-98771 – When a Rewards customer comes to the sales counter, you can apply a coupon to their transaction when they are eligible, even if they do not have a coupon with them. They may not even be aware that they qualify for a coupon. Coupon Rewards only apply to Sale transactions.
To apply a rewards coupon to a transaction (when there is no physical coupon):
1. From the Main Menu, choose Point of Sale > Sales to display the Sale Entry form.
Depending upon whether/when you chose to display the rewards prompt, the prompt displays.
Enter the customer’s rewards ID or look it up if you need to. When an unused coupon applies to their transaction, a message displays:
True Value Unused Coupon Prompt
2. Click Yes to view the coupon information. The Loyalty tab folder opens.
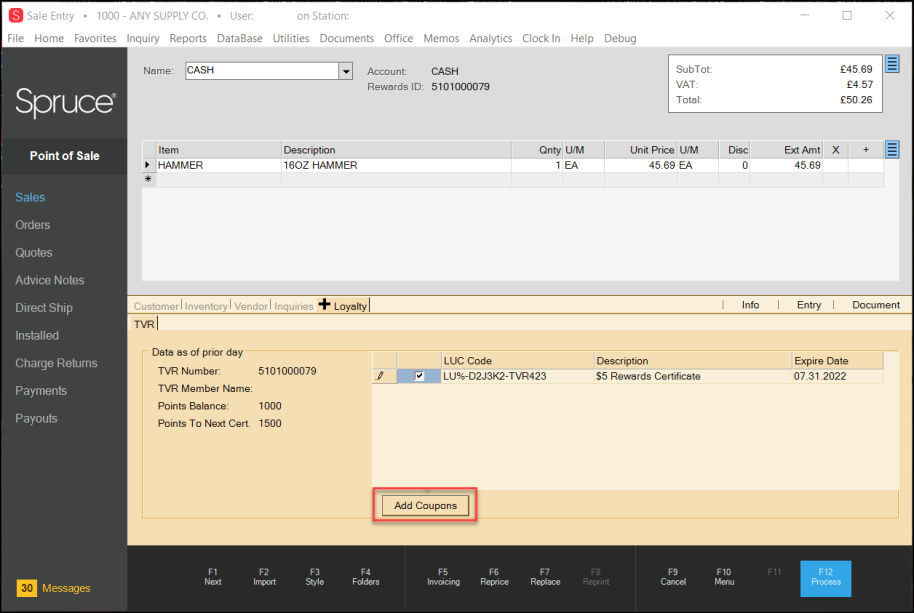
Sale Entry Form with True Value Loyalty Folder Open
One or more coupons may display in this list. You can apply all that are valid.
3. To apply one or more coupon(s) to the transaction, select the check mark beside the coupon(s) and click Add Coupons. The Coupon Entry box displays.
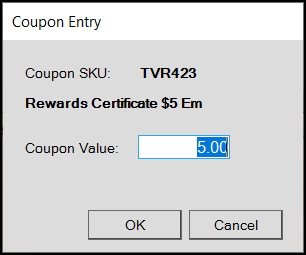
Coupon Entry Box
4. Click OK to apply the coupon to the transaction. The data grid updates to show the coupon entry.
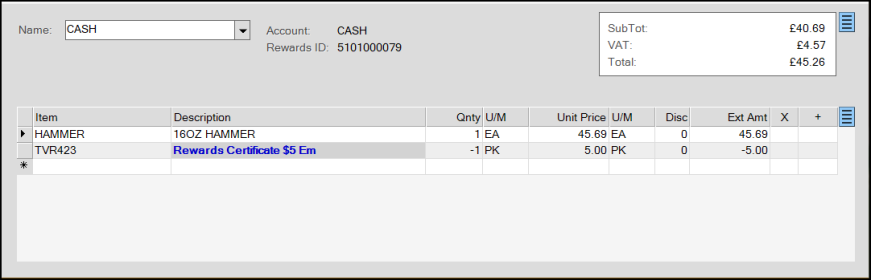
Sale Entry Form with Coupon in the Data Grid
Note: It may take a few seconds for the tax to update based on the discount.
5. When you Process (F12) the transaction, the discount is applied.
When you look up the invoice associated with this transaction, you will see the True Value Rewards coupon applied.
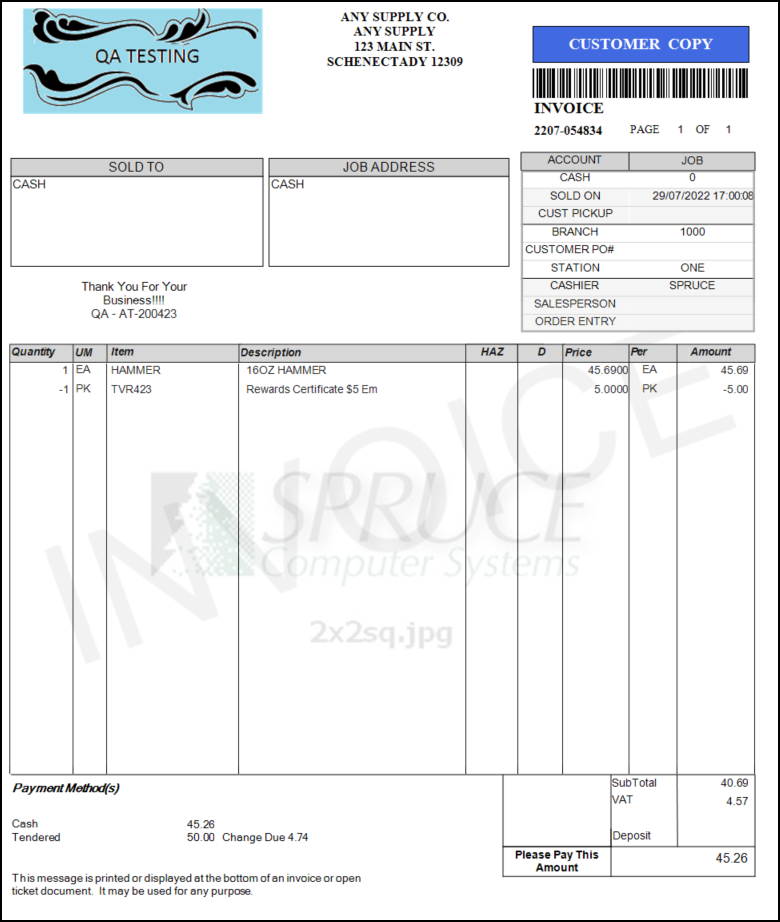
Invoice with True Value Rewards Coupon Applied
Note: If you suspend a sale with a True Value Coupon in it, the coupon will be ready for you to process when you return.
When you review the cash ticket, the rewards information displays according to the options you selected.
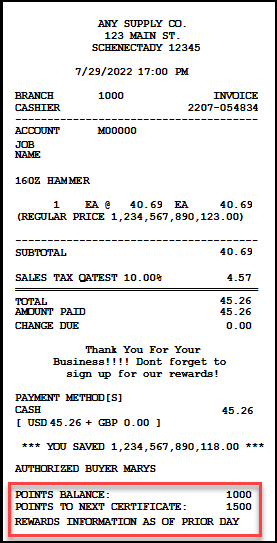
True Value Rewards with Points Balance and Points to Next Certificate Entries
Regional Updates
Using Linkly Devices at Point of Sale (Australia)
B-99563 – Our applications now support Linkly card processing devices used by over 500 POS systems in Australia and New Zealand. Linkly devices provide transaction processing support for cash, credit cards, debit cards, EMV chip and contactless transactions, refunds, gift cards, and manual entry. In the application, you can also perform some refunds using this device. You can use Linkly devices in the Point of Sale processes Sales, Orders, Advice Notes, Direct Shipments, Payments, and Payouts. Linkly and the application cannot process voids, the way you are used to them. Voids must be processed manually, outside the Linkly and also outside of the application.
This documentation assumes that you have already set up your merchant account credentials with Linkly and have the devices in house. These instructions will take you through the process of pairing the devices with the application-sponsored stations and processing transactions using the software and the device.
Since Linkly uses a virtual pin pad system for development, we will use this pin pad view to substitute for the device screen shots. That should provide an experience of the device behavior you can expect.
Working with ECI to Set Up your Linkly Devices
The ECI Implementation and Support teams will assist you setting up your stations and pairing your devices. Please let the ECI team know the following to facilitate the pairing process:
-
Let the team know which Branches will support Linkly devices
-
Give the team your Linkly Cloud Account Username and Password.
-
Let the team know whether you offer Cash Back as a service to your debit card customers and the maximum amount of cash back you allow.
-
Let the team know whether you want to display the customer’s item details on the Linkly device. We recommend that you do not.
Note: If you attempt to set up a Linkly device on a station before the Linkly Credit Card Processing parameter is set, an error message results:
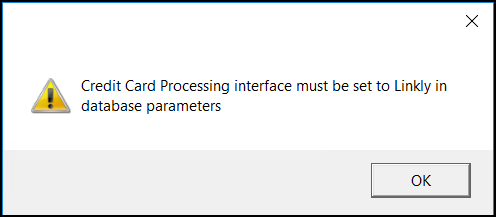
Linkly: Credit Card Processing Error Message
Using Linkly Devices in Point of Sale Transactions
B-99509, B-99518, B-99567, B-104642 – After you set up your Linkly Merchant account and you pair the device with the station, you are ready to use the Linkly device in transactions. You can process the sale for the total amount using one payment type or multiple payment types if you need to. If you have authorized the Cash Back feature, you can also provide cash back to the customer, when requested. You can process payments for Sales, Orders, Advice Notes, Direct Shipments, Payments, and Payouts, but not Charge Returns. The item entry part of the transaction is the same, so we pick up the transaction before you select Process (F12).
To use the Linkly device in a transaction:
1. The Cashier selects Process (F12) to process the transaction. The Process Invoice Document box displays.
2. The Cashier selects the transaction type (Cash (F1), Bankcard (F2), etc.) based on the customer’s selected payment type. As an example, we are processing this using a bankcard.
![]()
Process Invoice Document > Bankcard Option
3. The Cashier selects Finish (F12) and accepts any warnings that display.
If your business has Cash Back enabled, the Cash Back prompt displays. The Cashier selects Cash Back if the customer wants cash back. The Cash Back Amount prompt displays.
![]()
![]()
Station: Cash Back Prompt and Cash Back Amount Entry
4. The Cashier enters the cash back amount and selects OK. The application displays the Authorizing BankCard Amount message. The Linkly device updates with the purchase total and a prompt to swipe the card:
5. The Cashier/Customer swipes the card and the card information displays. The Select Account CHQ, SAV, or CRD message displays on the Linkly device.
6. Choose the CRD option. The Enter PIN prompt displays.
7. Ask the customer to enter the PIN for the card and click OK. The device processes the payment and displays an approved message when the transaction is successful.
![]()
Linkly Device: Approved Receipt
7. The Process Invoice Document displays the amount to be given to the Customer.
8. Press the Space Bar to close the transaction in the application.
Processing a Transaction with Multiple Payment Types
B-99518 – Sometimes a customer wants to use more than one payment type to complete their transaction. Often this includes gift cards that don’t cover an entire balance or the customer doesn’t have enough room on one credit card for the entire amount. When this happens, the Linkly device processes one transaction at a time and prompts the Cashier to present another payment type to process the remaining amount. When this occurs, a prompt like this, displays:
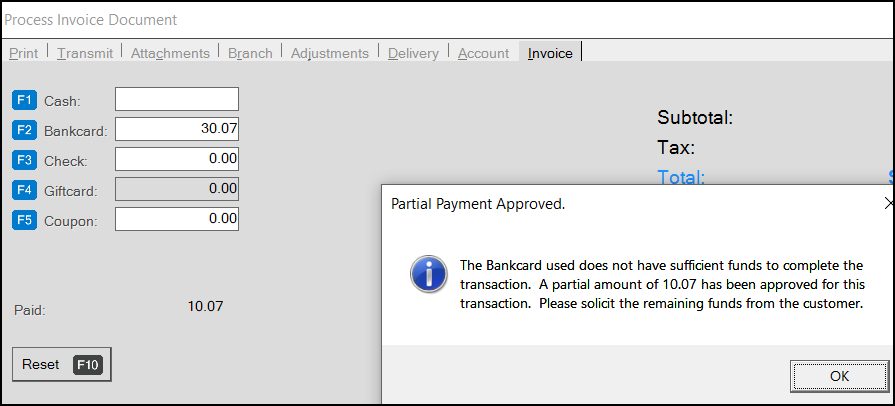
Process Invoice Document with Partial Payment Approved Message
When this message displays, the Cashier clicks OK, the Process Document subtracts the amount approved for the sale and presents the remaining amount as a new transaction. This is Linkly’s expected process. Continue by asking the customer for an additional form of payment and complete the transaction process.
Reprinting the Last Linkly Receipt
When a customer returns to the register, you can print a duplicate receipt if you have not processed another transaction after it.
To reprint the last receipt:
1. From the Main Menu, choose Point of Sale > Sales to display the Sale Entry form.
2. Without entering anything in the data grid, choose Process (F12) to display the Process Invoice Document.
3. Select Bankcard (F2) to display the Split Bankcard button and the Menu Marker .
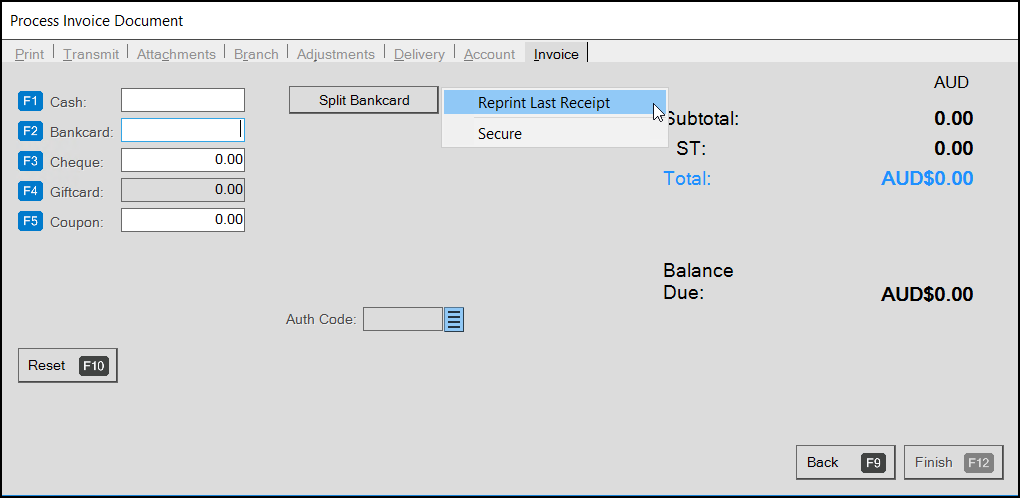
Process Invoice Document with Reprint Last Receipt Option Selected
4. Right-click the Menu Marker and choose the Reprint Last Receipt option. A confirmation prompt displays.
5. Click Yes. The Linkly device prints the duplicate receipt.
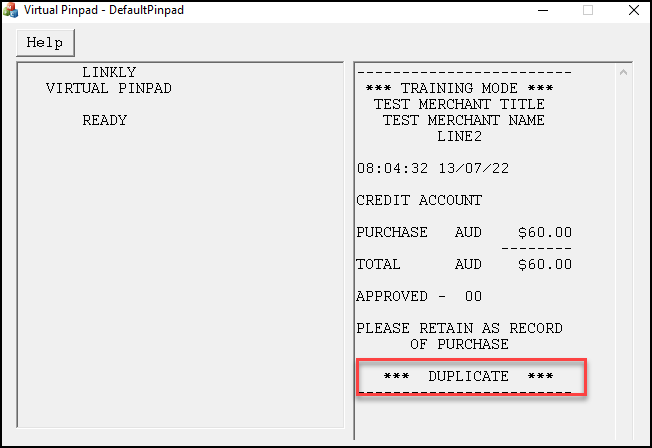
Linkly Device: Showing Duplicate Receipt
Refunding Linkly Sales to a Customer’s Card
B-99565 – The Linkly refund process follows the same path as other card processing device refunds. Follow the process below to refund a customer’s payment to a valid bankcard. This process assumes that the customer has purchased material from your business and that you can find the transaction document associated with that purchase.
To refund a sale to a bankcard using a Linkly device:
1. From the Main Menu, choose Point of Sale > Sales to display the Sale Entry form.
2. From the Name field, choose the account or choose the cash account.
3. In the data grid, enter the material the customer wants to return and choose Process (F12).
The Item Return box displays.
Item Return Box with Transaction Information
4. In the Original Invoice field, select the customer’s invoice record for the materials they are returning.
5. From the Reason for Return list, choose the customer’s reason for returning the material and check the Re-Stock Item check box if you are returning the material to inventory.
6. In the Notes section, enter any relevant notes about the return. (Not Required)
7. Choose Accept. The Process Document displays.
8. Select Bankcard (F2) to refund the transaction amount to the customer’s card.
Process Document with Refund Amount in Bankcard Field
9. Choose Finish (F12) to process the return.
The Linkly device prompts you to swipe the customer’s bankcard.
10. Swipe the customer's card and select the account type. The Enter PIN prompt displays.
11. Ask the customer to enter the PIN number and click OK. The Linkly Device displays the refund confirmation.
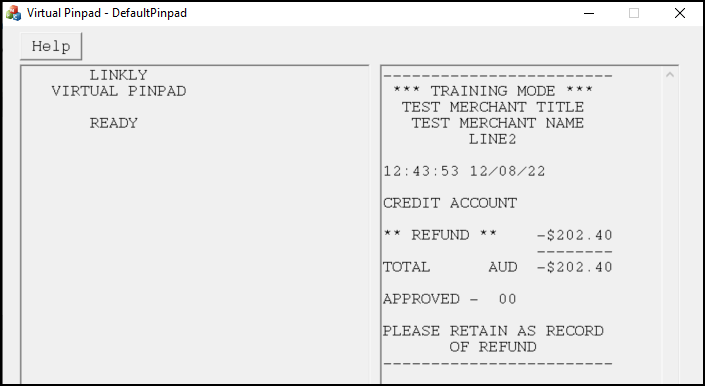
Linkly Device: Receipt Confirmation
Cancelling Sales on the Linkly Device (Cashier)
B-99522 – The Cashier can cancel a Linkly-based transaction when necessary. If the customer decides that they want to cancel the transaction after they have already swiped the card, the BankCard Verification (Linkly) prompt displays.
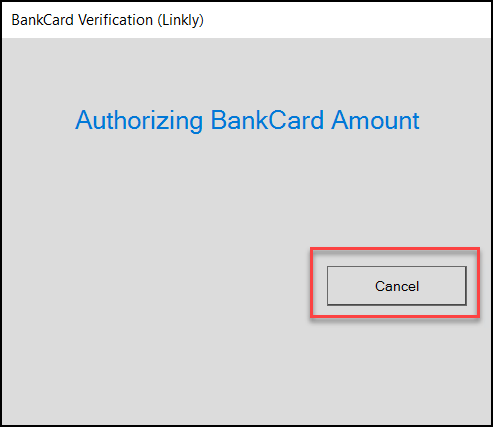
Application: Authorizing BankCard Amount with Cancel Highlighted
Click Cancel to cancel the transaction. A confirmation message displays.
Click Cancel again to display the Process Document box. Choose Back (F9) to return to the Entry window and cancel the transaction.
Canceling Sales on the Linkly Device (Customer)
B-99521 – The customer can cancel the sale on an Linkly device when necessary. After the Cashier processes the payment, the transaction information displays on the Linkly device with the Swipe prompt. The customer can click the Cancel button to cancel the transaction.
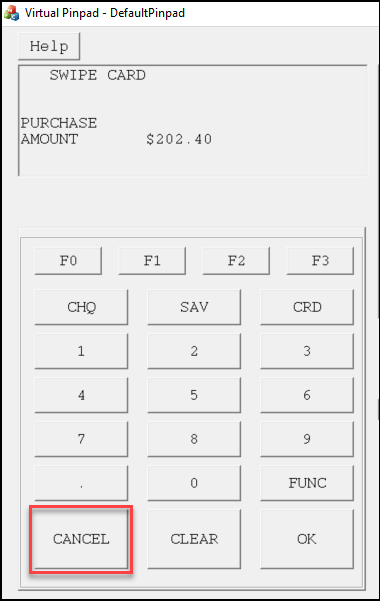
Linkly Device: Cancel Button Highlighted
A confirmation message displays.
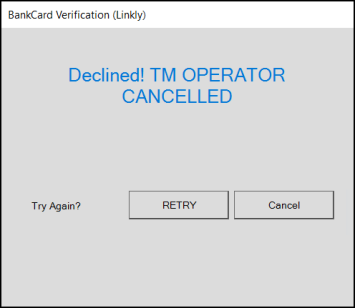
Application Prompt when the Customer Cancels the Transaction
If the customer wants to offer a different tender, select Cancel and return to the Process box and click the Reset (F10) option. If the customer wants to cancel the transaction entirely. Click Cancel, Reset (F10) and then Back (F9). Then you can cancel the transaction from the Entry form.
What if a Transaction/Device Goes Wrong?
If something happens during the transaction to disrupt the Linkly process, we have put some processes in place to protect the integrity of the transaction.
-
Transaction processes completely on the Linkly device and the application fails for some reason.
When this occurs and the Cashier powers the application back up, this message displays:-
There is an incomplete invoice from a previous session on this station that has bankcards captured on it.
Press OK to cancel the invoice and void the bankcards. Details Doc ID: <Document ID for the transaction>, Bankcard total: <Transaction Amount>.
The Cashier clicks OK to acknowledge the message. Since Linkly has no mechanism to void bankcards automatically a new message displays: -
Cannot void card. Bankcard cannot be automatically voided. Please use your credit card software to void this BankCard=<ending ID numbers> TROUTD=<number>.
In these cases, the transaction has to be reversed outside of the application.
-
-
Transaction started in the application, failed in the Linkly device.
When this occurs, the following message displays:-
Declined! TM Operator Timeout! In these cases, the application fails the transaction.
The customer’s bankcard does not have any transaction associated with it, so their security is not at risk.
-
Printing Purchasing Documents and Reports on A4 Paper Sizes
B-92553, B-92554, B-92559, B-92663, B-92665, B-92666 – To meet the needs of businesses that use the A4 paper size, we have resized the following documents to fit in this format. We have also expanded the Cost and Total fields to accommodate a larger number of digits and decimals in these documents.
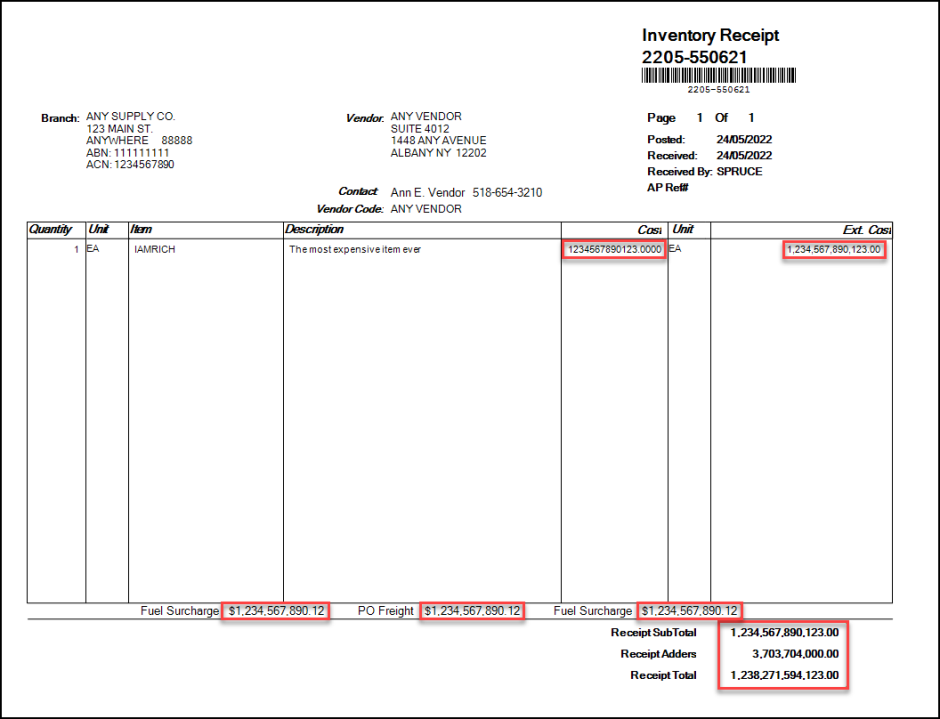
Inventory Receipt with Expanded Fields Highlighted (in A4 Format)
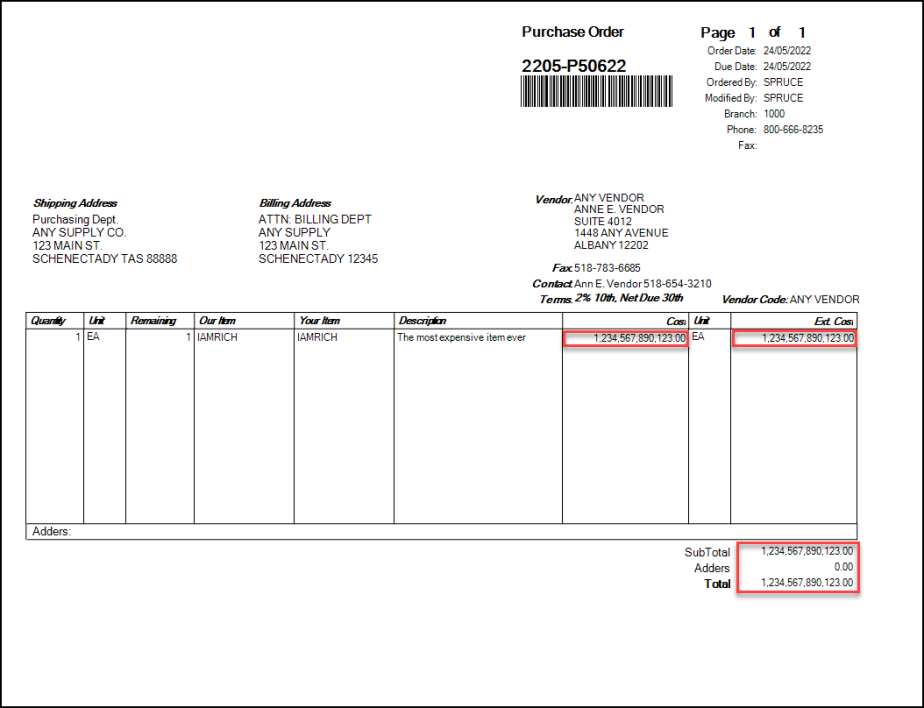
Purchase Order with Expanded Fields Highlighted (in A4 Format)
Vendor Quote with Expanded Fields Highlighted (A4 Format)
Inventory Receipts Summary Report with Expanded Fields Highlighted (in A4 Format)
Purchase Order Summary Report with Expanded Fields Highlighted (in A4 Format)
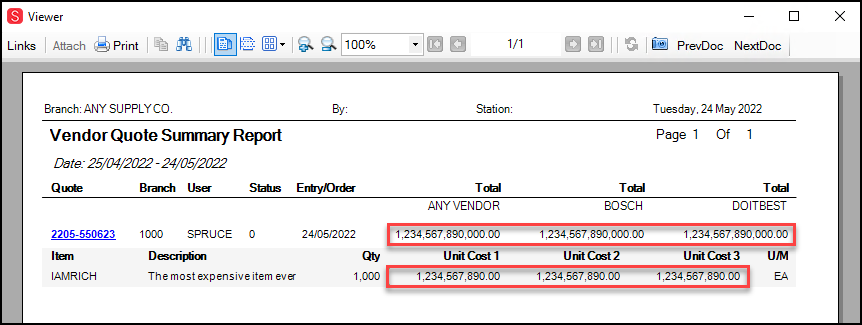
Vendor Quote Summary Report with Expanded Fields Highlighted (A4 Format)
Displaying Store Retail Pricing in VAT/GST Locations (AU/UK)
B-103683, B-103684 – For VAT regions and Inc Tax branches in GST-tax regions (except Canada), we have expanded the display of Store Retail prices with and without tax in Point of Sale and the Price Updates forms. This should make it easier to share the prices of inventory items with your customers so they can compare the costs with and without tax.
In the Point of Sale application area, you can see this change in Sales, Orders, Quotes, Open Tickets, Direct Shipments, and Charge Returns transactions.
To see this feature in Point of Sale (tax Inc branch only):
1. From the Main Menu, choose Point of Sale > Sales to display the Sales Entry form.
2. Place your cursor in the Item column in the data grid and click the down arrow.
Note: To limit the size of the list, you can enter the first few characters of the item ID.
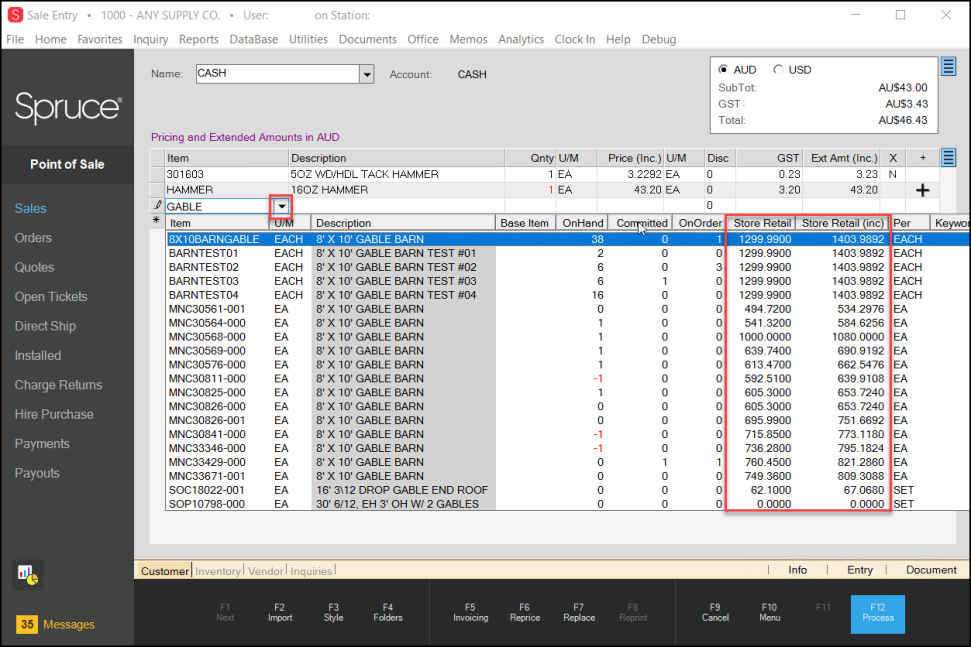
Sale Entry Form with Store Retail and Store Retail (Inc) Prices Displaying
We have also added this feature to the Price Updates data grid for the applicable entry and setup types.
To see this feature in the Price Updates data grid (inc tax branches only):
1. From the Main Menu, choose Inventory > Price Updates to display the Price Updates form.
2. Click a radio button in the upper left corner.
3. Put your cursor in the Item column of the data grid and click the down arrow.
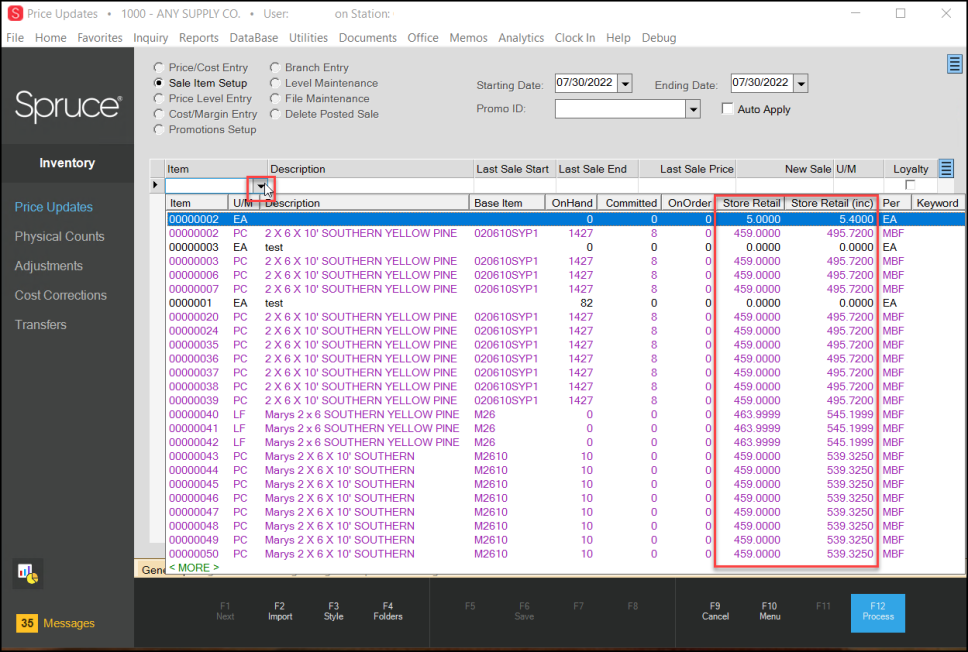
Price Updates Form with Store Retail and Store Retail (Inc) Prices Displaying
API and E-Commerce Updates
Setting up Branches for E-Commerce and User Notification
B-105841 – In preparation for new API features, we are expanding the support for branch-based e-commerce options. To enable your branch to receive and process e-commerce business, complete the following settings. You must have administrative permissions to choose these settings.
1. From the Main Menu, choose Maintenance > Database > Branches to display the Branch Setup form.
2. In the Branch ID field, choose the branch you want to enable e-commerce processing for.
3. Choose the E-Commerce tab.
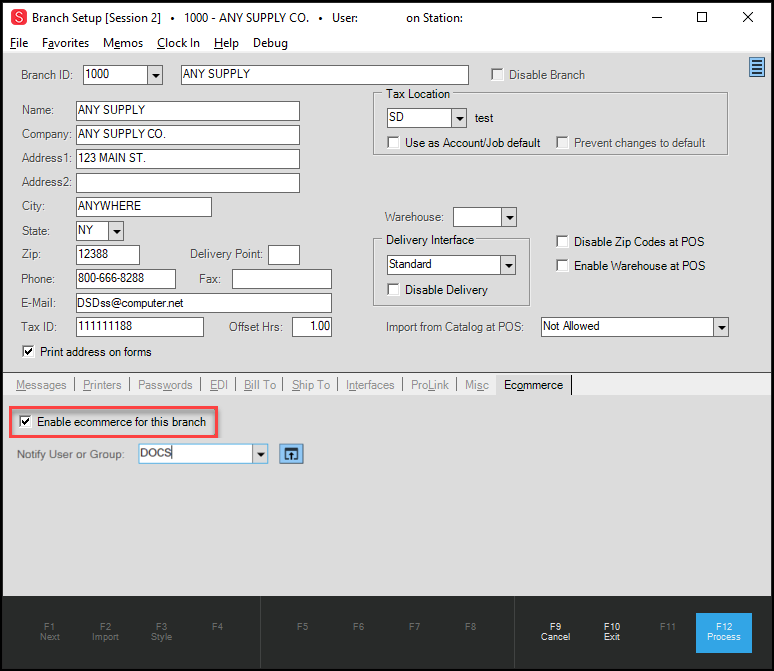
Branch Setup Form with E-Commerce Tab Options Displaying
4. Select the Enable e-commerce for this branch check box and in the Notify User or Group list, choose the User ID of the person or group that you want to notify when the application receives e-commerce orders.
5. When you have completed these entries, choose Process (F12) to save the settings.
Confirmation Email Options Added for E-Commerce Customers
B-106089, B-106636 – When you process orders and payments from e-commerce customers, you can set a parameter that the application can use to send a confirmation email to the customer when you complete these activities.
To set these confirmation email options:
1. From the Main Menu choose Maintenance > Database > Parameters > Point of Sale > Ecommerce API to display the Confirmation Email options.
Parameter Settings Form > Point of Sale > Ecommerce API Tab with Confirmation Email Options
2. Choose the email options that work for your business:
Note: You do not have to select both.
-
Select the Online Order check box to send a confirmation email to customers when you process their online orders.
-
Select the Online Payments check box to send a confirmation email to customers when you process their online payments.
3. When you have completed your selections, choose Process (F12) to save your changes.
When you select the Online Order option after your team processes the order, an email goes out to the customer containing the order information and the email address stored in the order record:
Order Email Sample
Updated Bankcard Handling for E-Commerce Orders
B-101991 – When you import e-commerce requests, keep in mind that typically, the customer has already paid for the order on the provider’s site. This means that team members who are processing these requests do not need to process a payment for these orders, even when the payment information is present in the order. Payments are also never processed for quote requests you receive via the e-commerce process.
To process an e-commerce order request and create an order:
1. From the Main Menu, choose Point of Sale > Orders to display the Order Entry form.
2. From the Name field, choose New. The application adds a new order to the form.
3. Choose Import (F2) and select Ecommerce from the context menu. The Import e-Commerce Quote/Order box displays.
4. Choose the order you want to process from the ID list and click Accept.
Note: You may be prompted to remove automatic adjustments. If so, choose Yes. The Order data grid updates to show the items associated with the customer’s order.
5. Choose Process (F12) to process the order. The Process Order Document displays.
The deposit amount displays automatically in the Bankcard field.
6. Click the Bankcard field to update the Card type and Auth Code fields with the customer’s paid bank card information.
Process Order Document with e-Commerce Payment Displaying
Since the information is pre-filled, the application does not process this as a payment.
7. Choose Finish (F12). The window closes without prompting the swipe of a card.
New: Closing E-Commerce Customer Orders
B-103344 – When an e-commerce order comes in and the customer subsequently cancels the order, you can close the order in the application. Begin by enabling these security permissions in the User ID settings of the team members who can perform this work. This requires administrative privileges.
Note: You can only close e-commerce orders that do not have a deposit associated with them.
Setting up these Permissions
To enable these permissions settings for a user:
1. From the Main Menu, choose Maintenance > Database > User IDs to display the User ID Maintenance form.
2. From the User ID list, choose the ID of the person or group to whom you want to give these permissions.
The form updates to show the user’s existing settings.
3. Choose the Application Security Settings ![]() icon to display the list of security settings.
icon to display the list of security settings.
4. Scroll down through the list and check the Allow Ecommerce Maintenance box.
5. Choose Apply and then Return.
6. Choose Process (F12).
7. Log out of the application and log back in using the User ID you just enabled.
Now you are ready to close an e-commerce order or quote that a customer has canceled.
Note: You cannot void these orders, but you can reject and close them.
Deposit Note: If the order has a deposit associated with it, you need to refund the deposit before you can close the order.
Closing an E-Commerce Order with a Deposit
To close an e-commerce order with a deposit:
1. From the Main Menu, choose Point of Sale > Orders to display the Order Entry form.
2. From the Name field, choose New. The application adds a new order to the form.
3. Choose Import (F2) and select Ecommerce from the context menu. The Import e-Commerce Quote/Order box displays.
4. Choose the order you want to close from the ID list and click Accept.
Note: You may be prompted to remove automatic adjustments. If so, choose Yes.
The data grid updates to show the items associated with the customer’s order.
5. Next to the Order # list, click the Menu Marker to display the local menu options.
Order Entry Form > Order # List Menu with Close Order Highlighted
6. Choose the Close Order option from the list. If there is no deposit associated with the request, the application can close the order, but if there is, you get a message:
-
Cannot Close Order. Deposit Remains.
7. To refund a deposit, from the Point of Sale Main Menu, select Payouts > Deposit Refund to display the Deposit Refund options.
8. In the Order # field, search for the Order Number from the e-commerce order and the Deposit to Refund amount displays in the field.
9. Choose Process (F12) to refund the deposit.
10. Return to Order Entry and you can close the order by recalling it in the list and following the instructions in steps 5 and 6.
Rejecting an E-Commerce Order
If you want to reject an e-commerce request, you can do that using these instructions. Rejecting the request ensures that the customer is notified that the order is not going to be processed. When you reject an e-commerce request, you do not create the order or close it.
To reject an e-commerce order:
1. From the Main Menu, choose Point of Sale > Orders to display the Order Entry form.
2. From the Name field, choose New. The application adds a new order to the form.
3. Choose Import (F2) and select Ecommerce from the context menu.
The Import e-Commerce Quote/Order box displays.
4. Choose the order you want to close from the ID list and click Accept.
The data grid updates to show the items associated with the customer’s order.
5. Beside the data grid, click the Menu Marker to display the context menu.
![]()
Order Entry Form > Context Menu > Reject E-Commerce Order
6. Choose Reject E-Commerce Order from the list. The Reject E-Commerce Quote/Order box displays.
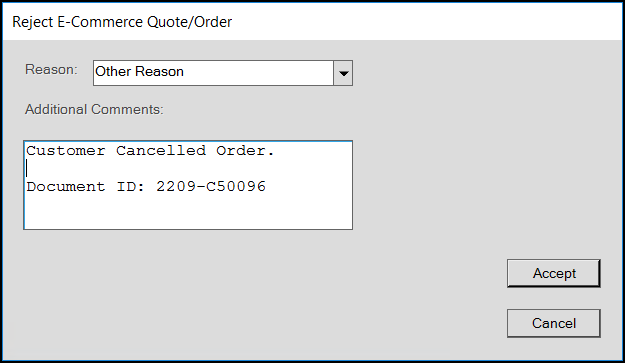
Reject E-Commerce Quote/Order Box
7. From the reason list, choose the appropriate reason and enter the Document ID in the Additional Comments box.
8. Click Accept. The application closes the e-commerce order.
New API Method Gives Your Customers a Way to Pay You Online
B-106070 – We have added the CreatePaymentRequest method to assist you in setting up a way for customers to pay their account balances online. You can get details of this new method in the API Guide, which is available from your ECI Account Manager.
E-Commerce Payment Process Now Supports Card On File
B-105846 – When customers purchase something online through a third-party provider, typically, they pay the third-party provider for the material. The application passes these payments through the application without processing a payment. No bank card validation is needed for these transactions.
When an Open Item account customer wants to purchase something from you directly, you can now offer them the convenience of using their Card on File for the transaction. If you have the convenience fee feature enabled, the application includes this fee in the structure of the payment.
To apply Card on File payments to an Open Item account’s e-commerce order:
1. From the Main Menu, choose Point of Sale > Payments > Receive on Account to display the Accept Payment form.
2. From the Account Name field, choose the account that has the e-commerce order to display their account information.
3. Select Import (F2) to display the context menu and choose the E-Commerce option.
The Import E-Commerce Payment box displays.
4. Choose the e-commerce order the customer wants to pay for with a Card on File from the list and click Accept.
The Job Number field updates if applicable. The Accept Payment form updates to display the amount from the order in the Amount to Apply field.
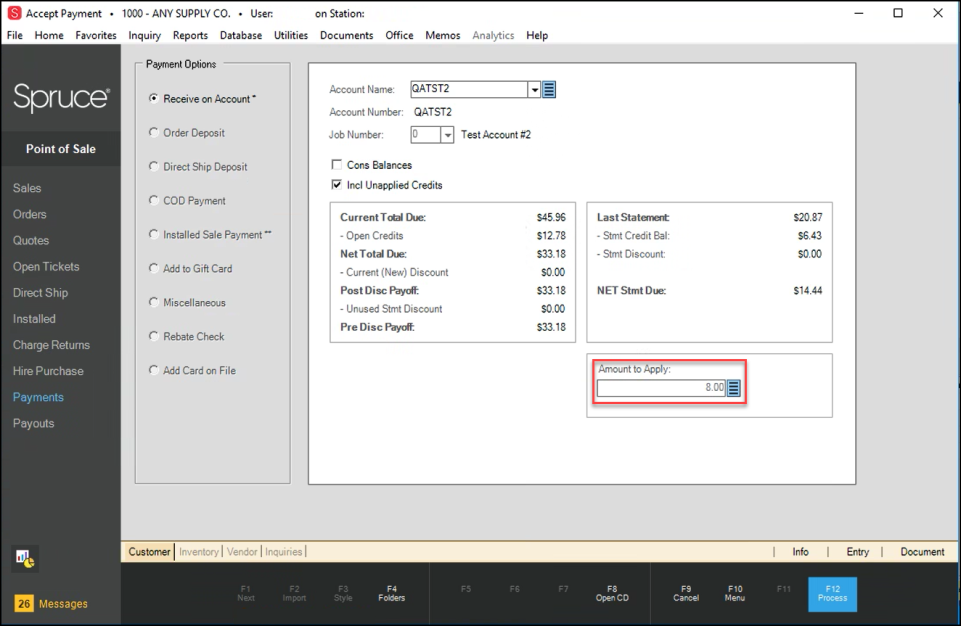
Accept Payment Form with Amount to Apply Field Highlighted
5. To process this payment with Card on File, choose Process (F12).
The application validates that the Card on File is authorized for the Job Number specified and the Process document box displays.
The application does not prompt you to confirm the use of Card on File. The application already knows that the customer has requested this.
The application applies the Card on File to the transaction directly and displays the Authorizing Bankcard Amount message (depending upon your device type).
6. When the processing is complete, choose Finish (F12) to close the transaction.
New Statuses Added for E-Commerce Orders
B- 107067 – We have added new statuses for e-commerce orders to provide more information about the handling of the current list of orders. New e-commerce order statuses include:
-
4 – Complete – Order has been invoiced (Provider).
-
5 – Staged – Order has been received and the items in the order have been collected for shipping.
-
6 – Shipped – Order has been shipped.
-
7 – Pending – Order has not yet been staged.
These statuses have been updated in the API Guide, which is available from your ECI Account Manager.
Security and Other Application-Related Updates
We have made the following updates to ensure better security and functionality for the new release.
Updated the Off Set Hours Field to Handle Time Differences
B-104346 – If your branch is not located in the same time zone as your server, you may experience mismatches in your documents and time entry processes as a result. We added the Offset Hours field in the Branch Setup form to assist with this so you can specify whether your branch is + 1 (an hour before) or -2 (two hours later) your server. For branches in Labrador, Newfoundland, and New Zealand who use a half hour difference or more from a standard time zone setting, we have updated this setting to allow them to shift their offset hours by thirty minute differences as well. These settings need to be in decimal increments and if there is no + or – in the field, the application assumes + (later than the time of the server). You must have administrative rights to set this option.
To set the time offset option for a specific branch:
1. From the Main Menu, choose Maintenance > Database > Branches to display the Branch Setup form.
2. In the Offset Hours field, type the number of hours difference there is between your branch’s time and the server’s time.
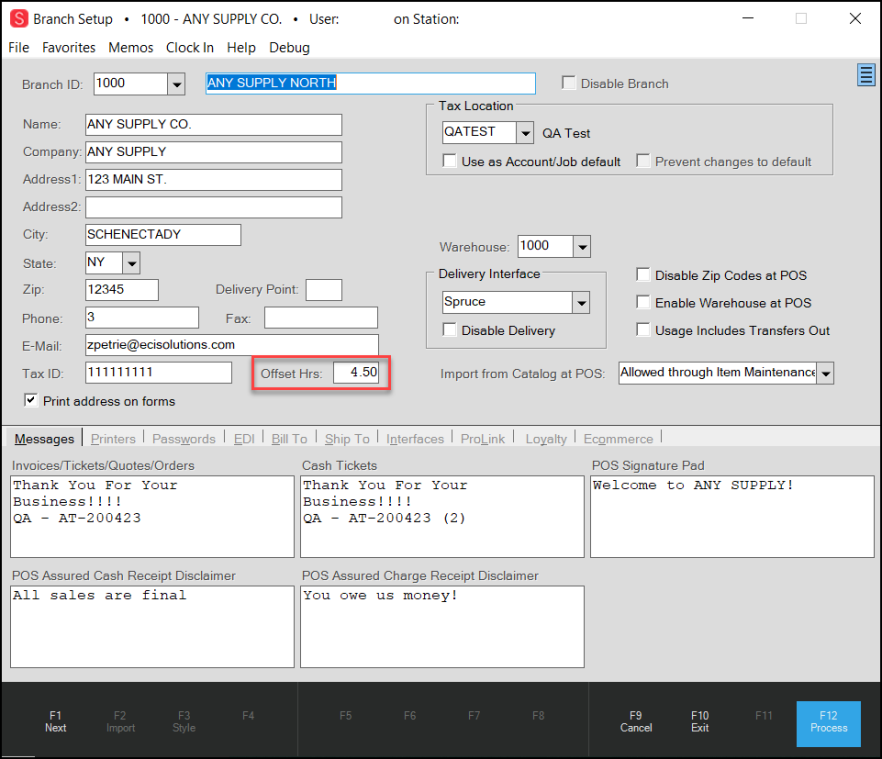
Branch Setup Form with Offset Hours Set at 4.5 Hours Ahead of the Server
3. When you have completed this setting, choose Process (F12).
Receiving DIB Price Updates Gets Easier
B-68162 – A customer had an issue when receiving Do It Best price updates; the application was applying the wrong price to the item record because the incoming unit of measure was not consistent with the expected UM type. We have added new logic that allows the application to convert the price based on the units of measure set in the Pricing UM field in Item Maintenance for this vendor. In testing, this ensured that the price setting is correct.
Inventory Sales Analysis Report Improved
B-103979 – Some customers reported issues with the Inventory Sales Analysis report where the report was not completing and caused the application to close. We have improved the way this report is processed to ensure that these errors do not occur and that the report generates more efficiently too.
Excel Import No Longer Relies on having Excel on your Device
B-107524 – When you import a file into the application, the application used to use some of the features of your installed version of Excel to perform the import. We have updated our processes to ensure that you can import Excel-generated files without having the Excel application present on your computer/device. This will not change the import process in any way.
EJD File Processing Enhancements Prevent Errors
B-107961 – Some EJD catalog files do not include unit of measure values. When using a template to create the items from the EDJ catalog, the application would default the UM entry to EA when these fields were empty. This caused downstream issues in the Vendor Item UM field for purchasing and orders. We have resolved this issue by copying the unit of measure entry from the template if the new UM entry is blank. Additionally, we have corrected the progress bar counter to display in two 100% passes rather than one 200% progress bar.
CrowdStrike Inspired Updates Improve Security
B-108313, B-108315, B-108317 – CrowdStrike identified some issues in the ProLink application that we have corrected in this release:
-
We corrected an order data vulnerability that exposed account information. We now check order detail requests against the account of the customer currently logged in.
-
We corrected a parameter tampering vulnerability that might have permitted adding negative quantities to an order, thereby reducing the total price of the order.
-
We also corrected an insecure direct object reference, which might have allowed the modification of an integer parameter in a request. This could have resulted in changes to billing, address, notes, and items list issues.
B-108314 – CrowdStrike also identified a local file inclusion vulnerability in the desktop client that allows remote file system files to be read externally. We have added additional validation controls for paths that contain the system drive (C:\) to prevent these references in the hosted system. This includes when you choose a file, folder, or path into the control’s input path. This prevents this vulnerability from happening.
Corrections
D-57198 – Installed Sales Contracts and Orders / Tickets No Longer Conflicting.
A customer reported an issue where they were making changes to an Installed Sales Contract in one session and on another an order was being modified that was tied to that same contract. We found in our research that this also happened with tickets associated with that contract as well. We have modified the Installed Sales Contract process to lock order and ticket documents associated with that contract when the contract is being modified. Conversely, if an installed sales contract’s ticket or order is open, the installed sales contract is locked preventing its’ modification. These locks are removed after any of these transactions is either canceled or processed.
D-62292 – Warehouse Quantities Displaying for Do It Best and True Value Materials Again.
If you have the Warehouse Quantity option set in your Do It Best or True Value EDI settings (Branch > EDI > DIB or TV Automation option), the application retrieves warehouse quantity information each evening. We display this information in the Catalog Maintenance form. This looks slightly different if you have Warehouse On Demand (live) Quantities selected. There was an issue where only the Standard Warehouse Quantities were not displaying.
To see this change:
1. From the Main Menu, choose Point of Sale > Database > Catalog to display the Catalog Maintenance form.
2. From the Vendor list, choose the vendor (Do it Best or True Value).
3. From the Vendor SKU list, choose the SKU you want to see the warehouse quantity for. The SKU record updates with the relevant vendor information.
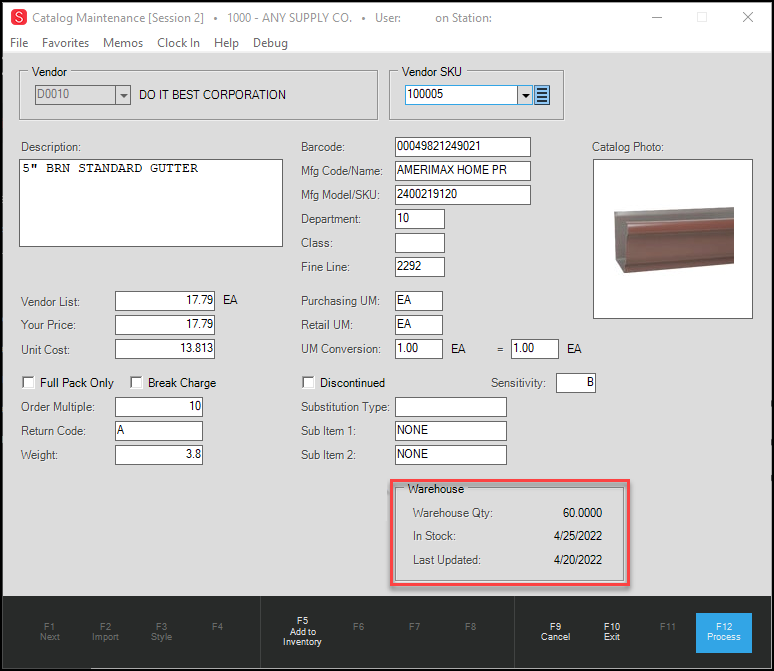
Catalog Maintenance with Warehouse Quantity Update Displaying
D-63600 – Application Closing Orders Successfully after Receiving and Closing Purchase Orders.
Some customers were experiencing errors after receiving inventory and closing the purchase order where the application still considered the received items on order. We have corrected this issue and this error no longer occurs.
D-64188 – Continue Mode Persists in Item Inquiry/Maintenance.
In the past when you selected the Continue Mode option in the Item Maintenance or Item Inquiry forms, the application turned it off when you cancelled/closed the form. We have changed the behavior of this feature to persist Continue Mode until you turn it off deliberately.
D-70716 – Cayan Bankcard Processing for Orders with Discount Issues Resolved.
A customer reported that they were seeing significant bank card processing issues for orders processed on Cayan devices when there was a deposit or a card on file payment involved. When processing the payment, the Cayan device would display the message Try Again? right after the Authorizing BankCard Amount message displayed. This turned out to be a combination of issues. This occurred when cashiers were entering or modifying an order where the price and the quantity were set with different units of measure. Then, during the payment process, if there was either a deposit on the order or the account used a card on file, the payment amount inexplicably multiplied. We have corrected the code that caused these issues so this no longer occurs.
D-71829 – Update to the GetInvoices Method Repairs Default Document Type Return.
In the past, when using the GetInvoices method, when the DocStatus was not supplied in the request, the API was not returning all of the appropriate documents. We have modified the API code to return all matching documents that match the other request requirements (except Installed Sales Invoices). This behavior mirrors the GetOrders method.
D-74937 – Corrected: PS Cashier Report Issues when Order Deposits were Involved.
A Canadian customer reported that their PS EOD Cashier Report saw issues when the order involved deposits. We found the source of these issues and corrected the logic. In the report, the deposit amount now displays as a separate entry in the End of Day Cashier Report (OrdDep). The Rounding Difference entry is consistent with the rounding setting you have chosen and the difference matches that calculated in the transaction. This issue may also have affected other businesses that use the penny rounding feature.

End of Day Cashier Report with Changes Highlighted
D-76291 – Beta Issue Resolved: Currency Denominations Issue with Four-Digit Decimals.
We have resolved the issue that occurred when adding a currency denomination with a four-digit decimal to Currency Denominations form. You can add currencies with four digits as needed.
D-81313 – Beta Issue Resolved: Displaying the Tags & Labels Designer.
During the beta process a customer was not able to access the new Tags & Label Designer feature. This turned out to be an ActiveReports issue, which we have corrected.
D-82120 – Execution Time Outs Expired Errors Resolved.
Some customers saw time out errors during the execution of the ACEPromoAutoApply procedure. We have resolved these issues.
D-83582 – True Value Inventory Rename and Merge Procedure Improved.
A customer reported delays during the initial load of the True Value rename and merge utility. We have refactored this process to ensure that the process loads and executes quicker, which resolved the delay issue.
D-83890 – Account Maintenance Only Displays Specified Currency Types in the Codes Tab.
In the Currency Code Maintenance form, you choose which currencies you expect at Point of Sale by choosing the Allow Exchange at Point of Sale check box. This setting enforces the types of currency you allow for Point of Sale transactions. We have updated this setting in the Account Maintenance form to ensure that only the currency types you authorize in Point of Sale are allowed in the Account Maintenance form as well.

Account Maintenance with Currency Type List Options Displaying
D-84649 – Corrected: Credit Card Signature Line Overwriting Text when Logo is Printed on Receipt.
A customer reported an issue when they printed receipts with logos. The credit card signature was displaying in the wrong part of the receipt. We have resolved this issue by modifying where the signature line is prints, in relation to the logo. Making this change corrected the issue.
D-84955 – Ensuring that Duplicate Employee Records are Not Created.
When two people are editing an employee record in the User Maintenance ID form at the same time, an error used to result which closed the application. We now handle this issue differently by displaying an error message to notify the person who opened the record later that the record is already open.
D-84959 – Editing Vendor SKU in Item Maintenance > Purchasing Tab Issues have been Resolved.
In the past, you could modify the Vendor SKU entry in the Item Maintenance > Purchasing tab when the vendor SKU changed. We have fixed the application to restore this capability in all Vendor tabs.
D-85283 – Item Global Modify for Price Level 0 Works like Other Price Levels Now.
In the past, when you used Item Global Modify maintenance utility to change the price level entries for Price Level 0, the application did not display the Old Value amount of the selected item in the Old Value column. We have corrected this issue to ensure that the Old Value displays for Price Level 0 too.
Item Global Modify Form with Price Level 0 Old Values Displaying
D-85425 – Corrected: Installed Sales Issue where Third-Party Actual Amount Did Not Display.
When you process a third-party transaction in Installed Sales, typically, you have given the customer an estimate of the cost of the third-party item. When the vendor amount differs, the application displays both the Estimated and the Actual amount in the Subtotal section. For example, if the estimate for the item was $25, but the vendor amount for that item was $29.54, the $29.54, the Actual value did not display.

Installed Sales Form > 3rd Party Tab > Vendor Invoice List Entry
We have corrected this issue so that both the Estimated amount you quoted and the Extended amount display in the data grid and the Estimated amount and the Actual Amount display in the Subtotal section.

Installed Sales Form > 3rd Party Tab > Estimate and Actual Values Displaying
D-85768 – Last Digit on GL Trial Balance Report Columns Display Correctly Again.
A customer in the UK reported that the last digit in the Debit, Credit, and Net columns of the GL Trial Balance Journal Summary were cut off. This turned out to be an ActiveReports issue when working with italicized values. We modified the report to ensure that the entries in this report display correctly.
D-86071 – Attaching Open Documents to Interim Statements Restored.
A customer reported that they were having trouble printing and attaching open documents to Interim Statements. After some investigation, we found that there was an issue when we upgraded ActiveReports; the new code prevented the cloning of these documents for printing and transmitting. We are now using new logic to complete this work and you can print and attach open documents to interim statements normally again.
D-86554 – Reversing and Closing AP Billing Invoices Repaired (UK).
We found an issue with a regional setting that caused the problem with reversing and closing AP Billing invoices in the UK. This error has been corrected, and UK customers who saw this issue should be able to process these reversals without trouble.
Note: The Reverse and Close process assumes you are reversing an unpaid AP Billing that you have transferred to the General Ledger (using the Transfer A/P feature).
Note 2: You can now make more than one manual AP Transfer in a day. See D-87348 for more information.
D-86622 – Do It Best Warehouse on Demand Quantities Displaying in Forms.
The Catalog Maintenance and Catalog Inquiry forms now display warehouse quantity details for Do It Best businesses that have the EDI Warehouse On-Demand settings in place. The Do It Best Warehouse On-Demand settings are enabled in the Parameter Settings (Setup > EDI > General > Best Rewards check box) and then select the Best Rewards Settings from the Menu Marker ). When the Warehouse On-Demand setting is enabled, warehouse quantities display in the Catalog Maintenance form in detail:
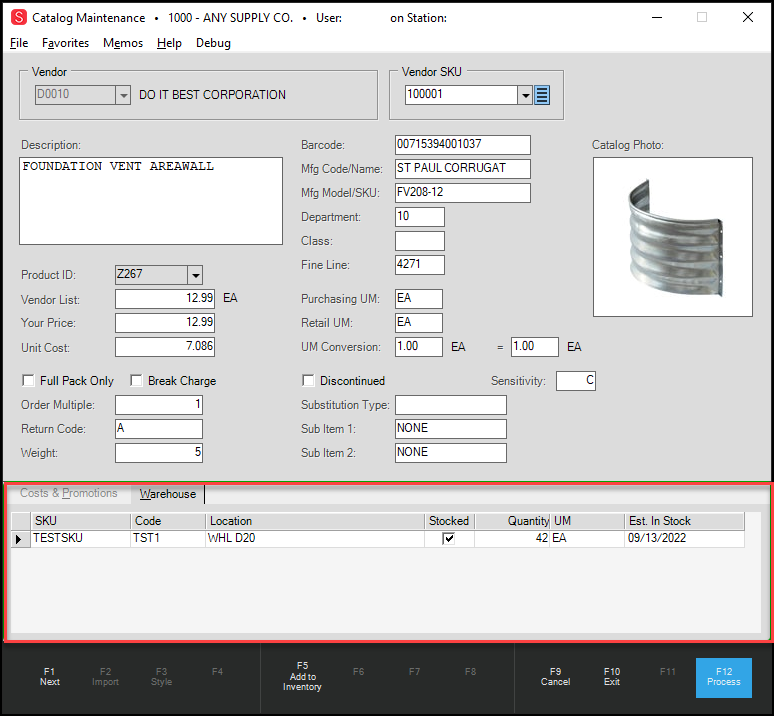
Catalog Maintenance > Warehouse Tab Entries with Warehouse On-Demand Enabled
When the Warehouse On-Demand option has not been enabled, the quantities still display in the tab, but with less detail:
Catalog Maintenance > Warehouse Tab when Warehouse On-Demand is not Enabled
D-86631 – Printed Interim Statements Include Line Item Pricing Again.
A customer reported that when they printed interim statements to send to customers, the line item pricing was not printing on these open documents. There is a check box in the Account Maintenance form (No Price Print POS) that, when checked, also prevented the application from printing line item amounts on interim statements. We have corrected this logic to ensure that even if this check box is enabled, line item pricing prints on open documents.
D-86703 – Incorrect GL Department Issue for Accrued AP Receipts Resolved.
A customer reported an issue that caused some receipts that were correctly branch-mapped to an AP Accrual account to post to the wrong GL department. We corrected this issue by modifying some currency differential logic and these receipts are posting correctly now.
D-86710 – Exporting Active Reports To Excel No Longer Creating Multiple Tabs.
After the upgrade to Active Reports 15, we found that some customers that were exporting custom reports to Excel saw that the resulting Excel file contained multiple tabs rather than the expected one tab with all of the information. When printing these reports, they would then print on multiple pages, rather than printing sequentially, as expected. We have corrected this issue.
D-86813 – Beta Issue Resolved: Specified Item Index is not in the ItemSet Message.
From the Inventory > Transfers area, scanning an item or using the <Ctrl + B> shortcut to simulate a scan used to cause an application error. This issue also affected the Tags & Labels (printing) form. We have corrected this issue.
D-86866 – Open Documents Tab Displaying All Open Account Documents Again.
When you are working in Point of Sale and you want to see what orders or other tickets might be open for the selected customer, you choose the Folders (F4) > Open Docs tab. A customer reported that this tab was not displaying the open orders (sales, quotes, tickets, direct shipment, etc.) records for the account that was open. We resolved this issue to ensure that this information is available for all Point of Sale transaction types.

Sale Entry > Open Docs Tab with Entries
D-87054 – Accessing Detail Mapping No Longer Causing Error (Canada).
We have corrected the issue reported by a Canadian customer that the application was closing when they tried to access General Ledger > Database > Detail Mapping. The issue was caused by a parameter setting that was an improper length. We have changed the requirements for the parameter setting to ensure this error does not occur.
D-87081 – Transfer A/P Utility Transferring AP Amounts Successfully Again.
A customer reported that using the Transfer A/P Utility did not transfer the selected AP Invoice amount to the appropriate GL accounts. We have corrected this issue to ensure you can transfer multiple payables at once as needed.
D-87124 – E-Commerce Message: Card Number Does Not Match Card Type Issue Resolved.
For processing e-commerce orders, typically, Web Payment selected in the Maintenance > Database > Parameters > Point of Sale > Ecommerce API > Bankcard Type setting so the application does not use the Mastercard payment type by default. Due to a change in the code, this was modified so that the Mastercard was used by default consistently. We have corrected this issue to ensure that the application pulls up the Web Payment setting again, but we changed the task list error message so now you can insert all bankcard payment types now.
D-87235 – Beta Issues Resolved: Tags & Labels Special Order Label Discrepancies.
A customer reported three issues for Special Order labels. There were significant printing delays for both Zebra and DYMO printers; there were missing template fields from the resulting printed labels; and the labels that were printing were not for the submitted customer orders. We have corrected each of these issues in the latest version of the application.
D-87348 – Two Manual AP Transfers Issues Resolved.
We discovered that after making a manual AP transfer, you were not able to transfer another AP invoice again the same day. Additionally, payments of 0.00 invoice amounts were not being marked as transferred. We have resolved these issues so that you can transfer manual AP invoices as you need to multiple times per day and zero amount invoices are transferring successfully.
D-87382 – Backed Out Checks No Longer Causing Negative Credit Entries.
A customer with the Payables Parameter setting > Disbursements Branch Split sometimes saw an issue when backing out checks. This activity caused negative credit entries in the End of Day Report, incorrectly. We have resolved the issue that caused this discrepancy and you can back out checks without causing this negative credit issue now.
D-87529 – Removing Payments using the AR Open Credit Utility is Working Correctly Again.
A customer found that removing payments from Open Item Accounts using the AR Open Credit Utility wasn’t always removing the credit on the account. This problem caused issues in the Account Receivables reporting and were depicted incorrectly in the customer’s statements. We have corrected these issues.
D-87601 - ProLink Statement Run Time Error Resolved.
A customer reported that when they tried to generate a current statement using ProLink, a serious error resulted. This has been corrected.
D-87671 – Beta Issue Resolved: Misaligned Dymo Labels Printing Accurately Now.
A beta customer noticed that the custom Dymo templates were not displaying the Vendor SKU field properly due to an error in the data conversion logic. Also, we realized that we had not converted default labels for Dymo price tag, bin tags, and special order tags, which contributed to the confusion. We have corrected the customer’s static Dymo templates and insert them as custom templates in their database. In the future, we will be converting the default templates for Zebra and Sheet Label templates.
D-87719 – View and Print of Backorder-Related Documents Restored.
Viewing and printing backorder and remaining invoice documents sometimes caused errors in the last release. We have corrected this issue.
D-87724 – Ability to Modify Customer Orders with Maximum Sales Tax Assigned.
In the past, when a business processed an order that specified a maximum sales tax, the application prevented the business from changing the order later. Now, when the customer asks to change this type of order, the application recalculates the sales tax according to the maximum tax requirements until the order is invoiced. After invoicing the order, if the customer wants to change it, the application prevents these changes, as before. The transaction recognizes the tax maximum, regardless of the number of levels that apply to the order.
D-87727 – Ability to Modify Customer Orders with Maximum Sales Tax Assigned.
In the past, when a business processed an order that specified a maximum sales tax, the application prevented the business from changing the order later. Now, when the customer asks to change this type of order, the application recalculates the sales tax according to the maximum tax requirements until the order is invoiced. After invoicing the order, if the customer wants to change it, the application prevents these changes, as before. The transaction recognizes the tax maximum, regardless of the number of levels that apply to the order.
D-87775 – Changing Branch Information after Changing Regions No Longer Results in Error.
A customer reported that after they changed regions and made a change to a branch entry, an error resulted. We have corrected this issue.
D-87839 – Beta Issue Resolved: Inventory Stock Valuation Report Runs Correctly for Single-Digit Groups/Sections.
A beta customer reported that the Inventory Stock Valuation Report was not running properly when only one Group/Section was specified. The application was having difficulties any parameters that included single digit Groups and Sections. We have corrected this issue.
D-88421 – Cash Drawer Tally Report Printer Selection Working Again.
A customer reported that the Cash Drawer Tally Report only printed on the default Windows printer rather than the specified printer. We have corrected this issue.
D-88473 – Adding a Document Note to a Billing Entry No Longer Causing Errors (UK).
A customer in the United Kingdom reported an error when they added tried to add a Note in the Document folder to a Billing Entry. We have corrected this issue so you can add a note to a vendor payment without errors.
D-88561 – Import Wizard Changes No Longer Breaking Grid Mapping.
A customer reported that when they tried to use the Import Wizard using their existing grid mapping styles, the import was not successful. When we looked into it, we found that we had changed the default column format, which caused this issue with existing mapping file styles. We have reset this column format to work as it did before so you do not have to recreate your grid mapping styles.
D-88657 – Importing Purchase Orders for Special Order Label Types in Tags & Labels Resolved.
A customer reported an issue when trying to import purchase orders for Special Order labels in Tags and Labels. The Purchase Order option was missing. We have restored the Purchase Order option to ensure you can import them when processing special order labels in Tags & Labels.
D-88663 – GST Tax Exemption Saving Correctly on Sales Orders.
An Australian customer reported that Sales and Orders were not displaying GST Tax Exemptions when these exemption IDs were present. We have corrected this issue.
D-89016 – Resolved: Purchasing Import Wizard Grid Mapping Works Correctly Again.
A customer reported that when importing an Excel spreadsheet in Purchase Order Entry and Receiving screens, the grid mapping does not match the preview data columns, which meant the data for these items was not mapped. We have corrected this issue to prevent these Excel-specific errors.
D-89033 – Price Tag Printing Issue Resolved (Tags & Labels Update).
When printing price tags after price updates using Tags & Labels, a customer reported that an error resulted when setting the Set Counts to OnOrder. An incorrect zero-label count setting caused this issue. We have updated the code to prevent this issue.
D-89089 – Invoicing using Batch Utilities Does Not Recalculate Aggregator Items in the Data Grid.
A customer reported that while using batch utilities to invoice an order or ticket, the application would recalculate Aggregator items in the list unnecessarily. This would often result in a message that the order or ticket had to be invoiced manually, when there was no need to do so. We have resolved this issue to prevent these errors and messages.