Release Details for Version 20
This section contains the detailed content for the version 20.0 release.
Note: We have changed the naming convention of our releases to simplify the numbering scheme. The first (left-most) number is the Major Release number, which includes all major changes associated with the release. The second number is the Minor Release number, which typically includes updates to improve stability and nuances that you have recommended to us pertaining to the release content. The third number, the Revision Number, refers to changes made during the beta process.
Key Updates:
Enhanced Search using Manufacturer's SKU
Orgill FanBuilder Program Support
Default Invoice Reprinting (F8)
New Item Price Handling Controls
Restricting Item Price Changes at POS
New Lineal Tally Item Features
International Support - Multi-Currency Updates
Regional Support - Zero Decimal Currency Updates
Application-Wide Update
Resizing the Application Window Allows Better Visibility and More Space
B-97233, B-96846 - We have made changes to forms and controls to permit re-size and full screen expansion to most forms in the application. After you set these window sizes, the application remembers the setting and uses it whenever you open the application. The application ties this setting to your user ID and your station (computer). So, whenever you log in, even if you use a different computer, the application window uses your settings to resize the application window.
We have made additional changes to the application to improve your customer sign-on and Point of Sale experience. When you sign into the application, you may notice that we have centered the User Login box and processing forms to the middle of the application window. When you move between the Point of Sale transaction types, we have made the transition smoother and quicker too.
These changes do not impact the scale of the application (font sizes, etc. aren’t changed) but adds additional space for data grids and dynamic increase in the width of certain controls when you change the size of the form.
To expand the size of the application windows:
1. Place the cursor at the edge or a corner of the application screen.
2. When the arrow displays, drag the screen to the size you want it to be.
Numerous AR, AP, GL, and Related Forms and Fields Expanded
We continue to expand forms to ensure that cost and amount fields can handle larger values, currency symbols longer than one character, and zero to four decimal digits. The forms we have expanded in this release include Inventory, Accounts Payable, Accounts Receivable, Vendor,
Point of Sale Features
Enhanced Search using the Manufacturer's SKU
When looking for an item in inventory, we have added a search by manufacturer's SKU option. This is particularly useful when you add new inventory to stock for the first time.
B-93804, B-93805, B-93818, B-93833, B-94014, B-93856, B-96038, B-96312 – When you search for a particular item either in inventory, the catalog, in Point of Sale, or in Purchasing, and you know the item’s manufacturer SKU, you can now use that SKU to find the item. We call this enhanced search. Before you get started, complete the enhanced search setup process.
Note: We have also added the Manufacturer’s SKU to the default enhanced search criteria.
Setting up the Manufacturer’s SKU Search Feature
You need to add the Import from Catalog at POS option to each branch setup that you want to use this feature.
To set up the manufacturer’s SKU search for a branch:
1. From the Main Menu, go to Maintenance > Database > Branches to display the Branch Setup form.
2. In the Branch ID list, choose a branch you want this feature for to display the branch settings.
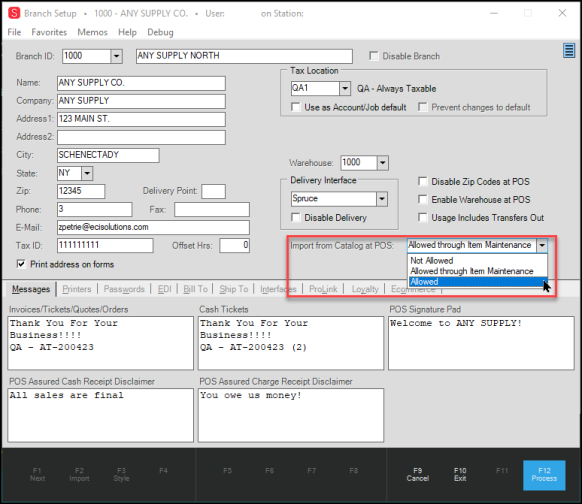
Branch Setup Form with Import from Catalog at POS Options Displaying
3. From the Import from Catalog at POS list, choose Allowed.
Note: If you want to restrict access to Item Maintenance, choose Allowed through Item Maintenance instead.
4. Select Process (F12) to save this setting.
5. Repeat steps a – d for each branch that needs this feature.
Important: Complete these steps for each branch.
Using the Manufacturer’s SKU Search in Catalog Maintenance
To search for an item using the manufacturer’s SKU in Catalog Maintenance:
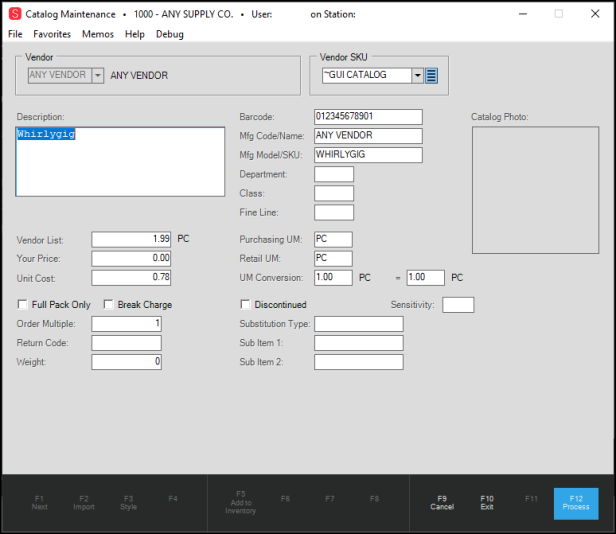
1. From the Main Menu, choose Inventory > Database > Catalog to display the Catalog Maintenance form.
2. In the Vendor SKU list, type the manufacturer’s SKU.
3. Right-click your mouse to display the context menu.
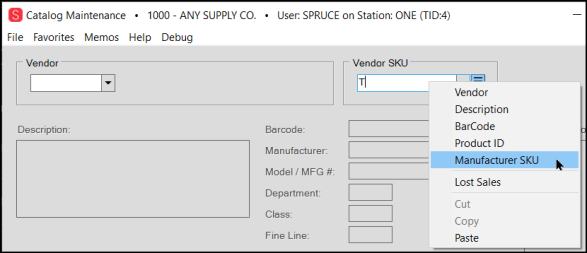
Catalog Maintenance Form with Vendor SKU Menu > Manufacturer SKU Selected
4. From the context menu, choose Manufacturer SKU to begin the search.
Items matching the SKU you entered display in a list:
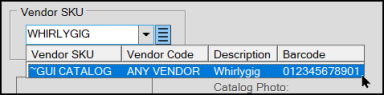
Catalog Maintenance Form with SKU Search Results
Note: This list may contain more than one item if the Manufacturer’s SKU is not unique.
5. Click the item you want to display from the list.
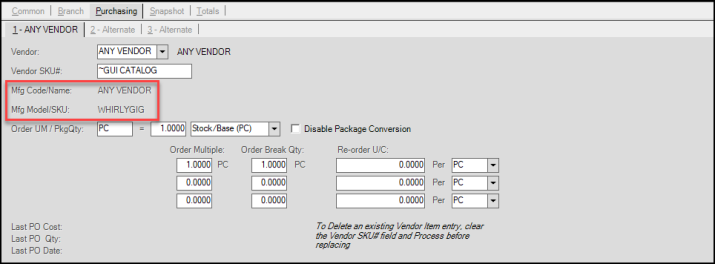
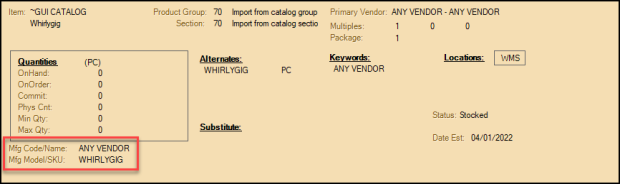
Catalog Maintenance Form with Manufacturer SKU Search Results
The Mfg Code/Name field contains a code or the name of the vendor, depending on the wholesaler’s catalog data. The Mfg Model/SKU field contains the SKU you used to perform your search; though this is more consistent across wholesalers, it won’t always be the same from one wholesaler to another.
Using the Manufacturer’s SKU Search in Item Maintenance
To search for an item using the manufacturer’s SKU in Item Maintenance:
1. From the Main Menu, choose Inventory > Database > Item to display the Item Maintenance form.
2. In the Item list, type the manufacturer’s SKU.
3. Right-click your mouse to display the context menu.
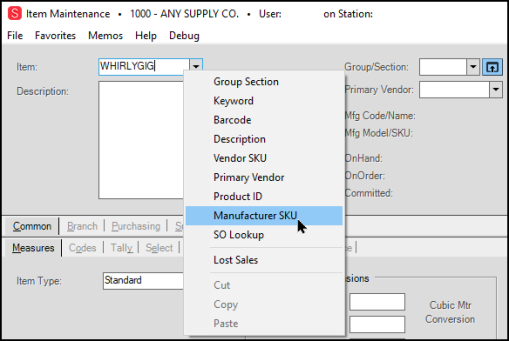
Maintenance with Item Context Menu and Manufacturer SKU Selected
4. From the context menu, choose Manufacturer SKU to begin the search.
Items matching the SKU you entered display in a list:
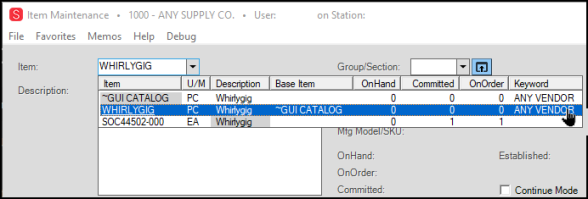
Maintenance with Item Context Menu and Manufacturer SKU Selected
Note: This list may contain more than one item if the manufacturer’s SKU is not unique.
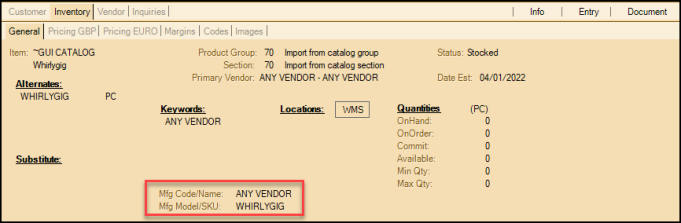
5. Click the item you want to display from the list. The item displays in the Item Maintenance form.
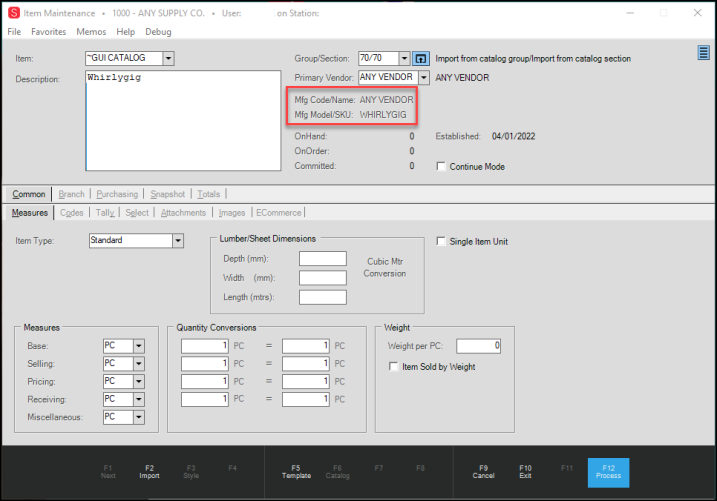
Item Maintenance Form with Manufacturer's SKU Results
6. When you click the Purchasing tab, the SKU information displays in the Model/SKU field.
Item Maintenance > Purchasing Tab with SKU Information Highlighted
Using the Manufacturer’s SKU Search in Point of Sale Data Grids
We have also added the manufacturer SKU search capability to the Point of Sale application area, to allow you to import the item by SKU from the vendor catalog. We demonstrate this feature in the Sale Entry form, but you can use this process in Order Entry, Quote Entry, Open Tickets (Advice Notices) Entry, Direct Shipments, and Charge Returns forms.
To add an item to the Point of Sale data grid using the manufacturer’s SKU:
1. From the Main Menu, choose Point of Sale and Sales to display the Sale Entry form.
2. In the Name field, choose the customer you want to initiate the sale for from the list. The data grid displays.
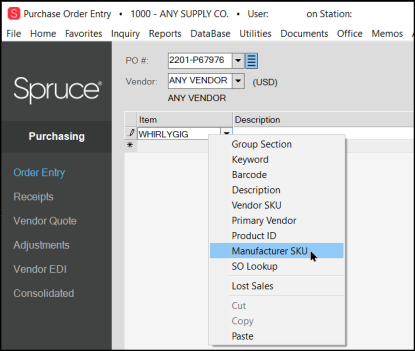
3. In the Item list, type the manufacturer’s SKU.
4. Right-click the entry. The context menu displays.

Sale Entry Form with Context Menu
5. Choose Manufacturer SKU from the list to begin the search. The search results display below the data grid.

Sale Entry Form with Search Results Displaying
6. Choose the item in the list that the customer is purchasing to populate the data grid.
7. Complete the entries in the data grid (Quantity, U/M, etc.).
Note: Before you move to the next row, you can review the details of the inventory item by choosing the Folders (F4) option and clicking the Inventory tab:
Sale Entry Form > Folders > Inventory > General Tab with Manufacturer's SKU Information Highlighted
8. From the Item Maintenance form, click Process (F12) to continue.
9. Click Accept Warnings if they display. The Branch List may display to allow you to choose the inventory used to fulfill the order.
Choose the branch from which the inventory should be taken and click Accept. The Sale Entry data grid redisplays.
The rest of the sale entry process continues as expected.
Using the Manufacturer’s SKU Search in Purchase Order Entry, Reports
You can also perform this search in the Purchase Order Entry form, which may be useful when it is time to replace sold items in inventory.
To search for an item using the manufacturer’s SKU (Purchase Order Entry):
1. From the Main Menu, choose Purchasing > Order Entry to display the Purchase Order Entry form.
2. In the PO # field, choose the purchase order you want to add the item to or click New to add a new purchase order.
3. In the Vendor field, enter or choose the name of the vendor that provides the SKU you are going to search for. The data grid displays.
4. In the Item field, type the manufacturer’s SKU.
5. Right-click the field to display the context menu.
Note: This SKU must be entered exactly for the search to be successful.
Purchase Order Entry Form with Item Context Menu > Manufacturer SKU Highlighted
6. Choose Manufacturer SKU from the list. A list of items that match the SKU displays.
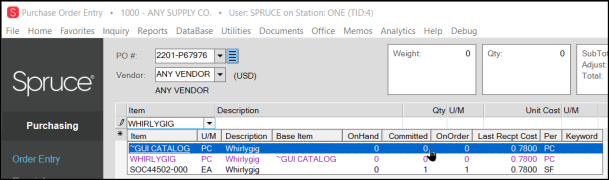
Purchase Order Entry Form with Item Context Menu > Manufacturer SKU Results
7. Choose the item you want to order from the list.
8. To view the details of this inventory item, choose Folders (F4). The General Tab displays.
Purchase Order Entry Form with Folder showing Manufacturer's SKU information
The rest of the purchase order process continues as expected.
You can also search Purchasing and Inventory reports using the manufacturer’s SKU. In the Purchase Orders Report form, type the SKU information you know in the Containing Item field and right-click the entry to display the context list. Choose Manufacturer SKU from the list and the application finds the matching POs in the system. If the application finds more than one item that matches your search entry, multiple items display in the list.
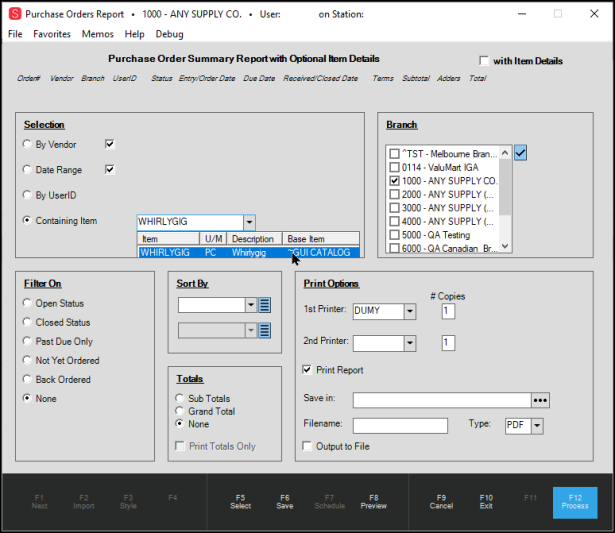
Purchase Order Reports Form with Containing Item using Manufacturer's SKU
For Inventory Reports, you use the same field list, Containing Item, to type in the SKU. Then, right-click to display the context menu and choose Manufacturer SKU. A list of options display and you can choose the one in the list to find the inventory records you need.
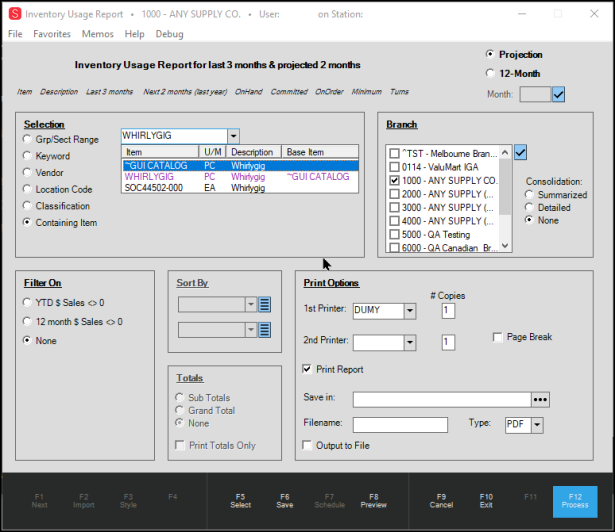
Inventory Usage Report with Manufacturer SKU Results
Support for Orgill FanBuilder Provides Custom Branded Rewards Program
E-11702 - The FanBuilder program allows businesses using the Orgill distributor to create a locally-branded rewards program for your customers. We show you how to take advantage of this program and generate additional sales in this release.
Businesses that sell Orgill Wholesale Distribution products now have access to the Orgill FanBuilder Loyalty Program, which allows you to provide coupons/reward benefits to your customers using your business’s custom branding. Your customers can sign up for the FanBuilder rewards program during the point of sale process or on the Orgill company website, by providing information including their email address and/or mobile number.
As these customers buy Orgill products at your authorized branch, the application uploads purchasing records to Orgill. When the customer earns enough points, Orgill sends the coupons you design to the customer for their use in the branches you have enabled. Customers can choose to receive these coupons via email or SMS, and they can always access them in the FanBuilder portal. Customers can then use these rewards to buy more products in the store and the application validates them during Point of Sale processing. We send and retrieve customer data, coupons, and sales history throughout the day based on your specified schedule.
Cashiers can sign the customer up during the sales process, validate the coupons/rewards presented during the POS process, and apply coupons/points to the customer’s sales purchases. You can track customer purchases and look up the customer’s program membership in the application.
There are three parts to the FanBuilder program setup:
1. Parameter setup.
Your ECI Implementation or Support team sets up the parameters for the feature in the application. Use the steps in Helping ECI Set your FanBuilder Parameters to create a rewards program according to your needs.
2. Create a Rewards Coupon template.
Create a new template item, to ensure that your coupons meet your systems criteria. Use the steps in Creating a Coupon Template.
3. Set up each branch.
After the first two steps are complete, follow the instructions in Setting up FanBuilder for a Branch for each branch at which you want to offer rewards. You can offer different rewards at different branches.
Helping ECI Set your FanBuilder Parameters
Your ECI Implementation and Support team members can set this feature up for you, according to your needs but you need to provide them with the following information:
-
Your Orgill GlobalSystemID code
This code uniquely identifies the business to the wholesaler. Typically, this is your Orgill customer code. ECI will encrypt this information for your privacy and protection. -
Your Orgill Password
Reach out to Orgill to obtain a unique password for this program. Your ECI team member needs this information to complete the setup process. This password will be encrypted to ensure your privacy and protection. -
Your ECI vendor code for Orgill
This is the Orgill vendor code that you use in the application. This is used to sync sales and customer data between the application and the Orgill system. -
Brand Name for your rewards program
This entry defaults to Orgill FanBuilder. But you can name this program anything that you feel promotes your business best. It could be something like, Joe’s Hardware Rewards or Big Bonus Points, etc. -
Program offer display timing
You decide if and when, during the Sales process, the rewards prompt should display. Options include: At the Beginning, At the Beginning and End, At the End, or Never. In addition, the cashier can use <Ctrl-R> (short for “Rewards” to pop up the window at point of sale. Let the ECI team member know what works best for you. -
Coupon Prefix Code
You can choose a prefix code for the coupons, to help group them together in inventory. Typically, the coupon prefix is three to eight characters. (The default is FBR.) The application adds the prefix you choose to each incoming coupon you create on the Orgill website.
Understanding FanBuilder Coupons
B-94343, B-95730 – You create the coupons the application uses on the Orgill website, which sends them through the EDI transmission process to the application. When Orgill sends the new coupon you created on their site, the data is loaded into a coupon template, to ensure the new record contains the data needed to process the coupon successfully. The new coupon is shared with the branches that you have enabled to use these rewards. These coupons are stored in the authorized branches’ inventories.
You also make changes to your coupons (such as new value, percentage off/dollar amount off, duration dates, quantities allowed, etc.) on the Orgill site. When the application retrieves the updated coupons, the system compares the incoming records to existing inventory to see if they are the same (to prevent duplicates).
The application checks the Inventory SKU (including your business-specific prefix) and the FanBuilder Coupon SKU.
-
If the new data does not match an existing coupon, the application adds the new coupon to the inventory.
-
If the new data matches an existing coupon in Inventory and Coupon SKU but has different settings (different dollar amount or expiration date, for example), the new coupon replaces the old coupon in inventory.

FanBuilder Coupon Sample
These coupons are then available for any FanBuilder program-enabled branch. If you do not enable a branch, the coupons will not be in the branch’s inventory and the customer cannot use them at Point of Sale. If a branch is enabled subsequently, contact Orgill to ensure that the branch receives the existing coupon updates.
When a customer qualifies for a coupon, Orgill sends them the coupon either through email or mobile phone number, which they can redeem at the enabled branch location(s). Valid coupons are also always available in the FanBuilder customer portal. Cashiers scan the barcode on the coupon and validate it in the application. If the coupon is valid, has not expired, and the transaction meets the qualifications of the coupon, the application applies the discount to the transaction. Cashiers can also add the coupon by typing in the coupon SKU, which is beneath the barcode.
You can retrieve these coupons manually using the process described in Sending and Receiving FanBuilder Data Manually. If the Orgill system is down, or there is some other communication issue that prevents the coupon’s validation, your business can choose to validate the coupon or refuse it.
-
If you choose to accept the coupon, the application will check the validity of the coupon the next time the EDI process completes. The coupon may be validated or it may not.
Rewards Coupons Rules
After a customer has signed up for the program and you have setup the coupons both on the Orgill system and stored them in branch inventory, the customer can redeem them during the sales process. There are a couple of rules for FanBuilder coupons:
-
Customers can redeem coupons in the Sales Entry form only (not Orders, Direct Shipments, etc.)
-
Coupons cannot be redeemed if there are no products in the transaction
-
Customers cannot use duplicate coupons in the same transaction
-
Customers cannot use more than one percentage-off coupon within the same transaction
-
The application can only process valid coupons on a transaction:
- Customer must be enrolled in the Rewards program
- Sales details must meet the criteria of the coupon. For Example: If the coupon has a minimum amount, the transaction must reach that amount.
- When a coupon is not valid, the application displays a message explaining the problem.
-
Coupons are validated both during the sales entry process and the transaction processing task
-
Rewards are set up by branch and a coupon must be in the branch’s inventory to be valid
IMPORTANT: In the unlikely event that the connection with the Orgill API is down during the transaction, the transaction can be processed . A popup message displays giving the cashier notice that they can either apply the coupon or reject it. Make sure your cashier knows how you want them to handle these situations.
Creating a Coupon Template
B-95730, B-94216 – Before you can complete the Branch setup process for the FanBuilder program, you need to create a coupon template that contains the required coupon details. This ensures that the new coupon contains the data needed to process a FanBuilder rewards transaction. Coupons are usually based either on the percentage of the amount purchased or a specific dollar amount. When the coupon is based on a percentage, the amount of the discount changes when the total changes, whether the change is an item reprice or a change in quantity. Additional adders applied to the transaction may also affect the amount of the coupon discount.
The application uses this template to validate the coupons you create on the Orgill website.
To create a FanBuilder coupon template:
1. From the Main Menu, choose Point of Sale > Database > Item to display the Item Maintenance form.
2. In the Item field, type the name of the coupon template for the Rewards program and press Enter.
3. In the Common > Measures tab, in the Item Type list, choose Rewards Coupon.
4. In the Common > Codes tab, choose among the following options:
-
Taxable Yes or No.
This option is not required, but you may want to consider this option for all coupons. -
Track QTY On Hand = No
This setting is required. -
Description Required = Y
This setting is required.
5. In the Common > Tally tab, choose Not a Tally Member.
6. In the Branch > Codes tab, choose the following options:
These selections are required.
-
Stocked = Y
-
Disabled = N
7. When you have completed these entries, click Process (F12) to save the template.
Setting up a Branch for the FanBuilder Program
B-94214 – After the parameter setup is complete and you have created your coupon template, you can enable the Branch settings for the FanBuilder program. Complete these settings for each branch at which you want to accept coupons and track rewards.
To enable the FanBuilder program for a branch:
1. From the Main Menu, choose Maintenance > Database > Branches.
The Branch Setup form displays.
2. From the Branch ID field, choose the branch you want to set up. The branch details display.
3. Click the EDI tab.
4. From the Settings For list, choose Orgill. The Orgill options display.
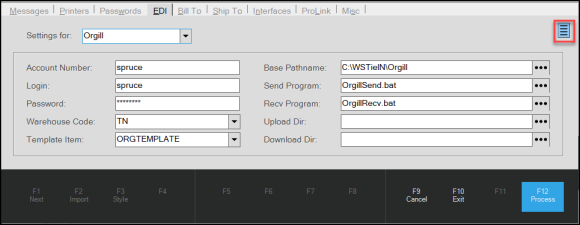
Branch Setup Form > EDI Tab with Orgill Settings
5. Click the local menu marker  to display the "Orgill FanBuilder" option.
Note: If you chose a branding name for your FanBuilder program, this name appears in the list instead.
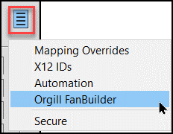
Branch Setup Form > EDI Tab > Local Menu
6. Choose the Orgill FanBuilder (or branding name) option. The Orgill FanBuilder Settings display.
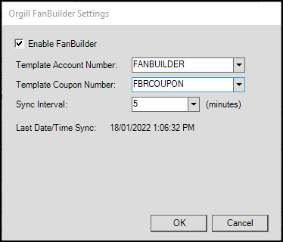
EDI Tab > Orgill FanBuilder Settings
7. Complete the entries in this box and click OK.
These entries are required to ensure successful FanBuilder transmissions for the branch.
-
Enable FanBuilder
Click this check box to enable the FanBuilder program for the branch. -
Template Account Number
Select the template account associated with the Branch from the list. -
Template Coupon Number
Select the coupon template inventory item that the application uses to create new item records for rewards coupons.
Note: This is the template you created in Creating a Coupon Template. -
Sync Interval
Choose the frequency for sending FanBuilder data to and from Orgill. The default is 5 minutes. -
LastDate/Time Sync
After you specify the Sync Interval, this read-only field will display the last FanBuilder transmission date and time. You may need this to troubleshoot potential issues.
After you click OK, the Branch Setup form redisplays.
8. Click Process (F12) to save these changes.
9. Follow these steps for each additional branch that you want to participate in the program.
Reviewing a Customer’s Enrollment in the Loyalty Program
B-94219 – When the Orgill FanBuilder setup is complete and customers sign up for the loyalty benefits online, the business can look up the account’s program status in the application.
To look up an account’s FanBuilder Program status:
1. From the Main Menu, choose Point of Sale > Database > Account. The Account Maintenance form displays.
2. Find the account you want the FanBuilder Program status for.
-
In the Account list, type the name, account ID, or other customer-specific data.
-
Press Enter. A list of one or more options displays.
-
Choose the account you want from the list.
3. When the account displays, click the Loyalty tab.
There is a new tab called Orgill FanBuilder (or the your local branding name).
4. Click the Orgill FanBuilder tab (or custom brand name) to show the account’s participation status. Options are either Registered or Unregistered.
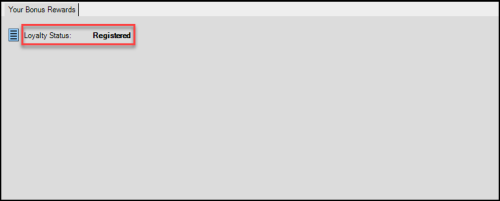
Account Maintenance Form > Loyalty Tab > Loyalty Status
When the enrollment is complete, you can see the account contact for the loyalty program on the Contacts tab. The person who enrolls the company in the program is added by default. Anyone else who registers who has an existing account is added as a contact too.

Account Maintenance – Contacts Tab – Loyalty Program Entry
Signing a FanBuilder Customer up at Point of Sale
B-94242, B-94342 – Cashiers can sign customers up for your FanBuilder program through the in-store process or customers can use the Orgill site. When customers sign up for your rewards program online the application retrieves the data and uses the name, email address, and mobile phone number to see if it matches an existing customer account. If the account cannot be identified, the application uses a template to create a new customer account. This allows the application to track the sales and points information and send it to Orgill. After this account setup process is complete, the customer can begin collecting rewards points.
When an existing customer updates their account information online, the EDI process collects the changes and updates the customer’s designated FanBuilder contact record in the existing account. If the account does not have a loyalty contact, the application adds the new contact record to the account. Conversely, when these changes are made during the in-store sales process, the contact record information is uploaded to Orgill based on your sync interval.
Note: The timing of the rewards program prompt is set during the parameter process based on the prompt type you specified (Beginning, Beginning and End, End, or Never).
To sign up a customer for your rewards program during the sales entry process:
1. From the Main Menu, go to Point of Sale > Sales.
At some point during the process, either the sign up prompt displays or the cashier can use the (Ctrl + R) key combination to display the sign up prompt:
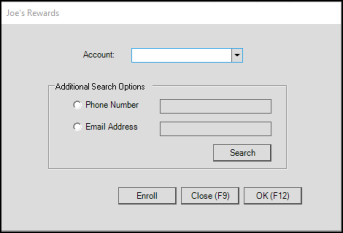
Orgill FanBuilder (Brand Name: Joe's Rewards) Prompt
2. Click the radio button to add the customer's phone number or email address in the fields provided.
3. With the phone number, or email address entered, click Search.
The application searches for matching account information and displays the results in a list.
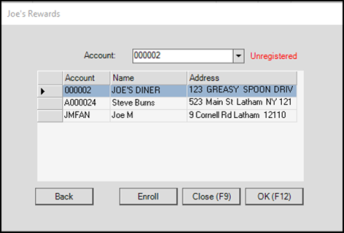
Orgill FanBuilder (Brand Name: Joe's Rewards) Search Results
4. Do one of the following:
-
If the account is registered, select the registered account from the list and click OK.
Then, complete the transaction as you normally would to add the points to the customer’s account. -
If the customer decides not to sign up for the program or chooses not to continue, click Close.
Then, complete the transaction as you normally would. -
If the wrong account information displays, click Back and enter a new account number and try again.
-
If the account is unregistered, select the new account name from the list and click Enroll and continue to the next step.
-
If the account is new, click Enroll without selecting a matching record to continue to the next step.
5. After you click Enroll, the Customer Information box displays. Complete these fields with the information the customer gives you:
Note: These fields are all required.
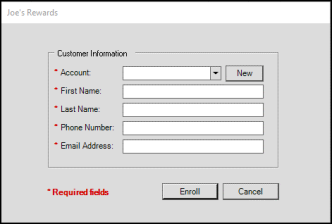
Orgill FanBuilder (Brand Name: Joe's Rewards) Customer Information Box
-
Account
If you selected the account from the previous list, the account number displays. If the account does not exist, click New and the application will generate a new account number. -
First Name/Last Name
Enter the customer’s first and last names in the fields provided. -
Phone Number
Enter the customer’s mobile phone number in the field provided.
Note: This must be a mobile phone number as Orgill will send SMS communications to this customer using this number. -
Email Address
Enter the customer’s email address in the field provided.
6. When you have completed these entries, click Enroll. From here, you can complete the transaction as you normally would.
Accepting a Customer’s Coupon/Rewards at Point of Sale
B-95257 – During the check-out process, if the customer has a coupon to redeem, they can present it to the cashier at their station. The cashier can either scan the coupon barcode or enter the coupon code (located below the barcode on the coupon) manually in the Item column of the data grid. It makes sense to enter all items associated with the sale before scanning or entering the Rewards coupon, to ensure the system can validate the coupon properly. Only one percentage coupon can be used per transaction. (For a complete list of coupon limitations, see Rewards Coupons Rules.) Changes to the transaction after the coupon is added (quantity, other adders, repricing actions) may result in changes to the amount of the coupon discount, depending upon the type of discount the coupon is for. In this way, this coupon is no different from other coupons the cashier might see at check out.
Note: If you add adjustments to a transaction that has a FanBuilder coupon, the coupon discount will not change if the adjustment(s) is (are) set to non-discountable.
Removing an Account’s FanBuilder Registration
B-96852 – If a customer decides that they no longer want to receive rewards through the FanBuilder program, use these instructions to remove their registration:
To unregister an account from the FanBuilder program:
1. From the Main Menu, go to Point of Sale > Database > Account to display the Account Maintenance form.
2. In the Account list, search for the account you need to remove the FanBuilder registration for. The account details display.
3. Click the Loyalty tab and the FanBuilder subtab (or the business’s brand name). The loyalty status of the account displays.
4. Right-click the menu marker  to display the Unregister option.
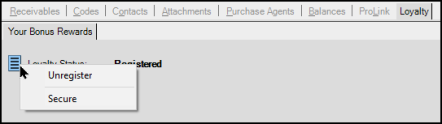
Account Maintenance Form > Loyalty Tab > <Your Rewards Program Name Tab > Contact Menu
5. Choose Unregister to unregister this account from the rewards program.
Note: After you select this option, the account will not be able to use rewards, even if they have earned them. A confirmation message displays.
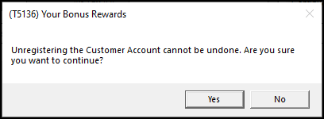
Unregister Confirmation Message
6. Do one of the following:
-
Click Yes to unregister the account from the FanBuilder program.
-
Click No to keep the account registered in the FanBuilder program.
7. If you make a change to the account, click Process (F12) to save the change.
Sending and Retrieving FanBuilder Data Manually
B-94206, B-94331, B-94332, B-95173, B-95257 – The core of the FanBuilder Rewards program is the sharing of customer information between your business and Orgill. When customers sign up for your rewards program during the sales process or make changes to their cell contact information remotely, it is essential that the application send/retrieve this information to keep the data in sync. Work with your ECI team to ensure that the setup for the FanBuilder program is complete.
The application sends and retrieves information from Orgill on a schedule you set up by branch (in the Sync Interval field in Orgill FanBuilder Settings box). Typically, the application sends and retrieves coupon and customer information every 1 -15 minutes. The application sends sales transaction and coupon redemption information every minute.
The process below describes how the application receives customer and coupon change updates, etc. and how you send updated customer transaction information and account information to Orgill. You can also send and receive FanBuilder data manually using the instructions below.
To transmit or retrieve Orgill FanBuilder data manually:
1. From the Main Menu, choose Purchasing > Vendor EDI. The Vendor EDI Communications form displays.
2. From the EDI Interface list, choose Orgill.
3. From the Vendor list, choose your Orgill vendor ID.
4. In the Options box, choose Extras to display the Function list.
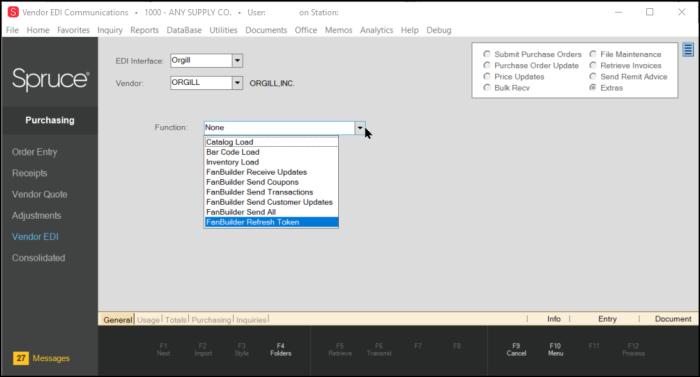
Vendor EDI Communications Form > Extras Options > Function List with FanBuilder Send Options
5. From the Function list, choose one of the following, based on the type of manual data transmission you want to start:
-
Catalog Load
Click this option to retrieve Orgill’s entire inventory list, including all SKUs and pricing information. -
FanBuilder Receive Updates
Click this option to retrieve updated customer registration information from Orgill. Typically, you select this option when a customer has informed you that they have signed up for the rewards program, but the application does not have this record. -
FanBuilder Send Coupons
Click this option to send redeemed coupon information to Orgill. -
FanBuilder Send Transactions
Click this option to send transaction information to Orgill. -
FanBuilder Send Customer Updates
Click this option to send new customer information to Orgill. -
FanBuilder Send All
Click this option to send all transactions, updates, and redeemed coupon information to Orgill. -
FanBuilder Refresh Token
Click this option to reset the access token that Orgill uses to identify your Business. You might do this if there have been errors in the transmission process.
The Transmit (F6) or Retrieve (F5) option, as appropriate, enables when you complete this selection.
6. Click Transmit (F6) or Retrieve (F5) to initiate your request.
When you retrieve data from Orgill, the application updates the internal Contacts tab of the Account Maintenance form to add the cell phone or email information for the enrolled customers. The Loyalty > Orgill FanBuilder tab displays the status of the customer’s participation (see Reviewing a Customer’s Enrollment in the Loyalty Program). When the application retrieves new customer information, it applies a template to the account, adds the new record, and set the FanBuilder status as Registered. The application maintains a log of these Orgill updates in the EDI Log Inquiry form so you can review these updates when you need to. This log and how to access it is discussed in the next section.
Reviewing the FanBuilder Messages in the EDI Log
The EDI Log shows you dated, detailed lists of the messages the application has sent and received from Orgill, both those sent manually and those that are scheduled. These transmissions show the details of the data sent/received, including customer registrations, updates to coupons, account and transaction updates. The Log Entries column shows you the overview of the events that have occurred for the date you choose. You can choose the amount of detail that displays in this list by asking your ECI team to change the logging level in the system parameters.
To see the EDI log:
1. From the Main Menu, choose Purchasing > Inquiry > EDI Log. The EDI Log displays.
2. To see the log entries for a particular date, click the + character next to the date.

EDI Log with Details
The Messages section shows the details of each change transmitted or received into the application.
B-94240 – Deleting an Account Deletes FanBuilder Records Too : When you delete a customer account in the Account Maintenance form and the account has FanBuilder data associated with it, the application creates an EDI event that deletes customer’s FanBuilder data from your system. Deleting the rewards information updates the Orgill database to remove the data there as part of the process.
B-94333 – Merging or Changing Account Numbers : When you merge two customer accounts or change an account number for some reason, the application preserves any FanBuilder rewards and coupons associated with these accounts in the new account. The EDI process sends these changes to the Orgill system to ensure these merged and updated records are updated to preserve reward balances and coupons. There are no changes to the way you perform the account and job merge processes. You can update the Orgill system manually if this change is urgent, by following the instructions in Sending and Receiving FanBuilder Data Manually.
B-94341 – Cannot Delete/Merge/Rename Orgill Vendor Code when used in FanBuilder Program Setup : When you set the vendor code for the FanBuilder program in the Setup > EDI > Orgill FanBuilder parameter form, the application does not allow you to delete, merge, or rename the vendor code. Since this code is central to the operation of the program, if you try to change or remove this vendor code, this change would prevent the successful data synchronization process. When you attempt to make this kind of change, an error message displays:
-
The selected Vendor is assigned as the Orgill FanBuilder <Branding Name> Data Synchronization code, and cannot be deleted, or
-
The selected Vendor is assigned as the Orgill FanBuilder <Branding Name> Data Synchronization code, and cannot be renamed/merged.
B-95442 – FanBuilder Program Security Token Storage Established : Orgill itself will manage most of the data in the FanBuilder Program, using the information the application uploads about customer purchases, and sending receipts and points information to the customer. The application maintains an access token with a 24-hour expiration window to ensure that the transmissions are secure. This token is unique to your business’s system. The application retrieves the new token whenever needed to maintain this connection. You can also use the manual EDI transmission process to refresh the current token.
B-95832 – Points Deducted when Reversing a FanBuilder-Associated Transaction : When you reverse a customer invoice that had FanBuilder points associated with it, the application sends a negative transaction to the Orgill site to remove the rewards points that the Customer earned with the transaction.
New Default Invoice Re-Printing (F8) Option
E-12250 - We are re-purposing the F8 key to allow cashiers to reprint of the latest transaction in all Point of Sale forms. See New Default Invoice Printing Option for an Account/Job (F8 Key). Businesses have asked us to give them more control over printing/sending invoices during Point of Sale process. There are two new features in this project:
-
In the Point of Sale application area, cashiers can use the Reprint F8 key to reprint the receipt for the station’s last transaction. This includes Sale Entry, Order Entry, Quote Entry, Open Ticket Entry, and Charge Return transactions. This option is disabled if the cashier changes the transaction from one type to another (such as Quote to Order, etc.).
Note: After the cashier moves on to the next transaction, they cannot reprint the receipt from the previous transaction. -
You can remove all POS Invoice Delivery methods for an account/job so the system does not attempt to print or send an invoice automatically. These changes affect Sale Entry, Order Entry, Quote Entry, Charge Returns and Open Tickets. Follow the instructions below to set up this process.
To complete the setup to prevent the requirement of automatic POS invoice delivery:
1. Sign-on (login) to the application as an administrator-type user.
These users have permission to modify the severity on task list messages with a default severity of either warning or hidden.
2. From the Main Menu, go to Point of Sale > Database > Job to display the Job Maintenance form.
3. Choose the account and the job you want to turn off the automatic invoice capability for.
4. Click the Select tab.
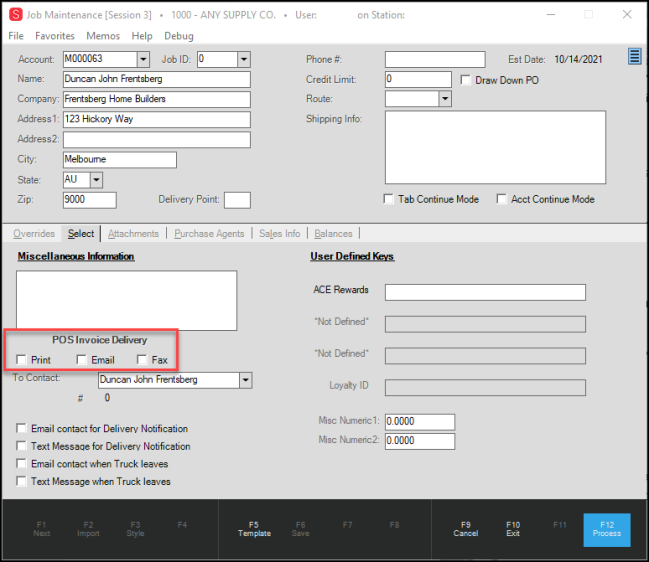
Job Maintenance Form with POS Invoice Delivery Options Highlighted
5. Uncheck each of the POS Invoice Delivery options.
6. Click Process (F12) to save the change.
Note: A warning message displays.
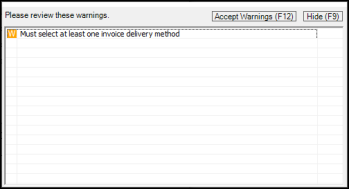
Job Maintenance Form - Delivery Method Warning Message
7. Right-click this message to display these options:
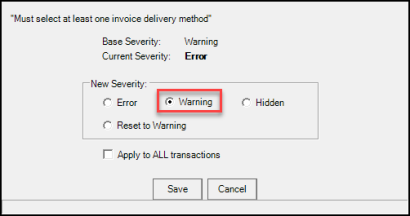
Message Settings
8. Choose the Warning option.
Note: You can also make this change in message severity by going to Maintenance > Database > Messages.
9. Consider whether you want to turn off the delivery method settings for all of this job’s transactions:
-
If Yes, click the Apply to ALL transactions check box and continue to the next step
-
If No, continue to the next step
10. Click Save. The Delivery Warning Message box redisplays with the W set.
11. Click Accept Warnings to move on. The Database updated message displays.
12. Click Exit and return to the Main Menu.
13. From the Main Menu, go to Maintenance > Database > Devices to display the Device Maintenance form.
14. Click the Printer radio button.
15. In the Device Name list, select the printer you do not want to print invoices from.
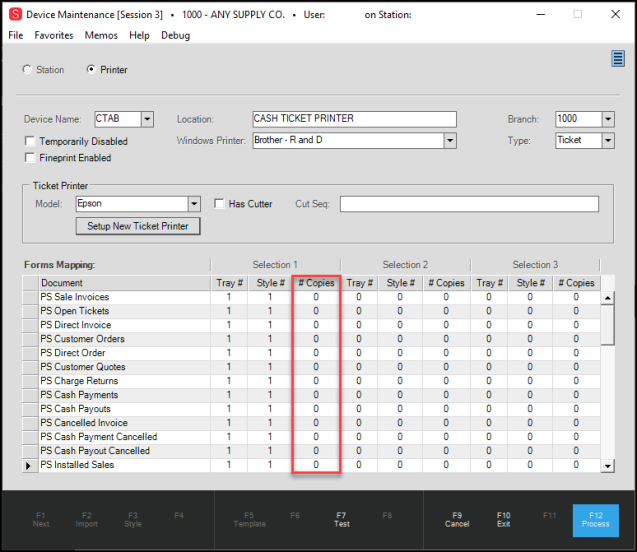
Device Maintenance Form with Number of Copies Column Highlighted
16. In the # of Copies column, type 0 for the types of documents you do not want to print, particularly Sale Invoices, Open Tickets, Customer Orders, Customer Quotes, and Charge Returns for the documents you do not want to print. When you set your printer copies option to 0, the system unchecks the Print Document option on the Point of Sale Processing form.
Note: The cashier can override these print setting to print a document using the Print tab options, at the customer’s request.
17. Optional: If you decide you do not want to print tickets of a particular type at a particular station, you can reset the default printers for that station using the Station settings in Device Maintenance as well. This is not required.
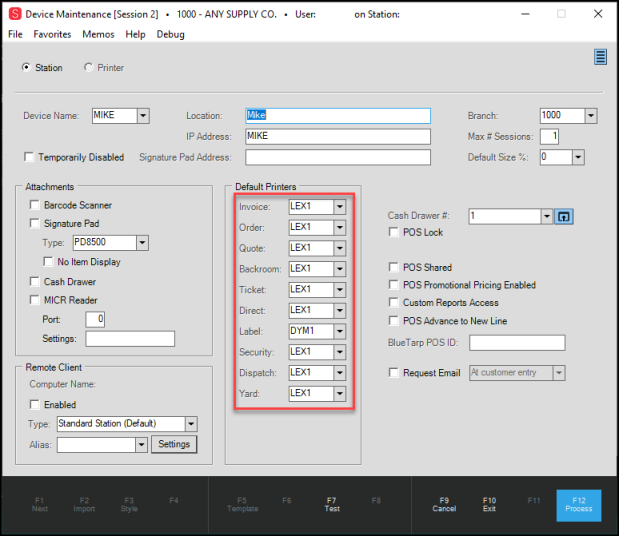
Device Maintenance > Station Settings > Default Printers Highlighted
18. When you completed your selections, click Process (F12) to save these settings.
New Controls for Managing Item Price Changes at Point of Sale
There are new tools for managing which employees can change restricted item pricing at the Point of Sale.
New Functionality Allows Business to Ignore Price Groups for Price Leader Products
B-89834 – We have added a new check box that allows you to exempt a product from a price group when the item is popular and competitively priced. In these cases, you may want to avoid discounts because you might accidentally price a product below your cost.
To exempt an inventory item from a price group:
1. From the Main Menu, go to Inventory, Database > Item and select the item you want to exclude from the price group it is assigned to.
2. Click the Codes tab to display the Ignore Price Groups check box.
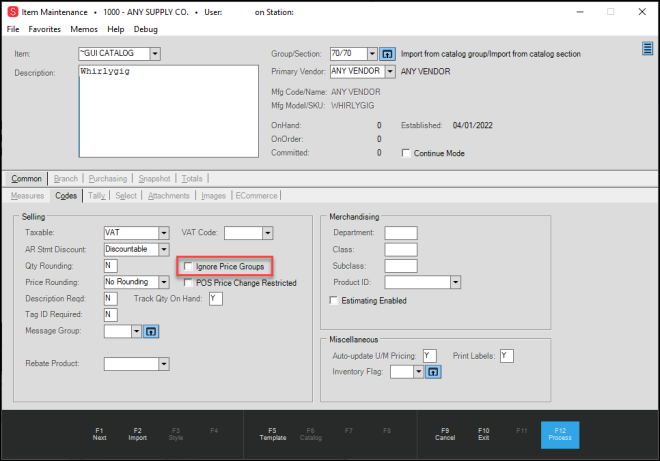
Item Maintenance Form > Codes Tab > Ignore Price Groups Highlighted
3. Click the Ignore Price Groups check box to exclude the current item from repricing due to price group membership.
4. Click Process (F12) to save the setting.
Note: When you import an item that you have added the Ignore Price Groups option to, the application remembers this setting and sets this option for the incoming inventory as well.
Changing Settings for New Pricing Options Globally
B-97137 – If you decide later you want to change the pricing settings of items you have restricted (either by Ignoring Price Groups or with the POS Price Change Restricted check boxes), you can make this change globally in the Item Global Modify form. This change will check or uncheck the boxes in the Item Maintenance form for these items and prevent or add these settings during the import process too.
You can make this change for catalog groups, for vendors, or by branch if you want, using the settings in this form. We show you how to use this form to modify the settings for one item only.
To reset the options for items with the Ignore Price Groups option selected:
1. From the Main Menu, go to Inventory > Utilities > Maintenance > Item Global Modify to display the Item Global Modify form.
2. From the Field Name list, choose Cmn – Ignore Price Groups.
3. In the Item field, enter the information for the item you want to change and press Enter.
The data grid updates to display the current Ignore Price Groups setting for the item.
Currently, this item’s Ignore Price Group’s setting is Y, which indicates that the application is ignoring price group settings for this item.
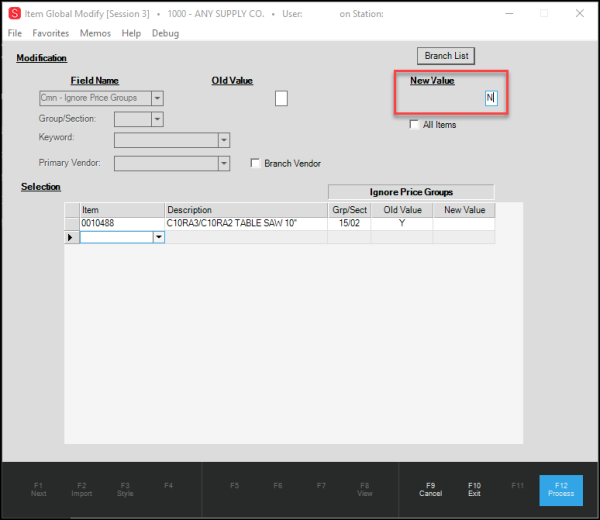
Item Global Modify with Ignore Price Group Option and Item Option Displaying
4. To change the Ignore Price Groups setting for this item from Y to N, type N in the New Value field.
5. Click Process (F12) to save this change.
You can use the same process to change the POS Price Change Restricted setting for the item by selecting Cmn – POS Price Change Restricted from the Field Name list instead.
Restricting Item Price Changes at Point of Sale
B-89826, B-89827, B-97137 – Your business can now choose which items can be price restricted and which employees can change restricted items at Point of Sale. A new set of options allow business owners to choose which items are price restricted and which employees can lower the prices of these restricted items sold during a transaction. Keep in mind that specific customers may have customer or contract discounts that apply to these restricted items and those discounts remain in place. Additionally, if a restricted employee tries to perform a manual reprice of a restricted item and the discount does not go below the extended price of the restricted item, the discount will remain in the transaction. You can lift these restrictions (on the item or the user record) at any time.
There are two steps to this change:
-
Adding price change restrictions to the items you want to restrict prices for
-
Adding restrictions to the employee IDs that should not change the prices for restricted items.
Note: User ID settings allow employees to make Point of Sale pricing adjustments by default.
Start by identifying the items in your inventory that should be price restricted.
Adding a Price Change Restriction to an Inventory Item
To restrict the POS price changes for an item in inventory:
1. From the Main Menu, go to Inventory > Database > Item to display the Item Maintenance form.
2. From the Item list, choose the item you want to restrict the price change for and press Enter.
3. Click the Codes subtab.
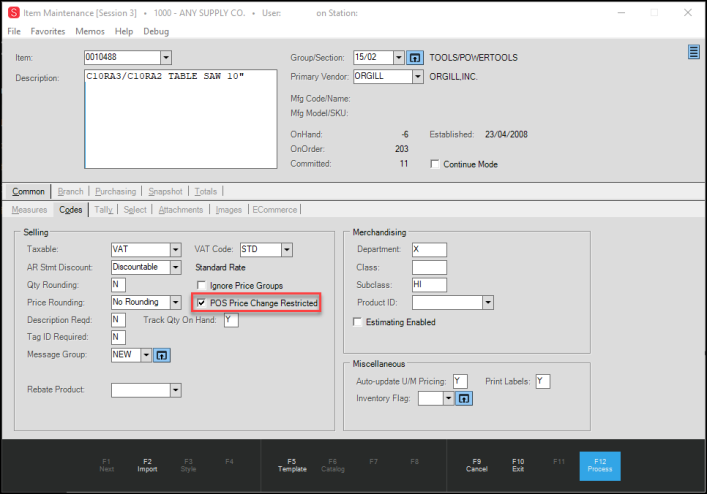
Item Maintenance Form > Codes Tab with POS Price Change Restricted Highlighted
4. Select the POS Price Change Restricted check box to prevent the restricted user from lowering the item price.
Note: You may also want to consider selecting the Ignore Price Groups check box if you want to use the price listed in the maintenance form without applying price group discounts.
5. When you have completed these selections, click Process (F12) to save these changes.
Note: When you import an item that you have added the POS Price Change Restricted option to, the application applies this setting and sets this option for the incoming inventory as well.
Adding Price Changing Restrictions for Users
The application allows employees to change the prices of all items during a Point of Sale transaction by default. To change this setting for a particular group of employees, use these instructions.
To add item pricing restrictions to an employee ID:
1. From the Main Menu, choose Maintenance > Database > User IDs to display the User ID Maintenance form.
2. On the Security Options tab, click the Application Security![]() button. The POS Permissions List Code Maintenance list displays.
button. The POS Permissions List Code Maintenance list displays.

POS Permissions List Code Maintenance with Change Restricted Prices at POS Highlighted
3. In the Code field, choose the user group you want to restrict from making these changes (ALL is selected by default).
4. Scroll down the list and uncheck the Change Restricted Item Prices at Point of Sale check box and click Apply. The Database Updated message displays.
5. Click Return to redisplay the User ID Maintenance form.
6. Close the User ID Maintenance form.
After you make this change, employees who area allowed to change restricted items at Point of Sale see a warning message in the Task List if they process a transaction when they have changed the price of a restricted item. The message shows them which item(s) were changed that were restricted so they can fix it, if needed:
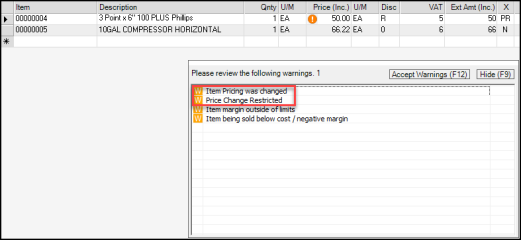
Item Pricing Warning Messages
When an employee with “Change Restricted Item Prices at POS” enabled changes the price of a restricted item at Point of Sale, an entry displays on the End of Day Exceptions Report with a new Exceptions code of “R” (Restricted).
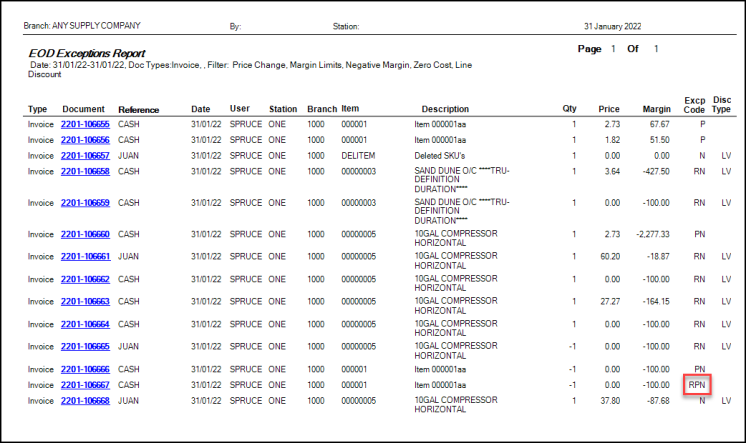
End of Day Exceptions Report with "R" (Restricted) Code Example Highlighted
Inventory Feature
Lineal Tally Enhancements Help Track Inventory and Cut Waste Better
E-11681 - We have added new tools to the lineal tally feature that help you manage cut items by tracking kerf and waste amounts and for helping you determine whether you can return child items to inventory.
In response to your requests, we are enhancing how the application tracks lineal tally materials to better account for cut lengths, kerf, waste, and to enhance the ability to return cut materials to inventory when appropriate.
Setting up New Lineal Tally Features
B-93906 – When you cut a lineal tally item, the application can return the remaining “child” item to existing stock when you set the Lineal Tally Return Remaining parameter in the Point of Sale > Settings tab. But for child items that do not exactly match a pre-defined length but can “round down” to an existing defined stock item length, there is a new setting called Lineal Tally Default to Round Down in the same parameter form. When you set this option, the application will default to returning child items that exceed a standard stock length to the nearest defined length. Selecting this check box defaults the new option to Round Down in the Lineal – Enter Qty, Length box..
For example, if you cut (2) 12’4” sections from a 40’ joist, rather than counting the remaining 15’ 4” as waste (since there is no pre-defined 15’ 4” length), the system can round down to the next-largest defined length, putting it back as a 15’ item if there is a defined 15’ length, or, if not, a 14’ item if there is a defined 14’ length, etc.
Note: Someone with administrative Point of Sale system permissions must make the parameter change below.
To set the lineal tally default to round-down option:
1. From the Main Menu, go to Maintenance > Database > Parameters > Point of Sale > Settings to display the Settings subtab:
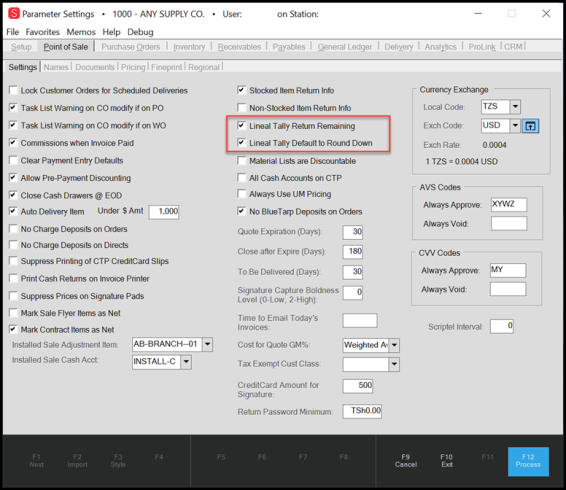
Parameter Settings > Point of Sale > Settings Tab with Lineal Tally Items Highlighted
Note: The Lineal Tally Default to Round Down check box is only enabled when you check the Lineal Tally Return Remaining check box.
2. Make sure that the Lineal Tally Return Remaining check box is selected.
3. Select the Lineal Tally Default to Round Down check box to allow child items that exceed the stocked length to be added to inventory.
4. When you have completed these settings, click Process (F12) to save the changes.
New Lineal Tally Features in Point of Sale
B-93843 – When a customer purchases a lineal tally item that requires a custom cut in Point of Sale (Sale Entry, Order, Quote, or Direct Ship), there are some new features to help you manage the resulting child materials:
-
Rounded Down Child Items to Match Existing Stock
You can now round down a remaining child Lineal Tally length to a standard inventory size, when the remaining cut piece doesn't match an existing stocked inventory size. -
Return Cut Lineal Tally Items to Inventory, after Rounding them Down
After a Lineal Tally child item is rounded down to a standard stock size, you can return it to inventory. -
Quantify the Waste Amount
When you cut a Lineal Tally item and the remaining child item is not a stock size, you can display it as a waste quantity. -
Including the Kerf Amounts in Cut Lineal Tally Items
You can account for kerf values in the remaining stock before returning it to inventory.
To process a sale of a cut length lineal tally item:
1. Follow the instructions in Setting up Support for New Lineal Tally Item Features and select the Lineal Tally Return Remaining and Lineal Tally Default to Round Down check boxes.
2. From the Main Menu, choose Point of Sale > Sales. The Sale Entry form displays.
3. From the Name list, choose the account for the sale. The data grid displays.
4. In the Item column, enter the lineal tally item the customer wants. For lineal tally items, an updated Lineal Tally box displays.
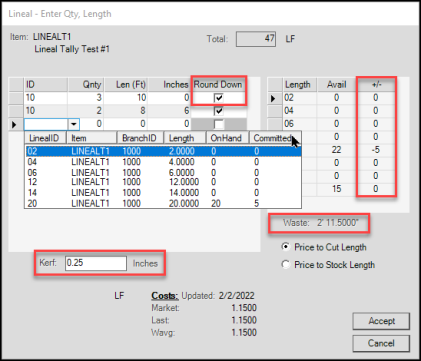
Lineal Tally Entry (Qty, Length)
New features in this box:
-
Round Down check box, reduces the remaining cut length to match the next-largest defined length, allowing it to be put back into stock.
-
Kerf field, allows you to specify the blade width that is lost when you cut a lineal tally item. You can enter kerf amounts as either a decimal or as a fraction in Imperial settings regions, but use decimal quantities only in regions that use metric values.
-
+/- (Inventory column) shows the effect the entries in this list have on the current item quantities in inventory
-
Waste field displays the amount of waste for all the defined sale quantities / lengths. This amount displays in feet, inches or meters, millimeters depending upon the regional settings.
5. In the ID list, click the down arrow to display the list of current tally lengths and choose the item you want to cut from the list.
6. In the Qty column, enter the number of items you want to cut from the defined length.
7. In the Len (Length) Ft and Inches (Cms) field, type the lengths the customer wants.
Note: This field is in metres and centimeters in regions that use metric measurements.
In the inventory table on the right, the application reduces the stock of the item appropriately.
The total amount of waste displays in the Waste field.
Kerf Note: When you enter an amount in the Kerf field , it reduces the size of the remaining cut item piece.
-
If the size of the remaining cut item matches an existing inventory item size, the application adds the remaining piece to inventory.
-
If the cut item (or rounded-down length) does not match a standard stock length, the application cannot return the item to inventory. The application displays the remaining amount as waste. See Scenarios for Returning Cut Items to Inventory to learn more.
8. To reprice the cut item, ignoring the waste amount for the purpose of calculating price, you can choose the Price to Cut Length button. This is not required. Regardless of this option, the total length of the item plus any waste is removed from the on-hand inventory, so though you can reduce the price to exclude waste, the system removes the waste quantity and its associated cost value from inventory independent of this selection option.
Note: As you click this button, the application updates the Total field to reflect the change.
9. When you have completed your entries and selections, click Accept.
The data grid redisplays, updating the Qty column with the lineal tally value from the Total field. The application multiplies the quantity by the unit price and displays the result in the Ext Amount field.

Sale Entry with Lineal Tally Item Added to the Data Grid
10. Click Process (F12) to process the sale and follow the usual steps to complete the process.
Note: This change is also available for Order Entry, Quotes, and Direct Ship transactions. The receipts/invoices and other transaction-related documents reflect the Lineal Qty, Length box measurements.
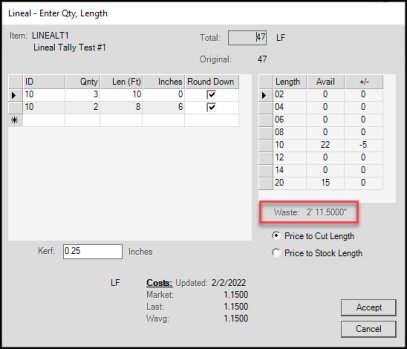
Lineal Tally Entry (Qty, Length)
Scenarios for Returning Cut Items to Inventory
We have designed these changes to help you manage your cut lineal tally items and, when possible, return them to inventory. The application can handle multiple cuts from the same lineal tally item, accounting for kerf, and return standard-sized items to inventory. So, when the remaining child pieces match or exceed current stock lengths, the application adds those items back into the inventory count.
For example, for a 15’ lineal tally item, if you cut two 6’ lengths from it, the remaining piece, after accounting for the kerf amount, would be about 2.9’. If a standard stock size for that item is 2’, the application would return the remaining piece to inventory as a 2’ item. The inventory column for the 2’ lineal tally item would display a +1 in it.
If the remaining rounded-down length does not match a stock item, but can be cut into one or more stock-sized items, accounting for kerf, the application adds those the appropriate quantity of cut items to inventory as well. For example, if the remainder of a cut item is 5 feet (after subtracting the kerf amount), and there are stock amounts of 1’ and 4’ for the lineal tally item, the application updates the inventory columns to show +1 for the 1’ item and +1 for the 4’ item to inventory.
The Lineal – Enter Qty, Length box also displays the amount of waste for cut items that the application cannot return to inventory. The Waste amount is cumulative, so as you add more cut items to the table, the application keeps track of the total amount of waste that cannot return to inventory.
Other Lineal Tally Updates
B-93835 – Decimal Length Values Supported for Metric Lineal Tally Items
In regions that support metric measurements and quantities, we have expanded support for decimal values for lineal tally items in the Item Maintenance form and in Point of Sale data grids. We have expanded the Length fields to accommodate this change. The application does not allow duplicate metric values for the same lineal tally item.
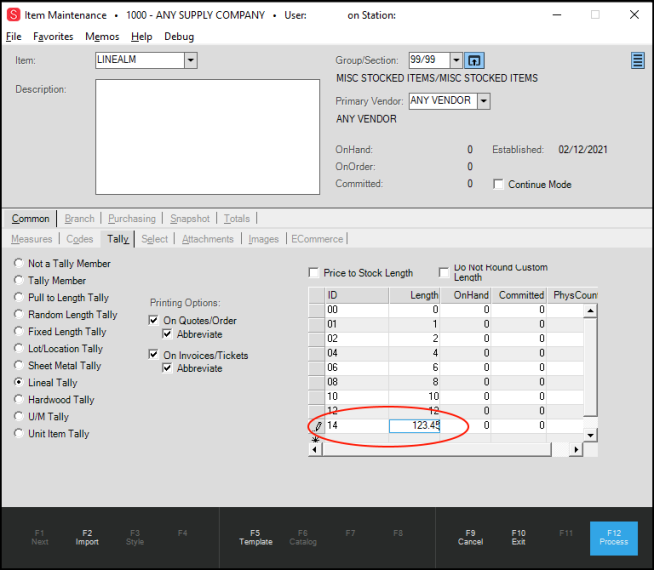
Decimal values will also display in the Point of Sale data grids as they were added to inventory.
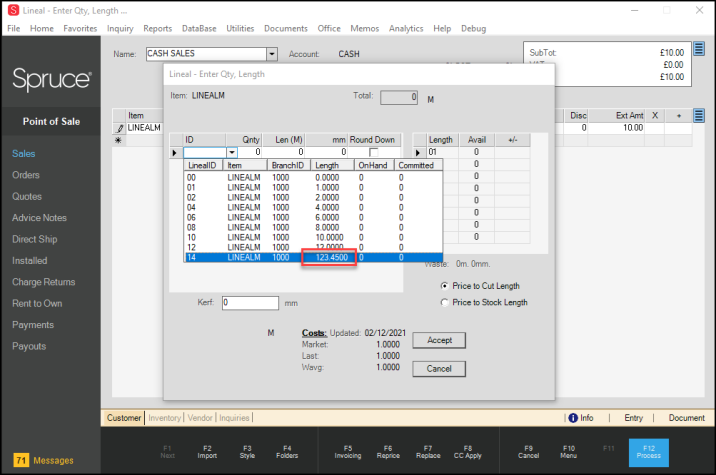
Sale Entry Form with Lineal Tally Detail (Showing Decimal Value Entry)
D-75635, D-76268 – Corrected: Final Lineal Tally Order Quantities Reflected Whole Job Numbers When Order was Closed.
When invoicing the last lineal tally order for an order with multiple lineal tally line items, the final sale of that order reduced the lineal tally inventory by the entire order quantity rather than just the remaining tally items. To correct this issue, the application makes sure that the lineal tally items that have already been delivered/sold no longer appear in inventory when the final order is applied.
D-76344 – Lineal Tally Items No Longer Include Committed Quantities in Adjusted Orders.
In the past, when a customer placed a lineal tally item order, and you adjusted the order quantity later, the Quantity on Hand still reflected the original lineal tally amount, as if it had already been removed from inventory. Customers reported that this was confusing. To correct this issue, when you adjust a lineal tally order, the application backs out the original order quantity before adding the new order quantity. This practice ensures that the application accurately reflects the inventory quantity on hand.
D-76345 – Corrected: Metric Lineal Tally Items No Longer Showing Imperial Units in Order Documents.
We have resolved an issue occurring with metric lineal tally products displaying with Imperial length symbol notations. We have modified the code to refer only to the original tally unit settings, which will display metric lengths only.
B-96884 –Measurement Symbols Updated Throughout the Application.
For regions that use Imperial measurements, we have updated the measurement symbols used to indicate feet (‘) and inches (“) throughout the application. For regions that use metric measurements, we have updated the measurement symbols to use to show meters (M) and millimeters (mm). You can see these changes in Point of Sale and Purchasing documents, receipts, and any selection boxes that involve specific lengths.
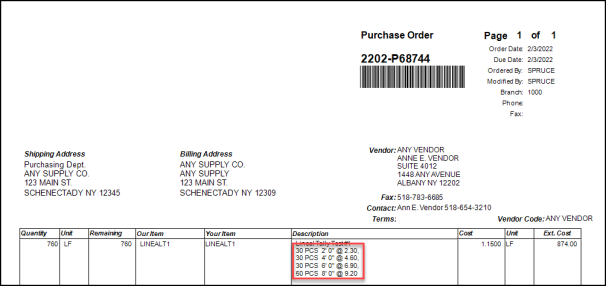
Purchase Order Document with Imperial Measurement Symbols
Purchasing Features
Enhanced Process for Updating Primary Vendor Records
B-96797- We have simplified the way you update an item’s primary vendor record. When you choose a new primary vendor for an item in inventory, you can add the new primary vendor in Item Maintenance. The application preserves the current vendor as the secondary vendor record and move any other vendor records to a successive tab.
Note: When you choose a primary vendor for an item in a branch, if you do not fill in the Vendor SKU#, this vendor will become the primary vendor in the Primary Vendor tab. When reloading the item, the information that loads is based on the entries in the vendor record.
To change the primary vendor for an item:
1. From the Main Menu, go to Inventory > Database > Item to display the Item Maintenance form.
2. From the Item list, choose the item you want change the primary vendor for and press Enter.
3. Click the Purchasing subtab.
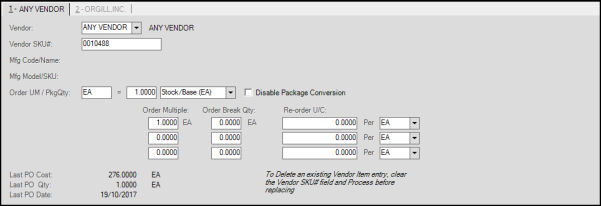
Item Maintenance Form > Purchasing Tab with Original Primary Vendor
4. In the first tab, go to the Vendor field and type the vendor ID for the new primary vendor and press Enter.
5. To save the change, click Process (F12). The Branch List displays.
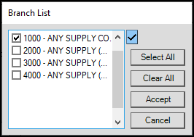
Branch List
6. Select check boxes beside the branch(es) for which the primary vendor ID should change or click Select All.
7. Click Accept. The application updates the Primary Vendor tab and moves the previous primary vendor to the next tab.
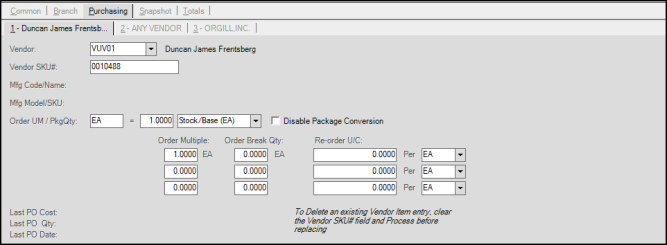
Item Maintenance Form > Purchasing Tab with Updated Primary Vendor
8. Press Process (F12) to save the changes. Update the purchase amounts as needed.
Receivables Features
Renaming Discount Code Field Clarifies Accounts Receivable (AR) Statement Amounts
B-89825 – We are changing the name of the Discount Code field in the Item Maintenance form, Codes tab to AR Stmt Discount to clarify that discounts associated with the item affect the accounts receivable statements, with no effect on the Point of Sale line discounts.

Item Maintenance > Common > Codes Tab with AR Stmt Discount Field
Renaming Discount Code Field Clarifies Discount Tax Type in the AR Receivables Statement
B-93189 – We have renamed the Discount Code field in the Parameter Settings > Receivables tab to Discount Tax Type to clarify the discount setting affects the tax amount in the Receivables statement.
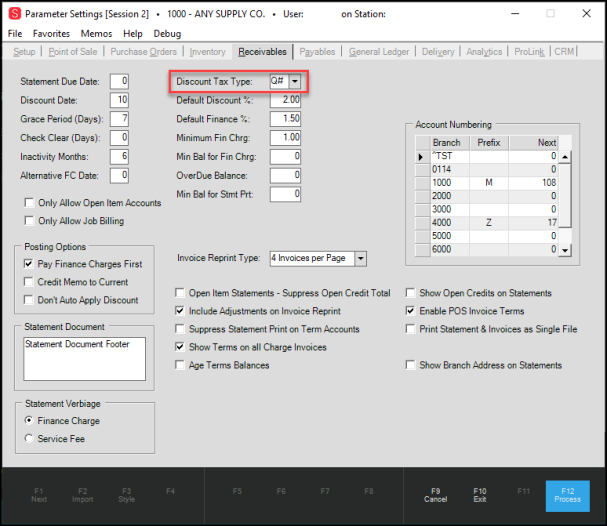
Parameter Settings > Receivables > Discount Tax Type Field
EDI Feature
New Options for Purging EDI Archive Files
B-88389 – Customers asked us to provide tools for managing excess files in the EDI archive. We have added the following purge tools to help you schedule and manage the number of files that you purge or retain as part of your use of the EDI tools. The purge process runs nightly, based on the purge options you select. Resetting this option requires administrative privileges.
Important: This feature is enabled by default, so if you do not want to purge archive EDI archived files, you need to disable this feature.
To use the new EDI purge archive options:
1. From the Main Menu, choose Maintenance > Database > Parameters to display the Parameter Settings form.
2. From the Setup tab, choose EDI > General to display the Purge Archive options.
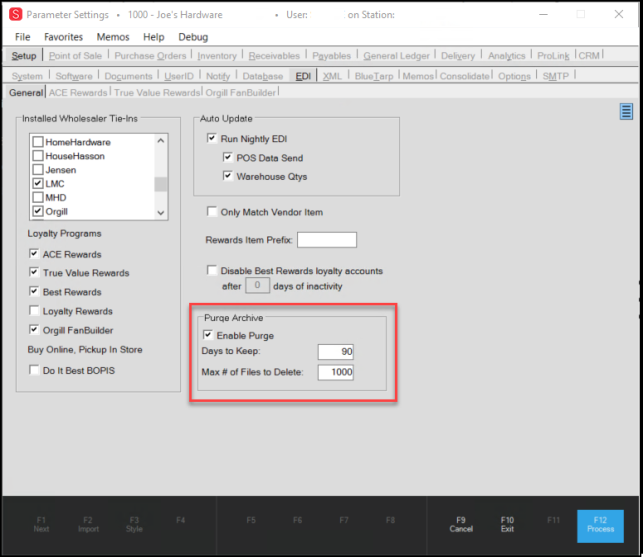
Parameter Settings > Setup > EDI > General Tab with Purge Archive Options Highlighted
2. Make sure the Enable Purge check box is enabled.
3. In the Days to Keep field, enter the number of days after which you want the application to purge the archive of files. By default, this setting is 90 days.
4. In the Max # of Files to Delete field, enter the number of files you want to delete during each nightly purge. By default, this setting is 1000 files.
Note: We recommend this file limit. Setting a maximum will prevent potential system performance issues resulting from the purge command.
5. When you have completed your entries and selections, click Process (F12) to save your changes.
Reports Update
Active Reports Coming Soon to the Customer Support Center
Soon, we will be replacing the Crystal Report templates with new Active Report templates in the LBMH Customer Support Center (also known as the Knowledge Base). Active Reports is the same software your application uses to produce documents and reports, and doesn’t require manual configuration for the database connection. Active Reports also doesn’t require additional software, so it’s more accessible to your employees. You will be able to import these templates into the Accounts Payable, Accounts Receivable, General Ledger, Inventory, Purchasing, and Point of Sale custom report libraries and generate these enhanced reports directly. You must have administrative rights to the application to import these templates.
Active Report templates are organized by application area and begin with a two character indicator that shows you which application area they belong to:
-
AP_ = Accounts Payable Report templates
-
AR_ = Accounts Receivable Reports templates
-
GL_ = General Ledger Report templates
-
IN_ = Inventory Report templates
-
MI_ = Miscellaneous Report templates
-
MN_ = Maintenance Report templates
-
PO_ = Purchasing Report templates
-
PS_ = Point of Sale Report templates
Best Practice Tip: Download the report templates into the matching application area’s Custom Report Library to avoid confusion. When you download a Point of Sale Report template into the Accounts Payable library, it causes issues for other people who need to use that template later.
But, What About Crystal Reports?
ECI applications still support Crystal Reports and these templates are still available to you. If you have custom Crystal Reports requirements or want to access a report template that was available on the Customer Portal, contact your ECI Support professional to discuss your business needs.
Downloading Active Report Templates from the Customer Service Portal
As with Crystal Reports, Active Report templates are zipped when you retrieve them from the Knowledge Base. There are also PDF samples of each report, so you can evaluate the contents of each report before you download it. The Active Reports contain the same contents as the same-named Crystal Reports do, but we have enhanced the layout of these reports to improve readability. We have combined some related reports and provide parameters that allow you to generate the reports you are used to.
To download Active Report templates:
1. Log into the Customer Service Portal using your username and password.
2. Navigate to the Reports Library you want to download the Active Report template from.
3. Scroll through the list of available templates to find the one you are looking for.
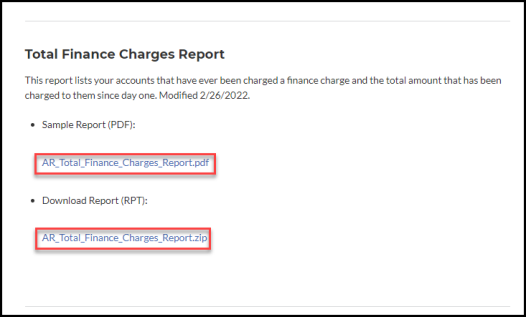
ECI Knowledge Base – Total Finance Charges Report Description with Sample and Template Links
4. To open the report sample, click the Sample Report PDF link. The report sample displays.
5. If this is the template you want to download, right-click the download report link. The Save As box displays.
6. Navigate to the folder you want to save the report template to or choose the Downloads folder and click Save.
7. Navigate to the folder you saved the template to and double-click the file to unzip it.
You must unzip the template before you can import it into the application.
Importing the Active Report Templates into your Application
After you have your repository of Active Reports templates stored on your system, follow these steps to import them into the application. Within the application, the process for generating the Active Reports is the same as for Crystal Reports.
To import an Active Report template into the application area’s custom report library:
1. From the Main Menu, choose the subsystem of the report you want to import (Point of Sale, Purchasing, Inventory, Receivables, Payables, or General Ledger). The Reports option enables in the Menu Strip.
2. Choose Reports > Custom Report Library to display the Custom Report Library form. The ActiveReports tab displays with any existing reports by default.
Note: If you need to import a Crystal Report template, click the Crystal Reports tab instead.
![]()
Custom Reports Library Form with Import Highlighted
3. To import the new report templates for this application area, press Import (F2). The Import Custom Reports box displays.
![]()
Import Custom Report (Blank)
4. Beside the Report File field, click the Ellipsis  button and navigate to the folder that contains the template you want to import.
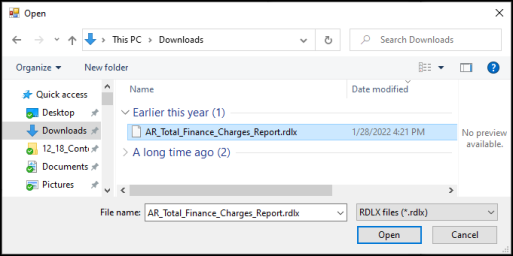
File Explorer with AR Template Highlighted
5. Click the template in the list and click Open. The Import Custom Reports Box updates with the template details.

Import Custom Report with Selected Template
6. Click Import. The new template displays in the list.
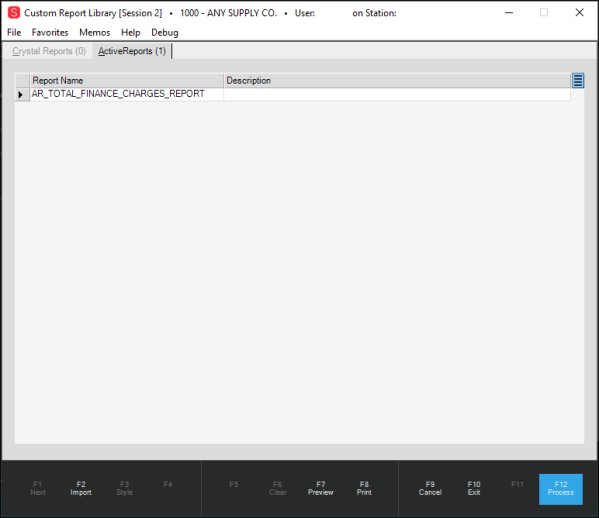
Custom Report Library with Template Entry
International Features
Enhancements Provide More Visibility for both Local and Foreign Prices at Point of Sale
E-10930 - We have updated the data grid and process options in Point of Sale to increase the pricing transparency for transactions with foreign currencies. In the data grid, you can now flip between local and foreign pricing easily, and in the process box, you can see local and foreign totals side by side. Customers can pay either in their own currency, yours, or both.
For businesses with customers that use foreign currencies, you can now display both currencies in Point of Sale transactions. Flipping between your local currency and the customer’s foreign currency allows you to discuss the transaction with your customer in financial terms that are familiar to both of you and ensures that the transaction is profitable for your business. The changes we discuss here have been completed for Sales, Orders, Quotes, Returns, and Direct Shipment transactions. These changes are visible in the data grid (including material lists and tally item boxes) and all customer-facing documents including invoices and tickets. Further, this information is available in the Inquiry forms. In this section, we cover these changes in depth.
Setup Notes: To use these new features effectively, the MultiCurrency check box must be enabled in the Point of Sale system parameters. Currency exchange values for the local and foreign currency must be set up in the Currency Code Maintenance form (Point of Sale > Database > Currency Codes) and the Allow Exchange at Point of Sale check box must be enabled. The customer’s currency setting must be established in their Account Maintenance form on the Codes tab and the Pricing POS check box must be selected.
Multi-Currency Transaction Changes in Point of Sale Data Entry
B-90859, B-90863, B-90865, B-90767, B-90768, B-90769, B-92003, B-92223, B-92359, B-94918, B-94919, B-95425 – When you discuss a transaction with a customer who uses a foreign currency, it may be useful to see the values of the materials in both the foreign currency and in your local currency. We have updated the Point of Sale Totals lists and data grid to allow for that review. The example here is in Sale Entry, but the currency review features are the same for Orders, Quotes, Open Tickets (Advice Notices), Direct Ship, and Returns.
To review the values of a sale for a customer that uses a foreign currency:
1. From the Main Menu, choose Point of Sale and Sales to display the Sale Entry form.
2. In the Name field, choose a customer that uses a foreign currency. The Totals section and the data grid update to reflect the foreign currency type set in the customer’s record.
3. Add a stocked item to the data grid.
The Totals section updates to reflect the transaction values in the foreign currency.
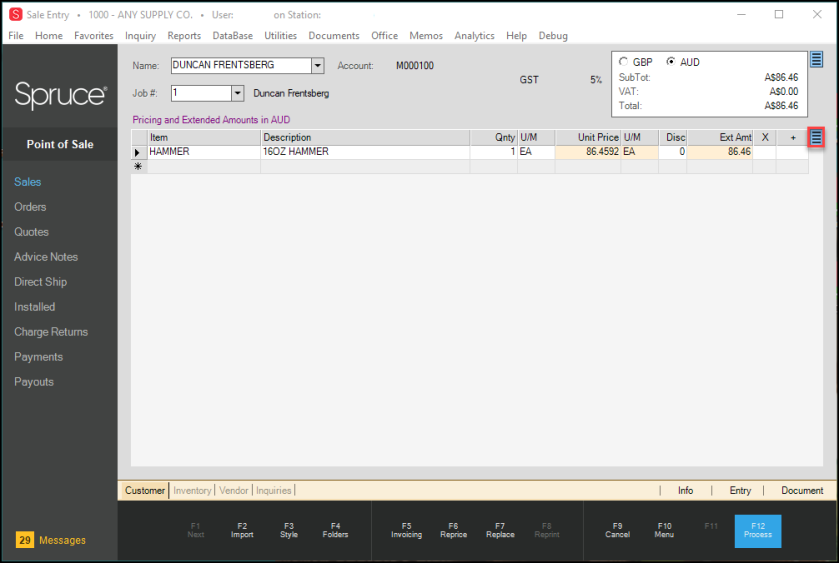
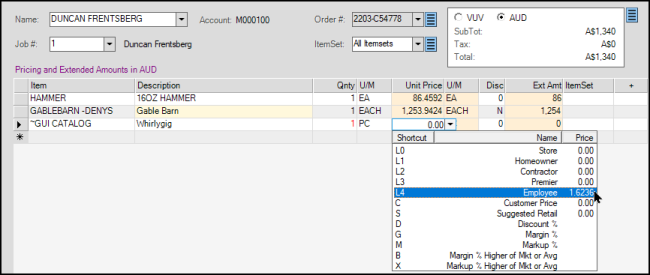
Sales Entry Form with Foreign Currency Customer and Local Menu Highlighted
The Unit Price, the Extended Amount and the Totals values in the data grid are in the foreign currency, as noted in the message: Pricing and Extended Amounts in AUD. The pricing and unit of measure entries are highlighted in yellow in the data grid to show they are foreign values.
4. To update the data grid only to show the entries in your local currency, right-click the local menu icon on the data grid and uncheck the Show Prices in Foreign Currency option.
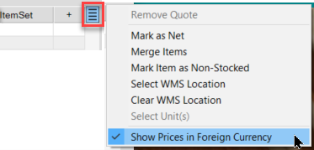
Order Entry Form with Local Menu > Show Prices in Foreign Currency Highlighted
The Unit Price, Unit of Measure, and Extended Amount entries in the data grid update to reflect the local currency values. The Totals box still reflects the transaction in the foreign currency.
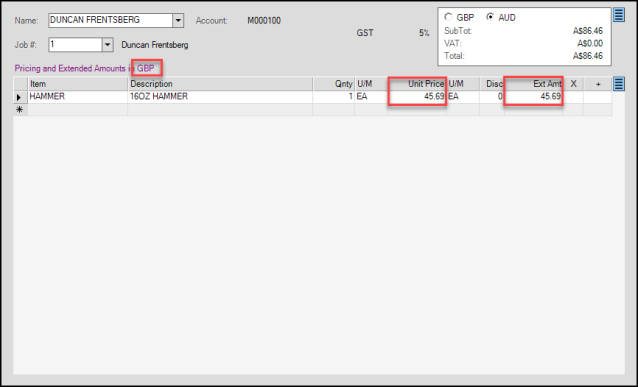
Sales Entry Form with Converted Amount Values Highlighted
The application updates the message, Pricing and Extended Amounts in GBP to reflect the local currency code. To revert to the foreign currency in the data grid, follow the steps in step 4 again. Although the values in the data grid and the Totals list may be in foreign currency, the Process Document displays the payment options initially in the local currency by default.
5. When you leave the foreign currency setting in place and add a tally item to the data grid, the Tally box reflects the foreign currency settings (price and unit of measure values).
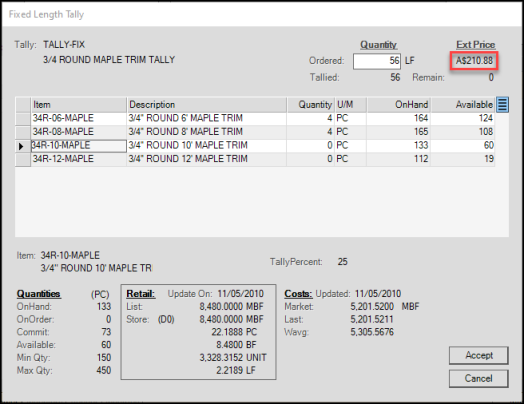
Tally Item Showing Foreign Currency Total
Note: When the data grid is set in local currency, local currency and unit of measure values display in this box.
6. When you click Accept and return to the data grid, the foreign currency values display.
7. When you add a material list item to the data grid, the Material List Selection box reflects the foreign currency amounts, because the data grid is still set to foreign currency.
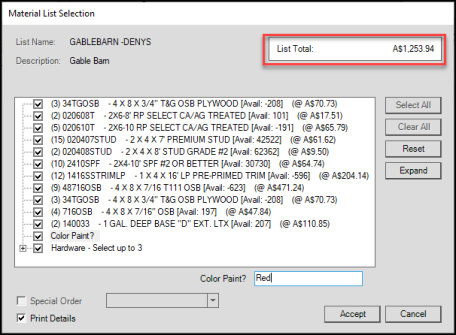
Material List Selection Box Showing Foreign Currency Total
The individual list entries also display the foreign currency amounts. When the data grid is set to local currency, local currency values display in this box.
8. After you click Accept, the data grid updates the material list record based on your selections.
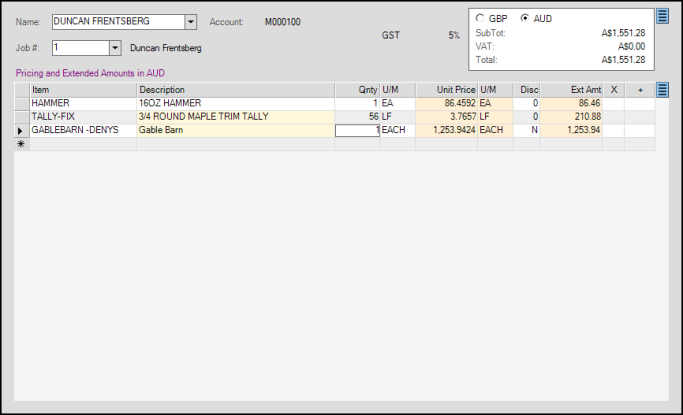
Sale Entry with Tally Item and Material List Entries
9. To redisplay these data grid values in local currency, right-click the data grid’s local menu and uncheck the Show Prices in Foreign Currency option. The currency and unit of measure values revert to the local values.

Sale Entry > Tally Item and Material List Entries in Local Currency
You can display the pricing for individual entries on the data grid in foreign currency using the Folders option Inventory > Pricing tab.
To display the foreign currency values of an entry in the data grid, click the entry (row) in the list and choose Folders (F4) > Inventory > Pricing (AUD). This tab displays the selected item value in foreign currency, even when the data grid is in local currency.
Note: The name of the subfolder reflects the transaction’s foreign currency code.
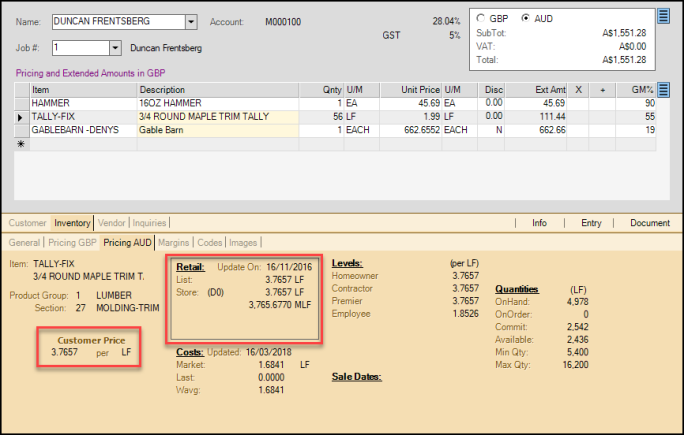
Figure 73. Inventory > Pricing AU Folder with Foreign Currency Values Highlighted
In Order Entry, you can also display non-stocked items in the data grid in foreign currency. The foreign currency highlight displays in the converted fields, and the application displays a message to indicate the type of currency calculation it is performing in the box (Sugg. and Unit prices are in AUD).
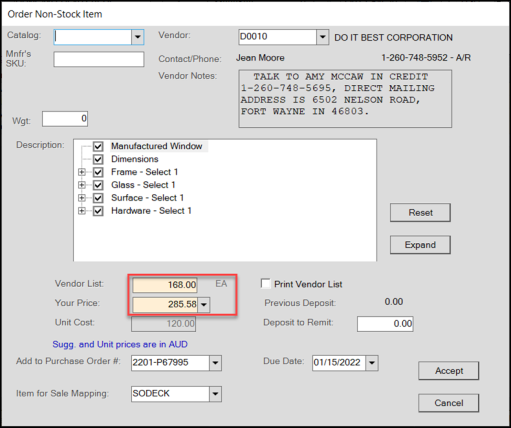
Order Non-Stock Item with Foreign Currency Entries Highlighted
You can also use the customer’s currency to reprice an item in the data grid, using all of the same repricing options.
Note: The Reprice Options box that display depend upon the current currency setting of the data grid. When the currency setting in the data grid is foreign, the Reprice options are in the foreign currency. If the account is foreign, but you are displaying the local currency settings in the data grid, the currency setting in the Reprice Options box will reflect the local currency.
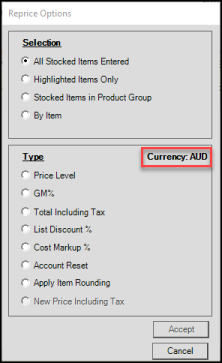
Sale Entry Form > Reprice Options with Foreign Currency Settings
When you copy a transaction with for an account that uses a foreign currency and the original transaction is calculated using that foreign currency, the copied transaction reflects the foreign currency calculations. This is also true when you are invoicing a sale or open ticket for a foreign account.
A Note About Repricing Items for a Foreign Currency Account in the Data Grid
When you enter an item in the Point of Sale data grid for an account that uses a foreign currency, the Unit Price displays in the customer’s currency by default.
Typically, for stocked, non-material list items, the price is fixed. Still, the application allows the cashier to choose customer-specific repricing options by clicking the drop-down list in the Unit Price column.
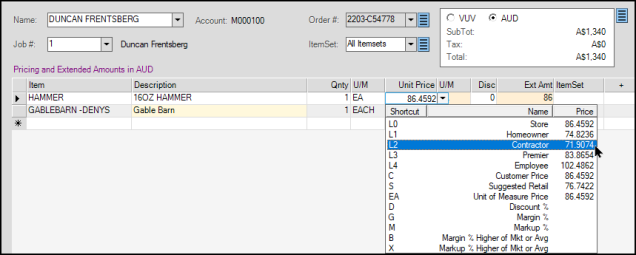
Point of Sale Data Grid with Foreign Unit Price Options Displaying (Stocked Item Entry)
Note: The unit prices in the drop-down list default to the customer’s currency.
For material lists, the prices in the Unit Price list can change because the customer can select different options that change the makeup of the material list. Because more information about the transaction is in the data grid, the Unit Price list amount matches the price in the data grid, and this is the only price option.
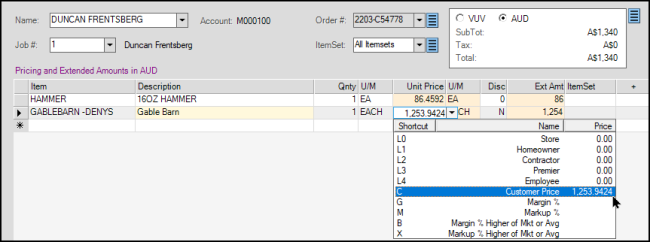
Point of Sale Data Grid with Foreign Unit Price Options (Material List Entry)
For non-stocked items, the price is fixed externally, so there is also only one price in the Unit Price drop down list.
Point of Sale Data Grid with Foreign Unit Price Options (Non-Stocked Items)
Processing Changes in Point of Sale for Multi-Currency Transactions
B-94774, B-94775, B-94776, B-94777, B-94778, B-94779, B-94497 – As of the last release, you can see transaction information for customers that use foreign currencies in the Point of Sale data grids. Now, when you process those sales (orders, quotes, etc.), you have more options in reviewing and receiving multi-currency payments in the application. The changes discussed here are visible throughout the Point of Sale features, including Sales, Orders, Quotes, Open Tickets (Advice Notices), Direct Ship, and Charge Returns. The transactions, although paid in foreign currency are converted to local currency for purposes of the General Ledger processes.
To process the payment for a foreign currency transaction:
1. Click Process (F12) to display the Process Invoice Document box.
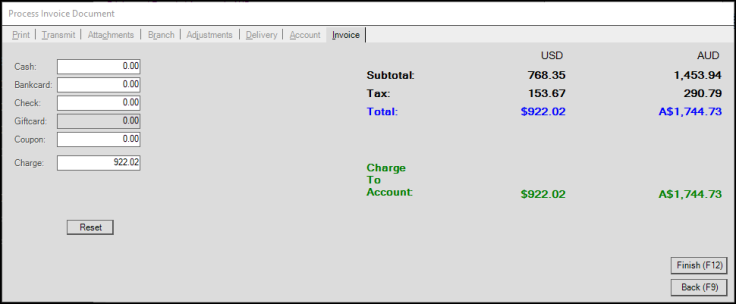
Sale Entry Form > Process Invoice Document (Local/Foreign Currency Displaying)
The format of this dialog box has changed. The transaction information displays in the local currency and foreign currency by default. The application expects the cost to be paid in local currency by default.
2. If the customer chooses to pay the cost in foreign currency, click Reset to display the Foreign Currency check box.
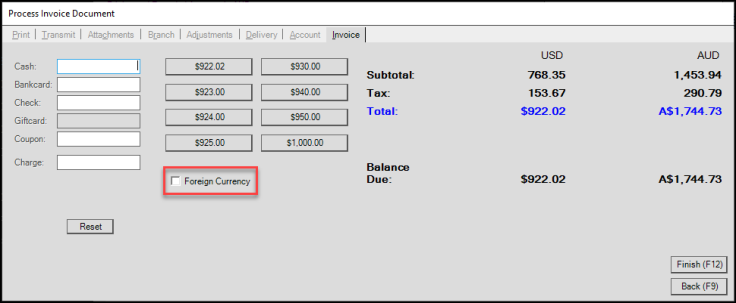
Sale Entry Form > Process Invoice Document (Foreign Currency Option Unchecked)
The amounts in the payment buttons reflect local currency values. The customer can still pay the balance in local currency using the Cash, Bankcard, etc. options.
3. To display the foreign currency payment options, click the Foreign Currency check box. The transaction amount in the customer’s currency displays in the Exchange Total field.
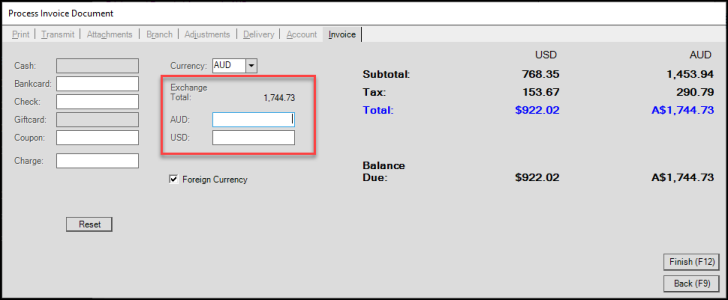
Sale Entry Form > Process Invoice Document (Foreign Currency Option Checked)
The transaction amount in the customer’s currency displays in the Exchange Total field.
4. In the account’s foreign currency field (in this case AUD), enter the amount the customer is tendering and press Enter to update the calculation.
The application updates the Cash field with the cash transaction amount in local currency.
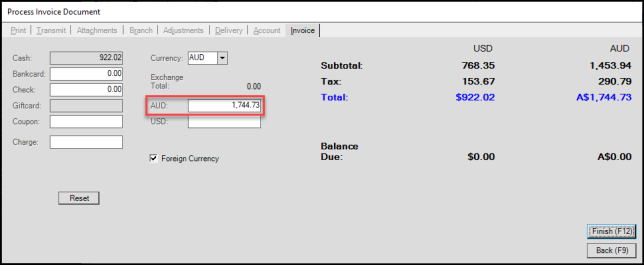
Sale Entry Form > Process Invoice Document with Foreign Currency Amount Entered
Note: If the customer wants to pay in multiple currencies, enter the cash amount in the local currency field (in this case USD). If the Customer wants to pay in local currency in some other format, the cashier can use the other tender fields (Bankcard, Check/Checque, or Charge).
5. When you have completed the transaction information, click Finish.
The application goes through the normal transaction evaluation process to complete the sale.
Note: Adjustment values appear in the currency used to process the transaction.
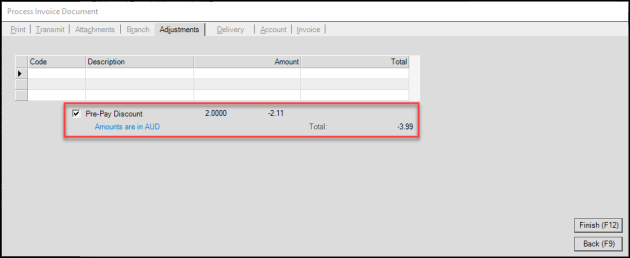
Sale Entry Form > Process Invoice Document > Adjustments Tab
When the customer chooses to pay in local currency, the local currency values display.
6. If you complete the adjustment after you click Finish, the processing box redisplays to reflect the change due or required from the customer.
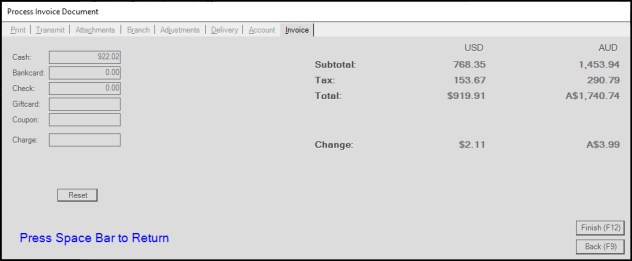
Sale Entry Form > Process Invoice Document with Adjustments Difference
7. Press the Space Bar when the transaction is complete.
The receipt document reflects the local currency amounts and at the bottom, the payment method details show the foreign currency payments and any applicable refunds.
![]()
Customer Receipt for Foreign Currency Transaction
Processing Payments for Foreign Currency Accounts
B-94255 – In the Point of Sale > Payments > Receive on Account option, the Accept Payment form accepts payments using the account’s currency settings by default but allows you to review the payment information in your local currency as well. In the example below, the remitted payment was in Pounds Sterling (GBP) but the local currency is in dollars (USD). By default, the entry in the Amount to Apply field is in Pounds.
is in Pounds.
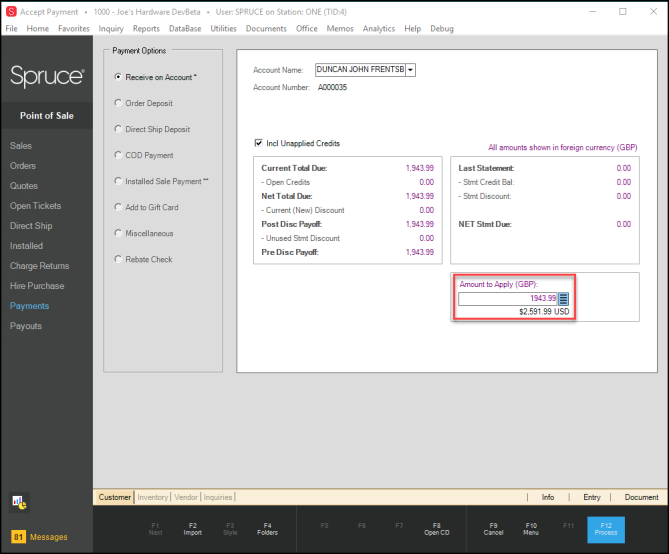
Accept Payment Form with Foreign Currency Payment Setting
The converted amount displays below the field in the local currency. The amounts that display, such as Current Total Due, Net Total, etc. are also in the account’s currency so you can discuss the payment with them, if needed. Foreign currency amounts always display in purple in this form.
To change the currency displayed on this page, beside the Amount to Apply field, click the local menu icon to display these options:
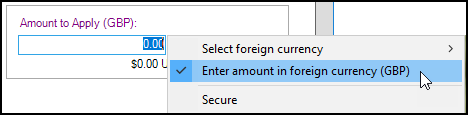
Accept Payment Form Local Menu
Uncheck the Enter amount in foreign currency (GBP) and enter the local currency amount to the Amount to Apply field. The values in the Current Total Due, etc. display the local currency amounts in black.

Accept Payment Form with Local Currency Payment Setting
Invoicing Orders or Quotes for Foreign Currency Accounts
B-94920 – When you bring in an order or a quote for an account that uses a foreign currency, the transaction comes into the data grid displaying the customer’s currency values. If the exchange rate has changed, since the original transaction was created a message pops up to prompt you to accept the original exchange rate or use the new one. See Handling Rate Changes in Multi-Currency Transactions to learn more about this process.
Changes in Multi-Currency Contracts
B-95384 – When you create an account/job contract with a customer that uses a foreign currency, the application saves the contract amounts in the customer’s currency rather than your local currency by default. When a cashier adds those contract items to a customer’s data grid, the application applies the contract pricing to those items. You can use the new Point of Sale options to display the prices in local currency at any time. Contract Reports show the customer’s currency code when the report includes the customer’s foreign currency account.
In the Contract Maintenance form, we have added a Currency section above the data grid that displays when the contract you are adding is for a customer using a foreign currency. The local currency displays on the left and the customer’s currency displays on the right. In the example below, the prices that display are in Japanese Yen, which you can tell is the foreign currency because the background of the Unit Price, U/M, GST (Tax), and Price fields is yellow.
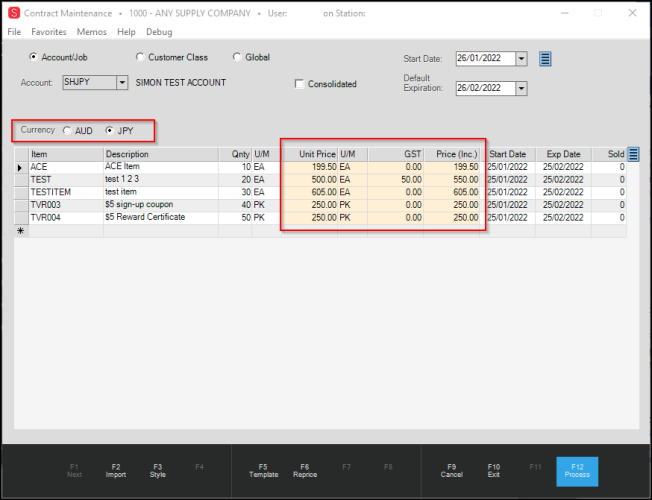
Contract Maintenance Form Showing Foreign Currency
To review the same entries in local currency, click the local currency button (in this case AUD) to update the values in the Contract Maintenance data grid.
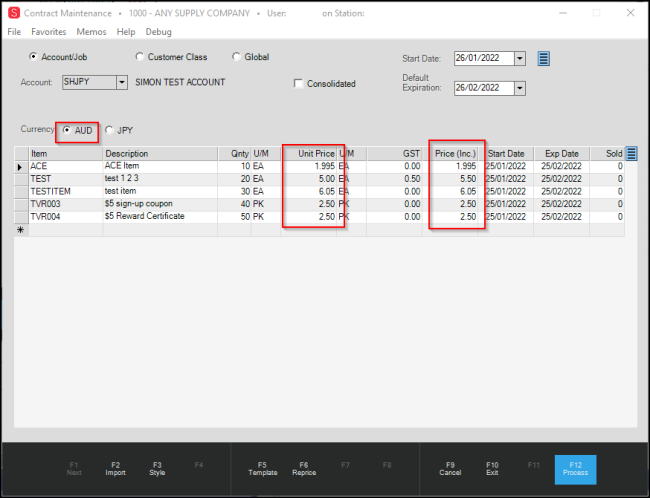
Contract Maintenance Form Showing Local Currency Values
When you complete your contract entries and click Process (F12), a confirmation message displays.
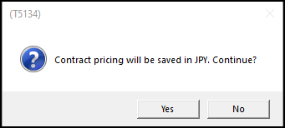
Contract Pricing Confirmation Message
Do one of the following:
-
Click Yes to confirm that you want to save contract pricing in the foreign currency, or
-
Click No to save the contract pricing in your local currency instead.
When you save contract pricing in local currency the current exchange rate stays in effect, even if the exchange rate changes. So, when you add contract items to the data grid in Point of Sale, the contract price will be in effect. If you change the display options in the Point of Sale data grid to local currency, the contract price will convert to local currency using the exchange rate in effect at the time of the initial contract.
Note: The Currency setting (Local or Foreign) in place at the time that you process the contract is the currency setting that is saved with the contract. If you save the contract with the local currency set, the confirmation message does not display. The exchange rate change rules remain the same.
Handling Exchange Rate Changes in Multi-Currency Transactions
B-95422 – As is predictable, currency exchange rates change. These rate changes affect Point of Sale transactions and documents, including sales, orders, quotes, tickets, direct ships, and contract amounts. When the exchange rate changes, the application gives your cashier a choice in handling the transaction calculation.
In general, when the currency exchange rate affects the currency of the current transaction, a message displays to notify the cashier. For example:
-
Exchange Rate has changed from <old rate> to <new rate> for currency (Foreign Currency Code).
Reprice to new exchange rate?
The cashier has three choices. If the cashier chooses:
-
Yes, the application applies the new exchange rate to the items in the data grid, updating the Unit Price, the Extended Amount, and Totals values.
-
No, the application leaves the existing exchange rate calculations in place for the items in the data grid and these amounts do not change.
-
Cancel, the application closes the transaction.
If the cashier modifies the items in the data grid or add new items, the application will apply the new exchange rate to the new/changed items.
Multi-Currency and Regional Defects Resolved
D-74412 – UK Customers Found Remaining Amount Reset to 0 after Partial Payment
Some businesses in the United Kingdom (UK) found that when a customer applied a partial vendor credit to their account, the application would set the remaining balance to 0. We have corrected this issue so that when you apply part of an AP vendor credit to an invoice, the balance remains open and the application decreases the remaining amount by the credit amount applied. This issue only occurred in UK businesses.
D-76738 – Sales Tax Total Now Displaying Correctly Based on Regional Settings
In some Point of Sale documents, the application was displaying the incorrect sales tax label on some receipts, particularly in the UK and Australia. We corrected this issue so the appropriate tax label displays based on the business’ regional setting in all Point of Sale documents (invoices, sales receipts, credits, etc.).
D-77051 – Modifying Fixed Price Material List Entries Causing Price Errors in Point of Sale Corrected
We have corrected a Point of Sale issue that occurred when a cashier changed the amount of a fixed price material list entry in an Inc tax field in the data grid. When making this change, the Inc Tax unit price did not match the Extended Amount, which was incorrect. We have resolved the issues that caused this inconsistency.
Expanded Support for Zero-Decimal Currencies
E-11857 - As part of our ongoing support for businesses in regions with a currency that has no sub-units (decimal portion), we have updated the application to ensure the receipt documents, and accounts payable, purchasing, inventory, delivery, and receivable reports they produce handle currency rounding properly. When your regional currency has zero digits, your ECi support teams can set the application’s regional parameters to ensure that business calculations are rounded properly to display the correct total values.
In version 19.0, we applied this technology to the Point of Sale system to ensure that businesses where decimal values are not used, calculate totals and remittances using the rounding values chosen by the business in the parameters setting Point of Sale > Regional tab. Cashiers still see the decimal amounts pertaining to the quantity, unit price/cost columns in the data grid, which reflect the original purchase price or partial quantities of the purchased materials. We are finishing out the changes in Point of Sale and in the Payments section. In this release, we have expanded these regional decimal value support and rounding capabilities to new subsystems:
-
Point of Sale (Rebate Payments, Payments on Account)
-
Accounts Payable (Billing Inquiry, Cash Requirements, Check Register, Disbursements, Documents, Reports, Schedule Payments, Shared Controls, and Utilities (Process AP Batch, Check Backout))
-
Accounts Receivable (Reports, Statement)
-
Deliveries (Reports and Utilities)
-
General Ledger (Account Inquiry, Documents, and Utilities,)
-
Inventory (Reports)
-
Purchasing (Order Entry and Reports)
The totals the application generates in these updated forms reflect the regional decimal and rounding settings chosen by the business. In this section, we show the zero-decimal currency setting and rounding option results. We have performed extensive testing on these calculations (both functional and regression) to ensure that these calculations are accurate.
D-76315 – Ensuring that Foreign Currency Payments Work for Zero-Decimal Currency Regions.
In the Point of Sale application area, when you received foreign payments in a zero-decimal currency region and deleted the amount from the Amount to Apply entry field, an error resulted. We have improved the logic for receiving payments in regions with zero-decimal currencies to ensure that foreign currency payments with decimal values are handled properly. The error no longer occurs.
e-Commerce API Enhancements
E-12150 - We have added new methods to our API for finding price changes and item quantity changes since the last request.
B-99564 – New Get Method Collects Item Price Changes.
We have developed a new method that returns a list of items that have had price changes since the last time the get was performed. for eCommerce providers who maintain local data regarding pricing. This new method is documented in the ECI API Guide, which is available from your ECI Sales team.
B-100716 – New Get Method Collects Item Quantity Changes.
We have developed a new method that returns the list of item quantity changes since the last time the get was performed for eCommerce providers who maintain local data regarding quantities. This new method is documented in the ECI API Guide, which is available from your ECI Sales team.
Security Updates
Improved Systems Stability and Corrected Known Issues
In response to your requests, we corrected many of the known system issues during the development process of this release.
B-91990 – Updates to API Protect Applications Under Error Conditions. We have disabled verbose messaging to prevent any display of internal application details when errors occur. These changes protect upgraded systems on prem and remote client services in the cloud. The content collected during these issues is still accessible to ECI Implementation and Support teams.
B-94685 – Stack Status Report Display Wait Time Improved. A customer notified us that the Saved Stock Status Report, which they run several times a day, was displaying slower than it had in the past. Since this delay had a significant impact upon the productivity of the team, our technical team made some changes to the way this report is processed to improve performance. When you upgrade to this version, you will see significant performance improvements for this report.
B-101415 – Error Messages Give You New Information
We have improved the application closure process to give you more information and better support when a severe error occurs. The application still prompts you to describe the work you performed when the interruption occurred, so we have the tools we need to investigate the issue and resolve the problem. But then, a new box displays:
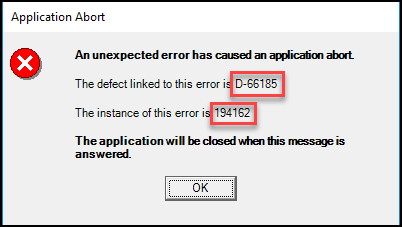
-
The Defect Number is the work ticket that the Development Operations team is using to research and correct the issue. As the Developer works on the issue, they update this ticket to explain their findings.
-
The Instance Number is the unique ID that your error produced.
When you contact ECI Support for an update and provide these two numbers, the Support team will be able to look up this error and explain what the company is doing to correct this issue. All defects are worked in a queue.
Corrections
B-94251 – Parameter for Region-Appropriate Naming of your Invoice/Cash Ticket Documents.
A new parameter allows you to rename your cash ticket from Invoice to something more appropriate for your region. In Australia, for example, Tax Invoice is preferable to Invoice both on the Invoice document and in the Cash Ticket. This setting can be updated for your region by the ECI Support team. This change is made for an entire region, not for individual businesses. Setting this parameter ensures that documents display the correct labels:
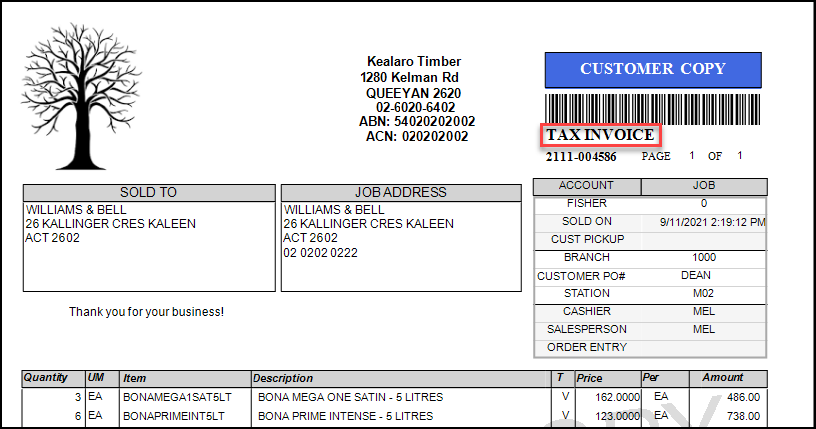
Sample Tax Invoice
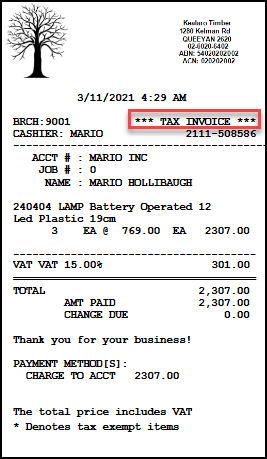
Sample Cash Ticket
B-94685 – Stack Status Report Display Wait Time Improved.
A customer notified us that the Saved Stock Status Report, which they run several times a day, was displaying slower than it had in the past. Since this delay had a significant impact upon the productivity of the team, our technical team made some changes to the way this report is processed to improve performance. When you upgrade to this version, you will see significant performance improvements for this report.
D-55346- Resuming a Direct Ship Order Works Correctly Now.
We noticed that when you tried to resume a suspended direct ship order that contained a unit tally item, the application displayed an error. We have fixed the issue that caused this error so you can suspend and resume these orders easily now.
D-57778 – Inventory Receipts Print without Extra Blank Pages (All Page Formats).
We corrected a customer-reported issue that printed extra blank pages on inventory receipts. This was caused by extra space on some inventory receipts, which we now remove. We tested this fix for 8.5 x 11 and A4 page sizes to ensure that this worked correctly for all inventory receipts.
D-62499 – Crystal Reports Viewer Issue Resolved.
In the past, if you attempted to preview a Crystal Report (by choosing Preview (F7)) before you selected a specific report type, the application displayed an error. We now disable the Preview (F7) button before a report is selected to prevent this issue. Preview always works correctly when you choose the Crystal Report parameters first.
D-70730 – Updating Prices for Many Branches Improved.
We improved the transmission process for large price updates to a network of branches. This change prevents errors and ensures the successful, timely delivery of all price changes. Ensuring that these large updates complete successfully will take slightly longer, so we recommend that you take that into account when sending out these changes.
D-72742 – Processing Unit Tally Orders from Quotes Issue Corrected.
When processing a unit tally order from a quote, the application was not unlocking the tally item from its quote status, which caused the transaction to fail. We have corrected this issue so that importing quotes with unit tally items on them process properly. We also resized the Unit Tally Select Units box to ensure better visibility of the Unit Details section.
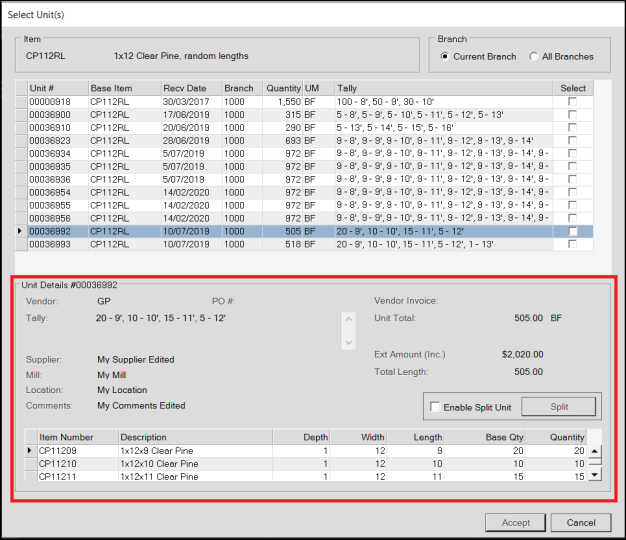
Select Units Box with Unit Details Section Highlighted
D-73402 – Receipts with Sheet Metal Tally Items do not Display X's between Feet and Inches.
In response to customer requests, we modified the Sheet Metal Tally receipts to better display dimension information in the Description section. In the past, we displayed the size of a sheet metal item as 10’ x 6”, when it should have been 10’ 6”.
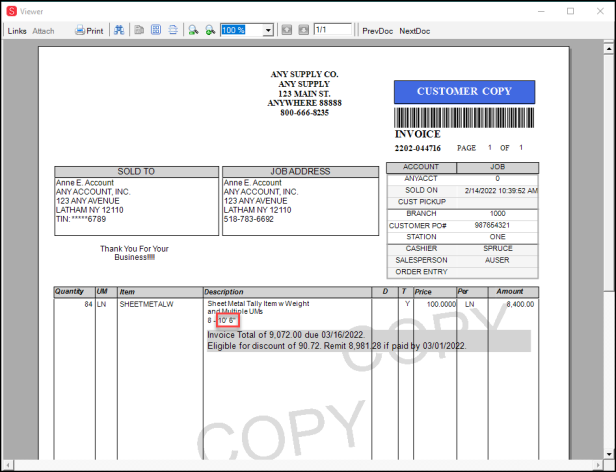
Sheet Metal Tally Receipt with Corrected Dimension Display
D-73618 – Updated Logic for Importing TrueValue Alternate SKUs.
We found that some TrueValue customers who were updating prices based on the alternate SKUs were changing the pricing of the wrong item (because the TrueValue alt SKU was different from the application’s alt SKU). We have corrected the logic we use to identify the correct database item. When we import a TrueValue item, we no longer base the item model on the alternate SKU. This update ensures that pricing changes affect the intended inventory item now.
D-74509 – Style Options on Cost/Margin Entry Working Reliably Now.
In the Price Updates form, when you select the Cost/Margin Entry option and set prices or margins for purchase order items, you can adjust the item details by selecting a new data grid style. Sometimes, when you selected a different style, the fields did not update as expected. This did not cause a problem in setting the margins properly or make mistakes in setting up the price updates. We have corrected these issues so the Level Display, Margin Display, and Report Sequence styles display correctly in the data grid.
D-75124 – Tax Exempt Direct Ship Transactions Corrected.
Internally, we noticed that some direct ship transactions for customers with tax-exempt IDs were being charged taxes when they should not have been. We have rewritten the application to prevent taxes from being collected from exempt transactions, except for the following circumstances, which are required by regional laws:
-
In VAT Regions, the application calculates taxes for Direct Ship items with a VATAlwaysTaxable tax code, based on the item location’s tax rate, even for businesses with tax-exempt IDs
-
In VAT Regions, the application calculates taxes for Direct Ship transactions with an Override Item VAT code, based on the transaction’s tax rate; however, a tax exempt ID entry will override the tax in this case
-
In non-VAT Regions (such as US and Canada), the application calculates taxes for Direct Ship items assigned an"Always" taxable flag based on the transaction’s tax location rate. There is no “item” tax location in this case
The application is now enforcing these rules in all locations.
D-75259 – All Text and Signatures Display on Sales and Bankcard Receipts Now.
When paying with a credit card and a signature, there were times that the signature overlapped some of the other elements on the receipt. This overlap occurred in different places for sales receipts than for the bankcard receipts. We have resolved this issue by adding the signature to the receipt last to prevent the overlap.
D-75618 – ProLink Showing Incorrect Branch Subtotals Issue Resolved.
A customer reported that ProLink was showing subtotals based on the prices assigned to the Branch 1000 inventory items even when the transaction was not occurring in that branch. While originally, this was considered a price level issue, we found during the investigation that the method we were using to collect the customer’s information did not include the branch location in the calculation. We have corrected this issue to ensure the application uses the item amounts in the branch supplying the product to calculate the subtotals.
D-76605 – Changing the Currency of the Cash Account No Longer Causing Errors.
During beta testing, if you changed the Currency setting of the Cash account to a foreign currency, serious errors occurred, preventing Cash selection from working in all Point of Sale forms. We have corrected this issue to ensure that you can set the Cash account to any currency that works for your business.
D-76989 – VAT Return Load Error for Cash Method Businesses Resolved (UK Only). In the United Kingdom, a customer using the Cash Method reported that they were getting a Failed to enable constraints error when trying to load a VAT Return (F8). This error occurred when an invoice from a prior reporting period was paid over more than one reporting period. The application was considering these payments duplicates, which resulted in the error. We reworked this logic to accommodate payments over time to ensure that the tax is calculated correctly for the reporting period in which each payment is made.
D-77032 – Errors when Exporting Images from ProLink: Resolved.
When you exported images from ProLink using the Support Utility (either ProLink Classic or ProLink (web)), sometimes serious errors resulted. We have corrected the URL-specific issues that caused this error.
D-78067 – Inaccurate Message Removed when Clearing an Item ID from the Point of Sale Data Grid.
In some previous versions, when you typed or searched for an item ID in the Point of Sale data grid and then deleted it, an error message would display that the item no longer existed in inventory. This message now only displays when, in fact, an item you search for is no longer in inventory.
D-78732 – Device Error in Cayan Genius Devices Corrected.
In the past, when a customer used a bank card on a Cayan device and the initial card validation failed, the application tried to validate the card again. Sometimes this led to charging the card even when the transaction failed. We have corrected this issue by preventing the application from trying to process the bank card a second time. The application also resets the device when this timeout occurs.
D-79321 – Invoicing Quotes with Multi-Currency Turned Off Working Correctly Now.
A customer reported that converting a quote to a sale while the Multi-Currency parameter was turned off, even if the customer did not use a foreign currency, resulted in serious errors. We have corrected this issue. We tested this change to ensure that the error also did not occur when the Multi-Currency parameter was turned on.
D-79405, D-79406 – Removing an Order or Quote from Sale Entry No Longer Causing Errors.
During the beta process, when you attempted to invoice an order or a quote in Sale Entry and then attempted to remove the order or quote from the data grid using the context menu, the application displayed a serious error. We have corrected these issues so that these orders and quotes can be removed from the Sale Entry and Order Entry forms without issues.
D-80204 – Exempt Tax Number Displaying Correctly on Customer Invoices.
A business reported that a receipt/invoice form was not displaying the tax exempt number for customers whose purchases are tax exempt. This was found on landscape-formatted documents. We have corrected this issue to display the tax exempt ID number on these documents.
D-80556 – Received Item Cost Corrections Working Correctly Again.
A customer reported that when performing a cost correction on a received item, the application did not calculate the Correct Ext Cost after entering an amount in the Correct Final field, and when processing the change, an error resulted. We have fixed the application to calculate the external amount and show the Total Receipt Correction as expected. The error no longer occurs.
D-80639 – Invoicing Large Orders are Processed More Successfully.
A customer tried to invoice a substantial customer order, first by selecting some items, and then by selecting all items in the order. This resulted in an error such that the business could not invoice the order. We corrected the issue that caused the application to try to process the tax on each item as it was imported into the grid. Now, the application calculates the taxes after the items are imported, which goes much faster. Invoicing large orders should be easier and faster now.
D-80682 – Taxable Adjustment Amounts Showing Up in Sales Tax Report Again.
A change we made in release 12.19 caused some taxable adjustment amounts to be rounded incorrectly, which caused inaccurate tax values in the Sales Tax Report. We have corrected this issue to ensure the application includes all taxable adjustment values in the Sales Tax Report.
D-80875 – Gross Margin Calculation for Non-Stocked Items Corrected (VAT Regions Only). When you tried to calculate the gross margin for non-stocked items or items that you had in stock but sold as non-stocked items, we included tax in the calculation, which was incorrect. This issue only occurred in regions that used VAT Inc Tax and Ex Tax settings. We have fixed this issue, so the calculation works correctly now.
D-80934 –Modified Embedded Material List Error Corrected. A customer reported an error when they tried to add a material list to a Sale Entry or Order Entry data grid that had a modified material list embedded in it. We have corrected this issue to prevent the error from occurring.
D-81029 – Importing Orders and Quotes from Another Account No Longer Causes Errors.
In the past, if you imported an order or a quote from another account with no job entry, a severe error could occur. We have corrected this issue to prevent these errors. We recommend that you create a template with the items you want to import rather than adding the complication of another account to the process, but importing a quote or an order from another account will work too.
D-81200 – Processing a Transaction with Multiple Payment Types Improved (Cayan).
We have improved processing when the consumer presents multiple cards for the same Cayan transaction. Previously, we passed a single transaction/document ID for all cards involved in a transaction; however, if one card transaction failed, it could cause a problem identifying whether prior card transactions were processed or not. We have improved this process to prevent this and now make the identifiers unique for each card in the same transaction.
D-81209 – Beta Issue Resolved: Application Window, Saved Off Screen, Can Now Redisplay.
As of this release, you can save application window settings (size and location), so the application opens with the same settings every time on any computer or tablet you use. If you saved the display settings on one computer but did not have the same monitor options on the next platform you went to, you might not be able to find the application window on the new platform. We have improved this process by returning the application window to the main screen when you move to a new platform that does not have the same screen configuration. This fix also works when you lose power while using multiple monitors or move the application partially off-screen.
D-81250 – Creating an Inventory Merge List No Longer Results in Error (UK Only).
When attempting to create an inventory list for merging items, the application displayed an error due to the date format. We have corrected this issue to support the use of the standard UK date/time format.
D-81285 – Beta Issue Resolved: Scanning Barcodes into Quote Point of Sale Data Grid Restored.
We resolved an issue that prevented barcode scans from displaying in the Quote data grid.
D-81321 – Beta Issue Resolved: Using the Clear (F6) Option for Crystal Reports Caused Error.
A customer reported that while working in the Custom Report Library with a Crystal Report file, clicking the Clear (F6) option resulted in an application error. We have disabled this option in the Custom Report Library to prevent this error from occurring. Customers told us that it was not a necessary feature for this report and therefore removing it was not an issue.
D-81382 – Beta Issue Resolved: BlueTarp Invoicing Restored.
We have corrected the issue that prevented the BlueTarp invoice fields from displaying in the Process Invoice Document.
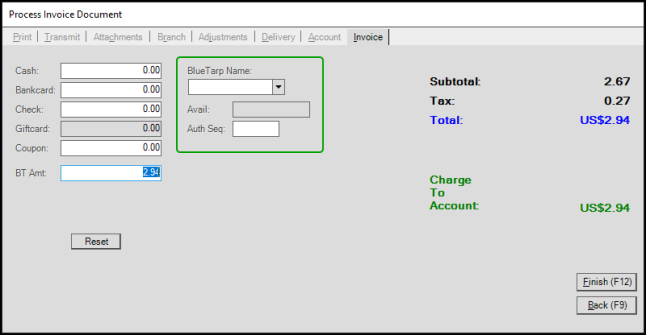
Process Invoice Document with BlueTarp Fields Restored
D-81388 – Beta Issue Resolved: Adding New TrueValue Rewards Customers Working Correctly.
A beta customer reported that they could not enroll new TrueValue rewards customers during Point of Sale transactions. We have corrected the problem that caused this issue and it did not impact most users.
D-81648 – Invoices No Longer Display a Second Total When Multi-Currency is not Set.
We have modified the process for creating invoices to allow the display of a second total amount when the customer is paying in a foreign currency. However, even without setting the Multi-Currency parameter, the application displayed a duplicate payment amount in invoices, even though it is in the same currency. We have corrected this to ensure that only one total displays in invoices that do not have multi-currency requirements.
D-81670 – Post Physical Counts Form Display Corrected.
After we enhanced the Post Physical Counts form, we found that displaying this form at certain screen resolutions resulted in overlapping selection options. We have corrected this to ensure that the Selection options display correctly at any resolution.
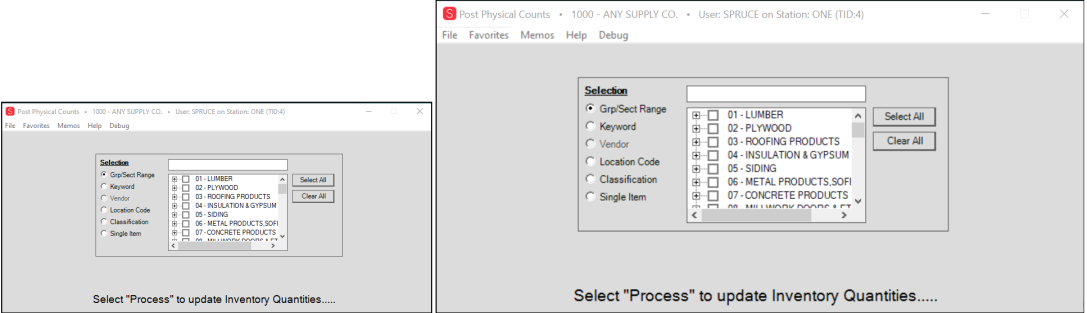
Post Physical Counts Form - 100% Scaling on Left, 150% Scaling on Right
D-81714 – Beta Issue: Adding Child Item Quantities to Fixed Length Tally Items in Purchasing Resolved.
In Purchasing Order Entry, an error occurred if you added a fixed length tally item and updated the quantity of one of the items in the list. The application was applying an unneeded conversion factor, which caused the issue. We have corrected this problem, and this feature works correctly now.
D-82245 – Beta Issue: Percentage-Based Adjustment Codes Problem Corrected.
A customer reported that they were unable to change Point of Sale adjustment codes that were based on percentages. We have corrected this issue. We have also fixed the cell-focus behavior where, after entering the adjustment code, the cursor moves to the Amount field rather than the next line.
D-82251 – Beta Issue: Retrieving TrueValue Price Updates Improved
The new purge EDI files feature was deleting sequence files, which contain information needed for price updates. We have corrected this issue to preserve these Sequence folders going forward, but TrueValue customers who have upgraded will need to recreate the sequence files that were deleted. We recommend that you reach out to ECI Support to replace these sequence files, which are usually located in the following folder:
-
Shared Folders > YourCustomerName > EDI > 1000 > TrueValue > Archive > Sequence
The files the Support Team may need to create are:
| File Name | File Contents | Where the xxx = Your TrueValue Sequence Number |
| COUP_SEQ.txt | COUPMxxx.ZIP | |
| COUP2_SEQ.txt |
COUPPxxx.DAT |
|
|
FMT_SEQ.txt |
TIERMxxx.ZIP | |
|
FMT2_SEQ.txt |
||
|
PC_SEQ.txt |
TIERPxxx.DAT | |
|
PO_SEQ.txt |
MRIxxx.DAT | |
| TVRC_SEQ.txt | TVRCxxx.DAT |
(For a TrueValue Rewards User) |
Note: Your business may have more or fewer files than appear in this list. The Sequence number is unique to your company.
D-82252 – Manual Override Restored for Deposit to Apply Field.
We made a change in this release that prevented users from overriding how a deposit was applied to a customer order. This has been corrected, so that this functionality works as it did in release 19.
D-82294 – Dollar Sign Returns to Checks.
A customer reported that the application was no longer printing checks with the dollar sign ($) in front of the amount. We have corrected this problem.
D-82315 – Cash Accounting Improved for in VAT Returns (UK Only).
When calculating a VAT return, the application did not manage the distinctions in invoice remittance types (charges are different from deposits, for example). This resulted in an inaccurate VAT Due amount. We have corrected the handling of these values for Box 4 and Box 7 of the VAT Return to ensure that we manage these values as required by the HMRC. We have also updated the handling of the Pay When Paid logic to ensure that the entries in Box 3 and Box 5 are using the Total VAT Amount, which caused these issues. These are now corrected as well.
D-82352 – Hidden Scheduled Reports Issue Corrected.
A customer found that some scheduled reports were not running after the 20.0 upgrade. We corrected a bug that caused the wrong permissions to get set during the report generation. The reports were generated but they were not visible. We have corrected the issue that caused this problem.
D-82412 – Update Restores the Single Item entry on the Attachment Maintenance Form.
A customer reported that the Single Item radio button option on the Attachment Maintenance form displayed out of sequence under some conditions. We have corrected the layout issues associated with this problem and the form displays correctly now.
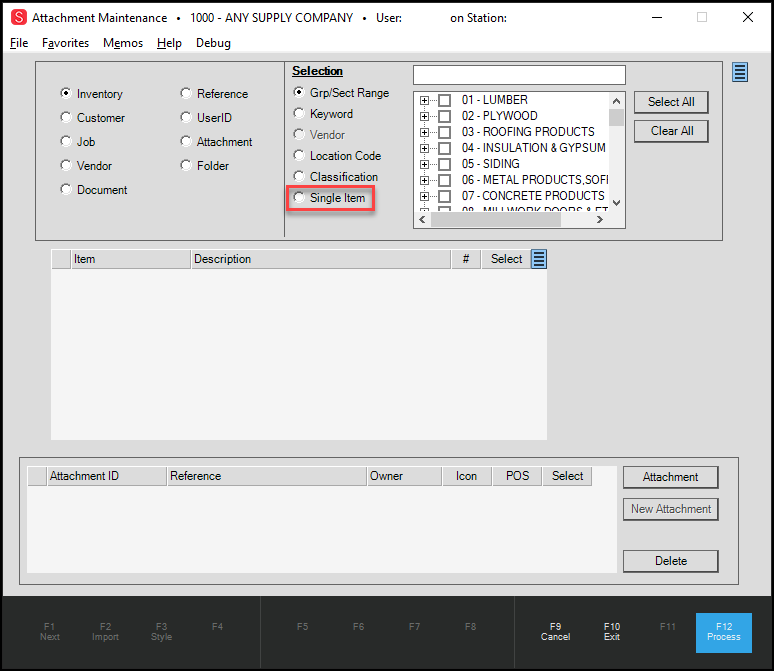
Attachment Maintenance Form with Single Item Fix Highlighted
B-101429 – Update Ensures Price Changes Convert Prices to Base UM in API.
We have corrected an issue that prevented price changes from applying to an items’ Base UM.
D-83059 – Viewing/Printing AR Statements Issues Resolved.
A customer reported errors when attempting to display and print Account Receivable statements for Retail Charge accounts using the Documents form. The error resulted when you tried to retrieve statements in the lower data grid and attempted to view or print them. We have corrected the issue that caused this error, and statements display and print as expected.