Release Details for Version 19.0
This section contains the detailed content of the version 19.0 release. Most of this information has been added to other sections of the Help System.
Note: We have changed the naming convention of our releases to simplify the numbering scheme. The first (left-most) number is the Major Release number, which includes all major changes associated with the release. The second number is the Minor Release number, which typically includes updates to improve stability and nuances that you have recommended to us pertaining to the release content. The third number, the Revision Number, refers to changes made during the beta process.
General Ledger
Units Fixed Asset Depreciation Method Disabled (For Now)
We found that the Units fixed asset depreciation method was not working correctly, so we have removed it from the Depreciation Method list as an option. From the Main Menu, go to General Ledger > Utilities > Fixed Asset Depreciation to see this change. The Units item is still in the list, but when you choose it, a new message displays:
-
The Units depreciation method is currently unavailable. Check the release notes in future software updates to know when this feature becomes available.
Point of Sale
Expanded Point of Sale Forms and Fields, Process Documents
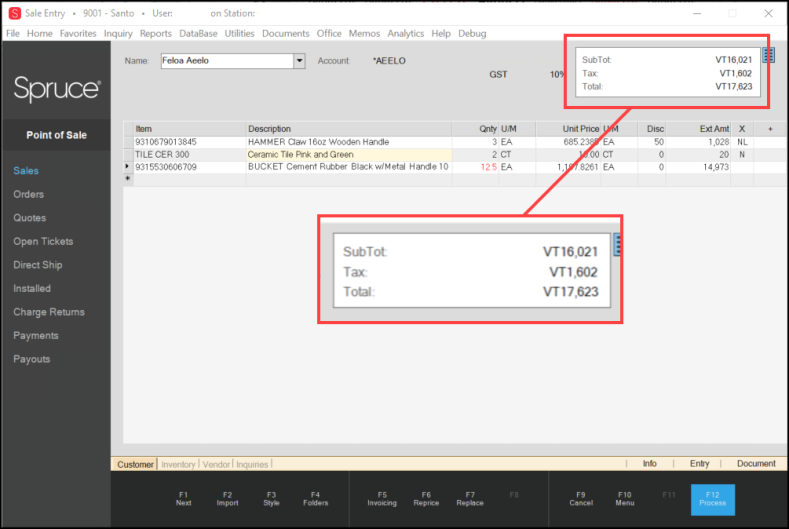
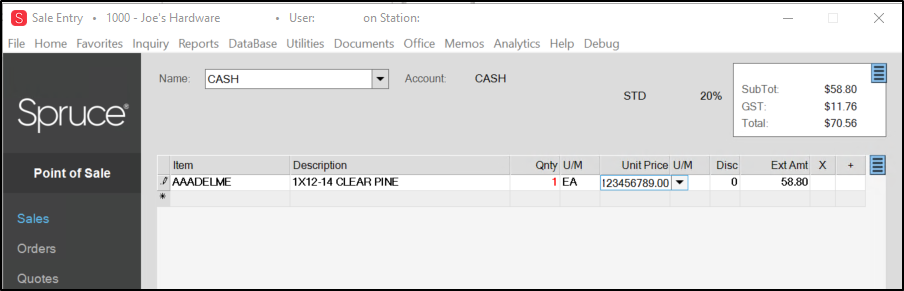
We have widened the forms and fields in the Point of Sale application areas and process documents to accommodate larger amounts. As you can see in the next figure, the Unit Price, External Amount, and the Subtotal detail boxes have been expanded since the previous version.

Sale Entry Form version 12.18.7 (background) and 12.19.1 (foreground)
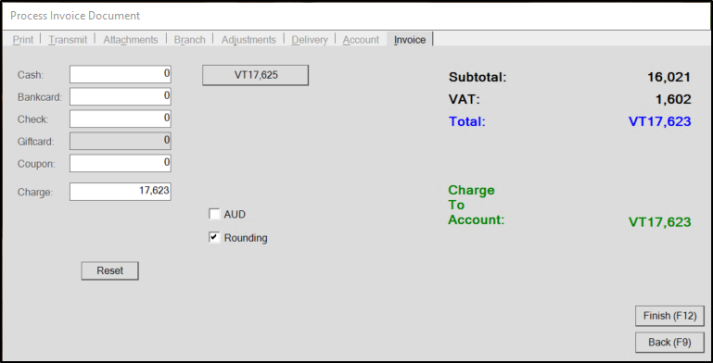
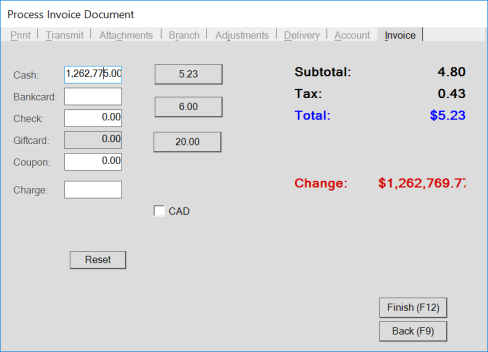
When you click Process (F12), you can see the difference in the Process Invoice Document dialog boxes. We have widened the Quick Payment buttons, Amount fields, and added room in the Subtotal/Tax/Total column for larger amounts. We have also increased the number of Quick Payment button options to provide more remittance choices for quicker checkout. These changes apply to all Point of Sale forms, including Sales, Orders, Quotes, Open Tickets, Direct Ship, and Change Returns.
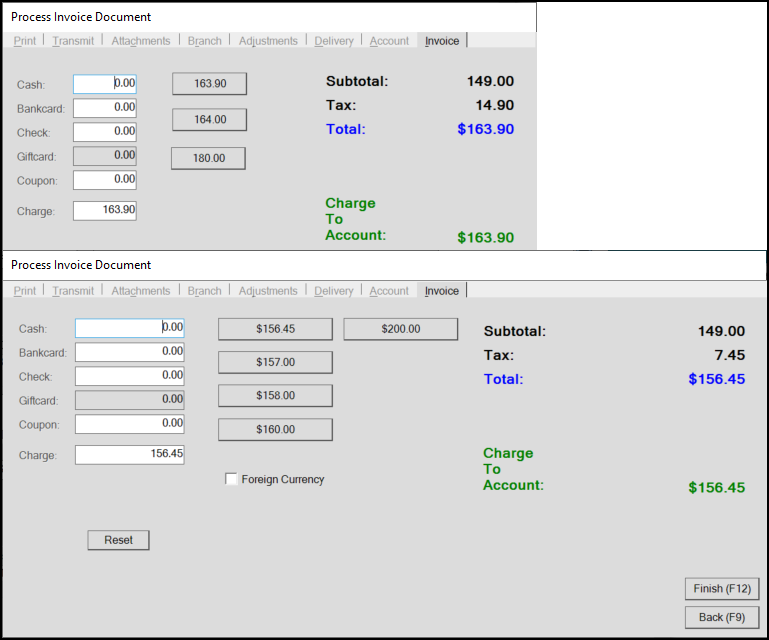
Process Invoice Document version 12.18 (background) and version 12.19 (foreground)
Account Interim Statement Enhanced
See Working with Interim Statements.
New Support for Value-Added Tax Locations in Point of Sale
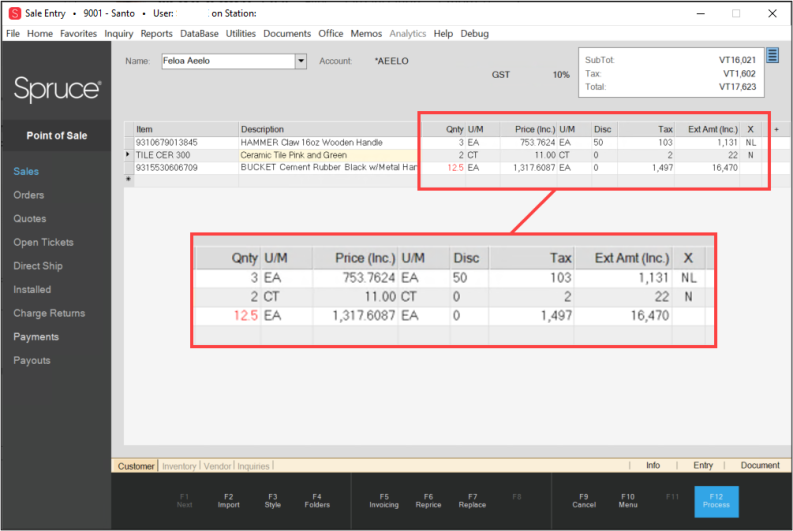
For businesses that require value-added tax settings and have set their branches to include taxes, we have added value-added tax support in the Point of Sale data grids:
-
The Unit Price column has been renamed Price (Inc.) and displays the unit price, including tax
-
The VAT or GST column shows the per-unit tax amount (when applicable) for the item
-
The Extended Amount column has been renamed Ext Amt (Inc.) and displays the line total with the tax amount included
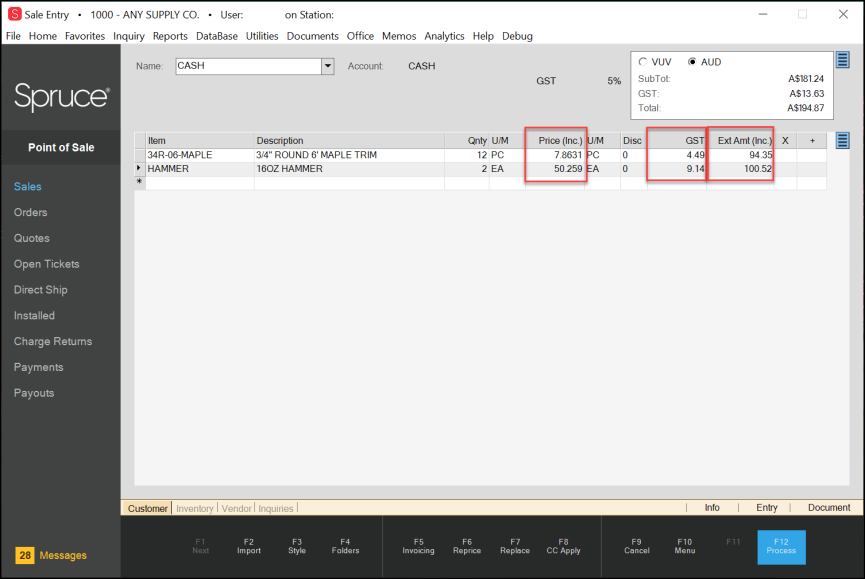
Sales Entry Form – Inc Tax Branch
These column settings display in Sales, Orders, Quotes, Open Tickets, Direct Ships, and Charge Returns for all value-added tax locations with Tax Included branch settings. These changes display for all material lists, including non-stocked items and tally items. As you change the quantities and unit information, the tax entries update to reflect the new totals. Subtotals, VAT/GST tax amounts, and Totals display in the Totals box at the top of the Point of Sale form.
Note: For more about the Tax Included branch setting, see Choosing the Inc Tax Setting for a Branch.
After you choose Process (F12), the Process Invoice Document box displays the value-added tax details as well:
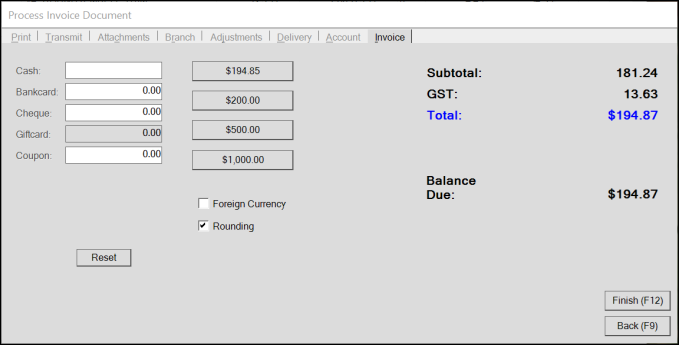
Process Invoice Document with Value-Added Tax Entries
We have also updated the Point of Sale customer-facing documents to reflect these tax settings for value-added tax sales. The following updates show in Invoice, Order, Quote, and Direct Ship, and Return documents:
-
a Price (Inc.) column indicates the item's unit price plus the tax for one unit
-
a Tax, VAT, or GST column shows the tax amount of a single line-item unit,
Note: The tax description varies by region, so the column name varies. -
an Extended Amount (Inc.) column showing the total line cost, including tax for the quantity specified,
-
a tax total tax amount for all line items in the document, which displays below the last entry line, and before the final total, and
-
the text, "Total price includes (VAT<or>GST)." appears at the bottom of the page.
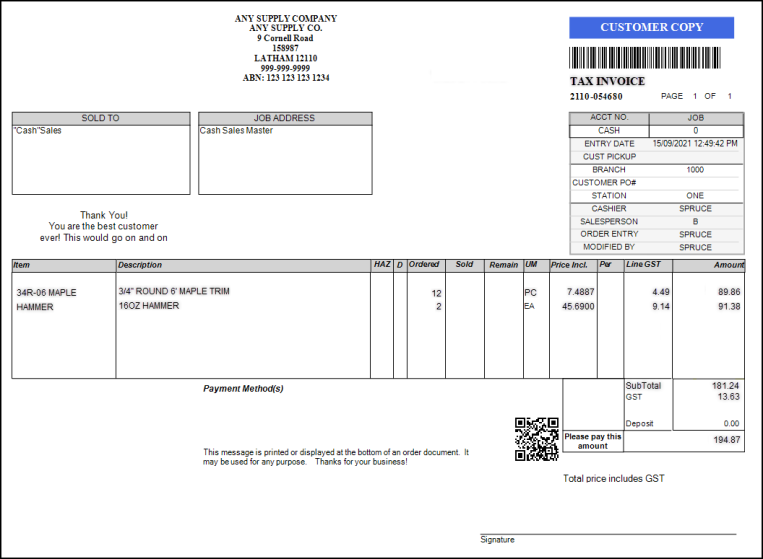
Tax Invoice with Value-Added Tax Entries
Typically, the application prints the Inc Tax document style in landscape orientation.
Note: When you add an inventory item to the data grid with a 0 price inventory setting, you can tab from the U/M field to the Price (Inc.) field and then press Enter to move to the next line.
Choosing the Inc Tax Setting for a Branch
In the Branch Setup form, a new option, Item Tax Entry Method, displays for businesses that require value-added tax settings. The application uses the value-added tax setting in the regional parameters to determine whether to display this option. The ECI Implementation or Support team sets this option for you. By setting the branch's Item Tax Entry Method to Tax Included, the branch's tax settings are applied to the unit prices and extended amounts for all entries in the Point of Sale data grid, except when the item itself has some native tax settings that apply. When the item has specific tax requirements, the application applies the item tax settings instead.
The Item Tax Entry Method list has two options: Tax Included or Tax Excluded. Tax Excluded is the default setting. You do not have to set this option for branches that exclude tax.
To set the Inc Tax branch option:
1. From the Main Menu, go to Maintenance > Database > Branches to display the Branch Setup form.
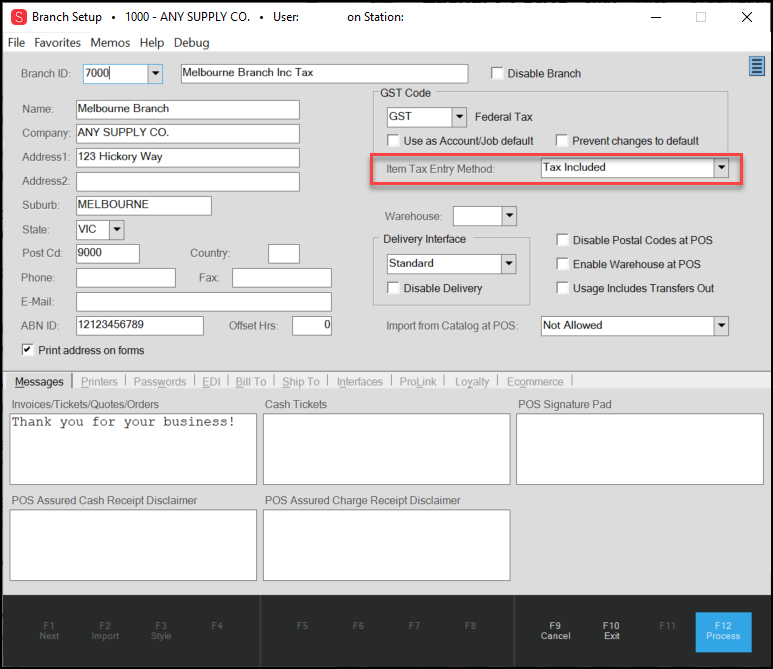
Branch Setup Form – Item Tax Entry Method Highlighted
2. In the Item Tax Entry Method list, choose Tax Included.
3. Click Process (F12) to save this change.
After you save this setting, the application uses the tax percentage associated with the entry in the Tax Code field to calculate the line taxes in your data grid, except when the line item has its own tax setting.
Note: If you do not see the Item Tax Entry Method option in your Branch Setup form, contact your ECI Implementation or Support team and ask them to set this option in your application:
-
Use VAT/GST in the Region Setup Utility form
You should also make sure that the Calculate VAT/GST Each Line option is selected in the Point of Sale > Regional tab.
We have also expanded your ability to customize Point of Sale document text to reflect local tax and equipment terminology. The resulting invoices, tickets, and other documentation reflect the updated terms as well.
Print Settings for Tax (VAT) Included Documents for POS
The application provides new document styles and printing options for value-added tax documents associated with Invoices, Orders, Quotes, Tickets, Direct Ship Orders, and Returns. These settings are valid for branches with an Item Tax Entry Method of Tax Included in the Branch Setup form.
To set this print option for each document type in an Inc Tax Branch:
1. From the Main Menu, go to Maintenance > Devices to display the Device Maintenance form.
2. Click the Printer button to display the Forms Mapping list.
3. Choose the appropriate branch and local printer options from the fields provided.
4. In the PS Sale Invoices Row, Style # column, click the list button and scroll down to the 21 InvoiceTax document style.
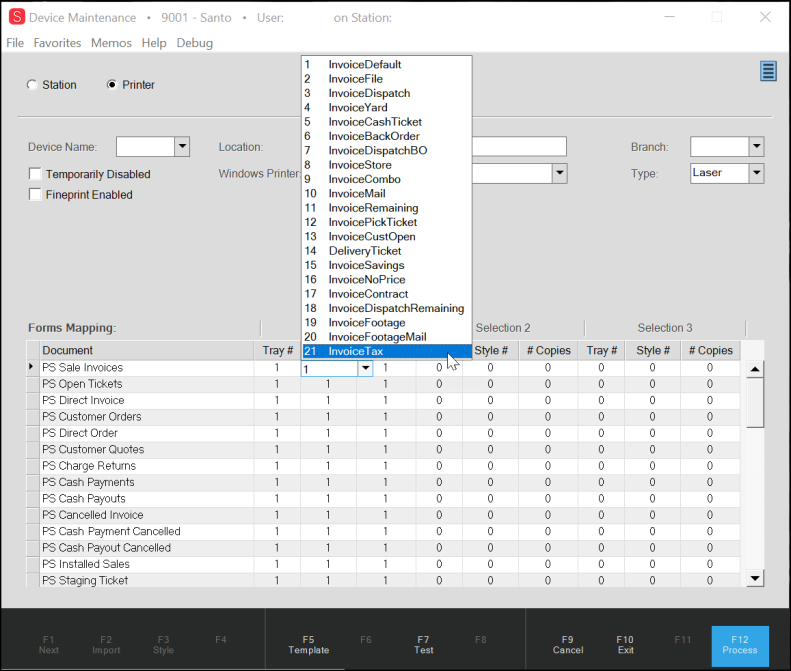
Device Maintenance Form – Printer Options – Invoice Tax Option (Point of Sale Invoice)
5. After you complete these settings, click Process (F12).
After these Invoice Tax settings are in place, when you print an invoice from Point of Sale, this type of invoice displays.
Tax Invoice Sample
Resetting the PS Sale Invoices option to the InvoiceTax style shows the tax information in the document types you selected.
Later, when you produce the documents (invoices, tickets, etc.) using the Documents form, the Invoice Tax item you selected will display as an option in the Selection Type list.
Tax (VAT) Included Options added to Contract Pricing
Value-added tax entries display in the Contract Maintenance form.
To see this change:
1. From the Main Menu, go to Point of Sale > Database > Contracts to display the Contract Maintenance form.
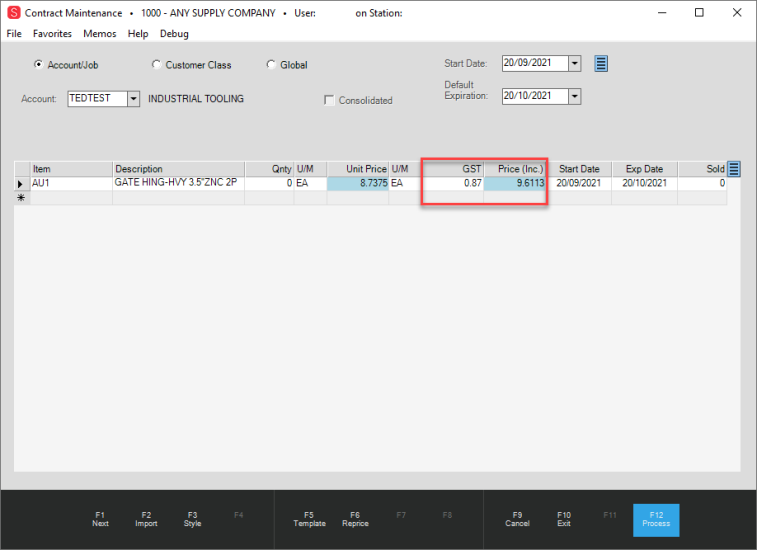
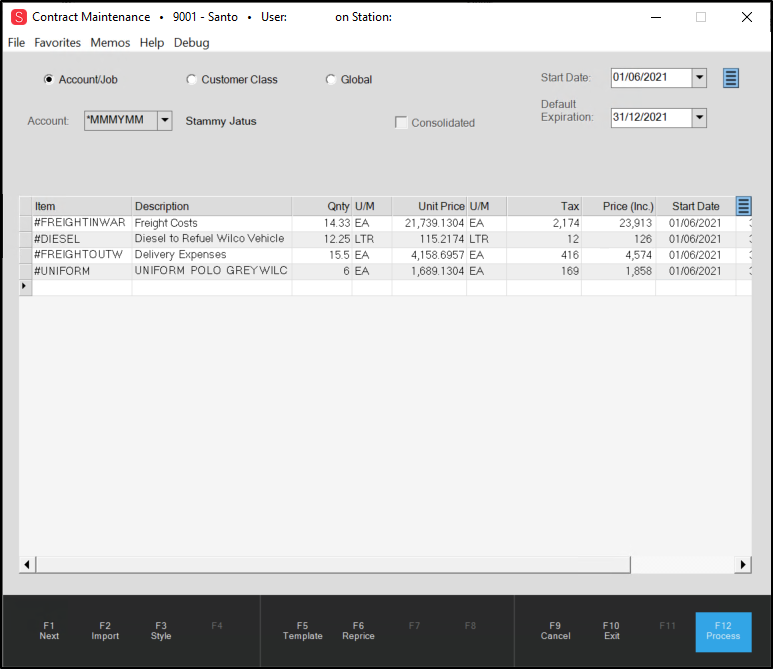
2. Add an item to the data grid to see the Tax and Price (Inc.) information for the item unit.
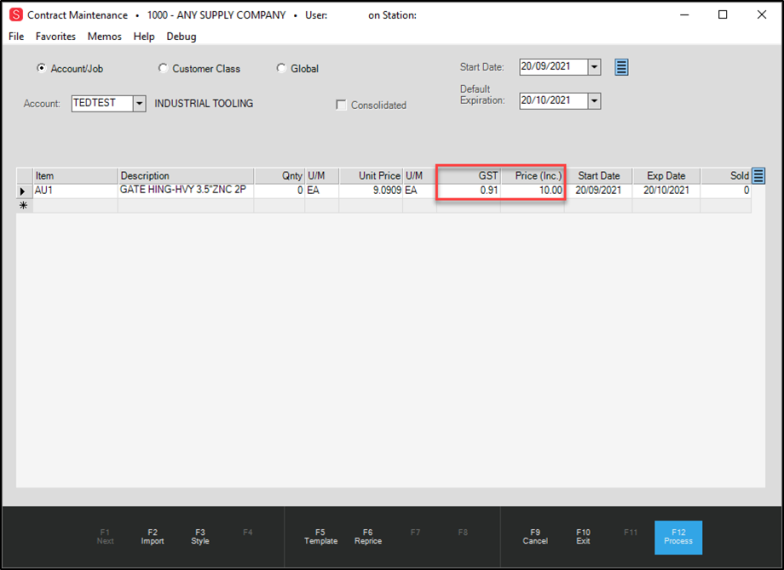
Contract Maintenance Form – New Columns Tax and Price (Inc.) Added
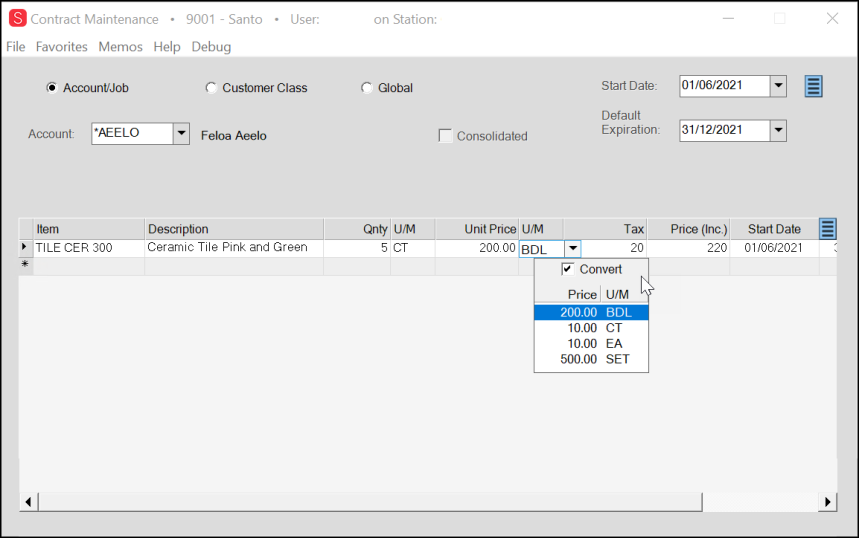
3. As you change the item's unit price options (apply discounts, change the markup, change the margin, etc.), the tax and Price (Inc.) column entries update to reflect the new tax information. References to tax terms can vary by region. GST (Goods & Services Tax) or VAT (Value Added Tax), etc.
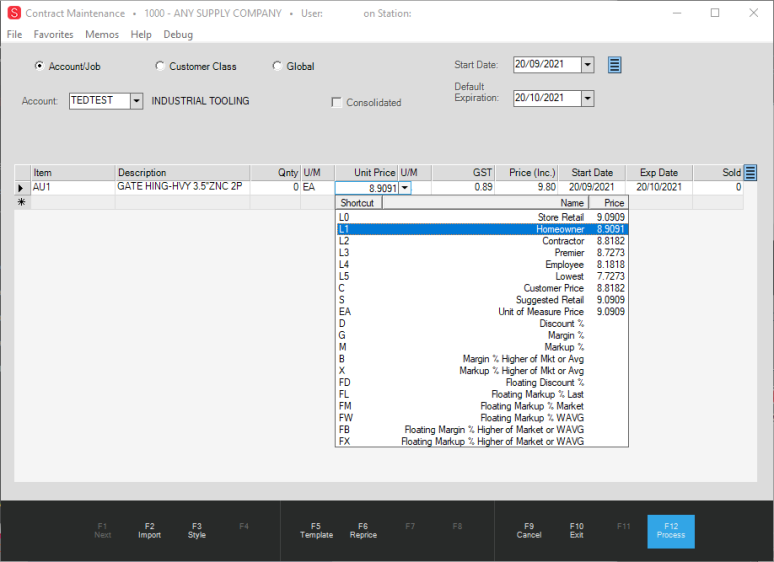
Contract Maintenance with Unit Price Selection Options
4. To check the gross margin value of an item in the list, click Style (F3), choose GM% from the local menu, and press Enter.
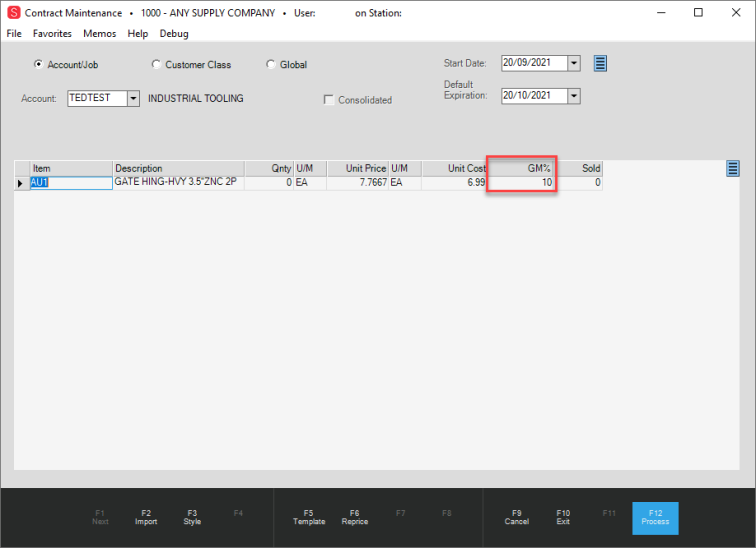
Contract Maintenance with Gross Margin Value Displayed
5. In the Unit Price field, if you apply a floating margin or Weighted Average Discount (FB) and type the amount 20 and press Enter, the GST/VAT and Price (Inc.) fields update and display with a blue background to indicate the floating point is applied.
Contract Maintenance with Floating Point Changes in GST and Price (Inc.) Values
6. If you choose a new unit of measure, the GST/VAT and Price (Inc.) fields remain in sync.
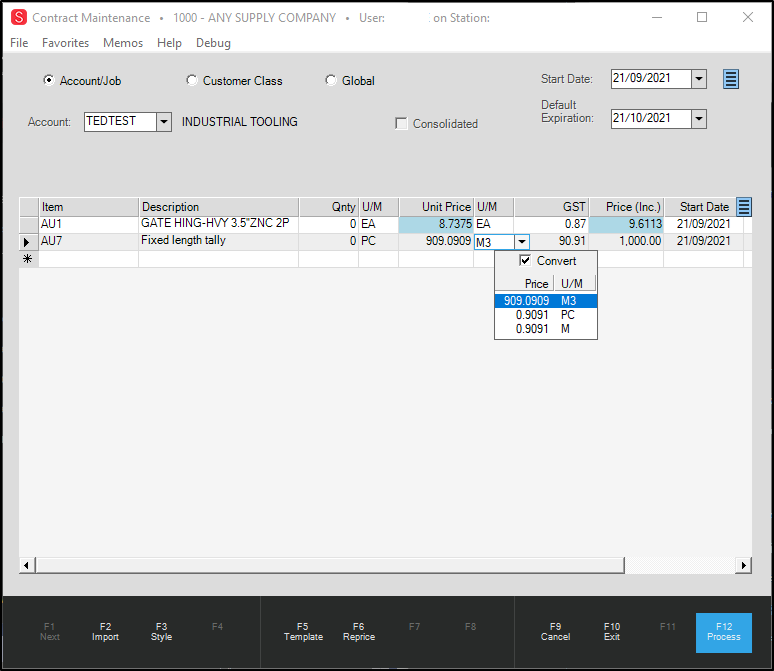
Contract Maintenance with Updated Unit Options Selected
Updates to Unit Tally Definition Box for Inc Tax Branches (Spruce Only)
When you add unit tally items to a Point of Sale data grid of an Inc Tax branch, the Price (Inc.) and the Ext Amt (Inc.) column headings display to show the tax included. When you add a unit tally item to the data grid and choose the unit of measure list, you can also click the Column Description to display the Unit Definition dialog box. The Extended Amount of the selected tally item includes the value-added tax.
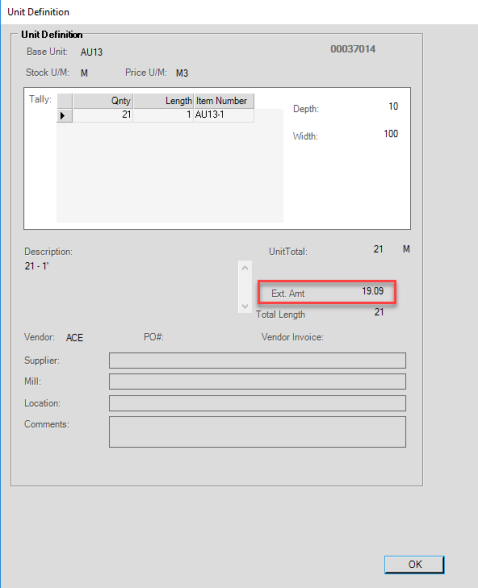
Unit Definition Box for Tally Item in Inc Tax Branch
Repricing the Total for Value-Added Items in Point of Sale
You can reprice items with value-added tax amounts in the Point of Sale data grid too. There is a new repricing option in the Reprice Options box for locations or items that use the value-added inc tax settings that allows you to specify the new total amount, including tax. The other rules of repricing an item still apply.
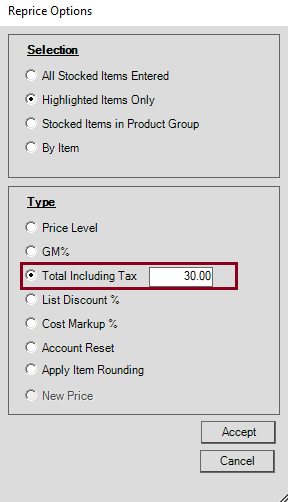
Repricing Options box with Inc Tax Settings
For value-added tax items that are in ex-tax branches or that do not have tax associated with them, a Subtotal Excluding Tax entry displays in the Reprice Options box instead:
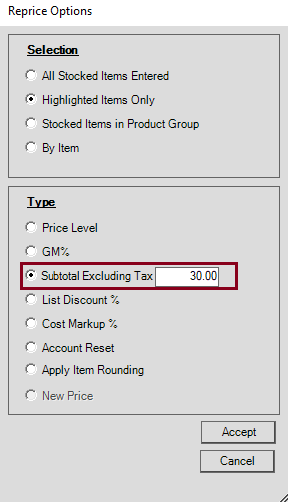
Repricing Options – Including and Excluding Tax Options Shown
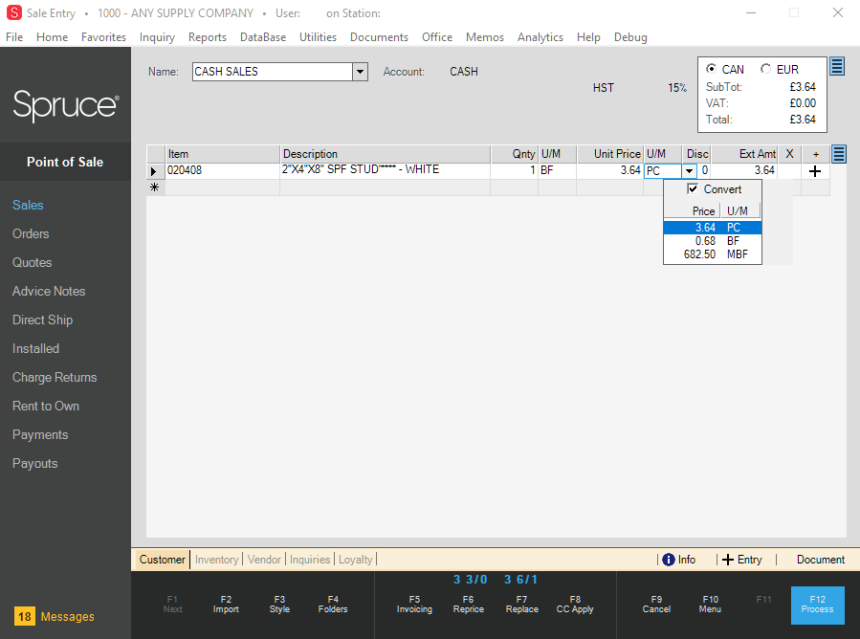
Unit of Measure Value-Added Tax Control Added
For businesses that use VAT/GST tax settings (where branches are set to Tax Included), we have added a new UM control to the data grid to show you tax-included prices associated with the item's units of measure.
Setting up the Save Tax ID Parameter
Sale Entry - Unit of Measure Control
Unit Price Entry Value-Added Tax shows Optional Tax Codes
For regions using tax-included value-added tax models, you can now review the unit price options by price category, with the tax included, by clicking the Unit Price list arrow. You can scroll through the list and choose the appropriate price category for this transaction.
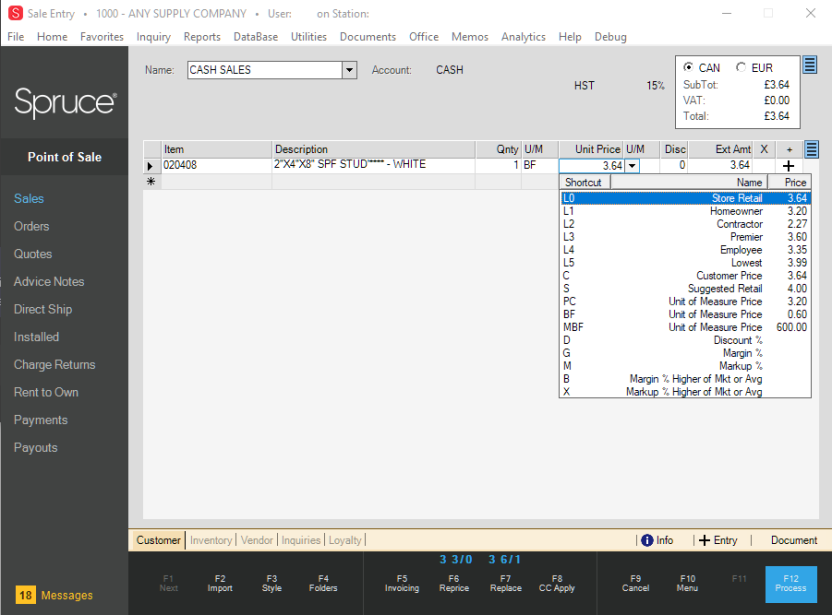
Sale Entry – Unit Price Field Highlighted
For Quotes, Value-Added Tax Document Style now Determined by Branch Settings
When you generate a quote, the application will use your branch settings to determine the tax language for the quoted materials or services. For example, in Australia, the tax quote will reflect GST inclusion or exclusion terms based on Branch location's Tax Included status setting in the Branch Setup form.
Data Grid shows Value-Added Tax Data for Fixed Length Tally Items in Point of Sale
For locations that use the VAT/GST tax settings and require tax information to be included in Point of Sale calculations, we have updated the Ext Price (Inc.) field outside of the data grid data to display Tax information, including pricing for fixed-length tally items. The amount in the Ext Price (Inc.) field reflects the total price, including tax, for all items in the grid. This change appears in the Sales Invoice, Orders, Quotes, Open Ticket, Direct Ship, and Charge Return forms.
Data Grid shows Value-Added Tax Data for Pull to Length Tally Items in Point of Sale
For locations that use the value-added tax settings and require tax information to be included in Point of Sale calculations, we have updated the data grid entries to display Include (Inc.) Tax information for Pull to Length Tally items. The Extended Price column now reads Ext Price (Inc.) to clarify that the tax is included in the price. This change appears in the Sales Invoice, Orders, Quotes, Open Ticket, Direct Ship, and Charge Return form data grid entries. Additionally, the Total Quantity Ordered field at the top of the form has been corrected to display the number of items in the grid.
Prices in Cash Tickets (Receipts) include Value-Added Sales Tax, As Needed
The application now displays the appropriate tax entries for value-added tax locations when the location is set to Tax Included by default in the Branch Setup form. For these cash purchases, the cash ticket now includes the tax in the following columns:
-
the unit price,
-
the regular price,
-
the extended amount,
-
the VAT/GST/tax description, as appropriate
-
the total tax amount entry.
The cash ticket also includes a message indicating that the total price includes VAT/GST/Tax as appropriate. When an item is tax-exempt, an asterisk displays beside it, and a message on the ticket explains that items with the asterisk are tax exempt. Any cash ticket items that are partially taxable include an additional line that shows the tax amount per unit with the unit material specified. (This change primarily applies to items in material lists.)
Cash Remittance Rounding Options Added to Point of Sale
In response to your requests, we have added new functionality to the Point of Sale system so you can choose rounding options that work best for the currency your business works in. This change should give you more control over the cash remittance amounts you ask from your customers.
We have created the following cash rounding options for sales, order, direct ship, payments, and payout remittance functions in Point of Sale. These rounding options are available in Spruce and POS Assured, if rounding is enabled for your system. Cashiers at the point of sale can choose the Rounding check box option or not based on the circumstances of the sale and the permissions you set for the cashier.
Note: This cash remittance rounding option also works for offline sale transactions.
You can select from these rounding options based on your regional currency requirements:
-
A nearest .05 rounding parameter (a "penny rounding" option)
-
A down to .05 rounding parameter (a "penny rounding" option)
-
An up to .05 rounding parameter (a "penny rounding" option)
-
A nearest integer parameter (one note rounding option)
-
A nearest 5.00 parameter (5 note rounding option)
-
A nearest 10 parameter (ten note rounding option)
-
A nearest 100 parameter (100 note rounding option)
-
A nearest 1000 parameter (1000 note rounding option)
When rounding is not enabled, default rounding for cash/currency remittance uses the standard two-decimal rounding logic.
When rounding is enabled and the user enters a cash amount that is not evenly divisible by the rounding algorithm, the following message displays:
-
"Invalid cash amount for currency rounding option ({0})" where {0} is replaced by text describing the rounding increment (Nearest .05, Nearest .05 Up, etc. corresponding to the options we offer).
Understanding the Nearest .05 Rounding Option
For currencies that no longer use a .01 coin denomination (penny/pence, etc.) this rounding option rounds up or down to the nearest .05 amount, whichever number is closer. For example, if a consumer purchases an item and you use the Nearest .05 parameter:
Note: If the total is under 0.05, the process will round the total up to 0.05.
-
If the total is 3.81, this process will round the total down to 3.80.
-
If the total is 3.83, this process will round the total up to 3.85.
-
If the total is 3.86, this process will round the total down to 3.85.
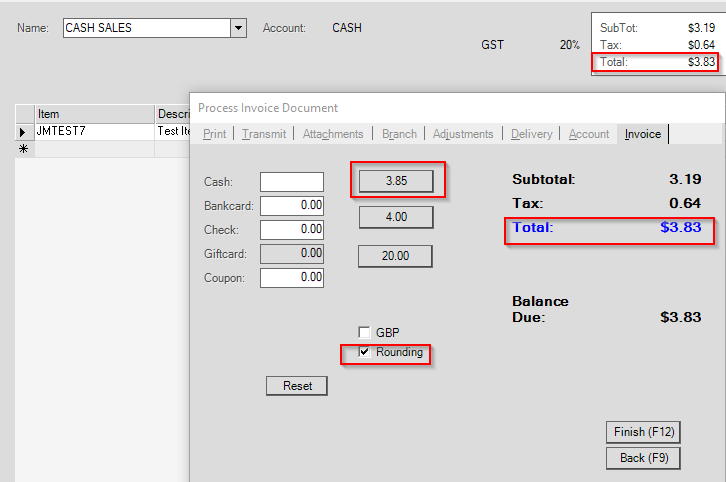
Cash Rounding Sample (Nearest 05 Rounding Option)
Note: If you uncheck the Rounding check box, the remittance amount would be 3.83 in the button beside the Cash field.
Understanding the Down to the Nearest .05 Rounding Option
For currencies that no longer use a .01 coin denomination (penny/pence, etc.), this rounding option rounds down to the next .05 amount. For example, if a consumer purchases an item and you use the Down to the Nearest .05 option:
-
If the total is 3.81, this process will round the total down to 3.80.
-
If the total is 3.83, this process will round the total down to 3.80.
-
If the total is 3.86, this process will round the total down to 3.85.
Understanding the Up to the Nearest .05 Rounding Option
For currencies that no longer use a .01 coin denomination (penny/pence, etc.), this rounding option rounds up to the nearest .05 amount. For example, if a consumer purchases an item and you use the Up to the Nearest .05 option:
-
If the total is 3.82, this process will round the total up to 3.85.
-
If the total is 3.83, this process will round the total up to 3.85.
-
If the total is 3.86, this process will round the total up to 3.90.
Understanding the Nearest 1.00 Rounding Option
We have added a nearest integer (whole number) parameter for rounding. For example, if a consumer purchases an item and you use the Nearest 1.00 option:
-
If the total is 25.49 or lower, this process will round the total down to 25.
-
If the total is 25.50 or higher, this process will round the total up to 26.
Understanding the Nearest 5.00 Rounding Option
We have added a nearest 5 parameter for rounding. For example, if a consumer purchases an item and you use the Nearest 5.00 option:
-
If the total is 25.49 or lower, this process will round the total down to 25.
-
If the total is 25.50 or higher, this process will round the total up to 30.
Understanding the Nearest 10.00 Rounding Option
We have added a nearest 10 parameter for rounding. For example, if a consumer purchases an item and you use the Nearest 10.00 option:
-
If the total is 251 - 254, this process will round the total down to 250.
-
If the total is 255 - 259, this process will round the total up to 260.
Understanding the Nearest 100.00 Rounding Option
We have added a nearest 100 parameter for rounding. For example, if a consumer purchases an item and you use the Nearest 100.00 option:
-
If the total is 201 - 249, this process will round the total down to 200.
-
If the total is 250 - 299, this process will round the total up to 300.
Understanding the Nearest 1000.00 Rounding Option
We have added a nearest 1000 parameter for rounding. For example, if a consumer purchases an item and you use the Nearest 1000.00 option:
-
If the total is 2001 - 2499, this process will round the total down to 2000.
-
If the total is 2500 - 2999, this process will round the total up to 3000.
Setting the Rounding Options for Cash Remittance
After you have chosen a rounding option for cash remittances, you can set this option in the Parameter Settings form.
To set the rounding options for Point of Sale Cash Remittance (tender rounding):
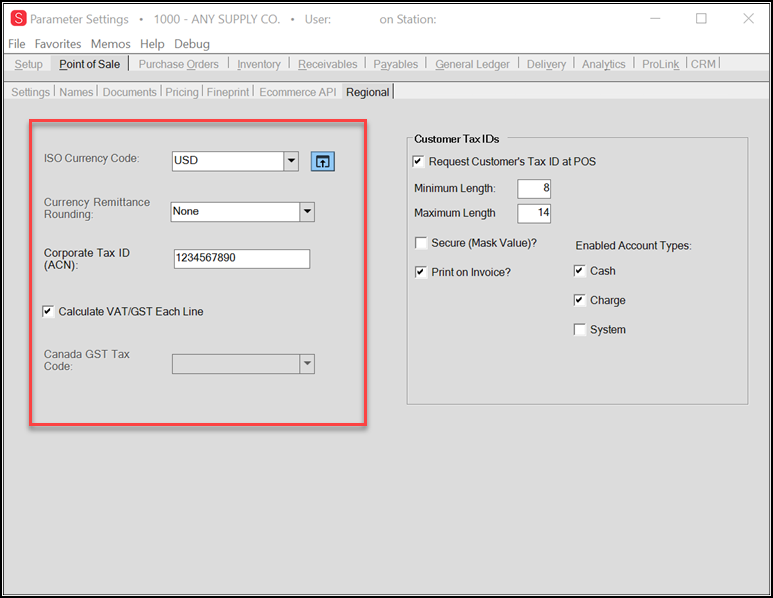
1. From the Main Menu, go to Maintenance > Database > Parameters > Point of Sale > Regional to display the regional parameter settings.
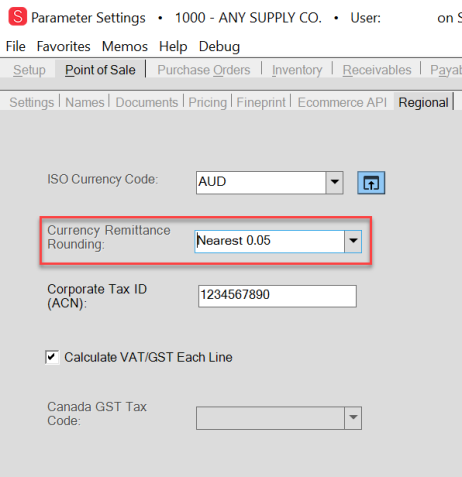
Parameters > Point of Sale > Regional Tab (Currency Remittance Rounding)
2. From the Currency Remittance Rounding list, choose the appropriate rounding option for your business:
-
A nearest .05 rounding parameter
-
A down to .05 rounding parameter
-
An up to .05 rounding parameter
-
A nearest integer parameter
-
A nearest 5.00 parameter
-
A nearest 10.00 parameter
-
A nearest 100.00 parameter
-
A nearest 1000.00 parameter
3. When you have completed your selection, click Process (F12) to save the setting.
Note: After this option is set, cashiers at the point of sale can choose the Rounding check box option or not based on the circumstances.
Handing Rounding when Importing Offline POS Assured Sales
When we import POS Assured offline sales, we import the rounding amount, which the application uses to calculate totals to mirror those of the original sale.
New Support for Collecting Tax IDs at Point of Sale
In some locations, consumer tax IDs are required on Point of Sale documents. Additionally, for some consumers, or types of accounts (CASH, for example), the tax ID may vary and need to be supplied during each transaction. Consumer tax information may or may not be considered sensitive depending upon the location. To meet this need, we have added a feature to request, display, and optionally retain the consumer's tax ID at time of Point of Sale processing. This gives your business control over this feature, which can be enabled for any region and any accounts that require it.
If you do not set the options described in this section, nothing changes in your Point of Sale process.
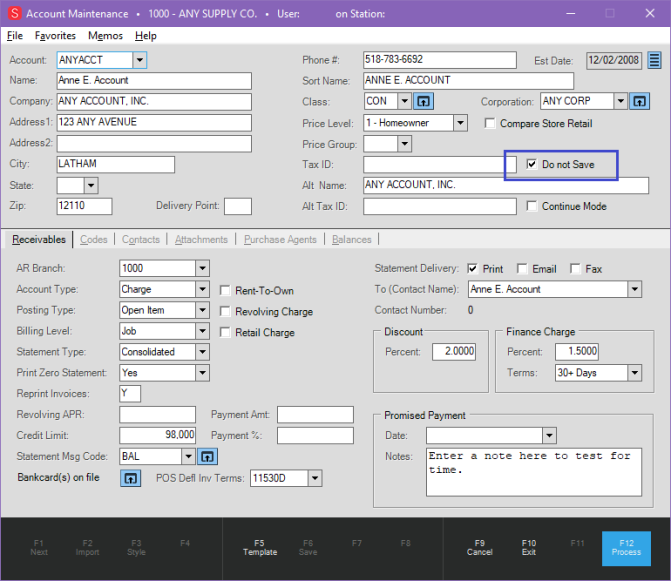
When the feature is enabled, a new check box, "Do not Save," displays in the Account Maintenance form, beside the primary Tax ID field.
The "Do not Save" check box beside the Tax ID field allows you control whether you save the Tax ID to the consumer's account when it is collected at the Point of Sale.

Account Maintenance Form with Do not Save Option Highlighted
When you check the Do not Save check box, the application does not save the tax ID that is collected during the Point of Sale process or retain it for future use. You can set the Tax ID behavior that works best for your business by following these guidelines:
-
To use the account's primary tax ID for every transaction:
Enter the account's primary tax ID in the Tax ID field and check the "Do not Save" check box. -
To require the entry of a tax ID for each account transaction and not save the tax ID given at the Point of Sale:
Leave the Tax ID field blank and check the "Do not Save" check box.
Note: If you want to save the new tax ID to the account each time it is provided at the point of sale, do not check the Do not Save check box.
When the option to require Tax ID is enabled and the cashier selects the print option, the application adds the Tax ID information to the receipt documents below the billing address.
During a transaction, if the Tax ID field is left empty, a warning message displays to prompt the cashier to fill the field. Management can escalate this warning to an error if they choose. More information about this feature is covered in the next section.
Note: Tax ID may not appear on receipts where the sales tax is not final (as with an interim or down payment).
Another Note: You can choose the accounts that will use these settings by following the instructions in Setting the Tax ID Option for a Group of Accounts. You can change the "Do not Save" check box setting for a single account using the instructions in Setting the Tax ID Option for an Account.
These instructions describe the setup process to add the "Do not Save" check box to the Account Maintenance page and Tax ID options for an account in Point of Sale.
To set up the collection of Tax IDs at the Point of Sale:
1. From the Main Menu, go to Maintenance > Database > Parameters > Point of Sale > Regional to display the Regional Parameters options.
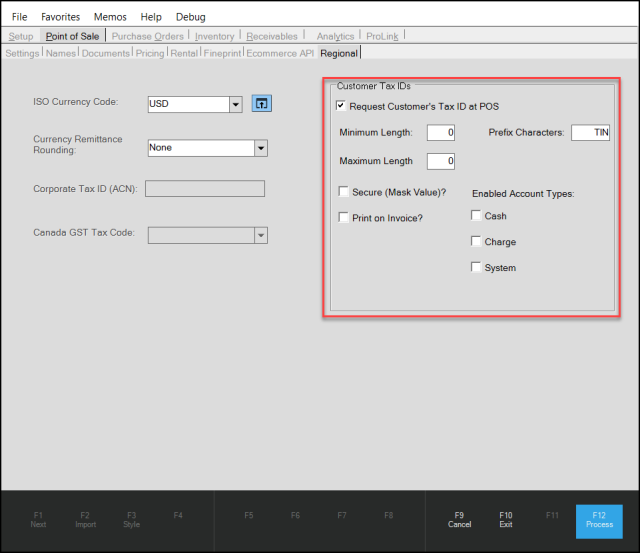
Point of Sale > Regional Tab – Customer Tax IDs Parameter Settings
2. Complete the following selections:
-
Request Customer's Tax ID at POS
Click this check box to prompt a cashier to collect the tax ID at the Point of Sale.
Note: If you leave this check box unchecked, the Tax ID field will not display in the Process Invoice Document, and the tax ID will not display on the invoice. -
Minimum/Maximum Length
Consider the number of digits required in the Tax ID field and enter the Minimum and Maximum length amounts. These entries are not necessary and can remain 0 by default. -
Secure (Mask Value)?
Select this check box to display the Tax ID field with the ID number masked in the Process Invoice Document at the point of sale. When you select this option, the cashier can still change the tax ID entry, if necessary.
- Cashiers with secure permissions can select the Tax ID menu button, and click Show Tax ID, which allows them to view and change the customer's tax ID.
- Cashiers without secure permissions can still type in a new Tax ID entry if there is no tax ID in the Account Maintenance form.
-
Print on Invoice
Click this check box to add the tax ID to the invoice.
Leave this check box unchecked to prevent the tax ID from printing on the invoice.
Note: To set up the application to print the tax ID on the invoices, tickets, or other POS-related documents, set the printer configuration (Maintenance > Database > Devices) to "print to file" printer. If you have physical receipt printers, you can use those devices instead. -
Enable Account Types: Cash, Charge, System
Choose the account types that this tax ID should be collected for. Options include: Cash, Charge, and System (for transactions that aren't linked to a specific account).
3. When you have completed these selections, click Process (F12).
Setting the Tax ID Options for a Group of Accounts
To add the "Do not Save" check box and Tax ID field changes to a group of accounts:
1. From the Main Menu, go to Receivables > Utilities > Maintenance > Account Global Modify. The Account Global Modify form displays. Two new options are in the Field Name List:
-
Do not save Tax IDs
Selecting this option adds the "Do not Save" check box (beside the Tax ID entry) in the Account Maintenance form. -
Tax ID
Selecting this option allows you to select the accounts for which the Tax ID field is a required entry field.
2. From the Field Name list, choose the Do not save Tax IDs entry.
3. In the New Value field, type N.
4. Select the filter criteria to display the accounts that should have this check box.
To display the "Do not Save" check box:
-
For all accounts, in the Filter section, leave the All Accounts check box selected.
-
For a particular class of accounts, choose the appropriate class from the Class list in the Filter section.
-
For a particular account type, choose the account type from the Acct Type list in the Filter section.
5. Then, click View (F8) to display the list of accounts that match your filter criteria.
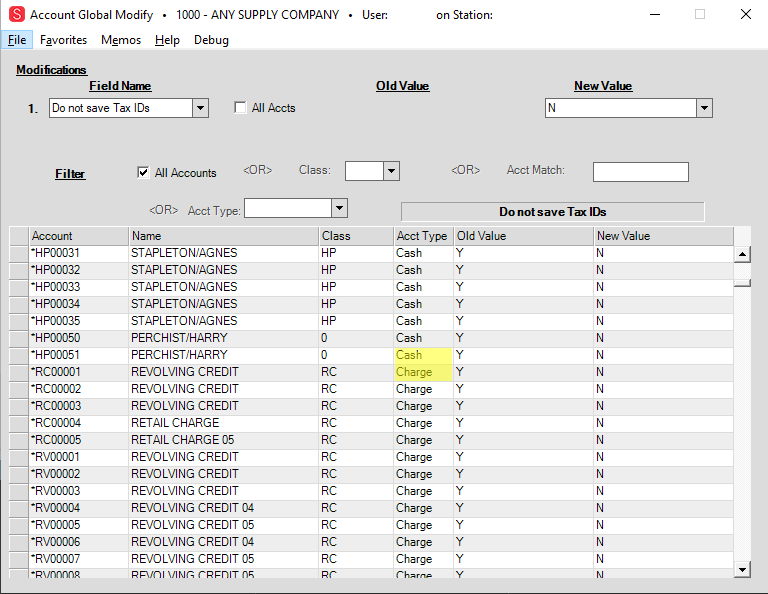
Account Global Modify Form with Do not Save Account Entries
6. When you have confirmed your selections in this list, click Process (F12) to save these settings.
7. Return to the Field Name list and choose the Tax ID entry.
8. In the New Value field, type Y.
9. Select the filter criteria to choose the accounts for which you want to display the Tax ID field. To display the Tax ID field:
-
for all accounts, in the Filter section, leave the All Accounts check box selected.
-
for a particular class of accounts, in the Filter section, choose the appropriate class from the Class list.
-
for a particular account type, in the Filter section, choose the account type from the Acct Type list.
Note: You cannot display filtered accounts if the Tax ID field does not display in the Account tab of the Process (F12) form.
10. When you have selected these options, click View (F8) to display the list of accounts that match your filter criteria.
11. When you have confirmed the entries in this list, click Process (F12) to save these settings.
Setting the Tax ID Option for an Account
When you use the "Do not Save" check box, you can either use the account's primary tax ID or the cashier can enter the tax ID manually for each transaction.
To see the changes in the Account Maintenance form:
1. From the Main Menu, go to Point of Sale > Database > Account. The Account Maintenance form displays.
2. From the Account list, select the account that you need to set the Tax ID Do not Save check box for.
Account Maintenance Form – "Do not Save" Check Box Highlighted
WARNING: If you select "Do not Save" in the Account Maintenance form and the cashier enters a new Tax ID during a transaction, the application will not save the new tax ID to the account record.
If you do not select "Do not Save" and the cashier enters a new tax ID during the transaction, the application saves the new tax ID to the account record.
3. Choose one of these options:
-
To save a tax ID for this account and use it in future transactions, enter the primary tax ID and select the "Do not Save" check box.
-
To prompt the cashier to ask for a new tax ID for each new transaction, leave the Tax ID field blank. If you want to save the tax ID entered for the next transaction
4. Then, click Process (F12) to save your change.
Using the Tax ID Changes in Point of Sale
When the Tax ID field setup and account settings are complete, a cashier with appropriate permissions can enter a new tax ID whenever they process a sale, order, quote, open ticket, or direct ship invoice for an updated account.
At the end of the transaction process, the Process (F12) form displays and the tax ID is located on the Account tab. The display behavior of the Tax ID field depends upon the cashier's permissions and the Tax ID and account settings:
-
If the cashier does not have permission to view the tax ID number, the field is not editable, and the application masks the tax ID number. The primary tax ID stored in the Account Maintenance Tax ID field for every transaction.
-
If the cashier has edit permissions, they can view/change the tax ID number entry. When they change the tax ID:
- If you checked the "Do not Save" check box for the account, the application uses the new tax ID number for this transaction only. The tax ID number is not saved to the Account Maintenance form.
- If you did not check the "Do not Save" check box for the account, the application uses the new tax ID number for the transaction and updates the account's primary tax ID in the Account Maintenance form. This new ID number will display for the next account transaction.
To enter the tax ID for an account in Point of Sale:
1. Complete a sale, order, quote, etc., as you usually would and click Process (F12).
The Process Invoice Document form displays.
On the Account tab, the Tax ID field displays but whether the entries are viewable/editable depends upon the setup options and the user rights. If the user has permission to change the Tax ID, the Local Menu icon displays.
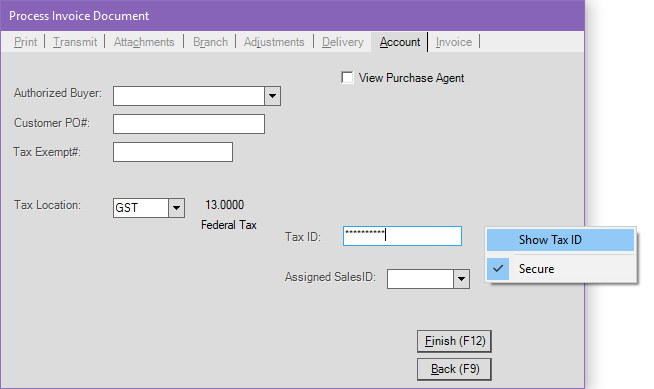
Process Invoice Document Form with Tax ID Local Menu
2. To change the tax ID, click the Local Menu icon, click Show Tax ID, and enter your password.
The current tax ID for the account displays in the Tax ID field.
3. In the Tax ID field, type the new tax ID.
4. Click Finish (F12).
The updated tax ID prints/displays on invoices, tickets, and return documents when enabled.
Calculating/Displaying Foreign Currencies in Point of Sale/Documents
If you have consumer accounts that use a currency different from your own, you can reset their accounts to recognize and use their foreign currency. This change allows the application to display all Point of Sale information in your consumer's local currency and produce Point of Sale documents that reflect their currency amounts.
When you make this change, the foreign currency shows in the Point of Sale forms and the documents that result, including sales invoices, orders, quotes, direct ship documents, and returns. You must have multi-currency enabled and currency conversion parameters set up before using this feature.
ECI Implementation and Support teams can set currency conversion options for your application so that when you are working with accounts that use a foreign currency, you can provide pricing and documentation in their local currency. These team members can help you set currency conversion details like:
-
Specifying the foreign currency code (based on the ISO 4712 currency code list)
-
Applying the conversion factors established to the Point of Sale data grids
-
Specifying the currency symbol that displays when the new currency amounts are in the Point of Sale forms and documents
-
Setting the check format that is appropriate for the new currency
-
Establishing the exchange rates between the local currency and the foreign currency used in Point of Sale data grids
-
Setting the General Ledger mapping for AP Accrual, Accounts Payable accounts, and, when Currency Differential is enabled, the Currency Differential accounts to keep track of currency rate changes.
These settings are based on the International Organization of Standardization guidelines and should not be reset independently. After these options are set, foreign currency settings can be shut off, but not modified.
Setting a Foreign Currency Type for a Group of Accounts
There are two new field name options in the Account Global Modify form that allow you to modify the currency settings for a single account or a group of accounts to show the consumer's foreign currency in the Point of Sale data grid and related documents. The field name options are:
-
Currency Code allows you to specify the code you want to change the consumer's account to
-
Currency Pricing POS allows you to apply this currency code setting to the Point of Sale data grids and documents in the consumer's account.
Changing an account's default currency code and applying it to the Point of Sale infrastructure allows the application calculate and quote prices in sales, orders, etc. using the consumer's own currency. This makes it much easier for them to see their actual costs.
These instructions explain how to set up these two field name options for a group of accounts. You can follow the instructions for a single account as well.
TIP: You may want to go through your list of accounts and group the accounts that will use the same currency code either as a class or an account type before you start this process.
To set up foreign currency codes for one or more account(s):
1. Check with your ECI Implementation or Support team to ensure that Multi-Currency is turned on for your application and the currency conversions have been set up for the consumer's foreign currency.
2. From the Main Menu, go to Point of Sale > Utilities > Maintenance > Account Global Modify to display the Account Global Modify form.
3. From the Field Name list, choose Currency Code.
4. From the Old Value list, choose the default currency code you currently use for the accounts.
5. From the New Value list, choose the account's foreign currency code from the currencies you have defined.
6. From the Filter options, consider the accounts you want to change the currency code for and choose the appropriate instructions to search for those accounts:
-
To change the currency code for a particular class of accounts, choose the class that contains those accounts from the Class list.
-
To change the currency code for consumers with a particular account type, choose that account type from the Account Type list.
-
To change the currency code of a single account, enter the account number in the Acct Match field.
7. When you have completed your account type selection, click View (F8) to display the list of accounts that match your search criteria.
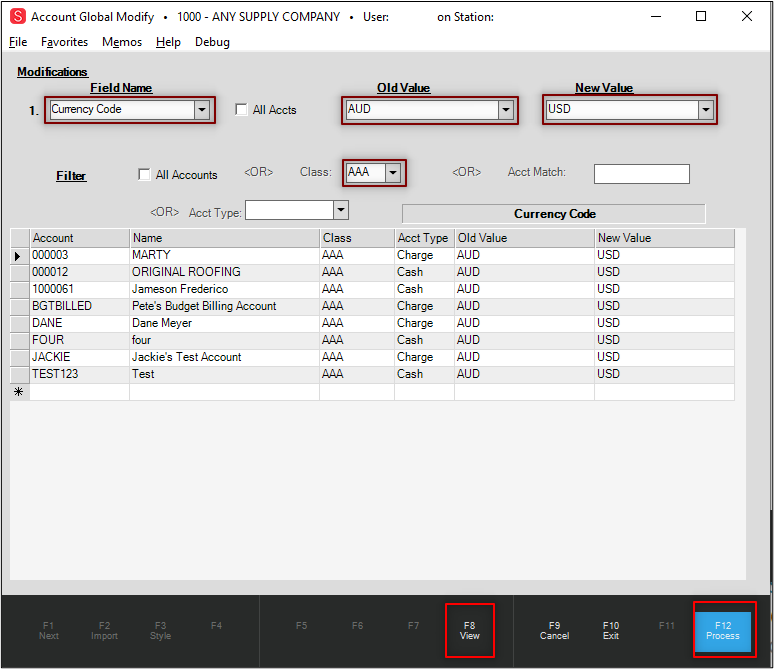
Account Global Modify Form with Account Search Results
8. Review the accounts in the list to ensure this is the list of accounts to which you want to apply the new currency code.
9. Click Process (F12) to apply the currency code to those accounts.
10. Return to the Field Name list and choose Currency Pricing POS.
11. From the Old Value list, type N.
12. From the New Value list, type Y.
13. As you did in step 6, choose the same filter options to display the same group of accounts.
-
To change the currency pricing in the POS grid for a particular class of accounts, choose the class that contains those accounts from the Class list.
-
To change the currency pricing in the POS grid for a particular account type, choose that account type from the Account Type list.
-
To change the currency pricing in the POS grid for a single account, enter the account number in the Acct Match field.
14. After you have made your account selection, click View (F8) to display the list of accounts that match your search criteria.
15. Review the accounts in the list to ensure this is the list of accounts to which you want to apply the new currency pricing.
16. Click Process (F12) to apply the currency pricing change to those accounts.
For the accounts you selected, the currency settings have been reset and the consumer's currency should display in the Point of Sale data grids and documents.
International Feature Support
Working with Zero Decimal Currencies
For currencies with zero decimal digits, such as the Vanuatu Vatu, the application uses rounding in Point of Sale areas for extended amounts, totals, and currency formatted values. Decimal values still display in Quantity, Unit Price, and Discount fields, but not in the Tax and Extended Amount or total fields. This rounding behavior affects the Tax and Extended Amount field in the data grid and the entries that display in the Total box at the top of the form. These changes are displayed in Sales, Orders, Quotes, Open Tickets, Direct Ship, Installed, and Change Returns data grids, and related pop-ups and documentation.
After this setting is enabled, you can see this change in the Point of Sale Forms and tabs, as shown in the next figure.
Point of Sale > Sales for Zero Decimal Currencies (Data Grid)
Line discounts taken in the Point of Sale data grid are reflected accurately in the Extended Amount.
The Totals box displays the sale results without decimals in the branch's regional currency.
Point of Sale > Sales for Zero Decimal Currencies (Total Box Detail)
After you click Process (F12), the Process Invoice Document displays the amounts from the data grid and the Totals box. The Cash buttons and regional currency symbols display
Process Invoice Document for Zero Decimal Currencies
The resulting invoice reflects the zero decimal settings and the regional currency symbols as well:

Invoice for Zero Decimal Currencies
Note: When a particular regional currency is set, the appropriate currency symbol and tax references display. When you run the General Ledger at the end of the day, the numbers are rounded and balanced correctly.
Displaying Contract Pricing for Zero Decimal Currencies in Point of Sale
In Contract Pricing, the Quantity, Unit Pricing, and Units of Measure detail still display decimal amounts, but the Tax and Price Including Tax (Inc.) do not.
Contract Maintenance Form for Zero Decimal Currency
Unit price options still display decimal values even in the selection list.

Contract Maintenance Form with Unit Price Selection List
When the data grid includes a tally unit, decimal amounts display as part of the Units of Measure option:
Contract Maintenance Form with Unit of Measure List Selected
Working with Promotions in Zero Decimal Currencies
Promotions are supported in the zero decimal currencies, ensuring that quantities and unit pricing reflect the decimal amounts as appropriate and the resulting Extended Amounts and taxes display as a rounded total.
As you may recall, promotions are applied to transactions only in the Point of Sale, Sales Entry form. There is no change to the way promotions are set up or managed; there is only a change to the way the information displays in the Sales Entry data grid. We tested our internal methods to ensure that the rounding process only occurs after the calculation has been completed. So, as discussed in other sections about zero decimal currencies, the quantity and unit price information still display decimal entries, but the Extended Price and tax data displays as a rounded amount.
Working with Adjustments in Zero Decimal Currencies
When working with adjustments in a zero decimal currency, the same exclusion rules about Quantity and Unit Price apply. The Extended Amount and the amounts that display in the Totals box are rounded. In the Adjustments tab of the Point of Sale items, the Adjustment amount column allows you to enter a decimal amount, but the Extended Amount entry is rounded as in the next example. The Subtotals, Tax, and Total entries update with the change automatically.
Sales Entry Form Adjustments in a Zero Digit Currency Account
Working with Receivables Entry, Posting, and Reporting in Zero Decimal Currencies
Payment entry, posting, and reporting for zero decimal currencies show the currency values without decimals. The Payment Entry form displays the Statement Due, Statement Net, and Amount fields without decimal amounts. If you enter a decimal amount in the Amount field, the system reverts the entry to the non-decimal value and rounds the amount you entered appropriately.
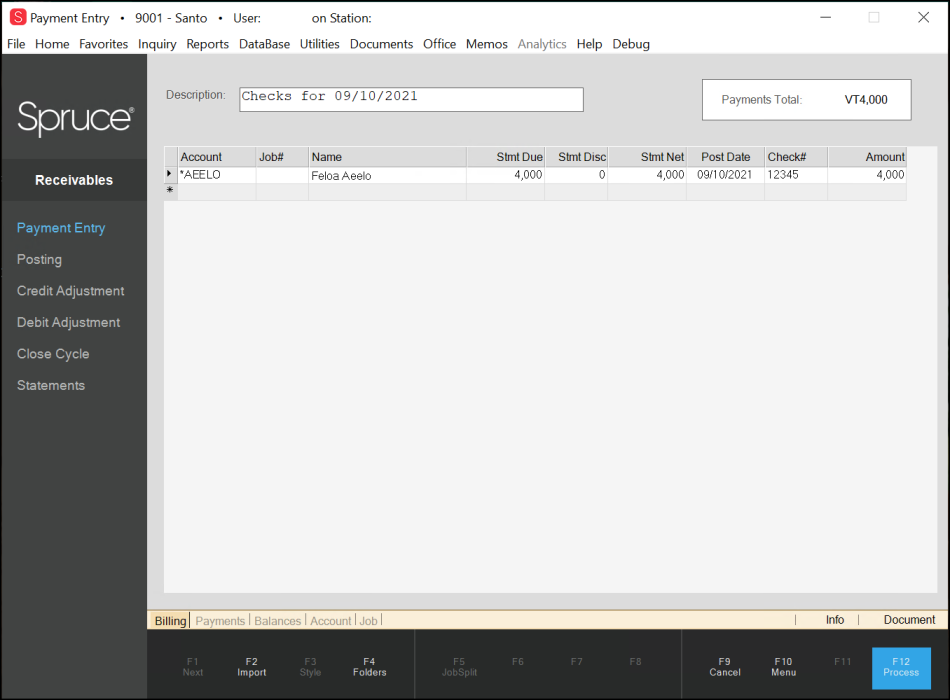
Payment Entry Form of Zero Decimal Currency Account
When you review the Payments and Balances tabs, the payments display without decimal amounts.
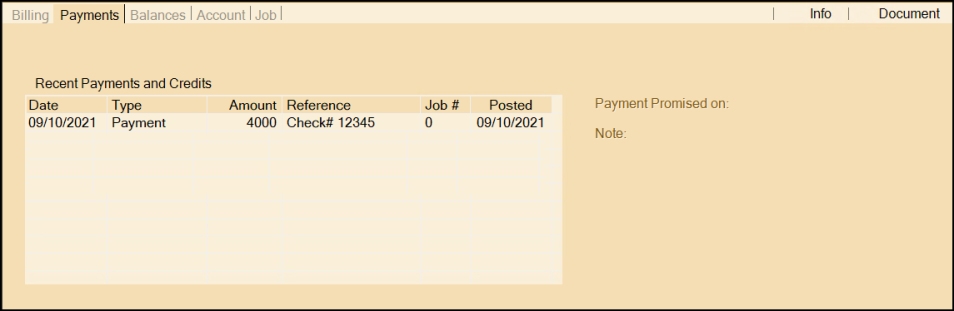
Payment Entry Form - Payments Tab
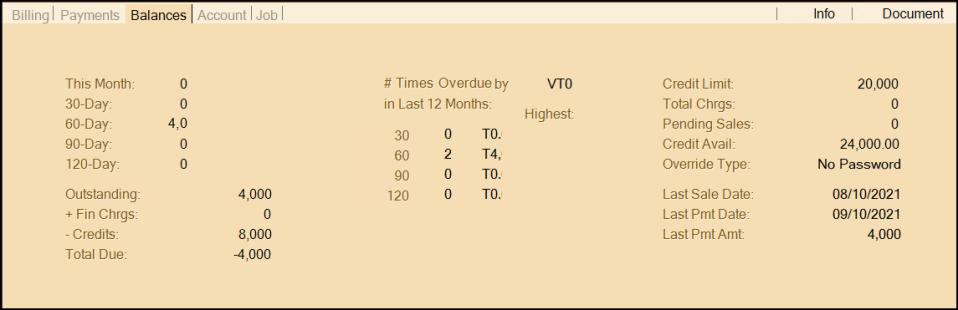
Payment Entry Form – Balances Tab
These changes also display in other Payment Entry form-related dialog boxes, such as Rent to Own Contracts (Hire to Purchase). These values are also represented in the General Ledger > Journal Selection entries.
When payments are posted, the values that reflect the charges, credits, and outstanding balances have no decimal amounts.
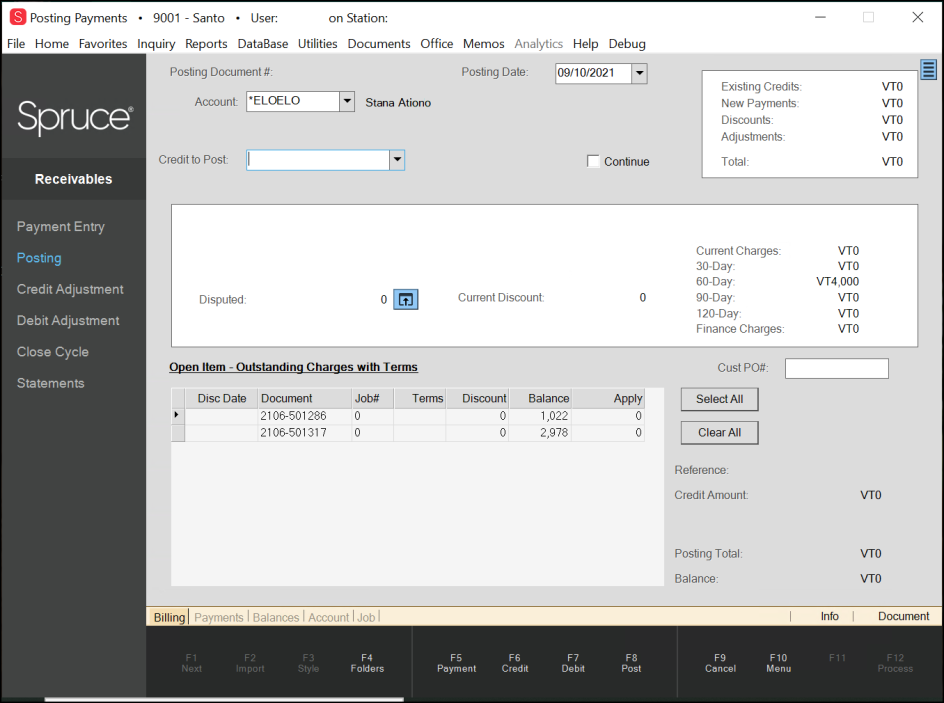
Posting Payments Form in Zero Decimal Currency
When you need to enter a payment, a credit adjustment, or a disputed invoice, the values in the Amount field show the zero decimal currency as well.
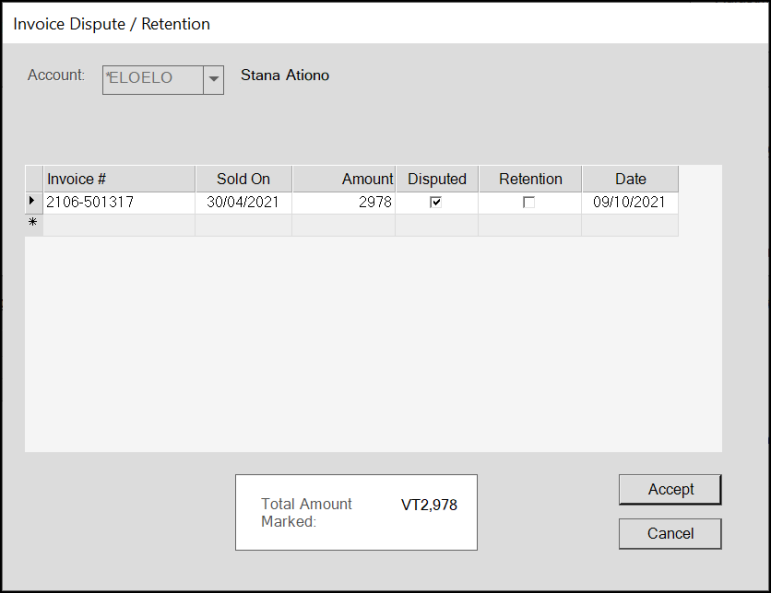
Payment Posting – Invoice Dispute / Retention Dialog Box in Zero Decimal Currency
When you add a Debit Adjustment, the Amount field allows you to type in a decimal but saves the amount with no decimal entries.
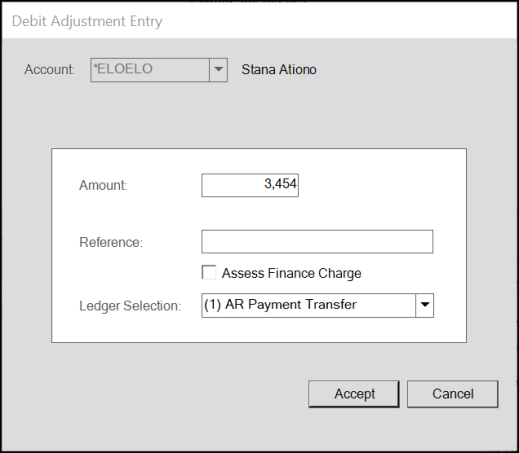
Payment Posting – Debit Adjustment Entry in Zero Decimal Currency
The reports that the Accounts Receivable section produce also reflect the zero decimal currency rules.

AR Statement Trial Balance in Zero Decimal Currency

Account Status Report in Zero Decimal Currency
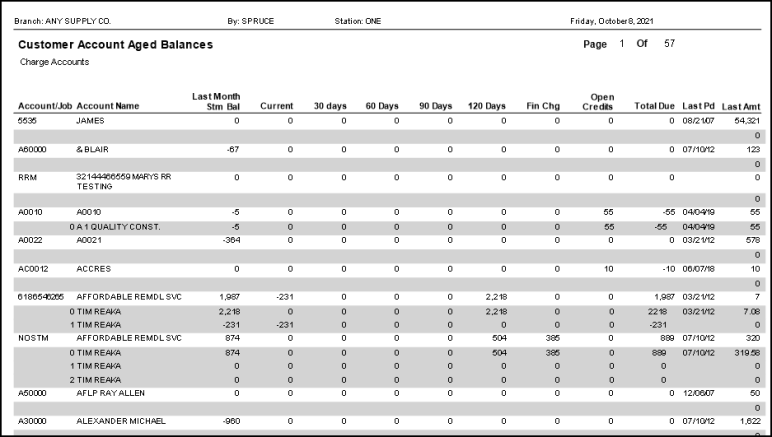
Customer Account Aged Balances Report in Zero Decimal Currency
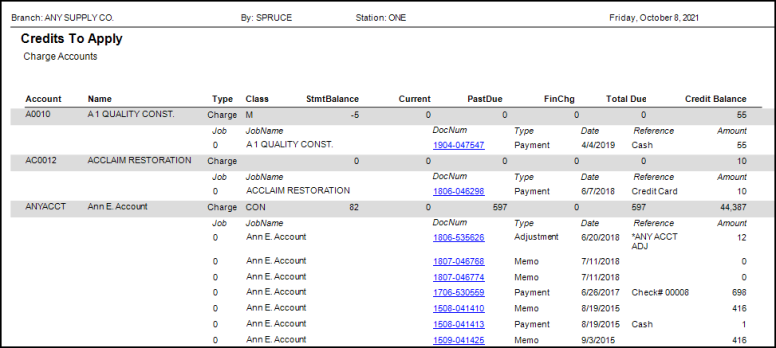
Credits to Apply Report in Zero Decimal Currency
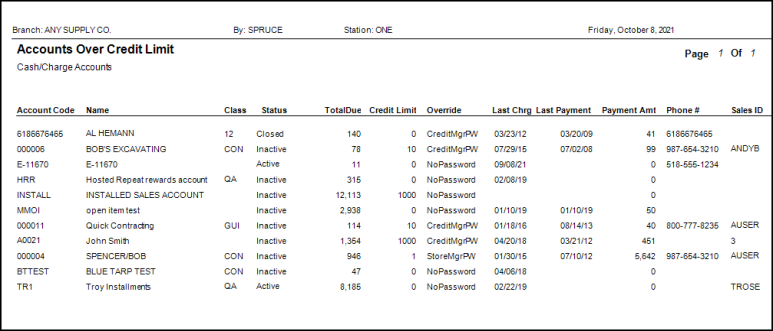
Accounts Over Credit Limit Report in Zero Decimal Currency
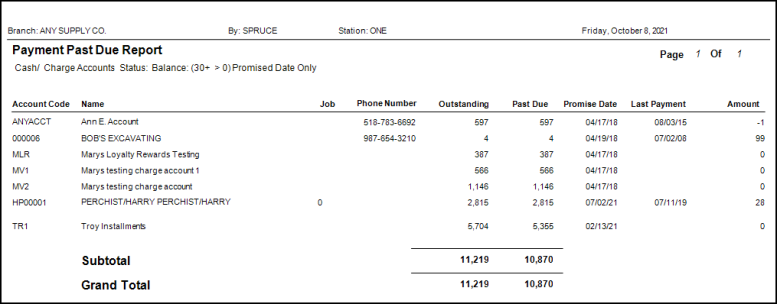
Payment Past Due Report in Zero Decimal Currency

Corporation Status Report in Zero Decimal Currency

Installment Report in Zero Decimal Currency
Updates to Cultural Parameters Ensure Better Regional Support
When you log into your ECI software, you expect the application and web services to use your local, cultural settings to manage your daily business. These parameters ensure that the system maintains the appropriate number system, currency values, tax codes, metric/imperial distance, and weight settings, and time and date format settings that are the basis for running your business on this platform. We now use Region and Cultural parameters to preserve these settings that apply to every aspect of Point of Sale, including sales, orders, quotes, inventory, returns, direct shipments, receipts (tickets), and payment tracking.
In this release, we have expanded support for many cultural and currency settings. We have increased the width of some numeric fields and forms for regions with higher currency valuations. Additionally, we have made changes to accommodate currencies with either zero-decimal-digit currencies or currencies with two digits. We have expanded your currency rounding choices for cash remittance to support additional regional business requests. We have updated our date formatting parameters to include DD/MM/YYYY date settings, which prevented some reporting and accounting features from working optimally in the past. We have updated our use of currency symbols to ensure that your quotes, documents, and reports display regional currency amounts correctly. We have made these changes so that every time you log in to your application or access ECI web services, you can complete your work successfully and serve your consumers reliably.
You can work with your ECI Implementation and Support teams to set the regional, language, and currency settings for
Setting a Regional Currency Code, Regional Tax, and Cash Remittance Rounding Options
We recommend the following settings to define your regional currency, cash remittance rounding options, and to set value-added tax options.
To set the native currency code and other regional options for your business:
1. From the Main Menu, go to Maintenance > Database > Parameters > Point of Sale > Regional tab to display these options:
Parameter Settings – Point of Sale – Regional Settings
2. Begin in the ISO Currency Code field. Type the appropriate three-character ISO currency code to specify your business's local currency and press Enter.
3. In the Currency Remittance Rounding field, select one of these options if you need currency rounding for cash remittances:
-
A nearest .05 rounding parameter (a "penny rounding" option)
-
A down to .05 rounding parameter (a "penny rounding" option)
-
An up to .05 rounding parameter (a "penny rounding" option)
-
A nearest integer parameter (one note rounding option)
-
A nearest 5.00 parameter (5 note rounding option)
-
A nearest 10 parameter (ten note rounding option)
-
A nearest 100 parameter (100 note rounding option)
-
A nearest 1000 parameter (1000 note rounding option)
See Cash Remittances Rounding Options Added to Point of Sale to learn more about these options.
4. In the Corporate Tax ID (ACN) field, enter the corporation's tax ID.
Note: This field is for Australian businesses only.
5. Consider the Calculate VAT/GST Each Line check box.
-
If your business has value-added tax requirements, check this option to ensure the system calculates the value-added tax for unit prices and extended amounts on each line of the Point of Sale data grid.
-
If your business does not have value-added tax requirements, leave this check box unselected.
6. In the Canadian GST Tax Code list, select the appropriate tax code option from this list.
Note: This field is for Canadian businesses only.
7. Click Process (F12) to save these selections.
New Support for Regional Currency Denominations (Notes and Coins)
In this release, we have created the infrastructure to support the addition of new currency denominations. These denomination settings (currency notes and coins) help you record end-of-day cash drawer amounts better.

Currency Denominations Form
We have established denomination records for our currently supported currencies; however, as you expand into new markets, you can add denominations that meet your needs.
Note: These currency denomination values are based on ISO-4217 Currency Codes (https://www.iso.org/iso-4217-currency-codes.html).
Important Note about Setting up Currency Code Maintenance
When you need to use foreign currencies, your Implementation and Support teams need to configure several application areas to ensure that the application manages these currencies correctly. We recommend that you work with them to complete this setup before you begin to use them.
Reviewing your Account's Currency Denomination Settings
For more about setting up your regional currency code, see Setting a Regional Currency Code, Regional Tax, and Cash Remittance Rounding Options. These settings are required for regions that do not use the US Dollar as a standard currency.
To review an account's currency denomination settings:
1. From the Main Menu, go to Maintenance > Database > Parameters > Point of Sale > Regional tab to display these options:
Parameter Settings – Point of Sale – Regional Settings
Note: The entries in this form depend on the Region settings that have been entered for this account in the Region Setup Utility form.
2. In the ISO Currency Code field, choose the three-character ISO Currency Code for the account’s native currency. Typically, one of these currency code options is selected, but our team can set up other currencies as your market needs expand:
-
AUD = Australian Dollar
-
CAD = Canadian Dollar
-
GBP = Great Britain Pound Sterling
-
PGK = Papua New Guinea Kina
-
XCD = St. Kitts and Nevis East Caribbean Dollar
-
TZS = Tanzanian Shilling
-
USD = US Dollar
-
VUV = Vanuatu Vatu
3. To see the denominations associated with the selected ISO currency, click the Settings  icon beside the ISO Currency Code. The Currency Denomination form displays. This list shows the note and coin denominations of the currency.
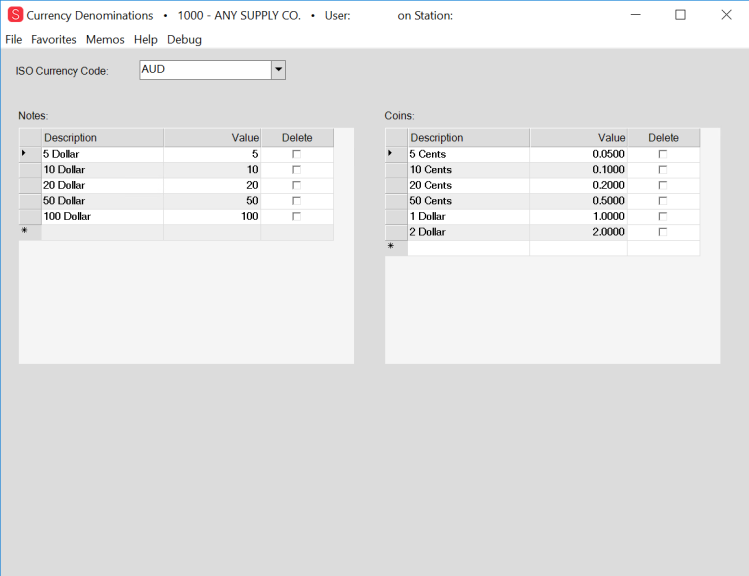
Currency Denominations Form
4. Click Close to return to the Regional tab.
Currently, there are pre-defined denomination settings for currencies in the following regions: United States, Canada, Great Britain, Australia, St. Kitts & Nevis, Vanuatu, Tanzania, and Papua New Guinea.
Getting Permission to Set up a Currency Denomination
If you need to add new denominations (notes and coins), use the instructions below to see the Currency Denomination options.
To add currency denomination settings to a user’s (or user group’s) permissions:
1. From the Main Menu, go to Maintenance > Database > User IDs to display the User ID Maintenance form.
2. On the Security Options tab click the Permissions List button to display the Permissions List Code Maintenance dialog box.
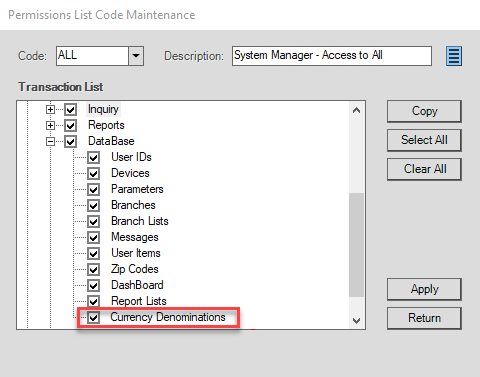
Permissions List Code Maintenance with Currency Denominations Highlighted
3. In the Code list, choose the user ID or group you want to set the permissions for to ensure you are adding permissions for the appropriate user/type.
4. Under the Maintenance > Database node, click the Currency Denominations check box and click Apply.
This adds the Currency Denominations option to the user's Database menu.
Note: You may have to exit and re-enter the application to ensure this change takes effect.
Setting up a New Currency Denomination
By default, we include currency denominations for the following regions: United States, Canada, United Kingdom, Australia, St. Kitts & Nevis, Vanuatu, Tanzania, and Papua New Guinea in our software. If you are adding a new currency that requires new currency denominations, use these instructions.
To set up new currency notes and coins for a new currency type:
1. Complete the instructions in Getting Permission to Set up a Currency Denomination first.
2. From the Main Menu, go to Maintenance > Database > Currency Denominations option. The Currency Denominations form displays.
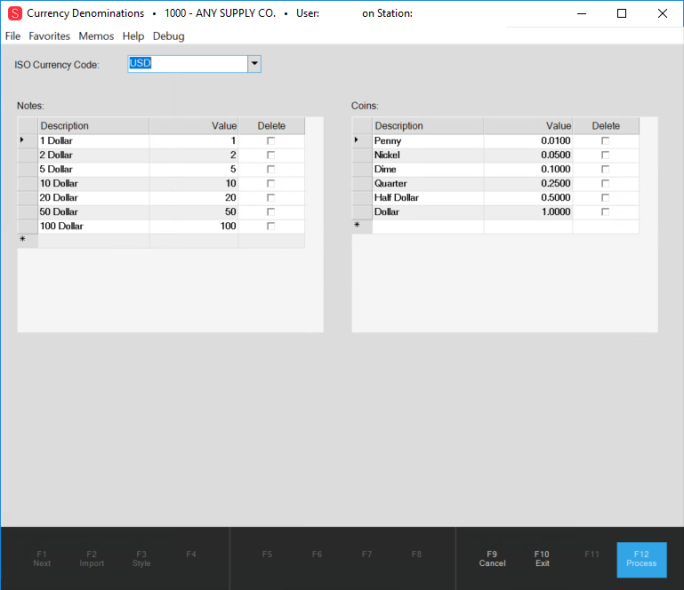
Currency Denominations – US Currency Example
In this form, we maintain a list of the notes and coins and their values associated with each currency type used by the customers we serve. We use this information in rounding and in the Cash Drawer Tally tracking feature, as well as for the quick cash options in the Point of Sale process forms.
3. To add denominations for a new currency, in the ISO Currency Code field, type the three-character currency code of the currency you want to add and press Enter. A reliable list of ISO 4217 Currency Codes is available here. The Notes and Coins lists refresh with blank fields.
4. In the Notes list Description field, enter the name of the currency denomination by typing the number and name of the denomination.
For example: 1 Dollar
5. Press Tab and in the Value field, enter the value of this denomination using numbers and decimal values, if decimal values apply to this currency.
6. Continue to enter additional increasing denominations using steps 4 and 5 and repeat these steps in the Coins list if the currency uses coins.
We have added the currency for Bermuda (BMD) as an example:
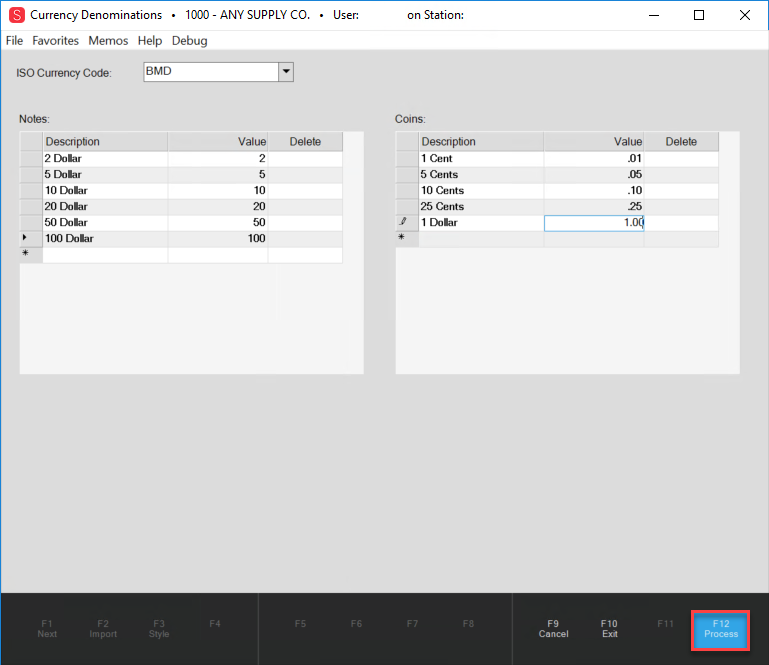
Currency Denominations Form – Bermuda (BMD) Currency Entered
7. After your entries are complete, click Process (F12), to save your denomination entries.
After your currency settings and denominations are configured, the Cash Drawer Tally feature will use the denominations for tallying the end-of-day cash drawer totals.
Recording the Cash Drawer Amounts at the End of Day
At the end of a cashier's shift, you can record the drawer’s cash on hand amounts for each note and coin type using this process:
1. From the Main Menu, go to Point of Sale > Utilities > Cash Drawer to display the Cash Drawer Handler form.
2. From the Drawer # list, choose the cashier's cash drawer ID.
3. From the Session Start list, choose the beginning of the cashier's shift. The Opening Balance information displays.
4. Click Tally (F6) to display the Cash Drawer Tally box.
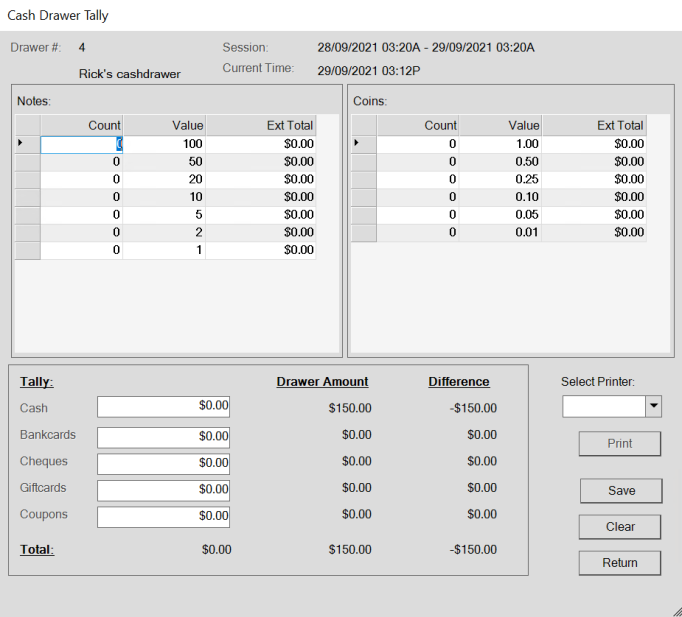
Cash Drawer Tally Box
5. In the Count column, enter the number of notes and coins of each denomination in the drawer.
In the Tally section at the bottom, the Cash field updates as you enter new count amounts.
WARNING: Do not enter an amount in the Cash field directly as it would not reflect the counts entered in the Notes and Coins columns.
For example, if the cashier's drawer has five 20s, seven 10s, four 5s, seven 2s and fifteen 1s, and they have three .50s, six .25s and four .01s, the Count entries would look like this:
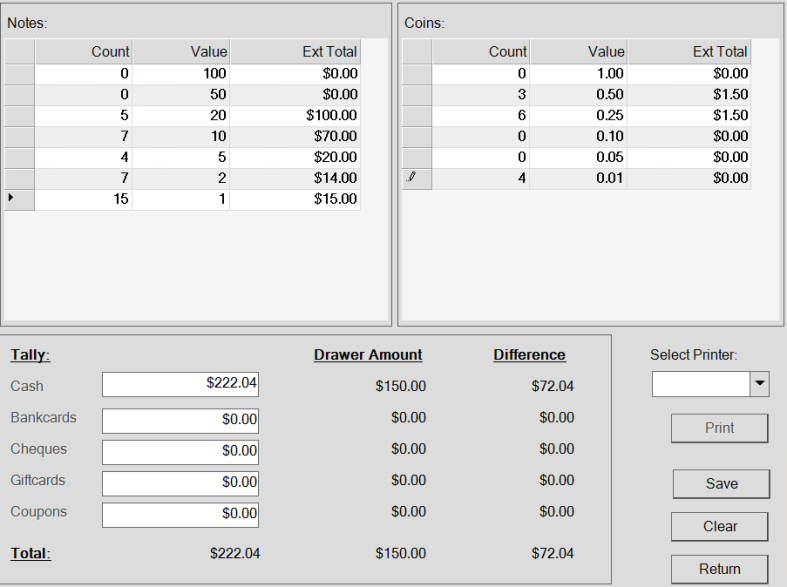
Cash Drawer Tally Details Entered
6. When you have completed your entries, click Print or press <Alt P>and select a printer to print a copy of the Cash Drawer Tally record. Printer options are your defined Windows printers, not the printer names identified in the application.
Note: This prints the form as an image but does not create a document. You cannot reprint this image later, so it is a good idea to print it when it is complete.
7. To finalize the Cash Drawer tally record, click Save to save the totals for the cash drawer session.
Setting an Account’s Currency Type in Point of Sale
For businesses that work with customers that use a foreign currency, you can now set the customer’s currency type in the account’s Account Maintenance form settings so that these values display in the Point of Sale forms (including Sale Entry, Order Entry, Quote Entry, Direct Ship, Open Ticket Entry, and Charge Returns Entry).
To set an account’s foreign currency type for Point of Sale transactions:
1. From the Main Menu, go to Point of Sale > Database > Account to display the Account Maintenance form.
2. In the Account list, find an account that uses a currency foreign to your business. The account details display.
3. Click the Codes tab.
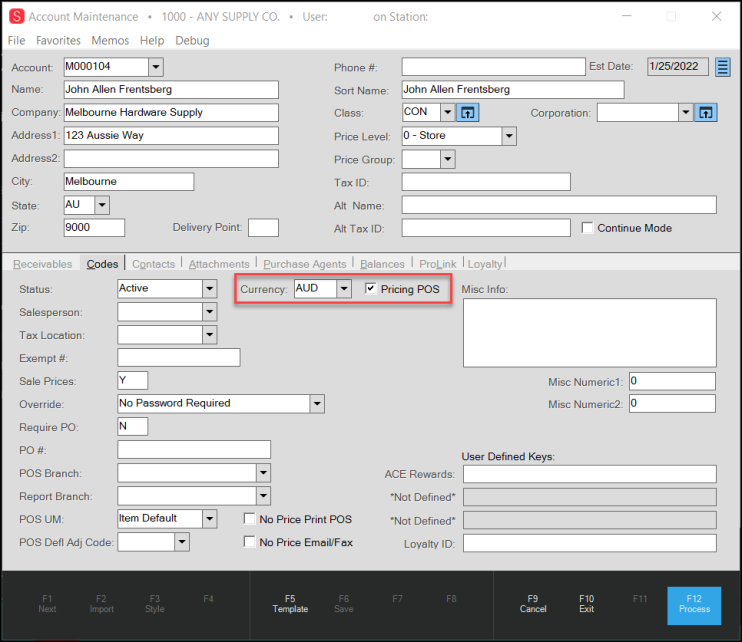
Account Maintenance Form > Codes Tab > Currency and Pricing POS Highlighted
4. From the Currency list, type the customer’s native currency code in the Currency list field. For example:
-
AUD = Australian Dollar
-
CAD = Canadian Dollar
-
GBP = Great Britain Pound Sterling, etc.
5. To display the customer’s local currency in the Point of Sale forms (Sales, Orders, Quotes, etc.), click the Pricing POS check box.
6. Click Process (F12) to save this setting. When you begin the sales entry process, these settings display.
7. From the Main Menu, click Sales to display the Sale Entry form.
8. In the Name field, type the name of the account you just set up with a foreign currency in Point of Sale.
9. Enter a couple of items in the data grid and review the Unit Price and Extended Amount fields.
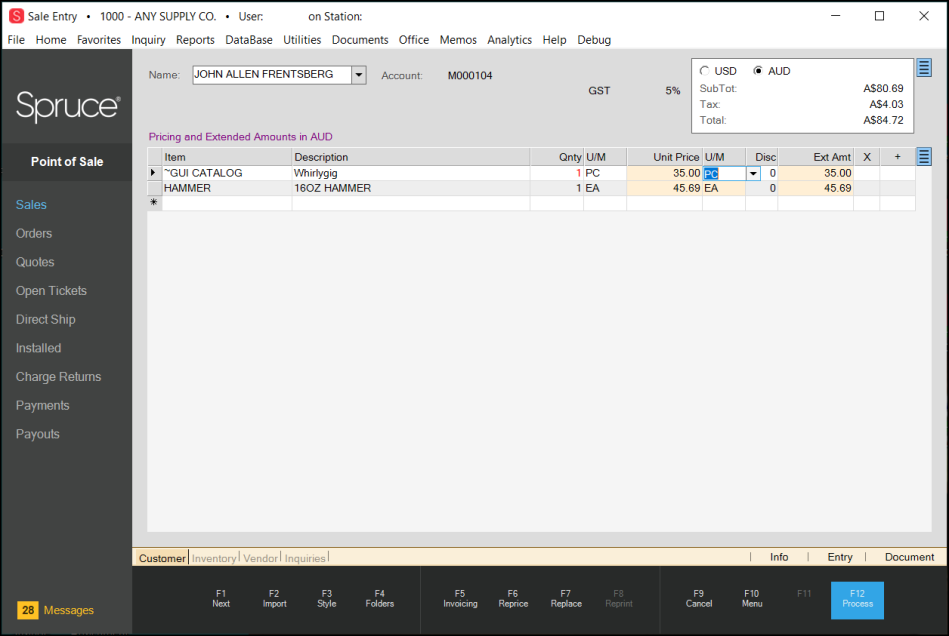
Sale Entry Form with Foreign Currency Customer Sale in Progress
In the data grid, the Unit Price and Extended Amounts of the items display in the customer’s foreign currency (and have a yellow background). The message above the data grid notes the currency that is being used to refer to the transaction:
-
Pricing and Extended Amounts in AUD
The Totals box displays the customer’s totals and tax information in the customer’s currency as well.
Updated the Display of ABN and ACN
In the past, when the Australian Business and Australian Company Numbers displayed in the user interface, the application displayed them as a single, non-spaced number, which made them harder to read. We have corrected this so that you can configure these numbers to display as you want them to.
Updated Sales Tax Rounding Rules for Value-Added Taxes in Point of Sale
We have updated our rounding processes to comply with the Australian Taxation Office Total Invoice and Taxable Supply rules. When reviewing the GST and Ext Amt (Inc.) columns for some items, you may notice that the tax amount for the same item may vary. This occurs to ensure that the final tax displays correctly due to the rounding rules.
Expanded Point of Sale Forms to Support International Currencies
We expanded the Point of Sale transaction forms and the field sizes of the Amount and Tax fields to accommodate larger numbers. While this changes the size of the transaction forms on display screens, the changes are specifically to allow larger numbers to be displayed properly, and you will see no other difference from current behavior. You can find these changes in the Sales, Orders, Quotes, Open Tickets (Advice Notes), Direct Ship, Charge Returns, Payments, and Payouts forms. We expanded the unit price, tax, and extended amount fields to better and more clearly represent decimal and non-decimal amounts required in the new currencies we support.
Sale Entry Form (Before Expansion)
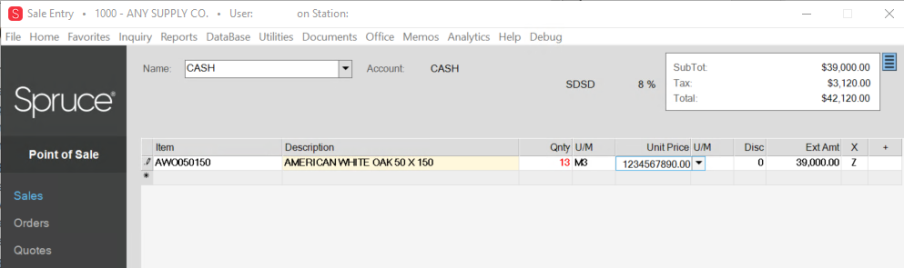
Sales Entry Form with Expanded Unit Price, Extended Amount Fields
Additionally, in Remittance forms, such as the Process Invoice Document, we have increased the field length of the entry totals particularly on the Invoice and Adjustments tabs. For transaction panel totals, we also expanded the size of the totals figures for currency values that include a currency symbol. We have widened the Cash buttons to accommodate larger numbers too.
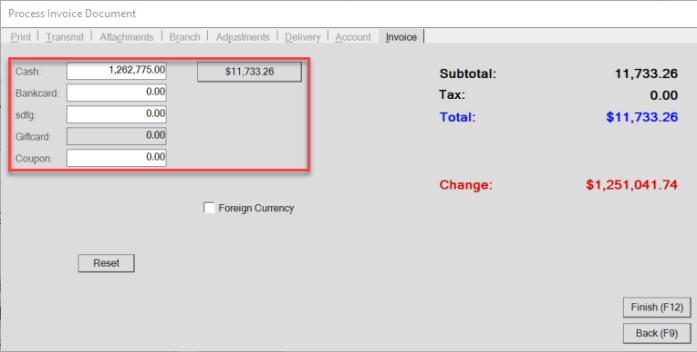
Process Invoice Document Box - Invoice Tab with Expanded Currency Fields and Box
This change is also visible in Purchasing > Order Entry when you adjust an amount using the Adjust (F6) feature. We have widened the Amount and Extended Amount fields:
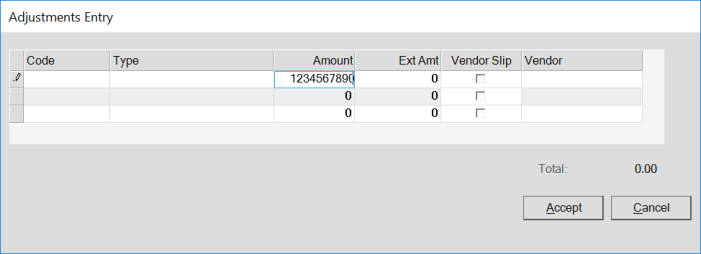
Order Entry > Adjustments Entry (12.18)
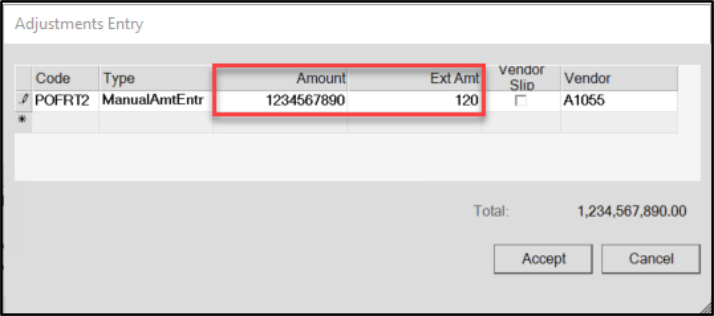
Order Entry > Adjustments Entry (12.19)
This same pop-up displays for Receipt and Vendor Quote adjustments.
In Inventory > Transfers and Adjust (F6), we expanded the Amount and the Extended Amount fields:
![]()
Inventory > Transfer > Adjustments Entry (12.18)
![]()
Inventory > Transfer > Adjustments Entry (12.19)
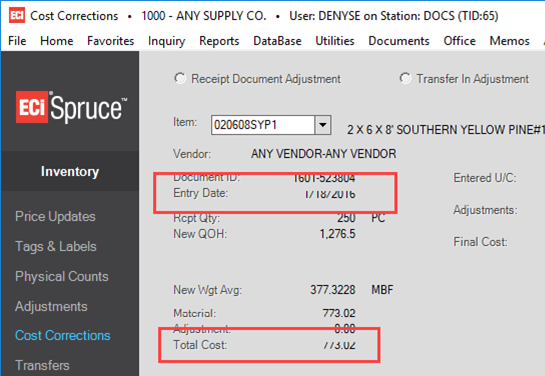
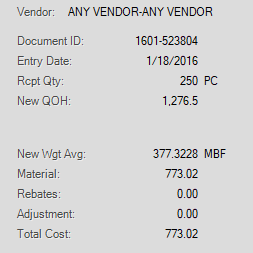
Finally, we have expanded the Amount fields in the Inventory > Cost Corrections form to 20 characters to allow enough space for new currencies:

Inventory > Cost Corrections > Adjustment Entry Fields (12.18)

Inventory > Cost Corrections – Adjustments Entry Fields (12.19)
Updated Tab Order for Device Maintenance Form
In the past, when you pressed the Tab key to move through the fields in the Device Maintenance form, the tab order forward was different from the tab order backward. This has been corrected.
Miscellaneous Features
POS Assured Submitted Rounding Amount Used when Processing Remittances Offline
When Spruce processes an imported POS Assured transaction, the rounding amount used to calculate the original remittance is preserved to ensure that the same results appear in the Spruce application.
Viewing Attachment Files through the Remote Client
When you use the Remote Client, you can now view attachment files locally on your remote workstation. This new feature makes it easier and more secure to view, save and print attachment files when using the Remote client.
Remote Client local attachment handling must be enabled by a User on the Hosted group team. When this option is enabled, all credentialled Remote Client users will be able to open and view attachment files on their local workstation using the Remote Client. You can work with your Implementation or Support team to set up this functionality.
e-Commerce API Enhancements
New e-Commerce API Method: GetAccounts
A new API method, GetAccounts, gives you a way to search for an account by account number, email address, customer company, customer name, or phone number. Phone numbers must be exact but the other search types return partial matches as a result. This method uses an AccountFilter and an AccountResults model to return the candidates. API-specific details are available in the ECI Ecommerce API document, which is available from your Sales team.
New e-Commerce API Method: GetBranches
A new API method, GetBranches, gives you a way to use branch ID (or partial branch ID data) to search for branch information (such as company name, address, phone number, and an indicator that shows whether the branch is enabled for e-commerce). A Branch model contains individual branch information and the BranchFilter model allows you to filter out branches that are disabled. The BranchResults model displays the results of the search request. API-specific details are available in the ECI Ecommerce API document, which is available from Sales team.
e-Commerce Stability Changes
LastModifiedDateTime entries to the ItemDetail and ItemFilter Models
Now you can use the GetItems method to retrieve updated information specific to item pricing and quantities available from the database. This method returns items where the Inventory Common or Store Record Audit time is greater than the supplied value. API-specific details are available in the ECI Ecommerce API document, which is available from Sales team.
Spruce/ProLink Update
Corrected: Cannot create an Account from the ProLink Sign In Page. (Spruce Only)
We have corrected the issues that prevented customers from registering a new account using the ProLink sign-in page. We have fixed this for the TDC ProLink webpage and the ProLink Mobile application.
Security Updates
GL Report Restrictions Added to Allow More Control over Branch GL Information
GL Reports now use the same logic for restricting a user's access to GL information by branch as other GL functions. Previously a user with restricted branch access to GL could run reports for any branch. We have added some new restrictions that give business owners more control over individual user's access to branch GL information. These new settings allow business owners to choose the GL branch information each user has access to. These restrictions apply to the following reports:
-
General Ledger > Reports > Trial Balance
-
General Ledger > Reports > Income Statement
-
General Ledger > Reports > Balance Sheet
-
General Ledger > Reports > Account List
-
General Ledger > Reports > Journal Posting
-
General Ledger > Reports > Fixed Asset
Adding GL Report Restrictions
To set user access restrictions to GL Reports:
1. From the Main Menu, go to Maintenance > Database > User IDs for each user ID that requires GL report access. The User ID Maintenance form displays.

User ID Maintenance – Branch Access Options
2. In the Branch Access section, place a check mark next to each branch this user should have access to.
3. Select the Grant full access to Allowed Branches check box.
4. Click Proceed (F12) to save this change.
Corrections
Updates to the Cost Corrections Form
In the Cost Corrections form, display issues caused some content to appear cut off at the top. We have corrected this issue and added a new field to display Rebate amounts.
Cost Corrections Form With Updated Spacing
Updates to the Vendor EDI Communications Form
In the past, when previewing a submitted purchase order in the Vendor EDI Communications form, the system did not display the Subtotals box correctly. We have corrected this problem, so the subtotal information displays correctly.
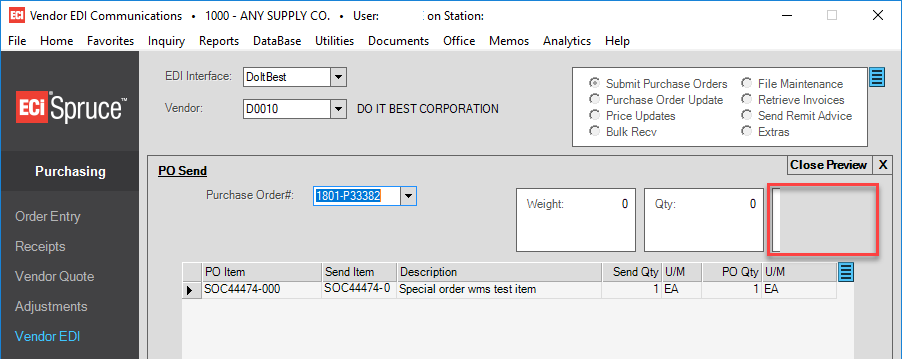
Vendor EDI Communications Form (12.18)
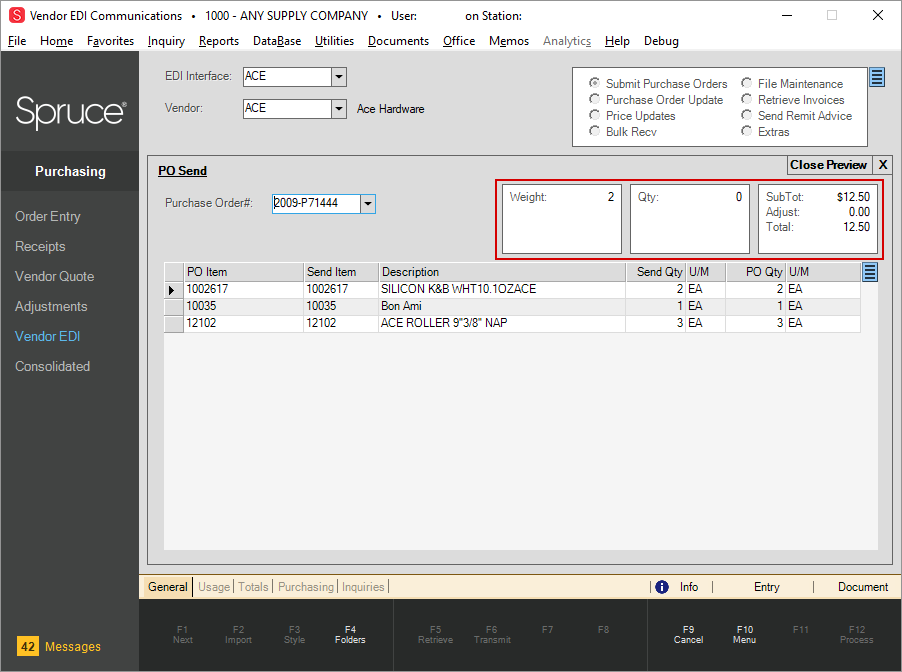
Vendor EDI Communications Form (12.19)
Task Scheduler Detail Entries Displaying Correctly
In the past, when you clicked a date in the Task Scheduler Form, the details on the left side of the form did not display correctly. The Started and Ended detail was missing. We have corrected this issue.
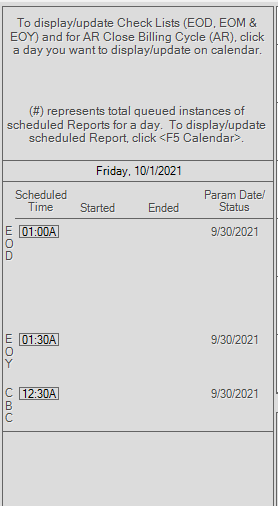
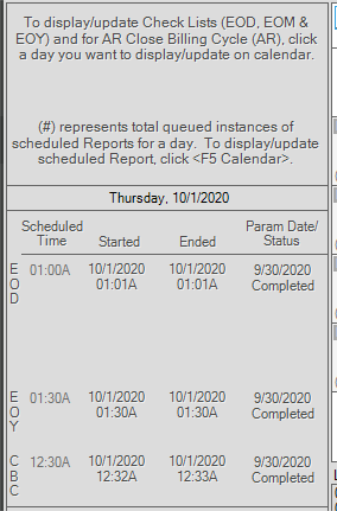
Task Scheduler Detail Old and New
Tally Dimension Boxes Display Properly in the Receive Unit Dialog Box
When defining tally units in the Purchasing > Receipts system, the Depth, Width, and Length field boxes did not display in the Receive Unit dialog box, except when you clicked the entries themselves. We have fixed this issue.
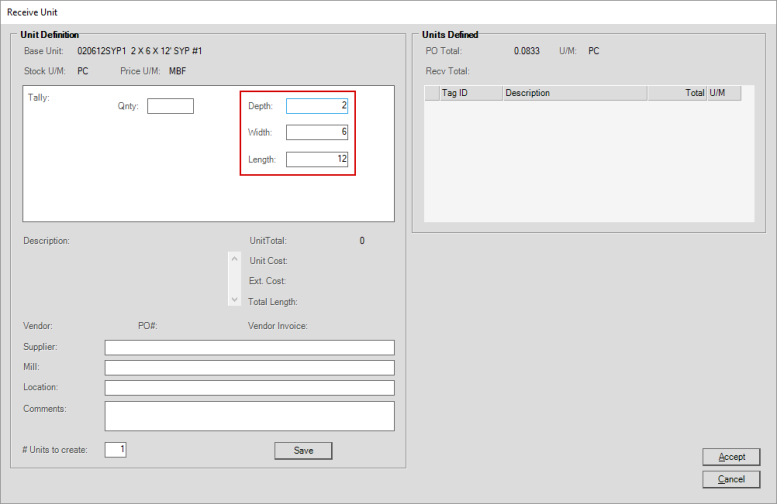
Receive Unit Dialog with Corrected Field Boxes Highlighted
Corrected Spelling Mistake in Void Contract Dialog Box
When converting an Order to a Rent To Own Contract, a Void Active Contract message displays when you void the contract. In that message, we misspelled the word "permanent." We have corrected this misspelling.
VAT Adjustment Displaying All Notes, Adjustment Amounts Correctly
In the past, when you reviewed VAT Adjustments in the document window, the entry in the Notes field was cut short. To correct this issue, we have expanded the size of the Notes field and reduced the number of characters allowed in this field. We also expanded the Adjustment Amount field in the data grid to prevent wrapping the Adjustment amount to the following line of the Adjustment Report document. You can review these changes in the next two figures.
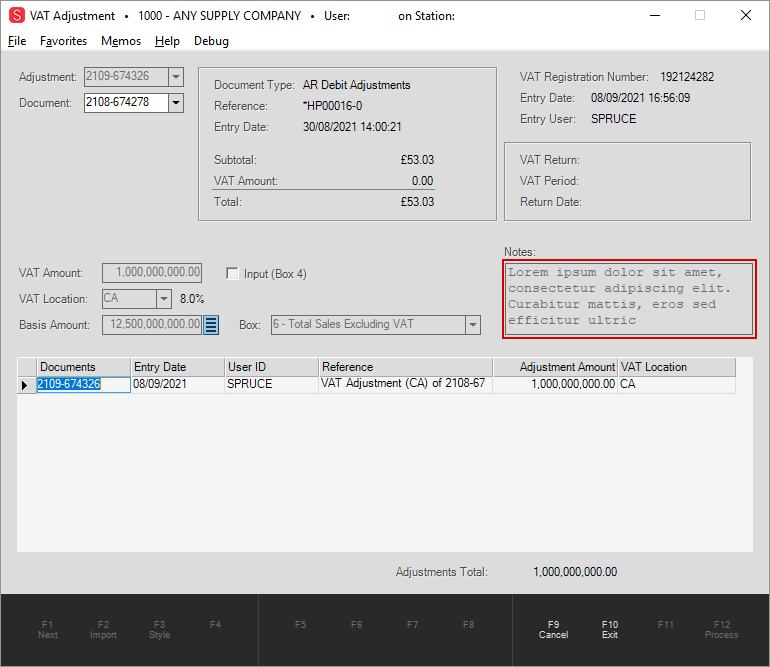
VAT Adjustment with Updated Notes Field
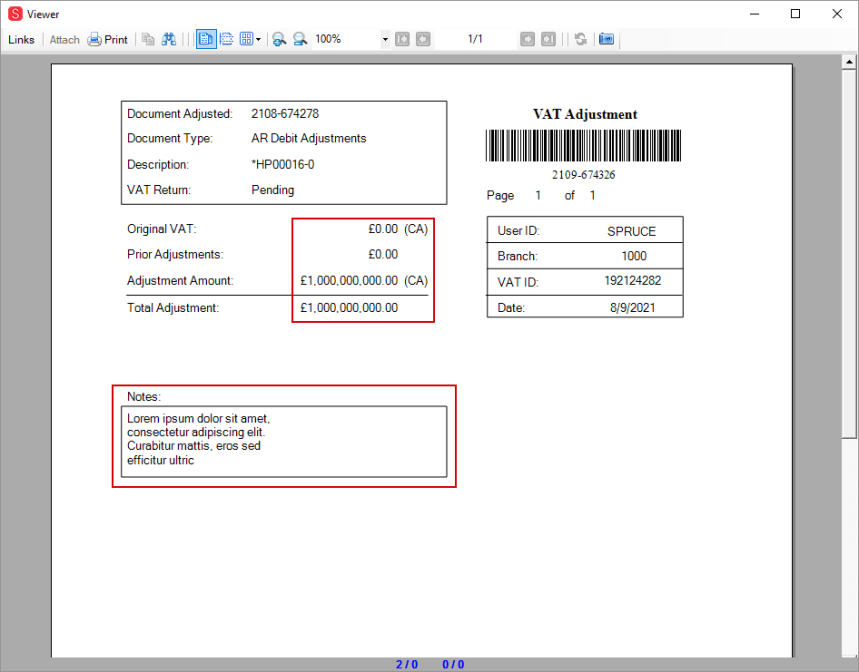
VAT Adjustment Report (Corresponding Document View)
POS invoice Terms Account Displays Correctly on Receive on Account Form
In the past, on the Accept Payment form, when you selected Receive on Account, at times, the POS Invoice Terms Account message displayed incorrectly. We have corrected this issue.
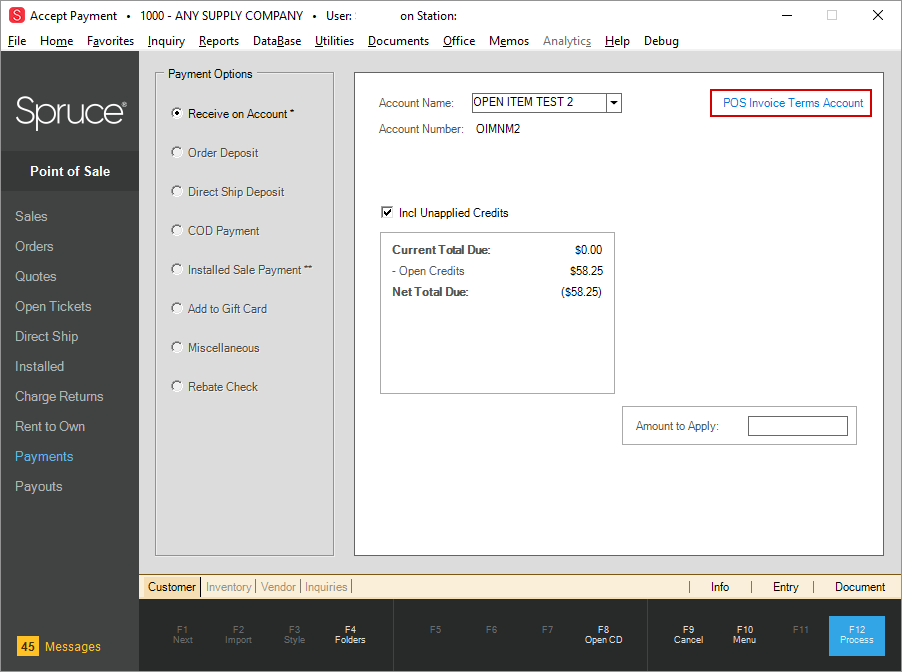
POS > Payments > Receive on Account with POS Invoice Terms Account Highlighted
Use Barcode Information to Add Inventory Items to the Data Grid (Item Enhanced Search)
If you know the barcode for an inventory item, you can enter it directly to add the item to any Point of Sale data grid. To use this new feature, you need to have Item Enhanced Search enabled. To set up Item Enhanced Search for your system, contact your ECI Implementation or Support team.
The Order Pick Ticket Document Style Sorts Items by Itemset Correctly
When you use the Order Pick Ticket “ItemSet” option to create an order, the Order Pick Ticket document has been revised to group items in the same itemset together. Items in the pick ticket are now listed with the following headings:
-
Branch Location
-
Quantity
-
Unit of Measure
-
Item name
-
Description
-
Inventory Flags (user-defined heading if enabled; HAZ in the example below)
-
Yard
-
Notes
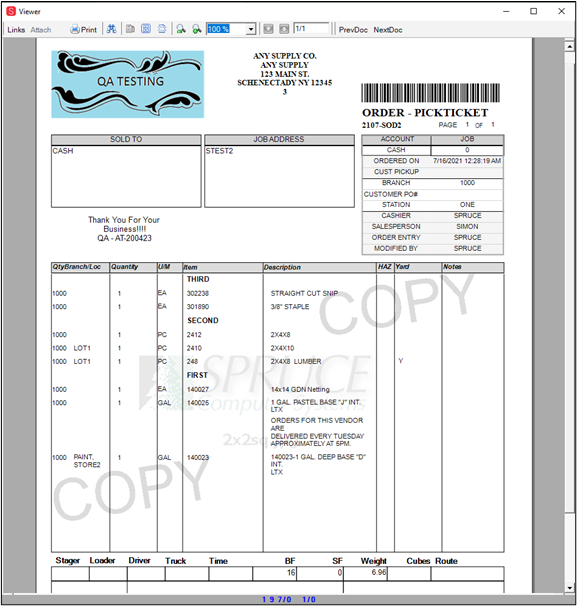
Viewer – Pick Ticket Document
Account's Sort Name Preserved on Account Maintenance Form
In the past, the Sort Name field in the Account Maintenance form was overwritten due to a blank setting in the loyalty record of a particular wholesaler. Sort Name replacements are now applied from the Rewards dialog only and only if the record has that option enabled, which should prevent this from happening accidentally.
PS Totals Report Net Change Column Calculation Corrected
At our customer's request, we have reviewed and corrected the way that the Net Change column is calculated in the PS Totals report. In the past, we were missing some same-day charges, which should be included in the calculation. This calculation is now working correctly.
POS Data Send Failing due to an Invalid True Value Rewards ID
A customer reported that the POS Data Send was failing almost every night. We found that when the True Value Rewards IDs were the wrong length, the error caused the nightly process to fail. We have added a new validation procedure for the Rewards IDs to prevent this issue.
Corrected: Bank Card Tender Deposits Now Working for Imported Vendor Quotes and Order Requests.
When importing a vendor quote or order request (using Saberis Connect), the cashier could not always complete the transaction using a physical bank card or when the customer did not have a bank card on the account. Further, when the initial, manual transaction failed, if you tried to use the card on file, that did not work either. This issue has been corrected.
In Purchase Order Entry, Food Type Items were not Loading After F7 (Builds) Selection
In the previous version, items marked with the type "Food" in the Item database did not pull into the Purchasing > Order Entry data grid after selecting the Build option. We have corrected this issue.
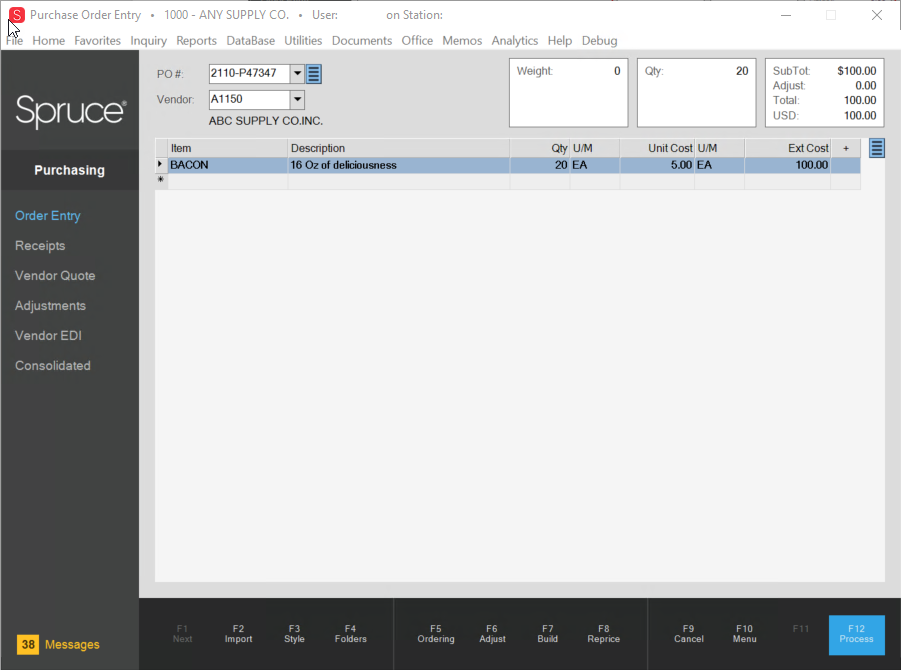
Purchase Order Entry Form with Food Item After Build
Corrected Display of Tax Location Detail in Process Invoice Document Dialog
In the Process Invoice Document box Account tab, beside the Tax Location / VAT Code box, the label's second line was cut off at the top. This label now displays correctly.
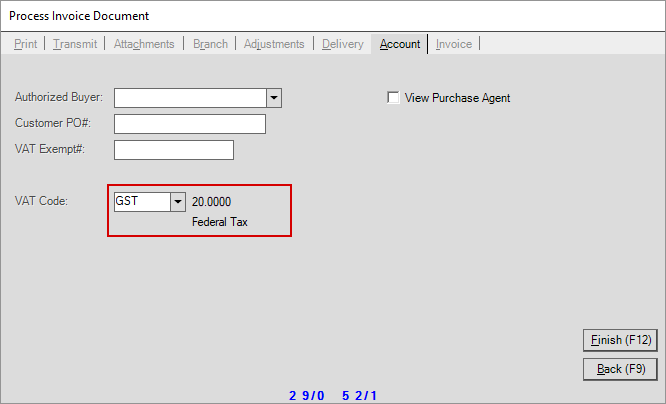
Process Invoice Document, Account Tab – VAT Code (Tax Code) Field with Proper Display
Point of Sale Material Lists No Longer Update Totals when No Change Has Occurred
In the past, when you clicked on a material list sub-item description, causing the entry to highlight, it would also update the totals for that row, even if no change had occurred. We corrected this issue, so now, the item only highlights when you click the material list sub-item description.
Add-On SKU Message Added to Prevent Errors
We corrected the Add-On SKU issues that caused errors when you deleted the add-on SKU or changed the quantity associated with the parent item. In the Item Maintenance form, when you use the Add-On SKU feature, if you don’t enter an Add-On Multiple quantity between the add-on SKU and the parent item, an error message displays:
-
Add-on SKU requires a numeric value to indicate the quantity relationship
If you do not enter this quantity, the application assumes that the relationship between the parent item and the add-on is 1:1.
Email Link to Support in the Help System Corrected
In the Training Schedule page of the Help System, when you clicked the link to send an email to the Support team, the help system displayed an exception that prevented you from creating and sending the email. We have corrected this issue so you can send the email to Support.
Vendor Maintenance Form Name Field Error Icon Fixed
In the Vendor Maintenance form, when there was an error in the Name field, the system displayed the error icon on the Email field instead. We have corrected this issue so that when there is an error in the Name field, the error icon displays in the right place.
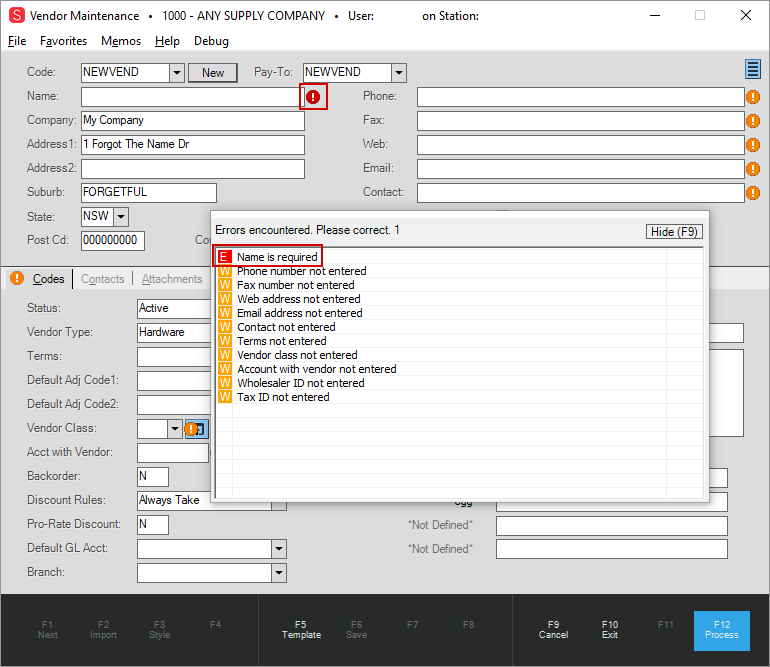
Vendor Maintenance (Error Icon Highlighted)
Corrected: Cursor Behavior Improves when Resetting Tally Items in Point of Sale List
In the past, when you reset fixed-length or random-length tally items in a Point of Sale list, the cursor would jump to a new item row after the pop-up changes were complete. We have corrected this issue.
Local Date Format Setting for Databases Added to Regional Parameters
We updated the local date settings in Point of Sale using the new Culture setting, but the issue was not resolved for database entries (and therefore some reporting). The date mismatch also caused some errors that resulted in the application closing prematurely. This has been corrected with the addition of a new parameter set for you by the ECI Implementation and Support teams to keep the local date setting and the database date settings in synch.
Unit Tally Items Not Displaying Proper Length in Receipts
In the past, we found that Unit Tally items were not displaying correctly in some receipts. After investigation, we found that the Unit Tally items containing decimal unit amounts were rounded because the receipt was forcing an integer rather than accepting a decimal number. This has been corrected. Receipts now reflect the correct Unit Tally units.
Corrected: Removed Leading Zeros from Member Store Numbers in DIB BOPIS API Calls
We have corrected the practice of padding Member Store Numbers with zeros in response to Member In-Store Order Get methods. When creating a response to DIB BOPIS API calls, we are now sending the member store number as either a 4-character string if there is no alpha suffix or a 5-character string if there is an alpha suffix.
Improved: Importing Andersen iQ+ Orders
Some customers reported seeing a software exception error when importing certain Andersen iQ+ orders into the application. We resolved this issue by more precisely identifying the pricing to be used in the data grid during the import process. Importing Andersen iQ+ orders and quotes now works as expected.
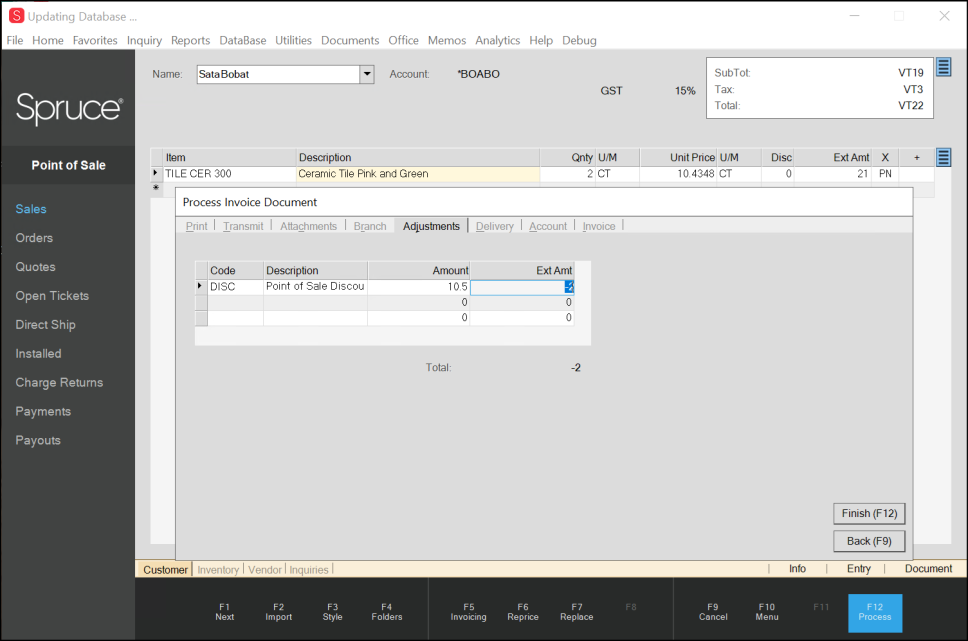
Making an Adjustment Taxable in Point of Sale for Value-Added Tax Transactions
For regions that use value-added tax (including VAT/GST, etc.), excluding the United States and Canada, the Adjustment Code Maintenance form now supports taxable adjustments for Point of Sale. A new GST/VAT selection control allows you to choose the appropriate VAT/GST location code for the adjustment. Both the “Taxable Adjustment” and {GST/VAT} “Code” are required if the adjustment should impact tax when included on a Point of Sale transaction. Tax calculations will be impacted if the Adjustment is set to be taxable and assigned a valid VAT/GST Tax Location. Prior to this change, adjustments at Point of Sale had no tax impact.
Note: Some regions, use the term “GST” and others “VAT” to describe their value-added taxation system. However, the term “GST” as used in Canada differs from “GST” in Australia. Canada’s tax system is a form of value-added taxation; however, due to regional variations in the tax rules in Canada, the term “GST” here is not referring to Canadian taxation nor does this feature apply to Canadian users.
To make a VAT/GST adjustment taxable:
1. From the Main Menu, go to Point of Sale > Database > Adjustment Codes to display the Adjustment Code Maintenance form.
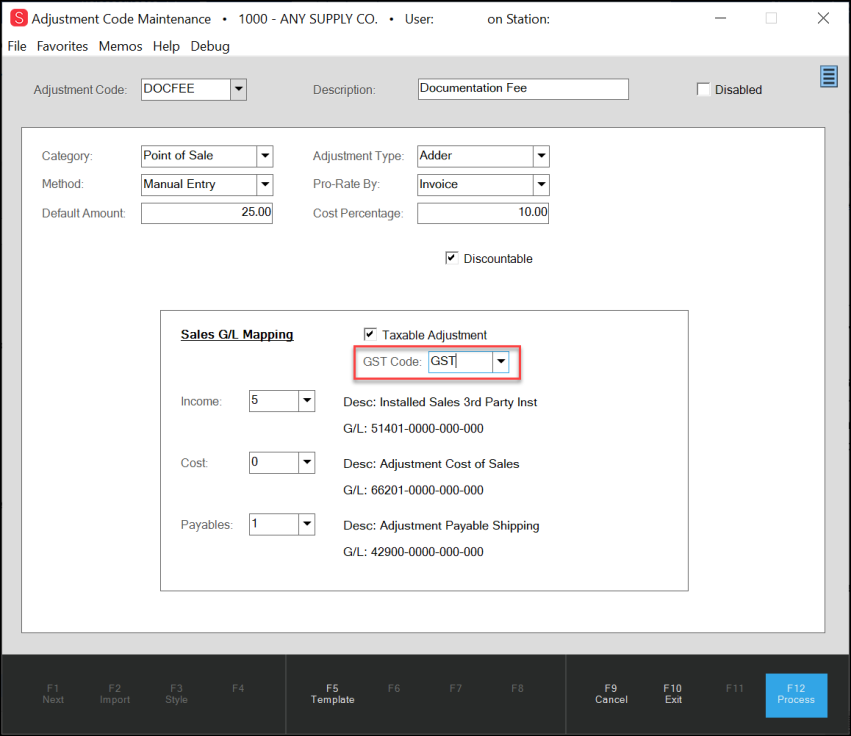
Adjustment Code Maintenance with GST(VAT) Code Highlighted
2. Complete the fields as you would for any new Point of Sale tax adjustment code and choose the VAT/GST tax location code appropriate for the adjustment.
3. When you have completed your entries and selections, click Process (F12) to save your new adjustment.
During processing, the tax is calculated for each line item in the data grid. When the cashier processes the payment, the tax impact caused by the adjustment(s) display on the Adjustments tab of the Process Invoice Document (F12) form. The name you have given the adjustment displays in the Code column. The tax information also displays on the receipt/ticket as well. This is applicable to Sales, Quotes, Orders, Direct Ship, and Charge Returns.

Process Invoice Document – Adjustments Tab
Inventory Lookup Display Improved
In the past, the Inventory Lookup list did not display well on 4K monitors. We have resolved this issue.
Out of Stock Email now includes Quantity
When we email a customer that a material they ordered is out of stock, we now include the quantity ordered.
Microsoft .NET Framework 4.8 Required Soon
With release 20.0, anticipated to be available in the second quarter (Q2) of 2022, the Spruce/RockSolid MAX and Remote Client applications will require Microsoft .NET Framework version 4.8. This newer version will provide the most current, industry-standard infrastructure for the application, including state-of-the-art protection from hacking and malware scanning schemes, strengthening your API security.
To prepare for this requirement, release 19.0 checks your current framework version. If you do not have the Microsoft .NET Framework 4.8 installed, the following warning message displays:
-
You must upgrade your .NET Framework to 4.8 before upgrading to the 20.0 release. After that upgrade, the application will not run on systems that do not meet the minimum requirements. We recommend you install the Microsoft .NET Framework 4.8 version as soon as possible.
Note: ECI hosted customers using Remote Client must perform this upgrade as well on their local workstations. Hosting environment infrastructure will have the newer .NET framework installed before the 20.0 release by ECI personnel.
For companies that take advantage of the ECI hosting environment, the requirement still applies to any servers or PC workstations that run the application. Contact your IT or hosting provider to notify them if you receive warnings.
True Value Quick Credit Application Time-Out Message Displays Better
In the past, when the consumer was filling out a True Value quick credit application and the application timed out, the warning message displayed behind the application. This issue prevented store personnel from seeing the message. The time-out message appears on top of the application now.
Spruce Displays QOH and Detail Records Correctly for Lot Tally Items
We have corrected some technical issues reported when creating lot tally item work orders using the Manufacturing features. The application now updates the QOH (quantity on hand) and detail records correctly, so you can keep track of inventory successfully.
Improved Viewing / Printing Enhanced Cash Tickets (Receipts) for EMV Chip Transactions
In the past, there were sometimes errors when printing or viewing enhanced cash tickets for some credit card chip transactions. The length of the captured EMV chip info was exceeding the maximum width of the cash ticket, resulting in an error. We have improved our handling of this information and the text will now appropriately wrap to the next line when needed.
Spruce/ProLink Spells Finalised Correctly for UK Emails
We have updated the spelling of the word “finalised” in UK consumer emails to ensure a better customer experience for UK-based consumers. You can see this change in emails related to payments, quotes, and orders.
Items with Comment in the Name Displaying Correctly Now in Order/Quote Documentation
We have corrected the issue that occurred with some inventory items that included the word “COMMENT” in the name. Some items displayed a quantity and unit cost/unit price entry of -.01 in the file versions of the Quote or Order documentation. This also impacted gross margin. We have updated the application to prevent this.
Clearing Committed Quantities of Lineal Tally Items after Change in Quantity
When you moved a lineal tally item from an order to sales and then changed the quantity, the appropriate amount was relieved from inventory but the committed quantity, as seen on the Tally tab in the item database, was not always updated correctly. We have corrected this issue to ensure that your committed quantity is updated reliably in these cases.
Corrected: Order Quantity Issues when Item Transfers are Reversed
We have updated our processes to handle circumstances where you adjust quantities after items are committed. Sometimes this happens when you are saving a purchase order and you adjust a quantity or initiate a transfer to another branch but then reverse it. In the past these changes could result in on-order quantities to be updated incorrectly. We have corrected this issue.
Pre-Pay Discount Amount Display Updated During Charge Process
We have updated how the pre-pay discount amount displays on the Adjustment tab during the payment process in response to customer requests. You see this change when a consumer with a charge account pre-pays a transaction, and your business has implemented a pre-pay discount.
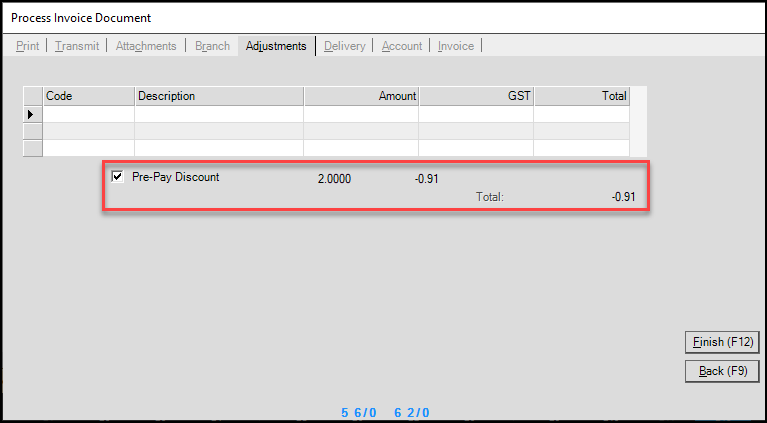
Process Invoice Document with Pre-Pay Discount Adjustment
Credit Card Fields have Stricter Validation Requirements
In response to customer requests, when you use the manual or card-not-present Bankcard options in Point of Sale, these fields have stricter entry requirements:
-
Card Number
This field requires a numeric entry. -
Exp Date
This field requires a numeric entry. -
3-Digit Code
This field requires a numeric entry. -
Auth Code
This field allows alpha-numeric characters. -
ZIP Code (US Only)/Post CD (Other Countries)
This field requires numeric entries only in the US but alpha-numeric characters in other countries.
Scrolling Corrected in Inquiries tab for Point of Sale Transactions
Some cashiers experienced scrolling issues when processing a Sales Entry transaction using the Folders (F4) option. When looking for a price, the cashier could no longer see documents that were older than the ones listed in the transaction. We have resolved this issue to allow the cashier to scroll through the Recent Documents listed under the History tab.