Understanding Documents in the Data Structure
This section may be useful for users who do custom reporting or would like to understand the "behind-the-scenes" handling of documents in the application data. This information is more technically advanced and not necessary for most users. Custom reporting is not necessarily included with your software plan. Before continuing, please read the important information listed below:
Important!On-premise customers may use SQL queries for reporting and data mining based on the data collected in the application databases; however, you should be extremely careful when you create these queries! Cloud-hosted companies have no direct database access; however, you can use custom reports and other sources to initiate large queries. Users should never attempt to issue any queries that insert, update, or delete data from database tables used by the software, nor should you make any changes to existing tables, procedures, functions, or views. Any external changes to the data can cause serious problems and downtime that affects your business negatively. These types of changes can be extremely difficult or impossible to correct. We reserve the right to immediately terminate Support if we find evidence of any tampering or manipulation of the data or data structure used by the software. For your protection, and upon request, we can provide on-premise companies with a read-only user name and password to the SQL database server. This should be used for reporting and any queries or other external access to the database. Even queries that SELECT information can have a negative impact on performance and can potentially "lock" data which can cause long delays in processing or even block the ability to process some or all transactions in the application. Make sure that queries do not lock records (by using the "(NOLOCK)" argument) and limit your queries to reasonable amounts of data by using WHERE conditions. Please note that application performance is affected by ActiveReports® reporting as well as other software products such as Microsoft® Office® Access® or Microsoft SQL Management Studio when used for accessing large quantities of data. Beyond this documentation, we do not provide support or training in SQL or any third-party software applications; however, there are many outside resources available to you if you want to learn more. |
What is SQL?
To understand and make use of data mining, it's best to have some understanding of how a database works and specifically, how the application data is organized.
This application's data is maintained in a SQL database. SQL is an abbreviation of "Structured Query Language." A "query" is a text command that selects, inserts, updates, or deletes data residing in a database table. If you decide to use queries in reports or independently, only use queries that SELECT when accessing the application's data. If you need to change data, do so in the software or contact Support for assistance.
The data in a SQL database is organized into tables. Each table is dedicated to maintaining a specific type of data. This a query command that selects all customer account records:
SELECT * FROM [dbo].[CustomerMaster] WITH(NOLOCK)
The asterisk (*) selects ALL columns.
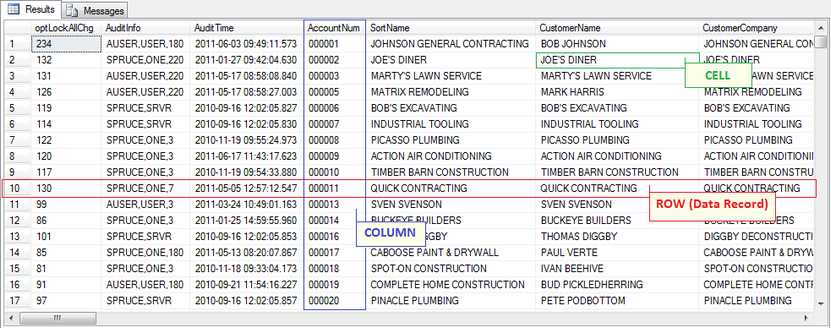
Tables contain data records. Each table's records have a predefined structure that all records in that table must use. Different tables may have different structures but all records within the same table must match that table's defined structure. When executing a query command, such as in the example above, records are commonly returned as rows in a grid. This format may be familiar if you've ever seen or used spreadsheet software (such as Microsoft Excel). In many areas of the software, data is also displayed in grids.*

Query ALL Records
*Some type of software must be used to present data in format we can view. In this case, we're using a grid and a program designed for data access called SQL Management Studio. It's helpful to think about the data in the SQL database in the format of tables, rows, and columns.
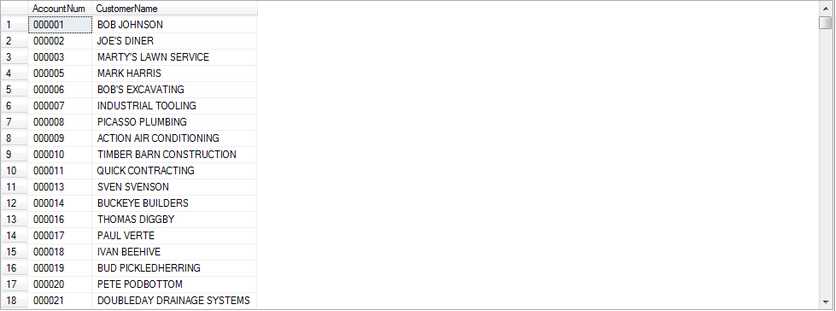
Every row (horizontal) in the table represents an individual data record. Each record, or row, contains information organized by named columns (vertical). The type of data that each column maintains (dates, numbers, text, etc.) is predefined. Columns are given names and can be individually selected and updated. If you look at the example (above), you'll notice column names at the top of each column (AuditTime, CustomerName, etc.). If we only wanted to retrieve the customer's account ID and name from the table, we'd use the following query, for example:
SELECT [AccountNum],[CustomerName] FROM [dbo].[CustomerMaster] WITH(NOLOCK)
Using the same data, the results would be similar to what's shown below:

Query Limited to Selected Columns
These are extremely basic examples. Queries can get much more complicated.
We mentioned that a database has "tables." The queries previously given as examples only gave us data from one table. This table is named CustomerMaster and maintains some of the general information about customers. The software's SQL database contains approximately 300 different tables, which will grow over time. Some tables maintain large amounts of data, others store very little.
Although each table is designed to store different data or information (accounts, inventory, users, etc.), the data in all these different tables often must be related or linked together in some way. For example, an account may be linked to one or more jobs. The account information is stored in one table, the jobs in another. For data in tables to be linked together, there must be something in the data that is a common factor in both or all the tables. In the case of accounts and jobs, the account number is the common factor. Both tables include the same account number so that this linking may be accomplished.
How are Documents handled in the SQL Database?
Documents are usually linked to some type of transaction such as a purchase order or sale, for example. There are over
All documents, regardless of type, share a common basic structure. From this common shared structure, the type of the given document determines what additional data is accessed. For example, an order document has some information that is shared by all other documents but also links with tables that are specifically used to store the order data. There are two tables that maintain most of the basic shared information about documents: Documents and DocumentLinks.
dbo.Documents
This table is used by all documents. Information that applies to documents only is maintained here, not any transaction specific information. For example, the documents table contains the type of document, branch, entry user, entry date, modify date, etc.
The Documents table (dbo.Documents) also contains an "internal" document ID. This internal ID is very important because it's what's used for linking a document to all other types of data (customer orders, invoices, etc.). This internal id ("DocIDInternal" is the actual column name) is not the same as the document ID visible to users in the software. The ID that users see is actually a combination of two separate columns in the dbo.Documents table and is never used to link data together.
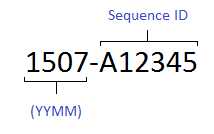
When you are writing reports, always use the DocIDInternal to link the documents table with other data. To display the document ID visible to users, you must use the columns DocYYMM and DocSeq to do this. The column DocYYMM maintains the year-month digits that prefix the document number (these are always numbers). The DocSeq column maintains the characters (alpha or numeric) that comprise the second half of the document ID.

DocIDInternal is always an integer (number) and is automatically assigned as new records are added to the document table. It is always unique to each document, no two documents will share the same DocIDInternal. To find the DocIDInternal for a specific application document using a SQL query, you could use a command similar to the following:
SELECT [DocIDInternal] FROM [dbo].[Documents] WITH(NOLOCK) WHERE [DocYYMM]=1407 AND [DocSeq]='A12345'
dbo.DocumentLinks
This table is used by any documents that are linked with other documents. Some documents do not have links, but most do. Links are usually created when a document is referenced by some other transaction (selling a customer order, for example) or as a result of some type of external processing (receivables billing, end of day processing, etc.). This table references the DocIDInternal and also a LinkDocIDInternal. Both columns are populated with "internal" document IDs; however, the DocIDInternal represents the document the link belongs to (parent), the LinkDocIDInternal is the internal ID of the "child" document linked with the parent. One parent document may have many children. The following SQL query would select all links to the document ID 123456:
SELECT * FROM [dbo].[DocumentLinks] WITH(NOLOCK) WHERE [DocIDInternal]=123456
Linking Documents to Other Data
Once you have the DocIDInternal, you can link the document to other data because each table that links with documents will also have a DocIDInternal column.
Document Types
It is likely that you will want to view information about a particular type of document, not all documents. The type of document is indicated by the column named DocType which holds a numeric (integer) value. Unless you have a list of what the DocType numbers represent, these aren't much use. Thankfully, a table named DocumentTypes is provided that includes information about each document type. The following query gives a listing of all document types in numerical order:
SELECT [DocType],[DocTypeDesc] FROM [dbo].[DocumentTypes] WITH(NOLOCK) ORDER BY [DocType] ASC
This query returns a listing similar to the following table which you may use for reference:
| DocType | DocTypeDesc |
|---|---|
| 1 | IN Receipt Cost Corrections |
| 2 | IN Inventory Adjustments |
| 3 | PO Inventory Receipts |
| 4 | IN Physical Counts Entry |
| 5 | IN Price Updates |
| 6 | IN Sale Flyers |
| 7 | IN Physical Counts Posting |
| 8 | PO Purchase Orders |
| 9 | PS Customer Orders |
| 10 | PS Sale Invoices |
| 11 | PS Cash Payments |
| 12 | PO Vendor Quotes |
| 13 | IN Yard Transfers In |
| 14 | IN Yard Transfers Out |
| 15 | IN Item Cost Corrections |
| 16 | PS Customer Quotes |
| 17 | PS Open Tickets |
| 18 | PS Charge Returns |
| 19 | PS Cash Payouts |
| 20 | AR Statements |
| 21 | AR Credit Adjustments |
| 22 | AR Debit Adjustments |
| 23 | AR Payment Entry Session |
| 24 | AR Payment Posting Session |
| 25 | AP Billing Invoice |
| 26 | AP Vendor Credit |
| 27 | AP Check Run |
| 28 | GL Journal |
| 29 | GL Posting |
| 30 | IN Work Order |
| 31 | PS Cancelled Invoice |
| 32 | PS Direct Order |
| 33 | PS Direct Invoice |
| 34 | PS Installed Sales |
| 35 | DD Manifest |
| 36 | IN Vendor Return |
| 37 | PS Staging Ticket |
| 38 | IN Mnfr Schedule |
| 39 | PS Suspended Transaction |
| 40 | PO Suspended Transaction |
| 41 | AR Preview Statements |
| 42 | PS Cancelled Misc Payment |
| 43 | PS Cancelled Misc Payout |
| 44 | PS Installment Purchase |
| 45 | AR Credit Application |
| 46 | PS Cash Payment Cancelled |
| 47 | PS Cash Payout Cancelled |
| 48 | PO Manifest |
| 49 | PS VAT Return |
| 50 | PS VAT Adjustment |
From the listing above, we can see that type nine (9) is used for Point of Sale Orders. To select just Orders, we limit our query to records with a DocType of 9 (we will also limit our query to the "top" ten records to keep the query results manageable):
SELECT TOP 10 * FROM [dbo].[Documents] WITH(NOLOCK) WHERE [DocType]=9
Document data alone doesn't provide much (if any) useful information about Orders beyond that an order document exists. If we want to link the Documents table with some specific fields from the OrdersHdr (Customer Orders Header) table, we can use a "JOIN" statement in our query:
SELECT TOP 10
[dbo].[Documents].[DocIDInternal]
,[dbo].[Documents].[DocType]
,[dbo].[Documents].[DocYYMM]
,[dbo].[Documents].[DocSeq]
,[dbo].[OrdersHdr].[OrderType]
,[dbo].[OrdersHdr].[Account]
,[dbo].[OrdersHdr].[Job]
,[dbo].[OrdersHdr].[Name]
,[dbo].[OrdersHdr].[OrderUser]
,[dbo].[OrdersHdr].[OrderDate]
,[dbo].[OrdersHdr].[OrderTotal]
FROM [dbo].[Documents] WITH(NOLOCK)
INNER JOIN [dbo].[OrdersHdr] WITH(NOLOCK)
ON [dbo].[Documents].[DocIDInternal]=[dbo].[OrdersHdr].[DocIDInternal]
WHERE [dbo].[Documents].[DocType]=9
This query gives us information from two tables and uses the DocIDInternal columns to match document data with the appropriate customer order data.
There are a number of different ways to use a JOIN statement. "INNER JOIN" (same as just "JOIN") requires that for the query to return any record, there must be records matching the criteria in both tables. For example, if there was a DocIDInternal in the Documents table for an order that did not exist in the OrdersHdr table for some reason, the SELECT query wouldn't return a record for that document. There are also LEFT, RIGHT, and FULL type JOIN operators. Each of these handle the linking of tables somewhat differently.
There are other ways to link tables together without using a "JOIN" command. It's possible to assign an alias to each table listed in the FROM statement and then use those aliases to identify which table each column references. In this case, the linking columns are specified in the WHERE section instead of using the join command's "ON" operator.
Here's a different way of doing a query similar to the one above without using "JOIN"...
SELECT TOP 10
doc.DocIDInternal
,doc.DocType
,doc.DocYYMM
,doc.DocSeq
,ord.OrderType
,ord.Account
,ord.Job
,ord.Name
,ord.OrderUser
,ord.OrderDate
,ord.OrderTotal
FROM [dbo].[Documents] doc WITH(NOLOCK), [dbo].[OrdersHdr] ord WITH(NOLOCK)
WHERE doc.DocType=9 AND doc.DocIDInternal=ord.DocIDInternal
The query shown above designates an alias for each table in the query: doc and ord. The alias is then used in place of the full table name to designate which table each column is being selected from. A different alias must be used for each table. The length of the alias can vary. For example, we could have used a single character such as d instead of doc.
Whenever the same column name exists in multiple tables, it's necessary to explicitly reference which table the column name is being queried from. In the application's database, a few columns, such as DocIDInternal and others, are used with many different tables. If you attempt to run a query where the same column exists in multiple tables and the parent tables are not explicitly referenced, an "ambiguous column" type error will be reported.