AnyWare Mobile Invoice
You can use the Mobile Invoice feature in a "drive-thru" yard. The application assigns a temporary ID to Mobile Invoices to identify the transaction until the final mobile invoice is processed in the Spruce application. When you use this feature in a drive thru setting, the most useful identifier tends to be the license plate number of the vehicle the material is loading onto; however, it can be anything your company decides. You can enter an identifier that is up to 30-characters in length. A mobile ticket is a separate and temporary transaction to allow changes and additions as the customer visits various yard locations. In this scenario, the mobile invoice could be edited by yard personnel at each yard stop. Before the customer leaves the yard, the Mobile Invoice (also known as a Ticket) would be invoiced. In most cases, this would be done at a guard shack, etc.
The Mobile Invoice data is maintained in your company's database, not locally on your device; however, it is maintained separately from application invoice data. No documentation is generated until after final processing of the Mobile Invoice in the application. Final processing is done by using the Import (F2) > Mobile Ticket function from the Point of Sale, Sales transaction.
Creating your Mobile Invoice/Ticket
The first step in creating a new mobile invoice/ticket is to assign an identifier. To do this, short press in the POS ID control's text area and type the desired identifier (such as, the license plate number, etc.).
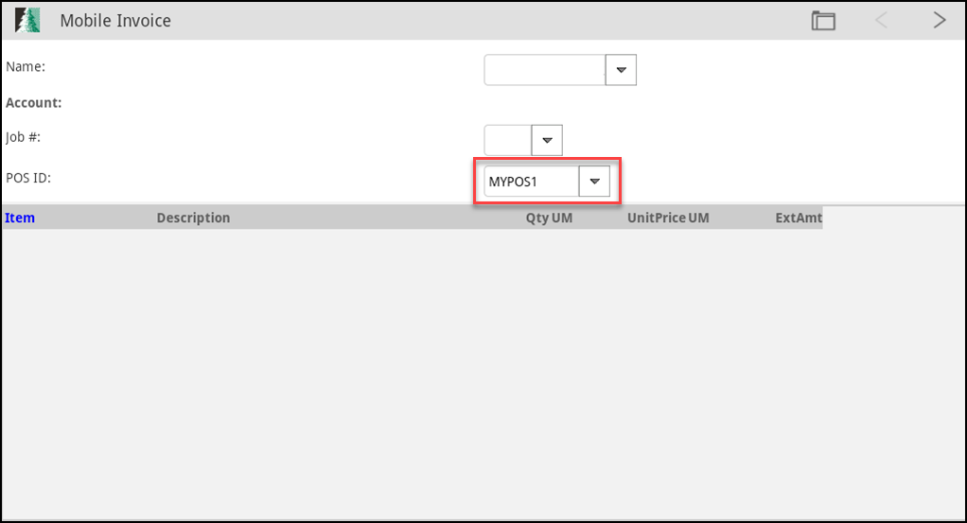
Mobile Invoice with POS ID Added
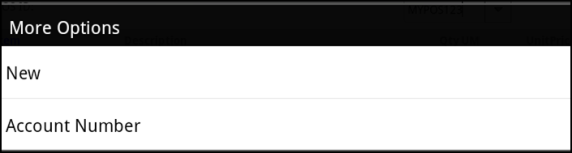
Next a long press on the POS ID's list ![]() button to display a local menu. Choose New from the menu.
button to display a local menu. Choose New from the menu.
You can use this same method to select a mobile ticket after you type a customer's account number in the POS ID control's text area.
The identifier will be used to select the mobile ticket by other AnyWare users after initial processing as well as for final processing by the application.
New Mobile (POS ID)
After you assign a mobile POS ID, you can also associate the ticket/invoice to a specific customer. This may make the final processing easier. This can be helpful, but it is not required.
To add or modify items, use the > button (upper right-hand corner) to scroll and view item fields.
The most efficient way to add items is to use either a wireless handheld BlueTooth™ scanner or a bolt-on scanner. If you have neither, the camera (if any) on your device may be used assuming you have installed the proper apps on your device. Cameras tend to be less reliable than an actual scanner, however, and are not suggested for regular use. Use the buttons provided on the grid to add (A), modify (M), or remove (X) existing rows (items). Long pressing on the grid area provides access to similar functions.
When you modify an existing Mobile Invoice/Ticket, the existing items display in the grid area (lower or bottom half of the display).
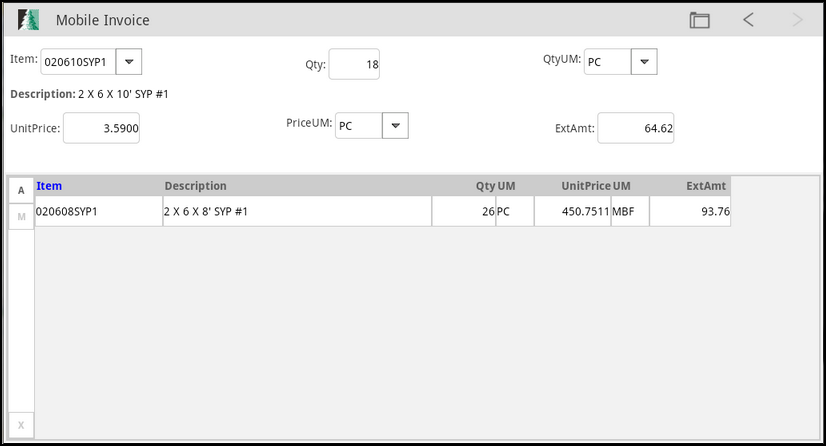
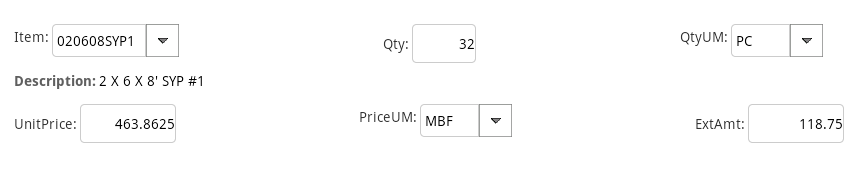
Mobile Invoice (Ticket) with Item Entered
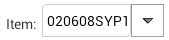
Selecting an Item
You can scan an item's UPC (barcode) or you can type in some or all of the item's SKU in the Item Text area to narrow the search.
If you have a Motorola Enterprise ET1 tablet with a bolt on scanner, you can use the paddle buttons on the back of the device to activate the scanner. You can also use other supported wireless BlueTooth™ scanners. If your Android device has a camera with the necessary software, you can use the Scan option from the Menu. In all these cases, the cursor or active field must be the Item control.

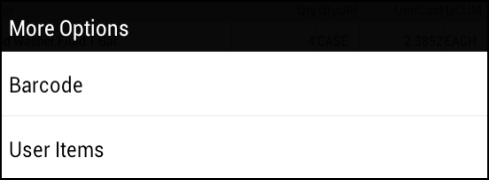
Alternate selection options include barcode and user items.
You can also use alternate selection options such as the Barcode and User Items. To see more options, in the Items text field, enter a full or partial barcode and long press on the item control until the "More Options" menu appears.
-
Choose Barcode from the list and the matching items (if any) display.
It is far easier to use your device's bolt-on scanner or a wireless handheld scanner than this method. -
Choose User Items to display a list of items that are linked to a specific user.
These items can be defined in the Spruce software and are often short lists of commonly needed or used items. Partial entries in the Item text area before choosing the alternate menu can help narrow down the results returned.
UM (Unit of Measure)
UM, or Unit of Measure, describes the relative measurement for either quantities or pricing. Items may have one or more measures defined. Each item has a BASE unit of measure that is used for the item's quantities (on-hand, on-order, committed, min, max, etc.). All other measurements have a numeric relationship with the BASE measurement. For example, an item with a "base" measure of EACH might have another measure for a CASE which is equivalent to 12 EACH.
When you enter quantities or pricing (including costs), the values have a corresponding measure. The value you enter must correspond with the measure (or you must change to the appropriate measure).
For example, if you had a lumber item that is normally priced using thousand board feet (MBF) and MBF is shown as the UM for the price, the price entered should be the price per MBF, not some other measure such as PC (per piece). Either quantities and pricing entered should be made to correspond with the measure shown - or - the measures should be changed to correspond with the quantity or price entered.
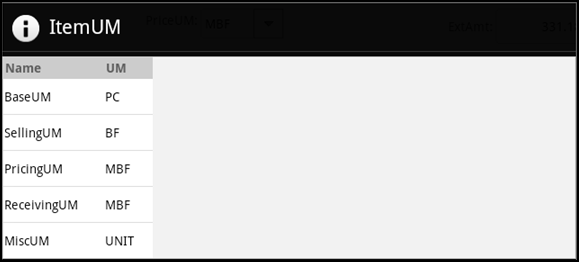
UM (Unit of Measure) Selection
Sometimes, items have alternate SKUs or barcodes which are mapped to specific units of measure. These can change the default measures shown for the item. Additionally, different pricing may be provided depending upon the unit of measure selected.
For example, a customer may receive a lower price for purchasing an entire box and a higher price when buying individual pieces.
There are currently no alternate selection methods provided for the unit of measure (UM) control.
Data Grid
The data grid contains the details of the items you have added to the invoice/ticket. The data grid provides options for adding new items, selection (modification), and deletion.
Minimally, a data grid lists items by SKU (item number) along with a description and other pertinent information such as quantities, units of measure, and extended amounts. The exact information presented in the data grid will vary based on the type of transaction; for example, a purchase order would display cost information whereas a customer order or mobile invoice would involve pricing. The controls provided for item entry can also vary in this regard since some "entry" fields will only apply to certain types of transactions and not others.
Buttons are provided along the left-hand edge of the data grid. These allow for quick access to the Add (A), Modify (M), and Delete (X) options. Selecting a row in the grid displays the item information in the upper area of the form. At this point, you can either (1) make changes and then choose (M) to modify and return the item to the grid or (2) choose delete (X) which removes the row (item) from the grid and the transaction.
As an alternative to using these buttons, you can also long press in the grid area. Doing this produces a menu offering the same add, modify, and delete options that the buttons provide. The long press may work better on smaller display screens (if you have difficulty pressing the appropriate buttons).
Depending upon your device's display size and number of items, some of the grid columns and/or rows may be hidden from view. You can scroll the grid control up and down and right and left to view additional details. Scrolling is done by using a swiping action on your touch display.
Once any item entry has been completed, you must process the Mobile Invoice/Ticket to save your changes. To do this, choose Process from the menu.

Folders
The Folders option in this feature is similar to the Folders (F4) option that exists in the Spruce application. When folders are available, the Folders ![]() icon is shown in the upper right-hand corner of the display. Short press on this icon to display or hide the folders or swipe from the left-hand side of the form toward the right. AnyWare displays folders using the full area of the form. In some cases, the folder icon is used somewhat differently than how it is described here. One specific example is the Delivery Tracking option. In this case, the Folder icon is used to toggle the type of information displayed and does not display "folders" in the same sense.
icon is shown in the upper right-hand corner of the display. Short press on this icon to display or hide the folders or swipe from the left-hand side of the form toward the right. AnyWare displays folders using the full area of the form. In some cases, the folder icon is used somewhat differently than how it is described here. One specific example is the Delivery Tracking option. In this case, the Folder icon is used to toggle the type of information displayed and does not display "folders" in the same sense.
Item Entry Notes: Random Length Tally Items
The random length tally is currently the only tally item type that may also be used in AnyWare. This item can be used in the Mobile Invoice transaction only, but may be added to additional areas in the future. This type of tally item allows entry of quantity-length combinations which are used to calculate a total lineal length. There are no children items associated with this type of tally. Quantity-Lengths selections are only saved with the document; however, no detailed information about individual lengths, such as on-hand, committed, etc., are maintained.
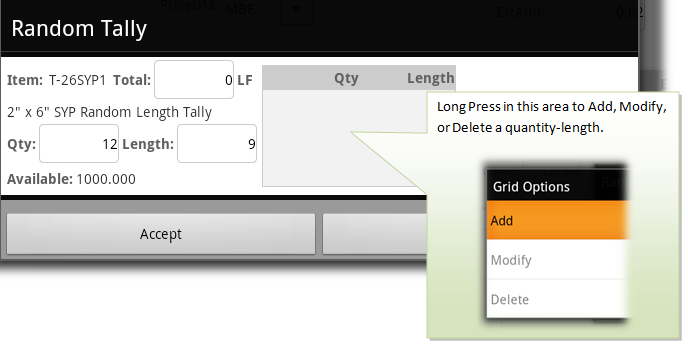
Where supported, you can scan tally items or enter them as any other item and they will display in the data grid. If you add a random length tally item to a transaction, the random tally form/dialog box displays.
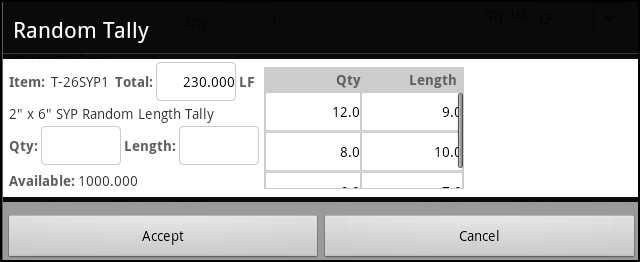
As you add quantity-lengths to the grid area, the total lineal length is "tallied" and shown in the "Total" text-area. Usually, the unit of measure used with this type of tally is LF or some other lineal measure. Although, we don't require any specific unit of measure be used for quantities, lineal measures are the only measures that make sense. You will have issues if you try to use volume based measures in most cases (BF, MBF, SF, etc.).
Once all the quantity-lengths have been specified, choose Accept. At this point, the "Random Tally" dialog box closes and you return to the Item Entry options.
Choosing Accept does not add a new tally to the transaction's data grid nor does it finalize any changes if you are modifying an existing item in the transaction.
You must still choose either "A" (add) or "M" (modify) to finalize (save) your changes and add/return the tally item to the transaction's grid.
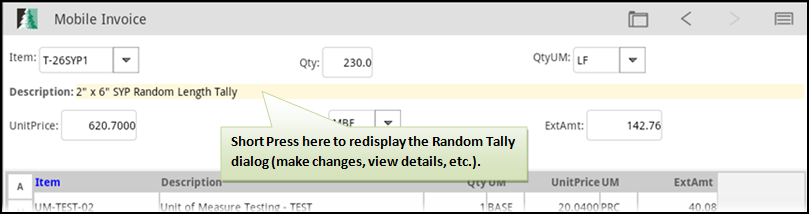
While a random length tally is active in the Item Entry area of the form (above the data grid), you can redisplay the Random Tally dialog box by pressing on the tally item's description which is highlighted using a different background color (see below).
Item Entry Notes: Hardwoods
The Spruce application offers a hardwoods item type that allows entry of a variety of quantity, width, and length combinations similar to how random length tallies function (with an added dimension). We have added the ability to use these items with the AnyWare app's Mobile Invoice transaction. The intended use for this item is for the sale of smaller pieces of less common exotic or hobby hardwoods. In these cases, it's likely that a hardwoods item would be needed for each species and depth so that pricing and costs would be consistent. The other dimensions (width and length) could be varying values in this case. Hardwood items do allow for preset dimensions (depth, width, and length) which may be used to calculate board footage for the item.
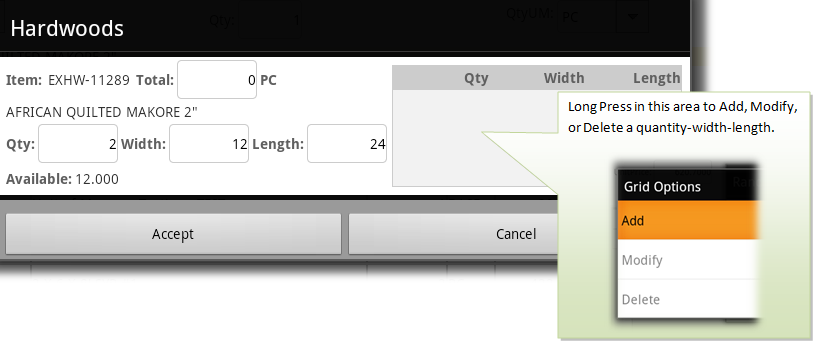
After you specify the dimensions and a quantity, long-press in the grid area (right-hand side) and choose "add" to add the piece(s). The "Total" text area will display a total that is calculated and based on the setup of the hardwood item. Add as many different quantity-width-length combinations as are necessary. Each combination appears as a separate row in the data grid.
To make changes or remove an entry, short press on a row to select it. Make your changes and then long-press on the data grid then choose Modify (or Delete to remove the row).
Once you have entered all combinations, choose Accept.
Pressing the Accept button does not complete the Item Entry process. It just accepts your selections. You usually will need to either choose "A" (add) or "M" (modify) from the Item Entry area's data grid to complete the process of associating a hardwoods item with a transaction.
The hardwoods item type is currently available in the Mobile Invoice transaction in AnyWare.
Processing the Mobile Invoice
Processing the Mobile Invoice (aka. Ticket) transaction is simple, no additional information or form completion is necessary.
Final Processing in the Application
The Mobile Invoice does not become a live transaction until you import it into the Point of Sale in Spruce.
In the application, choose Point of Sale > Sales to display the Sale Entry form and choose Import (F2). A context menu displays.
Choose Mobile Ticket from the list to import the ticket you created in AnyWare. When this transaction is processed in the application, it creates a PS Invoice document you can review later.
