Setting up AnyWare on the Zebra TC57 Mobile Device
Since the AnyWare app is Android-based, use the Camera app on the Android device to scan the QR code below to download the AnyWare app. You can also use these links to access the QR codes, To access the AnyWare app online, click:
To add the AnyWare app to the scanner device:
1. Download the AnyWare app to the device, using the QR code below:

2. When the download is complete, tap the AnyWare app on the device to open it.
3. Tap the Hamburger Menu ![]() on the right side of the screen. The menu options display.
on the right side of the screen. The menu options display.
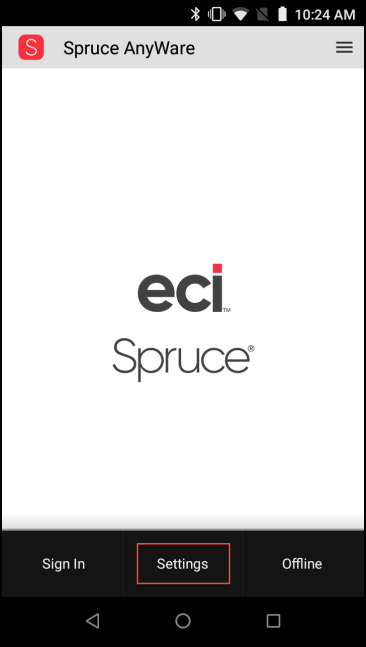
AnyWare Menu Options with Settings Highlighted
4. Tap Settings. The AnyWare Configuration settings display.
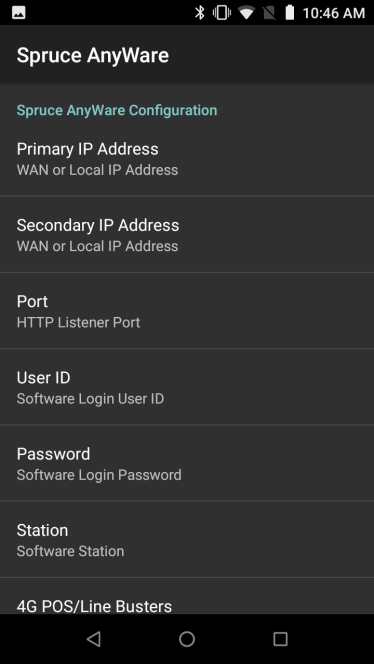
AnyWare Configuration List
5. Tap the following to complete the AnyWare app installation:
Note: The application saves your entries as you make them. Your system administrator or the Support team can help you identify the entries for some of these settings.
-
Primary IP Address (Required)
Enter the appropriate IP address for the device.
You can find this in the application device settings for this station by selecting Maintenance > Database > Devices and then choosing the AnyWare device from the Device Name list and checking the IP Address field.
Important: If you are entering an actual IP address, enter https:// or it will not work.
-
Secondary IP Address
If you are running AnyWare App on a Wi-Fi connection, enter this address as described by the system administrator. (See Important message above)
-
Port (Required)
Enter the Port ID, which is 443. -
User ID
Enter the user ID of the person using this device or leave it blank to require a log in each time the user accesses the application. -
Password
Enter the user’s password (for logging into the app) or leave it blank. -
Station (Required)
Enter the appropriate station ID you set up for this device (in Maintenance > Database > Devices > Device Name entry). -
4G POS/Line Buster
Check this option to enable the 4G POS connection. This option uses a full user license. Check with your system administrator to see if this is required. -
Use SSL (Required)
Select this check box.
Note: Consider the other settings, such as Landscape Flip, Portrait Orientation, etc. These may be helpful but are not required.
6. When you have completed these entries, close the application and log in using the settings you have just entered.
Setting up the Zebra TC57 Mobile Device Scanner
To set up the scanner on the Zebra TC57 device:
1. Turn on the Zebra device.
Note: When you first try to scan something, sometimes the AnyWare app prompts you to download the barcode scanner, please do not do this.
2. Tap the zConfigure folder on the device to display a list of apps.
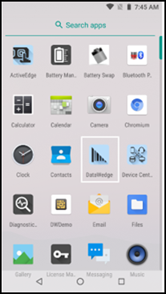
zConfigure Folder with DataWedge App Highlighted
3. Tap the DataWedge app. The DataWedge Profiles display.
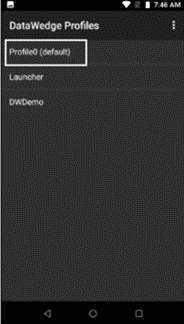
DataWedge App with DataWedge Profiles Displaying
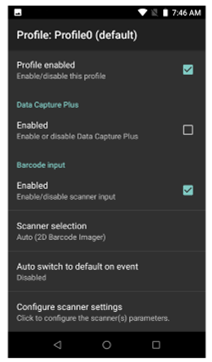
4. Tap Profile0 (default). The Profile0 options display.
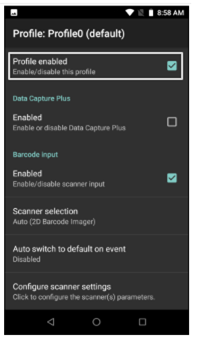
Profile 0 Options
5. Tap the following check boxes to enable them:
-
Profile enabled
-
Data Capture Plus
-
Barcode Input
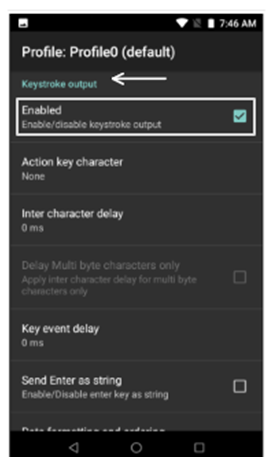
6. Scroll down to Basic data formatting and tap the following to enable them:
-
Keystroke Output
-
Send data
-
Send TAB key

7. Under IP Output, tap Remote Wedge.
8. At the bottom of the Profile0 Settings, tap Configure scanner settings. The Scanner configuration list displays.
Note: By default, DataWedge will only decode Interleaved 2 of 5 (ITF) barcodes that are 14 characters long. Some documents refer to it as enabling ITF.
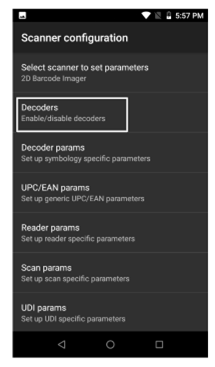
9. Tap the Decoders option and tap the Interleaved 2of5 option.
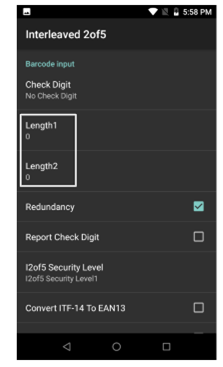
10. Scroll down to the Length1 field and change the entry to 0.
11. Tap the Back arrow and tap on the Length2 field. Change this entry to 0.
12. Change the profile to DWDemo and enable the following options:
-
Profile
-
Data Capture Plus
-
Barcode Input (and select Hardware Trigger)
-
Intent Output
-
IP Output, tap the Remote Wedge option
13. Under the
a. To the right of the Data Wedge main screen, tap the  button.
b. Choose Select New Profile and enter the name as
c. Make sure the profile is enabled.
d. Tap Applications. Then tap the button and tap New app/activity.
e. Scroll through the list to select *,com.
-
example.spruce4android
This displays the app symbol in front of this text and selects all the application components.
Note: There are other application options available, but do not choose them.
f. Scroll down. Tap Under Barcode input – Enabled and ensure that Hardware Trigger is selected.
g. Scroll down, and enable the Keystroke output.
h. Scroll down, and under IP output, enable Remote Wedge.
i. Scroll down and enable interleaved2of5 and choose the same options as described in steps 11 and 12 in Profile0.
This competes the setup process on the device.
Log into the AnyWare App and Begin Scanning
You can log into the AnyWare app to get started when this setup is complete.
-
Log into the AnyWare app and click the trigger on the side buttons on the mobile device to scan items into AnyWare App.
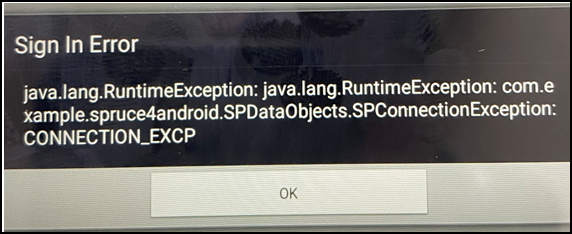
Note: If a sign in error occurs, check the IP address again in both Device Maintenance and in the AnyWare app to ensure that they match. The following error message may occur if you enter the wrong IP address: