Unit History Report
Use this report to collect history information about a specific unit tally item, all the items related to a specific event (date range), or items associated with a specific group/section or all group sections you choose.
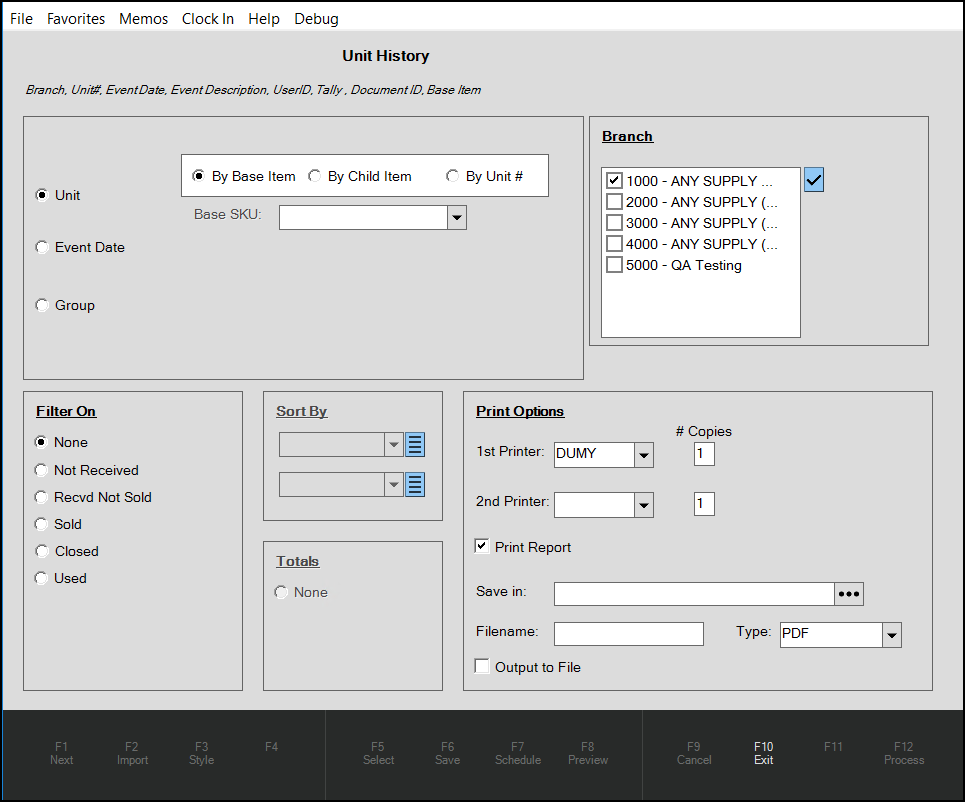
To generate this report:
1. From the Main Menu, choose Inventory > Reports > Unit History. The Unit History Report form displays.
2. In the Selection are choose the criteria you want the application to use to collect the records you want to report on. Choose one or more of the following:
Note: To add the criteria to the search, select the check box to the right of the label. To search by one one criteria, select only one check box.
-
Unit
Select this option and then from the other options choose the base Item SKU, the Child item SKU, or the Unit # you want to report on.
To include this option in the Sort criteria, choose the check box to the right of the Unit label. -
Event Date
Select this option to report on the date range of the event associated with the items you are reporting on. From the drop-down lists, choose the Starting Date and the Ending Date. Right-click the Starting Date check mark to choose specific day options for that field, including: Today, Yesterday, Tomorrow, Current Month, Last Month, Current Year, Last Year, Last 30 Days, Current Fiscal Year, or Last 365 Days.
To include this option in the Sort criteria, choose the check box to the right of the Event Date label. -
Group
Select this option to choose the group/section options for this report. When you select this option the Group/Section list displays so you can choose individual groups/sections, or combinations of groups/sections, or all groups/sections. You can use the Select All and Clear All buttons to help.
To include this option in the Sort criteria, choose the check box to the right of the Group label.
3. In the Filter On section, choose the filtering options, if any that you want the application to use to organize the reports results. Options include:
-
None
Choose this option to report all the items / details associated with the request without any filters. -
Not Received
Choose this option to report the items that have not been received that match the first section's Selection criteria. -
Recvd Not Sold
Choose this option to report on the items that have been received into inventory but have not yet been sold among the items associated with the Selection criteria. -
Sold
Choose this option to report on the items that match the first section's Selection criteria that have sold. -
Closed
Choose this option to report on the items that that match the first section's Selection criteria that have the status of Closed. -
Used
Choose this option to report on the items that match the first section's Selection criteria that have the status of Used .
4. In the Sort By list, there is no additional sort criteria. There are no Totals options either.
5. In the Branch section, choose the branch location(s) you want the application to report on and then choose the consolidation method for those branches from the options Summarized, Detailed, or None.
6. In the Print Options section, choose your print or storage settings for this report.
This works the same as all other reports. See Reports Overview for details.
7. When you are ready to generate the report, choose Preview (F8) to see that the information you wanted to collect displays as you expect.
The application shows you what a preview of the report would look like. If you don't see what you are looking for, it make sense to go back to the earlier steps and make changes until you are happy with the output.
8. When the report displays as you want it to, do one of the following:
-
To save the report, choose Save (F6).
The application displays the Save Report Settings box so you can complete the settings for this report.
Choose the report name and description.
You can choose to limit who can see this report (Private) or allow others to view it (Public). Then choose Accept to save the report according to the output settings you added. -
To process and print the report, choose Process (F12).
The application prints the report according to the settings you chose. When the report has printed, a confirmation message displays.