Removing Items from the Spruce eCommerce Online Store
There are many reasons why you might want to remove inventory items from your online store or hide them from view, and there are several ways to do it. Whether you have to remove them from inventory completely, or you need to remove them temporarily on a seasonal basis, there are a lot of choices for making these changes.
Changing the Visibility of an Item in the Online Store
If you want to maintain the items you have uploaded to the online store but hide them from view:
-
Change the item’s E-commerce-enabled setting in Item Maintenance.
When you uncheck the E-commerce Enabled check box of an item, (Inventory > Item > Common > ECommerce tab > E-commerce Enabled check box) after the inventory sync occurs, the product record remains in the online store but it does not display on the website. Using this approach is particularly helpful for seasonal products (snow shovels, spring garden equipment, etc.) as the item information is still in the online data store, so the records will be updated whenever you change them. When you are ready to display the items again, you simply enable this check box and the item with the current settings displays on your website.
Note: You can change these settings for one item using these instructions or you can choose a group of items and modify them using Item Global Modify as shown here and here.
-
Change the item’s Disabled setting in Item Maintenance.
Change the item’s Disabled setting of an item to Y (Inventory > Item > Branch > Disabled) and upload the item to the online store, the product is disabled on the data store the product is no longer visible on the website. As with the E-commerce Enabled check box setting, the item stays in the online store and continues to synchronize the item’s data updates.
Both options can be accomplished through Item Maintenance or Inventory Global Modify utility screens. When you change these settings and re-enable them, they are visible again.
Important Note: We recommend that you not delete Inventory items from Spruce that you no longer sell on Spruce eCommerce for several reasons.
-
Deleting items from Inventory removes much of the transaction and purchasing history, which, particularly in the application, creates issues with General Ledger records.
-
Deleting items from inventory means you cannot sell them locally either.
If you no longer want to sell an item in your inventory, merging the item records lets you retain the transaction, inventory, and purchasing history while removing it from the Point of Sale search lists. See Removing Dead Items from Inventory for more information.
Removing an Item from the Online Store Completely
There are many reasons why you might want to remove an item permanently from your online store. You might do this if your company no longer sells the item or you now see a similar item that is provided by a different supplier instead. These are the ways you can remove these items from the online store without losing the sales data from the original item:
-
When replacing an item with a new item from a different supplier, use the Merge/Rename process.
When you are replacing an item, you don’t want to lose the sales and inventory history pertaining to the old item, so you use the Merge/Rename Item utility to preserve that history. Merging/Renaming the product creates a new SKU for the item so when you initiate the update to the online store, the store removes the online product record of the original item entirely. This cannot be undone.Note: If the item you are merging from exists in multiple branches, it only be removed from the online store if the branch record for the item is the default branch set in the Inventory Item Sync parameters. You can learn more about this feature from the Merging/Renaming Items or by reviewing the Removing Dead items topics in the Help System.
-
Disable the product’s E-Commerce Enabled and Inventory Item Sync settings.
Disabling the E-Commerce Enabled and Item Sync Enabled settings (on the Inventory > Database > Item > Common > ECommerce tab ) stops the product from being ecommerce enabled and being synchronized with the online store. After this is done, you can delete the product record manually from the EvolutionX Admin dashboard in the Product section.
If you delete the item entirely from the database (Inventory > Database > Item >  > Delete Item), you remove it from the application inventory entirely. This initiates an update to remove the product from the online store completely. You must have specific administrative permissions to use this feature. This cannot be undone and you lose all of the inventory history of the item.
Note: If the product exists in multiple branch locations, the product will only be removed from the online store if the branch record for the item is deleted.
Removing an Item and Turning Off Inventory Sync for it in Spruce eCommerce
When you no longer want to sell an item in your Spruce eCommerce store, you can manually reset the E-Commerce Enabled setting for the item, sync the item with the SPEC/EvolutionX system, and then turn off the Item Sync Enabled setting for the item to make this happen. This removes the item from the website and prevents any updates you make in the application from transmitting to Spruce eCommerce.
To remove an item from Spruce eCommerce data store and turn off inventory sync for that item:
1. From the Main Menu, choose Inventory > Database > Item. The Item Maintenance form displays.
2. From the Item list, select the item you want to remove from the website.
3. Click the Common > ECommerce tab.

4. Disable (uncheck) the E-Commerce Enabled check box.
5. Choose Process (F12) to save this setting (and choose the appropriate branches that the item is available in, when prompted). The Item Maintenance form displays.
6. From the Item list, choose the item again and return to the Common > ECommerce tab.
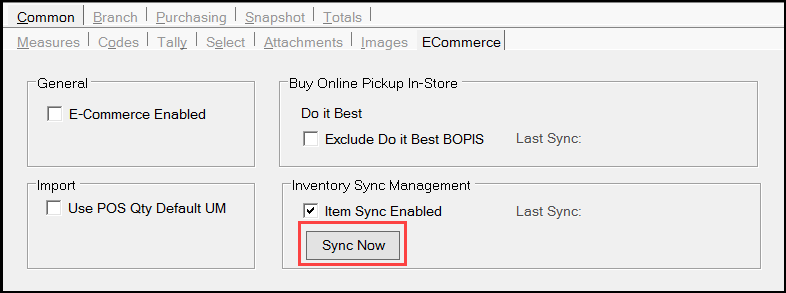
7. Choose the Sync Now button to update the item on the website.
8. Wait about 10 minutes and click the Ecommerce option on the toolbar to display the website.

9. Search for the item you removed on the website. When the item no longer displays, continue to the next step.
10. Return to the Item Maintenance form and choose the item from the list again.
11. Return to the Common > ECommerce tab and disable (uncheck) the Item Sync Enabled check box.

12. Choose Process (F12) to save this change.
Saving this change ensures that any changes you make to this item are no longer sent to the Spruce eCommerce website.
If you decide you want to sell this item on the Spruce eCommerce website again, return to the Item Maintenance form, choose the item from the Item list, re-enable the E-Commerce Enabled and the Item Sync Enabled check boxes in the ECommerce tab, and choose Process (F12). Then, from the Item list, choose the item again, navigate to the ECommerce tab, and choose Sync Now. The Inventory Sync process transmits any changes you have made to the item record to the Spruce eCommerce data store.
Disabling Ecommerce Settings for Many Inventory Items
Using the manual method to remove many items from the website would take a long time. In the Item Global Modify utility, use the Cmn – ECommerce option to reset the E-Commerce Enable flag for many selected items in your inventory at once. You need Inventory Administrator credentials to complete this work.
To reset the E-Commerce Enable flag for select ecommerce items in your inventory:
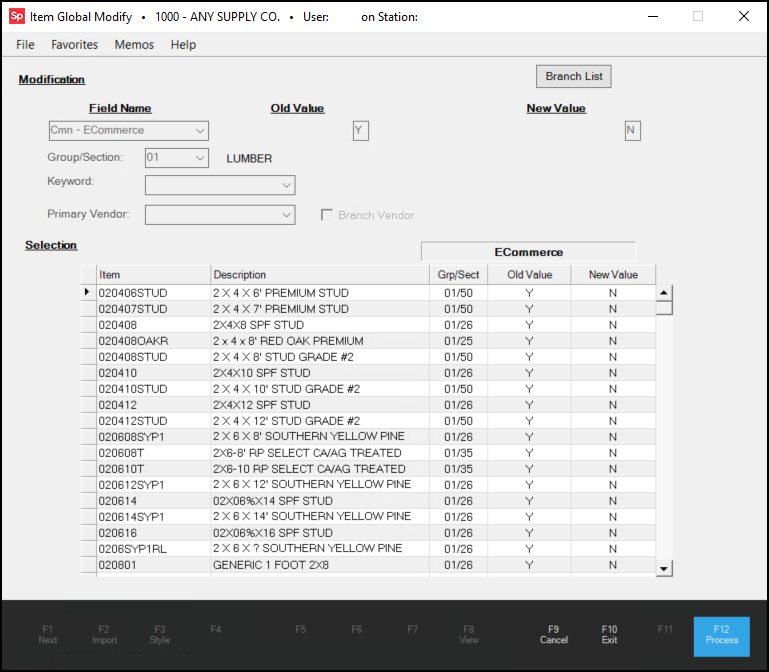
1. From the Main Menu, choose Inventory > Utilities > Maintenance > Item Global Modify. The Item Global Modify form displays.
2. From the Field Name list, choose Cmn – ECommerce.
3. In the Old Value field, enter Y.
4. In the New Value field, enter N.
5. In the Group/Section list, choose the groups and sections that contain the ecommerce-enabled items you want to remove from the website.
6. Choose View (F8) to collect the items that match your search criteria and add the new Ecommerce value to the item record.
7. Repeat steps 5 and 6 until all the items you want to remove from the website appear in the list.
8. Choose Process (F12) to save the new ecommerce setting for the selected item. When you process this change, and the inventory sync is complete, the items will be removed from view on the website.
Disabling Inventory Sync for Many Inventory Items
To reset the Inventory Sync setting for many ecommerce items individually would be time-consuming, so use the Cmn – ECommerce Inventory Item Sync option in the Item Global Modify utility to reset this flag for a group of inventory sync-enabled items at once. You need System Administrator credentials to complete this work.
To turn off the Inventory Item Sync flag for items in your inventory:
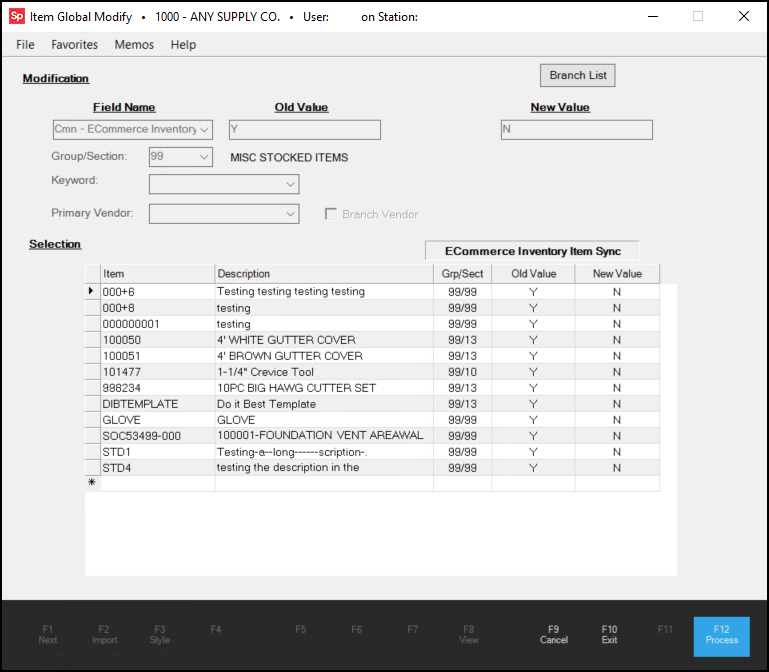
1. From the Main Menu, choose Inventory > Utilities > Maintenance > Item Global Modify. The Item Global Modify form displays.
2. From the Field Name list, choose Cmn – ECommerce Inventory Item Sync.
3. In the Old Value field, enter Y.
4. In the New Value field, enter N.
5. In the Group/Section list, choose the groups and sections that contain ecommerce inventory item sync-enabled items you want to remove inventory sync settings for.
6. Choose View (F8) to collect the matching items and add the new Inventory Item Sync value to the item record.
7. Repeat steps 5 and 6 until you have added all the items you want to remove the inventory sync setting from.
8. Choose Process (F12) to save the new inventory sync setting to the selected items. After you select Process, the Inventory Item Sync feature runs in the background to remove the selected items from the Spruce eCommerce data store.
See Also:
Using the EDI Log to Review Spruce eCommerce Item Uploads
Setting Up and Using Inventory Item Sync