Do It Best - BOPIS (Buy Online, Pickup in Store)
The Do It Best Buy Online, Pickup In Store (BOPIS) ecommerce program is a significant opportunity for Do It Best-supplied stores to allow local customers to use the Do It Best website to purchase items and pick them up in your store. Customers pay for those items online, and Do It Best sends the order information directly to the application using an EDI process. Your business provides regular inventory updates to ensure you have the items in stock, and Do It Best pays the taxes on all orders. When the customer arrives to pick up their BOPIS order, you can complete the transaction in Point of Sale to keep track of the inventory. Do It Best sends you a monthly payment for these items sold through the website.
To participate in this program, please reach out to your ECI Account Manager. Your ECI Project Managers may need to contact the J H Specialties Group or Do It Best directly to obtain the API keys for each branch participating in the program. The Implementation or Support team member must also enable the Ecommerce parameter to get started.
Understanding the DIB BOPIS Process
When you receive BOPIS data through the EDI process from Do It Best, the application adds the data to the same request queue tables (QORequestHdr, etc.) it uses for ecommerce and ProLink order and quote requests. The process is the same whether the requests are initiated manually from the Vendor EDI form or automatically from the SysCheck (named EDIDOCUMENT.RECEIVEDIB_BOPIS) process. The application attempts to create (or update) an actual order, invoice, or quote depending upon the type of request that is submitted. Some of the logic is shared with ecommerce but there are processing differences between the two. Each BOPIS request has a status.
After this integration is set up within your software, when a customer submits an online order on the Do It Best website, the order goes through several possible statuses:
-
Reserve (0) – After the customer places an online order (and chooses your branch), Do It Best checks to ensure the branch can fulfill the order. When Do It Best completes this assessment, they send the order to your store via an EDI process, and the order advances to the next status.
-
Cancel (1) – DIB notifies your business through the EDI process if a customer cancels an order through the Do It Best website. At this point, the order has a Cancel status.
-
Release (2) – The application loads the order into Point of Sale > Orders using the account you have created in this process. After the customer picks up the order from the store, the order completes the Release status.
-
Return (3) – If the customer returns a DIB BOPIS item, you can return the former DIB BOPIS item(s) to stock.
-
Quote (4) – If the customer requests a quote from your store, you receive this notification.
The application creates or updates an actual order for requests with the statuses Cancel (1) and Reserve (0). For the statuses Release (2) and Return (3), the application creates an invoice (Sale or Return Sale as appropriate). For the last status, Quote (4), the application creates a quote. These statuses come from Do it Best.
What Could Go Wrong?
During the order process, there are certain issues that might prevent the request process from completing normally. In these cases, the application retains the request records. Here’s a list of some potential issues:
-
The request queue (QORequestHdr) ID is empty. This is unlikely, but we check for it.
-
For submissions with a Cancel (1) status, an order matching the {{ImportSourceId}} must exist in the request queue. If it does not, that may cause an issue.
-
There must be a DIB wholesaler record in the Branch settings (user context). This is covered here.
-
There must be a Do It Best BOPIS account used to display incoming BOPIS orders. The account must be a charge-type account and set to tax exempt. Set up for this account is described here.
-
You should have the Ecommerce parameter enabled to ensure successful use of the Import (F2) option if/when a BOPIS order issue occurs. You need to reach out to ECI Support to enable this feature.
-
If during order processing, the transaction has unresolved task list errors, the application will not create the order/quote.
Note: If the transaction has task list warnings or no messages, the application processes the order.
If there are any validation errors or warnings during the request process, or if there are application exceptions, the application sends the people identified here a notification.
There are sometimes Universal Log entries with the log source set to the ECommerceSource (DIBBOPIS), depending upon the severity of the issue and the logging level.
Failures to create the order due to either validation errors or some type of application exception would retain the QO request; however, if the Ecommerce parameter is not enabled, there is limited visibility on those requests. The F2 Import, eCommerce option in Point of Sale - Orders is enabled only if eCommerce is enabled. This option would show requests from any source including BOPIS; however, it is not necessary for BOPIS processing.
If there is an error during this process (if there is a system update with Do It Best, or the transmission fails), orders can be delayed or may not display in the Point of Sale > Order list. In these cases, you can manually process your Do It Best BOPIS orders using the Import (F2) process in the Point of Sale > Orders form discussed here.
To review the typical Do It Best BOPIS order transaction process, click here.
Setting up the DIB BOPIS Feature in the Application
After the ECI team has enabled the Ecommerce parameter and you have the information you need to get started, you can set up the DIB BOPIS feature by completing the steps below.
A Note about DIB BOPIS Unit of Measure Pricing
Some customers raised the issue that when an item's Point of Sale unit of measure pricing does not match the Purchasing unit of measure pricing, the text "Call for Pricing" displays on the Do It Best BOPIS ecommerce site. We now recommend that you choose the Stock (Base) setting in the POS UM list in the DIB BOPIS account described here, to ensure that these purchasing and selling values match. An item's Point of Sale Quantity Unit of Measure (POS UM) on the Branch tab and the item's Receiving unit of measure should be set to the same measure to avoid Do It Best BOPIS website display issues.
Setting up the DIB BOPIS System Parameters
To enable the Do It Best BOPIS parameters:
1. From the Main Menu, choose Maintenance > Database > Parameters. The Parameter Settings form displays.
2. Under the Setup tab, choose the EDI option to display the General EDI settings.
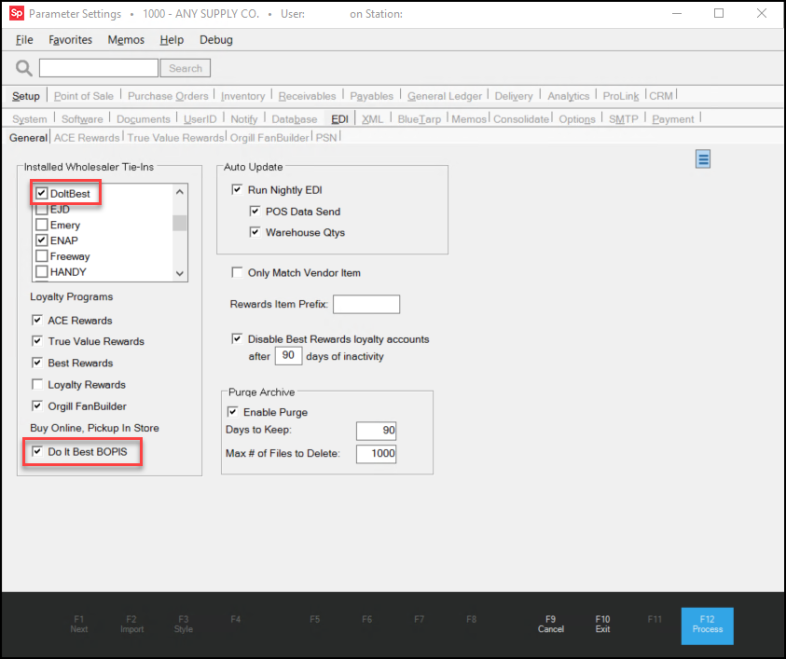
3. In the Installed Wholesaler Tie-Ins list, choose the Do It Best check box.
4. In the Loyalty Programs list, choose the Do It Best BOPIS check box.
5. Choose Process (F12) to save these settings.
Note: These instructions assume that you have already set up the Do It Best Program API settings as described here.
Adding a DIB BOPIS Receivable Account
When you set up the DIB BOPIS branch, you add a standard receivables account that the application can use to collect the DIB BOPIS records that are submitted for your store. Use the instructions below to establish this account. The charge account must be tax-exempt and must disable sales prices as we describe below. You can use this account record to bring up any BOPIS orders that show up for your store. It is not necessary to set a credit limit for the account. If you accept DIB BOPIS orders at more than one store, you should set up DIB BOPIS accounts at each branch location for tracking and accounting purposes.
Do It Best gives your branch credits for the website transactions you fulfill and posts that credit monthly, so the application treats the invoiced order as an Accounts Receivable transaction. Use the instructions below to add a BOPIS-specific receivables account for each branch to track and reconcile the monthly DIB credits. The account type for this BOPIS account must be Charge.
We also recommend, but not require, that you setup an exempt BOPIS tax code and map the tax location’s activity to an “Analysis Required” or similar generic system clearing GL account, since you should never see sales tax activity for these BOPIS transactions. Do It Best is responsible for paying taxes on BOPIS transactions, and the mapping will allow you to know there’s a problem if a balance shows up on this account.
To add a DIB BOPIS account:
1. From the Main Menu, choose Point of Sale > Database > Account. The Account Maintenance form displays.
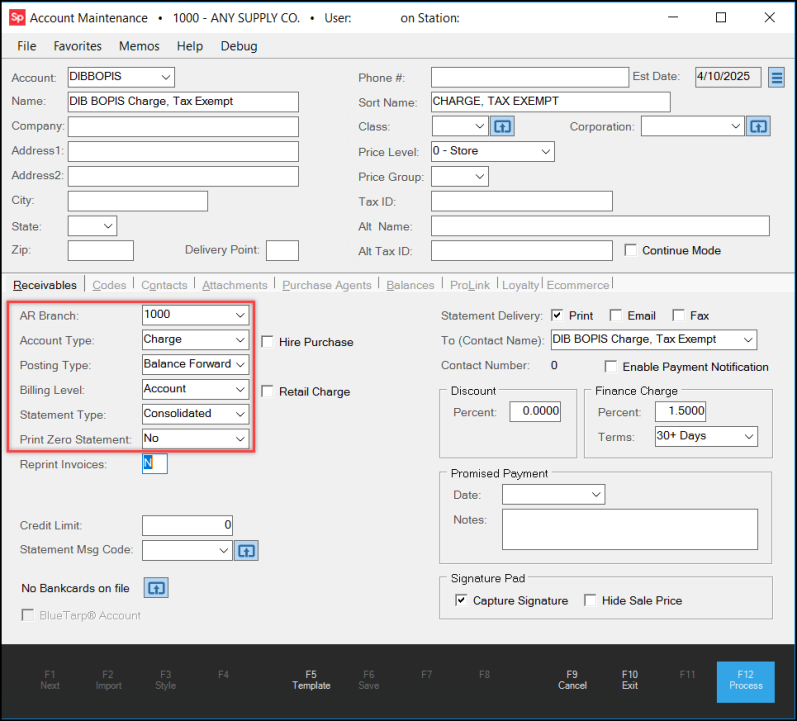
Account Maintenance > Receivables Tab with Required DIB BOPIS Settings
2. In the Account field, enter an ID that your Salespeople will identify with the DIB BOPIS programs, such as DIB BOPIS.
3. In the Name field, enter a name that indicates that it is a charge account with a tax-exempt status. Other entries in the top fields are not required.
4. On the Receivables tab, choose the following settings:
Note: Setting up a credit limit for a DIB BOPIS account is unnecessary.
-
AR Branch
Choose the default branch for the DIB BOPIS orders. -
Account Type
Choose Charge. -
Posting Type
Choose Balance Forward. -
Billing Level
Choose Account. -
Statement Type
Choose Consolidated. -
Print Zero Statement
Choose No.
5. Choose the Codes tab and complete the following entries.
-
Status
Choose Active. -
Tax Location
Choose Exempt. -
Exempt #
Enter the tax exempt ID for the account. -
Sale Prices
Enter N for No. -
POS UM
Choose the Stock (Base) option in this list to ensure that the quantity and pricing units of measure for purchasing and selling match.
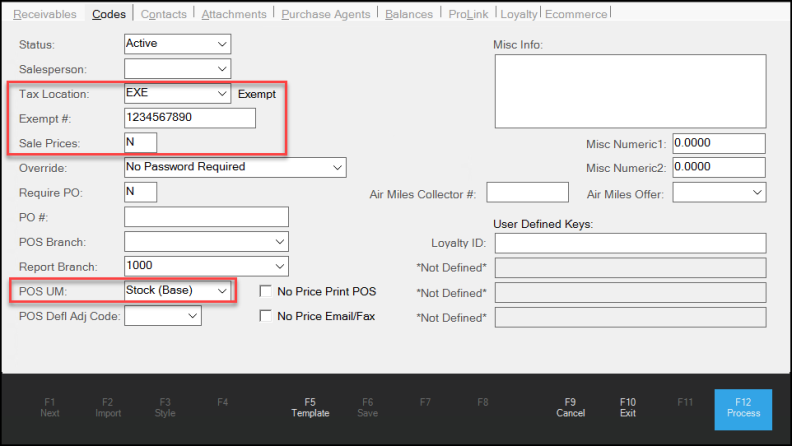
Account Maintenance > Codes Tab with Required DIB BOPIS Settings
6. When you have completed these entries, choose Process (F12) to save them to the database.
Adding a DIB BOPIS Adjustment Code
The DIB BOPIS adjustment code is for tracking service fees charged by Do It Best for BOPIS transactions. When you add a BOPIS adjustment code, enter the information as shown below for each category, and select the GL Mapping details as you have them defined.
To add a Do It Best BOPIS-specific adjustment code:
1. From the Main Menu, choose Point of Sale > Database > Adjustment Codes. The Adjustment Code Maintenance form displays.
2. Complete the entries for this adjustment code as shown below and enter the default amount or cost percentage that is charged by DIB.
3. Set the Method field to Manual Entry, because although there is a percentage charge to use BOPIS, you will receive a dollar amount for each transaction. The application uses that transaction-specific dollar amount when processing the BOPIS order and then applies this adjustment amount to account for the BOPIS service fee. Your monthly credit from DIB for your transactions will be reduced by each transaction's applicable service fees, so mapping should be done accordingly. We recommend you work with your accounting team to determine the appropriate GL mapping journal settings.
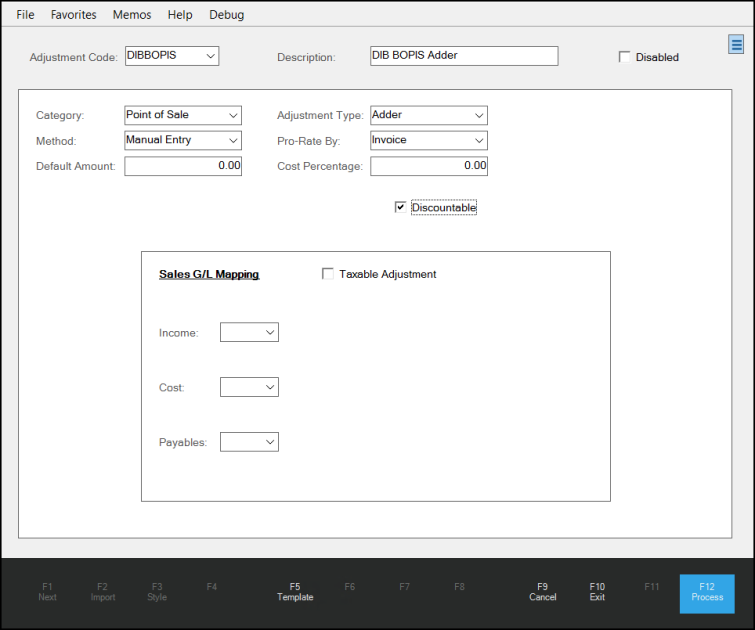
4. When you have completed these settings choose Process (F12) to save the adjustment code.
Setting up a Branch for DIB BOPIS Orders
Do It Best BOPIS settings must be defined for each branch that accepts these orders. Each branch's process is the same, but the API keys are unique. It makes sense to collect and set up all of the records you need before you get started, including:
-
Get the Do It Best EDI Account, Login, and Password information from Do It Best
Note: You may have to reset the password, so you may have to work with Do It Best directly to complete this process. -
Add a DIB BOPIS Receivables Account as described here.
-
Add a DIB BOPIS Adjustment code as described here.
-
Set up the BOPIS Notification Group, if you need one, as described here.
When you have this information, you are ready to set up the branch settings. Complete this task for each branch that will accept DIB BOPIS transactions.
To set up the branch EDI settings for the DIB BOPIS program:
1. From the Main Menu, choose Maintenance > Database > Branches. The Branch Setup form displays.
2. From the Branch ID list, choose the branch you want to complete the settings for. The Branch Setup form displays the branch details.
3. Choose the EDI tab.
4. From the Settings for list, choose DoItBest. The Do It Best settings display.
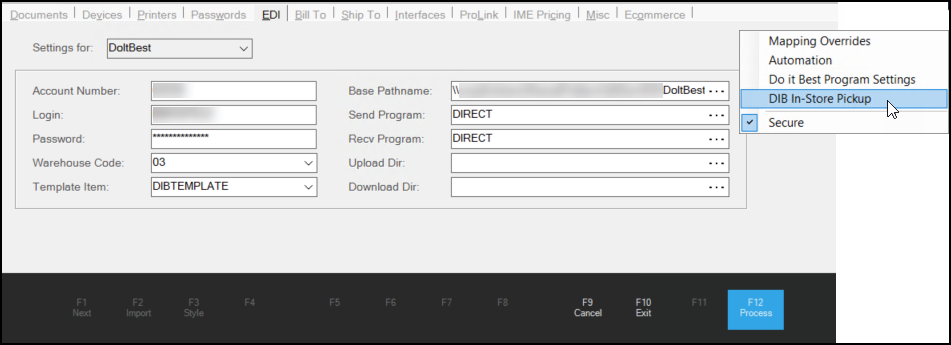
5. Click the Menu Marker  to display the context list and choose the DIB In-Store Pickup option. The DIB In-Store Pickup Settings box displays.
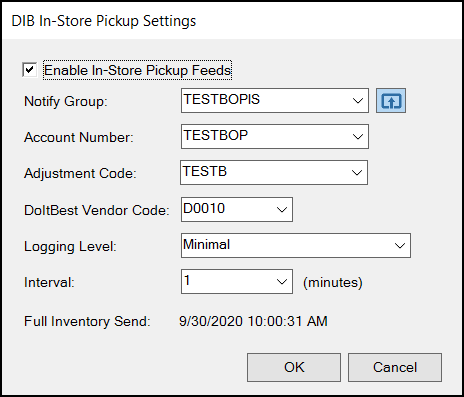
6. Complete the following entries as appropriate for the branch:
-
Enable In-Store Pickup Feeds
Select this check box. This setting is required to enable the Full Inventory Send process. -
Notify Group
From this list, choose the group that should be notified when BOPIS orders are detected. This can be an existing group, or you can create a new one. To add a new notification group, click here. -
Account Number
Choose the AR account number you created here to track the Do It Best BOPIS orders for this branch. -
Adjustment Code
Choose the adjustment code you added here to add the new adder for service fees charged by Do It Best for BOPIS transactions. -
DoItBest Vendor Code
Choose the business's Do It Best vendor ID from the list. -
Logging Level
Choose the logging the system uses to track the DIB BOPIS processes. This is set to Minimal by default, but if you see errors, you can switch to Verbose or Debug to research the problem. Choose the Minimal setting for better performance. -
Interval
This is the interval at which the application will check for DIB Pickup orders. This is set to 5 minutes by default. This interval does not pertain to how often the business's inventory changes are pushed to DIB.
Note: Below this setting, the Fill Inventory Send field displays the last time the application sent the branch's full available inventory list to Do It Best. If you are setting this up for the first time, the application displays the message: Initial upload has not been completed.
7. When you complete these settings choose OK. When you click OK, a message displays:
-
A full inventory upload must be done for this Branch location before any daily inventory updates will be sent to Do It Best.
8. Choose OK to close this message.
9. Choose Process (F12) to save these settings.
After you complete this process, define the items in your inventory that you want to include in the BOPIS program (as recommended here). Then send the branch inventory information to Do It Best using the instructions in this section. Please note that all qualified items will be sent to DIB to be included on their website unless you specifically exclude them from the BOPIS program. Although
Creating a BOPIS Notification Group
Use these instructions to create a notification group that activates when BOPIS orders show up in the application. When these user IDs are added to the notify group, the application sends an email to each team member when the BOPIS order is detected.
To create the notification group for BOPIS orders:
1. Follow the instructions described in Setting up a Branch for DIB BOPIS Orders to Step 6.
2. Click the Settings ![]() icon to display the User Group Maintenance box.
icon to display the User Group Maintenance box.
3. In the Group and Description fields, enter the name of the user group that will be notified when BOPIS orders come in.
4. From the list of user IDs, choose the check boxes beside the IDs of the users who should be notified to fulfill BOPIS orders.
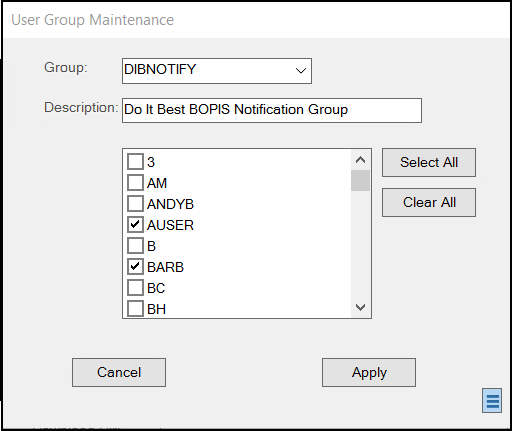
5. Choose Apply. The DIB In-Store Pickup Settings box redisplays.
Click here to return to the Branch EDI Setup instructions.
Choosing Inventory for the DIB BOPIS Program
The Do It Best BOPIS process includes all DIB inventory by default in the Send process as long as it meets the following criteria:
-
The Item has a valid UPC for the Point-of-Sale quantity unit of measure assigned to the item.
Additionally, the UPC must be of either 8-, 12-, 13-, or 14-digits in length.
-
The Item must be a stocked item
-
The Item cannot be disabled
-
The item must be one of the following item types: Standard, Lumber, Sheet Goods, Clothing, Food, Manufactured (Stocked)
-
The Item cannot be a Tally item
-
The Item has an assigned Class or Fine Line Code
-
The Item has an assigned Department
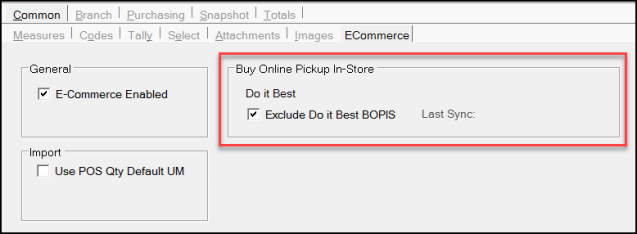
If an Inventory item does not meet all of the above criteria, it will not be eligible for upload to Do It Best for inclusion in the BOPIS program. You can exclude items from the BOPIS program by selecting the Exclude Do It Best BOPIS check box in the inventory item's Common > ECommerce tab. (Inventory > Database > Item form.) Using the Item Global Modify utility, you can also set this exclusion option for many items at a time. (Choose the Cmn - DIB BOPIS Exclude option in the Field Name list.) To learn more about the Item Global Modify utility process, click here.
If you want to add non-Do It Best inventory items to the BOPIS ecommerce site, contact Do It Best using the BOPIS ecommerce website for more information.
Pro Tip: If you find that the item availability and unit of measure pricing for an item is not updating on the Do It Best microsite, click the Exclude Do It Best BOPIS check box (and choose Process (F12), wait 30 minutes, and then uncheck the same check box and choose Process (F12) again. This is the quickest way to reset these item settings on the Do It Best BOPIS microsite reliably. If you need to change this setting for multiple items, you can use the Item Global Modify utility (using the field name described above) to collect the list of items and make these changes to all the items in the list.
Merge/Rename/Delete Item Note: If you are merging, deleting, or renaming items that have the Ecommerce tab Buy Online Pickup In-Store enabled, disable this check box for these items first and wait (five or 10 minutes) for the EDI update to complete before you follow these instructions. If you do not take these steps, errors result. After the update is complete, re-enable the Buy Online Pickup In-Store check box for the item(s) you are going to change and return to the Merge/Rename or Removing Dead Items tasks to begin this process. The application will update the Do It Best BOPIS records you modify through the normal EDI process after the merge/renaming is complete.
After you complete the branch settings, you are ready to send the full inventory and promotion details for your stock to Do It Best.
Sending the Branch Inventory to Do It Best for BOPIS
To perform the Inventory and Promotion Send process for the DIB BOPIS program:
1. From the Main Menu, choose Purchasing > Vendor EDI. The Vendor EDI Communications form displays.
2. From the EDI Interface list, choose the Do It Best interface. In general, the Vendor list updates to show the matching vendor ID.
3. Choose the Extras button. The Function list displays.
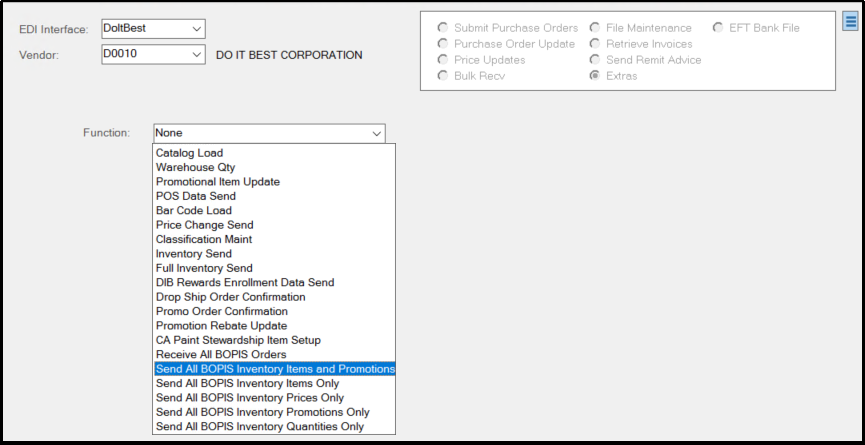
4. From the Function list, choose Send All BOPIS Inventory Items and Promotions.
5. To begin the initial inventory transmission of all items and pricing information, choose the Transmit (F6) key.
After you complete the initial inventory send and have received confirmation from Do It Best, more BOPIS send options display in the Function list.
This is the list of manual transmission options, specific to the BOPIS program, and their purposes:
-
Receive All BOPIS Orders:
Use this option to pull BOPIS orders from the DIB website to the application's database.
Since your system is set to receive orders on a pre-determined time interval (based on your defaults), there is no need to use this option, unless you feel there is a need to manually receive the BOPIS information. -
Send All BOPIS Inventory Items Only:
Use this option to send inventory items only (quantity and prices). Promotions will not be sent. -
Send All BOPIS Inventory Prices Only:
Use this option to send inventory prices only. Item quantities and promotions will not be included in this send package. -
Send All BOPIS Inventory Promotions Only:
Use this option to send Inventory promotions only. Items will not be included in this send package. -
Send All BOPIS Inventory Quantities Only:
Use this option to send Inventory quantities only. Item prices and promotions will not be included in this package.
Processing a DIB BOPIS Order
Typically, when a customer arrives to pick up their BOPIS order, you will use the Account process below to complete the transaction. If your notification team receives an email about an interruption in the BOPIS process, you may need to use the Import option to find the customer’s online order. Of the two methods, you should only use the Import option if the Account option discussed below is not working.
Using the Account Option to Process a DIB BOPIS Order
When a customer arrives to pick up their DIB BOPIS merchandise, you can display the order in the Order Entry form in Point of Sale. The application adds an order record for each DIB BOPIS order using the DIB BOPIS integration process. You can view and process these orders by opening the Point of Sale > Orders form, choosing the DIB BOPIS Account created for this branch, and then finding the customer’s order details as described below.
When a customer comes into the store to pick up their DIB BOPIS merchandise, you can display the order in the Order Entry form in Point of Sale. The application adds an order record for each DIB BOPIS record sent to your store using the DIB BOPIS integration process. You can view and process these orders by opening the Point of Sale > Order Entry form, choosing the DIB BOPIS Account created for this branch, and then finding the customer’s order details as described below.
Note: After you complete the steps below, you still need to invoice the order to apply the inventory costs to the appropriate GL accounts.
To process a DIB BOPIS order using Point of Sale:
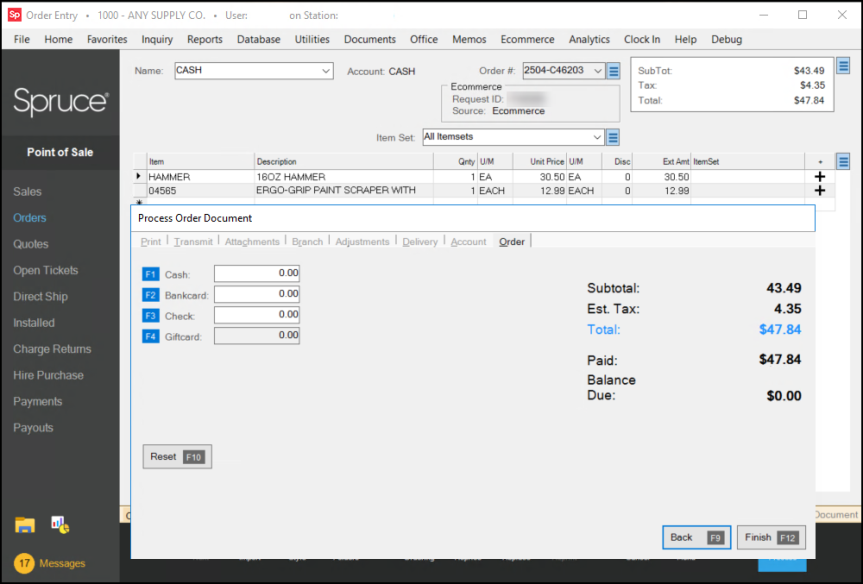
1. From the Main Menu, choose Point of Sale > Orders. The Order Entry form displays.
2. From the Name field, choose the DIB BOPIS account you created and shared in the Branch Setup instructions.
3. From the Order # list, choose the BOPIS order that the customer wants to pick up. They may have information with them that helps you identify which order is theirs. The order materials display in the data grid.
4. Verify that they have the right order materials and choose Process (F12). Review the Process Order Document entries to see if any remaining amounts are required.
5. When you have completed your review of the transaction, choose Finish (F12). You need to invoice this transaction to update the inventory and order tracking systems in the application.
Using the Import Option to Process a DIB BOPIS Order
If a customer comes in to pick up a BOPIS order but you don’t see it in the Order list, you can use the Import (F2) process to import the BOPIS transaction. Check to ensure that all of the DIB BOPIS configuration settings described above are complete for the branch if this becomes a recurring issue. You may not see the Import > Ecommerce option in the context menu if the Ecommerce parameter is not set.
To process a DIB BOPIS online order using the Import (F2) key:
1. From the Main Menu, choose Point of Sale > Orders. The Order Entry form displays.
2. From the Name list, choose the DIB BOPIS account.
3. In the Order list, choose Tab to add a new order ID. This enables the Import (F2) function key.
4. Choose the Import (F2) key to display the Import menu options.
5. Choose E-Commerce from the list. The Import E-Commerce Quote/Order box displays.
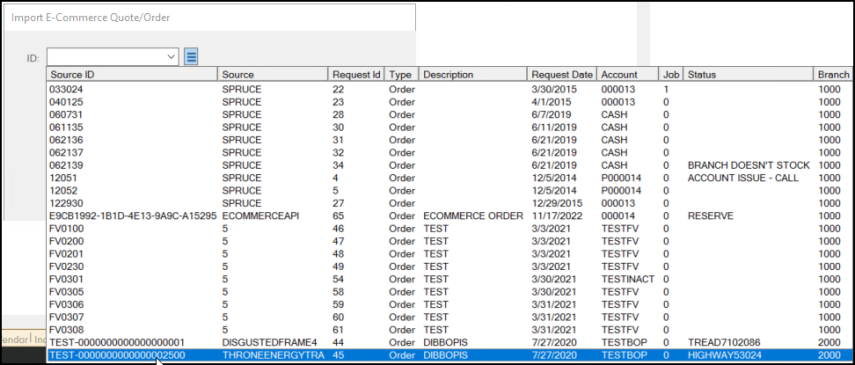
6. From the ID list, use the information the customer gives you to choose the appropriate DIB BOPIS order and click Accept. A confirmation message displays.
7. Click Yes to continue. The Order Entry data grid updates to show the item(s) the customer purchased online.
8. Check to make sure the customer has the items listed on the data grid and then choose Process (F12) to complete the transaction. Since the customer paid online, the Process Order Document does not require a payment at the time of the customer pick up. You complete the transaction to add a record with the inventory and cost information.
9. Choose Finish (F12) to complete the transaction.
Invoicing Completed DIB BOPIS Orders
There are two options for invoicing DIB BOPIS orders that customers have picked up from your store.
-
To invoice a single DIB BOPIS order, use these instructions.
-
To Invoice multiple DOB BOPIS orders, use these instructions.
Invoicing a DIB BOPIS Order
After a DIB BOPIS order is processed, you can update the inventory records by invoicing the order using the process below.
To invoice a DIB BOPIS order:
1. From the Main Menu, choose Point of Sale > Sales. The Sale Entry form displays.
2. From the Name field, choose the DIB BOPIS account from the list.
3. Choose Invoicing (F5) to display the Invoicing context list and choose Customer Order. The Select Order box displays.
4. From the Order # list, choose the order you want to invoice. The data grid updates to show the items associated with the order.
5. Choose Process (F12) to display the Process Invoice Document.
Note: In the Print tab, you may want to turn off the print option if you do not need the paper version of this document.
6. Choose Finish (F12) to complete the invoice. This updates the item quantities in inventory, and adds a balance to the Receivables Account.
Using the Invoice Orders Utility to Invoice DIB BOPIS Orders
To invoice multiple BOPIS orders at a time, you can use the Point of Sale > Invoice Orders utility. Make sure that you only invoice the DIB BOPIS orders that customers have already picked up.
To invoice Do It Best BOPIS orders using the Invoice Orders utility:
1. From the Main Menu, choose Point of Sale > Utilities > Invoice Orders. The Invoice Orders form displays.
2. Choose the All Orders button and click Select to display the Customer Order Selection box.
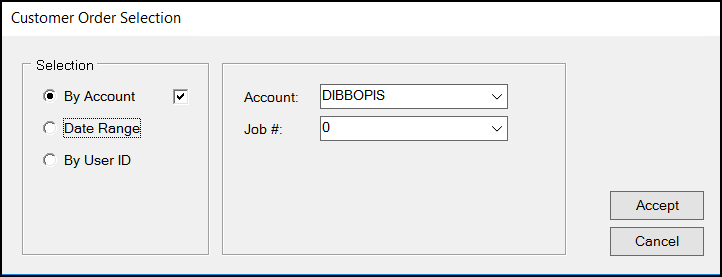
Invoice Orders Utility > Customer Order Selection Options
The By Account option is selected by default.
3. From the Account list, choose the Do It Best BOPIS account you created for this process and enter 0 in the Job # field.
4. Click Accept to display the current DIB BOPIS orders. The data grid updates to show the current DIB BOPIS orders.
5. Review the list and delete the orders that have not yet been released.
6. Choose Process (F12) to invoice the selected orders. The Process Session Document form displays.
7. In the Print tab, uncheck the print options, as you do not need to provide these documents to anyone.
8. Choose Finish (F12) to update the inventory records of the selected DIB BOPIS orders.