Working with Convenience Fees
When you need to process a credit card payment for a Receivables account, that costs you money. Adding a convenience fee allows your customer to pay their account their way and helps you maintain your profit margin. After the Convenience Fee setup and mapping are complete, the application will apply Convenience Fees automatically to any account that pays all or part of their balance using a credit card. Before you implement a Convenience Fee policy, we recommend that you add a note to your customer statements alerting them of this new policy and when you will be implementing it.
Disclaimer: When you apply Convenience Fees to account payments paid by credit or debit card, there may be legal, tax liability, and/or contractual restrictions that may apply in your area. Further, adding this charge may affect the terms of your card merchant or other contractual agreements. Your company is responsible for researching these legal regulations, liabilities, and restrictions to determine whether you can comply with them when applying the convenience fees in this application. ECI and the software applications we provide are not responsible for making these determinations on your behalf, nor do we claim this feature is suitable for your company. You are not required to use the Convenience Fee feature; only you can determine whether a convenience fee is appropriate for your business. Before enabling this feature, we recommend you work with your local legal and financial counselors to ensure you can apply Convenience Fees where you are.
A Note about Tax Liability: The Convenience Fee feature has no automatic consumer tax impact and does not include a tax component. Specifically, existing tax reports and transaction details at the time of sale do not include convenience fees because they are applied to payments afterward. If convenience fees are considered taxable in your area (when charged at the time of payment (VAT/GST, etc.), you need to report and pay these taxes manually. Convenience fees are recorded as income (based on your GL mapping in the application) and impact your company’s financial reporting. We also recommend you track any convenience fee taxes using the appropriate GL accounts.
You can also completely prevent bank card payments for Receivables accounts by updating the severity on a task list to an error. This prevents credit card payments during the processing step in the Point of Sale > Payments transaction. Managers or employees with administrative rights can override this setting, if needed.
Convenience Fee Setup
There are two steps required to set up and implement the Convenience Fee feature:
-
Setting the Convenience Fee Parameters
Allows you to set the default convenience fee percentage by branch for each credit card your business accepts.
-
Mapping the Convenience Fees to the Appropriate Journal Account
Allows you to specify which journal account to apply the Convenience Fees to. Once this mapping is established, the application will manage this for you.
Setting the Convenience Fee Parameters
To set the Convenience Fee parameters, you must have administrative rights to the application. When you set these parameters, we recommend setting them for each branch that uses the feature. You can set separate rates for various credit cards, based on their charges, if you wish, or you can set one percentage for all cards. You can include or exclude debit cards from this fee.
To set the Convenience Fee parameter:
1. From the Main Menu, go to Maintenance > Database > Parameters to display the Parameter Settings form.
2. Select the Receivables tab to display the Card Convenience Fee options.
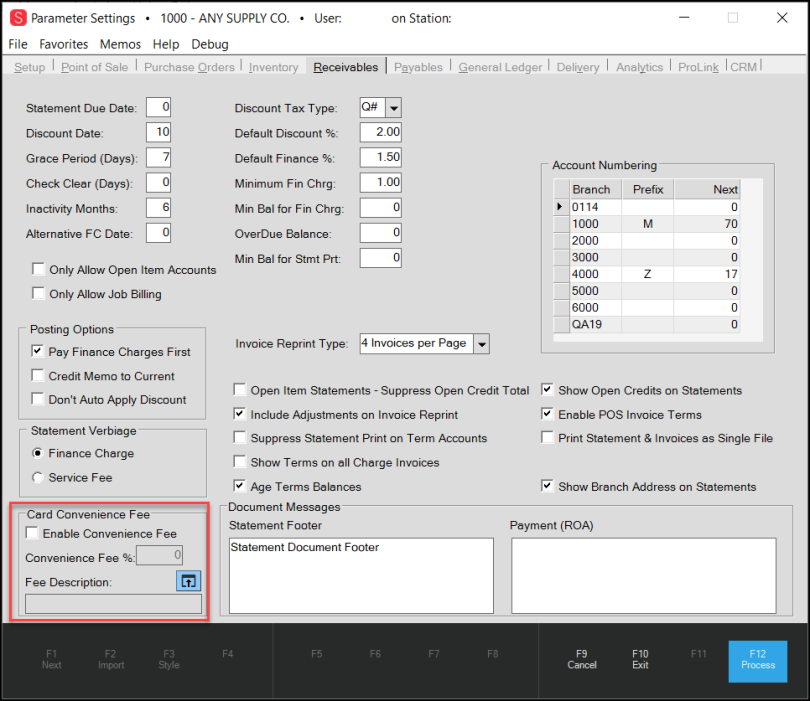
Parameter Settings > Receivables > Card Convenience Fees Options
3. In the Card Convenience Fee box, select the Enable Convenience Fee check box.
4. Select the Fee Description Settings ![]() icon to display the Convenience Fee Setup box.
icon to display the Convenience Fee Setup box.
If you choose to set different rates for different cards, the Card Type list displays the list of cards from the Parameters > Setup > Software tab. Only cards in that list are configurable in this feature.
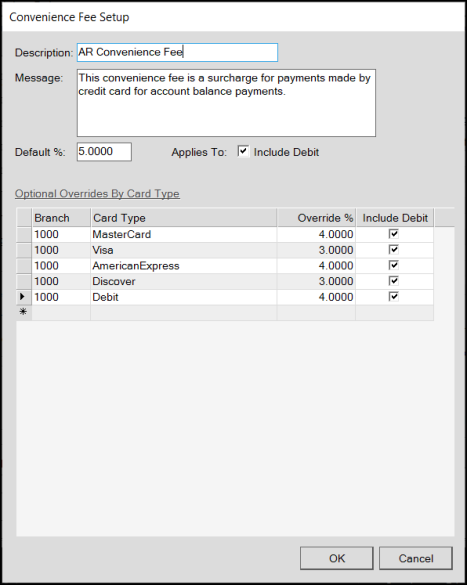
Convenience Fee Setup
In the data grid, you cannot enter duplicate records for the same branch.
5. Complete the settings in this box for each card you accept at each Branch.
-
Description
Enter a description for the Convenience Fee. This is the text that displays beside the convenience fee transaction amount in the customer’s invoice document. (Required). -
Message
Enter the message you want to display on the customer’s invoice explaining the convenience fee when the customer pays their balance by credit card. This message only displays when the application applies a Convenience Fee to an account payment. -
Default Percent
Enter the default percentage for any card you accept that you do not explicitly list in this box. This percentage is the default for all cards and branches.
This entry must be a positive number, and it cannot exceed 99.9999%. The application applies the default convenience fee percentage to any debit cards you do not list specifically in the data grid. -
Include Debit
Select this check box if you intend to include convenience fees for debit card payments by default for all card types. -
Data Grid Entries
For each branch, enter records for any credit card type that requires a different convenience fee percentage from the setting in the Default Percent field. The application applies the percentage you set in this list whenever an account payment uses this card type. You can sort this list by selecting the Branch heading.
Note: If you leave out any branch/card combinations, the application displays a warning message to allow you to verify you want to apply the default settings to these cards -
Debit check box
Select the Debit check box if the Include Debit check box is not selected and you want to apply the same convenience fee percentage entered for a particular card type to the associated debit card account payments.
You can include or exclude Debit cards by default (check box at the top) or include debit cards by card type if you prefer by selecting the appropriate check box(es).
Note: When you add a new branch location, you need to add any necessary Convenience Fee settings if you want to add specific fees to apply for that branch in this table. This is not completed automatically. If you do not add new entries, the application applies the default percent to transactions that incur convenience fees.
6. When you have completed these entries, select OK to save them. The application updates the parameter settings based on your entries.
![]()
Card Convenience Fee Entries Complete
7. Choose Process (F12) to save these settings. An error message displays, reminding you to set the mapping for this fee in the Journal Account.
Note: When you create this fee, you need to complete the journal mapping so the company can track this asset appropriately.
8. Complete the steps in Mapping the Convenience Fees to the Appropriate Journal Account and then return to these instructions.
9. Choose Process (F12) again to clear the error message and complete the setup process.
Mapping the Convenience Fees to the Appropriate Journal Account
After you set the Convenience Fee parameters, it is important to map these payments to an appropriate journal account. A default script adds a new AR Convenience Fee entry in the System Journal Setup form, but you need to add the appropriate journal account to track these incoming funds.
To map the convenience fees to a journal account:
1. From the Main Menu, go to General Ledger > Database > System Journals to display the
2. In the Journal Type list, choose Point of Sale.
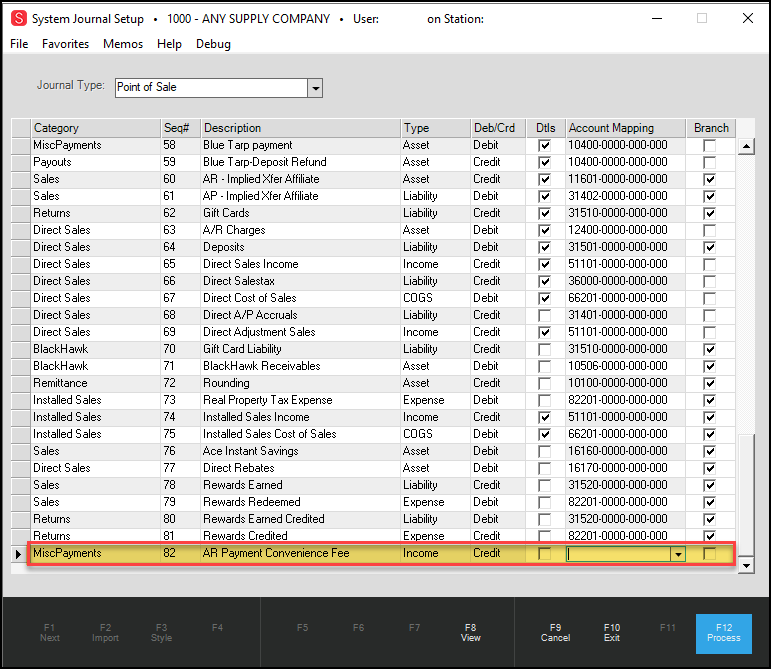
MiscPayments Entry for Convenience Fee Payments
3. Scroll down to find the AR convenience fee entry.
Note: If this entry does not exist, scroll down to the bottom of the form and add the MiscPayments entry for AR Payment Convenience Fee with a Type of Income.
4. From the
5. When you have completed your mapping settings, select Process (F12) to save the change.
6. Return to the Parameter Settings > Receivables tab and select Process (F12) to update the journal mapping.
Applying a Convenience Fee to an Account Payment
In the Point of Sale > Receive on Account task, when you select the bankcard option (and the Convenience Fee settings are in place), the application applies the convenience fees by default. You can override Convenience Fees at Point of Sale if you need to, with the proper permissions. In regions with currency rounding rules, these rules also apply to Convenience Fees.
Note: If the customer’s bankcard cannot authorize the entire payment amount, they cannot use the card for the payment. When the payment fails, the following message displays to explain the issue:
-
Partial payment not available when convenience fees are active; card transaction voided.
To see the Convenience Fee to be applied at Receive on Account:
1. From the Main Menu, choose Point of Sale > Payments > Receive on Account to display the Accept Payment form.
2. From the Account Name field, select the account you want to process the payment for.
3. In the Amount to Apply field, enter the amount the customer is paying.
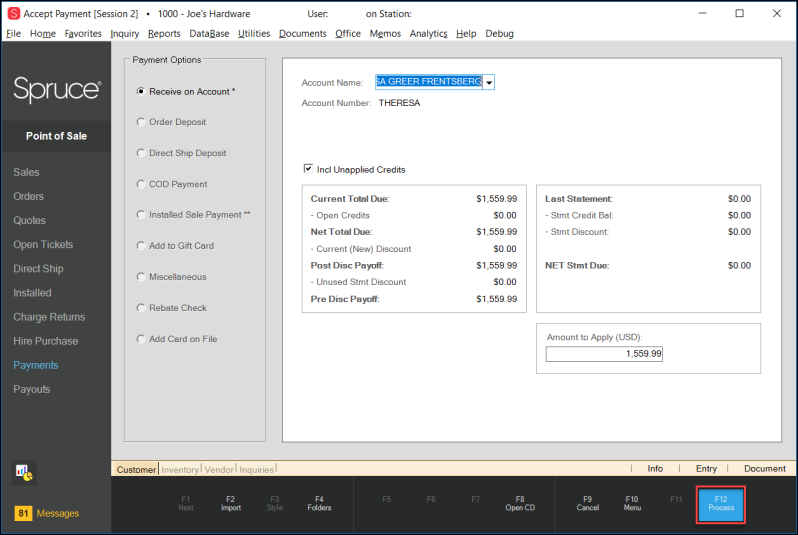
Accept Payment Form with Receive On Account Amount Applied
4. Select Process (F12) to display the Process Payment Document.
5. Select BankCard (F2) to display the debit and credit card options for the account.
If you choose not to use the default card on file to process the payment, you must select/enter the new card processing details (as specified in the next step) before processing.
Note: The application does not select a default credit card when Convenience Fees apply. Since the fee rate may vary and depend upon the card you choose, the application cannot apply the convenience fee until you complete the credit card entries.
6. Select the Credit or Debit button and choose the credit card type.
Note: The percentage set for the Mastercard credit card in this case is 4%.
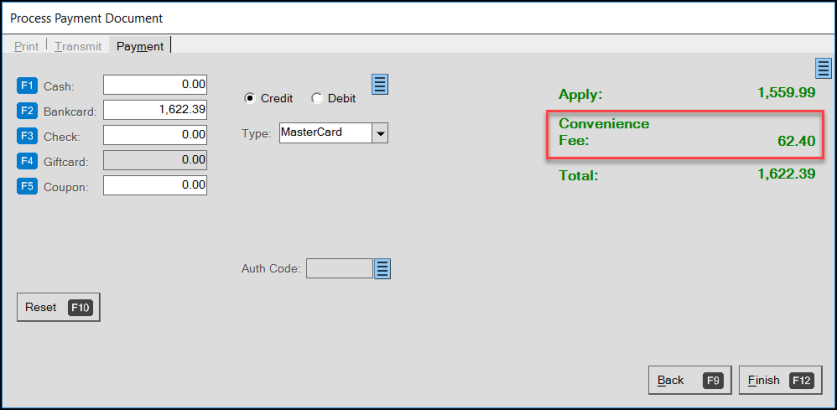
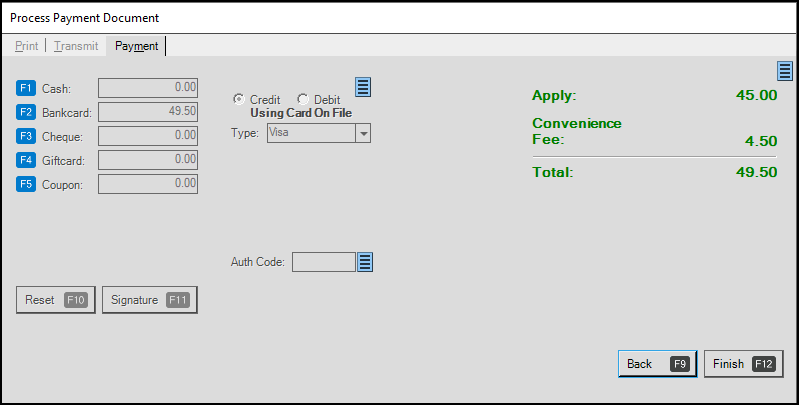
Process Payment Document for Receive on Account Payment with Credit Card
Note: If the customer wants to make a partial payment using another tender type (such as cash, coupon, gift card, etc.) and it affects the bankcard balance, the application adjusts the convenience fee using the new Bankcard amount.
7. If you change the credit card type, and the percentage setting is different, the Convenience Fee updates.
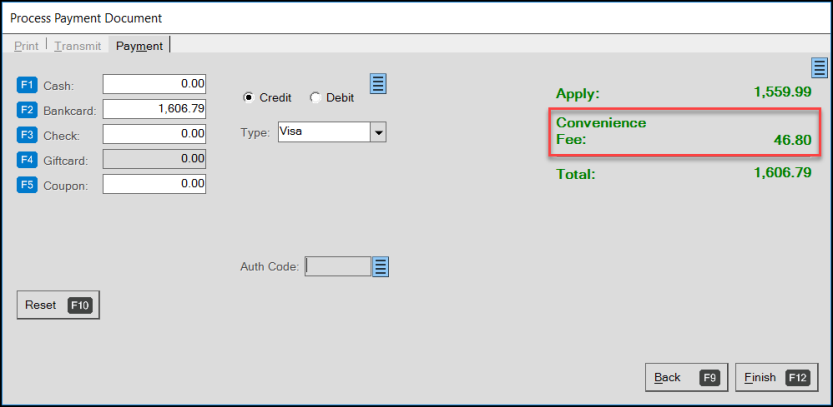
Process Payment Document for Receive on Account Payment with Different Card Percentage
To override the convenience fee in the Process Payment Document box, select the blue Menu Marker  to display the override option.
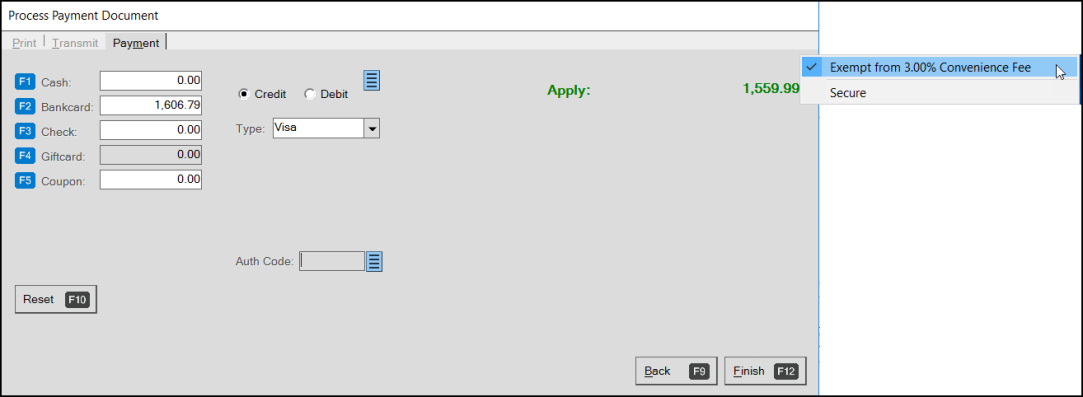
Process Payment Document with Override Message
Select the Exempt from X.XX% Convenience Fee option. The application removes the convenience fee from the transaction. Uncheck the option to redisplay the Convenience Fee.
Note: If you override the convenience fee, re-enter the original amount in the Bankcard field to reflect the total without the convenience fee.
8. Complete the credit card entries and select Finish (F12).
When you pay with a credit card or override the payment with a credit card, a warning message displays:
-
Bankcard payment type specified for Received on Account
9. Select the Accept Warnings option to continue.
10. To review the Payment document, go to Documents > PS Sales Invoices (Account Name).
The customer copy of the invoice displays. The message at the top is the message entered in the parameter settings. The AR Convenience Fee (Percentage) reflects the Convenience Fee percentage charged.
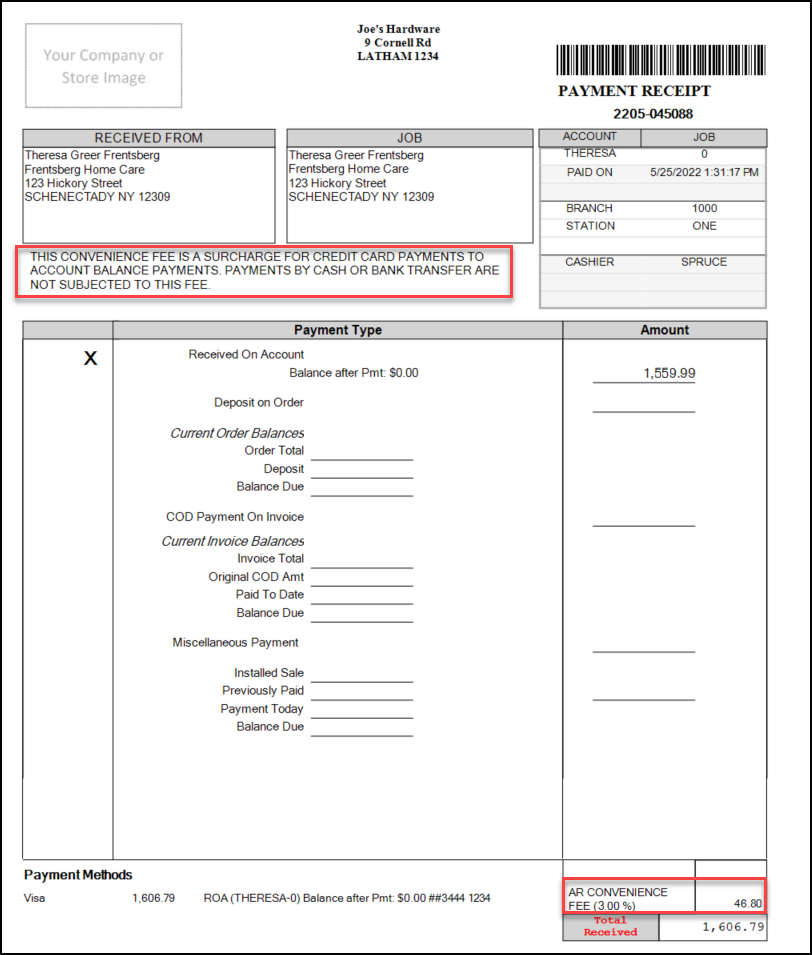
Invoice Document with Convenience Fee Message and Entry Highlighted
When you complete a transaction with a convenience fee, the application updates the appropriate general ledger account for the End of Day report and the EOD Cashier’s Report. Convenience fees display as separate line items.
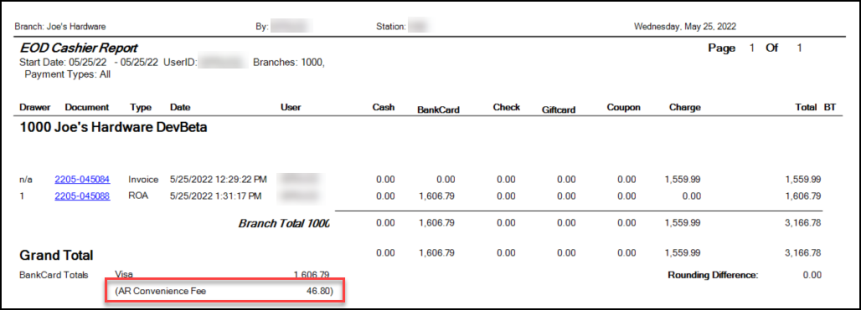
Convenience Fee on EOD Cashier Report
Using Moneris Devices to Process Payments with Convenience Fees
For businesses that use Moneris devices for bankcard processing, the Process Payment Document form does not display a list of card options by default, except when cards are not integrated. Since selecting the debit and credit options and choosing the card type are required for the Convenience Fee feature, we have made some changes to how bankcard processing works for Moneris-paired devices in the application.
For Moneris devices with integrated cards, we have added the Card Type list and the Credit and Debit buttons to the Process Payment Document form; these features now display by default. The Card Type list also displays non-integrated cards, but the Moneris system will not process these payments automatically. You still need to process those payments manually outside of the application.
We have renamed the Type field, Trans Type, which displays the Credit/Debit option when you choose Bankcard payment options.
When you process the account payment using the Receive on Account feature, you enter the customer’s requested payment in the Amount to Apply field and choose Process (F12) to display the Process Payment Document. When the customer asks to pay using credit or debit options, follow the process below.
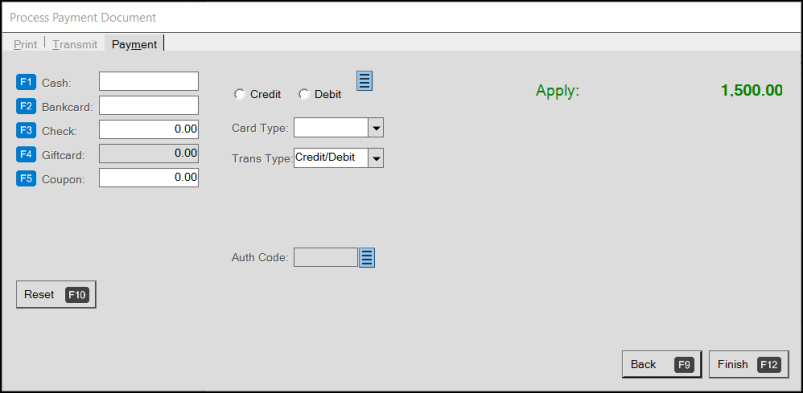
Process Payment Document (Initial)
To process a convenience fee with a payment using Moneris devices:
1. In the Process Payment Document form, in the Bankcard field, enter the amount the customer wants to apply to their account balance.
2. Choose the Credit or Debit button depending upon the customers requested transaction type.
3. From the Card Type list choose the bankcard the customer wants to apply the payment to. The appropriate Convenience Fee amount displays and updates the Bankcard field amount.
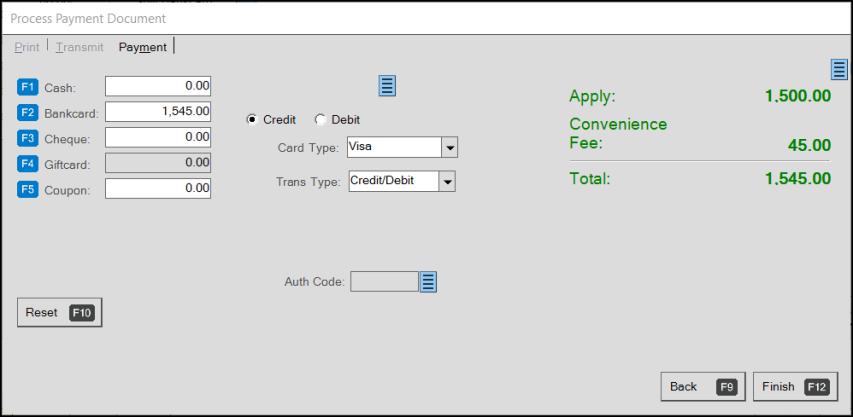
Process Payment Document with Convenience Fee Options Displaying
Note: The application still uses the entry in the Trans Type list to signal the type of payment you are processing to the Moneris device. If you select a non-integrated card type from the Card Type list, the application expects you to process that payment using a different device or method. If you select an integrated card from the Card Type list, the Moneris device processes the payment as it normally would. If you leave the Card Type list entry blank, the device assumes you are paying using the Mastercard bankcard type.
4. To process the payment, choose Finish (F12). One of these things occur:
-
If you chose an integrated bankcard or debit card, the Moneris device processes the payment with the Convenience Fee.
-
If you chose a non-integrated bankcard or debit card, the transaction completes with the convenience fee, but the application assumes you are using another payment validation method.
Integrated or non-integrated Moneris card settings are defined in the Parameter Settings > Setup > Software subtab. You must have administrative rights to set or modify these entries.
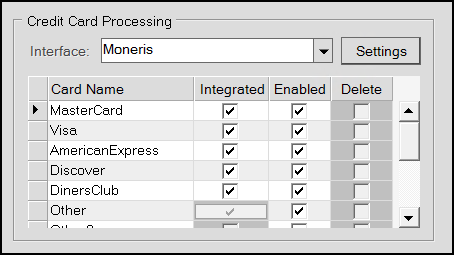
Parameter Settings Form > Setup > Software Subtab > Credit Card Processing Settings Sample
Processing a Convenience Fee using ProLink
You can also use ProLink to apply convenience fees to accounts with balance forward settings, when you have completed the Convenience Fee setup. No additional configuration is required for this to work on ProLink.
To process a payment with a convenience fee for a customer in ProLink:
1. Log into ProLink and access an account with a balance forward amount.
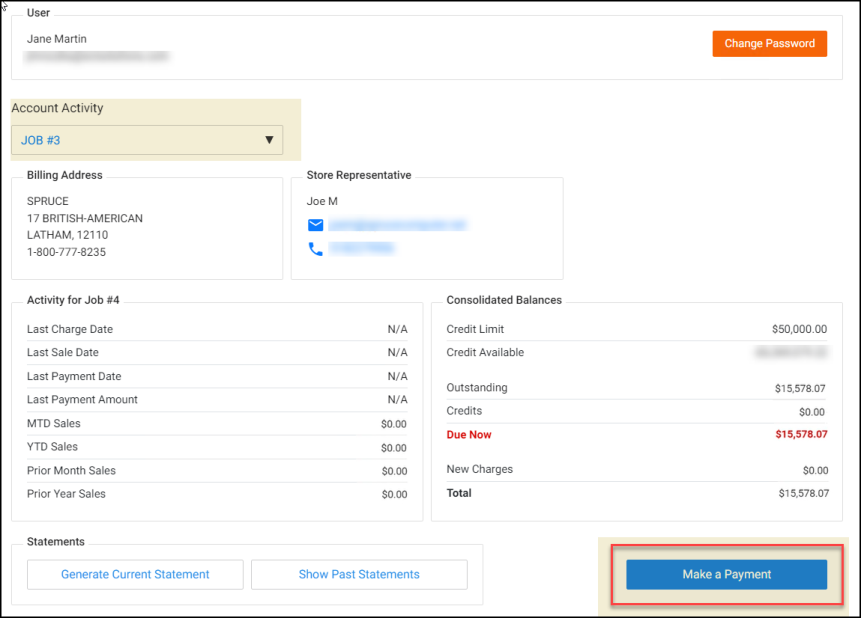
ProLink with Account Activity to be Paid
2. Select Make a Payment. The Make a Payment page displays.
3. Enter a credit card payment amount (such as 45) and the Convenience Fee amount displays (updating the total).

ProLink – Make a Payment with Convenience Fee Highlighted
4. Select Submit Payment. The confirmation message displays confirming the Payment total amount.
5. Do one of the following:
-
Click OK to accept the payment change.
-
Click Cancel to return to the Make a Payment options and change the payment method.
Applying a Convenience Fee to a Specific Invoice
You can also see the Convenience Fee applied to a specific invoice if the customer wants to pay that way.
To see the convenience fee applied to a specific invoice in ProLink:
1. Login to ProLink with the same account as above.
2. Select the Select Invoices button to display the list of open invoices.
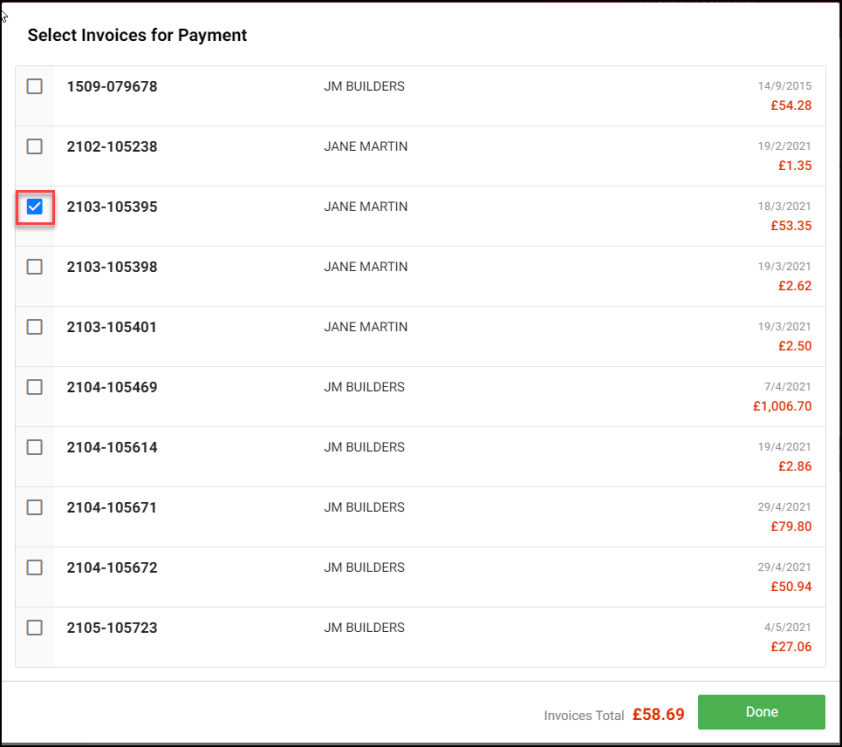
ProLink – List of Open Invoices
3. Select the check box beside the invoice you want to pay and choose Done. The Make a Payment page displays.
4. Enter a credit card payment amount for the full amount and the convenience fee field updates.
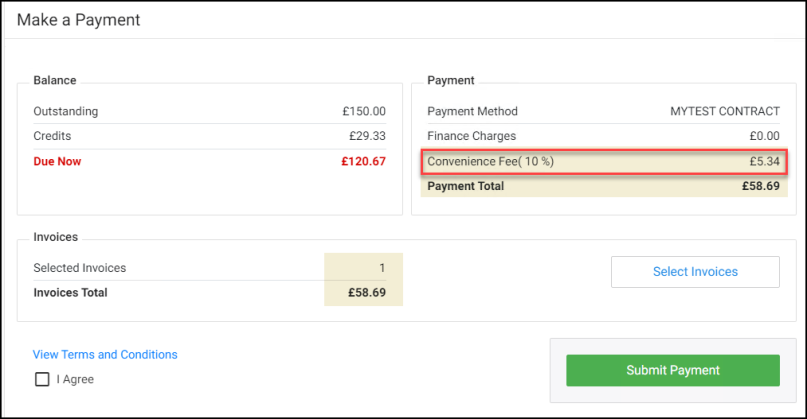
ProLink – Make a Payment with Convenience Fee Amount Highlighted
5. Select Submit Payment. The confirmation message displays confirming the Payment total amount.
6. Do one of the following:
-
Click OK to accept the payment change.
-
Click Cancel to return to the Make a Payment options and change the payment method.
Importing Ecommerce Payments and Applying Convenience Fee
When you import a customer’s online purchase, you can apply a convenience fee for using a credit card. You can select the account in ProLink to make the payment request as well. Note: In some cases, you may already account for convenience fees in ecommerce payments.
To import an e-commerce payment:
1. From the Main Menu, go to Point of Sale > Payments > Receive on Account to display the Accept Payment form.
2. In the Account Name field, choose the account you want to process the payment for.
3. Select Import (F2) and choose the E-Commerce option.

Accept Payment Form with Import E-Commerce Option Highlighted
The Import E-Commerce Payment box displays.
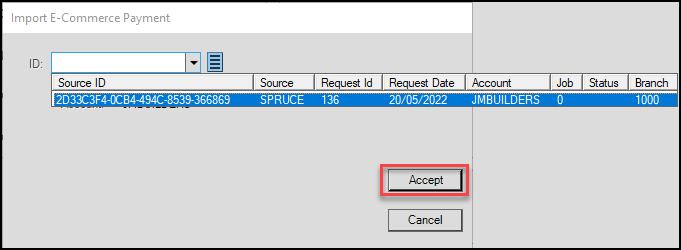
Import E-Commerce Payment Box
4. Select the payment ID from the list and select Accept.
The application adds the payment amount in the Amount to Apply field. The entered amount is read-only.
5. Select Process (F12) to process the payment. The Process Payment Document box displays.
The application applies the convenience fee automatically based on the e-commerce record.
Process Payment Document with Convenience Fee Applied Automatically
6. Select Finish (F12) to complete the transaction.
When you review the convenience fees in your general ledger accounts, you notice that they display like this:
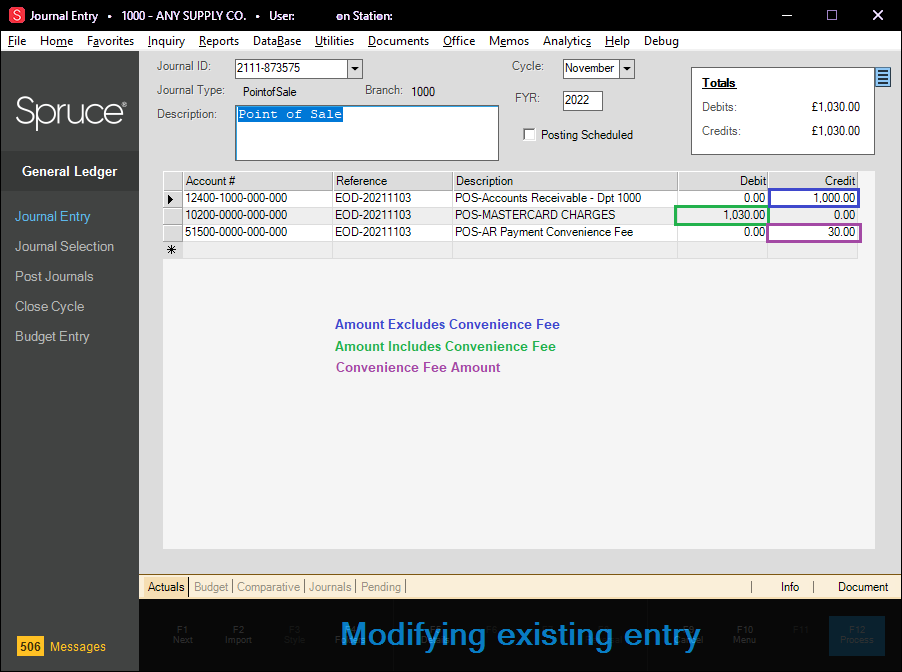
Journal Entry Form with Convenience Fee Mapping Shown