Setting up and Managing Rental Transactions
The application offers a built-in rental feature for your use. There is no additional charge for this option.
Preparing your Company for Managing Rental Transactions
Your company should seek legal counsel to limit the liability that may be associated with your rental program. Regardless of the type of rental program you are adding, you should have one or more legal contracts or agreements to limit the risk of liability. This risk may be higher with tool and equipment rentals in particular. For these reasons, it's important to protect yourself and your company legally.
RockSolid MAX does not produce or provide any legal statements or rental agreement documents, and ECI accepts no responsibility if your company fails to do so, or does so improperly. It is entirely your company's responsibility to make sure that your rental documents (contracts, insurance agreements, legal statements, etc.) meet any and all legal requirements for your area and provide protection for your company from any liability from damages, lawsuits, etc.
Consider having rental agreements and/or legal statements printed on the back of the paper used for your rental invoices; or print them as separate documents (adding any required documents to your rental items as attachments might make this easier).
A Note about the Third-Party Rental Integration App
Third party rental integration is no longer supported.
Setting the Rental Parameters
You can set some Rental parameters, including Rental Durations (in hours, weeks, months) and Insurance Waiver percentages in the Parameter Settings form. Setting these options requires system administrator privileges.
Note: Do not enable the old Rental S/W parameter as it refers to a legacy third-party integration that is no longer supported.
To set the Rental parameter options:
1. From the Main Menu, choose Maintenance > Database > Parameters. The Parameter Settings form displays.
2. Choose the Point of Sale > Rental tab to display the rental parameters.
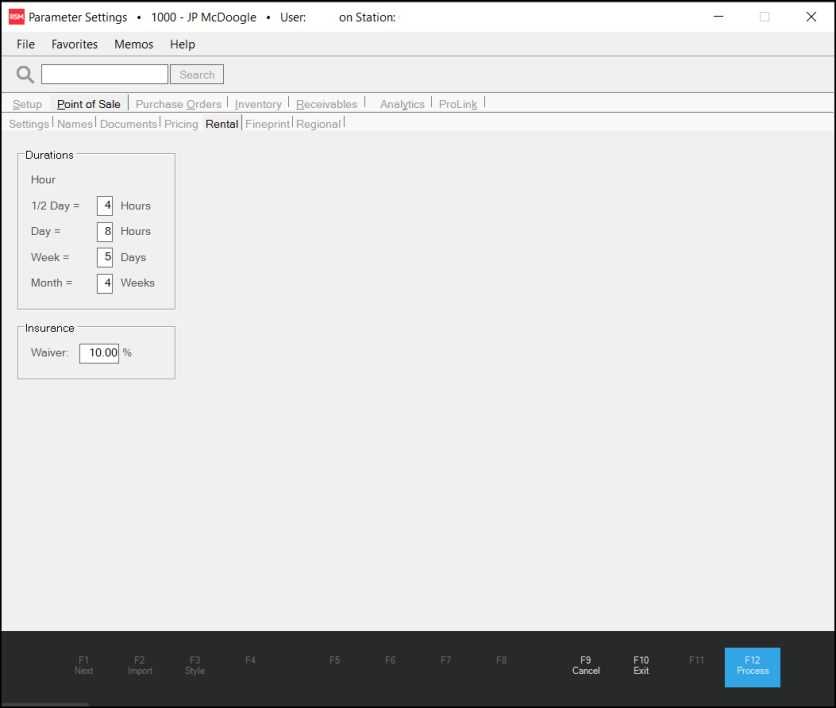
3. Update the Duration and Insurance Waiver entries based on the needs of your business.
-
Durations
Parameters define the relationship between rental periods used with rental items.
All rental reservations are made in 1/2 day increments. Rental Items don't require either hourly or 1/2 day rates. If a rental item is rented for a 1/2 day with no 1/2 day rate specified, half (1/2) the daily rate is used instead.
You can optionally specify an hourly rate for a rental item (if desired). If you define an hourly rate, these parameters determine how many rental hours are considered a 1/2 day, full day, and so on.
Note: You can set rental rates for items individually in the Item Maintenance form. When you do, the Item Maintenance rates are used rather than the parameter settings listed here. -
Insurance Waiver
Rental contracts may require insurance or offer it as an add-on. This parameter sets the default percentage used for the insurance amount. You can modify this percentage during rental process and may also be applied to any add-on charges or credits when the item is returned. This is not considered a deposit and cannot be refunded to the consumer.
4. Choose Process (F12) to save this record to the database.
Why are Duration Settings Needed?
One company might consider a 1/2 day rental as 4 hours but others may view a 1/2 day as 8 or 12 hours and a full day as a 24 hour period, for example. We provide these parameters so you can select your own options.
Setting up Rental Items
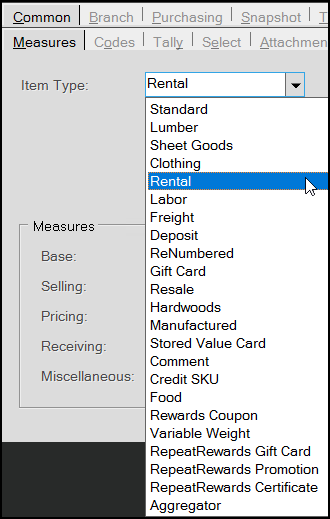
The products you will rent are defined in Item Maintenance just like other items. There is a Rental item-type that must be assigned to the rental products.
After assigning the type, a Rental panel appears on the Branch > Pricing tab.
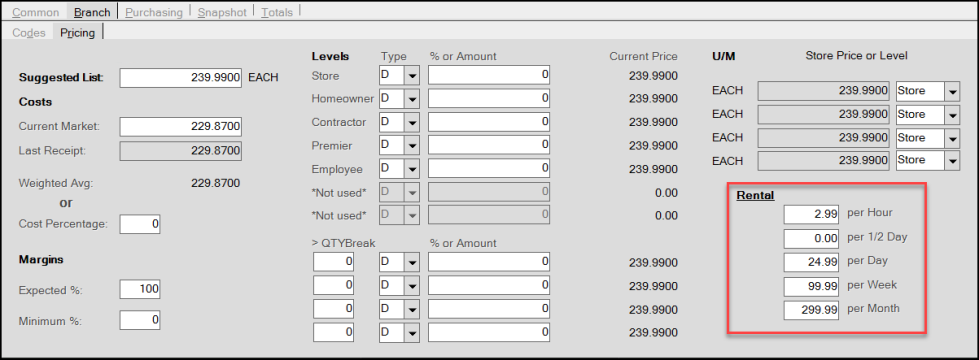
Item Maintenance > Branch > Pricing Tab with Rental Panel Options
This is where you set rental rates for the particular product. There are five rates defined: per Hour, per 1/2 Day, per Day, per Week, and per Month.
The Parameters for Rental (described earlier in this topic) determine the numeric relationships between these periods. The minimum reservation period is 1/2 day. Define Hourly and 1/2 Day rates only if you prefer. If you only define the daily rate, for example, the parameters would be used to determine the rate for a half day rental and so on. It's up to your company to decide by item whether different rates are used based upon the rental period (your company might charge less for a week's rental than for 7 days individually, for example).
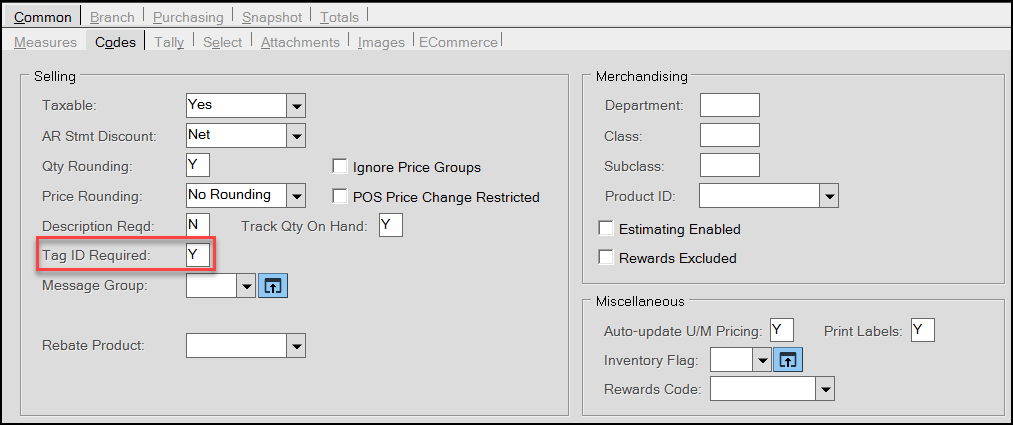
Rental Items that have a serial number associated with them require the Tag ID Required setting in the Common > Codes tab to be set to Y.
Why have an hourly rate?
An hourly rate is important so you can apply additional charges if an item is returned late. We are assuming that in most cases, the minimum reservation period for any rental would be at least 1/2 day. If you allow a customer to rent for a shorter time, you can always enter a partial quantity (a decimal such as .5) or credit the customer back for any time less than the 1/2 day increment after the item is returned.
The rental item must allow for returns. To prevent rental items from appearing on Purchase Order builds, set both the minimum and maximum quantities to zero.* This is done from the Branch >Codes tabs. Set the Returnable field for Rental items to Y.

*Even though rental items on-hand is never adjusted by a rental, rental items are reserved using customer orders and this can cause a rental item to be included in Purchase Order builds. Items with no minimum and maximum are excluded from builds.
Here are some quick points about Rental and rental products:
-
Rentals are tracked by item. There is no special "rental" document or transaction.
-
Rentals can be reserved for a date by placing the rental item on a customer order.
This is optional. -
Reservations are only allowed for 1/2 day increments (two reservations per day). Reservations are not tracked hourly. It is up to your company to define what a "half" day means to you.
Note: if a rental item leaves at 7 AM and is returned at 9 AM the same day, that AM or 1st rental period would immediately become available for another rental. The limitation is that you cannot reserve specific hours of the day in advance, not that you cannot rent hourly. -
Rentals are considered "out" (or rented) when a Sale is processed for the rental item.
-
More than one rental item can be rented at the same time. This is true even if the periods for the items are different.
-
Additional (non-rental) products may be sold at the same time as a rental.
-
Rentals are returned by processing another Sale for the rental item when the product is returned.
When a rental item is returned, a new invoice document is created. The Rental pop-up form has a radio button for "return" that is selected when processing a return of a rental. Additional charges or credits may be applied from the Rental pop-up form. The quantity on the Sales form always displays as a positive figure regardless of whether the Sale represents a "rental" or "return." -
Renting a product does not affect the item's on-hand or other quantities. Regardless of the rental status (in/out), the item maintains the same on-hand, etc. This is necessary because regardless of whether an item is rented or not, your company still owns and maintains the item as part of your inventory.
-
Rentals can be reserved ahead by using a customer order. The rental item is reserved for the dates selected.
-
When a rental item is received by the customer, the order (if any) is invoiced. If there is no order, the item may be invoiced directly. A special rental form is provided for choosing the rental period.
-
Rental items can require serial number entry (see the Tag ID field in Item Maintenance). Although entry of the serial number is required during rental processing, serial numbers don't determine whether or not any specific serial numbered item is available for rental. The Serial Number inquiry can be used to view a history of transactions involving a particular serial number. Rental items that are tied to a serial number default to Quantity 1 in the Item Rental dialog box. The Tag ID Required (Y) entry in the Common > Codes tab indicates that a serial number applies to the item.
-
Rental items must allow returns.
-
A rental item must have an on-hand to be rented. For rental products, the on-hand determines the overall total that is potentially available for rental (assuming none were rented). If your company has 3 floor sanders that are rented, the floor sander item should have 3 on-hand.
-
The price (optional) and cost of the rental item should be entered based upon the retail and replacement value of the item being rented. The rental item's standard item pricing settings and units of measure are not used for rental rates but would be needed for accurate stock valuation, etc.
-
Income from rentals is not recorded as Sales for specific rental items; however, rentals do update branch totals as sales. No cost of sales is associated with rentals. The Rental report can be used to view rental income by item as needed.
-
Rental items can be sold but must either be changed from rental to standard first --or-- be quantity adjusted along with another non-rental item which is used for the sale. Rental products can be ordered and received using purchase orders just like any other item; however, we suggest setting the minimum and maximum quantities to zero on such items to prevent accidental automated ordering.
-
With some types of rentals, you may sell additional related products or supplies. Feel free to include additional, non-rental products on any invoices or orders as needed. Consider setting up one or more Material Lists to keep your common rental add-on's together for easier access.
Handling Rental Deposits
There is no built-in deposit handling with standard rental; however, you can use the Add-on SKU field to automatically associate a "deposit" item with a rental product. When returning a rental item with an "add-on SKU" and that item is a deposit type item, the quantity is now automatically set to a negative quantity. We are assuming that the associated deposit item will be refunded in these cases. Refund logic, prohibiting a mix of sales and returns (if enabled via the Task List) is not enforced with deposit items.
If your company chooses to use deposits with rentals, we suggest that you charge both the deposit and full amount of the rental when the consumer receives possession of the rental. In this case, the deposit is refunded when the rental item is returned as long as it is within the terms of the contract or agreement. This ensures that your company has received full payment for the rental and at the same time provides some motivation for the consumer to return the rental as agreed upon and in an acceptable condition. We don't suggest using deposits as security for future payment as this is difficult to enforce.
Rental Management
We offer a Rental Inquiry form (available from the Point of Sale application) and a Rental report (available from the Inventory application). The report can be used for income analysis related to rentals. The inquiry is provided for checking availability.
Reserving, Renting, and Returning Rentals
The first step for rental processing is to reserve a rental. Accepting reservations is entirely optional and may be done on an "as needed" basis. Customer Orders are used for reserving a rental item for a specific time period. You may want to consider using order deposits as a guarantee for holding a rental product for a customer. This amount could be returned to the customer once they pick up the rental or applied to the rental amount and/or other deposit at that time. Deposits of any kind are not required and are used at your company's discretion.
The Rent and Return radio buttons determine whether a rental product is being rented or returned. In an order, the only option that can be selected is "rent" since reservations don't apply when returning a rental product. When "rent" is selected, the panel below the calendar displays information regarding current rentals for the selected product.
When "return" is selected, the panel below the calendar changes and displays options for additional charges and credits instead. Return can only be selected in the Sales transaction.
Whenever a rental item is used in a Sales or Orders transaction, the same rental reservation form is used. The form changes somewhat when using the "return" option. Rental items cannot be used from other Point of Sale transactions; however, they may be added to purchase orders and received.
Reserving or Renting an Item
To reserve or rent a rental item:
1. From the Main Menu, choose Point of Sale and either Sale or Order.
The Sale Entry or Order Entry form displays.
2. In the Name field, choose the account of the customer who wants to rent the item.
3. In the data grid, enter the item the customer wants to rent.
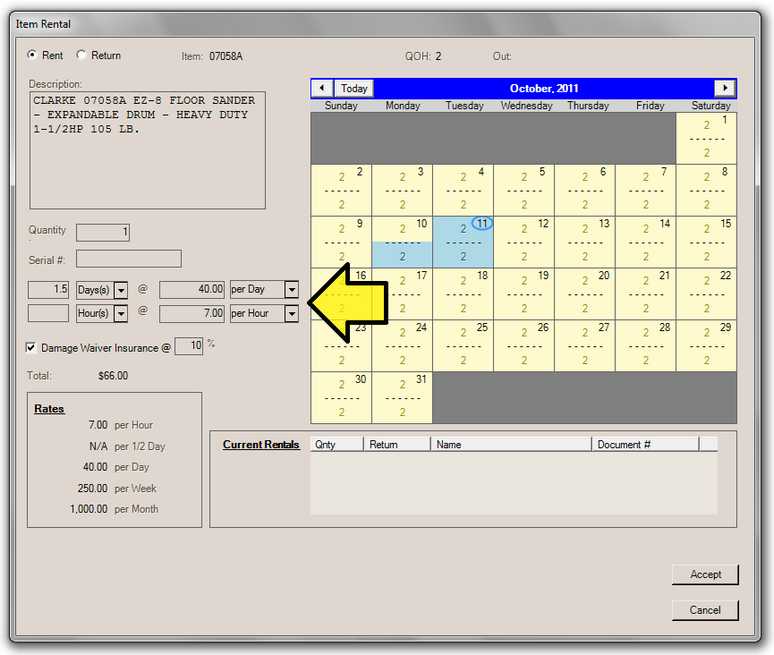
The application displays the Item Rental box.
4. In the Quantity field, enter the quantity of items being rented.
When reserving or renting an item, the quantity being rented must be specified in the rental form. Quantities cannot be modified on a return.
Note: If you select an item that requires a serial number, this entry defaults to 1.
5. In the Serial # field, enter the serial number of the item being rented.
This field displays if a serial number is required for the item being rented, therefore, if a Serial # field does not display, this entry is not required.
6. Use the Rental Schedule fields to specify the rental period, which can be added as a number of hours, days, weeks, or months. The price defaults to the amounts entered in the Item Maintenance Rental panel for the selected item.
7. Leave the Damage Waiver check box selected if the charge applies. You can change the rate if you need to. This field is not required.
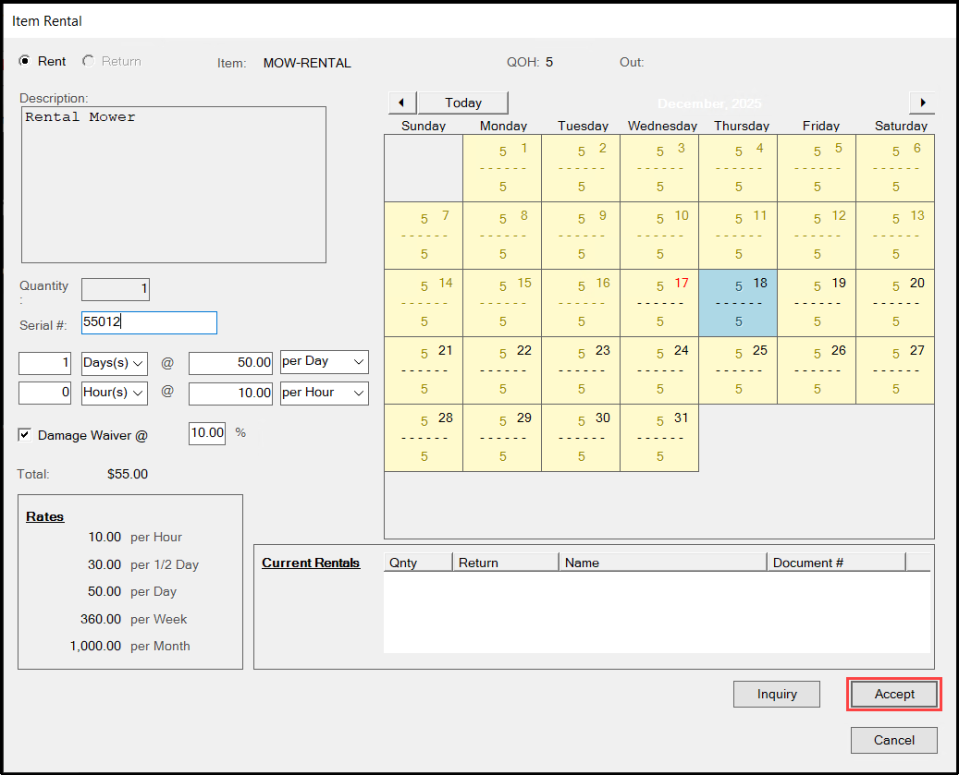
8. Select the date or date range of the rental on the Calendar. See Selecting Dates for more about this process. Note: The Calendar cannot add dates if the QOH setting of the rental item is 0.
Note: This date range entry cannot be back-dated after this transaction is processed.
9. When you have completed these entries and selections, choose Accept.
The Point of Sale form redisplays.
10. When you have completed your review of the entries and selections, choose Process (F12) to save this rental and handle the payment as you normally would.
When a customer rents an item, the application creates an invoice from the Sales transaction.
Note: When a rental item was reserved on an order, the same order should be used when invoicing the rental item in the Sales transaction (use the Invoicing (F5) function); otherwise, the reservation will remain in effect and could improperly reduce the actual quantity available for rental.
Returning a Rental Item
To return a rental item to inventory:
1. From the Main Menu, choose Point of Sale and either Sale or Order.
The Sale Entry or Order Entry form displays.
2. In the Name field, choose the account of the customer who wants to return the rental item.
3. In the data grid, enter the item the customer wants to return.
The application displays the Item Rental box.
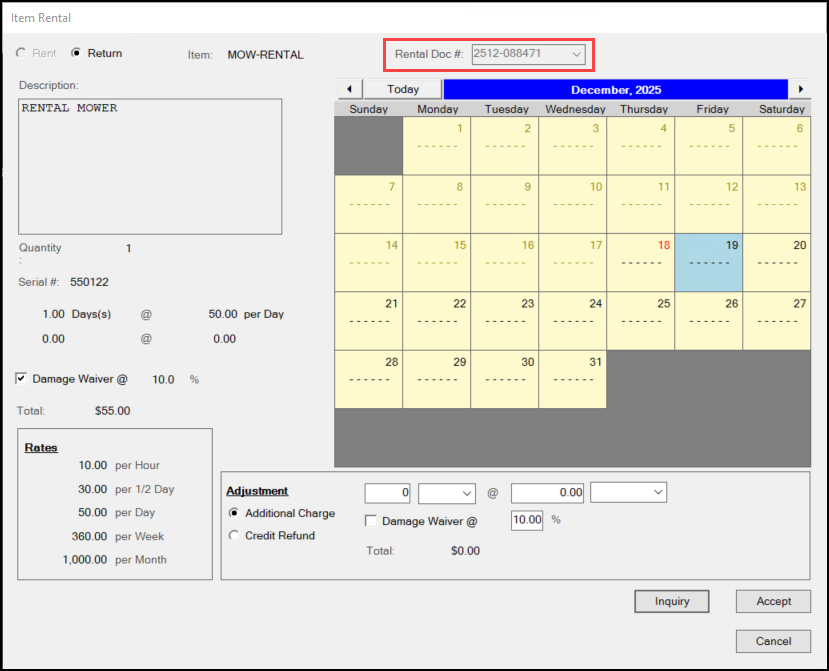
4. Click the Return button.
5. From the Rental Doc list, choose the rental document for the item the customer is returning. The Adjustment fields enable.
Note: If more than one of the same rental item exists on the selected document, an additional drop down appears asking you to select the detail item to return.
6. Update the entries in the Adjustment fields to reflect any Additional Charges or Credit Refunds that are appropriate to this transaction. If additional or rental hours/day charges or credits apply, you can specify those amounts in this Adjustment section.
7. Use the Damage Waiver check box to apply the waiver percentage to either the adjustment or credit total.
For example, if a customer chooses the damage waiver originally but then returned the product 1/2 day late, you would likely apply the same waiver percentage to the additional rental time (since it would have been charged up front were the rental period originally longer). If no charge or credit has been designated, selecting the waiver check box has no effect.
8. To complete the return, choose Accept. If no additional charges or credits were designated during a return, a confirmation is required before completing your entry. Click Yes to continue or No to make changes in your Adjustment settings.
9. Choose Process (F12) when you return to the Sale Entry form to complete the return.
Additional Advice about Completing these Entries
See the details below for entries in the Item Rental box.
QOH and Out
These fields display when reserving or renting an item. The Quantity On-Hand (QOH) matches the total quantity your company owns of the rental product. The Out quantity reflects the number of this item that is out on rental for the current date and time. The Out quantity is not adjusted by date selection in the calendar, it's always for the current date and time.
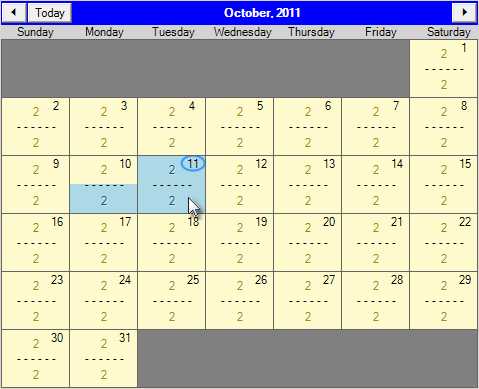
Using the Calendar
The calendar provides information about rental availability and is also used for selecting rental periods.
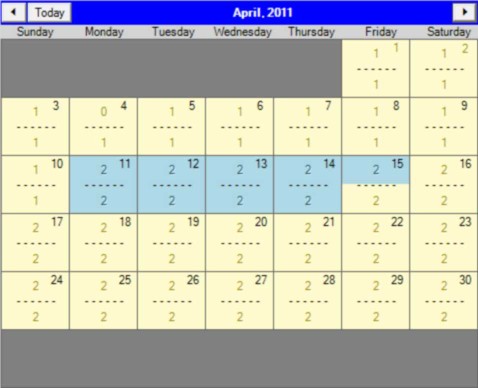
In the corner of each date cell, the calendar day of the month is displayed. The current date is listed in red text, future dates are listed in black, and past dates are dimmed out (disabled). Dates in the past cannot be selected for new rental periods.
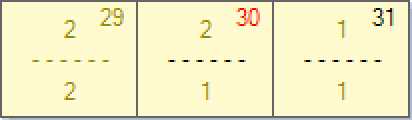
There are two digits listed for each day (one above the other) separated by a dashed line. The top digit is the quantity of the selected item that is available for rental in the AM (or first 1/2 day) period for the date. The bottom digit is the quantity available for rental in the PM or second 1/2 of the day. If a zero appears, all of the available rental items have been previously reserved or are already rented.
Selecting Rental Dates
Rental Periods are selected/reserved in 1/2 day increments. Selected periods are indicated by a light-blue background. Use your mouse to select a starting period and then click on the last period to complete the range or selection. Clicking on a previously selected period clears that period as well as any future selections in the range.

Step 1: Locate the Start Date
After finding the starting date on the calendar, click in either the AM (top) or PM (bottom) time slot.
")
Step 2: Choose a Starting Period (AM or PM)
Next, you can click on the ending period to select all of the periods between...
")
Step 3: Choose an Ending Period (AM or PM)
If you need to change the ending period, click on a new end date (and AM or PM period) to either extend or shorten the length of the rental period.
When you change the selected dates in the calendar, the Calendar changes update the period rates automatically.
Waiver insurance may be offered as an add-on charge. Your company can set the default percentage using the system parameter (set to zero if you don't want to offer or use waiver insurance). The percentage may be changed on this form by the user. Waiver Insurance would typically be offered to a customer as optional protection for the consumer from additional charges should there be any damage to the equipment being rented. Waiver insurance is not considered a deposit and is not returned to the customer.
If your company decides to offer waiver insurance, it is your company's responsibility to verify the legality of any such agreements in your area. We advise that your company seek legal counsel prior to implementing any rental program or other activities that involve written contracts or agreements. The software neither produces nor maintains any type of legal document supporting this feature. It is entirely your company's responsibility to manage all legal aspects of your rental program including but not limited to contracts, agreements, and any insurance offered.
Rates
This panel displays the rates currently assigned to the item. The Per Hour and Per 1/2 Day rates are optional and will display "N/A" (not applicable) if they haven't been assigned prices.
Current Rentals
This panel is visible when reserving or renting only, not when returning an item. Documents linked with current rentals for the selected item will be listed. This listing will not include reserved but not yet invoiced rentals. Only rentals that are actually out for the current time/date will be included (if any). This panel is not dependent on or affected by calendar selections.

