Verify Picklist
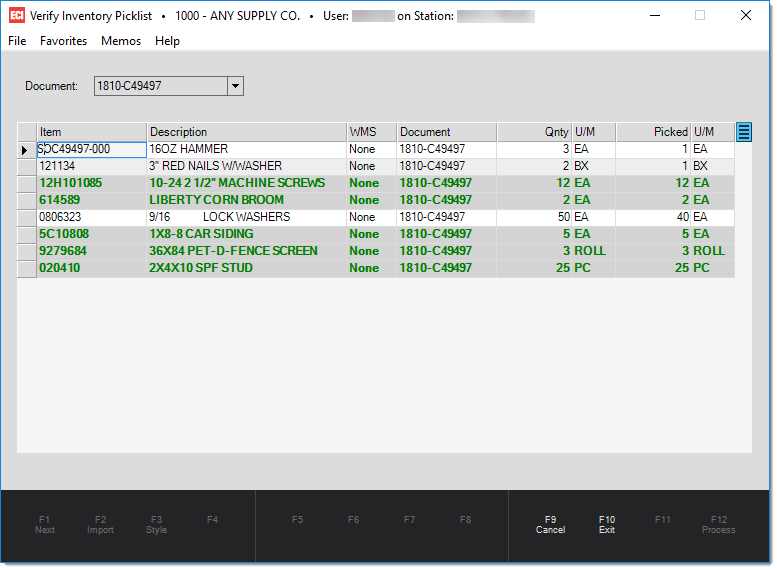
The Verify Picklist form provides a visual reference for comparing an existing document with the inventory being pulled for fulfilling staging, delivery, or other requirements. This may be used with

Verify Inventory Picklist
When scanning, we attempt to match the unit of measure associated with the barcode as well as the item SKU. This is done to handle instances where an item exists on multiple lines and with different units of measure. Once the item row matching the unit of measure is fulfilled (met), additional scans will update the remaining item rows. The unit of measure for the quantity picked will be changed if it was updated by scanning a barcode associated with a different unit of measure (UM). Decimal quantities may occur in this case.
For example, an item exists on a document with a quantity of 24 EACH. The item comes in cases of 12 EACH and the picker scans two (2) cases. In this case, the picked quantity and unit of measure will be 2 CASE, not 24 EACH because cases were scanned rather than individual EACH barcodes.
|
Scanning Issues There are a few possible issues you might encounter while scanning items for a given document. When scanning a barcode and an item match is found, the item may or may not exist within the selected document. Another issue is that the barcode scanned either isn't associated with an existing item or the user scanned the wrong barcode (if more than one is present). When either of these issues occur, a beep and dialog are provided to indicate that there's a problem. In the case of a barcode that isn't associated with an item, the user may be prompted to add the barcode to an item if they have security permission to do so (this is determined by whether they have access to the barcode add utility or not). The beep is done from the PC, not the scanner, so it will only be noticed if the PC has speakers that are not muted and can be heard. The dialog stops any further items from being added, but won't prevent additional scans using the scanner device (communication is one-way). For these reasons, it's best if the computer being used has speakers and that the user checks their monitor on a regular basis to avoid missing any issues. |
Using the context menu marker (![]() ) , located near the upper right-hand corner of the data grid, the user can optionally filter fulfilled items from the list leaving only those items that are either not yet fulfilled or item rows that were over filled.
) , located near the upper right-hand corner of the data grid, the user can optionally filter fulfilled items from the list leaving only those items that are either not yet fulfilled or item rows that were over filled.