Scanner Scale
The Datalogic Magellan™ Scanner Scales give Cashiers a way to scan barcode items and weigh them using the device itself. Magellan Scanner Scales are high-performance bar code scanners designed with digital imagers in all planes so they can read both 1D and 2D bar codes without requiring the Cashier to orient the item in a particular way. Spruce supports both the Magellan™ 9400i and Magellan™ 9500i.
Please contact your Aftermarket Sales Representative to discuss purchasing this equipment.
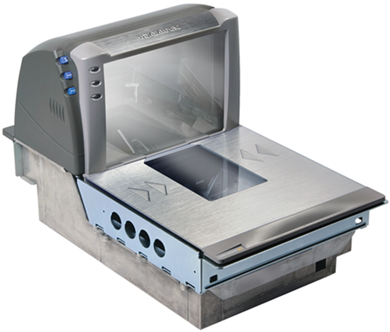
Magellan 9400i
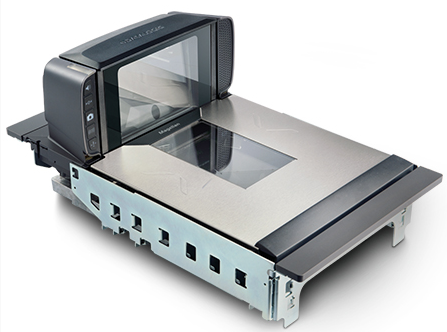
Magellan 9550i
Purchasing Datalogic Magellan Scanner Scales
You can purchase the Datalogic Magellan 9400i and Magellan 9500i through ECI Software Solutions, Inc.. The ECI Implementation and Support teams will assist in setting up these devices with your system so it is ready when your units arrive.
Using the Scanner Scale at Point Of Sale
Scanning Items
To scan an item, users pass the barcode over the laser scanner. The item list will populate with the item information and cost. If multiple items are scanned with the same barcode, the item count will increase.
Weighing Items
Items sold by weight will need to be weighed at checkout. Because the Qty (quantity) field is used for the retrieved weight for items sold by weight, items will appear on separate lines in the transaction form. You can process these items in two separate ways:
-
Place item on the scanner scale before you enter the Item SKU
A dialog box pops up to show the item's weight while entering the item SKU number into the transaction. The item will show in the grid with the quantity reflecting the weight scanned. If an item needs to be re-weighed, press CTRL-W. -
Scan or enter the Item SKU before you place the item on the scanner scale
If you scan a barcode or enter an item before placing an item on the scanner scale, a dialog box pops up prompting you to retry obtaining the item weight. The cashier can place the item on the scale and press Retry.
Settings for Items that are Sold by Weight
To sell items by weight, the item to be a Standard or Food item type and the Sold by Weight setting needs to be turned on in Item Maintenance. The Sold by Weight check box does not display for other item types.
To enable an item to be sold by weight:
1. From the Main Menu, choose Inventory > Database > Item. The Item Maintenance form displays.
2. From the Item list, choose the item you want to sell by weight or add a new item by typing in a new item code.
3. In the Measures tab, enter the weight value in the Weight per <Base Measure> field and select the Sold by Weight check box.
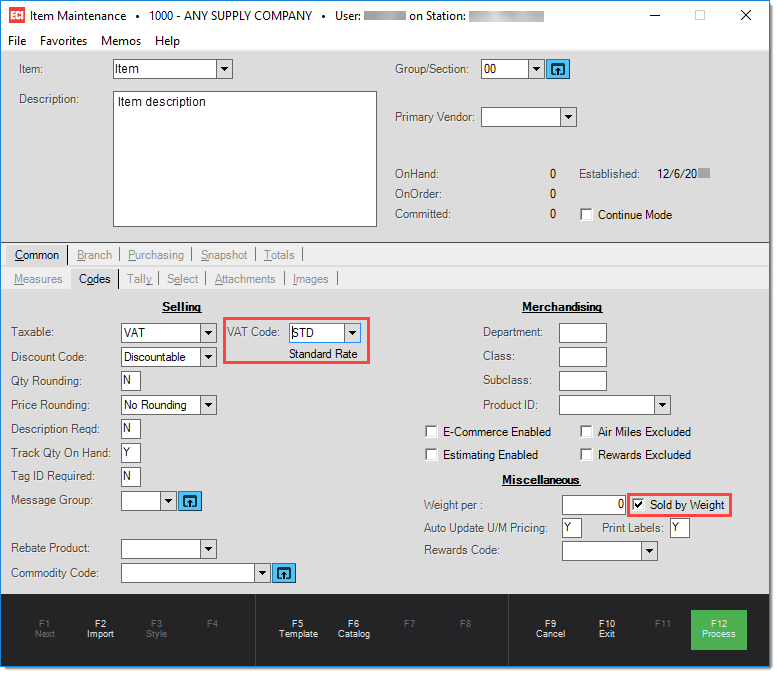
4. Choose Process (F12) to save this setting.
The scanner scale must be configured and the station connected to the Scanner Scale must be enabled before use.
Adding a Scanner Scale to the Application
To access the Scanner Scale functionality from a station, install the Scanner Scale settings on the station device using the instructions below:
and then add the device to the station in the application as described here.
Setting up a Magellan 9400i Scanner Scale
Note: The Scanner Scale requires Remote Client for use.
1. Connect the Scanner Scale to a PC COM port using a DB9 serial cable.
A DB9 to USB adapter cable is required to connect the Scanner Scale via USB.
Additionally, the USB-COM driver must be installed on the PC to create a virtual COM port for communication if using a USB adapter cable. You can download the driver installation from www.datalogic.com.
2. Configure the Magellan 9400i Scanner Scale by following the steps below.
|
Magellan 9400i Configuration |
|
|---|---|
|
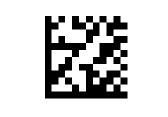
Step 1. Enter/Exit Scanner Scale into programming mode. |
Enter/Exit Programming Mode |
|
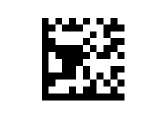
Step 2. Set RS-232 Single cable interface. |
Interface Type = RS-232 Single Cable |
|
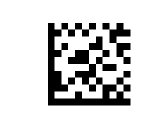
Step 3. Prevent Barcode Symbology Prefix on UPC scan. |
Label ID Control = Disable |
|
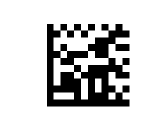
Step 4. (Optional) Disable Scanner Beep on good scan read. |
Good Read Beep Control = Disable |
|
Step 5.(Optional) Enable Scanner beep on good scan read. |
Good Read Beep Control = Enable |
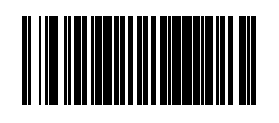
Now you are ready to add the Scanner Scale to the station in the application using the instructions here.
Setting up a Magellan 9550i Scanner Scale
Use the instructions below to prepare the Magellan 9550i Scanner Scale for integration with the application.
On the station you are going to access the Scanner Scale from:
1. Go to this SharePoint folder and download the following resources:
-
The Datalogic Magellan Configuration PDF
-
The Datalogic USB Com Driver for Windows (either x64 or x86, depending upon your platform)
-
Datalogic: Aladdin_Setup exe file
Note: As of version 3.3.1.8, this will prompt you to install the Datalogic USBCOM v7.1.4 driver.
There is also a new driver, USBCOM v7.1.5, which we tested and is working. -
Configuration xml file
2. Install the Datalogic Aladdin Software from the Configuration files folder.
Use the appropriate driver from the list above. This process adds two ports (COM & LPT):
-
Bar code Scanner (1) (COM4)
-
Bar code Scanner (2) (COM3)
3. Under Properties > Port Settings tab, ensure that these ports have the following settings:
-
Bits per second: 9600
-
Data bits: 7
-
Parity: Odd
-
Stop bits: 1
4. In Aladdin, use the Device Detection feature to find your scanner.
5. In Aladdin, under Parameters, find the Custom Configuration File.
6. Use the Hamburger button and select Load Configuration.
Note: You can either use the configuration file or the 9550i PDF file from the SharePoint folder to provide the barcode for scanning. The process uses this to configure the scanner.
7. Close the Device tab in Aladdin and click Yes to reset the device.
8. Close Aladdin and use the instructions below to add the scanner to the application.
Note: If you find the device is not communicating when designating one of the two COM ports, try the other. Then, choose Save. Then, log out and log back in again.
Now you are ready to add the Scanner Scale to the station in the application using the instructions below.
Adding the Scanner Scale to the Application
This process is the same for both Scanner Scale types.
To add an installed scanner scale to a station:
1. Navigate to Maintenance > Database > Parameters and select the Setup > Software tab.
2. In the Remote Client Services section, select the Scanner Scale check box.
Note: If you have enabled other scanner scales, this may already be selected.
This option must be turned on to enable setup options and allow use throughout all branches.
After this option is turned on, individual stations can be configured to use the scanner scale.
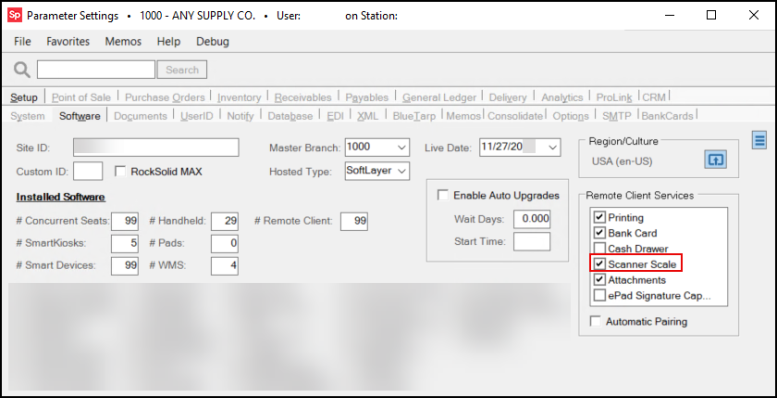
3. Click Process F12 to save this setting.
4. From the Main Menu, choose Maintenance > Database > Devices.
The Station radio button is selected by default.
5. In the Device Name field, enter the station ID that the scanner scale is connected to and press Enter.
6. In the Remote Client section, check the Enabled check box.
This activates the Scanner Scale option in the Remote Client Services section from step 2.
7. Select the Scanner Scale check box.
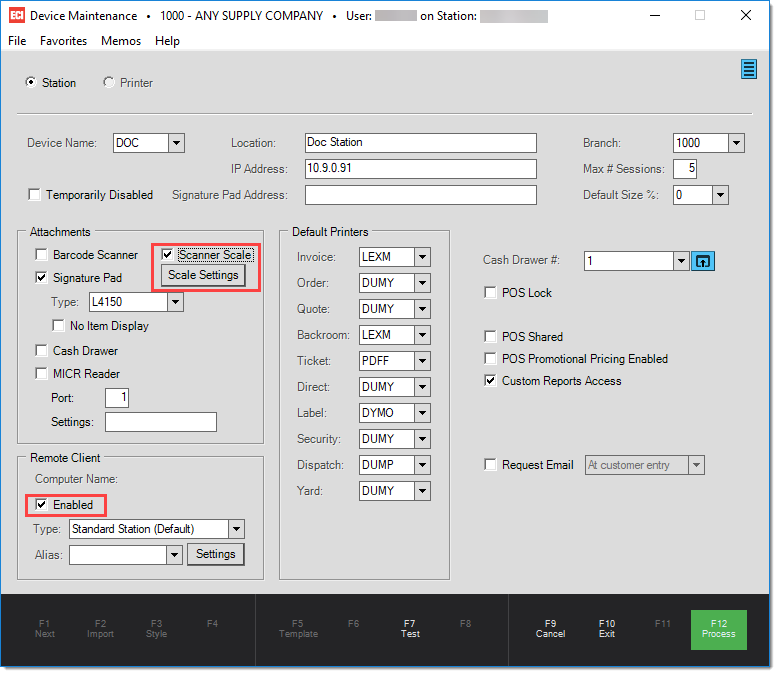
8. Select the device type (Magellan 9400i or Magellan 9550i).
9. Click the Settings button to display the Scale Device Settings box.
The settings entered in this box must match the settings in the Windows Device Manager.
To look up these port settings in the Device Manager:
a. Click the Start  button on the desktop.
b. In the Search box, type Device Manager and select Device Manager from the menu.
c. Navigate to Port Settings (COM & LPT) tab and select the port the device is connect to.
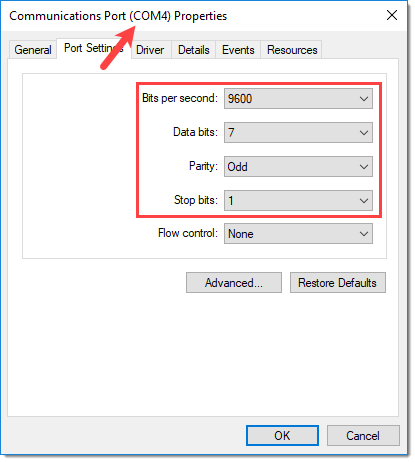
d. Add these settings to the same fields in the Scale Device Settings box.
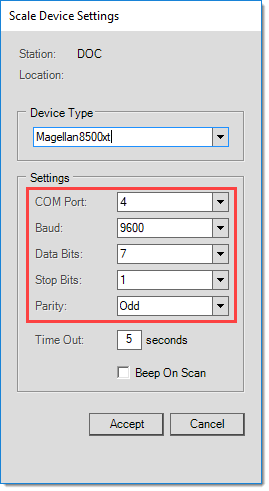
e. Click Accept.
10. Choose Process (F12) to save the settings.
We recommend you close and re-launch the Spruce application on the station to ensure that the changes to settings are enabled.