Rent to Own/Hire Purchase Report
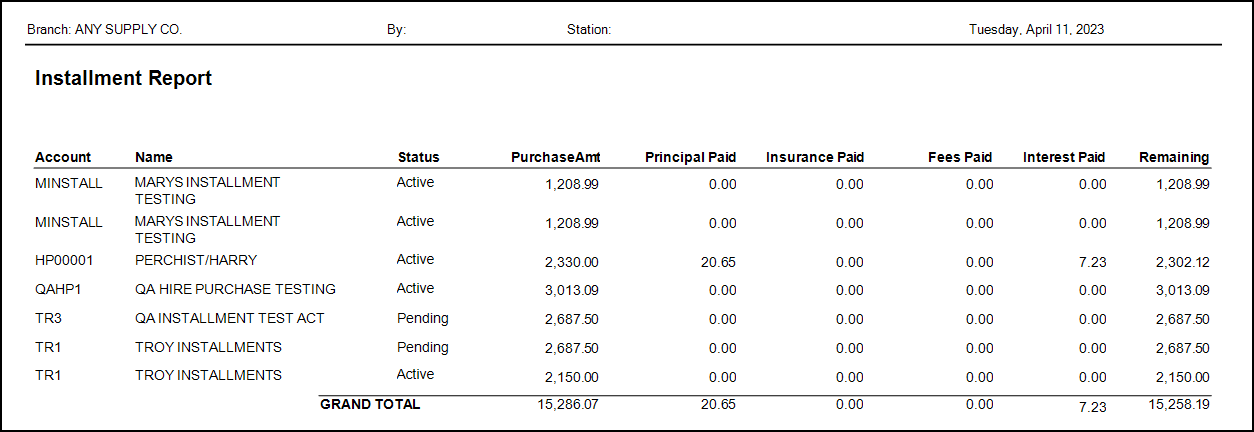
The Rent to Own Report (also known as Hire Purchase Report in some regions) Plan Report provides current information about the accounts that are on a rental plan, including the purchase amount, the principal paid, the insurance paid, the fees paid, the interest paid, and the amount remaining for each account you include. Use the information below to choose the accounts you want to include and the other report layout details.
Selection Section
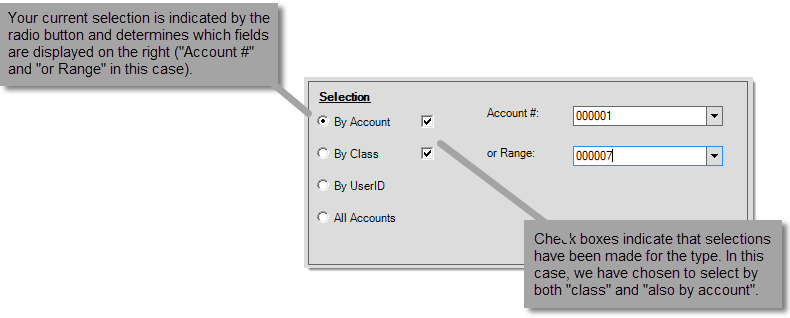
The selection panel typically offers four (4) radio buttons: by account, by class, by user ID, and all accounts. More than one selection choice may be used at the same time and doing so will typically provide a smaller quantity of results. When any of the four (4) selection options has criteria specified, a check box ![]() is displayed to the right of the radio button. The current selection (radio button) determines which fields are displayed in the area of the panel to the right. For example, when the "By Account" radio button is the active selection, fields for specifying an account number or range are shown.
is displayed to the right of the radio button. The current selection (radio button) determines which fields are displayed in the area of the panel to the right. For example, when the "By Account" radio button is the active selection, fields for specifying an account number or range are shown.
By Account
The By Account selection option allows you to choose either a single account or a range of accounts. Accounts are selected based on the alpha-numeric values of the account identifier in ascending order. Some companies may use numeric account numbers; however, regardless of whether the actual account is numeric or not, the value is always treated as alpha-numeric (because alpha characters are allowed whether your company uses them or not). For this reason, accounts are always sorted "alphabetically" rather than numerically (the left-most character position is sorted first followed by the next position moving from left to right). For example, if you enter a starting range of "1" and an ending range of "1999," any accounts beginning with a digit other than "1" will not be included (the values: 2, 30, and "000722" would not be part of the selection even though they would fall numerically within the range).*
")
For ranges, the upper text area (drop down) is the lower range value and the bottom text area is for the upper or higher range value (in ascending order 0-9, A-Z). The form won't allow you to enter an invalid range. Additionally, it is not possible to specify an upper (bottom) range without also a lower (top) range. For a single account, enter the account ID in the upper text area only.
*For this reason, we strongly advise that account numbers be the same length in characters and if numeric values are being used, we advise padding any numbers with leading zeros (on the left) such as "000089" instead of "89" to maintain a consistent length and to force accounts to be sorted the same as their numeric sort order would indicate.
By Class
The By Class selection may also be used to build a list of customer accounts for reporting and other purposes. One customer class code may be selected from the drop down. Classes can be used for grouping certain types of customers together. Customer class is an optional classification tool that may be used along with accounts. This feature involves defining codes that maintain a description and then assigning them to customer accounts (jobs don't have a class code assigned to them). If you add selection criteria based on customer class, only accounts assigned to that class code will be included in the selection.

By UserID
The By UserID selection option only includes accounts where the "assigned" sales person (Account Maintenance, Codes tab, Salesperson field) matches your selection. An option (check box) for "Current User ID" is also provided.

All Accounts
The All Accounts option allows you to select all of the accounts that are on a Rent to Own or Hire Purchase for this report. You can choose other options if you want, but this is the most efficient way to collect the records that are specific to this report.

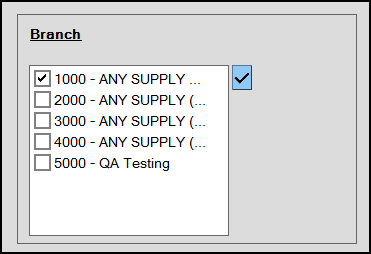
Branch Selection
Select the branch or branches for which you want to run this report. Right-click the Context Menu icon ![]() to choose Current Branch or All Branches or other options when applicable.
to choose Current Branch or All Branches or other options when applicable.
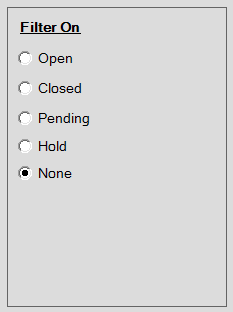
Filter On Selections
Select the type of filter you want to base the report on in this section. The filters here are based on the Rent to Own/Hire Purchase status of the account at the time the report is run. Choose None (the default) to not consider an account's rental status for inclusion or exclusion on the report. Otherwise, select the status or statuses that should be included by clicking in the radio buttons ![]() next to the status descriptions.
next to the status descriptions.
Sort By Selections
Sorting determines the order that information the application collects appears on the report, but also can determine how subtotals (when enabled) are done. Typically, subtotals are provided for any sort by selections when subtotals are indicated in the "Totals" panel.
For this report there are two sorting options. When you enable both sort options, the top selection is considered the "primary" sort and the bottom is considered a "secondary" sort. Usually, all sort selections are optional. Use the Menu Marker  to select the sorting direction, either Ascending Key (the default) or Descending Key. Almost always, data is sorted alphanumerically.
For this report, the sort options include:
-
Account
Select this option to sort the list of accounts by Account ID alphabetically in the report. -
Name
Select this option to sort the list of accounts by Account Name alphabetically in the report. -
Status
Select this option to group the accounts alphabetically by status. -
Branch
Select this option to group the accounts alphabetically by branch. -
UserID
Select this option to group the accounts by the person who set up the rental for the customer.
Choosing Totals Options for a Report
For some reports you can specify how Totals and Subtotals are organized. Using the Totals panel, you can select the types of totals you want the report to calculate (when applicable).
Grand Totals refer to an overall total appearing at the end of the report.
Subtotals are based upon the selections in the "Sort By" panel, so you cannot use this selection type when there are no "Sort By" options for the report; however, this can depend on the report.
The Totals panel is disabled (appears grayed out) whenever totals are not an option or when the use of totals require additional selections prior to use (such as a "sort by" selection). Totals do not apply to all reports; furthermore, some reports provide totals regardless of selections and do not allow overrides using the Totals panel.
")
Totals (Enabled) |
")
Totals (Disabled) |
You can select one of three Total panel options: Subtotals, Grand Total, or None. The Print Totals Only check box is available with the first two options only.
Subtotals
Subtotals indicate that the report should include totals based on the change of certain data. Typically, this "break" for totals is determined by your selections in the "Sort By" panel. Some reports may automatically provide a subtotal level. When the "subtotals" selection is chosen, the report will also include a grand total.
Grand Total
Grand total indicates that the report should include a grand total (ending total) printed on the last page below the last details (when "print totals only" is not checked). Subtotals would not be included when this option is selected.
None
This selection indicates that no totals are to be included when the report is viewed, printed, or processed as a file. If you choose "none," the "print totals only" check box is disabled and the check (if any) is cleared.
Print Totals Only
Use this check box to suppress all the report details when the report is viewed, printed, or processed as a file. When you select this check box, the report only reflects the Subtotals and Grand Totals results.
Print and Output Options
After you have decided what should be in the report and how you want to organize it, you can choose how you want to print/output the content in a way that is most useful to you. In this section you specify how you want to print the report or you can save the contents of the report to a number of different formats. You might want to save the report in CSV or an Excel format if you want to work on the reporting yourself.

Consider how you will use the report and select the print and/or output options that best meet your needs. When you specify the print and output options, the application executes these selections when you choose the Process (F12) function. You do not have to select both options.
1st Printer and # Copies
The drop down control next to the label "1st Printer" provides a listing of available printers. An available printer is a printer that is either installed on your local machine or a server accessible printer if you are connected via Remote Desktop services (aka. Terminal Services). The default selection is the backroom printer assigned to the current station (if any). The listing of printers may contain devices that are specialty types, such as label printers, etc. that are not suitable for printing reports. This printer is only used if the "Print Report" check box is checked and the number of copies is greater than zero (> 0). Printing is not performed until you choose Process (F12).
2nd Printer and # Copies
The drop down control next to the label "2nd Printer" also provides a listing of available printers (see above). This allows you to print a report at two (2) separate locations if desired. Even if a selection is made, the second printer is only used if the "Print Report" check box is checked and the number of copies is greater than zero (> 0). Printing is not performed until you choose Process (F12).
Print Report
Select this check box to print the report. This is selected by default, so if you do not want to print the report, uncheck this box.
Save In
Use this section to choose the location of your output file. Click the Browse button  to review the list of folders on your computer where you can the report as a file. This might be on a local machine or a shared network location of some sort.
Note: The application does not save your report as a file until you choose the Process (F12) function and only if you select the Output to File check box. Directory and file permissions can prevent you from saving files in some locations. It's best to choose a location you'll remember such as your "Documents" or "Desktop" locations.
Filename
Use this field to set the file name of the report. The application adds the extension based on your selection from the "Type" drop down control. Note: The application does not save your report as a file until you choose the Process (F12) function and only if you select the Output to File check box.
Output to File
Select this check box to specify that you want to save the report as a file. This check box is not selected by default.
Type
Use this list to choose the output format of the report when you save it as a file. Choices currently include: PDF (Portable Document Format, .PDF), Microsoft Excel (Spreadsheet, .XLS), Hypertext Markup Language (Web Page, .HTML), or Tagged Image File Format (Fax, .TIFF), .CSV, or the Microsoft Excel *.xlsx version. Free Adobe Acrobat Reader® software is required to access PDF format files. Any browser can be used to open HTML files. TIFF files is an older image format commonly used with faxing.
Completing the Report
After you have selected the format, the scope, the sort, the total options, and the print/output options you are ready to produce the report. You have several options now.
-
Save (F6)
Choose this option to save the report settings you selected so you can use this same format again later. -
Preview (F8)
Choose this option if you want to see the results of your selections before printing or saving it to a file. This is a good idea if this is the first time you are generating this report because you can review how the report is organized before you generate it. -
Process (F12)
Choose this option when you are ready to print or save the report to a file. -
Cancel (F9)
Choose this option if you don't like how the report turned out and you want to start over.