A "quote" is a list of items that a customer has requested pricing or information regarding, but has not necessarily committed to purchasing. Quotes are available from the Quotes transaction unless purged (voided/deleted). Quotes typically remain available until the close date indicated has past (a daily process marks quote documents as "closed" if they have passed the date). Up to that time, a quote may be resumed (modified) or used to create another transaction type such as a sale or an order. Quote documents are not actually removed even after being closed and may be accessed in other ways. Expiration is considered the end of the period that the quote pricing is promised for. Archived quotes, if data archiving is enabled, would not be available except for inquiry using the Documents form.
As is true with sales or order activities, a quote begins with account (and sometimes job) selection. Next, a quote document ID is generated or entered that is used for identifying the quote in the future.
For information regarding folders in the Point of Sale areas, click here.
Selecting an Account
In the Point of Sale Name list, you can either enter the Sort Name (from the Account Maintenance form) or the account ID. Most Point of Sale transactions involve selecting an account and sometimes job (when applicable) first. For Sales, you can scan or enter the items into the data grid first, but for other transaction types (Orders, Quotes, Tickets, etc.), you choose an initial account first. If you know the customer participating in the transaction, there is usually no need to choose an alternate menu, just type either the sort name or the account number/ID.
When a customer has their own charge account, we recommend that you enter their name in the Name list. You can change it to a different account, if needed, before processing.
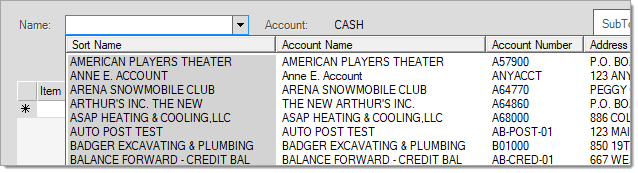
There are some additional search options you can use, based on other information you know at the time of your search. You can review these options here
more...
Other Account Search Options
To see additional search options, enter the text you know (address, phone number, etc.) in the Name field and right-click the down arrow beside the field to see additional search options.
Note: The application includes the Account ID and the Sort Name in the search by default, so you do not need to select these options from the list.
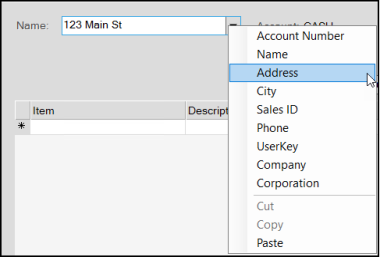
If you do not enter any text or you enter text that matches more than one account, the application sorts the list by the field (Address, City, etc.) you selected. You can click the column headings to sort the list in a different order. In some cases, only those account's with a value for the selected field(s) will be included.
If the Enhanced Look Up option is not enabled, you can also use a "wildcard" (using a % character/symbol) to represent unknown characters to perform a search. A wildcard can represent any character or set of characters before and/or after the text you enter to find records that may match (see the examples below).
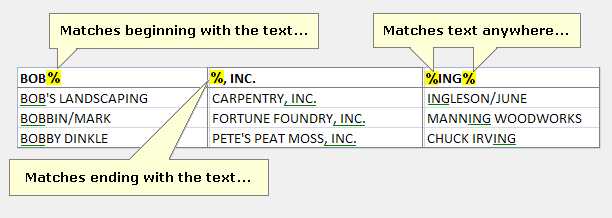
You can use wildcards to look for account matches using the alternate menu selections as well.
For example, in the Name list, you could enter %1234 and choose Phone to search for accounts that have 1234 as the last four digits of their phone number.
Searching for an Account Using the Customer's Rewards or Loyalty Card
If your company participates with the Do it Best® Loyalty Rewards program, Best Rewards™, or other loyalty rewards programs, you can scan the customer's rewards card ID or enter the customer's card ID in the Name list and choose the UserKey option to perform the search.
We should point out that as long as a Loyalty ID is assigned to the customer correctly and the customer's account is used for the transaction, there is no need to scan their card to associate a transaction with the program. All sales transactions will be associated with their rewards ID automatically regardless of whether or not a card was scanned or loyalty ID was used for selection.
For ACE Rewards™, choose <CTRL-R> to scan or enter the customer's rewards ID unless it has been associated with the customer's account. In the latter case, the customer's rewards ID is automatically associated and displayed in a Point of Sale, Sales transaction. Other transactions (Orders, Quotes, Open Tickets, etc.) do not support ACE Rewards promotions and these transactions are intentionally not associated with the customer's ACE Rewards ID. Scanning of the customer's ACE Rewards card is not supported except when the ACE Rewards dialog is shown. For more information about using ACE Rewards at Point of Sale, search for the ACE Rewards topic in the Help System.
|
When the Enhanced Look Up feature is enabled, you have more selection options, but the account's Sort Name field entry is still the primary match field. The application only shows you account number matches if no sort name matches are found. If matches for both the sort name and account number exist, only the entries with the name display.
Using the Enhanced Account Look Up Feature to Find an Account
When enabled, the Enhanced Look Up feature searches using the account number, sort name, address (line 1), and company name automatically. For each row, the cell matching the look up text contains a gray background color. Even when more than one column for the same row (account) has a match, the application only highlights the column with the first look up match. Typically, the more text you enter, the shorter and more useful the list of matching results will be. With enhanced look up, there is a maximum number of matches (up to 70). There is no <<More>> option, which means that if more than 70 matches exist, you may have to either enter additional text to narrow the search or enter new search information instead.
Note: You cannot use the % character as a wild card when using the Enhanced Look Up feature.

The Enhanced Look Up feature can be enabled by Support upon request. The team sets up parameters and uses a Support Utility to populate tables with the data you have already entered into the application. If you decide you do not want to use this feature after it is enabled, Support needs to reset these tables and the application returns tothe original methods for search. You can request to re-enable this feature in the future if you choose. Key look up data is removed when account or items are modified if you disable the enhanced look-up feature.
After you select an account from the list, the account type displays beside the list. There are three types of accounts:
-
A Cash account is a customer-specific account that does not allow receivables charges.
-
A Charge account is also a customer-specific account that allow receivables charges to accumulate.
-
A System account is a general-use account that is not customer-specific. A System account does not have a credit limit or allow charges.
All companies must have a system account named CASH. Except in the case of Tickets* (Advice Notes) and Charge Returns, the default account, "CASH," is the default when no specific account is indicated.
To select the System account, press TAB . In addition, this type of account requires the entry of a delivery name when used with non-sale type transactions (orders, quotes, etc.). more...
Understanding System Accounts vs. Cash Accounts
System accounts are used for cash and carry transactions, where the customer doesn't have their own account. Your company can create more than one System account; however, most companies only have one.
By contrast, Cash accounts require additional information, such as the customer's name (or other information), for certain payment types and in cases of delivery. When you begin a transaction using a system account, you can create a new "cash-only" account directly using the Delivery tab on the Process form (when applicable). Cash-only and System accounts are not the same.
|
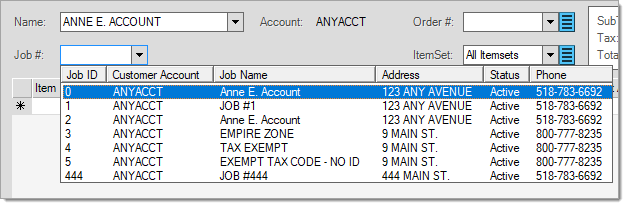
Selecting a Job
Accounts may be linked to one or more jobs; every account has at least one job, known as the master job (0). You can add additional jobs to any account to track account activity separately from the account. You are only prompted to select a job if the account has multiple jobs (more than the required job "zero"); otherwise, all activity is assumed to be for the master job. In Point of Sale, disabled and closed jobs are not included in selection list. You may be able to add new jobs during the transaction processing (on the Delivery tab of the Process (F12) form).*
*Your security settings may prevent you from adding jobs during processing.
Note: In other Point of Sale areas (such as Order or Sale Entry) you can also add a job in the Delivery tab. This option is not available in Tickets/Advice Notes.
Quote Selection & Document ID
Like most documents, new quotes may be assigned a sequential number automatically; however, users are able to specify their own ID as well. All document types, including quotes, can be assigned to one of 3 specific numeric ranges. These ranges are used when automatically assigning an ID. When assigning a custom quote ID, the user must do this before any other number/ID is automatically assigned.
The sequence portion of the document identifier can be a maximum number of 6-characters (numbers or letters) in length. When using a custom ID, it's best to use all the characters available (especially if you do document scanning or bar code labels). The standard YYMM date prefix will be added to all quote IDs.
To have the application assign a new quote number instead, press the TAB, Enter (or return) key, or choose "<<<NEW>>>" from the drop down.
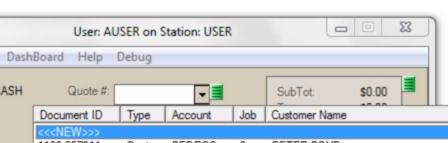
This field is also used for selecting an existing quote for modification. If the quote is recent, clicking the drop down lists the most recent quote documents first. If you know the ID, you can type it in. Otherwise, a number of selection options are available from the Quote # drop down's alternate menu (usually a right mouse click).
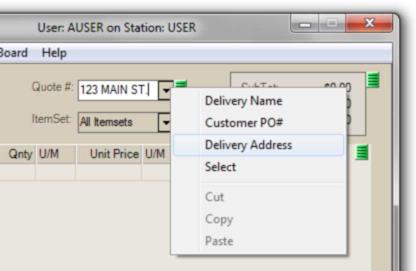
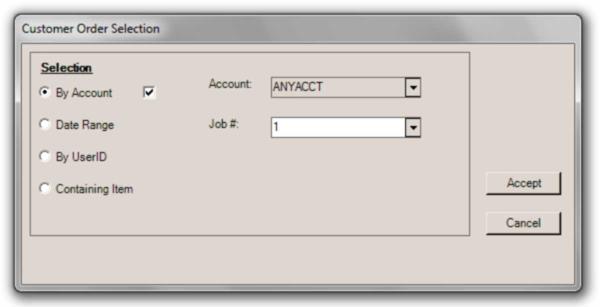
Delivery Name, Customer PO#, and Delivery Address all seek matches based upon what you have typed in the Quote # field. The "Select" option offers a form with additional Quote selection options (Note: this same form is used with customer orders)...
The menu marker  to the right of the quote # field can be used to void an existing quote. "Voided" quotes are removed permanently.

If you use quotes as templates for other transactions (via import), there is an option available for "locking" individual quotes. This option will not appear unless it has been enabled by support. This is only done upon request (there is no charge for enabling this option).
When "locking" has been enabled, a "lock quote" option appears on the menu marker after a document ID has been assigned (not before).
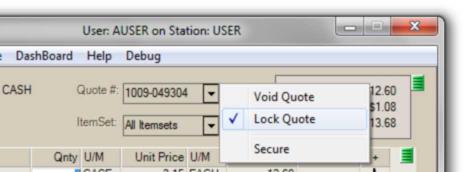
A "check" appears next to the "lock quote" option after locking has been selected.
Locking prevents other users from making any changes to the "locked" quote. The user who locked the quote will be the only one allowed to make changes (including "unlocking" the quote if desired). Once locked, a quote may still be invoiced or ordered by other users. Locking only prevents permanent modifications to the quote by other users. It does not affect whether users change pricing or quantities after the quote is copied into another transaction.
To use a quote repeatedly as a template, the quote should be copied into Sales (Quotes, Orders, etc.) using the Import (F2), Wizard function so that the quote isn't updated as sold, etc.
How this is used may vary based upon whether or not you want the template quote's pricing to change or not. The Import Wizard can be used to select a quote and either keep the original prices or use the customer's current pricing (in this second case, just don't map the price columns). The Import, Document option always reprices the quote to match the selected customer.
Working with ItemSets
An ItemSet is a classification tool used for Sales, Orders, and Quotes where you can assign items to groups, or "sets" so you can sort, invoice, and/or deliver them separately.
For example, if you are adding a large order, and the customer wants specific goods delivered at different times, ItemSets are an excellent way of keeping track of the customer's delivery needs while maintaining a single order at the same time.
 more...
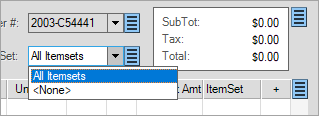
Using the ItemSet Control
The ItemSet field (located above the data grid on Sale, Order, and Quote forms) allows you to filter items based on the ItemSets assigned to an item. The default setting is All Itemsets, which displays all grid items regardless of their assigned ItemSet (if any). If you choose the None option from the ItemSets list, only the items that have not been assigned to any ItemSet. This setting only works if some of your items have been assigned ItemSets.
If any ItemSets are assigned to items in the data grid, they will be listed as selections in the ItemSet list:
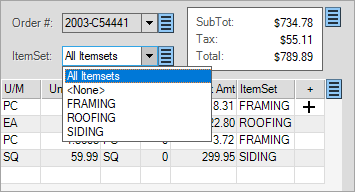
ItemSet designations (if any) also display in the grid under the "ItemSet" column and can be modified from the grid as needed.
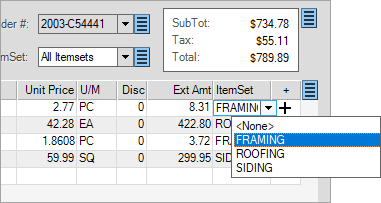
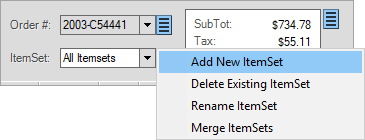
Click the Menu Marker  beside the ItemSet list to add, delete, rename, and merge ItemSets. The Menu Marker may not display if you do not have user credentials for the ItemSet feature. beside the ItemSet list to add, delete, rename, and merge ItemSets. The Menu Marker may not display if you do not have user credentials for the ItemSet feature.
If your business uses ItemSets frequently, they may have set up ItemSet defaults in the Parameters > Point of Sale > Names tab, which will display in the Add ItemSet list. You can select one of these existing ItemSet types or add a new one, if you need to.
Adding an ItemSet to a Sale, Order, or Quote
To add an ItemSet to a sale, order, or quote, choose Add New ItemSet entry from the Menu Marker list. The ItemSet Maintenance form displays. Select an existing ItemSet from the listing of presets (if any) or type in a name in the Add ItemSet field provided. ItemSets are limited to 30-characters.
Note: New ItemSets you add here don't become presets for future transactions.
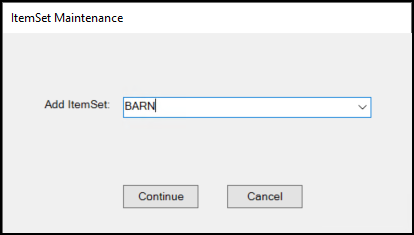
Then click Continue. Add the items to the data grid that you want to be associated with this ItemSet.
The ItemSet column displays the assigned ItemSet setting for the new item.

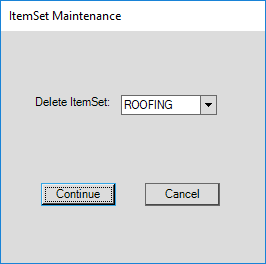
Deleting an ItemSet from the Transaction
You cannot delete an existing ItemSet from the sale, order, or quote if there are still items with this ItemSet assigned to it. You must have ItemSet credentials to delete an ItemSet. Also, deleting an ItemSet does not delete it from the list of ItemSet defaults.
To delete an ItemSet from a transaction, from the Menu Marker list, choose Delete Existing ItemSet, choose the ItemSet you want to delete from the list, and click Continue.
-
If there are no items assigned to the ItemSet, the application will delete it from the transaction and it will no longer display in the ItemSet list.
-
If there are items are currently assigned to the name, no changes will be made.
Renaming an ItemSet
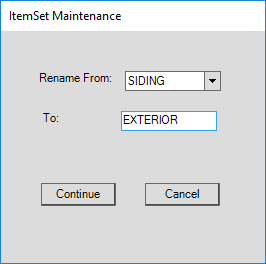
You can rename an ItemSet to change the name of it for all items that has it assigned. You might do this if the purpose of the selected ItemSet has changed.
To rename an ItemSet for a sale, order, or quote, choose Rename ItemSet entry from the ItemSet Menu Marker list. The ItemSet Maintenance form displays. From the Rename From list, choose the ItemSet you want to rename. In the To field, enter the new name for the ItemSet and click Continue.
Merging ItemSets
You can merge ItemSets to combine two ItemSets into one, with all occurrences of one existing ItemSet renamed to the other. There must be two different ItemSets with items assigned to them to perform this task.
To merge two ItemSets for a sale, order, or quote, choose Merge ItemSet entry from the ItemSet Menu Marker list. The ItemSet Maintenance form displays. From the Merge From list, choose the ItemSet you want to merge into the new one. In the Into list, choose the new ItemSet and click Continue.
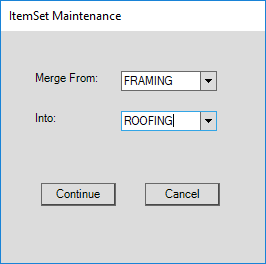
The Merge From ItemSet is automatically removed (deleted) from the transaction and the new ItemSet name displays for the existing items.

|
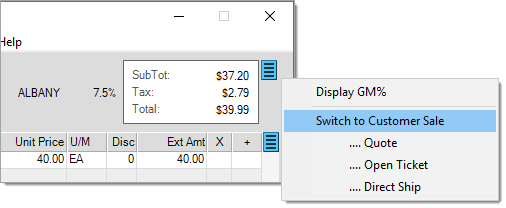
Totals Panel
The upper right-hand area of the form includes a display-only panel showing the transaction's current sub-total, sales tax, and total. The tax location and rate (percentage) are displayed to the left of the panel when enough room is available (the tax location and rate can be viewed in the Process (F12) form otherwise). These figures will automatically update as changes are made. Figures also update to reflect any adjustments (adders/discounts, etc.) applied on the Process (F12) form.
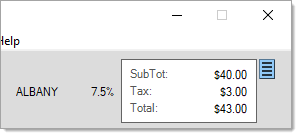
The menu marker (to the right of the totals panel) offers additional options allowing the user to switch to a different transaction type (sale, quote, ticket) or display the current GM% (gross margin percentage) for the entire transaction.
|
 Canadian Settings Canadian Settings
|
|
Users in Canada can double click on the tax amount to display the split provincial (PST) and GST tax dollar amounts. For Canadian provinces with both PST and GST taxes, both locations (and rates) are displayed to the left of the totals panel. HST (Harmonized Sales Tax) locations (used for the Maritime provinces) combine the GST and any local amounts together into one tax rate, so no split is provided in those cases.

Tax Details (Canada Only)
|
Grid & Item Entry
The grid is used for item entry. Inventory being sold may be entered or scanned at any time. A "discountable" column (Disc) has been added with release 8.1.0 (January 2013). This can be used to view the discountable status of the item or to specify a line-item discount (if the item is discountable).

Item Entry in Quotes
Primary entry fields include all columns except description, extended amount, and additional information.
For more information about item entry and selection, click here.
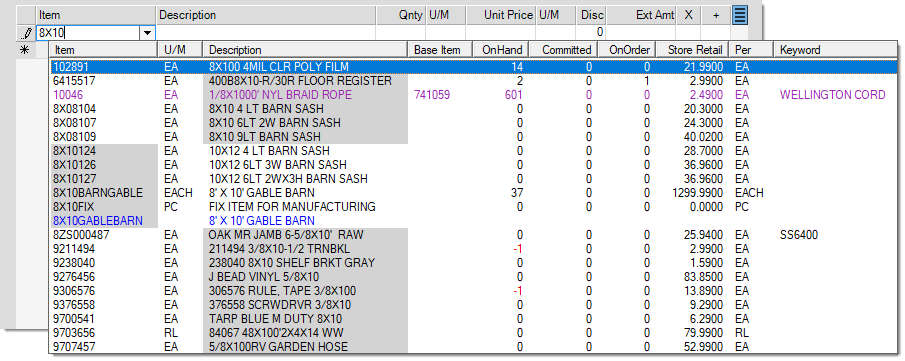
One of the most important features of a retail software solution is Item Entry. When the item is physically present, scanning the item's barcode is the easiest and fastest way to enter it into the application. If you don't have a scanner or the item has no barcode, you can always enter a full or partial item number if it's available. When entering text that partially matches existing item codes, the application displays a list of items that match. Items in selection lists are color coded to help distinguish between item numbers and alternate SKUs (in purple). On-hand quantities in a selection list are also color coded when an item has a negative on-hand (red).
There are cases when you may not be working with any physical item, such as when you are building an order or quote, so scanning or manual item entry isn't always a realistic option. For these situations, you can enter the information you want to search for and right-click the Item list icon to display a list of search options.
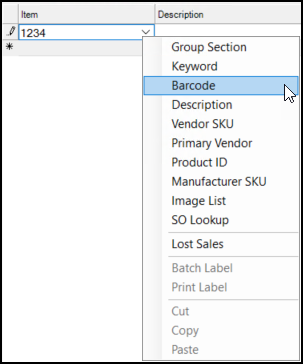
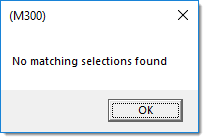
All of the following alternate selection choices are used to build a selection list matching the criteria you either enter or select. Based upon your selections, you can wind up with a list that contains a few items, many items, or one item. In addition, it's possible for your selection to produce no matches.
Selection listings are assigned a set "page" size. Usually, this initial listing or page is limited to the first 25 records. When more items match the criteria than the page size, a "<<<MORE>>>" option is displayed at the bottom. Clicking "more" populates the selection listing with the next page of items. Previous records (items in this case) remain in the listing and can be viewed by moving the scroll bar on the right-hand side of the listing.

|
If you want to add more than one item in the list to the data grid, you can hold down the CTRL (Control) or SHIFT key and click the items you want to add as follows:
After you select the items you want, press the Enter key. Then, use the Next (F1) key to add the items you selected to the data grid one-at-a-time.
Selected items are not automatically copied into a grid. This feature works this way because not all selections made using these keys end up in a data grid.
|
Selecting Items using Group Section
Since all items must be assigned to a group and section, you can use the Group Section settings to find an item. Groups and sections are numbered (1-255), but are also assigned a text description. In almost all cases, the text description is shown along with the numbers. Numbers are used because they take up less space and also makes sorting and searching data more efficient in the database. Each company can choose how it wants to organize its inventory.
Group/Section Selection List
Group and section selection uses an expandable navigation "tree." Each group listed in the tree can be expanded to display the sections within the group. You can make multiple selections. For example, you can create a selection list of all the items in three different groups -- or -- just a few sections within one or more groups.

When all the items in either a group or section are selected, the check box background is displayed in white  . If you select some but not all sections within the same group, the group's check box background is changed to gray
  . Use the Select All button to select all groups and sections. Use the Clear All button to clear all check boxes. Choose Accept to build a selection list based upon the groups and/or sections you have chosen (checked). Or, click Cancel to close the window and not build a selection list.
Selecting Items using a Keyword
Items may be assigned up to five keywords. Keywords are meant to be a common and intuitive word that generally describes the product. It's best to use a word rather than a phrase and to not get overly specific. Keyword matches are not case-sensitive (you can type them using upper and/or lowercase letters). Some examples of good keywords are: TRUSS, PAINT, SINK, DRILL, BRICK, etc. The more specific the keyword, the less intuitive, and less likely that it will be used. Keywords are not required on items. Try using the Description search as an alternative if you are unsuccessful.
There are two ways to use the Keyword selection to find an item you are looking for:
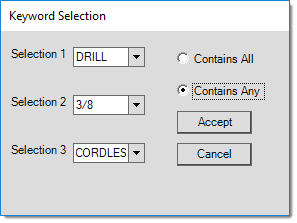
1. In the Item column, type in the word or number you want to search for and right-click the drop-down arrow. Choose the Keyword option to display a list of items that contain the word or number you entered.
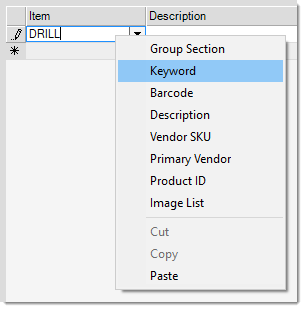
2. In the Item column right-click the down arrow and choose the Keyword selection option first (before you type anything in the Item field). The application displays a Keyword Select list where you can specify up to three keywords at the same time. You can choose to match on either ALL or ANY keywords. If you choose "Contains All", only items assigned to all the keywords will be included in the selection list. If you choose "Contains Any", items with any of the keywords specified will be included.
Selecting Items using a Barcode
You can assign up to five different barcodes to each item. You can use these different barcodes to distinguish different units of measure (BOX vs. EACH, for example), so it's important to pay attention to the unit of measure that displays when entering quantities. This selection tool can be used with either a full or partial match on an item's barcode. Partial matches are made beginning with the first non-zero number in the barcode. Leading zeros are not considered.
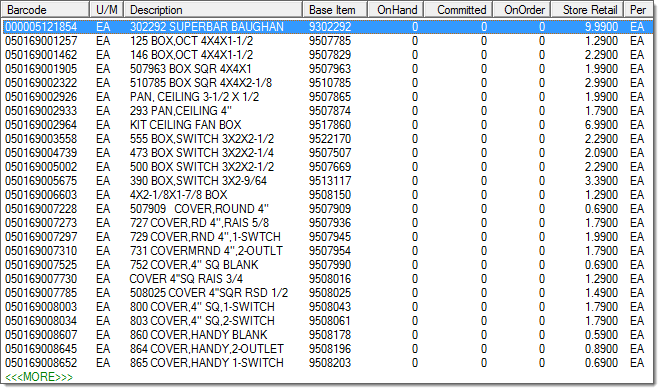
When using the barcode selection option, products are listed in order of barcode. The "base item" column contains your company's SKU for the item.
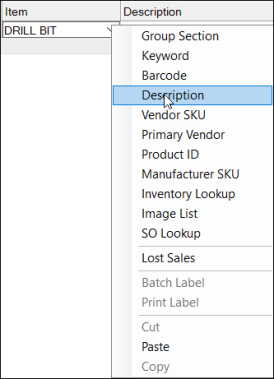
Selecting the Item using the Description
Use the Description search to find items using the words or numbers in the item's description. Matches are not case-sensitive (so it doesn't matter whether you use upper or lower case letters). The text can be located anywhere in the item's description (beginning, end, or middle); however, the entire text is matched together as a phrase, not as independent words. For example, if you type in "FAN KIT" but the item's description is "KIT CEILING FAN BOX," the application would not find the match, despite the fact that both words do exist in the item's description.
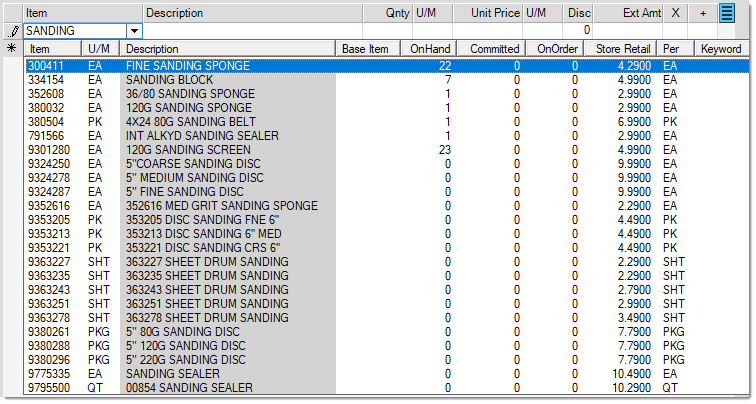
You may notice that some items populated in the selection listing don't appear to include the word you typed in the "description" column. Why is this? Items may have very long descriptions (up to 1088-characters, including spaces); however, we use a shorter truncated description for selection lists that is only 32-characters. This is done to keep selection listings a reasonable size and for database performance. The description used for locating matches is a special "search" description that is essentially the item's full description with any sequential spaces between words removed (this description also doesn't include line feed, carriage return, and other non-printing characters that might prohibit matches).
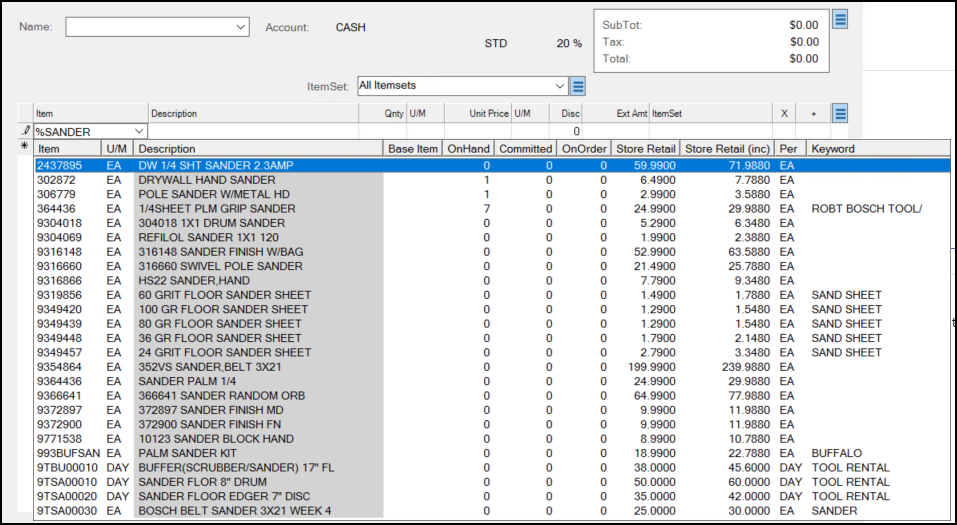
Pro Tip: If you type the character % and then the text your are searching for in any text field in a data grid, the application will restrict the search results to the records that contain that text.
Selecting Items using a Vendor SKU
Use the SKU (Stock Keeping Unit) to describe the numbers or identifiers assigned to products. Your company may use its own item numbers (codes), it may use the same codes as a supplier/wholesaler, or a mix of both of these. Each item can be assigned up to three different vendor items (or SKUs). These identifiers are used when ordering products from the vendors (wholesalers, manufacturers, buying group, co-op, etc.).
Enter in the vendor's item number (SKU) in the item drop down and choose Vendor SKU from the alternate menu. If a match is located, the matching item (or items) will display. This option only works if an exact match is located. Partial matches are not returned.
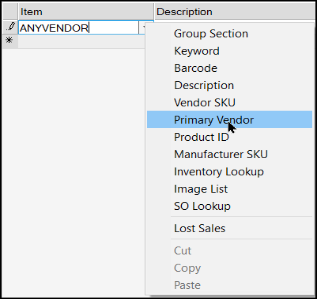
Selecting Items using the Primary Vendor
Each item may be assigned one primary vendor. The primary vendor can be different for each branch (store location). To use this selection option, enter the full vendor code associated with the vendor. This option only accepts an exact match for an existing vendor code. All items in the current branch assigned to the vendor as a primary vendor will be included in the selection listing.
Selecting the Item using the Product ID
You can use the Product ID as a classification tool to either create custom product IDs (groups) for your related items or, if you are a Do it Best® member, you can use them to mirror the Do it Best product departments, categories, sub-categories, and product groups. You can use a combination of both custom and Do it Best product IDs; however, only one ID may be assigned per product. The same product ID may be associated with as many items as you like.
If you want to define your own product IDs, this is done from the Code Definitions form (Inventory > Database > Code Definitions) (select the "Product ID" tab from this form). To use Do it Best product categories, you must first retrieve the classifications using EDI (from the Purchasing area, choose the Vendor EDI transaction, Extras (radio button), and choose "Classification Maint."). Once this information has been populated successfully using EDI. Once completed, a "DIB" check box will appear on the Product ID selection form. This check box is hidden unless the categories table is populated with data.

Do it Best Product Classifications
If checked, the form allows you to choose either a department, category, sub-category, or product group to produce an item selection listing. If you pick a department, all items assigned to the categories, sub-categories, or product groups within that department will be included in the selection listing, for example. Items may be assigned to any level; however, it's usually best if they are assigned to a product group (the lowest level). To choose a level in the tree, double click on the node to select it.
Selecting the Item using the Manufacturer SKU
When you search for a particular item and you know the item’s manufacturer's SKU, you can use that SKU to find the item. We call this enhanced search. The enhanced search feature must be set up before you use this feature. We have added the Manufacturer’s SKU to the default enhanced search options as well.
To search by the Manufacturer SKU, enter the SKU in the Item field, select the down arrow beside the item field, and choose the Manufacturer SKU option. The application displays the list of items that match the SKU you entered.

Sale Entry Form with Manufacturer SKU Search Results
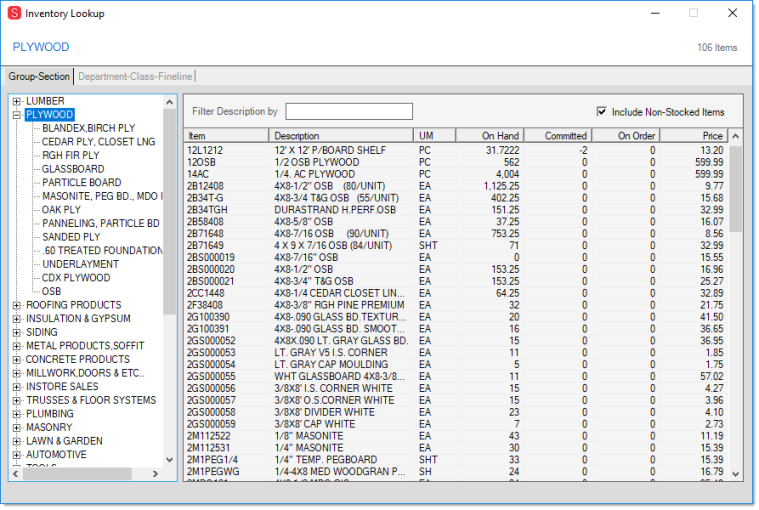
Selecting the Item using Inventory Look up
Selecting Inventory Look up will open a Utility that searches for items by Group-Section or Department - Class - Fineline.
Note: This listing includes Disabled Items.
Inventory Lookup : Group-Section
In order to search by Group-Section, all items must be assigned to a group and section. Your company may define between 1 and 255 groups and also between 1 and 255 sections within each group. Groups and sections are numbered (again 1 - 255), but are also assigned a text description. In almost all cases, the text description is shown along with the numbers. Numbers are used because they take up less space and also makes sorting and searching data more efficient in the database. Each company can choose how it wants to organize its inventory.
Select a group to view all item within that group. You may then narrow down the list by selecting the section. Click on an Item to add it to the data grid. The main dialog window will become active as soon as you select an item, at which point you can adjust quantity and price as well as continue adding items. The Inventory Lookup Utility window will remain open in the background, facilitating navigation between the windows.
You may also use the "Filter Description by" field by typing in the item number or Description. The list will narrow down as you type in more characters in the field. Check the "Include Non-Stocked Items" to include all items, included items you don't currently carry.
Inventory Lookup : Department - Class - Fineline
There are three merchandising classes available: class, department, and fineline (sometimes named "subclass"). These can be used as a selection tool. Merchandising codes are typically reserved for codes provided by vendors and may be updated by EDI processing or when adding items using a vendor's catalog.
Select a Department to view all item within that department. You may then narrow down the list by selecting the Class and then the Fineline. Click on an Item to add it to the data grid. The main dialog window will become active as soon as you select an item, at which point you can adjust quantity and price as well as continue adding items. The Inventory Lookup Utility window will remain open in the background, facilitating navigation between the windows.
You may also use the Filter Description by field by typing in the item number or the description. The list will narrow down as you type in more characters in the field. Check the Include Non-Stocked Items box to include all items, included items you don't currently carry.
Selecting Items using the Image List Selection
The Image List feature provides a visual method for item selection. Before using the Image List feature, your company must define an Image List from the Image List Maintenance form available from the database menu in the Inventory area. There is one consolidated image list for your company. This list can have many different categories and sub-lists, however. Up to five layers of organization are permitted from the "start" location. The list should be organized from less to more specific categories and ending with items as the last level. Once a user opens the list, the list remains open in the background and retains the user's last location in the list if they re-open the list again. This is done until the user logs off, closes the application, or changes branch locations.
There are two types of content in the Image List: lists and items. Lists are indicated by either a yellow or an antique-white (light-yellow) background color. Items are indicated by a light or dark green color. The darker colors indicate the current selection. Keyboard navigation can be used as well as the mouse (single click) and touch screen if available.
Along the top of the form, navigation links are provided. Click on these to return to the "start" location or a prior list level.
Selecting Items using SO Lookup
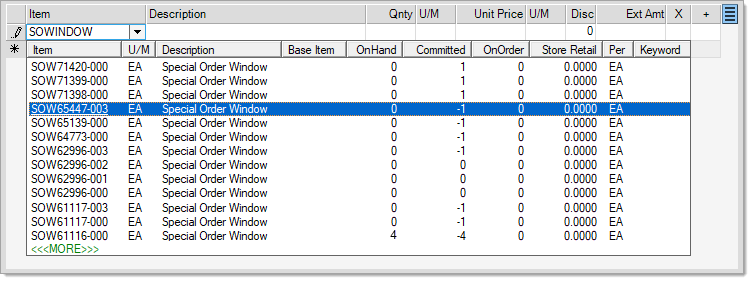
Search for renumbered Special Order (SO) items by entering a full or partial SO item number in the data grid, right-click and select SO Lookup. In the example below, we are searching for an item called "SOWindow". A list of all "SOWindow" items will be returned; click on the <<<MORE>>> link to view additional items of the special order renumbered SKUs. Item are listed in descending order.
Selecting Items using Lost Sales
You can track your Lost Sales using the Inventory > Utilities > Lost Sales utility form as well as from any Item selection grid or Catalog selection control anywhere in the application. Search for the Lost Sales search to find out more about this functionality.
Can't Find the Items I am Looking For, Any Other Ideas?
There are two additional search features you can use to find items quickly in Point of Sale or Inventory. Both of these features must be enabled by Implementation or Support team members. These features are discussed below.
Using the Enhanced Item Look Up Feature
When Enhanced Item look up is enabled, item selection automatically involves the following fields: item number, description, and keyword(s). The column cells matching the look up text are indicated by a gray background color. With Enhanced Item look up enabled, there is no "more" option provided and the maximum number of matches shown is 70. This means that if more than 70 matches exist, not all will be shown, and you may have to either enter additional text to narrow the selection or use other (alternate) selection options instead. Item number matches are given a preference over description and keyword matches (since alternate methods do exist for selection by description and keyword if necessary); however, the listing is finally re-ordered by Item SKU so the item matches may not necessarily appear first.
Exact matches on an item SKU do not provide a selection list.
Selection with no entry in the text area as well as selection involving the alternate menu do not use the enhanced look up feature. In these cases, item selection does provide the "more" option, and works as expected.
Typically, the more text entered, the shorter the listing of matching results will be.
The Enhanced Item Look Up feature requires setup by ECI Support personnel. Support enables a parameter and populates a special look up table using a support utility. This is only done upon request. After the Enhanced Look Up feature is enabled, ALL users and ALL locations can use it for item searches in all data grids that include items.
You can disable this feature at any time by contacting Support. If for some reason, an "enhanced" search is disabled, the tables will need to be repopulated again if it is re-enabled in the future.
Wild card searches (using the % character) are not supported when using the Enhanced Look Up features.
We have updated the ecommerce API to support the transmission of three additional fields of information:
• Discount Date
This specifies the last date that the discount applies. (This allows the API to compare the discount date to the date the payment is being made to ensure the discount can be applied.)
• Discount Amount
The calculated amount of the discount. (This provides the amount of the discount, which the API can subtract from the ROA payment balance.)
• Outstanding Amount Discount
The original amount that can be discounted, minus the discount amount, and minus the customer’s account payment, minus any additional discounts not included above.
Additional details are available in the API Guide.
Using the Enhanced Item Description Look Up Feature
When you are looking for an inventory item and cannot remember the exact name or Item ID, you can use a tool for searching the item descriptions to find the right materials quickly. The Enhanced Item Description Search features to give you those tools. Traditionally, you were restricted to searching for 32 characters when you used a Description search, we have expanded this to 300 characters, when needed. Additionally, we have added additional description search tools, such as using quotes (“Drill Bit”) and using wild cards (Drill B*) to help search for items using their extended item description. The search results show the closest matches at the top and any additional results that match the criteria below.
You can use this feature wherever there is an Item list (Point of Sale > Inquiry > Item Maintenance, etc.) and is restricted to ECI Hosted customers only. Adding this feature requires a lot of additional database overhead, which we can manage better in our hosted environment. To enable this feature, reach out to the Implementation or Support teams; as it is disabled by default. Once enabled, there are no special permissions required to use this feature; it is accessible to all users.
Search for the Enhanced Item Description topic for more information.
|
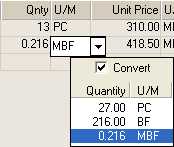
Unit of Measure Changes
Quantities and pricing reflect the unit of measure displayed. Changing the unit of measure (U/M) to a measure with some other value (other than 1:1) can optionally modify the related quantity or price. If the "convert" box is checked  , the existing quantity or price will be converted to a value equal to the current value (displayed in the drop down). The "convert" option will not change existing extended amounts. If the "convert" option is not checked, the existing quantity or price will not change, and will be used to re-calculate extended amounts.
Pricing Changes
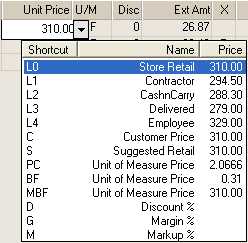
There are a number of ways to affect pricing. Users can modify the price by typing another in, select a reprice option (F6), type a discount, or select an alternate price from the input drop-down. Typed keyboard shortcuts are also available. For example, type L2 in the unit price field to use the level 2 price, or D20 to do a 20% discount.
Discount
The "Disc" or "discount" column has two (2) purposes. If an item allows discounts, the column can be used to specify a line item discount by entering a percentage. For items which are not discountable, the column will display the letter "N" (net) and won't allow changes. To mark all items on the transaction as "net," you can use the "Mark as Net" option available from the menu marker found on the right-hand side of the grid (user security can limit your ability to view or utilize menu marker functions).

Mark As Net
If you have administrative credentials, you can change a Point of Sale transaction from one type to another (such as a Sale to an Order) when your customer needs to do that. This allows you to convert the existing transaction to a new type while retaining much of the information from the original. This process preserves all items (and item comments), pricing, customer-job selection, customer PO#, and deliveryinformation. Other information is not maintained unless it is permanently associated with the account or job. This includes a number of fields located on the Process (F12) form such as Print and Transmit options, Adjustments, and any manually entered information such as a Tax Exempt number or Purchase Agent.