Price Updates - Price/Cost Entry
Use this option to change the List Price and Market Cost for the items entered in the data grid. The grid displays other costs and the item's matrix code (if used) for reference only.
You can modify an item's price at Point of Sale using a variety of methods, but these changes must be based on how the item's pricing is defined. For instance, if an item's default price level is based on it's weighted average cost, making changes to the list price won't change the item's pricing (because it's not based on the list price). The application does not maintain price updates as a "batch" or "group," so other changes for the same date can be included and even overwrite existing price change data. For example, if you do manual price updates and then EDI adds price updates for the same date, the two will be combined together. It's also possible that if the same item exists in both, the latest change can overwrite any existing price change for an item (for that same date).

Price Updates: Price/Cost Entry
You can adjust the pricing of the items in the data grid by highlighting them and selecting the Menu Marker  , when enabled, then reviewing your update options.
Note: User ID Security permissions may limit your ability to access Menu Markers.
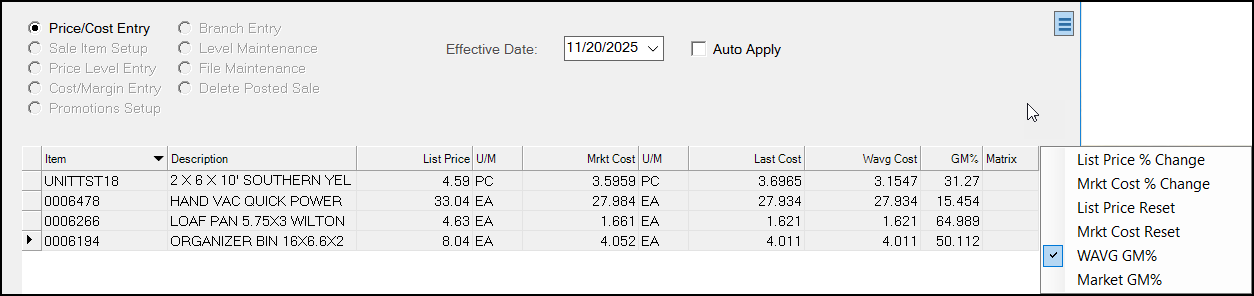
The highlighted entry in the Menu Marker list is the items' current price-defining setting.
To change the pricing for the items in the list:
-
You can select the List Price Reset or the Mrkt Cost Reset options to change all list prices or market costs back to their original values.
-
You can select the WAVG GM% and Market GM% to choose which cost the gross margin is calculated using. The default cost for gross margin is the weighted average (WAVG).
-
You can make the List Price (and the associated U/M column) read-only in the case of "Cost Only" EDI (Electronic Data Interchange) price updates. These only update market cost.
Understanding the Price Update Options for Import (F2) Items
You have a variety of Price Updates options when you import your data, but not all of these options are available for the type of update you are addressing. Price Updates may only apply in certain circumstances and under certain conditions to items prior to import. When you click the Import (F2) key, the list of import types display.
")
Price Update: Import (F2) Options
Conditions Applied Before Import
The following list of conditions are applied when items are imported:
-
All Import (F2) options (except the Wizard) exclude "pull-to-length" tally items, which are linked to other items. Other tally item types are not specifically excluded; however, not all are necessarily supported.
-
When using the Level Maintenance option, the application checks the items selected for import to see if any of the item's price levels involve a type "P" (set price). If so, the item is copied (imported); otherwise, if no price levels involve a specifically set price (P), the item is not copied.
Import Availability by Price Update Type
In the table shown below, the import types are listed along the top row (horizontally) and the types of price updates are listed in the first (left-most) column. For example, when you import data using the Matrix Code Import type, you can only use this for Price Cost Entry or Sale Item Setup update types, and not with any of the other options.
| Matrix Code | Inventory | Purchase Order | Receipt | Vendor Promo | Previous Sale | Previous Price Update | Wizard | |
|---|---|---|---|---|---|---|---|---|
|
Price Cost Entry |
Yes |
Yes |
Yes |
Yes |
Yes |
Yes |
Yes |
Yes |
|
Branch Entry |
No |
Yes |
Yes |
Yes |
Yes |
Yes |
Yes |
No |
|
Sale Item Setup |
Yes |
Yes |
Yes |
Yes |
Yes |
Yes |
Yes |
No |
|
Level Maintenance |
No |
Yes |
Yes |
Yes |
Yes |
Yes |
Yes |
Yes |
|
Price Level Entry |
No |
Yes |
Yes |
Yes |
Yes |
Yes |
Yes |
Yes |
|
File Maintenance |
No |
Yes |
Yes |
Yes |
Yes |
Yes |
Yes |
Yes |
|
Cost/Margin Entry |
No |
No |
No |
No |
No |
No |
No |
No |
|
Delete Posted Sale |
No |
No |
No |
No |
No |
No |
No |
No |
|
Promotions Setup |
No |
No |
No |
No |
No |
No |
No |
No |
|
ACE Rewards |
No |
No |
No |
No |
No |
No |
No |
No |
Matrix Code
This option imports inventory items matching a price matrix code you specify. Matrix codes may be defined from either the Code Definitions form or from Item Maintenance and the Branch, Codes tab Price Matrix Maintenance Settings ![]() icon. When a matrix code is assigned to an item, pricing is calculated using defined multipliers and the specified basis price or cost. Multipliers less than 1.0 reduce the basis and multipliers greater than 1.0 increase the basis. Typically a number less than 1.0 would be used to provide a discount from the basis (which in this case would typically be either suggested list or store retail (level 0)). Numbers greater than 1.0 would usually be used with a basis that represents one of the item's costs (market, last receipt, or average cost) to calculate a price that is higher than the cost.
icon. When a matrix code is assigned to an item, pricing is calculated using defined multipliers and the specified basis price or cost. Multipliers less than 1.0 reduce the basis and multipliers greater than 1.0 increase the basis. Typically a number less than 1.0 would be used to provide a discount from the basis (which in this case would typically be either suggested list or store retail (level 0)). Numbers greater than 1.0 would usually be used with a basis that represents one of the item's costs (market, last receipt, or average cost) to calculate a price that is higher than the cost.
, Matrix Code")
Import (F2), Matrix Code
Only two Price Update options support Import (F2) by Matrix code: Price Cost Entry and Sale Item Setup.
Inventory
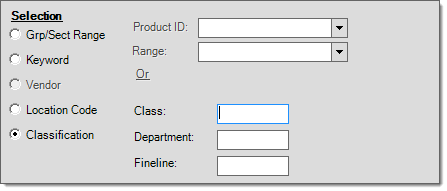
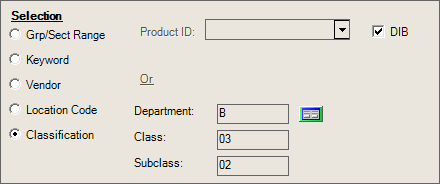
The Import (F2) option for inventory offers a variety of options for selecting and copying inventory items into a transaction's data grid. Selection choices include the following: group/section range, keyword, location code, and classification.

Inventory Copy
The Selection control used here matches the control used by inventory reports and functions identically. For more detailed information about selection by inventory, ![]() click here
click here


Purchase Order
This option is used to copy items from an existing purchase order document. The item number, retail price (if any), and unit cost from the purchase order are copied. Unit Cost is converted to match the item's Pricing Unit of Measure if different. The retail price should already match the item's Pricing unit of measure unless it has been changed since the Purchase Order document was created. This Import (F2) option is available for most Price Update options excluding the following: Cost/Margin Entry, Delete Posted Sale, ACE Rewards, and Promotions Setup.
Receipt
This option is used to copy items from an existing inventory receipt document. Only items with a received quantity greater than zero are copied (imported). Only the item from the Inventory Receipt document is copied, not any pricing or cost information. Item costs are updated when inventory (items) are received. This Import (F2) option is available for most Price Update options excluding the following: Cost/Margin Entry, Delete Posted Sale, ACE Rewards, and Promotions Setup.
Vendor Promotion
Vendor promotions originate from a supplier and indicate special pricing for specific items for a specified period of time. This import option is only used with Do it Best® EDI currently. It does not refer to ACE Rewards™ or Spruce "promotions" which aren't traditional sale pricing and are applied with additional criteria.
The vendor's promotional data is compared to your inventory's vendor-item data to locate matching items. Pricing may be adjusted from the vendor's price if your corresponding item has a matching vendor-item with a package quantity defined. Package quantity is not considered if the "disable package conversion" is set on the vendor-item or the unit of measure already matches the default UM for Price Updates and the package quantity is one. If package conversion is not disabled, the package quantity is converted to the base unit of measure (based on the package quantity's designated unit of measure). This figure may be used to adjust the price if the resulting quantity isn't a one-to-one relationship with the vendor's package quantity. Costs, when applicable, are not adjusted and typically would not be found in promotional data.
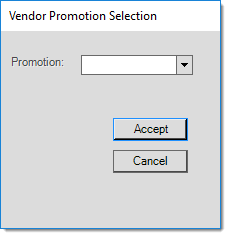
The promotion ID, promo description, and vendor code are listed for selection.
|
Important! Since your vendor's units of measure may not match with the measures your company uses for pricing, you should always visually compare prices to their associated units of measure to make sure they make sense before processing any changes. |
When this option is used along with the Sale Pricing option, starting and ending sale dates are set to match the vendor's promotion by default.
Items must be marked for "copy" using the EDI Promotions utility prior to import. Only selected "copy" items are imported.
This Import (F2) option is usually used with the Sale Pricing option; however, it is available for most Price Update options excluding the following: Cost/Margin Entry, Delete Posted Sale, ACE Rewards, and Promotions Setup.
Previous Sale
This option allows you to copy items from a previously applied "sale" price update. Sale Price updates are selected by document, not dates. After selecting a sale document, a dialog is shown asking whether you want to set the "new" price to match the most recent sale price for the items being copied (imported). The most recent sale price is not necessarily the same as the price from the document you select. If you select "no," only the items and their current pricing are copied (imported) into the data grid.
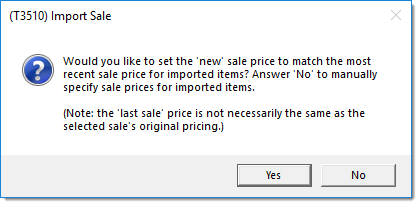
Warning!If you respond "Yes" to the prompt, the price is set to match the most recent sale price for the item even if the Price Update selection is not Sale Pricing! |
This Import (F2) option is usually used with the Sale Pricing option; however, it is available for most Price Update options excluding the following: Cost/Margin Entry, Delete Posted Sale, ACE Rewards, and Promotions Setup.
Previous Price Update
The "previous price update" option allows you to copy items from a previously applied price update (does not include "sale" pricing which are maintained separately). No conditions are applied to the data and only the list of items from the document is copied (imported). Pricing from the document is not imported.
Using the Import Wizard for Price/Cost Entry
The Import (F2), Wizard option provides a generic way to import external data into the application. There are two methods for data selection: document and Windows file. The document option allows you to select any document. The "Windows File" option can be used to import data from a delimited file or spreadsheet, for example. Different transactions have different requirements. As one example, the wizard may be used for copying inventory items into a transaction's data grid. In this case, copying inventory items is only possible if the source document or data selected contains item information.
To import data using the Import Wizard in Price Updates:
1. From the Main Menu, choose Inventory > Price Updates. The Price Updates form displays.
2. Choose the Price/Cost Entry button, and choose the effective date for the updates from the Effective Date list.
3. Choose the Import (F2) key and choose Wizard from the context list.
The Import Wizard dialog box displays.

4. From the Document list or the Windows File list, choose the file or document that contains the price update data you want to import.
-
For Windows Files, the Grid Mapping section updates based on the data in the file and you need to determine the columns you need to import. The source document or file will contain some columns that apply to the transaction specific "mapping" and some that don't. Mapping selections can be saved for future use. This is suggested if you repeatedly copy data from the same document type or file source.
-
For Price Update documents (IN Price Updates) from the application display the information you need for price updates in the Preview Data list.
5. Choose the Item, List Price, Price UM, Market Cost, and Cost UM locations in the original file from the lists to map the data you are importing correctly.
Note: Depending upon the type of information you are importing, these list options change. Additional conditions may be applied to the data after the user chooses Process. Choosing Cancel clears and closes the form without importing any data.
6. Select the Remove Invalid Items option, if applicable. (Not Required).
The Remove Invalid Items check box can be used to permit processing when one or more valid item rows are present in the data.
For example, if you have ten items and two of them have errors, check the Remove Invalid Items to produce a Task List with a Warning (and the option to Accept the warning) instead of a hard error. This would allow you to process the remaining the eight item rows without any errors.
7. Choose Process (F12) to complete the import wizard process.
A message appears asking if you want to print a session report (these reports are not retained as documents and may not be reprinted later without re-saving the pricing update before it has been applied). After the session report message, users are asked to select one or more branches.

Branch List
Due to the mapping feature, the Wizard frequently can be used as a work around when other more specific Import functions are not provided.
The Import (F2) Wizard closes immediately after processing, so you'd want to "export" your errors before processing if you want to review and fix the items with errors later on. If you forget, you can always import the same file, export the errors and then cancel the import.