Orgill FanBuilder Rewards Program
The Orgill FanBuilder program allows businesses using the Orgill distributor to create a locally-branded rewards program for your customers. We show you how to take advantage of this program and generate additional sales. Work with your After Market Salesperson to add this feature to your account.
Businesses that sell Orgill Wholesale Distribution products now have access to the Orgill FanBuilder Loyalty Program, which allows you to provide coupons/reward benefits to your customers using your business’s custom branding. Your customers can sign up for the FanBuilder rewards program during the point of sale process or on the Orgill company website, by providing information including their email address and/or mobile number.
As these customers buy Orgill products at your authorized branch, the application uploads purchasing records to Orgill. When the customer earns enough points, Orgill sends the coupons you design to the customer for their use in the branches you have enabled. Customers can choose to receive these coupons via email or SMS, and they can always access them in the FanBuilder portal. Customers can then use these rewards to buy more products in the store and the application validates them during Point of Sale processing. We send and retrieve customer data, coupons, and sales history throughout the day based on your specified schedule.
Cashiers can sign the customer up during the sales process, validate the coupons presented during the POS process, and apply coupons to the customer’s sales purchases. You can track customer purchases and look up the customer’s program membership in the application.
Setting up the FanBuilder Program
There are three parts to the FanBuilder program setup:
1. Parameter setup.
Your ECI Implementation or Support team sets up the parameters for the feature in the application. Use the steps in Helping ECI Set your FanBuilder Parameters to create a rewards program according to your needs.
2. Create a Rewards Coupon template.
Create a FanBuilder-specific template item, to ensure that your coupons meet your systems criteria. Use the steps in Creating a Coupon Template.
3. Branch setup.
After the first two steps are complete, follow the instructions in Setting up FanBuilder for a Branch for each branch at which you want to offer rewards. You can offer different rewards at different branches.
A Note for On-Prem Customers Setting up Orgill FanBuilder Rewards
If you run into issues accessing the Orgill FanBuilder Rewards API, it may be due to firewall settings that are already in place for cloud users. Our Support team can help you troubleshoot and resolve these issues as a one-time billable service. Support would require access to your server via LogMeIn to complete this work.
Helping ECI Set your FanBuilder Parameters
Your ECI Implementation and Support team members can set this feature up for you, according to your needs but you need to provide them with the following information:
-
Your Orgill GlobalSystemID code
This code uniquely identifies the business to the wholesaler. Typically, this is your Orgill customer code. ECI encrypts this information for your privacy and protection. -
Your Orgill Password
Reach out to Orgill to obtain a unique password for this program. Your ECI team member needs this information to complete the setup process. This password will be encrypted to ensure your privacy and protection. -
Your ECI vendor code for Orgill
This is the Orgill vendor code that you use in the application. This is used to sync sales and customer data between the application and the Orgill system. -
Brand Name for your rewards program
This entry defaults to Orgill FanBuilder. But you can name this program anything that you feel promotes your business best. It could be something like, Joe’s Hardware Rewards or Big Bonus Points, etc. -
Program offer display timing
You decide if and when, during the Sales process, the rewards prompt should display. Options include: At the Beginning, At the Beginning and End, At the End, or Never. In addition, the cashier can use <Ctrl-R> (short for “Rewards”) to pop up the window at point of sale. Let your ECI team member know what works best for you. -
Coupon Item Prefix
Enter a prefix that the application will use to manage coupons. Click the Blue Question Mark icon to learn more about this field. Typically, the coupon prefix is three to eight characters. The application adds the prefix you choose to each incoming coupon you create on the Orgill website.
 -
Coupon Barcode Prefix
The Coupon Barcode Prefix field reflects your business’s coupon prefix as set in the Orgill Store System Manager portal. A Blue Question Mark icon displays to explain the use of this field.
Note: If these last two fields do not display, the Orgill has not completed it's release of the updated FanBuilder Coupon features.
Understanding FanBuilder Coupons
You create the coupons the application uses on the Orgill website, which sends them through the EDI transmission process to the application. When Orgill sends the new coupon you created on their site, the data is loaded into a coupon template, to ensure the new record contains the data needed to process the coupon successfully. The new coupon is shared with the branches that you have enabled to use these rewards. These coupons are stored in the authorized branches’ inventories.
You also make changes to your coupons (such as new value, percentage off/dollar amount off, duration dates, quantities allowed, etc.) on the Orgill site. When the application retrieves the updated coupons, the system compares the incoming records to existing inventory to see if they are the same (to prevent duplicates).
The application checks the Inventory SKU (including your business-specific prefix) and the FanBuilder Coupon SKU.
-
If the new data does not match an existing coupon, the application adds the new coupon to the inventory.
-
If the new data matches an existing coupon in Inventory and Coupon SKU but has different settings (different dollar amount or expiration date, for example), the new coupon replaces the old coupon in inventory.

FanBuilder Coupon Sample
These coupons are then available for any FanBuilder program-enabled branch. If you do not enable a branch, the coupons will not be in the branch’s inventory and the customer cannot use them at Point of Sale. If a branch is enabled subsequently, contact Orgill to ensure that the branch receives the existing coupon updates.
Note: If you need to accept coupons from a phone, use a 2D scanner for this purpose.
When a customer qualifies for a coupon, Orgill sends them the coupon either through email or mobile phone number, which they can redeem at the enabled branch location(s). Valid coupons are also always available in the FanBuilder customer portal. Cashiers scan the barcode on the coupon and validate it in the application. If the coupon is valid, has not expired, and the transaction meets the qualifications of the coupon, the application applies the discount to the transaction. Cashiers can also add the coupon by typing in the coupon SKU, which is beneath the barcode.
You can retrieve these coupons manually using the process described in Sending and Receiving FanBuilder Data Manually. If the Orgill system is down, or there is some other communication issue that prevents the coupon’s validation, your business can choose to validate the coupon or refuse it.
-
If you choose to accept the coupon, the application will check the validity of the coupon the next time the EDI process completes. The coupon may be validated or it may not.
Rewards Coupons Rules
After a customer has signed up for the program and you have setup the coupons both on the Orgill system and stored them in branch inventory, the customer can redeem them during the sales process. There are a couple of rules for FanBuilder coupons:
-
Customers can redeem coupons in the Sales Entry form only (not Orders, Direct Shipments, etc.)
-
Coupons cannot be redeemed if there are no products in the transaction
-
Customers cannot use duplicate coupons in the same transaction
-
Customers cannot use more than one percentage-off coupon within the same transaction
-
The application can only process valid coupons on a transaction:
- Customer must be enrolled in the Rewards program
- Sales details must meet the criteria of the coupon. For Example: If the coupon has a minimum amount, the transaction must reach that amount.
- When a coupon is not valid, the application displays a message explaining the problem.
-
Coupons are validated both during the sales entry process and the transaction processing task
-
Rewards are set up by branch and a coupon must be in the branch’s inventory to be valid
IMPORTANT: In the unlikely event that the connection with the Orgill API is down during the transaction, the transaction can be processed . A pop-up message displays giving the cashier notice that they can either apply the coupon or reject it. Make sure your cashier knows how you want them to handle these situations.
Creating a Coupon Template
Before you can complete the Branch setup process for the FanBuilder program, you need to create a coupon template that contains the required coupon details. This ensures that the new coupon contains the data needed to process a FanBuilder rewards transaction. Coupons are usually based either on the percentage of the amount purchased or a specific dollar amount. When the coupon is based on a percentage, the amount of the discount changes when the total changes, whether the change is an item reprice or a change in quantity. Additional adders applied to the transaction may also affect the amount of the coupon discount.
The application uses this template to validate the coupons you create on the Orgill website.
To create a FanBuilder coupon template:
1. From the Main Menu, choose Point of Sale > Database > Item to display the Item Maintenance form.
2. In the Item field, type the name of the coupon template for the Rewards program and press Enter.
3. In the Common > Measures tab, in the Item Type list, choose Rewards Coupon.
4. In the Common > Codes tab, choose among the following options:
-
Taxable Yes or No.
Follow your local tax guidelines to set this option. You may want to consider how this option works with coupons. -
Track QTY On Hand = No
This setting is required. -
Description Required = Y
This setting is required.
5. In the Common > Tally tab, choose Not a Tally Member.
6. In the Branch > Codes tab, choose the following options:
These selections are required.
-
Stocked = Y
-
Disabled = N
7. When you have completed these entries, click Process (F12) to save the template.
Setting up a Branch for the FanBuilder Program
After the parameter setup is complete and you have created your coupon template, you can enable the Branch settings for the FanBuilder program. Complete these settings for each branch at which you want to accept coupons and track rewards.
To enable the FanBuilder program for a branch:
1. From the Main Menu, choose Maintenance > Database > Branches.
The Branch Setup form displays.
2. From the Branch ID field, choose the branch you want to set up. The branch details display.
3. Click the EDI tab.
4. From the Settings For list, choose Orgill. The Orgill options display.

Branch Setup Form > EDI Tab with Orgill Settings
5. Click the local Menu Marker  to display the "Orgill FanBuilder" option.
Note: If you chose a branding name for your FanBuilder program, this name appears in the list instead.
Branch Setup Form > EDI Tab > Local Menu
6. Choose the Orgill FanBuilder (or branding name) option. The Orgill FanBuilder Settings display.
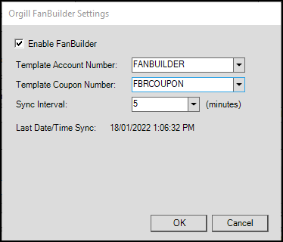
EDI Tab > Orgill FanBuilder Settings
7. Complete the entries in this box and click OK.
These entries are required to ensure successful FanBuilder transmissions for the branch.
-
Enable FanBuilder
Click this check box to enable the FanBuilder program for the branch. -
Template Account Number
Select the template account associated with the Branch from the list. -
Template Coupon Number
Select the coupon template inventory item that the application uses to create new item records for rewards coupons. Note: This is the template you created in Creating a Coupon Template. -
Sync Interval
Choose the frequency for sending FanBuilder data to and from Orgill. The default is 5 minutes. -
LastDate/Time Sync
After you specify the Sync Interval, this read-only field will display the last FanBuilder transmission date and time. You may need this to troubleshoot potential issues.
After you click OK, the Branch Setup form redisplays.
8. Click Process (F12) to save these changes.
9. Follow these steps for each additional branch that you want to participate in the program.
Reviewing a Customer’s Enrollment in the Loyalty Program
When the Orgill FanBuilder setup is complete and customers sign up for the loyalty benefits online, the business can look up the account’s program status in the application.
To look up an account’s FanBuilder Program status:
1. From the Main Menu, choose Point of Sale > Database > Account. The Account Maintenance form displays.
2. Find the account you want the FanBuilder Program status for.
-
In the Account list, type the name, account ID, or other customer-specific data.
-
Press Enter. A list of one or more options displays.
-
Choose the account you want from the list.
3. When the account displays, click the Loyalty tab.
There is a new tab called Orgill FanBuilder (or the your local branding name).
4. Click the Orgill FanBuilder tab (or custom brand name) to show the account’s participation status. Options are either Registered or Unregistered.

Account Maintenance Form > Loyalty Tab > Loyalty Status
When the enrollment is complete, you can see the account contact for the loyalty program on the Contacts tab. The person who enrolls the company in the program is added by default. Anyone else who registers who has an existing account is added as a contact too.
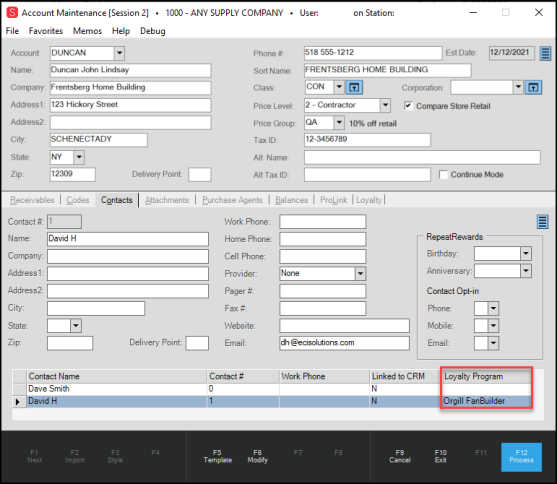
Account Maintenance – Contacts Tab – Loyalty Program Entry
Signing a FanBuilder Customer up at Point of Sale
Cashiers can sign customers up for your FanBuilder program through the in-store process or customers can use the Orgill site. When customers sign up for your rewards program online the application retrieves the data and uses the name, email address, and mobile phone number to see if it matches an existing customer account. If the account cannot be identified, the application uses a template to create a new customer account. This allows the application to track the sales and points information and send it to Orgill. After this account setup process is complete, the customer can begin collecting rewards points.
When an existing customer updates their account information online, the EDI process collects the changes and updates the customer’s designated FanBuilder contact record in the existing account. If the account does not have a loyalty contact, the application adds the new contact record to the account. Conversely, when these changes are made during the in-store sales process, the contact record information is uploaded to Orgill based on your sync interval.
Note: The timing of the rewards program prompt is set during the parameter process based on the prompt type you specified (Beginning, Beginning and End, End, or Never).
To sign up a customer for your rewards program during the sales entry process:
1. From the Main Menu, go to Point of Sale > Sales.
At some point during the process, either the sign up prompt displays or the cashier can use the (Ctrl + R) key combination to display the sign up prompt:
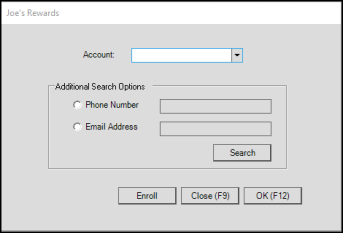
Orgill FanBuilder (Brand Name: Joe's Rewards) Prompt
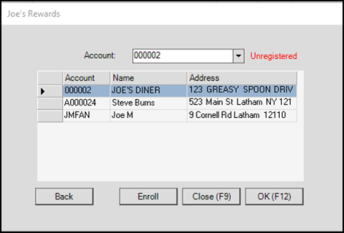
2. Click the radio button to add the customer's phone number or email address in the fields provided.
3. With the phone number, or email address entered, click Search.
The application searches for matching account information and displays the results in a list.
Orgill FanBuilder (Brand Name: Joe's Rewards) Search Results
4. Do one of the following:
-
If the account is registered, select the registered account from the list and click OK.
Then, complete the transaction as you normally would to add the points to the customer’s account. -
If the customer decides not to sign up for the program or chooses not to continue, click Close.
Then, complete the transaction as you normally would. -
If the wrong account information displays, click Back and enter a new account number and try again.
-
If the account is unregistered, select the new account name from the list and click Enroll and continue to the next step.
-
If the account is new, click Enroll without selecting a matching record to continue to the next step.
5. After you click Enroll, the Customer Information box displays. Complete these fields with the information the customer gives you:
Note: These fields are all required.
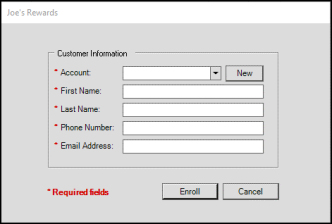
Orgill FanBuilder (Brand Name: Joe's Rewards) Customer Information Box
-
Account
If you selected the account from the previous list, the account number displays. If the account does not exist, click New and the application will generate a new account number. -
First Name/Last Name
Enter the customer’s first and last names in the fields provided. -
Phone Number
Enter the customer’s mobile phone number in the field provided.
Note: This must be a mobile phone number as Orgill will send SMS communications to this customer using this number. -
Email Address
Enter the customer’s email address in the field provided.
6. When you have completed these entries, click Enroll. From here, you can complete the transaction as you normally would.
Accepting a Customer’s Coupon/Rewards at Point of Sale
During the check-out process, if the customer has a coupon to redeem, they can present it to the cashier at their station. The cashier can either scan the coupon barcode or enter the coupon code (located below the barcode on the coupon) manually in the Item column of the data grid. It makes sense to enter all items associated with the sale before scanning or entering the Rewards coupon, to ensure the system can validate the coupon properly. Only one percentage coupon can be used per transaction. (For a complete list of coupon limitations, see Rewards Coupons Rules.) Changes to the transaction after the coupon is added (quantity, other adders, repricing actions) may result in changes to the amount of the coupon discount, depending upon the type of discount the coupon is for. In this way, this coupon is no different from other coupons the cashier might see at check out.
Note: If you add adjustments to a transaction that has a FanBuilder coupon, the coupon discount will not change if the adjustment(s) is (are) set to non-discountable.
Removing an Account’s FanBuilder Registration
If a customer decides that they no longer want to receive rewards through the FanBuilder program, use these instructions to remove their registration:
To unregister an account from the FanBuilder program:
1. From the Main Menu, go to Point of Sale > Database > Account to display the Account Maintenance form.
2. In the Account list, search for the account you need to remove the FanBuilder registration for. The account details display.
3. Click the Loyalty tab and the FanBuilder subtab (or the business’s brand name). The loyalty status of the account displays.
4. Right-click the Menu Marker  to display the Unregister option.
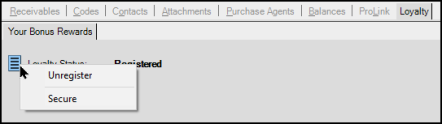
Account Maintenance Form > Loyalty Tab > <Your Rewards Program Name Tab > Contact Menu
5. Choose Unregister to unregister this account from the rewards program.
Note: After you select this option, the account will not be able to use rewards, even if they have earned them. A confirmation message displays.
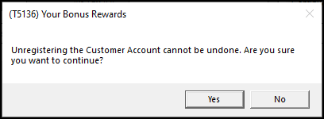
Unregister Confirmation Message
6. Do one of the following:
-
Click Yes to unregister the account from the FanBuilder program.
-
Click No to keep the account registered in the FanBuilder program.
7. If you make a change to the account, click Process (F12) to save the change.
Sending and Retrieving FanBuilder Data Manually
The core of the FanBuilder Rewards program is the sharing of customer information between your business and Orgill. When customers sign up for your rewards program during the sales process or make changes to their cell contact information remotely, it is essential that the application send/retrieve this information to keep the data in sync. Work with your ECI team to ensure that the setup for the FanBuilder program is complete.
The application sends and retrieves information from Orgill on a schedule you set up by branch (in the Sync Interval field in Orgill FanBuilder Settings box). Typically, the application sends and retrieves coupon and customer information every 1 -15 minutes. The application sends sales transaction and coupon redemption information every minute.
The process below describes how the application receives customer and coupon change updates, etc. and how you send updated customer transaction information and account information to Orgill. You can also send and receive FanBuilder data manually using the instructions below.
To transmit or retrieve Orgill FanBuilder data manually:
1. From the Main Menu, choose Purchasing > Vendor EDI. The Vendor EDI Communications form displays.
2. From the EDI Interface list, choose Orgill.
3. From the Vendor list, choose your Orgill vendor ID.
4. In the Options box, choose Extras to display the Function list.

Vendor EDI Communications Form > Extras Options > Function List with FanBuilder Send Options
5. From the Function list, choose one of the following, based on the type of manual data transmission you want to start:
-
Catalog Load
Click this option to retrieve Orgill’s entire inventory list, including all SKUs and pricing information. -
FanBuilder Receive Updates
Click this option to retrieve updated customer registration information from Orgill. Typically, you select this option when a customer has informed you that they have signed up for the rewards program, but the application does not have this record. -
FanBuilder Send Coupons
Click this option to send redeemed coupon information to Orgill. -
FanBuilder Send Transactions
Click this option to send transaction information to Orgill. -
FanBuilder Send Customer Updates
Click this option to send new customer information to Orgill. -
FanBuilder Send All
Click this option to send all transactions, updates, and redeemed coupon information to Orgill. -
FanBuilder Refresh Token
Click this option to reset the access token that Orgill uses to identify your Business. You might do this if there have been errors in the transmission process.
The Transmit (F6) or Retrieve (F5) option, as appropriate, enables when you complete this selection.
6. Click Transmit (F6) or Retrieve (F5) to initiate your request.
When you retrieve data from Orgill, the application updates the internal Contacts tab of the Account Maintenance form to add the cell phone or email information for the enrolled customers. The Loyalty > Orgill FanBuilder tab displays the status of the customer’s participation (see Reviewing a Customer’s Enrollment in the Loyalty Program). When the application retrieves new customer information, it applies a template to the account, adds the new record, and set the FanBuilder status as Registered. The application maintains a log of these Orgill updates in the EDI Log Inquiry form so you can review these updates when you need to. This log and how to access it is discussed in Reviewing the Messages in the EDI Log.
Accessing an Account’s FanBuilder Rewards Dashboard
The application can retrieve the customer's coupons and rewards information from the Orgill website. You can do this in the Sale Entry form (using the Loyalty folder) or in the Account Maintenance form (on the FanBuilder Loyalty tab).
Note: We have added additional security to the Customer Rewards Dashboard to safeguard the application from hackers.
From Account Maintenance
You might want to look up the account’s FanBuilder rewards and coupons from Account Maintenance if you have them on the phone.
To access an account’s FanBuilder Customer Dashboard from Account Maintenance:
1. From the Main Menu, choose Point of Sale > Database > Account to display the Account Maintenance form.
2. From the Account list, choose an account that has enrolled in the FanBuilder rewards program.
3. Select the Loyalty > Orgill FanBuilder (or the rewards program name you have selected) tab. The FanBuilder Customer Dashboard button displays on the tab.
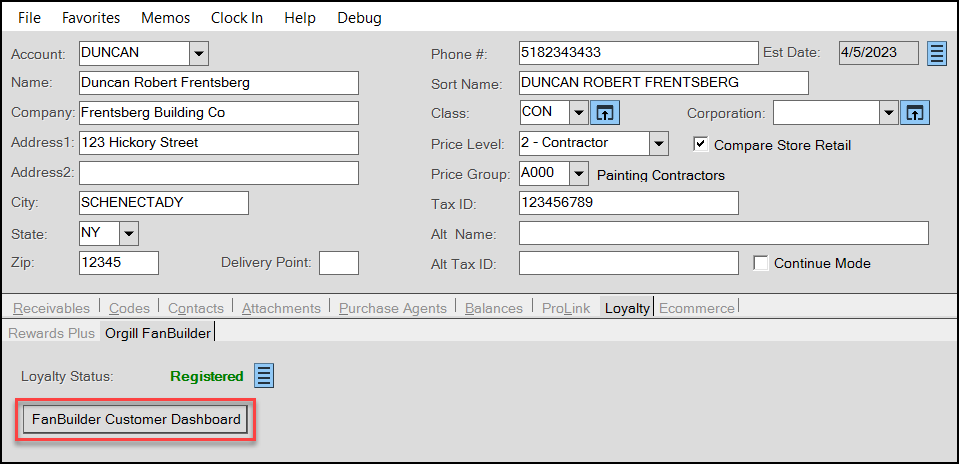
4. Click the FanBuilder Customer Dashboard button to display the account’s accumulated coupons and rewards points:
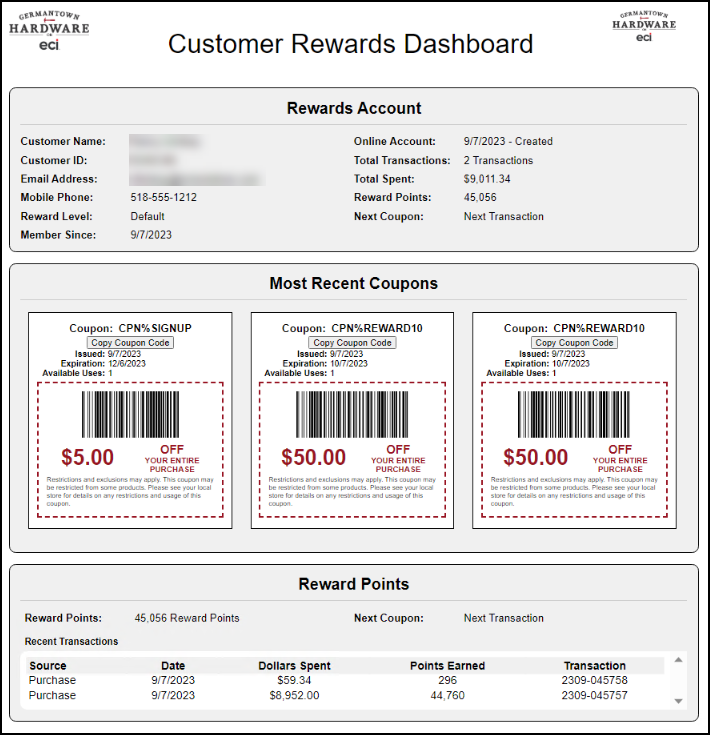
Note: The branding that displays on this form reflects your business’s account settings on the Orgill site.
5. To close the Dashboard, click the X in the upper right corner.
Note: If you do not close the dashboard, it remains open until the Cashier logs out of the application.
From Sale Entry
To access an account’s FanBuilder Customer Dashboard during a Sale Entry transaction:
1. From the Main Menu, choose Point of Sale > Sales to display the Sale Entry form.
2. From the Name list, choose an account that has enrolled in the FanBuilder Rewards Program.
3. Choose Folders (F4) to display the related account folders.
4. Select the Loyalty > Orgill FanBuilder (or the rewards program name you have selected) tab. The FanBuilder Customer Dashboard button displays on the tab.
5. Click the FanBuilder Customer Dashboard button to display the account’s accumulated points and coupons. Closing the dashboard works the same as described above.
Reviewing the Messages in the EDI Log
The EDI Log shows you dated, detailed lists of the messages the application has sent and received from Orgill, both those sent manually and those that are scheduled. These transmissions show the details of the data sent/received, including customer registrations, updates to coupons, account and transaction updates. The Log Entries column shows you the overview of the events that have occurred for the date you choose. You can choose the amount of detail that displays in this list by asking your Support team to change the logging level in the system parameters.
To see the EDI log:
1. From the Main Menu, choose Purchasing > Inquiry > EDI Log. The EDI Log displays.
2. To see the log entries for a particular date, click the + character next to the date.
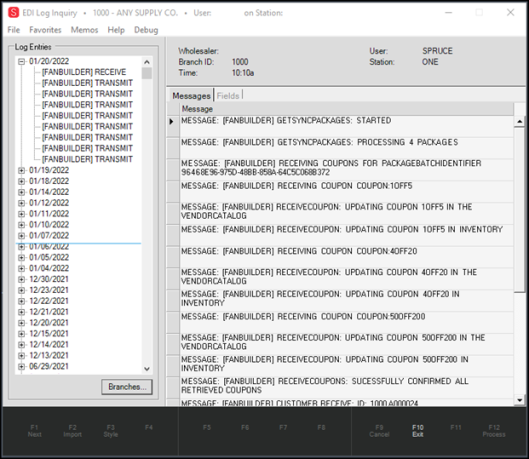
EDI Log with Details
The Messages section shows the details of each change transmitted or received into the application.