MX 860 - Calibration
The following instructions will vary somewhat based on whether or not your VeriFone MX 860 pad is equipped with a smart card or not.
1.From the computer that connects to the pad being calibrated, make sure that the software is not open.
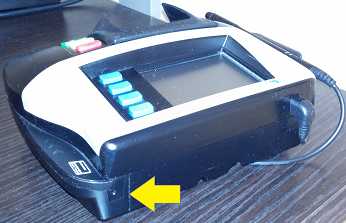
2.Reset the device by finding pressing the reset button. The reset button is located on the back (top) side edge near the card swipe (see the picture below). Use a paper clip, etc. to press the button until the 3 blue arrow lights on the card swipe turn on.
3.If the User Select (1) screen is displayed, choose the Secure USR1 icon; otherwise, continue to the next step.
4.At the "Enter Password" prompt, if you have an MX 860 with a smart card type: 166831; otherwise, type: 166832 (Note: if one password fails, try the other). After entering the password, press the green button on the pad (to the right of the numeric keypad).
5.A "home" menu with icons will display. The pad supports keypad navigation as well as use of the stylus. For keypad navigation to the calibration feature, press and release 2, 9, and 5 sequentially. To navigate using the stylus, choose "CONFIGURE" then tap the arrow icon on the right-hand side of the display and choose "CALIBRATE." The following message will be displayed:
|
DO NOT TOUCH display!
|
6.To make sure that the stylus still works, tap the "Calibrate" icon using the stylus. The pad will calibrate again.
7.Tap the tap the left arrow twice with the stylus. This should display "home" menu which has an icon labeled "File Manager" at the bottom center position.
8.Choose "File Manager" with the stylus. Choose "Restart." This icon should be displayed in the top center of the icons.
9.The screen will go blank & the pad will reset. Once the pad has fully reset, the System Information screen is displayed.
10. At this time, you can restart the software and login. The pad should respond as usual.