Margin Master
Margin Master is a software product of Retailer Soft™ (Retailer Soft, Inc.) which is used for profit analysis and price strategy planning. For more information about the Margin Master product, please visit their web site or contact them directly:
https://retailersoft.com/marginmaster
Using the Margin Master View
Margin Master needs some or all of your inventory data. With recent versions of Margin Master, we have provided views so that the Margin Master software can connect directly to your database. You may need to contact us to setup a vendor user name and password for database access. The MSSQL view named vw_MarginMaster was specifically intended for Margin Master; however, other views such as vw_InventoryStore and vw_InventoryCommon may also be useful. A "view" is basically a selection query that is saved for re-use. In order for Margin Master to access the data provided by this view, you may need the following information:
•The static name or IP address to be used for local access.
•The port number (if any) necessary for routing to the SQL Server.
•A SQL user name providing read-only access to your database. Please contact Support for assistance if you need the login or password.
•Below is a MSSQL query that includes all the fields provided by the Margin Master view:
SELECT[STORE] --Branch ID
,[RETAILPRICE] --Store Level 0 Price
,[MFGRNAME] --Store Primary Vendor Name
,[MFGRCODE] --Store Primary Vendor Code
,[QUANTITYONHAND] --Store Quantity On-Hand
,[AVERAGE_COST] --Current Average Cost
,[REPLACE_COST] --Current Prevailing Market Cost
,[LISTPRICE] -- Suggested List Price
,[SKU] -- Item Number
,[DESCRIPTION] -- Description (Full)
,[GROUP] -- Group Number (1-255)
,[GROUPNAME] -- Group Name
,[SECTION] -- Section Number (1-255)
,[SECTIONNAME] -- Section Name
,[UNIT] -- BASE Unit of Measure Pricing Unit of Measure (Changed on 3/3/2017 - Releases 12.3.0 and later).
,[UPC] -- Barcode (0)
,[CLASS] -- Class (Merchandising)
,[DEPARTMENT] -- Department (Merchandising)
,[FINELINECODE] -- Fine Line (Merchandising)
,[PRODUCTID] -- Product ID (Merchandising)
,[VENDORNUMBER] -- Vendor-Item Number for Store Primary Vendor
,[LAST_YEAR_SALE_DOL] -- SUM of Sales for the Prior Calendar Year
,[LAST_YEAR_SALE_UNIT] -- SUM of Quantity Usage for the Prior Calendar Year
,[YTD_TRANSACTION] -- SUM of Quantity Usage for the Current Calendar Year
,[YTD_SALES_DOL] -- SUM of Sales for the Current Calendar Year
,[LocationCode0] -- First of Three Location Codes
,[LocationCode1] -- Second of Three Location Codes
,[LocationCode2] -- Third of Three Location Codes
FROM[dbo].[vw_MarginMaster]
This view combines data from a number of tables including: InventoryCommon, InventoryStore, GroupSection, StockValue, and VendorItem.
Importing Data on Old Versions of Margin Master
For old versions of Margin Master software, data had to be imported into Margin Master using a Microsoft Excel file. This file must be created and placed in the C:/MARGINMASTER directory on the computer that the Margin Master software is installed. Here is a step-by-step explanation. Similar information is available on the Retailer Soft web site.
Step 1: Download the Margin Master Report
This step only needs to be done once (assuming no changes are made to the report). You can use the following link to locate this report. The report requires that either (a) Crystal Reports software is installed on the PC using Margin Master or that (b) a computer with Crystal Reports software have access to the C:/MARGINMASTER directory on the computer where Margin Master is installed.
To access the support area, you will need a user name and password. You can request one by filling out a form on our Customer Portal. User accounts are manually verified and typically approved in 1-2 business days.
Step 2: Open the Report and Connect to your Database
Open the report using Crystal Reports. From the Database menu, choose "Set Datasource Location." What you do next will vary depending upon whether you've previously used Crystal Reports with your Spruce data.
Using an Existing Connection
If your current connections display the server address for your Spruce SQL server, you can select that connection in the "Replace With" panel and then click the "Update" button.
Establishing a New Connection
Otherwise, you will need to use the "Create New Connection" option. Expand the tree (click the "+"), and find "OLE DB (ADO)" in the listing. If your server is not already listed, choose "Make New Connection." You will need the server's IP address or name, database name, and user name/password for access. The read-only user name is usually spruceuser and spruceuser$ respectively. A read-only SQL user account will be created for you if you don't already have one (contact support to request this). A port number may also be required in some cases. To save this information with the report, check the "integrated security" option.
The report requires some parameters for the starting/ending group and section. You will be prompted to enter these automatically when you change the connection.
Step 3: Refresh the Data
If this is not the first time you're using the report, you'll want to refresh the data before exporting it for Margin Master. Typically, old data from the last time the report ran will be displayed by default. If this is the first time you are running the report, the initial data will be up-to-date. Refresh is only necessary in this latter case if you want or need to modify the parameters for group/section that were initially entered.
Step 4: Export to an Excel File
From the File menu in Crystal Reports, choose Export and choose Export Report. Export as a "Microsoft Excel 97-2000" file. Check the “Custom” option, then check the “Export page headers and footer” and “Simplify page headers” options and click OK. Save the file in the C:/MARGINMASTER directory (folder) on the computer where Margin Master is installed.
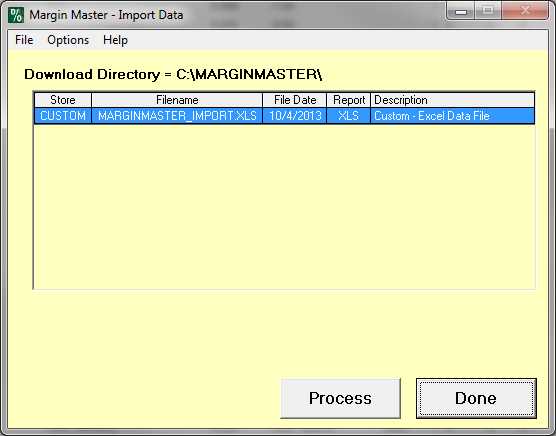
Step 5: Import Data in Margin Master
The final step (as far as importing data) is to open the Margin Master software and click the Import button on the main form. A listing of files in the C:/MARGINMASTER directory is provided. Select the file and choose Process.